Purpose of detection
-
deployment is used to maintain the robustness of pod
After the pod hangs, deployment will generate a new pod -
However, if the pod is running normally, but there is a problem in the pod, the deployment cannot be monitored at this time.
Therefore, probe is required
The user defines "what kind of situation" to call the problem
When the probe detects this problem, it will think that there is a problem with the pod and execute the "restart method" to solve the problem. -
We all know that Kubernetes will maintain the status and number of pods. Therefore, if you just want to restart the Pod content container after failure, there is no need to add health check. You just need to configure the restart strategy of Pod reasonably. The more suitable scenario for health check is that we need to actively kill and restart the containers according to the inspection results. Some containers need to load some data before officially providing services, so we can use readiness to check whether these actions are completed.
Environmental preparation
First, you need to have a set of clusters
[root@master ~]# kubectl get nodes
NAME     STATUS   ROLES    AGE   VERSION
master   Ready    master   43d   v1.21.0
node1    Ready    <none>   43d   v1.21.0
node2    Ready    <none>   43d   v1.21.0
[root@master ~]#
Then we create a file to put the following test files and create a namespace in which the following tests are done
[root@master ~]# mkdir probe
[root@master ~]# cd probe
[root@master probe]# kubectl create ns probe
namespace/probe created
[root@master probe]# kubens probe
Context "context" modified.
Active namespace is "probe".
[root@master probe]# kubectl get pods
No resources found in probe namespace.
[root@master probe]#
What is Container Probes
- Official documents and templates can also be seen here:
livenss - In the architecture of Kubernetes, there are kubelets on each Node. The health check of the Container Probe, that is, the container, is performed by kubelet regularly.
Health status description
- Kubelet performs the check action by calling the Handler of the container in the Pod. There are three types of handlers.
- ExecAction: execute a specific command in the container. If the command exits, a return of 0 indicates success
- TCPSocketAction: TCP check is performed according to the container IP address and specific port. Port opening indicates success
- HTTPGetAction initiates an HTTP request according to the container IP, port and access path. If the return code is between 200 and 400, it indicates success
- Each check action may have three return states.
- Success means passing the health examination
- Failure, which means that you have not passed the health examination
- Unknown indicates that the check action failed
- When creating a Pod, you can detect the operation of the Pod content container through liveness and readiness
- liveness can be used to check the survival of applications in the container. If the check fails, the container process will be killed. Whether to restart the container depends on the restart strategy of the Pod.
- readiness checks whether the applications in the container can normally provide external services. If the detection fails, the Endpoint Controller will delete the IP of this Pod from the service.
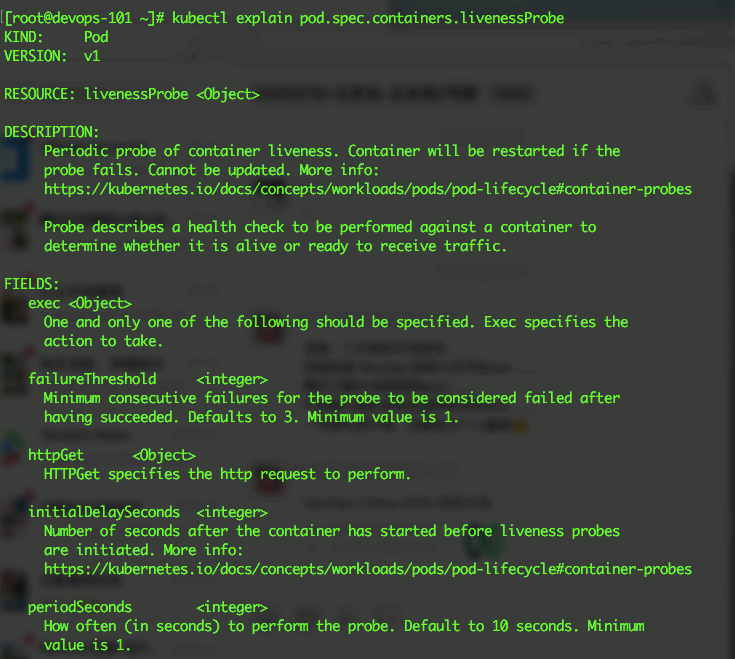
yaml configuration file parameter description
- If you don't understand the parameters in the following configuration files, you can correspond to them below. I won't comment the meaning of the code in each configuration file.
- initialDelaySeconds: the number of seconds to wait for the first probe after the container is started.
- periodSeconds: the frequency of probe execution. The default is 10 seconds and the minimum is 1 second.
- timeoutSeconds: probe timeout, default 1 second, minimum 1 second.
- successThreshold: the minimum number of successful consecutive detections after a detection failure is considered successful. The default value is 1. For liveness, it must be
Is 1, the minimum value is 1. - failureThreshold: the number of retries of - Kubernetes when Pod is started and failure is detected. Abandonment in the case of survival detection means restarting the container. The abandoned Pod in the case of ready detection will be labeled as not ready. The default value is 3. The minimum value is 1
- Properties of httpGet
- Host: host name or IP
- scheme: link type, HTTP or HTTPS. The default is http
- Path: request path
- httpHeaders: custom request headers
- Port: request port
Pre test of perbe function
- The following code comes from the official website above, adding 2 lines of content [immediate delete and image pull strategy] and modifying the image name
# The node node needs a busybox image
[root@node1 ~]# docker images | grep busybox
busybox                                                           latest     69593048aa3a   3 months ago    1.24MB
[root@node1 ~]#


# Code content on master
[root@master probe]# cat pod1.yaml
apiVersion: v1
kind: Pod
metadata:
  labels:
    test: liveness
  name: liveness-exec
spec:
  terminationGracePeriodSeconds: 0
  containers:
  - name: liveness
    image: busybox
    imagePullPolicy: IfNotPresent
    args:
    - /bin/sh
    - -c
    - touch /tmp/healthy; sleep 30; rm -rf /tmp/healthy; sleep 600
    #livenessProbe:
    #  exec:
    #    command:
    #    - cat
    #    - /tmp/healthy
    #  initialDelaySeconds: 5
    #  periodSeconds: 5
[root@master probe]#
- Test process:
- 1. Create / TMP / health
- 2. Sleep for 30 seconds
- 3. Delete / TMP / health
- 4. Sleep for 600 seconds
- 5. Container failure, end of test
[root@master probe]# kubectl apply -f pod1.yaml
pod/liveness-exec created
[root@master probe]#
[root@master probe]# kubectl get pods
NAME            READY   STATUS              RESTARTS   AGE
liveness-exec   0/1     ContainerCreating   0          4s
[root@master probe]# kubectl get pods
NAME            READY   STATUS    RESTARTS   AGE
liveness-exec   1/1     Running   0          8s
[root@master probe]# kubectl exec -it liveness-exec -- ls /tmp
healthy
[root@master probe]#
[root@master probe]# kubectl get pods
NAME            READY   STATUS    RESTARTS   AGE
liveness-exec   1/1     Running   0          27s
[root@master probe]# kubectl get pods
NAME            READY   STATUS    RESTARTS   AGE
liveness-exec   1/1     Running   0          31s
[root@master probe]# kubectl exec -it liveness-exec -- ls /tmp
[root@master probe]#
The above meaning of the test is that if the file is gone, it will disappear. After the prebe is defined below, the file will disappear and can be automatically regenerated for us [regeneration is to restart the pod and return to the initial state of the pod]
kubectl describe pod pod_name can view the restart process
liveness probe
To solve the problem through restart - restart method - the so-called restart is to delete the pod and create a pod with the same name [the difference between manual and manual is that the creation time will not start over, but will accumulate, and only the number of restarts is increasing]
command
In the first 30 seconds of the container's life, there is a / TMP / health file. So in the first 30 seconds, the command cat / TMP / health returns a success code. After 30 seconds, cat / TMP / health returns the failure code [detection in about 5 seconds], so 35 + 30 deletes and waits, and the container will restart in about 75 seconds.
Therefore, the process is that the / tmp file exists in about 30 seconds, the file disappears after 30 seconds, and the container restarts and the file exists again after 75 seconds
[root@master probe]# cat pod2.yaml
apiVersion: v1
kind: Pod
metadata:
  labels:
    test: liveness
  name: podliveness2
spec:
  #terminationGracePeriodSeconds: 0
  containers:
  - name: liveness
    image: busybox
    imagePullPolicy: IfNotPresent
    args:
    - /bin/sh
    - -c
    - touch /tmp/healthy; sleep 30; rm -rf /tmp/healthy; sleep 600
    livenessProbe:
      exec:
        command:
        - cat
        - /tmp/healthy
      initialDelaySeconds: 5 # No detection within 5s of container startup
      periodSeconds: 5  # Once every 5s
[root@master probe]#
Start the test and pay attention to the notes below
# Create and observe the container time and tmp file, which are normal
[root@master probe]# kubectl apply -f pod2.yaml
pod/podliveness2 created
[root@master probe]# kubectl get pods
NAME           READY   STATUS    RESTARTS   AGE
podliveness2   1/1     Running   0          2s
[root@master probe]# kubectl exec -it podliveness2 -- ls /tmp
healthy
[root@master probe]# kubectl get pods
NAME           READY   STATUS    RESTARTS   AGE
podliveness2   1/1     Running   0          17s
[root@master probe]# kubectl exec -it podliveness2 -- ls /tmp
healthy
[root@master probe]# kubectl get pods
NAME           READY   STATUS    RESTARTS   AGE
podliveness2   1/1     Running   0          26s
[root@master probe]# kubectl exec -it podliveness2 -- ls /tmp
healthy
[root@master probe]#

# After 30 seconds, the tmp file will last for 24 hours. After 75 seconds, the container will restart
[root@master probe]# kubectl get pods
NAME           READY   STATUS    RESTARTS   AGE
podliveness2   1/1     Running   0          33s
[root@master probe]# kubectl exec -it podliveness2 -- ls /tmp
[root@master probe]#
[root@master probe]# kubectl get pods
NAME           READY   STATUS    RESTARTS   AGE
podliveness2   1/1     Running   0          42s
[root@master probe]# kubectl get pods
NAME           READY   STATUS    RESTARTS   AGE
podliveness2   1/1     Running   0          54s
[root@master probe]# kubectl get pods
NAME           READY   STATUS    RESTARTS   AGE
podliveness2   1/1     Running   0          65s
[root@master probe]# kubectl exec -it podliveness2 -- ls /tmp
[root@master probe]#
[root@master probe]# kubectl get pods
NAME           READY   STATUS    RESTARTS   AGE
podliveness2   1/1     Running   0          73s
[root@master probe]#

# As can be seen above, the tmp file still does not exist. After 75 seconds, the container RESTARTS times become 1. It has been restarted. At this time, the file should also exist
[root@master probe]# kubectl get pods
NAME           READY   STATUS    RESTARTS   AGE
podliveness2   1/1     Running   1          76s
[root@master probe]# kubectl exec -it podliveness2 -- ls /tmp
healthy
[root@master probe]#
# After that, it actually starts to enter a cycle. The container restarts the tmp file for 30 seconds, and then it is deleted
#Wait about 75 seconds for the container to restart and the tmp file exists again. The time will accumulate, but the restart times will increase.
[root@master probe]# kubectl get pods
NAME           READY   STATUS    RESTARTS   AGE
podliveness2   1/1     Running   7          10m
[root@master probe]#
[root@master probe]# kubectl exec -it podliveness2 -- ls /tmp
healthy
[root@master probe]#
[root@master probe]# kubectl get pods
NAME           READY   STATUS    RESTARTS   AGE
podliveness2   1/1     Running   7          10m
[root@master probe]# kubectl exec -it podliveness2 -- ls /tmp
healthy
[root@master probe]# kubectl exec -it podliveness2 -- ls /tmp
[root@master probe]#
[root@master probe]# kubectl get pods
NAME           READY   STATUS    RESTARTS   AGE
podliveness2   1/1     Running   7          10m
[root@master probe]#
httpGet
- The code is as follows [use ngxinx instructions]:
[root@master probe]# cat pod3.yaml
apiVersion: v1
kind: Pod
metadata:
  labels:
    test: liveness
  name: liveness-http
spec:
  terminationGracePeriodSeconds: 0
  containers:
  - name: liveness
    image: nginx
    imagePullPolicy: IfNotPresent
    livenessProbe:
      failureThreshold: 3
      httpGet:
        # The following / is not the root of the system, but the root of nginx / usr/share/nginx/html
        path: /index.html
        port: 80
        scheme: HTTP
      initialDelaySeconds: 10
      periodSeconds: 10
      successThreshold: 1
      timeoutSeconds: 10
[root@master probe]#
-
[the following description comes from the official website with modifications] in the configuration file, you can see that Pod has only one container. This periodSeconds field specifies that kubelet should perform active detection every 3 seconds. This initialDelaySeconds field tells kubelet that it should wait 10 seconds before performing the first detection. In order to perform detection, kubelet runs in the container and listens The server on port 80 sends an HTTP get request. If the server's handler / index HTML returns a successful code, and kubelet thinks the container is alive and healthy. If the handler returns a failure code, kubelet will kill the container and restart it.
- Any code greater than or equal to 200 or less than 400 indicates success. Any other code indicates a failure.
- You can see the source code of the server: Server.go
The / healthz handler returns a status of 200 for the first 10 seconds that the container is active. After that, the handler returns a status of 500.
http.HandleFunc("/healthz", func(w http.ResponseWriter, r *http.Request) {
    duration := time.Now().Sub(started)
    if duration.Seconds() > 10 {
        w.WriteHeader(500)
        w.Write([]byte(fmt.Sprintf("error: %v", duration.Seconds())))
    } else {
        w.WriteHeader(200)
        w.Write([]byte("ok"))
    }
})
- Three seconds after the container starts, kubelet starts to perform a health check. So the first health checks will be successful. However, after 10 seconds, the health check will fail and kubelet will kill and restart the container.
The test process is as follows
# Create and verify that everything is normal now
[root@master probe]# kubectl apply -f pod3.yaml
pod/liveness-http created
[root@master probe]# kubectl get pods
NAME            READY   STATUS    RESTARTS   AGE
liveness-http   1/1     Running   0          6s
[root@master probe]#
[root@master probe]# kubectl exec -it  liveness-http -- ls /usr/share/nginx/html/index.html
/usr/share/nginx/html/index.html
[root@master probe]#

# Let's delete this file now
[root@master probe]# kubectl exec -it  liveness-http -- rm /usr/share/nginx/html/index.html
[root@master probe]#
[root@master probe]# kubectl exec -it  liveness-http -- ls /usr/share/nginx/html/index.html
ls: cannot access '/usr/share/nginx/html/index.html': No such file or directory
command terminated with exit code 2
[root@master probe]#

# Start to wait for detection, once every 10 seconds. Because I added 0 seconds to delete, this should be recreated in 10 seconds
[root@master probe]# kubectl get pods
NAME            READY   STATUS    RESTARTS   AGE
liveness-http   1/1     Running   0          30s
[root@master probe]#
[root@master probe]# kubectl get pods
NAME            READY   STATUS    RESTARTS   AGE
liveness-http   1/1     Running   0          34s
[root@master probe]# kubectl get pods
NAME            READY   STATUS    RESTARTS   AGE
liveness-http   1/1     Running   0          40s

# After re creation, the file will be automatically generated again
[root@master probe]# kubectl get pods
NAME            READY   STATUS    RESTARTS   AGE
liveness-http   1/1     Running   0          46s
[root@master probe]# kubectl get pods
NAME            READY   STATUS    RESTARTS   AGE
liveness-http   1/1     Running   1          51s
[root@master probe]#
[root@master probe]# kubectl exec -it  liveness-http -- ls /usr/share/nginx/html/index.html
/usr/share/nginx/html/index.html
[root@master probe]#
[root@master probe]#

# It will always detect normal conditions. The container is always running normally. If we delete this file once, the pod will be restarted [because of detection]
[root@master probe]# kubectl get pods
NAME            READY   STATUS    RESTARTS   AGE
liveness-http   1/1     Running   1          4m54s
[root@master probe]# kubectl exec -it  liveness-http -- rm /usr/share/nginx/html/index.html
[root@master probe]# kubectl get pods
NAME            READY   STATUS    RESTARTS   AGE
liveness-http   1/1     Running   1          5m8s
[root@master probe]# kubectl get pods
NAME            READY   STATUS    RESTARTS   AGE
liveness-http   1/1     Running   2          8m45s
[root@master probe]#
View the Pod event to verify that the activity probe failed and that the container was restarted: kubectl describe pod pod_name
[root@master probe]# kubectl describe pod liveness-http | tail -n 20
Volumes:
  kube-api-access-8h26g:
    Type:                    Projected (a volume that contains injected data from multiple sources)
    TokenExpirationSeconds:  3607
    ConfigMapName:           kube-root-ca.crt
    ConfigMapOptional:       <nil>
    DownwardAPI:             true
QoS Class:                   BestEffort
Node-Selectors:              <none>
Tolerations:                 node.kubernetes.io/not-ready:NoExecute op=Exists for 300s
                             node.kubernetes.io/unreachable:NoExecute op=Exists for 300s
Events:
  Type     Reason     Age                    From               Message
  ----     ------     ----                   ----               -------
  Normal   Scheduled  3m10s                  default-scheduler  Successfully assigned probe/liveness-http to node2
  Normal   Pulled     2m21s (x2 over 3m10s)  kubelet            Container image "nginx" already present on machine
  Normal   Created    2m21s (x2 over 3m10s)  kubelet            Created container liveness
  Warning  Unhealthy  2m21s (x3 over 2m41s)  kubelet            Liveness probe failed: HTTP probe failed with statuscode: 404
  Normal   Killing    2m21s                  kubelet            Container liveness failed liveness probe, will be restarted
  Normal   Started    2m20s (x2 over 3m9s)   kubelet            Started container liveness
[root@master probe]#
tcpSocket
Mainly use the above two methods. The following tcp code is as follows. Those interested can study it by themselves.
In this way, the survival is determined through the TCP connection, as shown in the Pod arrangement example.
apiVersion: v1
kind: Pod
metadata:
  labels:
    test: liveness
    app: node
  name: liveness-tcp
spec:
  containers:
  - name: goproxy
    image: docker.io/googlecontainer/goproxy:0.1
    ports:
    - containerPort: 8080
    readinessProbe:
      tcpSocket:
        port: 8080
      initialDelaySeconds: 5
      periodSeconds: 10
    livenessProbe:
      tcpSocket:
        port: 8080
      initialDelaySeconds: 15
      periodSeconds: 20
readiness probe
- It does not restart, but the requests sent by the user are no longer forwarded to this pod [if you do not restart, the error will always be wrong]
- The configuration of readiness is similar to that of liveness. You can change the liveness probe to readiness probe.
- You can use the kubectl explain command to view the specific configuration properties. Here is a brief list of the main properties.
command
- The code is as follows [use ngxinx instructions]:
[root@master probe]# cat pod4.yaml
apiVersion: v1
kind: Pod
metadata:
  labels:
    test: liveness
  name: pod4
spec:
  terminationGracePeriodSeconds: 0
  containers:
  - name: liveness
    image: nginx
    imagePullPolicy: IfNotPresent
    lifecycle:
      postStart:
        exec:
          command: ["/bin/sh","-c","touch /tmp/healthy"]
    readinessProbe:
      exec:
        command:
        - cat
        - /tmp/healthy
      initialDelaySeconds: 5
      periodSeconds: 5
[root@master probe]#
- Create three pods through the above configuration file [at this time, the pod labels are the same]
[root@master probe]# kubectl apply -f pod4.yaml
pod/pod4 created
[root@master probe]# sed 's/pod4/pod5/' pod4.yaml | kubectl apply -f -
pod/pod5 created
[root@master probe]# sed 's/pod4/pod6/' pod4.yaml | kubectl apply -f -
pod/pod6 created
[root@master probe]#
[root@master probe]# kubectl get pods
NAME   READY   STATUS    RESTARTS   AGE
pod4   1/1     Running   0          26s
pod5   1/1     Running   0          16s
pod6   1/1     Running   0          12s
[root@master probe]# kubectl get pods --show-labels
NAME   READY   STATUS    RESTARTS   AGE   LABELS
pod4   1/1     Running   0          32s   test=liveness
pod5   1/1     Running   0          22s   test=liveness
pod6   1/1     Running   0          18s   test=liveness
[root@master probe]#
- Write arbitrary content to each pod to distinguish different pods, and then create an svc
[root@master probe]# kubectl exec -it pod4 -- sh -c "echo 111 > /usr/share/nginx/html/index.html"
[root@master probe]# kubectl exec -it pod5 -- sh -c "echo 222 > /usr/share/nginx/html/index.html"
[root@master probe]# kubectl exec -it pod6 -- sh -c "echo 333 > /usr/share/nginx/html/index.html"
[root@master probe]#
[root@master probe]# kubectl expose --name=svc1 pod pod4 --port=80
service/svc1 exposed
[root@master probe]#
[root@master probe]# kubectl get svc -o wide
NAME   TYPE        CLUSTER-IP     EXTERNAL-IP   PORT(S)   AGE   SELECTOR
svc1   ClusterIP   10.96.190.13   <none>        80/TCP    9s    test=liveness
[root@master probe]#
- At this time, we use a loop to access this address. We can see that the contents of the three containers will appear randomly [ip is the svc ip above]
[root@master ~]# while true ; do curl -s 10.96.190.13; sleep 1; done
333
333
222
111
333
111
333
111
111
111
333
333
222
111
222
333
222
111
^C
[root@master ~]#
- At this time, we delete the tmp file of pod6 [delete this file because the container is healthy or not, the tmp file we defined]
[root@master probe]# kubectl exec -it pod6 -- rm /tmp/healthy
[root@master probe]#

# After deletion, the container is still Running, but READY will become 0 / 1
[root@master probe]# kubectl get pods
NAME   READY   STATUS    RESTARTS   AGE
pod4   1/1     Running   0          11m
pod5   1/1     Running   0          11m
pod6   1/1     Running   0          11m
[root@master probe]# kubectl get pods
NAME   READY   STATUS    RESTARTS   AGE
pod4   1/1     Running   0          12m
pod5   1/1     Running   0          12m
pod6   0/1     Running   0          12m
[root@master probe]#

# And the container is still accessible at this time
[root@master probe]# kubectl exec -it pod6 -- bash
root@pod6:/# sleep 1
root@pod6:/# exit
exit

# You can view the event and see that the file is gone
[root@master probe]# kubectl get ev | tail -n 10
15m         Normal    Scheduled   pod/pod6            Successfully assigned probe/pod6 to node2
15m         Normal    Pulled      pod/pod6            Container image "nginx" already present on machine
15m         Normal    Created     pod/pod6            Created container liveness
15m         Normal    Started     pod/pod6            Started container liveness
13m         Normal    Killing     pod/pod6            Stopping container liveness
12m         Normal    Scheduled   pod/pod6            Successfully assigned probe/pod6 to node2
12m         Normal    Pulled      pod/pod6            Container image "nginx" already present on machine
12m         Normal    Created     pod/pod6            Created container liveness
12m         Normal    Started     pod/pod6            Started container liveness
1s          Warning   Unhealthy   pod/pod6            Readiness probe failed: cat: /tmp/healthy: No such file or directory
[root@master probe]#
- When you visit the test again, you can see that the 333 of pod6 is gone [because the status is abnormal, it is eliminated]
root@master ~]# while true ; do curl -s 10.96.190.13; sleep 1; done
222
111
222
222
111
222
222
111
222
111
222
222
111
111
222
111
222
222
^C
[root@master ~]#
httpGet
The use method is the same as the above liveness, and the use method can refer to the above liveness
tcpSocket
The use method is the same as the above liveness, and the use method can refer to the above liveness