Preface introduction
It is inevitable that there are access hotspots in the business, and redis will also encounter this problem. However, how to find the hot key has been perplexing many users. Redis4 0 has brought us many new features, including LFU based hot key discovery mechanism.
Least Frequently Used
Least Frequently Used - referred to as LFU, which means Least Frequently Used. It is redis4 0 adds a new type of memory eviction strategy. From the literal meaning of LFU, we can easily think of the access frequency of key. However, the initial version of 4.0 was only used for memory eviction, and there was no good record of the access frequency. After some transformation, redis was released in 4.0 Version 3 officially supports the hot key discovery mechanism based on LFU.
Introduction to LFU algorithm
Each object in Redis has 24 bits space to record LRU/LFU information:
typedef struct redisObject {
    unsigned type:4;
    unsigned encoding:4;
    unsigned lru:LRU_BITS; /* LRU time (relative to global lru_clock) or
                            * LFU data (least significant 8 bits frequency
                            * and most significant 16 bits access time). */
    int refcount;
    void *ptr;
} robj;
When these 24 bits are used as LFU, they are divided into two parts:
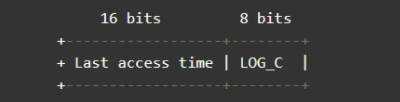
- The upper 16 bits are used to record the access time (in minutes) LRU
- The lower 8 bits are used to record the access frequency, referred to as counter LFU
Counter: probability based logarithmic counter
The maximum value of 8 bits is 255. Is it enough to use only 8 bits to record the access frequency?
For the counter, redis uses a trick method. The counter is not a simple linear counter, but a logarithmic counter based on probability. The algorithm is as follows:
uint8_t LFULogIncr(uint8_t counter) {
      if (counter == 255) return 255;
      double r = (double)rand()/RAND_MAX;
      double baseval = counter - LFU_INIT_VAL;
      if (baseval < 0) baseval = 0;
      double p = 1.0/(baseval*server.lfu_log_factor+1);
      if (r < p) counter++;
      return counter;
  }
The corresponding probability distribution calculation formula is:
1/((counter-LFU_INIT_VAL)*server.lfu_log_factor+1)
Including LFU_INIT_VAL is 5. Let's look at the probability distribution diagram and have a more intuitive understanding. Take the default server lfu_ log_ Take factor = 10 as an example: 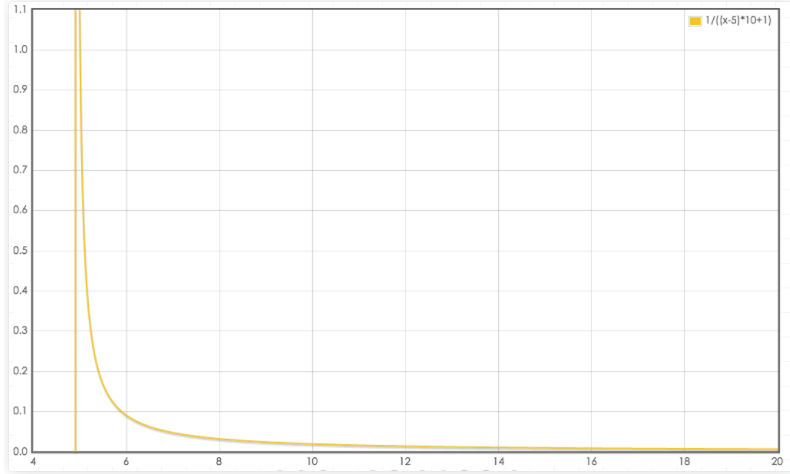
It can be seen from the above figure that the larger the counter, the smaller the probability of increase. 8 bits is enough to record a high access frequency. The following table shows the server with different probability factors lfu_ log_ Correspondence between factor and access frequency counter:
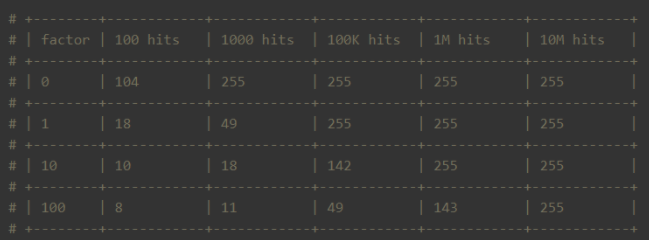
That is, the default server lfu_ log_ When the factor is 10, the counter of 8 bits can represent the access frequency of 1 million.
Attenuation factor of counter
In the counter growth function LFULogIncr, we can see that with the increase of key traffic, the counter will eventually converge to 255, which brings a problem. If the counter only grows without attenuation, it will not be able to distinguish hot keys.
To solve this problem, redis provides the attenuation factor server lfu_ decay_ Time, which is in minutes. The calculation method is also very simple. If a key is not accessed for a long time, its counter will be reduced. The reduced value is controlled by the attenuation factor:
unsigned long LFUDecrAndReturn(robj *o) {
    unsigned long ldt = o->lru >> 8;
    unsigned long counter = o->lru & 255;
    unsigned long num_periods = server.lfu_decay_time ? LFUTimeElapsed(ldt) / server.lfu_decay_time : 0;
    if (num_periods)
        counter = (num_periods > counter) ? 0 : counter - num_periods;
    return counter;
}
If the default value is 1, that is, if there is no access within N minutes, the counter will be reduced by N.
Probability factor and attenuation factor can be configured. It is recommended to use the default value of redis:
lfu-log-factor 10
lfu-decay-time 1
Hot key discovery
After introducing the LFU algorithm, the next step is the hot key discovery mechanism we are concerned about.
The core is to update the access time and counter represented by the 24 bits field of the LFU every time the key is read and written, so that each key can obtain the correct LFU value:
void updateLFU(robj *val) {
    unsigned long counter = LFUDecrAndReturn(val);
    counter = LFULogIncr(counter);
    val->lru = (LFUGetTimeInMinutes()<<8) | counter;
}
So how do users get access frequency? redis provides the OBJECT FREQ subcommand to obtain LFU information. However, it should be noted that the memory eviction policy should be set to allkeys LFU or volatile LFU first, otherwise an error will be returned:
127.0.0.1:6379> config get maxmemory-policy
1) "maxmemory-policy"
2) "noeviction"
127.0.0.1:6379> object freq counter:000000006889
(error) ERR An LFU maxmemory policy is not selected, access frequency not tracked. Please note that when switching between policies at runtime LRU and LFU data will take some time to adjust.

127.0.0.1:6379> config set maxmemory-policy allkeys-lfu
OK
127.0.0.1:6379> object freq counter:000000006889
(integer) 3
Underlying algorithm: use the scan command to traverse all keys, and then obtain the access frequency through OBJECT FREQ and sort to get the hot key.
redis 4.0.3. It also provides the redis cli hotspot key discovery function. When redis cli is executed, you can add the -- hotkeys option. An example is as follows:
$./redis-cli --hotkeys

# Scanning the entire keyspace to find hot keys as well as
# average sizes per key type.  You can use -i 0.1 to sleep 0.1 sec
# per 100 SCAN commands (not usually needed).

[00.00%] Hot key 'counter:000000000002' found so far with counter 87
[00.00%] Hot key 'key:000000000001' found so far with counter 254
[00.00%] Hot key 'mylist' found so far with counter 107
[00.00%] Hot key 'key:000000000000' found so far with counter 254
[45.45%] Hot key 'counter:000000000001' found so far with counter 87
[45.45%] Hot key 'key:000000000002' found so far with counter 254
[45.45%] Hot key 'myset' found so far with counter 64
[45.45%] Hot key 'counter:000000000000' found so far with counter 93

-------- summary -------

Sampled 22 keys in the keyspace!
hot key found with counter: 254    keyname: key:000000000001
hot key found with counter: 254    keyname: key:000000000000
hot key found with counter: 254    keyname: key:000000000002
hot key found with counter: 107    keyname: mylist
hot key found with counter: 93    keyname: counter:000000000000
hot key found with counter: 87    keyname: counter:000000000002
hot key found with counter: 87    keyname: counter:000000000001
hot key found with counter: 64    keyname: myset
You can see that the hot key s are in the top.
Introduction to Scan operation
Anyone familiar with Redis knows that it is single threaded. Therefore, be very careful when using some commands with time complexity of O(N). The process may be blocked if you are not careful, resulting in a jam in Redis.
-
Sometimes, we need to operate on some commands that meet the conditions, such as deleting to test_ key at the beginning. So how do I get these keys? On redis2 Before version 8, we can use the keys command to get the keys we need according to regular matching. However, this command has two disadvantages:
-
Without limit, we can only obtain all qualified key s at one time. If there are millions of results, you are waiting for "endless" string output.
-
The keys command is a traversal algorithm, and the time complexity is O(N). As we just said, this command can easily cause the Redis service to get stuck. Therefore, we should try to avoid using this command in the production environment.
How to choose between meeting the demand and Redis Caton caused by the existence? Facing this dilemma, Redis provided us with a solution in version 2.8 - scan command.
Advantages of Scan operation
Compared with the keys command, the scan command has two obvious advantages:
-
Although the time complexity of scan command is also O(N), it is carried out in stages and will not block threads.
-
The scan command provides the limit parameter, which can control the maximum number of returned results each time.
These two advantages help us solve the above problems, but the scan command is not perfect. The results it returns may be repeated, so the client needs to redo. Scan command
The summary has the following characteristics:
- The returned results may be repeated, which needs to be repeated by the client, which is very important;
- If data is modified during traversal, it is uncertain whether the modified data can be traversed;
- If the result of a single return is empty, it does not mean that the traversal is over, but depends on whether the returned cursor value is zero;
scan command usage example
//The first parameter specifies the cursor, the second parameter specifies the matching pattern, and the third parameter specifies the number of returned data. / / Note: the count parameter limits the number of dictionary slots traversed by the server in a single pass, not the number of returned key s
127.0.0.1:6379> scan 0 match key99* count 1000
1) "13976"
2)  1) "key9911"
    2) "key9974"
    3) "key9994"
    4) "key9910"
    5) "key9907"
    6) "key9989"
    7) "key9971"
    8) "key99"
    9) "key9966"
   10) "key992"
   11) "key9903"
   12) "key9905"
127.0.0.1:6379> scan 13976 match key99* count 1000
1) "1996"
2)  1) "key9982"
    2) "key9997"
    3) "key9963"
    4) "key996"
    5) "key9912"
    6) "key9999"
    7) "key9921"
    8) "key994"
    9) "key9956"
   10) "key9919"
127.0.0.1:6379> scan 1996 match key99* count 1000
1) "12594"
2) 1) "key9939"
   2) "key9941"
   3) "key9967"
   4) "key9938"
   5) "key9906"
   6) "key999"
   7) "key9909"
   8) "key9933"
   9) "key9992"
......
127.0.0.1:6379> scan 11687 match key99* count 1000
1) "0"
2)  1) "key9969"
    2) "key998"
    3) "key9986"
    4) "key9968"
    5) "key9965"
    6) "key9990"
    7) "key9915"
    8) "key9928"
    9) "key9908"
   10) "key9929"
   11) "key9944"...
It mainly discusses how scan works from the perspective of underlying structure and source code.
Redis structure
Redis uses the Hash table as the underlying implementation for the reason that it is efficient and easy to implement. When it comes to Hash tables, the first reaction of many Java programmers is HashMap. Yes, the storage structure of redis's underlying key is an array + linked list structure similar to HashMap. The array size of the first dimension is 2n (n > = 0). Each expansion doubles the length of the array.
The scan command is to traverse this one-dimensional array. The cursor value returned each time is also the index of this array. The limit parameter indicates how many array elements are traversed, and the qualified results attached under these elements are returned. Because the size of the linked list attached to each element is different, the number of results returned each time is also different.
Traversal order of SCAN
For the traversal order of the scan command, we can use a small chestnut to take a specific look.
127.0.0.1:6379> keys *
1) "db_number"
2) "key1"
3) "myKey"
127.0.0.1:6379> scan 0 MATCH * COUNT 1
1) "2"
2) 1) "db_number"
127.0.0.1:6379> scan 2 MATCH * COUNT 1
1) "1"
2) 1) "myKey"
127.0.0.1:6379> scan 1 MATCH * COUNT 1
1) "3"
2) 1) "key1"
127.0.0.1:6379> scan 3 MATCH * COUNT 1
1) "0"
2) (empty list or set)
There are three key s in our Redis. We only traverse the elements in one-dimensional array at a time. As shown above, the traversal order of the SCAN command is
0->2->1->3
This order looks strange. It's easier for us to understand by converting it into binary.
00->10->01->11
We find that every time this sequence is high-order plus 1. Ordinary binary addition is to add and carry from right to left. This sequence is added and carried from left to right. This is also confirmed in the source code of redis.
In the dictScan function of the dict.c file, the cursor is processed as follows
v = rev(v);
v++;
v = rev(v);
It means to invert the cursor, add one, and then invert it, which is what we call the "high-order plus 1" operation.
You may have questions here. Why do you use this order for traversal instead of the normal order of 0, 1, 2... Because you need to consider the expansion and contraction of the dictionary during traversal (you have to admire the comprehensiveness of the developers).
Let's take a look at how the SCAN traversal will be performed when capacity expansion occurs. The original array has four elements, that is, the index has two bits. At this time, it needs to be expanded into three bits and rehash.
All elements originally attached to XX are assigned to 0xx and 1xx. In the figure above, when we are about to traverse 10, dict rehash. At this time, the scan command will traverse from 010, while 000 and 100 (the elements hitched under 00) will not be traversed again.
Let's look at the shrinkage. Suppose that dict shrinks from 3 bits to 2 bits. When it is about to traverse 110, dict shrinks, and scan will traverse 10. At this time, the elements attached under 010 will be iterated, but the elements before 010 will not be iterated. Therefore, some repeated elements may appear during volume reduction.
rehash of Redis
Rehash is a complex process. In order not to block Redis processes, it adopts a progressive rehash mechanism.
/* Dictionaries */
typedef struct dict {
    // Type specific function
    dictType *type;
    // Private data
    void *privdata;
    // Hashtable
    dictht ht[2];
    // rehash index
    // When rehash is not in progress, the value is - 1
    int rehashidx; /* rehashing not in progress if rehashidx == -1 */
    // Number of security iterators currently running
    int iterators; /* number of iterators currently running */
} dict;
In redis's dictionary structure, there are two hash tables, a new table and an old table. During rehash, redis gradually migrates the elements in the old table to the new table. Next, let's take a look at the source code of rehash operation of dict.
/* Performs N steps of incremental rehashing. Returns 1 if there are still
 * keys to move from the old to the new hash table, otherwise 0 is returned.
 *
 * Note that a rehashing step consists in moving a bucket (that may have more
 * than one key as we use chaining) from the old to the new hash table, however
 * since part of the hash table may be composed of empty spaces, it is not
 * guaranteed that this function will rehash even a single bucket, since it
 * will visit at max N*10 empty buckets in total, otherwise the amount of
 * work it does would be unbound and the function may block for a long time. */
int dictRehash(dict *d, int n) {
    int empty_visits = n*10; /* Max number of empty buckets to visit. */
    if (!dictIsRehashing(d)) return 0;

    while(n-- && d->ht[0].used != 0) {
        dictEntry *de, *nextde;

        /* Note that rehashidx can't overflow as we are sure there are more
         * elements because ht[0].used != 0 */
        assert(d->ht[0].size > (unsigned long)d->rehashidx);
        while(d->ht[0].table[d->rehashidx] == NULL) {
            d->rehashidx++;
            if (--empty_visits == 0) return 1;
        }
        de = d->ht[0].table[d->rehashidx];
        /* Move all the keys in this bucket from the old to the new hash HT */
        while(de) {
            uint64_t h;

            nextde = de->next;
            /* Get the index in the new hash table */
            h = dictHashKey(d, de->key) & d->ht[1].sizemask;
            de->next = d->ht[1].table[h];
            d->ht[1].table[h] = de;
            d->ht[0].used--;
            d->ht[1].used++;
            de = nextde;
        }
        d->ht[0].table[d->rehashidx] = NULL;
        d->rehashidx++;
    }

    /* Check if we already rehashed the whole table... */
    if (d->ht[0].used == 0) {
        zfree(d->ht[0].table);
        d->ht[0] = d->ht[1];
        _dictReset(&d->ht[1]);
        d->rehashidx = -1;
        return 0;
    }

    /* More to rehash... */
    return 1;
}
Through comments, we can see that rehash is migrated based on bucket. The so-called bucket is actually the element of the one-dimensional array we mentioned earlier. Migrate one list at a time.
- First, judge whether rehash is in progress. If yes, continue; Otherwise, return directly.
- The next step is to start progressive rehash in n steps. At the same time, it also determines whether there are remaining elements to ensure security.
- Before rehash, first judge whether the bucket to be migrated is out of bounds.
- Then skip the empty bucket. Here is an empty bucket_ The visits variable indicates the maximum number of empty buckets that can be accessed. This variable is mainly used to ensure that there are not too many blocked Redis.
- The next step is element migration. rehash all the elements of the current bucket and update the number of elements in the two tables.
- After migrating a bucket each time, you need to point the bucket in the old table to NULL.
- Finally, judge whether all the migration is completed. If so, recover the space and reset the rehash index. Otherwise, tell the caller that there is still data that has not been migrated.
- Because Redis uses a progressive rehash mechanism, the scan command needs to scan both new and old tables and return the results to the client.