Detailed tutorial on Spring annotation development (with Raytheon's video)
1, Design mode - factory mode
    Factory pattern is the most commonly used instantiation object pattern, which is replaced by methods in the factory new A design pattern for creating objects.
    We take Mybatis of SqlSession Interface as an example, it has an implementation class DefaultSqlSession,If we want to create an instance object of this interface:SqlSession sqlSession=new DefaultSqlSession();
    However, the reality is that usually we have to create SqlSession Do some initialization during instance,For example, parsing XML,Encapsulate the information connected to the database, and so on.
     When creating an object, if there are some initialization operations that we have to do, the first thing we can do is to use the constructor, so that the generated instance can be written as:SqlSession sqlSession=new DefaultSqlSession(Path to incoming profile);
     However, if you create sqlSession The initialization of the instance is not as simple as assignment. It may be a long piece of code. If it is also written into the constructor, your code will be ugly (you need to Refactor Refactoring).
     Why does the code look ugly? Beginners may not feel this way. We analyze it as follows. If the initialization work is a long piece of code, it means that a lot of work needs to be done. Loading a lot of work into a method is equivalent to putting a lot of eggs in a basket. It is very dangerous, which is also contrary to Java Object oriented principle, object-oriented encapsulation(Encapsulation)And distribution(Delegation)Tell us, try to "cut" the long code into each segment, and then "encapsulate" each segment(Reduce coupling between segments),In this way, the risk will be dispersed. If it needs to be modified in the future, as long as each paragraph is changed, nothing will happen again.
	So, Mybatis The framework provides us with SqlSessionFactory Factory class, obtained by method SqlSession Object. At the same time, the method has many overloads to meet different requirements. This method is openSession(),It supports incoming Connection Parameters to ensure the consistency of the connection; Support incoming true|false To ensure the timing of transaction submission, etc.
2, IOC and DI
1,IOC-Inversion of Control
    It means: control reversal. It is not a technology, but an idea. Its function is to reduce the coupling between codes. Its implementation idea is to use the factory design pattern to separate the created object code from the specific class and hand it over to the factory, so as to reduce the dependency between codes.
    The coupling is classified as follows(The following is for understanding):
   		(1) Content coupling. When a module directly modifies or operates the data of another module, or a module transfers to another module without normal entry, such coupling is called content coupling. Content coupling is the highest level of coupling and should be avoided.
		(2) Common coupling. Two or more modules jointly reference a global data item. This coupling is called common coupling. In a structure with a large number of common coupling, it is very difficult to determine which module assigns a specific value to the global variable.
		(3) External coupling. If a group of modules access the same global simple variable instead of the same global data structure, and the information of the global variable is not transmitted through the parameter table, it is called external coupling.
		(4) Control coupling. One module transmits a control signal to another module through the interface, and the module receiving the signal performs appropriate actions according to the signal value. This coupling is called control coupling.
		(5) Mark coupling. If a module A Interface to both modules B and C Passing a public parameter is called a module B and C There is a tag coupling between.
		(6) Data coupling. Data coupling is defined as the transfer of data between modules through parameters. Data coupling is the lowest form of coupling. This type of coupling generally exists in the system, because in order to complete some meaningful functions, it is often necessary to take the output data of some modules as the input data of others.
		(7) Indirect coupling. There is no direct relationship between the two modules, and the relationship between them is completely realized through the control and call of the main module.
	Why decoupling:
		Coupling is an important factor affecting software complexity and design quality. In design, we should adopt the following principles: if there must be coupling between modules, use data coupling as much as possible, use less control coupling, limit the scope of public coupling and avoid content coupling as much as possible.
2,DI-Dependency Injection
    Its full name is dependency injection. yes spring Framework core ioc Specific implementation of.
	Example: when writing our program, we handed over the creation of objects to the user through control inversion spring,However, there can be no dependency in the code. ioc Decoupling only reduces their dependencies, but it will not eliminate them. For example, our business layer will still call the methods of the persistence layer.
The dependency between the business layer and the persistence layer is in use spring After that, let spring To maintain it.
	Simply put, it means waiting for the framework to transfer the persistence layer object to the business layer without getting it ourselves.
3, AnnotationConfigApplicationContext
1. Configuration class
1.1 using traditional xml
applicationContext.xml:
<bean id="person" class="com.rg.domain.Person" >
    <property name="name" value="Zhang San"/>
    <property name="age" value="19"/>
</bean>
person class:
package com.rg.domain;

public class Person {
    private String name;
    private Integer age;

    public String getName() {
        return name;
    }

    public void setName(String name) {
        this.name = name;
    }

    public Integer getAge() {
        return age;
    }

    public void setAge(Integer age) {
        this.age = age;
    }

    public Person(String name, Integer age) {
        this.name = name;
        this.age = age;
    }

    @Override
    public String toString() {
        return "Person{" +
                "name='" + name + '\'' +
                ", age=" + age +
                '}';
    }
}
Test class:
@Test
public void test01(){
    //Load profile
    ApplicationContext applicationContext = new ClassPathXmlApplicationContext("ApplicationContext.xml");
    Person person = (Person) applicationContext.getBean("person");//Get entity by id
    System.out.println(person);
}
1.2 using configuration methods:
MainConfig configuration class
//Configuration class = = configuration file
@Configuration //Tell Spring that this is a configuration class
public class MainConfig {
    //Register a Bean for the container; The type is the type of return value, and the default id is the method name
    @Bean("person") //Modify method name
    public Person person(){
        return new Person("lisi",20);
    }
}
Test class
@Test
public void test02(){
    ApplicationContext applicationContext = new AnnotationConfigApplicationContext(MainConfig.class);
    Person person = applicationContext.getBean(Person.class);//Get by class name
    System.out.println(person);
}
2. Packet scanning
2.1 traditional xml method:
<!--Packet scanning,Just mark it@Controller,@service,@Repository,@Component Class objects are automatically loaded into the IOC In container-->
<context:component-scan base-package="com.rg"/>
2.2 annotation method:
MainConfig configuration class
//Configuration class = = configuration file
@Configuration //Tell Spring that this is a configuration class
@ComponentScan("com.rg")
public class MainConfig {
    //Register a Bean for the container; The type is the type of return value, and the default id is the method name
    @Bean("person") //Modify method name
    public Person person(){
        return new Person("lisi",20);
    }
}
Project structure:
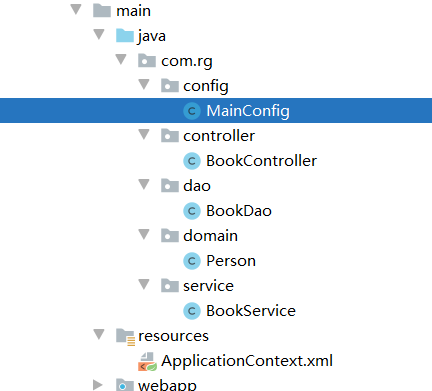
The classes in controller, Dao and service all use corresponding annotations
Test class:
@Test
public void test03(){
    ApplicationContext applicationContext = new AnnotationConfigApplicationContext(MainConfig.class);
    String[] names = applicationContext.getBeanDefinitionNames();//Gets the names of all objects in the container
    for (String name : names) {
        System.out.println(name);
    }
}
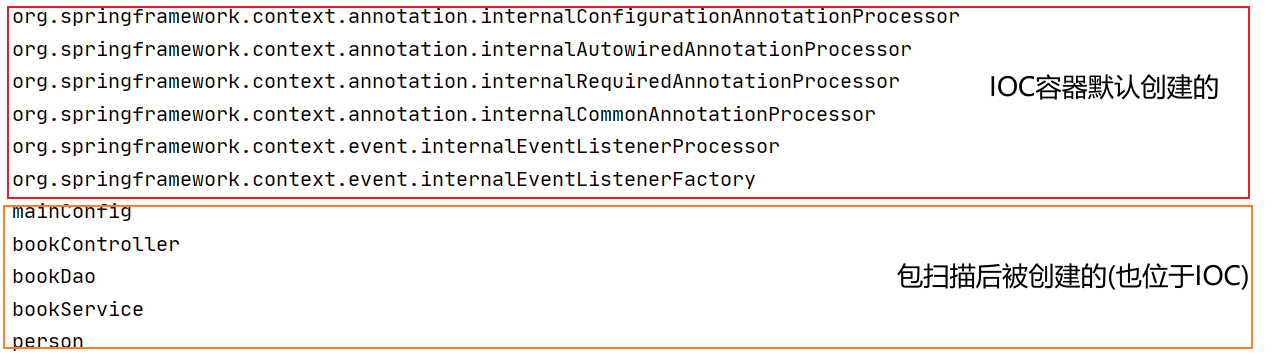
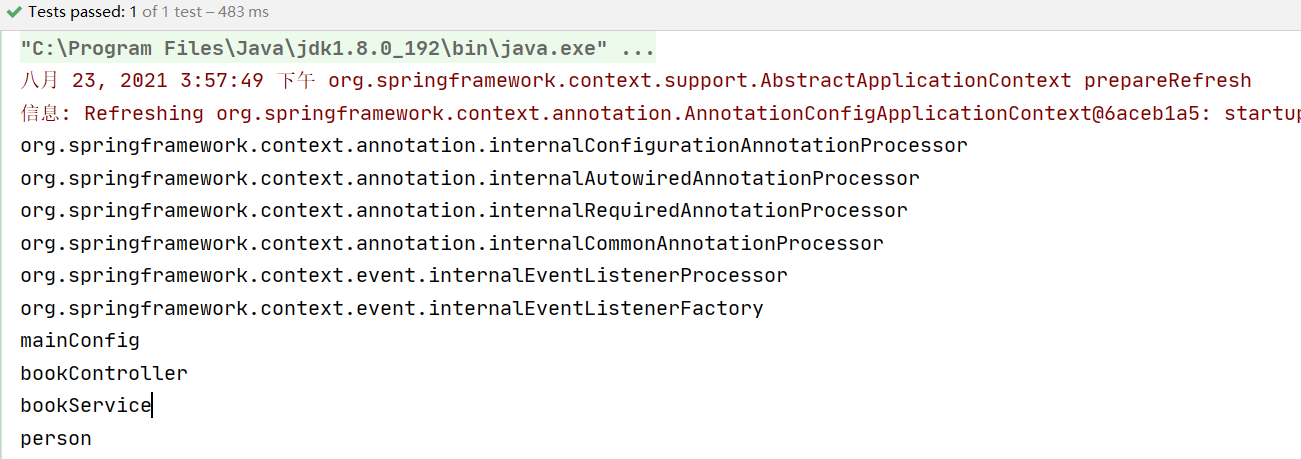
Operation results:
4, Component addition
1.@ComponentScan
1.1 traditional xml
<!--Packet scanning,Just mark it@Controller,@service,@Repository,@Component Class objects are automatically loaded into the IOC In container-->
<context:component-scan base-package="com.rg" use-default-filters="false">
     <!--use-default-filters : Whether to use the default filter, default value true Scan all files in the package-->
	 <!-- Note: if used include-filter To customize the scanned content, you should use-default-filters="false"Otherwise, it will "fail" and be overwritten by the default filtering mechanism -->
    type Can be regex (regular),annotation(annotation),assignable(Interface or class)

   <context:exclude-filter type="assignable" expression="com.rg.controller.BookController"/>
        <context:include-filter type="assignable" expression="com.rg.service.BookService"/>

</context:component-scan>
1.2 use configuration class
1.2. 1 basic use of componentscan annotation
//Configuration class = = configuration file
@Configuration //Tell Spring that this is a configuration class

//Multiple ComponentScan can be written after JDK8; If it is not this version, you can use the ComponentScans property
//be careful
@ComponentScan(value="com.rg",includeFilters = {
        @ComponentScan.Filter(type=FilterType.ANNOTATION,classes={Controller.class})},
        useDefaultFilters = false)

@ComponentScans(
        value = {
                @ComponentScan(value="com.rg",includeFilters = {
                        @ComponentScan.Filter(type=FilterType.ANNOTATION,classes={Controller.class}),//The first filter, according to the annotation type
                @ComponentScan.Filter(type = FilterType.ASSIGNABLE_TYPE,classes = {BookService.class}),//According to the given type
                },
                 useDefaultFilters = false),
                @ComponentScan(),
                //...
        }
)
//@Componentscan value: Specifies the package to scan
//excludeFilters = Filter []: Specifies the rules to exclude those components during scanning
//includeFilters = Filter []: specifies which components only need to be included during scanning
//FilterType.ANNOTATION: according to the annotation
//FilterType.ASSIGNABLE_TYPE: according to the given type;
//FilterType.ASPECTJ: use ASPECTJ expressions
//FilterType.REGEX: specify with regular
//FilterType.CUSTOM: use custom rules
public class MainConfig {
    //Register a Bean for the container; The type is the type of return value, and the default id is the method name
    @Bean("person") //Modify method name
    public Person person(){
        return new Person("lisi",20);
    }
}
Test result (the test class is the same as the previous one):
Only objects created in Controller package and service package
Note: POM In XML
<maven.compiler.source>1.8</maven.compiler.source>
<maven.compiler.target>1.8</maven.compiler.target>
It controls the JDK version used for compilation. If JDK7 is used here, multiple @ ComponentScan. Can't be added to MainConfig
1.2. 2 custom filter
Create MyTypeFilter class in config package, inherit TypeFilter interface and write filter conditions
public class MyTypeFilter implements TypeFilter {
    /**
     *
     * @param metadataReader:Read the information of the class currently being scanned
     * @param metadataReaderFactory:You can get the information of any other class
     * @return
     * @throws IOException
     */
    @Override
    public boolean match(MetadataReader metadataReader, MetadataReaderFactory metadataReaderFactory) throws IOException {
        //Gets the information of the current class annotation
        AnnotationMetadata annotationMetadata = metadataReader.getAnnotationMetadata();
        //Gets the class information of the current scan
        ClassMetadata classMetadata = metadataReader.getClassMetadata();
        String className = classMetadata.getClassName();//Gets the current class name
        System.out.println("-->" + className);
        if (className.contains("er")) {//If the class name contains er
            return true;//Filtered by filter
        }
        return false;//Not filtered
    }
}
Import in MainConfig:
@ComponentScan(value="com.rg",includeFilters = {
        // @ComponentScan.Filter(type=FilterType.ANNOTATION,classes={Controller.class}),
        // @ComponentScan.Filter(type = FilterType.ASSIGNABLE_TYPE,classes = {BookService.class}),
        @ComponentScan.Filter(type = FilterType.CUSTOM,classes = {MyTypeFilter.class})
        }, useDefaultFilters = false)
@Configuration //Tell Spring that this is a configuration class
public class MainConfig {
    //Register a Bean for the container; The type is the type of return value, and the default id is the method name
    @Bean("person") //Modify method name
    public Person person(){
        return new Person("lisi",20);
    }
}
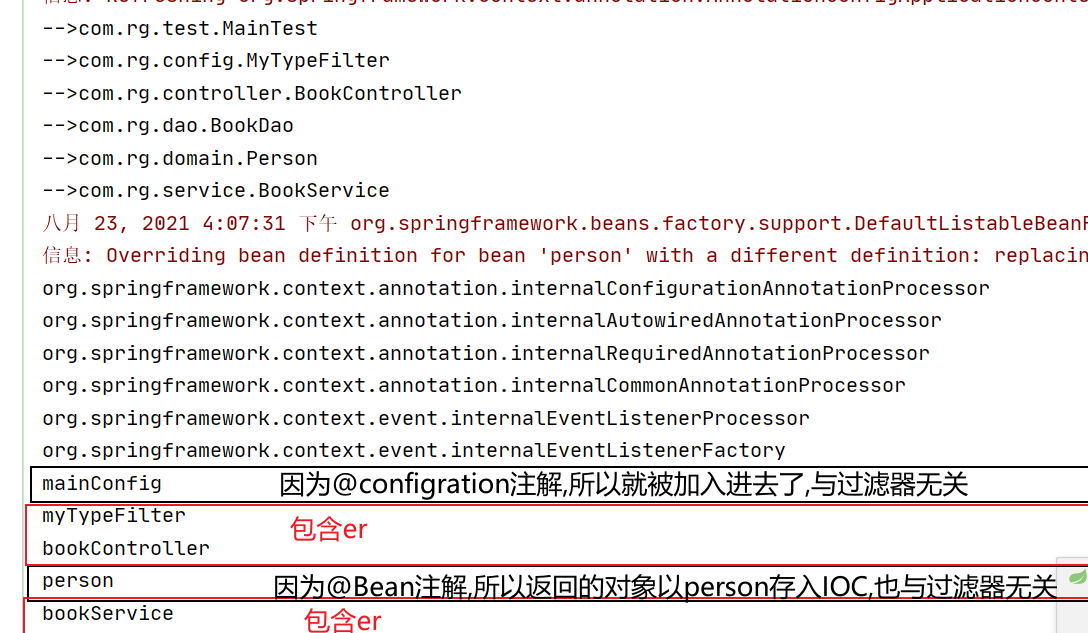
Test results:
The first part is the qualified class name, and the second part is the name of the object stored in the IOC container
2.@Scope
MainConfig:
//The default is single instance
/**
 * * @see ConfigurableBeanFactory#SCOPE_PROTOTYPE
 * * @see ConfigurableBeanFactory#SCOPE_SINGLETON
 * * @see org.springframework.web.context.WebApplicationContext#SCOPE_REQUEST request
 * * @see org.springframework.web.context.WebApplicationContext#SCOPE_SESSION session

 * @return\
 * @Scope:Adjust scope
 * prototype: Multi instance: ioc container startup does not call methods to create objects in the container.
 *                 The method will be called to create the object each time it is obtained;
 * singleton: Single instance (default): when the ioc container starts, the method will be called to create the object and put it into the ioc container.
 *           In the future, each acquisition is taken directly from the container (map.get()),
 * request: Create an instance for the same request
 * session: Create an instance of the same session
 *
 * Lazy loading:
 *        Single instance bean: the object is created when the container is started by default;
 *        Lazy load: container startup does not create objects. Use (get) Bean to create an object for the first time and initialize it;
 *
 */
@Scope( )
@Configuration
public class MainConfig2 {
    //Register a Bean for the container; The type is the type of return value, and the default id is the method name
    @Bean("person")
    public Person person(){
        System.out.println("Add to container Person...");
        return new Person("lisi",20);
    }
}
Test:
@Test
public void test04(){

    AnnotationConfigApplicationContext applicationContext = new AnnotationConfigApplicationContext(MainConfig2.class);
    //System.out.println("IOC container creation completed...);
    //System.out.println("hahha ow ow");
    //   Person person = (Person) applicationContext.getBean("person");
    //  Person person2 = (Person) applicationContext.getBean("person");
    //  System.out.println(person == person2); // When it is the default, the result is true; when it is prototype, the result is false


}
Operation results:

When it is modified to @ Scope("prototype"), the IOC container will be created first, and then the method will be called and the object will be created each time it is obtained
Note: the problem of @ Scope("prototype") invalidation will appear here. The solution has not been found yet
3.@Lazy
Single instance bean: the object is created when the container is started by default;
Lazy load: container startup does not create objects. Use (get) Bean to create an object for the first time and initialize it
MainConfig
@Lazy
@Scope
@Configuration
public class MainConfig2 {
    //Register a Bean for the container; The type is the type of return value, and the default id is the method name
    @Bean("person")
    public Person person(){
        System.out.println("Add to container Person...");
        return new Person("lisi",20);
    }
}
Test:
@Test
public void test04(){

    AnnotationConfigApplicationContext applicationContext = new AnnotationConfigApplicationContext(MainConfig2.class);
    System.out.println("IOC Container creation complete...");
    //System.out.println("hahha ow ow");
       Person person = (Person) applicationContext.getBean("person");
     Person person2 = (Person) applicationContext.getBean("person");
     System.out.println(person == person2);


}
Test results:
4.@Conditional
Judge according to certain conditions and register bean s in the container if the conditions are met;
Example:
- If the system is windows, register ("bill") in the container
- If it is a linux system, register ("linus") in the container
Create Linux Condition, windows Condition and implement Condition interface
LinuxCondition
//Determine whether it is a Linux system
public class LinuxCondition implements Condition {
    /**
     *
     * @param context Determine the context (environment) used by the condition
     * @param metadata :Annotation information
     * @return
     */
    @Override
    public boolean matches(ConditionContext context, AnnotatedTypeMetadata metadata) {
        //1. Obtain BeanFactory used by IOC
        ConfigurableListableBeanFactory beanFactory = context.getBeanFactory();
        //2. Get class loader
        ClassLoader classLoader = context.getClassLoader();
        //3. Obtain current environmental information
        Environment environment = context.getEnvironment();
        //4. Get the registration class defined by the Bean
        BeanDefinitionRegistry registry = context.getRegistry();

        String property = environment.getProperty("os.name");

        //You can judge the registration of beans in the container or register beans in the container
        if(property.contains("linux")){
            return true;
        }


        return false;
    }
}
WindowsCondition
//Determine whether it is a windows system
public class WindowsCondition implements Condition {
    @Override
    public boolean matches(ConditionContext context, AnnotatedTypeMetadata metadata) {
        Environment environment = context.getEnvironment();
        String property = environment.getProperty("os.name");
        if(property.contains("Windows")){
            return true;
        }
        return false;
    }
}
MainConfig
//The components in the class are set uniformly. Only when the current conditions are met can all bean registrations configured in this class take effect;
//@Conditional({WindowsCondition.class})
@Configuration
public class MainConfig3 {


    /**
     * @Conditional({Condition}) :  Judge according to certain conditions and register bean s in the container if the conditions are met
     *
     * If the system is windows, register ("bill") in the container
     * If it is a linux system, register ("linus") in the container
     */
    @Conditional({WindowsCondition.class})
    @Bean("bill")
    public Person person01(){
        return new Person("Bill Gates",62);
    }

    @Conditional({LinuxCondition.class})
    @Bean("linus")
    public Person person02(){
        return new Person("linus",48);
    }

}
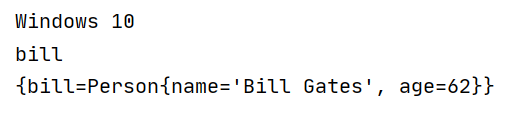
Test:
@Test
public void test05() {
    AnnotationConfigApplicationContext applicationContext = new AnnotationConfigApplicationContext(MainConfig3.class);
    String[] names = applicationContext.getBeanNamesForType(Person.class);
    //Get system environment configuration object
    ConfigurableEnvironment environment = applicationContext.getEnvironment();
    //Get environment variables dynamically
    String property = environment.getProperty("os.name");
    System.out.println(property);
    for (String name : names) {
        System.out.println(name);
    }
    Map <String, Person> persons = applicationContext.getBeansOfType(Person.class);
    System.out.println(persons);

}
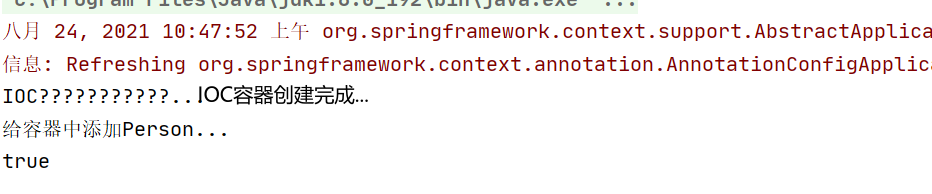
Operation results:
When used on a class, it means:
Set the components in the class uniformly. Only when the current conditions are met can all bean registrations configured in this class take effect;
5.@Import
5.1 @ import (components in the container to be imported);
This component will be automatically registered in the container, and the id is the full class name by default
Create color and red classes as imported components
MainConfig
//The components in the class are set uniformly. Only when the current conditions are met can all bean registrations configured in this class take effect;
@Conditional({WindowsCondition.class})
@Configuration
//@Import(value = Color.class)
@Import({Color.class, Red.class})
public class MainConfig4 {

    @Bean("person") //Modify method name
    public Person person(){
        return new Person("lisi",20);
    }

    @Conditional({WindowsCondition.class})
    @Bean("bill")
    public Person person01(){
        return new Person("Bill Gates",62);
    }

    @Conditional({LinuxCondition.class})
    @Bean("linus")
    public Person person02(){
        return new Person("linus",48);
    }

}
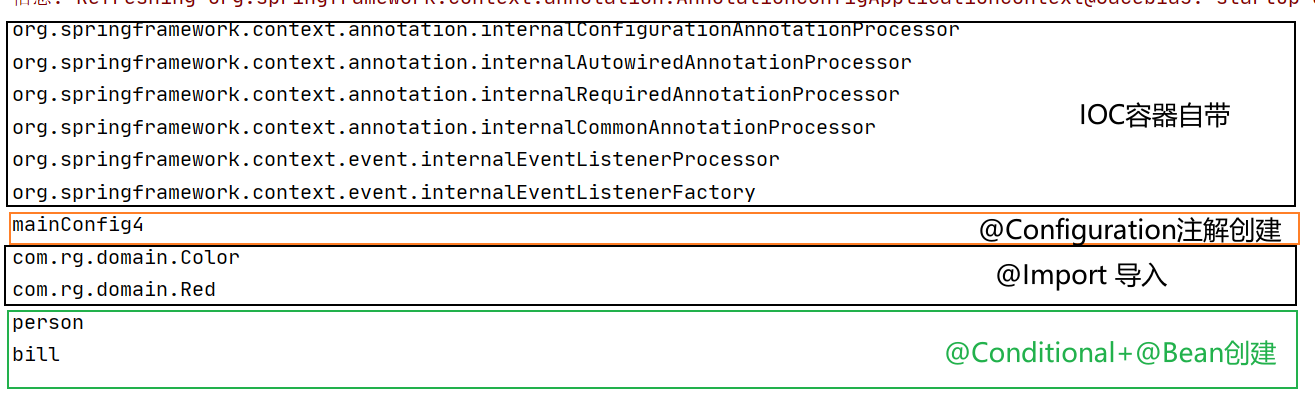
Test:
@Test
public void test06() {
    ApplicationContext applicationContext = new AnnotationConfigApplicationContext(MainConfig4.class);
    String[] names = applicationContext.getBeanDefinitionNames();//Gets the names of all objects in the container
    for (String name : names) {
        System.out.println(name);
    }

}
Operation results:
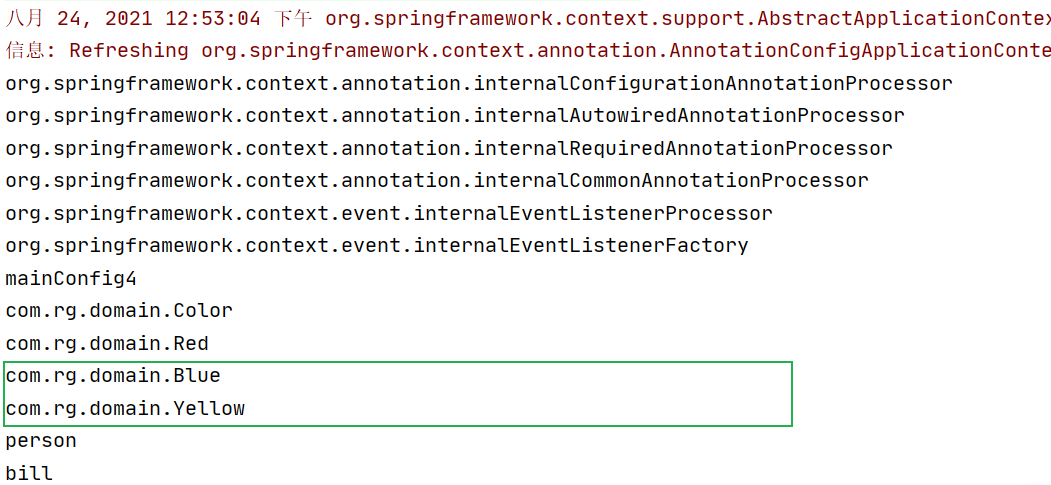
5.2 ImportSelector
Return the full class name array of the component to be imported;
Function: batch register beans:
Write MyInportSelector to implement the ImportSelector interface
public class MyInportSelector implements ImportSelector {
    @Override
    public String[] selectImports(AnnotationMetadata importingClassMetadata) {
        return new String[]{"com.rg.domain.Blue","com.rg.domain.Yellow"};
    }
}
Add comments on MainConfig: @ Import({Color.class, Red.class, MyInportSelector.class})
Operation results:
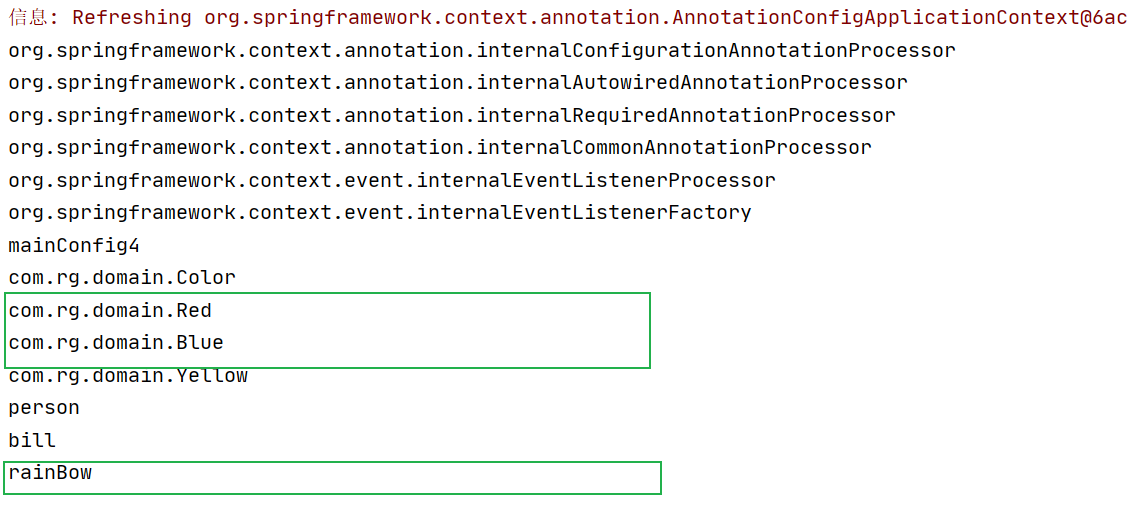
5.3 MyImportBeanDefinitionRegistrar
Manually register the bean into the container (you can specify the name of the bean)
Create myimportbeandefinitionregister, implement the importbeandefinitionregister interface, and write the registration logic
public class MyImportBeanDefinitionRegistrar implements ImportBeanDefinitionRegistrar {
    /**
     * AnnotationMetadata: Annotation information of the current class
     * BeanDefinitionRegistry:BeanDefinition Registration class;
     * 		Add all the bean s that need to be added to the container; call
     * 		BeanDefinitionRegistry.registerBeanDefinition You can specify a name for manual registration
     */
    @Override
    public void registerBeanDefinitions(AnnotationMetadata importingClassMetadata, BeanDefinitionRegistry registry) {
        boolean definition = registry.containsBeanDefinition("com.rg.domain.Red");
        boolean definition2 = registry.containsBeanDefinition("com.rg.domain.Blue");
        if(definition && definition2){
            //Specify Bean definition information;
            RootBeanDefinition rootBeanDefinition = new RootBeanDefinition(RainBow.class);
            //Register a Bean and specify the Bean name
            registry.registerBeanDefinition("rainBow",rootBeanDefinition);
        }
    }
}
Add comments on MainConfig: @ Import({Color.class, Red.class, MyInportSelector.class, MyImportBeanDefinitionRegistrar.class})
Operation results:
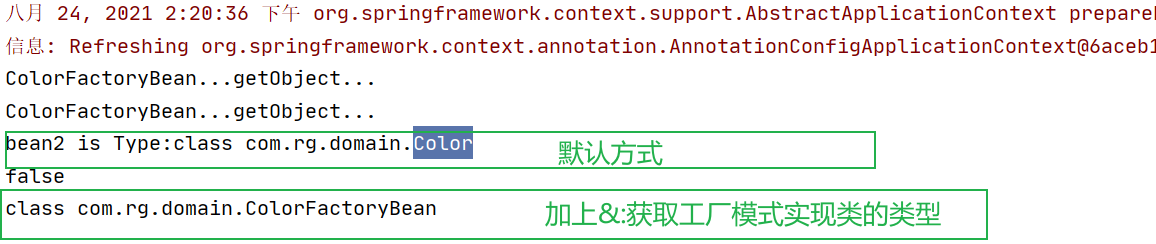
6. Use FactoryBean to register components
Use the FactoryBean provided by Spring;
1) . by default, the object created by the factory bean calling getObject is obtained
2) To obtain the factory Bean itself, we need to add a & & colorfactorybean in front of the id
Create ColorFactoryBean to implement FactoryBean interface
//Create a Spring defined FactoryBean
public class ColorFactoryBean implements FactoryBean<Color> {
    //Returns a Color object that will be added to the container
    @Override
    public Color getObject() throws Exception {
        System.out.println("ColorFactoryBean...getObject...");
        return new Color();
    }

    //Returns the type of the object
    @Override
    public Class <?> getObjectType() {
        return Color.class;
    }

    //Single case or not
    //true: This bean is a singleton, and a copy is saved in the container
    //false: multiple instances. A new Bean will be created for each acquisition
    @Override
    public boolean isSingleton() {
        return false;
    }
}
Write MainConfig
//The components in the class are set uniformly. Only when the current conditions are met can all bean registrations configured in this class take effect;
@Configuration
public class MainConfig5 {


    // Use the FactoryBean provided by Spring;
    //1) . by default, the object created by the factory bean calling getObject is obtained
    //2) To obtain the factory Bean itself, we need to add a & & colorfactorybean in front of the id

    @Bean
    public ColorFactoryBean colorFactoryBean(){
        return new ColorFactoryBean();
    }

}
Test:
@Test
public void test07() {
    ApplicationContext applicationContext = new AnnotationConfigApplicationContext(MainConfig5.class);
    //The Bean gets the object created by calling getObject
    Object bean = applicationContext.getBean("colorFactoryBean");
    Object bean2 = applicationContext.getBean("colorFactoryBean");
    System.out.println("bean2 is Type:"+bean2.getClass());
    System.out.println(bean==bean2);

    Object bean3 = applicationContext.getBean("&colorFactoryBean");
    System.out.println(bean3.getClass());
}
Operation results:
&&Summary: four ways to register components in a container
1) Package scanning + Component annotation (@ Controller/@Service/@Repository/@Component) [self written class]
2) , @ Bean [components in imported third-party packages]
3) , @ Import [quickly Import a component into the container]
- 1) , @ import (component to be imported into the container); This component will be automatically registered in the container, and the id is the full class name by default
- 2) , ImportSelector: returns the full class name array of the components to be imported
4) . use the FactoryBean provided by Spring;
-
1),The factory is obtained by default bean call getObject Created object
- 2) To obtain the factory Bean itself, we need to add a & & colorfactorybean in front of the id
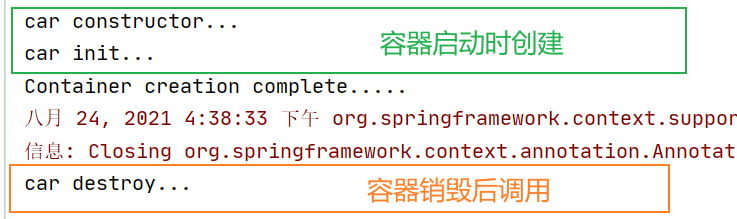
7. Life cycle
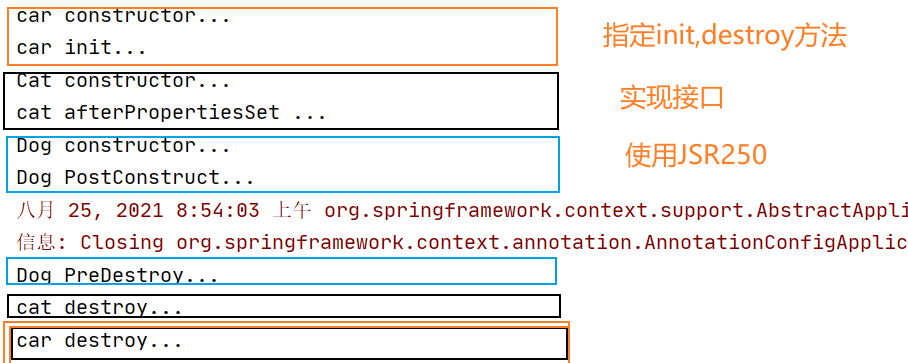
7.1 specifying initialization and destruction methods
Specify init method and destroy method through @ Bean, which is equivalent to in xml
<bean id="person" class="com.rg.domain.Person" init-method="XXX" destroy-method="XXX" >
Construction (object creation)
- Single instance: create objects when the container starts
- Multi instance: create an object every time you get it
Initialization: after the object is created and assigned, call the initialization method
Destruction:
- Single instance: when the container is closed
- Multi instance: the container will not manage this Bean, and the container will not call the destroy method
Write the mainconfigofflife class
@Configuration
public class MainConfigOfLifeCycle {

    @Scope("prototype")
    @Bean(initMethod="init",destroyMethod = "destroy")
    public Car car(){
        return new Car();
    }
}
Test:
@Test
public void test01(){
    AnnotationConfigApplicationContext applicationContext = new AnnotationConfigApplicationContext(MainConfigOfLifeCycle.class);
    System.out.println("Container creation complete.....");
    applicationContext.getBean("car");
    //Close the container
    applicationContext.close();
}
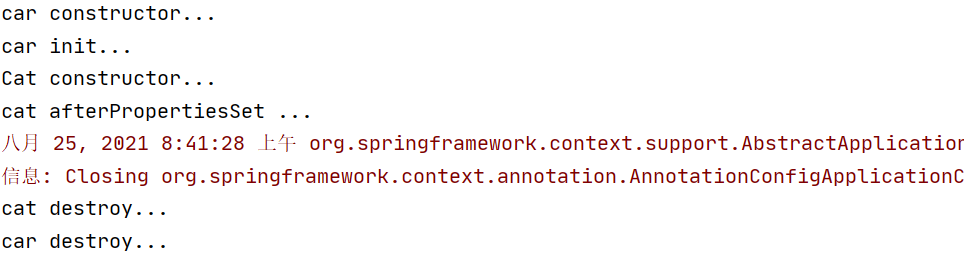
When it is a single instance:
When multiple instances:

7.2 define initialization logic
By enabling the Bean to implement InitializingBean (define initialization logic) and DisposableBean (define destruction logic);
Create Cat class and implement initializingbean and disposablebean interfaces
@Component
public class Cat implements InitializingBean, DisposableBean {

    public Cat(){
        System.out.println("Cat constructor...");
    }

    @Override
    public void destroy() throws Exception {
        System.out.println("cat destroy...");
    }

    @Override
    public void afterPropertiesSet() throws Exception {
        System.out.println("cat afterPropertiesSet ...");
    }
}
Mainconfigofflife configuration class
@Configuration
@ComponentScan("com.rg")
public class MainConfigOfLifeCycle {
 	@Bean(initMethod="init",destroyMethod = "destroy")
    public Car car(){
        return new Car();
    }
}
@Test
public void test01(){
    AnnotationConfigApplicationContext applicationContext = new AnnotationConfigApplicationContext(MainConfigOfLifeCycle.class);

    //Close the container
    applicationContext.close();
}
Operation results:
7.3 JSR250 can be used
@PostConstruct: after bean creation and attribute assignment are completed; To execute the initialization method
@PreDestroy: notify us to clean up before the container destroys the bean s
To create a Dog class:
@Component
public class Dog  {
    public Dog(){
        System.out.println("Dog constructor...");
    }

    //After the object is created and assigned, it is called.
    @PostConstruct
    public void init(){
        System.out.println("Dog PostConstruct...");
    }

    //Before removing objects from the container
    @PreDestroy
    public void destroy(){
        System.out.println("Dog PreDestroy...");
    }
}
Test:
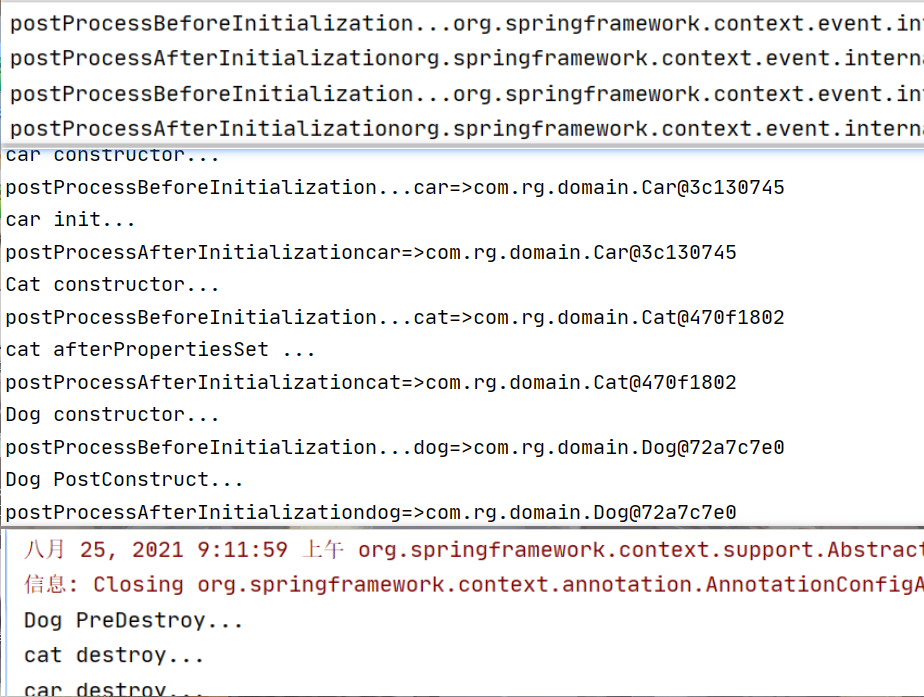
7.4BeanPostProcessor - post processor of bean
Do some processing before and after bean initialization;
postProcessBeforeInitialization: work before initialization
postProcessAfterInitialization: work after initialization
Create MyBeanPostProcessor and implement the BeanPostProcessor interface
/**
 * Post processor: process before and after initialization
 * Add the post processor to the container
 */
@Component
public class MyBeanPostProcessor implements BeanPostProcessor{


    @Override
    public Object postProcessBeforeInitialization(Object bean, String beanName) throws BeansException {
        System.out.println("postProcessBeforeInitialization..."+beanName+"=>"+bean);
        return bean;
    }

    @Override
    public Object postProcessAfterInitialization(Object bean, String beanName) throws BeansException {
        System.out.println("postProcessAfterInitialization"+beanName+"=>"+bean);
        return bean;
    }


}
Operation results:
BeanPostProcessor principle
populateBean(beanName, mbd, instanceWrapper);to bean Assign attributes
initializeBean
{
   applyBeanPostProcessorsBeforeInitialization(wrappedBean, beanName);
   invokeInitMethods(beanName, wrappedBean, mbd);Perform custom initialization
   applyBeanPostProcessorsAfterInitialization(wrappedBean, beanName);
}
The use of BeanPostProcessor in Spring bottom layer;
bean assignment, injection of other components, @ Autowired, lifecycle annotation function, @ Async,xxx BeanPostProcessor;
8.@Value
Function: assign values to attributes
- Basic value
- Can write spiel: #{}
- You can write ${}; Take out the value in the configuration file [properties] (the value in the running environment variable)
Person class
public class Person {
    //Assignment with @ Value
    //1. Basic value
    //2. You can write spiel: #{}
    //3. You can write ${}; Take out the value in the configuration file [properties] (the value in the running environment variable)

    @Value("zhangsan")
    private String name;
    @Value("#{20+1}")
    private Integer age;

    @Value("${person.nickName}")
    private String nickName;

    public String getNickName() {
        return nickName;
    }

    public void setNickName(String nickName) {
        this.nickName = nickName;
    }

    public String getName() {
        return name;
    }

    public void setName(String name) {
        this.name = name;
    }

    public Integer getAge() {
        return age;
    }

    public void setAge(Integer age) {
        this.age = age;
    }

    public Person(String name, Integer age) {
        this.name = name;
        this.age = age;
    }

    @Override
    public String toString() {
        return "Person{" +
                "name='" + name + '\'' +
                ", age=" + age +
                ", nickName='" + nickName + '\'' +
                '}';
    }

    public Person(){

    }
}
MainConfig configuration class:
//Use @ PropertySource to read the k/v in the external configuration file and save it to the running environment variable; After loading the external configuration file, use ${} to get the value of the configuration file
@PropertySource(value = {"classpath:person.properties"})
//@PropertySources(value = {@PropertySource({}),@PropertySource({})})
@Configuration
public class MainConfigOfPropertyValues {
    @Bean
    public Person person(){
        return new Person();
    }
}
test
@Test
public void test08(){
    AnnotationConfigApplicationContext applicationContext = new AnnotationConfigApplicationContext(MainConfigOfPropertyValues.class);
    Person person = (Person) applicationContext.getBean("person");
    System.out.println(person);

    Environment environment = applicationContext.getEnvironment();
    String value = environment.getProperty("person.nickName");//You can also get the attribute value of the configuration file through the environment
    System.out.println(value);
    applicationContext.close();
}
person.properties file
person.nickName=\u5C0F\u674E\u56DB
Operation results:

9. Automatic assembly
Spring uses dependency injection (DI) to complete the dependency assignment of each component in the IOC container;
nine 1@Autowired : automatic injection
1) . the default priority is to find the corresponding component in the container according to the type: ApplicationContext getBean(BookDao.class); Assign value when found
2) If multiple components of the same type are found, use the name of the attribute as the id of the component to find ApplicationContext in the container getBean(“bookDao”)
@Controller
public class BookController {
    @Autowired
    private BookService bookService;
}

@Service
public class BookService {
    @Autowired
    private BookDao bookDao;

    @Override
    public String toString() {
        return "BookService{" +
                "bookDao=" + bookDao +
                '}';
    }
}

// The default is lowercase
@Repository
public class BookDao {
    private String Label = "1";

    public String getLabel() {
        return Label;
    }

    public void setLabel(String label) {
        Label = label;
    }

    @Override
    public String toString() {
        return "BookDao{" +
                "Label='" + Label + '\'' +
                '}';
    }
}
@Configuration
@ComponentScan({"com.rg.service","com.rg.dao","com.rg.controller"})
public class MainConfigOfAutowired {
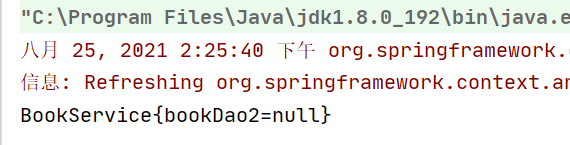
@Bean("bookDao2")
public BookDao bookDao(){
BookDao bookDao = new BookDao();
bookDao.setLabel("2");
return bookDao;
}
}
Test:
@Test
 public void test01(){
    AnnotationConfigApplicationContext applicationContext = new AnnotationConfigApplicationContext(MainConfigOfAutowired.class);
    //Get BookDao injected in BookService
    BookService bookService = applicationContext.getBean(BookService.class);

    //BookDao bean = applicationContext.getBean(BookDao.class);   Class cannot be used when there are multiple objects in IOC container Class to get the object
    //System.out.println(bean);
    System.out.println(bookService);
}
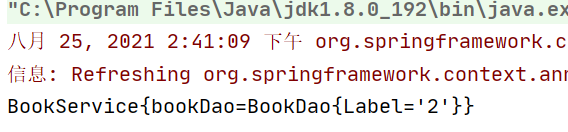
Operation results:
There are bookDao and bookDao2 in the IOC container. Because the required name under @ Autowired is bookDao, the bookDao object is registered in it If it is changed to bookDao2, the bookDao2 object is registered inside

3) Use @ Qualifier to specify the id of the component to be assembled instead of the default attribute name
BookService{
	  @Qualifier("bookDao2")
      @Autowired
      BookDao  bookDao;
}
In this way, bookDao2 is registered in bookDao
4) . the attribute must be assigned by default for automatic assembly, and an error will be reported if it is not assigned; By using @ Autowired(required=false); It can be registered sometimes and null when not
BookService{
	  @Qualifier("bookDao2")
      @Autowired(required = false)
      BookDao  bookDao;
}
5) , @ Primary: when Spring performs automatic assembly, the preferred bean is used by default; You can also continue to use @ Qualifier to specify the name of the bean to be assembled
BookService{
	  //@Qualifier("bookDao2")
      @Autowired(required = false)
      BookDao  bookDao;
}

@Repository
public class BookDao {
    ......
}


@Configuration
@ComponentScan({"com.rg.service","com.rg.dao","com.rg.controller"})
public class MainConfigOfAutowired {

    @Primary
    @Bean("bookDao2")
    public BookDao bookDao(){
        BookDao bookDao = new BookDao();
        bookDao.setLabel("2");
        return bookDao;
    }
}
When there is no Qualifier, adding @ Primary to BookDao will increase its priority and give priority to registering the object However, if there is a Qualifier at this time, it is determined by the name inside
6). Extension: Spring also supports the use of @ Resource(JSR250) and @ inject (jsr330) [Java specification annotation]
@Resource:
-
Can and@Autowired Realize the automatic assembly function; It is assembled by component name by default;
-
No one can support it@Primary Feature not supported@Autowired(reqiured=false);
@Inject:
-
Import required javax.inject My bag, and Autowired It has the same function. No, required=false The function of; support@Primary
@Autowired:Spring defined specification@ Resource and @ Inject are java specifications
Summary:
@Autowired can be used when there is only one IOC container This is determined by the name to be registered
@Autowired is often used with @ Qualifier; At this point, you can break the default and register the object specified by Qualifier
@Autowired can also annotate with @ Primary + other components (@ Bean,@Service,@Controller...), so as to improve its priority and be used first
9.2 extension: @ Autowired location:
@Autowired: constructor, parameter, method, attribute; Get the value of the parameter component from the container
1. Put it at the parameter position
1) , on property location or setter method
The default component added to the ioc container. When the container is started, it will call the parameterless constructor to create the object, and then perform operations such as initialization and assignment
@Component
public class Car {
	....
}
@Component
public class Boss {

    //@Autowired: attribute location
    private Car car;
    public Car getCar() {
        return car;
    }

    //When the Spring container creates the current object, it will call the method to complete the assignment
    //Method, and the custom type is obtained from the IOC container
    @Autowired//Methodologically
    public void setCar(Car car) {
        this.car = car;
    }

}
2) [mark on constructor]: if the component has only one constructor with parameters, @ Autowired of the constructor with parameters can be omitted, and the component with parameter position can still be automatically obtained from the container
@Component
public class Car {
	....
}
@Component
public class Boss {


    private Car car;

    @Autowired//Can be omitted
    public Boss(Car car){
        this.car = car;
        System.out.println("Boss Parametric constructor...");
    }

    public Car getCar() {
        return car;
    }


    public void setCar(Car car) {
        this.car = car;
    }

    @Override
    public String toString() {
        return "Boss{" +
                "car=" + car +
                '}';
    }
}
In the program: it will automatically call the Car in the parametric structure as Boss for assignment The Car in the IOC container is the same as the Car in the Boss
3) , [marked at method location]: @ Bean + method parameter; Parameters are obtained from the container; Don't write @ Autowired by default. The effect is the same; Can be assembled automatically
@Bean
@Autowired
public Color color(Car car){
    Color color = new Color();
    color.setCar(car);
    return color;
}
Note: parameters can be unloaded on the method, before or omitted
9.3@Profile
Spring provides us with the function of dynamically activating and switching a series of components according to the current environment;
For example, when we develop the environment, we automatically add the relevant components of development in the environment, when it is the test environment, we automatically add the relevant components of test, and when it is the generation environment, we automatically add the components of production
@Profile: Specifies the environment in which the component can be registered in the container. If it is not specified, the component can be registered in any environment
@Configuration
@PropertySource("classpath:/jdbc.properties")
public class MainConfigOfProfile implements EmbeddedValueResolverAware {


    private String driverClass;
    @Value("${jdbc.user}") // @value on attribute
    private String user;

    @Override
    public void setEmbeddedValueResolver(StringValueResolver resolver) {
        //this.resolver = resolver;
        driverClass = resolver.resolveStringValue("${jdbc.driver}");
    }

    @Bean
    public Yellow yellow(){
        return new Yellow();
    }

    @Bean("prodDataSource")
    @Profile("prod")
    //@Profile ("default") @ value is placed on the parameter
    public DataSource dataSourceProd(@Value("${jdbc.password}")String pwd) throws Exception {
        ComboPooledDataSource dataSource = new ComboPooledDataSource();
        dataSource.setUser("root");
        dataSource.setPassword(pwd);
        dataSource.setJdbcUrl("jdbc:mysql:///goods");
        dataSource.setDriverClass(driverClass);
        return dataSource;
    }

    @Profile("test")
    @Bean("testDataSource")
    public DataSource dataSourceTest(@Value("${jdbc.password}")String pwd) throws Exception {
        ComboPooledDataSource dataSource = new ComboPooledDataSource();
        dataSource.setUser("root");
        dataSource.setPassword(pwd);
        dataSource.setJdbcUrl("jdbc:mysql:///test");
        dataSource.setDriverClass(driverClass);
        return dataSource;
    }

    @Bean("devDataSource")
    @Profile("dev")
    public DataSource dataSourceDev(@Value("${jdbc.password}")String pwd) throws Exception {
        ComboPooledDataSource dataSource = new ComboPooledDataSource();
        dataSource.setUser("root");
        dataSource.setPassword(pwd);
        dataSource.setJdbcUrl("jdbc:mysql:///travel");
        dataSource.setDriverClass(driverClass);
        return dataSource;
    }

}
Supplement:
There are two ways to use a profile:
- Use @ PropertySource("classpath: / filename") with @ Value("key")
- Class implements embeddedvalueresolveaware through resolver Resolvestringvalue gets the value corresponding to the key
Test:
	 @Test
    public void test01(){
        //1. Use the command line dynamic parameters and add - dspring. In VM options of Edit Configurations profiles. active=test
        //2. Activate an environment by using code
        //1. Create an applicationContext
        AnnotationConfigApplicationContext applicationContext = new AnnotationConfigApplicationContext();
        //2. Set the environment to be activated
        //AnnotationConfigApplicationContext applicationContext = new AnnotationConfigApplicationContext(MainConfigOfProfile.class);
       applicationContext.getEnvironment().setActiveProfiles("dev","test");
       //3. Register the main configuration class
       applicationContext.register(MainConfigOfProfile.class);
       //4. Start the refresh container
        applicationContext.refresh();
        String[] names = applicationContext.getBeanNamesForType(DataSource.class);
        System.out.println(names);
        for (String name : names) {
            System.out.println(name);
        }
        applicationContext.close();
    }
Operation results:

2) Written on the configuration class, all configurations in the entire configuration class can take effect only when it is the specified environment
If @ Profile("test") is added to the class and the development environment is used, all configurations in it are invalid It will take effect only if it is consistent
3) . bean s without environment ID are loaded in any environment;
5, AOP principle
1.AOP function test
AOP: [dynamic agent]
It refers to the programming mode of dynamically cutting a piece of code into the specified position of the specified method during program operation;
Test steps:
1. Import aop module; Spring AOP: (spring-aspects)
2. Define a business logic class (MathCalculator); print the log when the business logic is running (before the method, after the method is running, when the method is abnormal, xxx)
3. Define a log aspects class: the methods in the aspects class need to dynamically perceive where MathCalculator.div runs and then execute;
Notification method:
-
Before advice (@Before): logStart: In target method(div)Run before run
-
Post notification(@After): logEnd: In target method(div)Run after running (whether the method ends normally or abnormally)
-
Return notification(@AfterReturning): logReturn: In target method(div)Run after normal return
-
Exception notification(@AfterThrowing): logException: In target method(div)Run after exception
-
Around Advice (@Around): Dynamic agent, manually advancing target method operation( joinPoint.procced())
4. Mark when and where to run the target method of the aspect class (notification annotation);
5. Add the aspect class and business logic class (the class where the target method is located) to the container;
6. Spring must be told which class is an aspect class (add an annotation to the aspect class: @ Aspect)
[7] Add @ EnableAspectJAutoProxy to the configuration class [enable annotation based aop mode]
There are many @ EnableXXX in Spring;
Target class MathCalculator:
public class MathCalculator {
   //Target method (method to be enhanced)
   public int div(int i,int j){
      System.out.println("MathCalculator...div...");
      return i/j;
   }
}
Section class:
/**
 * Section class
 * @Aspect:Tell Spring that this is a faceted class
 */
@Aspect
public class LogAspects {
    //Extract common pointcut expressions
    //1. References in this category
    //2. Other section references
    @Pointcut("execution(public int com.rg.aop.MathCalculator.*(..))")
    public void pointCut(){}

    //Cut in before the target method: cut in expression (specify which method to cut in)
    @Before("pointCut()")
    public void logStart(JoinPoint joinPoint){
        Object[] args = joinPoint.getArgs();
        System.out.println(joinPoint.getSignature().getName()+"Running...@Before:The parameter list is:"+ Arrays.asList(args));
    }

    //Final notice
    @After("com.rg.aop.LogAspects.pointCut()")
    public void logEnd(JoinPoint joinPoint){
        Object[] args = joinPoint.getArgs();
        System.out.println(joinPoint.getSignature().getName()+"end...@After:The parameter list is:"+Arrays.asList(args));
    }


    // Execute after post notification pointcuts
    @AfterReturning(value = "pointCut()",returning = "result")
    //JointPoint must appear first in the parameter table
    public void logRegurning(JoinPoint joinPoint,Object result){

        System.out.println(joinPoint.getSignature().getName()+"Normal return...Operation results:"+result);
    }

    @AfterThrowing(value = "pointCut()",throwing = "exception")
    public void logException(JoinPoint joinPoint,Exception exception){
        System.out.println(joinPoint.getSignature().getName()+"An exception occurred...Abnormal information:"+exception);
    }
}
Configuration class:
@EnableAspectJAutoProxy  //Enable annotation based AOP mode
@Configuration
public class MainConfigOfAOP {
    //Add business logic classes to the container
    @Bean
    public MathCalculator calculator(){
        return new MathCalculator();
    }

    //Adding faceted classes to containers
    @Bean
    public LogAspects logAspects(){
        return new LogAspects();
    }

}
Test:
@Test
public void test01(){
    AnnotationConfigApplicationContext applicationContext = new AnnotationConfigApplicationContext(MainConfigOfAOP.class);
    //Here, the MathCalculator object must be provided by Spring, because only the objects provided by Spring can have functions such as dynamic proxy
    // MathCalculator mathCalculator1 = new MathCalculator();
    // mathCalculator1.div();
    MathCalculator mathCalculator = applicationContext.getBean(MathCalculator.class);
    mathCalculator.div(1,1);
    applicationContext.close();
}
Operation results:

Summary:
- 1) . add business logic components and Aspect classes to the container; Tell Spring which Aspect class is (@ Aspect)
- 2) Note the notification annotation on each notification method on the aspect class to tell Spring when and where to run (pointcut expression)
- 3) Turn on the annotation based aop mode@ EnableAspectJAutoProxy
2. Principle of @ enableaspectjautoproxy (I)
1. Analyze @ EnableAspectJAutoProxy
@EnableAspectJAutoProxy
		↓
Import@Import(AspectJAutoProxyRegistrar.class)
            ↓
class AspectJAutoProxyRegistrar implements ImportBeanDefinitionRegistrar {
	AopConfigUtils.registerAspectJAnnotationAutoProxyCreatorIfNecessary(registry);
	//Register an AspectJAnnotationAutoProxyCreator
	...
}
			↓

registerOrEscalateApcAsRequired(AnnotationAwareAspectJAutoProxyCreator.class, registry, source);//Register or upgrade if needed

			↓
 if (registry.containsBeanDefinition(AUTO_PROXY_CREATOR_BEAN_NAME)) {//Judge whether auto is included_ PROXY_ CREATOR_ BEAN_ Name, definitely not at first. Don't enter
                BeanDefinition apcDefinition = registry.getBeanDefinition(AUTO_PROXY_CREATOR_BEAN_NAME);
                if (!cls.getName().equals(apcDefinition.getBeanClassName())) {
                    int currentPriority = findPriorityForClass(apcDefinition.getBeanClassName());
                    int requiredPriority = findPriorityForClass(cls);
                    if (currentPriority < requiredPriority) {
                        apcDefinition.setBeanClassName(cls.getName());
                    }
                }
                return null;
		}
RootBeanDefinition beanDefinition = new RootBeanDefinition(cls);//cls is the annotation awareaspectjautoproxycreator above, creating a RootBeanDefinition
//Set relevant properties for beanDefinition
beanDefinition.setSource(source);
beanDefinition.getPropertyValues().add("order", Ordered.HIGHEST_PRECEDENCE);
beanDefinition.setRole(BeanDefinition.ROLE_INFRASTRUCTURE);
//Register it in regist er Named AUTO_PROXY_CREATOR_BEAN_NAME= internalAutoProxyCreator
registry.registerBeanDefinition(AUTO_PROXY_CREATOR_BEAN_NAME, beanDefinition);
return beanDefinition;//return.
AUTO_PROXY_CREATOR_BEAN_NAME=internalAutoProxyCreator=cls
=AnnotationAwareAspectJAutoProxyCreator
Analysis result: register an annotation awareaspectjauto proxycreator in the container: the AspectJ facet automatic proxy creator of annotation assembly mode
Tip: if you encounter @ enable XXX annotation in the future Let's click in to see if there are @ Inport and other classes, and then analyze step by step to find out the final results of these operations
2. Inheritance system of annotationawareaspectjautoproxycreator:
AnnotationAwareAspectJAutoProxyCreator
	->AspectJAwareAdvisorAutoProxyCreator
		->AbstractAdvisorAutoProxyCreator
			->AbstractAutoProxyCreator
				implements SmartInstantiationAwareBeanPostProcessor, BeanFactoryAware
    		->ProxyProcessorSupport implements ordered...
    		->...
be careful:
XXXBeanPostProcessor post processor (do things before and after bean initialization)
BeanFactory aware: automatically assemble BeanFactory into container
3. Principle of @ enableaspectjautoproxy (II)
AbstractAutoProxyCreator:
set up BeanFactory:		setBeanFactory(☆)
Method of post processor        postProcessBeforeInstantiation(☆)
        			 postProcessAfterInitialization(☆)
        			 ↓
AbstractAdvisorAutoProxyCreator
 rewrite setBeanFactory(),And called within the method initBeanFactory()(☆)
					↓
AspectJAwareAdvisorAutoProxyCreator:There is no method associated with it
					↓
AnnotationAwareAspectJAutoProxyCreator:
	initBeanFactory()  Call and override the method of the parent class.(☆)
Therefore, we can debug on the above (the method marked with five pointed star) and the two methods in LogAspects: >
Debug process analysis:
1)Incoming configuration class,establish IOC container
... = new AnnotationConfigApplicationContext(MainConfigOfAOP.class);
			↓
 2)Register configuration class,call refresh Refresh container
     register(annotatedClasses);
	 refresh();=>call registerBeanPostProcessors method
3)registerBeanPostProcessors(beanFactory):register bean Post processor for,Convenient interception.
    1), obtain IOC All the objects that need to be created that have been defined in the container BeanPostProcessor
         String[] postProcessorNames = beanFactory.getBeanNamesForType(BeanPostProcessor.class, true, false);

		// Register BeanPostProcessorChecker that logs an info message when
		// a bean is created during BeanPostProcessor instantiation, i.e. when
		// a bean is not eligible for getting processed by all BeanPostProcessors.
		int beanProcessorTargetCount = beanFactory.getBeanPostProcessorCount() + 1 + postProcessorNames.length;
	2),Add something else to the container BeanPostProcessor
		beanFactory.addBeanPostProcessor(new BeanPostProcessorChecker(beanFactory, beanProcessorTargetCount));
		//Separate the BeanPostProcessors that implement the priorityordered, ordered, and rest interfaces
		// Separate between BeanPostProcessors that implement PriorityOrdered,
		// Ordered, and the rest.
		List<BeanPostProcessor> priorityOrderedPostProcessors = new ArrayList<>();
		List<BeanPostProcessor> internalPostProcessors = new ArrayList<>();
		List<String> orderedPostProcessorNames = new ArrayList<>();
		List<String> nonOrderedPostProcessorNames = new ArrayList<>();
		for (String ppName : postProcessorNames) {
			if (beanFactory.isTypeMatch(ppName, PriorityOrdered.class)) {
				BeanPostProcessor pp = beanFactory.getBean(ppName, BeanPostProcessor.class);
				priorityOrderedPostProcessors.add(pp);//If it is a PriorityOrdered type, it is added to the priorityOrderedPostProcessors collection In the same way
				if (pp instanceof MergedBeanDefinitionPostProcessor) {
					internalPostProcessors.add(pp);
				}
			}
			else if (beanFactory.isTypeMatch(ppName, Ordered.class)) {
				orderedPostProcessorNames.add(ppName);
			}
			else {
				nonOrderedPostProcessorNames.add(ppName);
			}
		}
		//Separation complete
 	3).Priority registration is realized PriorityOrdered Interfaced BeanPostProcessor
		// First, register the BeanPostProcessors that implement PriorityOrdered.
		sortPostProcessors(priorityOrderedPostProcessors, beanFactory);
		registerBeanPostProcessors(beanFactory, priorityOrderedPostProcessors);
	4).Then register the implementation in the container Order Interfaced BeanPostProcessor(What we focus on internalAutoProxyCreator Will enter here)
		// Next, register the BeanPostProcessors that implement Ordered.
		List<BeanPostProcessor> orderedPostProcessors = new ArrayList<>();
		for (String ppName : orderedPostProcessorNames) {
            //6. Registering a BeanPostProcessor is actually creating a BeanPostProcessor object and saving it into a container
            // Register the beanpostprocessor according to the name (this process is very difficult, and you can debug each step yourself.)
			BeanPostProcessor pp = beanFactory.getBean(ppName, BeanPostProcessor.class);
			orderedPostProcessors.add(pp);
			if (pp instanceof MergedBeanDefinitionPostProcessor) {
				internalPostProcessors.add(pp);
			}
		}
		sortPostProcessors(orderedPostProcessors, beanFactory);
	7).hold BeanPostProcessor Register to BeanFactory in.The underlying principle is:beanFactory.addBeanPostProcessor(postProcessor);

		registerBeanPostProcessors(beanFactory, orderedPostProcessors);
	5).Register a common that does not implement the priority interface BeanPostProcessors
		// Now, register all regular BeanPostProcessors.
		List<BeanPostProcessor> nonOrderedPostProcessors = new ArrayList<>();
		for (String ppName : nonOrderedPostProcessorNames) {

			BeanPostProcessor pp = beanFactory.getBean(ppName, BeanPostProcessor.class);
			nonOrderedPostProcessors.add(pp);
			if (pp instanceof MergedBeanDefinitionPostProcessor) {
				internalPostProcessors.add(pp);
			}
		}
		registerBeanPostProcessors(beanFactory, nonOrderedPostProcessors);

		// Finally, re-register all internal BeanPostProcessors.
		sortPostProcessors(internalPostProcessors, beanFactory);

		registerBeanPostProcessors(beanFactory, internalPostProcessors);

		// Re-register post-processor for detecting inner beans as ApplicationListeners,
		// moving it to the end of the processor chain (for picking up proxies etc).

		beanFactory.addBeanPostProcessor(new ApplicationListenerDetector(applicationContext));)
Summary of the process of creating and registering AnnotationAwareAspectJAutoProxyCreator:
 * 		1),Incoming configuration class, creating ioc container
 * 		2),Register the configuration class and call refresh()Refresh container;
 * 		3),registerBeanPostProcessors(beanFactory);register bean Post processor to facilitate interception bean Creation of;
 * 			1),Get first ioc The container has defined all the objects that need to be created BeanPostProcessor
 * 			2),Add something else to the container BeanPostProcessor
 * 			3),Priority registration is realized PriorityOrdered Interfaced BeanPostProcessor;
 * 			4),Then register the implementation in the container Ordered Interfaced BeanPostProcessor;
 * 			5),Register that does not implement the priority interface BeanPostProcessor;
 * 			6),register BeanPostProcessor,It's actually creating BeanPostProcessor Object, saved in a container;
 * 				establish internalAutoProxyCreator of BeanPostProcessor[AnnotationAwareAspectJAutoProxyCreator]
 * 				1),establish Bean Examples of
 * 				2),populateBean;to bean Assignment of various attributes of
 * 				3),initializeBean: initialization bean;
 * 						1),invokeAwareMethods(): handle Aware Method callback of interface
 * 						2),applyBeanPostProcessorsBeforeInitialization(): Application of post processor postProcessBeforeInitialization()
 * 						3),invokeInitMethods();Execute custom initialization methods
 * 						4),applyBeanPostProcessorsAfterInitialization();Execute post processor postProcessAfterInitialization();
 * 				4),BeanPostProcessor(AnnotationAwareAspectJAutoProxyCreator)Successfully created;-->aspectJAdvisorsBuilder
 * 			7),hold BeanPostProcessor Register to BeanFactory Medium;
 * 				beanFactory.addBeanPostProcessor(postProcessor);
 * =======The above is creation and registration AnnotationAwareAspectJAutoProxyCreator Process of========
cessors(beanFactory, nonOrderedPostProcessors);
	// Finally, re-register all internal BeanPostProcessors.
	sortPostProcessors(internalPostProcessors, beanFactory);

	registerBeanPostProcessors(beanFactory, internalPostProcessors);

	// Re-register post-processor for detecting inner beans as ApplicationListeners,
	// moving it to the end of the processor chain (for picking up proxies etc).

	beanFactory.addBeanPostProcessor(new ApplicationListenerDetector(applicationContext));)
<font color=green><b>Create and register AnnotationAwareAspectJAutoProxyCreator Process summary:</b></font>
-
1),Incoming configuration class, creating ioc container
-
2),Register the configuration class and call refresh()Refresh container;
-
3),registerBeanPostProcessors(beanFactory);register bean Post processor to facilitate interception bean Creation of;
-
1),Get first ioc The container has defined all the objects that need to be created BeanPostProcessor
-
2),Add something else to the container BeanPostProcessor
-
3),Priority registration is realized PriorityOrdered Interfaced BeanPostProcessor;
-
4),Then register the implementation in the container Ordered Interfaced BeanPostProcessor;
-
5),Register that does not implement the priority interface BeanPostProcessor;
-
6),register BeanPostProcessor,It's actually creating BeanPostProcessor Object, saved in a container;
-
establish internalAutoProxyCreator of BeanPostProcessor[AnnotationAwareAspectJAutoProxyCreator]
-
1),establish Bean Examples of
-
2),populateBean;to bean Assignment of various attributes of
-
3),initializeBean: initialization bean;
-
1),invokeAwareMethods(): handle Aware Method callback of interface
-
2),applyBeanPostProcessorsBeforeInitialization(): Application of post processor postProcessBeforeInitialization()
-
3),invokeInitMethods();Execute custom initialization methods
-
4),applyBeanPostProcessorsAfterInitialization();Execute post processor postProcessAfterInitialization();
-
4),BeanPostProcessor(AnnotationAwareAspectJAutoProxyCreator)Successfully created;-->aspectJAdvisorsBuilder
-
7),hold BeanPostProcessor Register to BeanFactory Medium;
-
beanFactory.addBeanPostProcessor(postProcessor);
- =The above is the process of creating and registering AnnotationAwareAspectJAutoProxyCreator==