SpringBoot is a very popular scaffold at present. It can be seen from the name that it is encapsulated based on the Spring framework. I believe everyone should be able to give some reasons for using it and know some of its features or advantages, but how does its bottom support these features? Today, let's learn how it works at the bottom. First, let's take a look at how the official website introduces SpringBoot
-
Create stand-alone Spring applications # can create Spring applications independently
-
Embedded Tomcat, jetty or undertow directly (no need to deploy war files) is embedded with Tomcat, jetty and other servers, and there is no need to deploy war packaging files
-
Provide optionated 'starter' dependencies to simplify your build configuration provides some starter dependencies to simplify application configuration
-
Automatically configure Spring and 3rd party libraries whenever possible
-
Provide production ready features such as metrics, health checks, and externalized configuration encapsulates some functions, such as monitoring, health checks, and so on
-
Absolutely no code generation and no requirement for XML configuration the project can be configured without XML configuration and code generation
This time, in order to better sort out the features of SpringBoot, I'm going to let you know more about SpringBoot from the use of SpringBoot and some source code analysis
SpringBoot is easy to use
The use of SpringBoot is very simple. You only need to reference the package and annotate it. This is consistent with its first feature, that is, it can be used independently without configuration. Now how many friends remember to configure Dispatcher, Servlet path, Service and Listener when configuring SpringMVC. You can do nothing in SpringBoot. You just need to introduce the package, Then the main function starts or inherits the SpringBootServletInitializer, and a complete MVC project is initialized. I won't talk about how to start it. Let's take a look at the official configuration steps https://spring.io/quickstart I believe everyone is the kind who can see it at a glance.
The key codes are as follows:
<dependency>
  <groupId>org.springframework.boot</groupId>
  <artifactId>spring-boot-starter-web</artifactId>
</dependency>
@SpringBootApplication
public class Application {
public static void main(String[] args) {
SpringApplication.run(Application.class, args);
}
}With such a simple configuration, you can start the project. But while enjoying the convenience brought by SpringBoot, have you considered how to implement it? Today I'll take you to understand these features of SpringBoot in principle.
There are many posts on the Internet that introduce the SpringBoot application, which is very convenient and has a built-in Tomcat container. However, few people talk about how SpringBoot does this. Today, let's start with the embedded container feature to analyze SpringBoot
Spring embedded container
In fact, when it comes to the embedded Tomcat container, you can start talking about Tomcat. Tomcat is also a container developed by java language that meets the Servlet specification. Why can't Nginx or Apache be used as a container for Java EE? Because they are not implemented according to the Servlet specification. Also meeting the Servlet specification are the implementations of Jetty, Undertow and so on. Later, we can give you a container comparison article.
Since Tomcat is written in Java and has been developed in the Apache foundation for many years, the project is very mature and standardized. According to our understanding, a server class or interface should be abstracted. For example, the expectation is this
Server tomcatServer = new Server(port, path);
What a coincidence. In fact, Tomcat has actually done so, and the reading comprehension is also very high.
<dependency>
      <groupId>org.apache.tomcat.embed</groupId>
      <artifactId>tomcat-embed-core</artifactId>
      <version>8.5.55</version>
    </dependency>
    <dependency>
      <groupId>org.apache.tomcat</groupId>
      <artifactId>tomcat-servlet-api</artifactId>
      <version>8.5.55</version>
    </dependency>
    <dependency>
      <groupId>javax.servlet</groupId>
      <artifactId>javax.servlet-api</artifactId>
      <version>3.1.0</version>
      <scope>provided</scope>
    </dependency>
    <dependency>
      <groupId>org.apache.tomcat</groupId>
      <artifactId>tomcat-jasper</artifactId>
      <version>8.5.55</version>
</dependency>
public class Tomcat {
    protected Server server;
    protected int port = 8080;
    protected String hostname = "localhost";
    protected String basedir;
    // Omit some attributes
    public Tomcat() {
        ExceptionUtils.preload();
    }
    // Omit get/set
    public Context addWebapp(String contextPath, String docBase) {
        return this.addWebapp(this.getHost(), contextPath, docBase);
    }
}
Then we will try to embed Tomcat in non SpringBoot projects to simulate the functions of SpringBoot according to the methods provided by it
public class SpringApplication {
// Simulate SpringBoot boot boot container
public static void main(String[] args) throws LifecycleException {
SpringApplication.run();
}
public static void run() throws LifecycleException {
Tomcat tomcat = new Tomcat();
tomcat.setPort(1010);
tomcat.start();
Context context = tomcat.addContext("/", "/Users/Lee/WorkSpace/zysDemo2/src/main/webapp");
tomcat.addServlet("/", "dispathcher", new DispatcherServlet());
//Match all accesses
context.addServletMappingDecoded("/*", "dispathcher");
tomcat.getServer().await();
}
}
Then let's look at how servlets are implemented
public class DispatcherServlet implements Servlet {
@Override
public void service(ServletRequest req, ServletResponse resp) throws ServletException, IOException {
HttpServletRequest servletRequest = (HttpServletRequest) req;
String requestURI = servletRequest.getRequestURI();
System.out.println("Current request URI: "+requestURI);
System.out.println("Current request parameters:"+ JSON.toJSONString(servletRequest.getParameterMap()));
}
// Omit some methods
}
Then I requested my server on the browser and got the following results
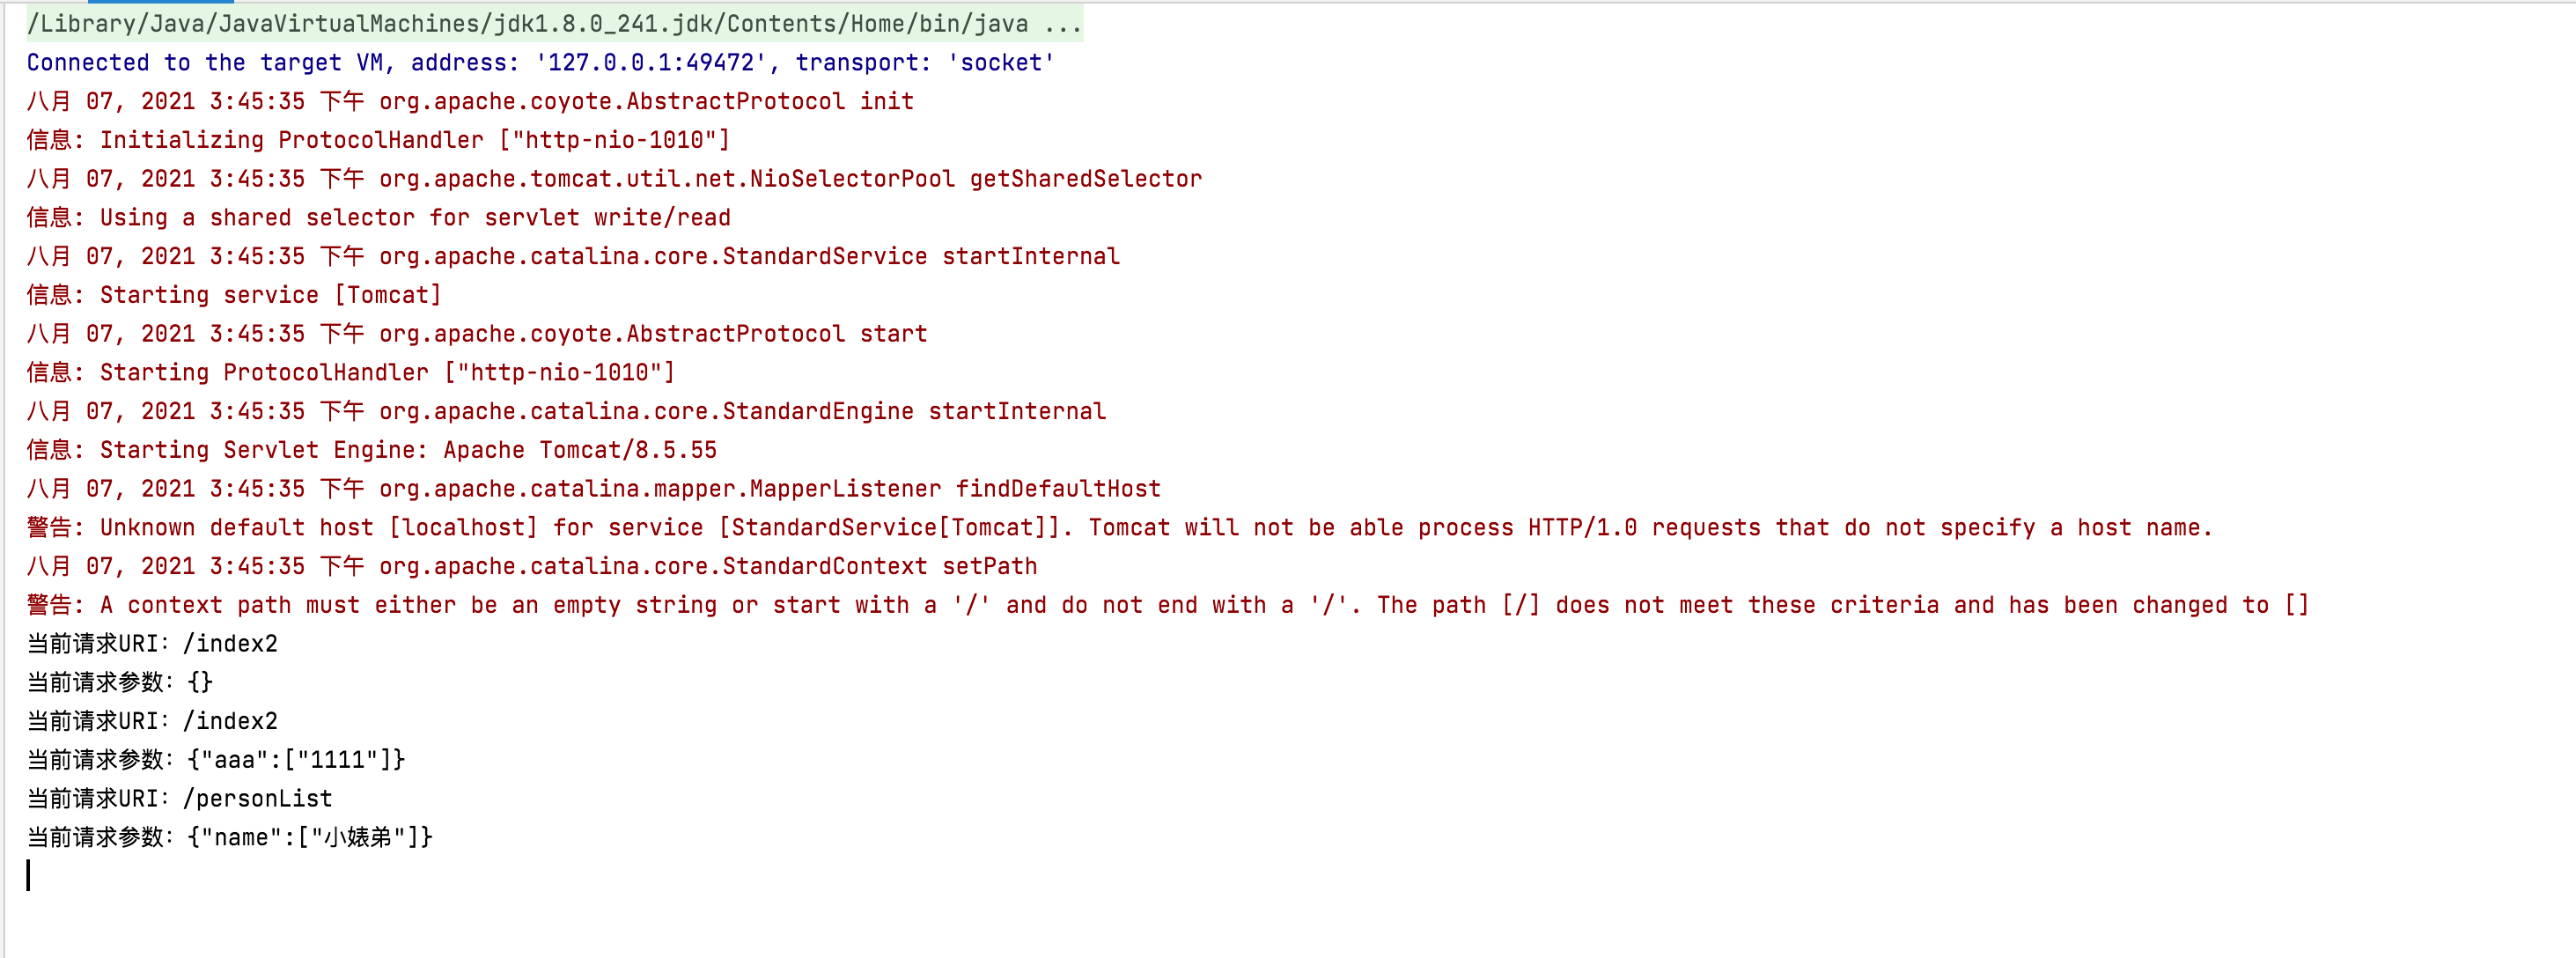
Friends with a little experience feel enlightened when they see it here. I specially define the name of Servlet as dispatcher Servlet and output the URI, leaving you some imagination space. You can imagine whether you can expand it? For example, when initializing, the URI is key, and the class is stored in the map as value. When the request comes, get the class from the map according to the URI, and then use reflection to call the method. Is this similar to simple spring MVC logic? Embedded Tomcat is roughly this logic, and Jetty and Undertow have similar ideas. So how to implement the SpringBoot source code? I'll paste the code directly. There is such a method in tomcatservlet webserverfactory
public WebServer getWebServer(ServletContextInitializer... initializers) {
if (this.disableMBeanRegistry) {
Registry.disableRegistry();
}
Tomcat tomcat = new Tomcat();
File baseDir = this.baseDirectory != null ? this.baseDirectory : this.createTempDir("tomcat");
tomcat.setBaseDir(baseDir.getAbsolutePath());
Connector connector = new Connector(this.protocol);
connector.setThrowOnFailure(true);
tomcat.getService().addConnector(connector);
this.customizeConnector(connector);
tomcat.setConnector(connector);
tomcat.getHost().setAutoDeploy(false);
this.configureEngine(tomcat.getEngine());
Iterator var5 = this.additionalTomcatConnectors.iterator();
while(var5.hasNext()) {
Connector additionalConnector = (Connector)var5.next();
tomcat.getService().addConnector(additionalConnector);
}
this.prepareContext(tomcat.getHost(), initializers);
return this.getTomcatWebServer(tomcat);
}Is it very similar to what I simulated.
Spring simplified configuration
The simplified configuration should be the biggest highlight of SpringBoot, Let's first mention automated configuration: SpringBoot automated configuration is to configure the components that need to be integrated with Spring. Bean s are loaded into the SpringIOC container when SpringBoot starts up after introducing the relevant Starter package according to the standard specification. Developers only need to configure component parameters according to the template to achieve the purpose of component integration.
Speaking of this simplified configuration, I am deeply touched. For historical reasons, my old employer first used webService. A lot of configurations, such as multiple service master libraries, multiple service slave libraries, redis, oss, etc., will be added from time to time with the development of the business, and then various configuration parameters will be modified and copied. Some businesses need 123 configuration and some businesses need 456 configuration, The most fatal thing is that more than 20 online applications need to switch if the database is hung. Haha, it's terrible to think about so many configurations to be modified. We have encountered no less than three accidents because the cloud manufacturer's database is hung to modify the configuration. There are also many problems of wrong replication, wrong configuration and wrong configuration. Later, we used the springboot scaffold to extract all the parameters of the configuration class into a snapshot version of the jar package. We only need to add annotations as needed to meet the functions, just like building blocks to assemble the required configuration. One advantage is that this key configuration is a black box for development and only focuses on business in business development, If we encounter the above temporary database migration, we can directly adjust and restart with the configuration center. The specific effects are as follows.
@SpringBootApplication
@EnableAdminDB
@EnableErpDB
@EnableBizDB
@EnableRedis
@EnableOSS
@EnableSlaveDB
public class Application {
public static void main(String[] args) {
SpringApplication.run(Application.class, args);
}
}Next, let's talk in detail about how SpringBoot helps us simplify the configuration? To understand the principle of SpirngBoot, you must first have the experience of Spring, especially the life cycle of Spring ', and then say so much from the above. First, you may pay attention to the @ SpringBootApplication annotation. There are many interview questions about this annotation. For example, what is the use of this annotation and how does SpringBoot use this annotation? Which life cycle stage does Spring belong to? The head is big and small. The interviewer will really set up one set after another
First, analyze @ SpringBootApplication, click this annotation and find that it is a composite annotation composed of multiple annotations. The key codes of @ SpringBootConfiguration,@EnableAutoConfiguration,@ComponentScan are shown below
// Omit other information
@SpringBootConfiguration
@EnableAutoaConfiguration
@ComponentScan(
    excludeFilters = {@Filter(
    type = FilterType.CUSTOM,
    classes = {TypeExcludeFilter.class}
), @Filter(
    type = FilterType.CUSTOM,
    classes = {AutoConfigurationExcludeFilter.class}
)}
)
public @interface SpringBootApplication {
  // Omit other information
}
The @ ComponentScan is very simple. It is a component configured by the component scanning package. Do you remember when < ComponentScan / > was configured in XML? Here is as like as two peas in XML, and a careful little buddy may ask: in XML, configuration will specify the registration, but SpringBoot is not specified. In springboot, this component scans the package annotation. If the package is not specified, it scans the annotation in the current package and sub package of the configuration class by default.
SpringBootConfiguration annotation
@The SpringBootConfiguration component clicks in and finds another @ Configuration indicating that the current class will be declared as a Configuration class, which will be scanned and processed by Spring as a Configuration class
@The annotation EnableAutoaConfiguration is a big play, in which @ AutoConfigurationPackage and import an AutoConfigurationImportSelector class. Briefly, the function of @ AutoConfigurationPackage annotation is to scan the class with this annotation or the class with the specified package. If no package is specified, the class of the annotation will be scanned by default. Curious friends will certainly ask what is the difference between this annotation and @ ComponentScan?
Let me distinguish it with my personal understanding
-
Both annotations are objects that can scan annotations such as @ controller, @ Service and @ Bean and inject them into Spring's IOC container
-
@ComponentScan is the annotation provided by Spring in the Context package, and @ AutoConfigurationPackage is the newly added annotation of SpringBoot
-
The scanned objects are a little different, @ ComponentScan scans the specified package or specified Class. If not specified, scan from the package and sub package of the annotated Class, while @ AutoConfigurationPackage specifies the package or specified Class. If not specified, scan from the annotated Class and cannot scan the sub package Class
AutoConfigurationImportSelector class
This class is the core class of SpringBoot automatic configuration. It is a class imported by @ EnableAutoConfiguration annotation. I don't know your Spring source code skills. Are you sensitive to Import? It's very deep here. Maybe you have to bear it 🤪, However, I will draw a flowchart at the end of the chapter to let you have a clearer understanding of how SpringBoot is configured automatically.
The Import component is a component provided by the Spring framework. I think it is an extension port. You can fill in a Class array in the annotation and inject this Class into the IOC container as a Bean. There are roughly three usage scenarios. The implementation classes of ordinary general classes, ImportSelector and ImportBeanDefinitionRegistrar, are introduced. As I mentioned above, I made extensive use of @ Import annotation in the separation of component configuration in my last company. The detailed use of Import and DEMO will be explained separately next time. This time, I won't explain too much, just explain it briefly, and then introduce it into the implementation Class of ImportSelector, because SpringBoot uses this method.
 * <p>Provides functionality equivalent to the {@code <import/>} element in Spring XML.
 * Allows for importing {@code @Configuration} classes, {@link ImportSelector} and
 * {@link ImportBeanDefinitionRegistrar} implementations, as well as regular component
 * classes (as of 4.2; analogous to {@link AnnotationConfigApplicationContext#register}).
 *
// The key is this comment, which means that the Import annotation provides a < Import / > function equivalent to XML. It allows the introduction of @ Configuration, ImportSelector, / / ImportBeanDefinitionRegistrar interfaces. It can also be used as a regular component. The function of this annotation is similar to
//AnnotationConfigApplicationContext#register.  This comment tells us how to use Import, which roughly refers to the common class, ImportSelector
//Implementation class of ImportBeanDefinitionRegistrar
// Omit some notes
@Target(ElementType.TYPE)
@Retention(RetentionPolicy.RUNTIME)
@Documented
public @interface Import {

	/**
	 * {@link Configuration @Configuration}, {@link ImportSelector},
	 * {@link ImportBeanDefinitionRegistrar}, or regular component classes to import.
	 */
	Class<?>[] value();

}
SpringBoot is a bit of a black box in the use of Import. Let's look at the definition first
public interface ImportSelector {
String[] selectImports(AnnotationMetadata var1);
@Nullable
default Predicate<String> getExclusionFilter() {
return null;
}
}Just one ImportSelector interface seems to be a simple interface and two methods, not a black box, but springBoot uses the DeferredImportSelector interface, which is a sub interface of ImportSelector. The logic of this interface is that when spring is called, it will be called according to whether you implement the Group interface. If you do not implement the Group, ImportSelector is no different in normal times, Spring will call getExclusionFilter() and then selectImports() method. However, if the Group interface is implemented, spring will call the process and selectImports() of the Group interface. The specific running steps may not be mapped one by one. I'll post some key figures. Then draw the finishing flow chart at the end
public void process(AnnotationMetadata annotationMetadata, DeferredImportSelector deferredImportSelector) {
AutoConfigurationImportSelector.AutoConfigurationEntry autoConfigurationEntry = ((AutoConfigurationImportSelector)deferredImportSelector).getAutoConfigurationEntry(annotationMetadata);
this.autoConfigurationEntries.add(autoConfigurationEntry);
Iterator var4 = autoConfigurationEntry.getConfigurations().iterator();
while(var4.hasNext()) {
String importClassName = (String)var4.next();
this.entries.putIfAbsent(importClassName, annotationMetadata);
}
}
protected List<String> getCandidateConfigurations(AnnotationMetadata metadata, AnnotationAttributes attributes) {
List<String> configurations = SpringFactoriesLoader.loadFactoryNames(this.getSpringFactoriesLoaderFactoryClass(), this.getBeanClassLoader());
Assert.notEmpty(configurations, "No auto configuration classes found in META-INF/spring.factories. If you are using a custom packaging, make sure that file is correct.");
return configurations;
}See meta-inf / spring Factories this configuration file, very excited, isn't it. Then enter the loadFactoryNames method to see what happened
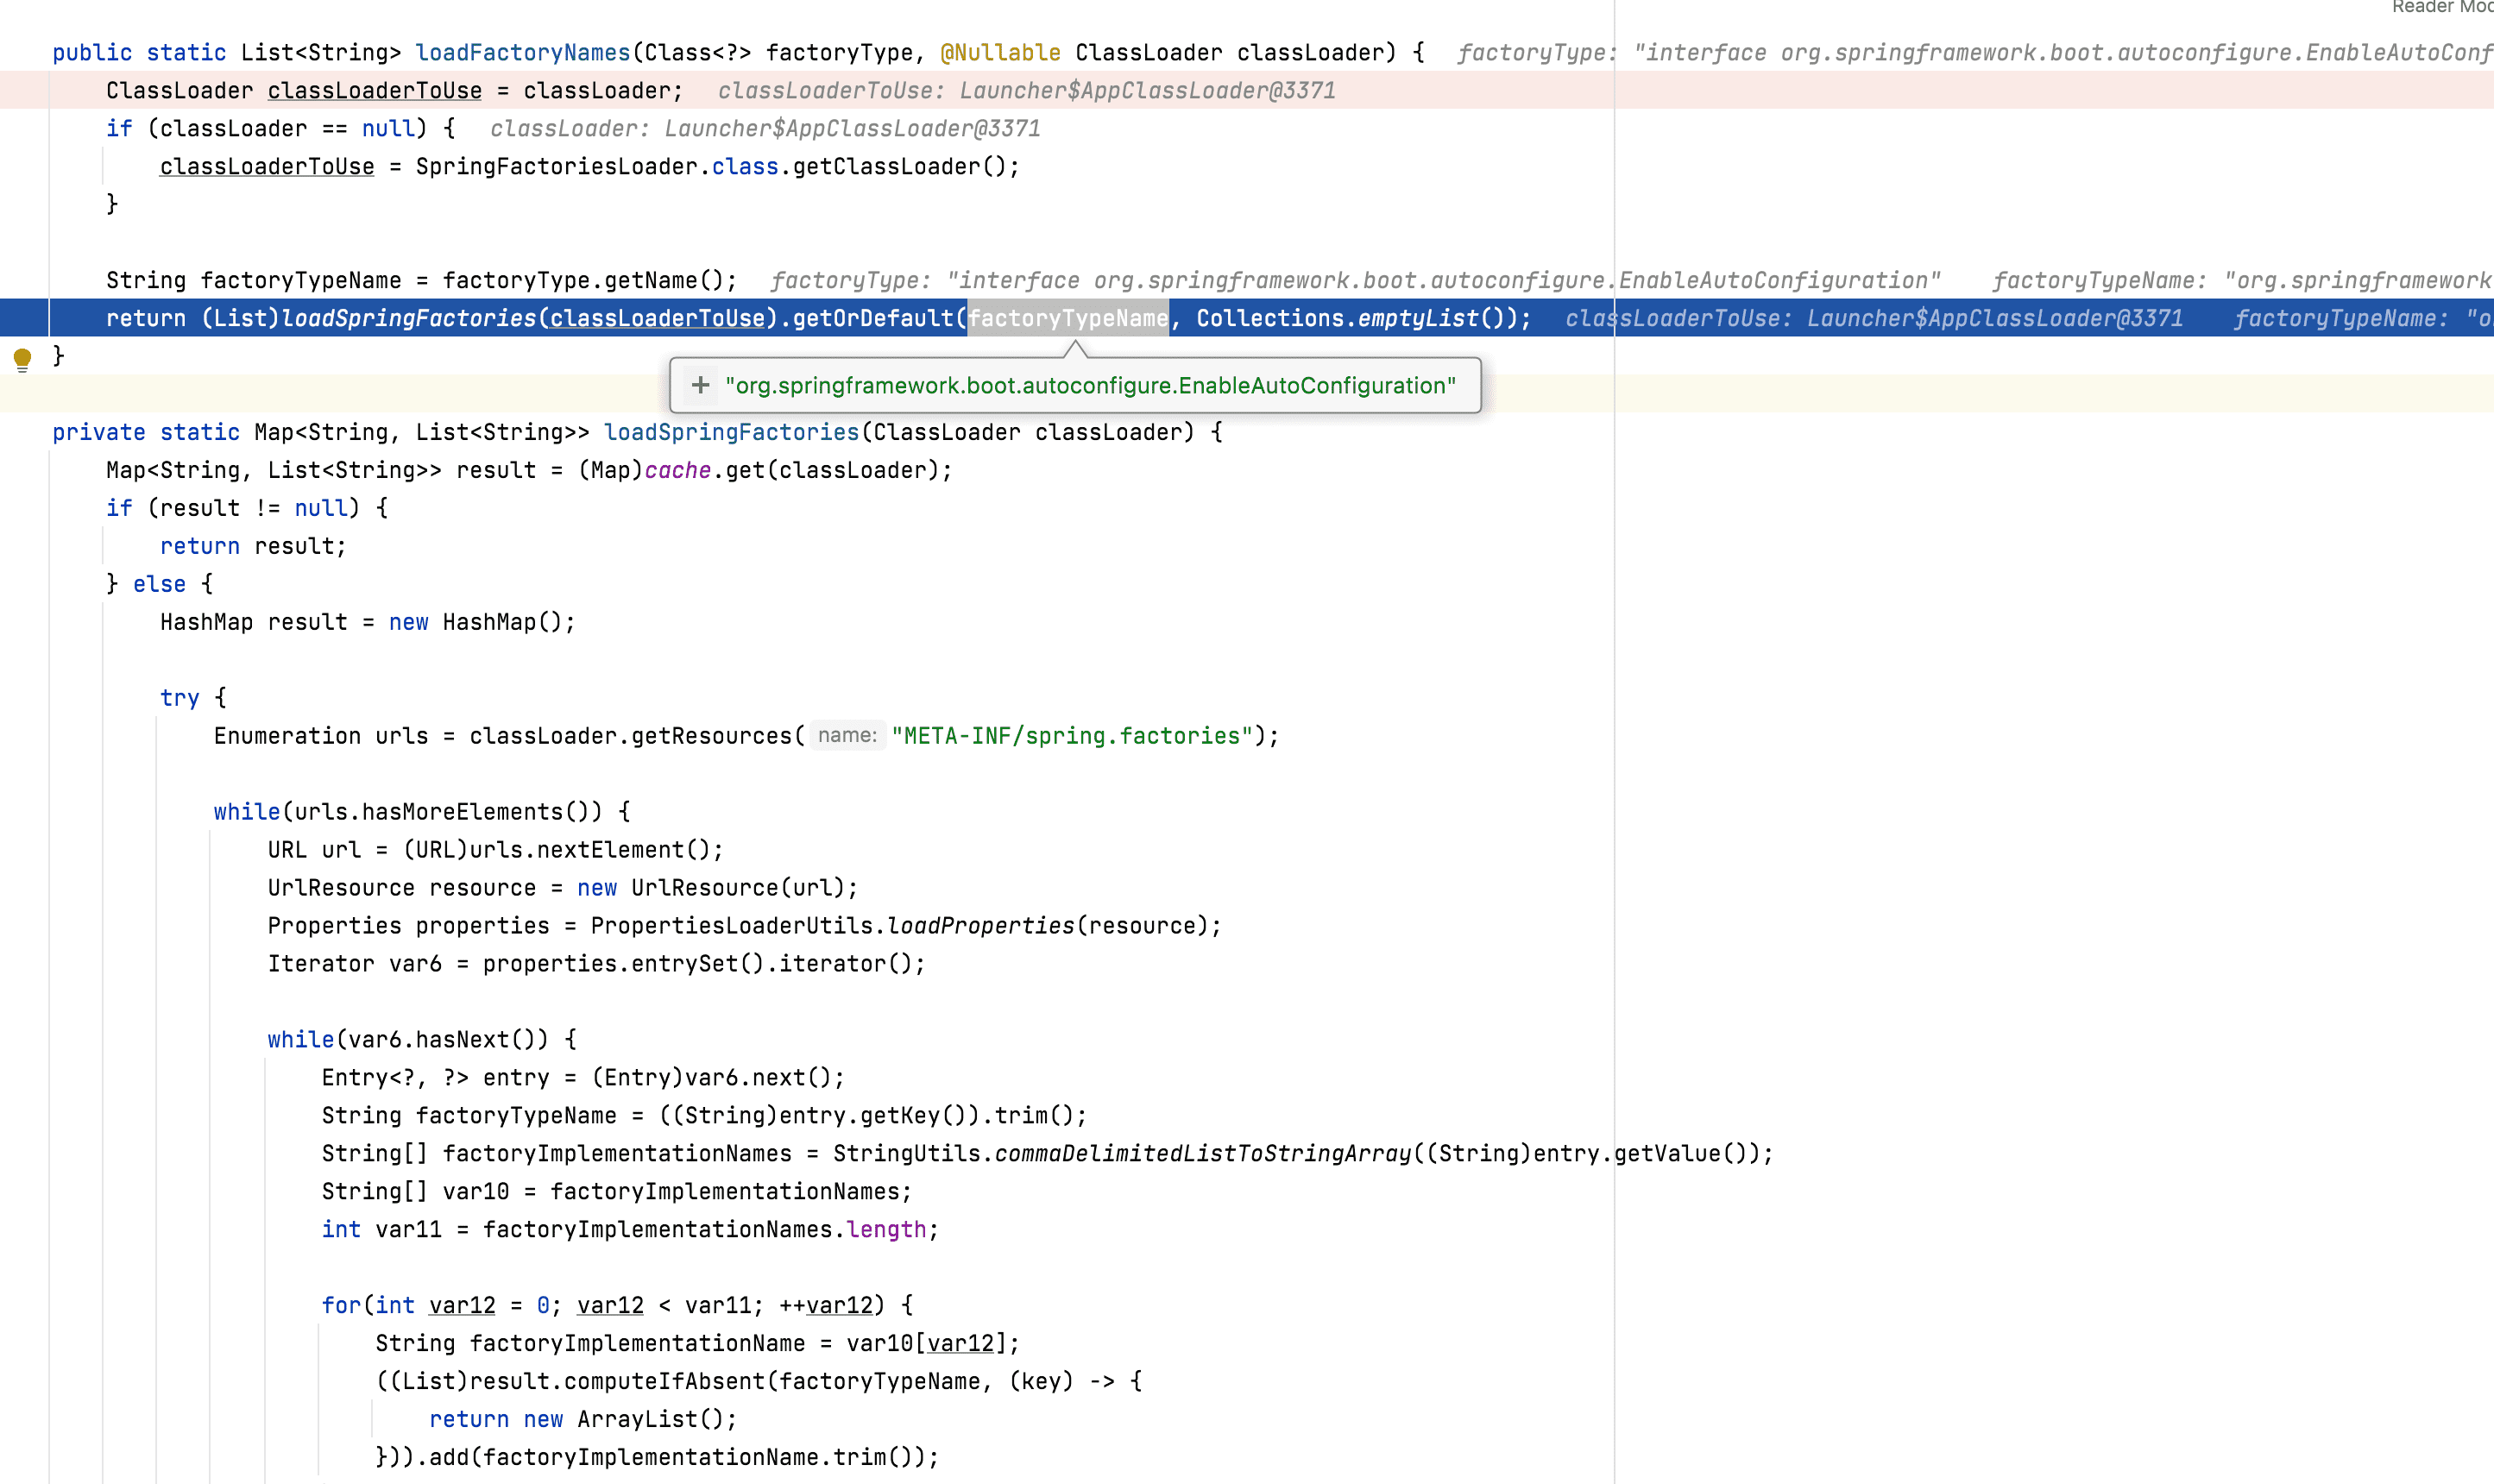
Seeing this, many small partners generally understand why many blogs say that the list of automatic configuration of SpringBoot is in meta-inf / spring In the factories file! But really read spring The process of reading the factories file is not here, and it is not the first time to read it when the AutoConfigurationImportSelector class is introduced. The real place to read this configuration file is org springframework. boot. Spring application #getbootstrap registryinitializers from spring factories has not started its life cycle at this time. After reading, it is stored in the cache in the format of key value, but the configuration beans that are not required for automatic configuration are read at startup, When processing the Import annotation, the String array read from the cache is the full class name for automatic configuration.
Below I post some class names for all default assemblies of SpringBoot automation assembly
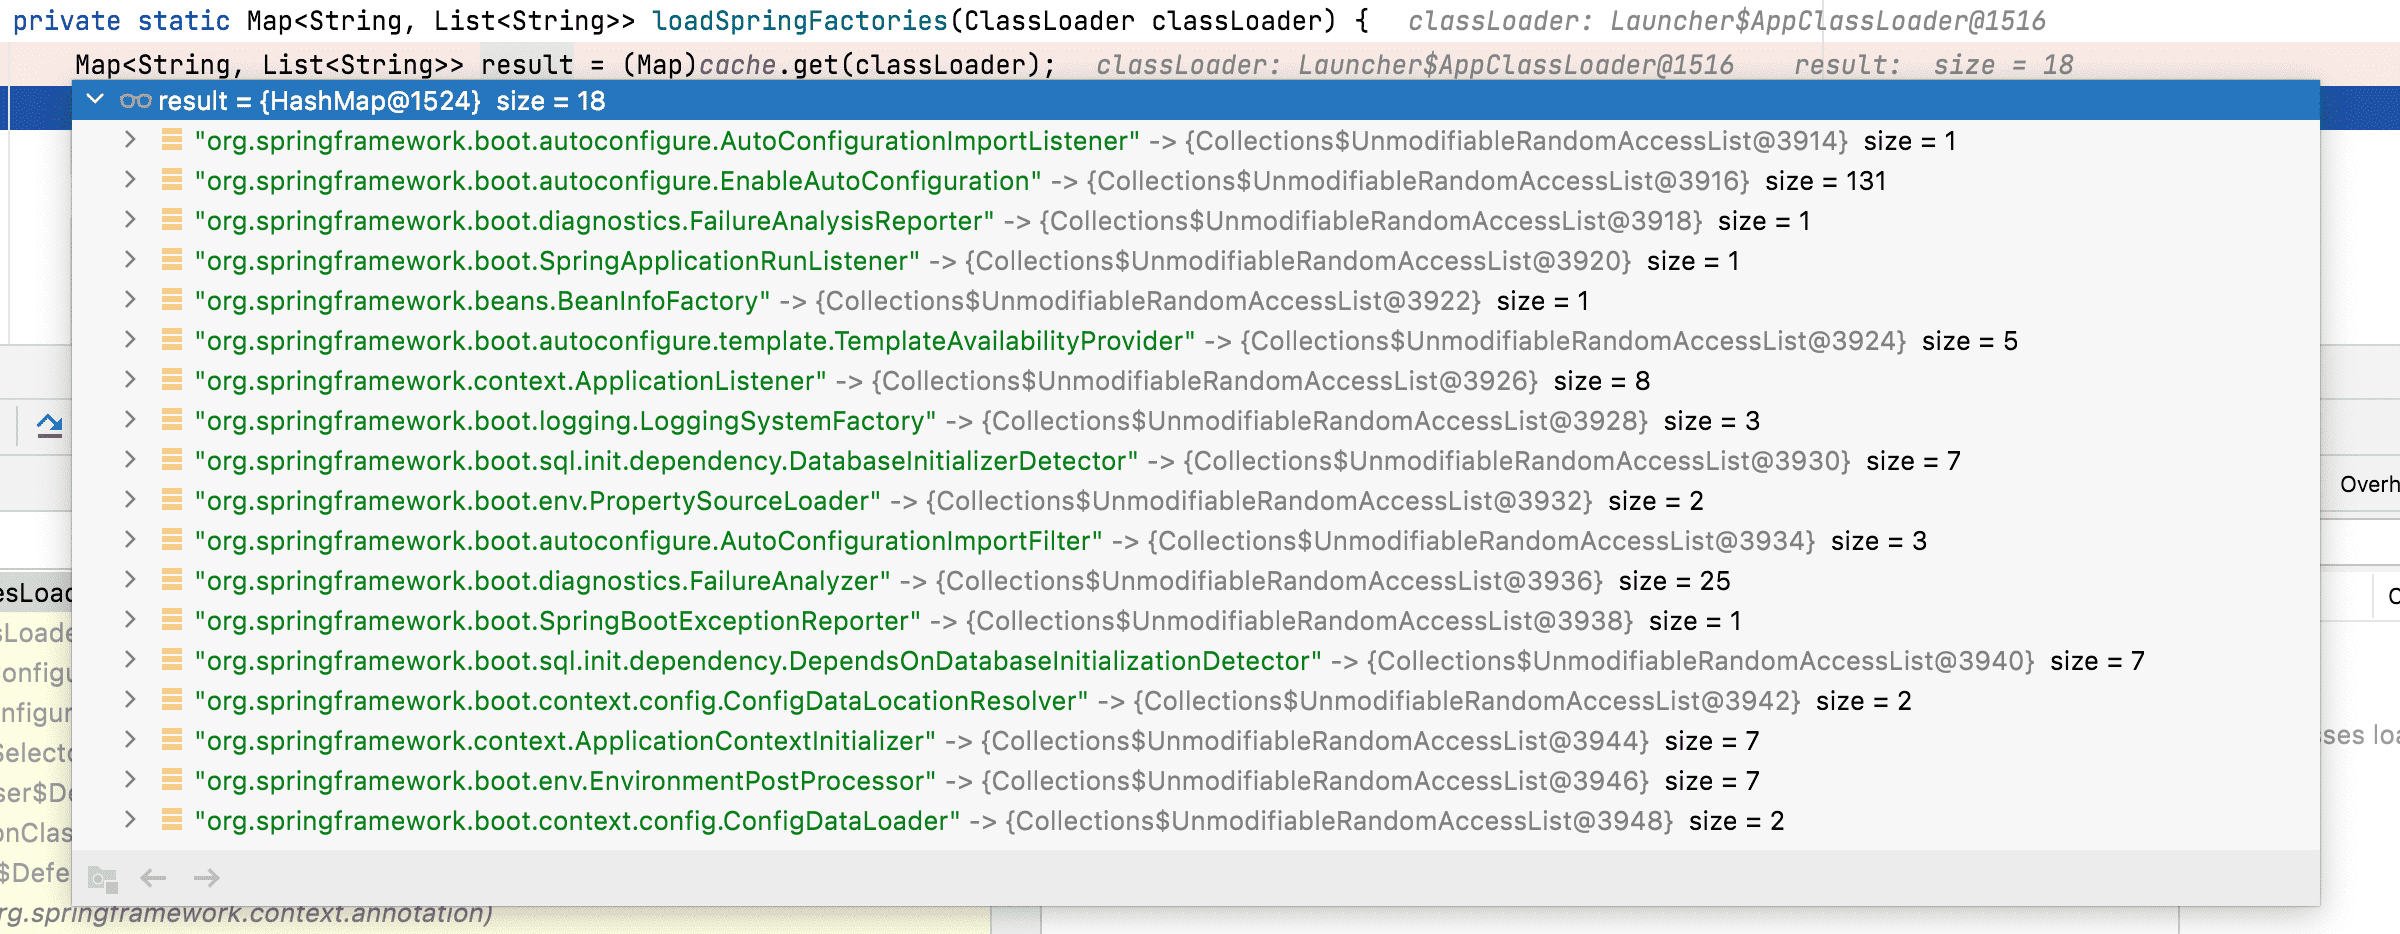
There are quite a lot of data, including 131 EnableAutoConfiguration, but what we really use is based on our POM It is determined by the starter configured in the XML. For example, if I only configure spring boot starter web, there are only 24 configuration classes that meet the requirements after you filter. The number of configuration classes varies with different spring boot versions

Let's take a look at the important descriptions, such as AOP aspect configuration class, message conversion configuration class, dispatcher servlet configuration class, sevletwebserver factory configuration class and file upload configuration class, which are very common and necessary for Web projects. Take these configuration classes for example, and see how SpringBoot makes our Web I killed it.
AOP initialization
First, let's talk about the configuration class aopaoutoconfiguration. The smart little cute thought that this is the AOP automatic configuration class. Yes, this is the AOP automatic configuration configuration class in the SpringBoot automatic configuration. Do you know how to configure AOP in the XML era?
Let me post a section of the configuration of the official website to fool you 🤪, After all, I haven't configured this useful XML project for many years. I may not be able to configure it without reading the document.
<!-- License plate address https://docs.spring.io/spring-framework/docs/current/reference/html/core.html#spring-core --> <!-- this is the object that will be proxied by Spring's AOP infrastructure --> <bean id="personService" class="x.y.service.DefaultPersonService"/> <!-- this is the actual advice itself --> <bean id="profiler" class="x.y.SimpleProfiler"/> <aop:config> <aop:aspect ref="profiler"> <aop:pointcut id="theExecutionOfSomePersonServiceMethod" expression="execution(* x.y.service.PersonService.getPerson(String,int)) and args(name, age)"/> <aop:around pointcut-ref="theExecutionOfSomePersonServiceMethod" method="profile"/> </aop:aspect> </aop:config>
Well, if springBoot kills the xml file, it will certainly be presented in another way. Let's find out.
Back to SpringBoot, we only need such a simple configuration to implement the above logic. I can surround notifications before and after
// You can also see the entry point on the official website https://docs.spring.io/spring-framework/docs/current/reference/html/core.html#spring-core
@Component
@Aspect
public class AopTest {
@Before("execution(public * net.ziyoushu.*.*(..))")
public void before() {
System.out.println("Execute before business method");
}
@After("execution(public * net.ziyoushu.*.*(..))")
public void after() {
System.out.println("Execute before business method");
}
@Around("execution(public * net.ziyoushu.*.*(..))")
public void aroud(ProceedingJoinPoint pjp) throws Throwable {
System.out.println("Before surround notification");
pjp.proceed();
System.out.println("After surround notification");
}
// Business method
public void doBiz() {
System.out.println("Business method execution");
}
}
The use method is still very simple. This is also the use method of annotations in Spring, but we are concerned about how springBoot helps us configure AOP and how to scan our aspects.
@Configuration
@ConditionalOnClass({EnableAspectJAutoProxy.class, Aspect.class, Advice.class, AnnotatedElement.class})
@ConditionalOnProperty(
prefix = "spring.aop",
name = {"auto"},
havingValue = "true",
matchIfMissing = true
)
public class AopAutoConfiguration {
public AopAutoConfiguration() {
}
@Configuration
@EnableAspectJAutoProxy(
proxyTargetClass = true
)
@ConditionalOnProperty(
prefix = "spring.aop",
name = {"proxy-target-class"},
havingValue = "true",
matchIfMissing = true
)
public static class CglibAutoProxyConfiguration {
public CglibAutoProxyConfiguration() {
}
}
@Configuration
@EnableAspectJAutoProxy(
proxyTargetClass = false
)
@ConditionalOnProperty(
prefix = "spring.aop",
name = {"proxy-target-class"},
havingValue = "false",
matchIfMissing = false
)
public static class JdkDynamicAutoProxyConfiguration {
public JdkDynamicAutoProxyConfiguration() {
}
}
}
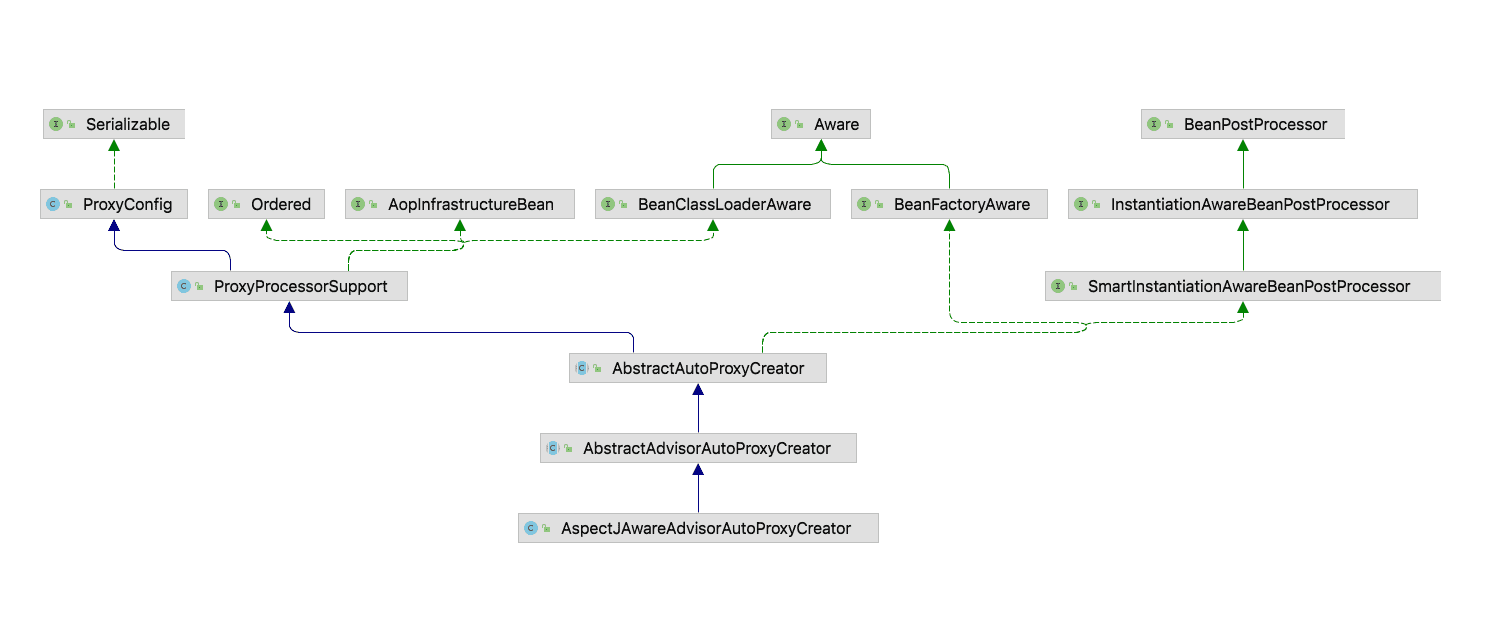
From the above class, we can see that there are conditions to enable aop. First, we need to introduce aop packages, because @ ConditionalOnClass is used to detect whether there is a specified class under the classpath. If it is not specified, aopaoutoconfiguration configuration will not be enabled. Then you can also see that this version of spring adopts cglib as the proxy implementation by default, and what attracts our attention is the annotation @ EnableAspectJAutoProxy, which introduces an aspectjautoproxyregister. The function of this registrar is to register an AnnotationAwareAspectJAutoProxyCreator in the spring container, which is a BeanPostProcessor. Taking a look at this kind of class diagram, we can see that the implementation of Aware and BeanPostProcessor are both steps in the spring life cycle
Here, I've sorted out the preconditions related to AOP configuration in SpringBoot, and now let's explain how Spring scans facets and pointcuts. First, let's take a look at the above. We define a facet class, connection point, tangent point and other information.
Spring will execute all beanpostprocessors when it executes the Bean life cycle and getBean() logic. In this process, it will execute the annotation awareaspectjautoproxycreator mentioned above.
Some friends may ask, how does Spring know that a Bean is cut? In the AnnotationAwareAspectJAutoProxyCreator class, there is a method findcandidedadvisors (), which is used to obtain the defined connection point. There is a section judgment in buildAspectJAdvisors()
// For better display, delete some logic. Here is the pseudo code
if (beanType != null && this.advisorFactory.isAspect(beanType)) {
AspectMetadata amd = new AspectMetadata(beanType, beanName);
if (amd.getAjType().getPerClause().getKind() == PerClauseKind.SINGLETON) {
// Scan connection points
List<Advisor> classAdvisors = this.advisorFactory.getAdvisors(factory);
if (this.beanFactory.isSingleton(beanName)) {
this.advisorsCache.put(beanName, classAdvisors);
} else {
this.aspectFactoryCache.put(beanName, factory);
}
} else {
if (this.beanFactory.isSingleton(beanName)) {
throw new IllegalArgumentException("xxx");
}
MetadataAwareAspectInstanceFactory factory = new PrototypeAspectInstanceFactory(this.beanFactory, beanName);
this.aspectFactoryCache.put(beanName, factory);
advisors.addAll(this.advisorFactory.getAdvisors(factory));
}
}
// Other logicHere is the advisorfactory Isaspect (beantype) detects that the defined class is in front, based on the judgment that it has @ Aspect annotation and is compiled by aspectj. From this judgment, we can know that @ Aspect must be used to define an Aspect using annotation. The next step is to scan the getAdvisors(factory) of the connection point. The logic is to scan all the previous methods and sort them. The specific logic defines a sort in the static block of the reflective aspectjadvisorfactory class.
//@see ReflectiveAspectJAdvisorFactory
static {
adviceMethodFilter = ReflectionUtils.USER_DECLARED_METHODS.and((method) -> {
return AnnotationUtils.getAnnotation(method, Pointcut.class) == null;
});
// AOP executes the order of connection points
Comparator<Method> adviceKindComparator = new ConvertingComparator(new InstanceComparator(new Class[]{Around.class, Before.class, After.class, AfterReturning.class, AfterThrowing.class}), (method) -> {
AspectJAnnotation<?> ann = AbstractAspectJAdvisorFactory.findAspectJAnnotationOnMethod(method);
return ann != null ? ann.getAnnotation() : null;
});
Comparator<Method> methodNameComparator = new ConvertingComparator(Method::getName);
adviceMethodComparator = adviceKindComparator.thenComparing(methodNameComparator);
}This is a very biased place, but I think it is very important to see the execution sequence of AOP aspects here, and I can see the connection points during return and exception, which I haven't used before 🤪, This is also a supplement to myself.
Here's how SpringBoot automatically configures AOP. That's all. If you don't understand, you can pay attention to me: Java geek help
SpringMvc initialization
When it comes to MVC configuration, I have to talk about the initialization of DispatcherServlet. Do you remember how XML configures DispatcherServlet? It's on the web Dispatcherservelet is configured in XML. In order to arouse everyone's memory, I'll post the specific configuration
// Official license plate: https://docs.spring.io/spring-framework/docs/current/reference/html/web.html#spring-web <web-app> <listener> <listener-class>org.springframework.web.context.ContextLoaderListener</listener-class> </listener> <context-param> <param-name>contextConfigLocation</param-name> <param-value>/WEB-INF/app-context.xml</param-value> </context-param> <servlet> <servlet-name>app</servlet-name> <servlet-class>org.springframework.web.servlet.DispatcherServlet</servlet-class> <init-param> <param-name>contextConfigLocation</param-name> <param-value></param-value> </init-param> <load-on-startup>1</load-on-startup> </servlet> <servlet-mapping> <servlet-name>app</servlet-name> <url-pattern>/app/*</url-pattern> </servlet-mapping> </web-app>
However, this method is not recommended on the Spring official website, and the API configuration method is put in the first place. With the popularity of springboot and the specification of servlet 3, it is estimated that you will rarely encounter web configuration XML project. Good nonsense. I'll throw a big melon here. Through the DEBUG source code, I found that the online article says that springboot initializes SpringMVC, that is, automatically configuring DispatcherServlet class. 90% of them are configured by DispatcherServletAutoConfiguration. However, I don't agree with this point. I don't agree with 90% of the people. I first came into contact with springboot by reading articles on the Internet. I once mistakenly understood that the Spring boot automatic configuration DispatcherServlet was initialized through the DispatcherServletAutoConfiguration configuration class, but I actually found that this was not the case after DEBUG.
For this reason, I tried the case of embedded Tomcat and external Tomcat. Both of them are inconsistent with online articles. Is my view wrong or 90% of the online articles wrong? Let's draw a conclusion after reading it. The principle of built-in Tomcat has been described above, so I won't talk about it any more. But when it comes to external tomcat, I can't help mentioning the SPI mechanism. What is SPI? Let's talk about it later. Let's see how SpringBoot external Tomcat operates. First, remove the built-in Tomcat dependency from maven and introduce the Servlet 3 specification.
<dependency>
<groupId>org.springframework.boot</groupId>
<artifactId>spring-boot-starter-web</artifactId>
<exclusions>
<exclusion>
<groupId>org.springframework.boot</groupId>
<artifactId>spring-boot-starter-tomcat</artifactId>
</exclusion>
</exclusions>
</dependency>
<dependency>
<groupId>javax.servlet</groupId>
<artifactId>javax.servlet-api</artifactId>
<version>3.1.0</version>
<scope>provided</scope>
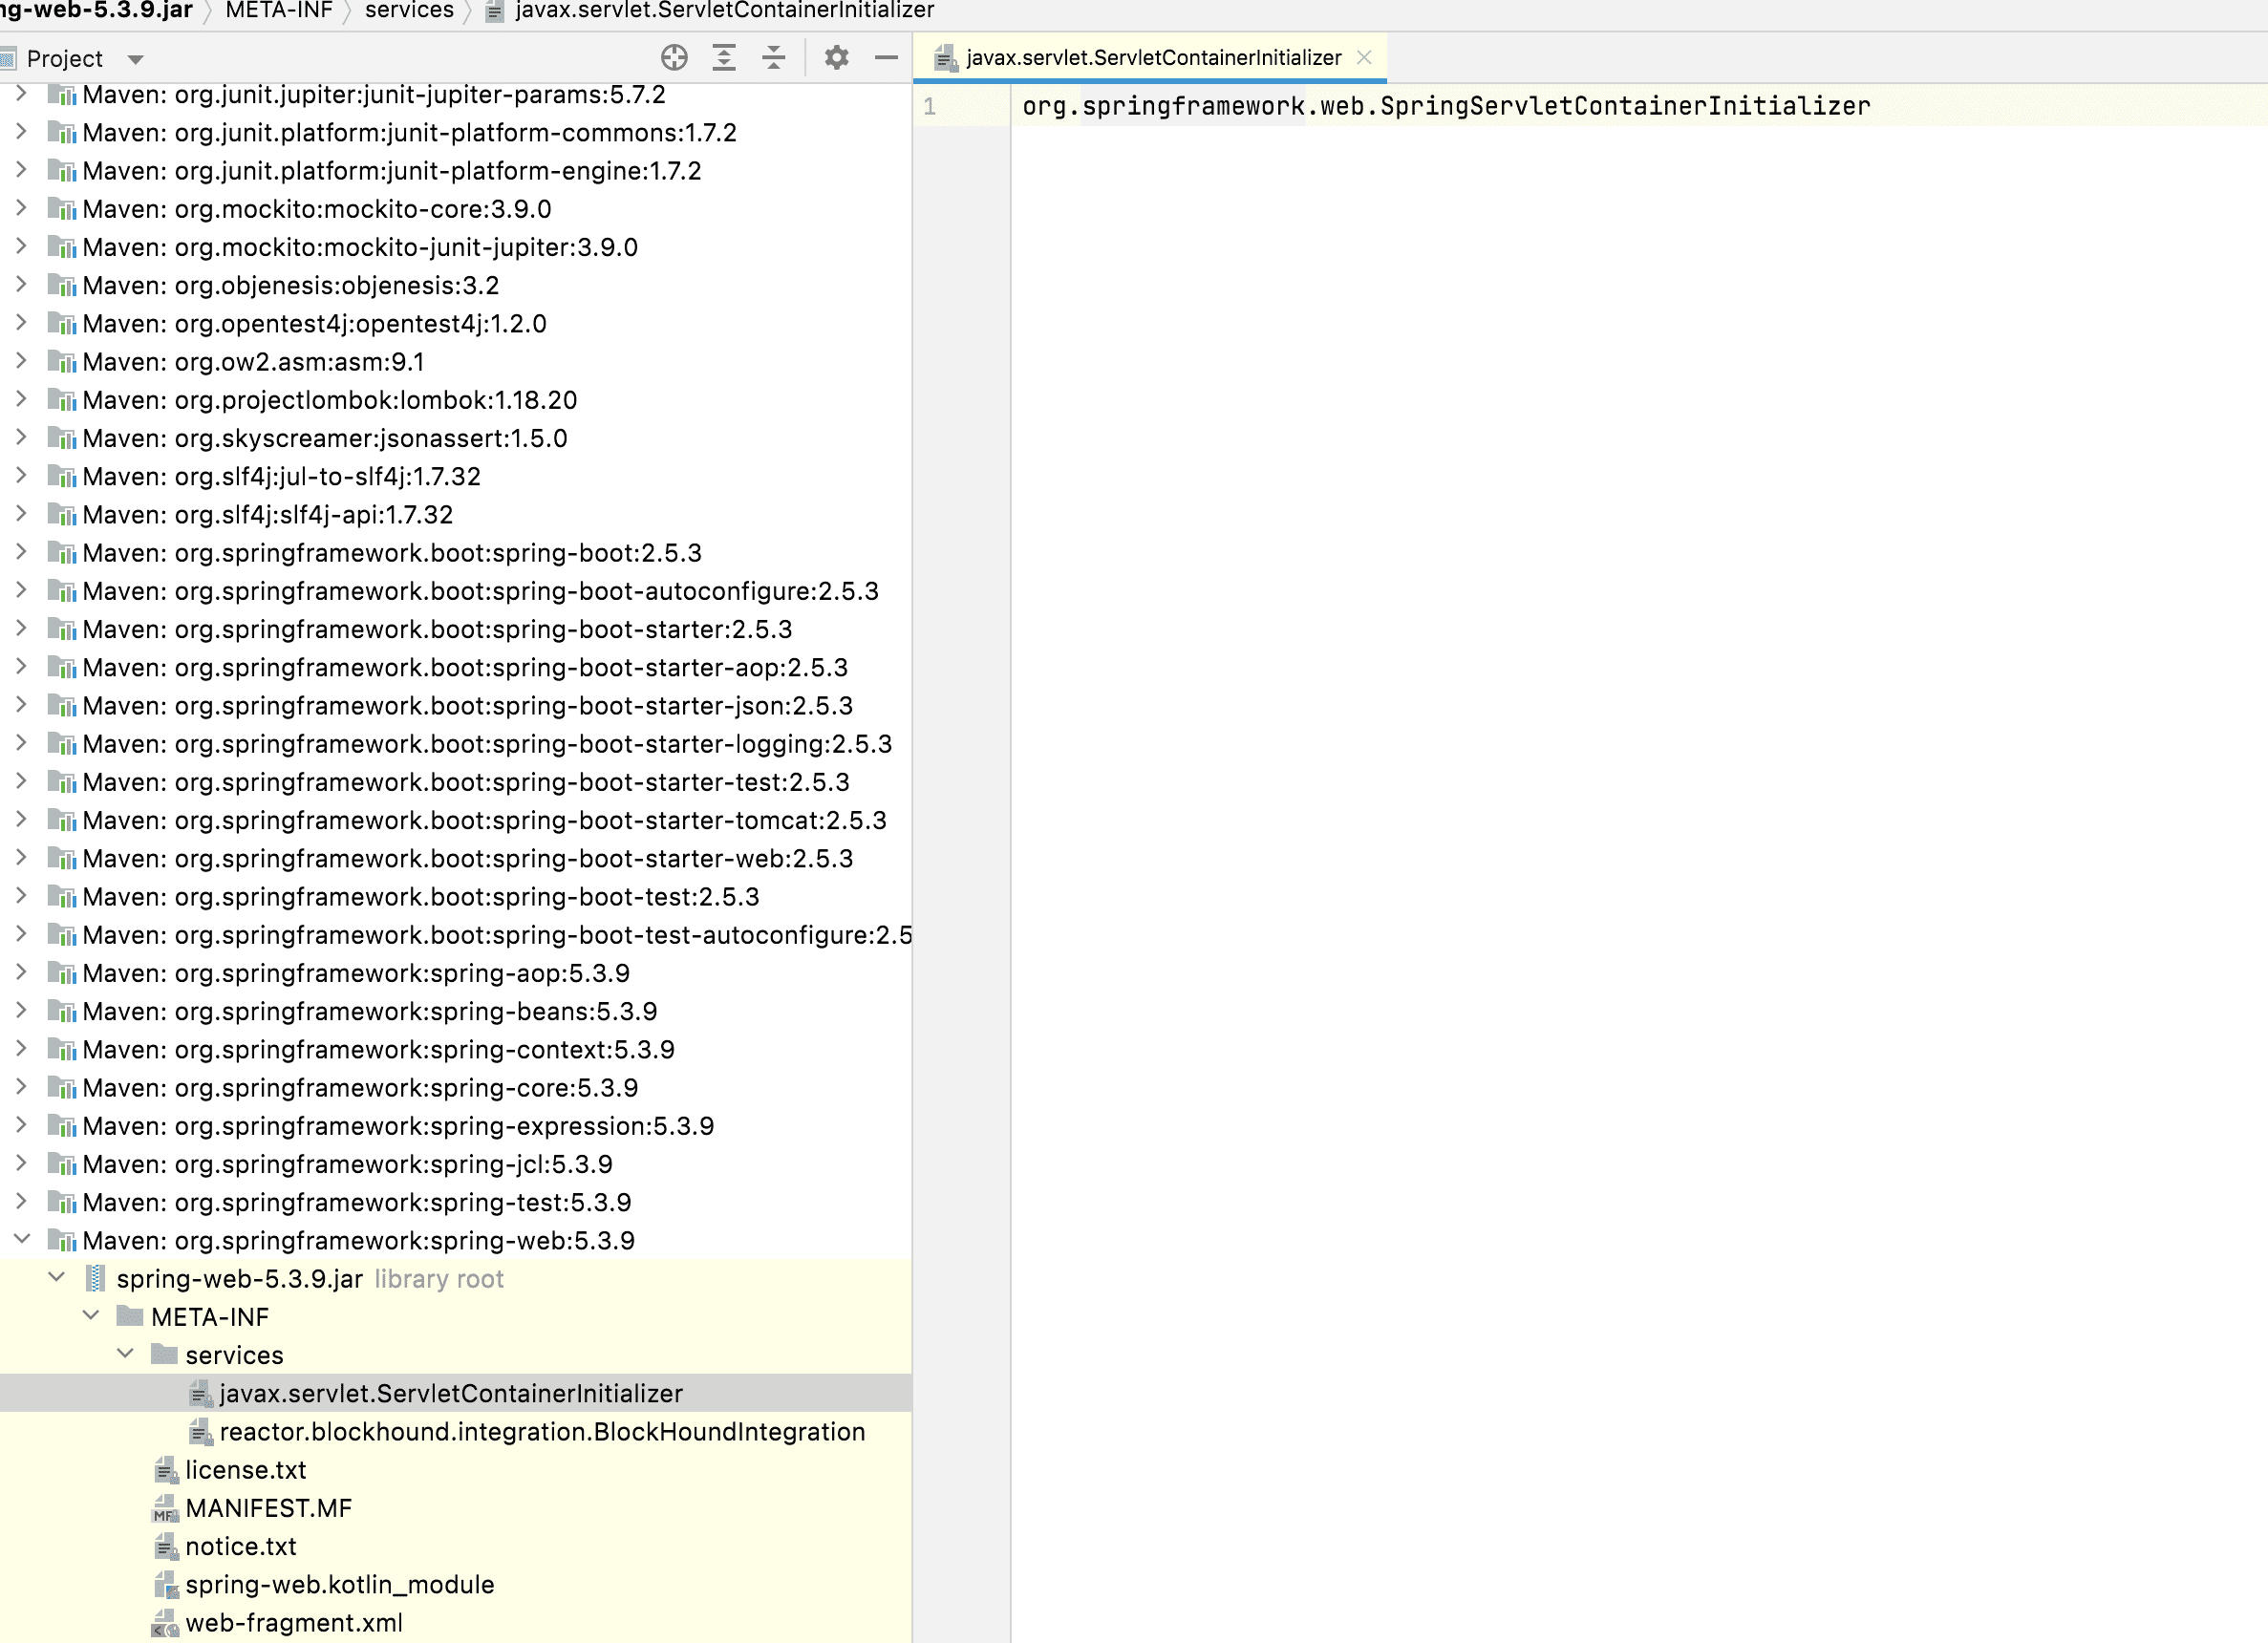
</dependency>Then make some adjustments on the startup class, and the SpringBootServletInitializer interface is the Servlet3 specification, which is javax configured in the / META-INF/services directory servlet. In the servletcontainerinitializer file, as follows:
@SpringBootApplication
public class ZysDemoApplication extends SpringBootServletInitializer implements CommandLineRunner {
@Override
protected SpringApplicationBuilder configure(SpringApplicationBuilder builder) {
return builder.sources(ZysDemoApplication.class);
}
}
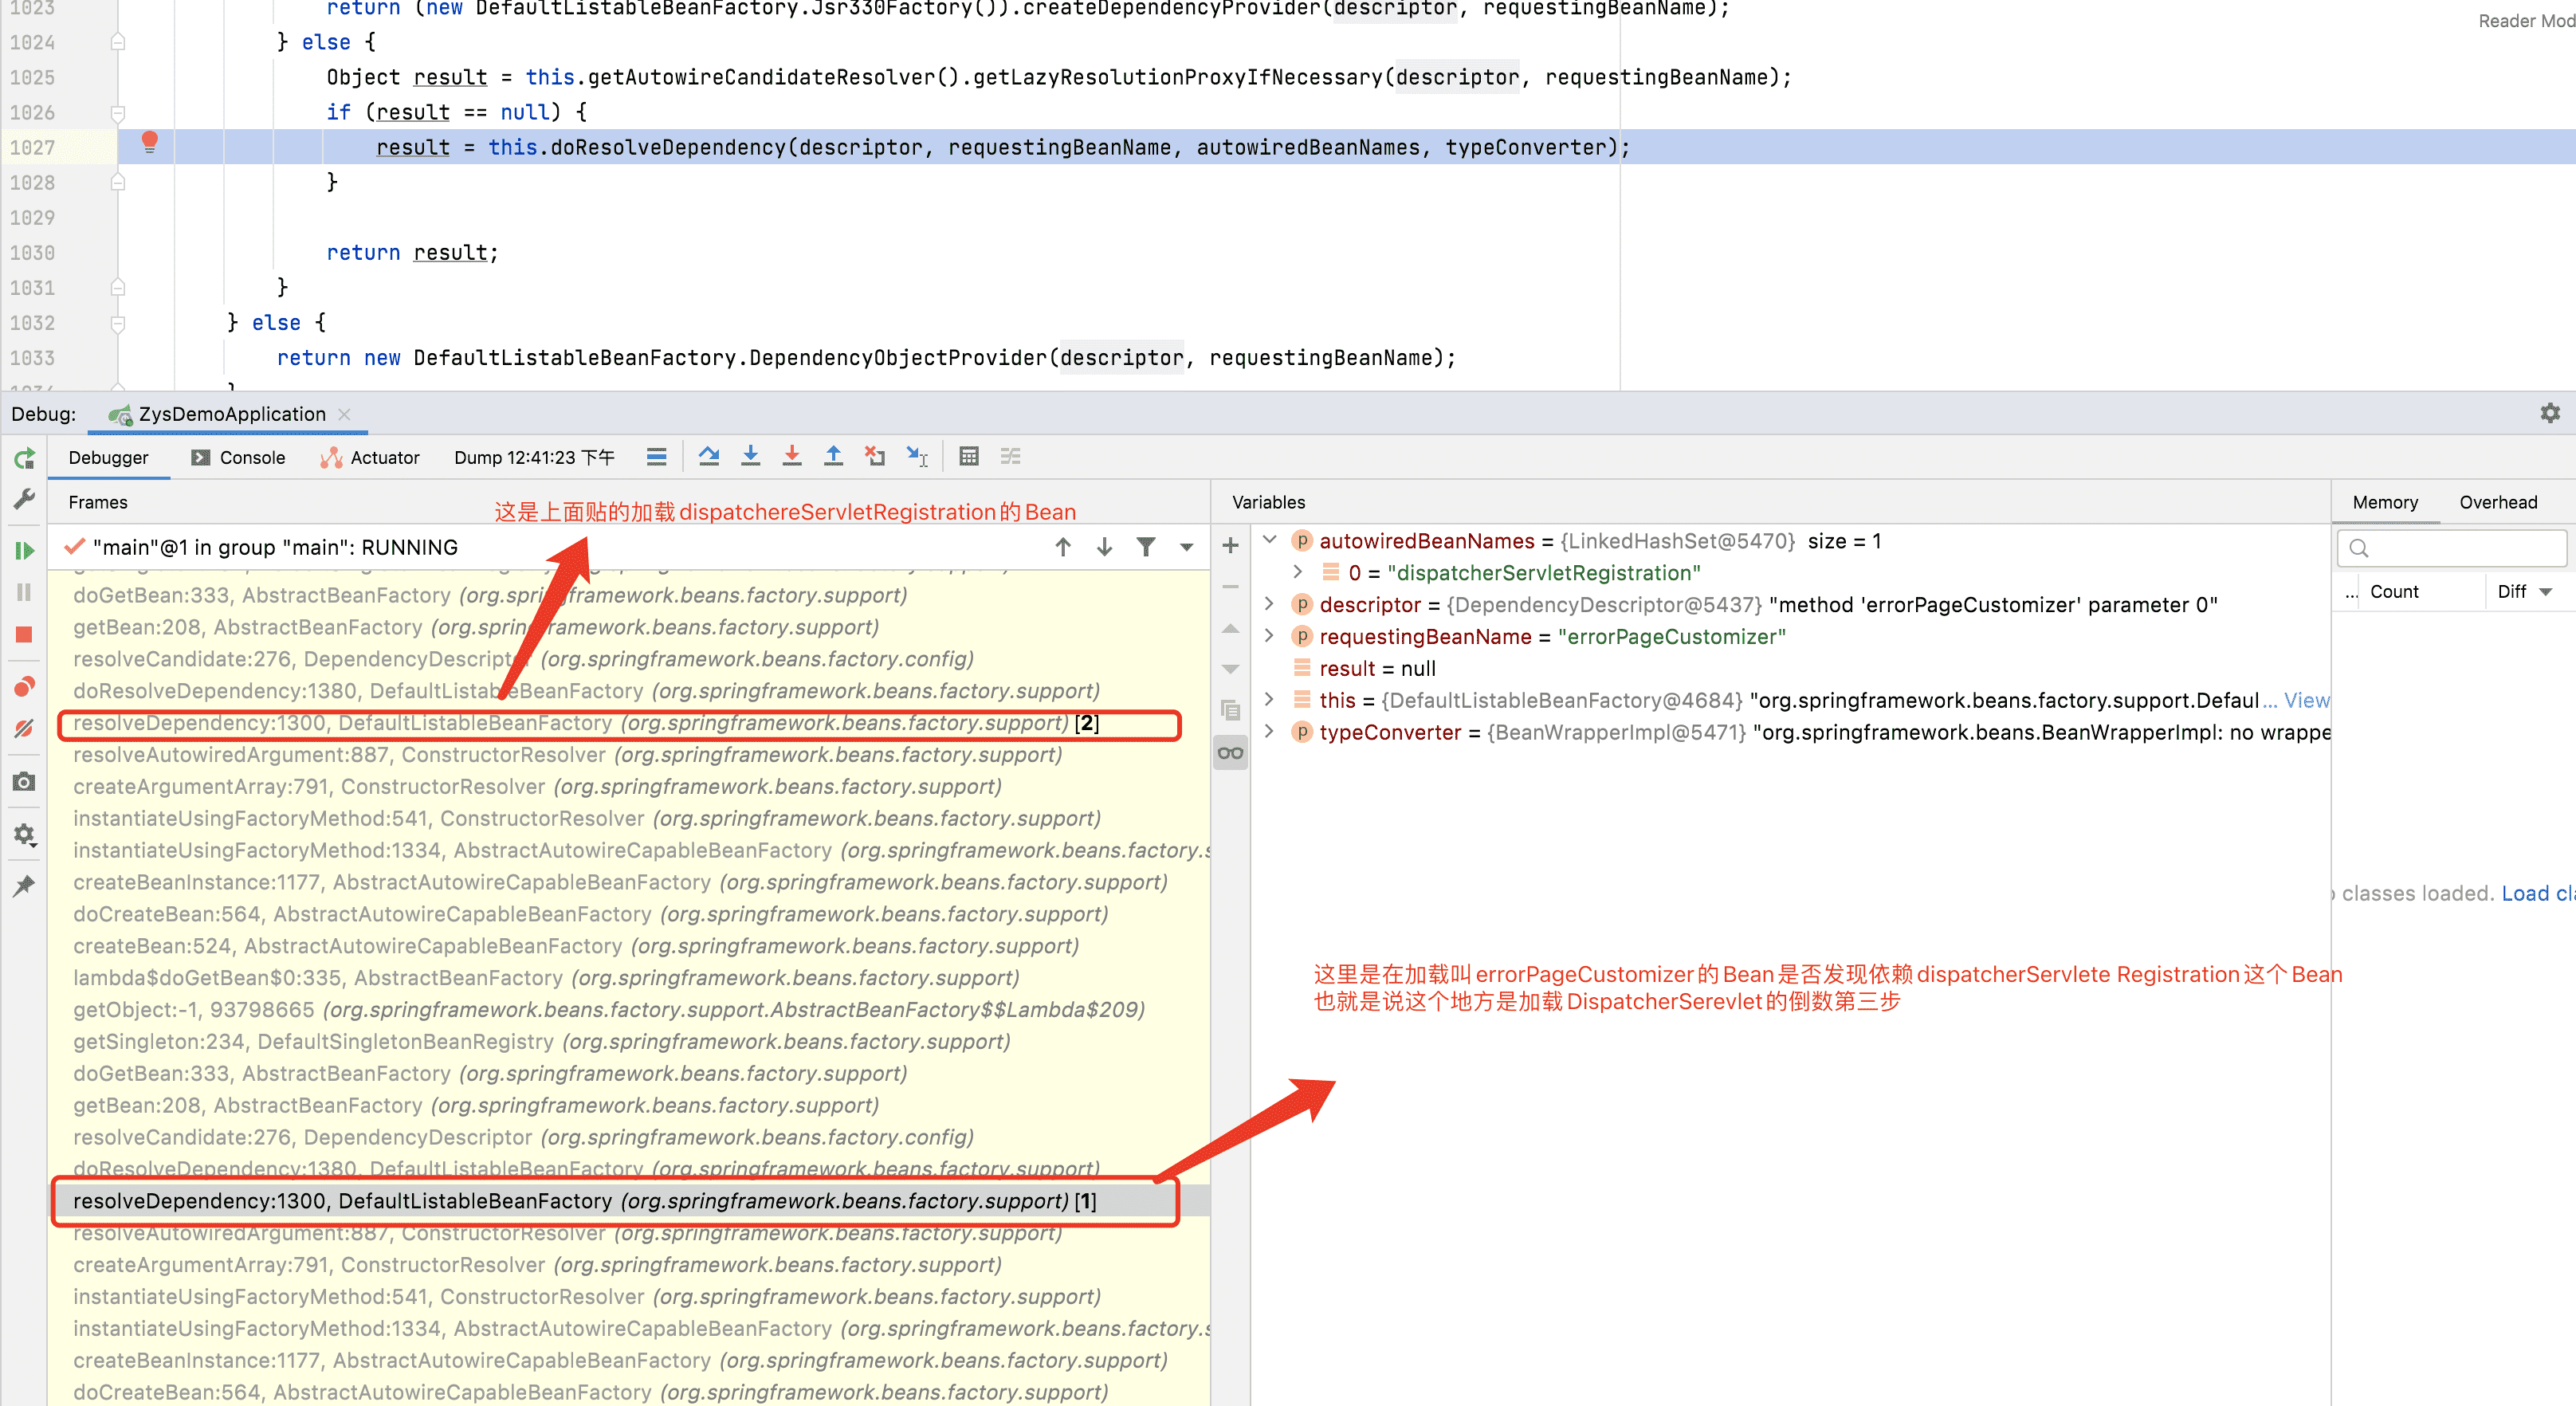
Then let's talk about how to assemble the dispatcher servlet. The process of debugging is relatively boring. I directly put a breakpoint at the position of initializing the Bean of the dispatcher servlet to see what steps have been taken. Initialize DispatcherServlet. This Bean is completed in the method of DispatcherServletAutoConfiguration class - > dispatcherservletregistrationconfiguration - > dispatcherservletregistration (). I start the program with built-in Tomcat to see the execution process. I push back step by step.

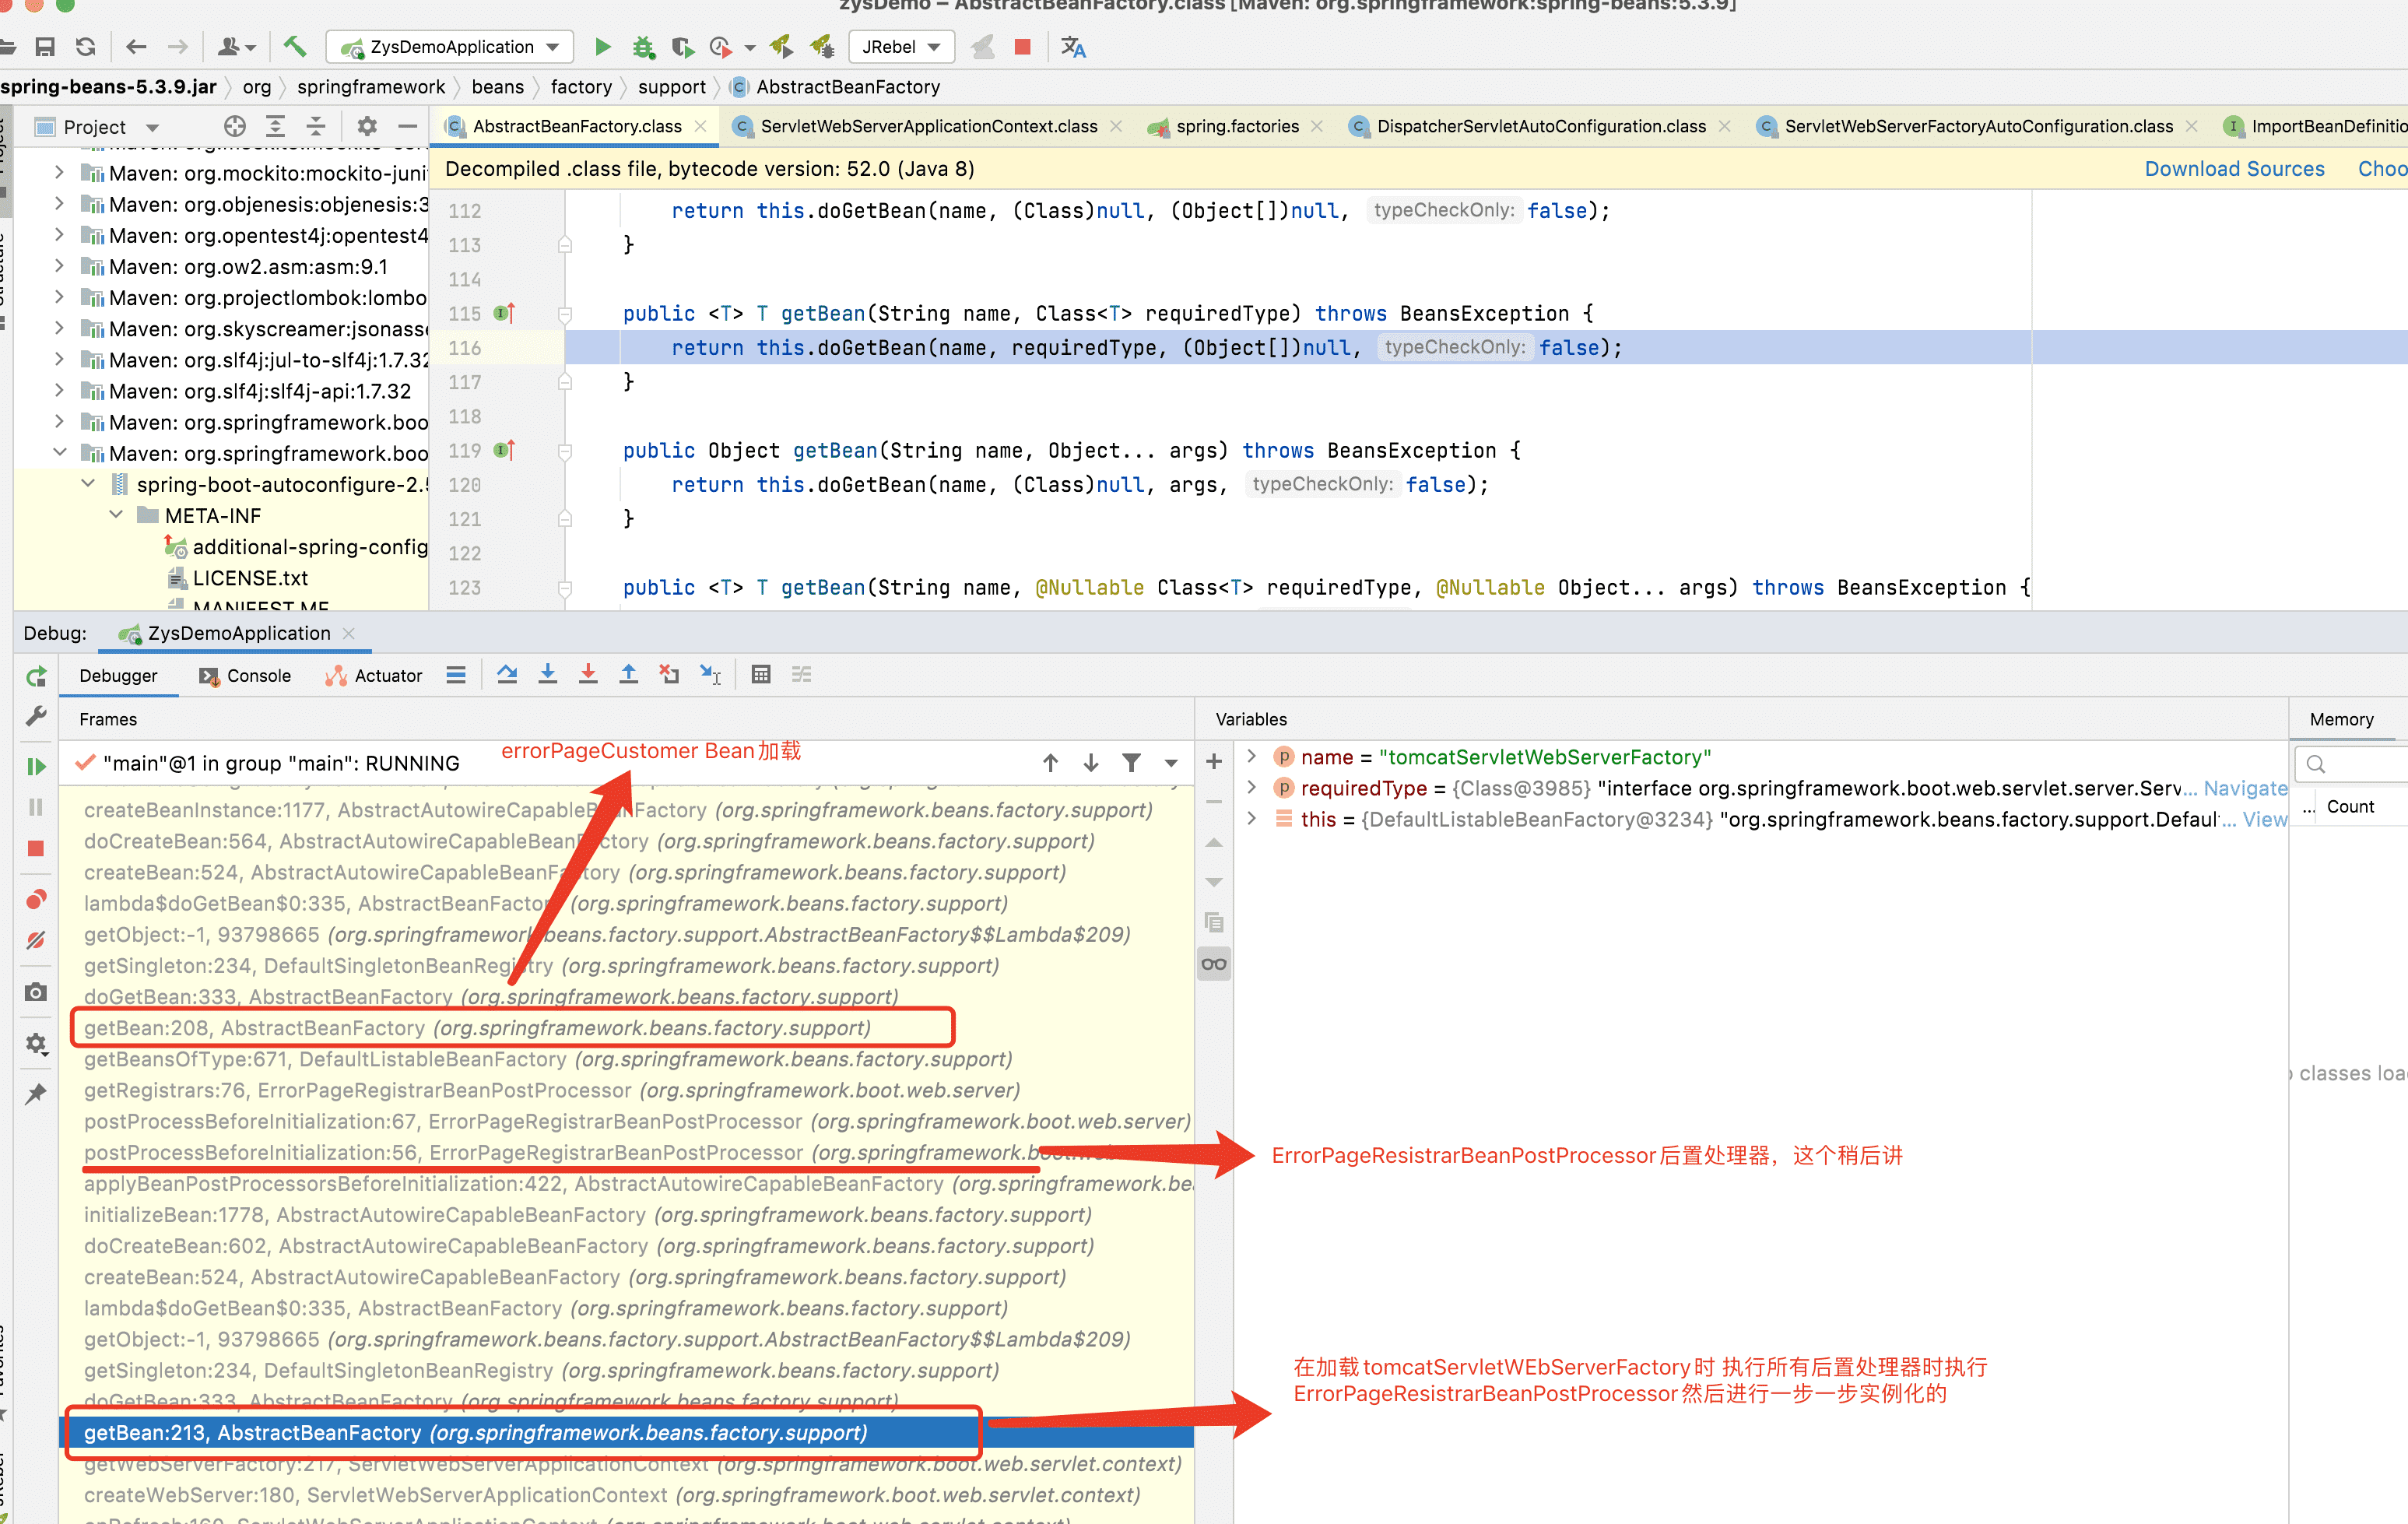
Here, when loading a tomcatservletwebfactory, because the Bean's life cycle will also execute all post processors, a post processor errorpageregisterbeanpostprocessor is executed. Then, where do we continue to find the post processor defined?
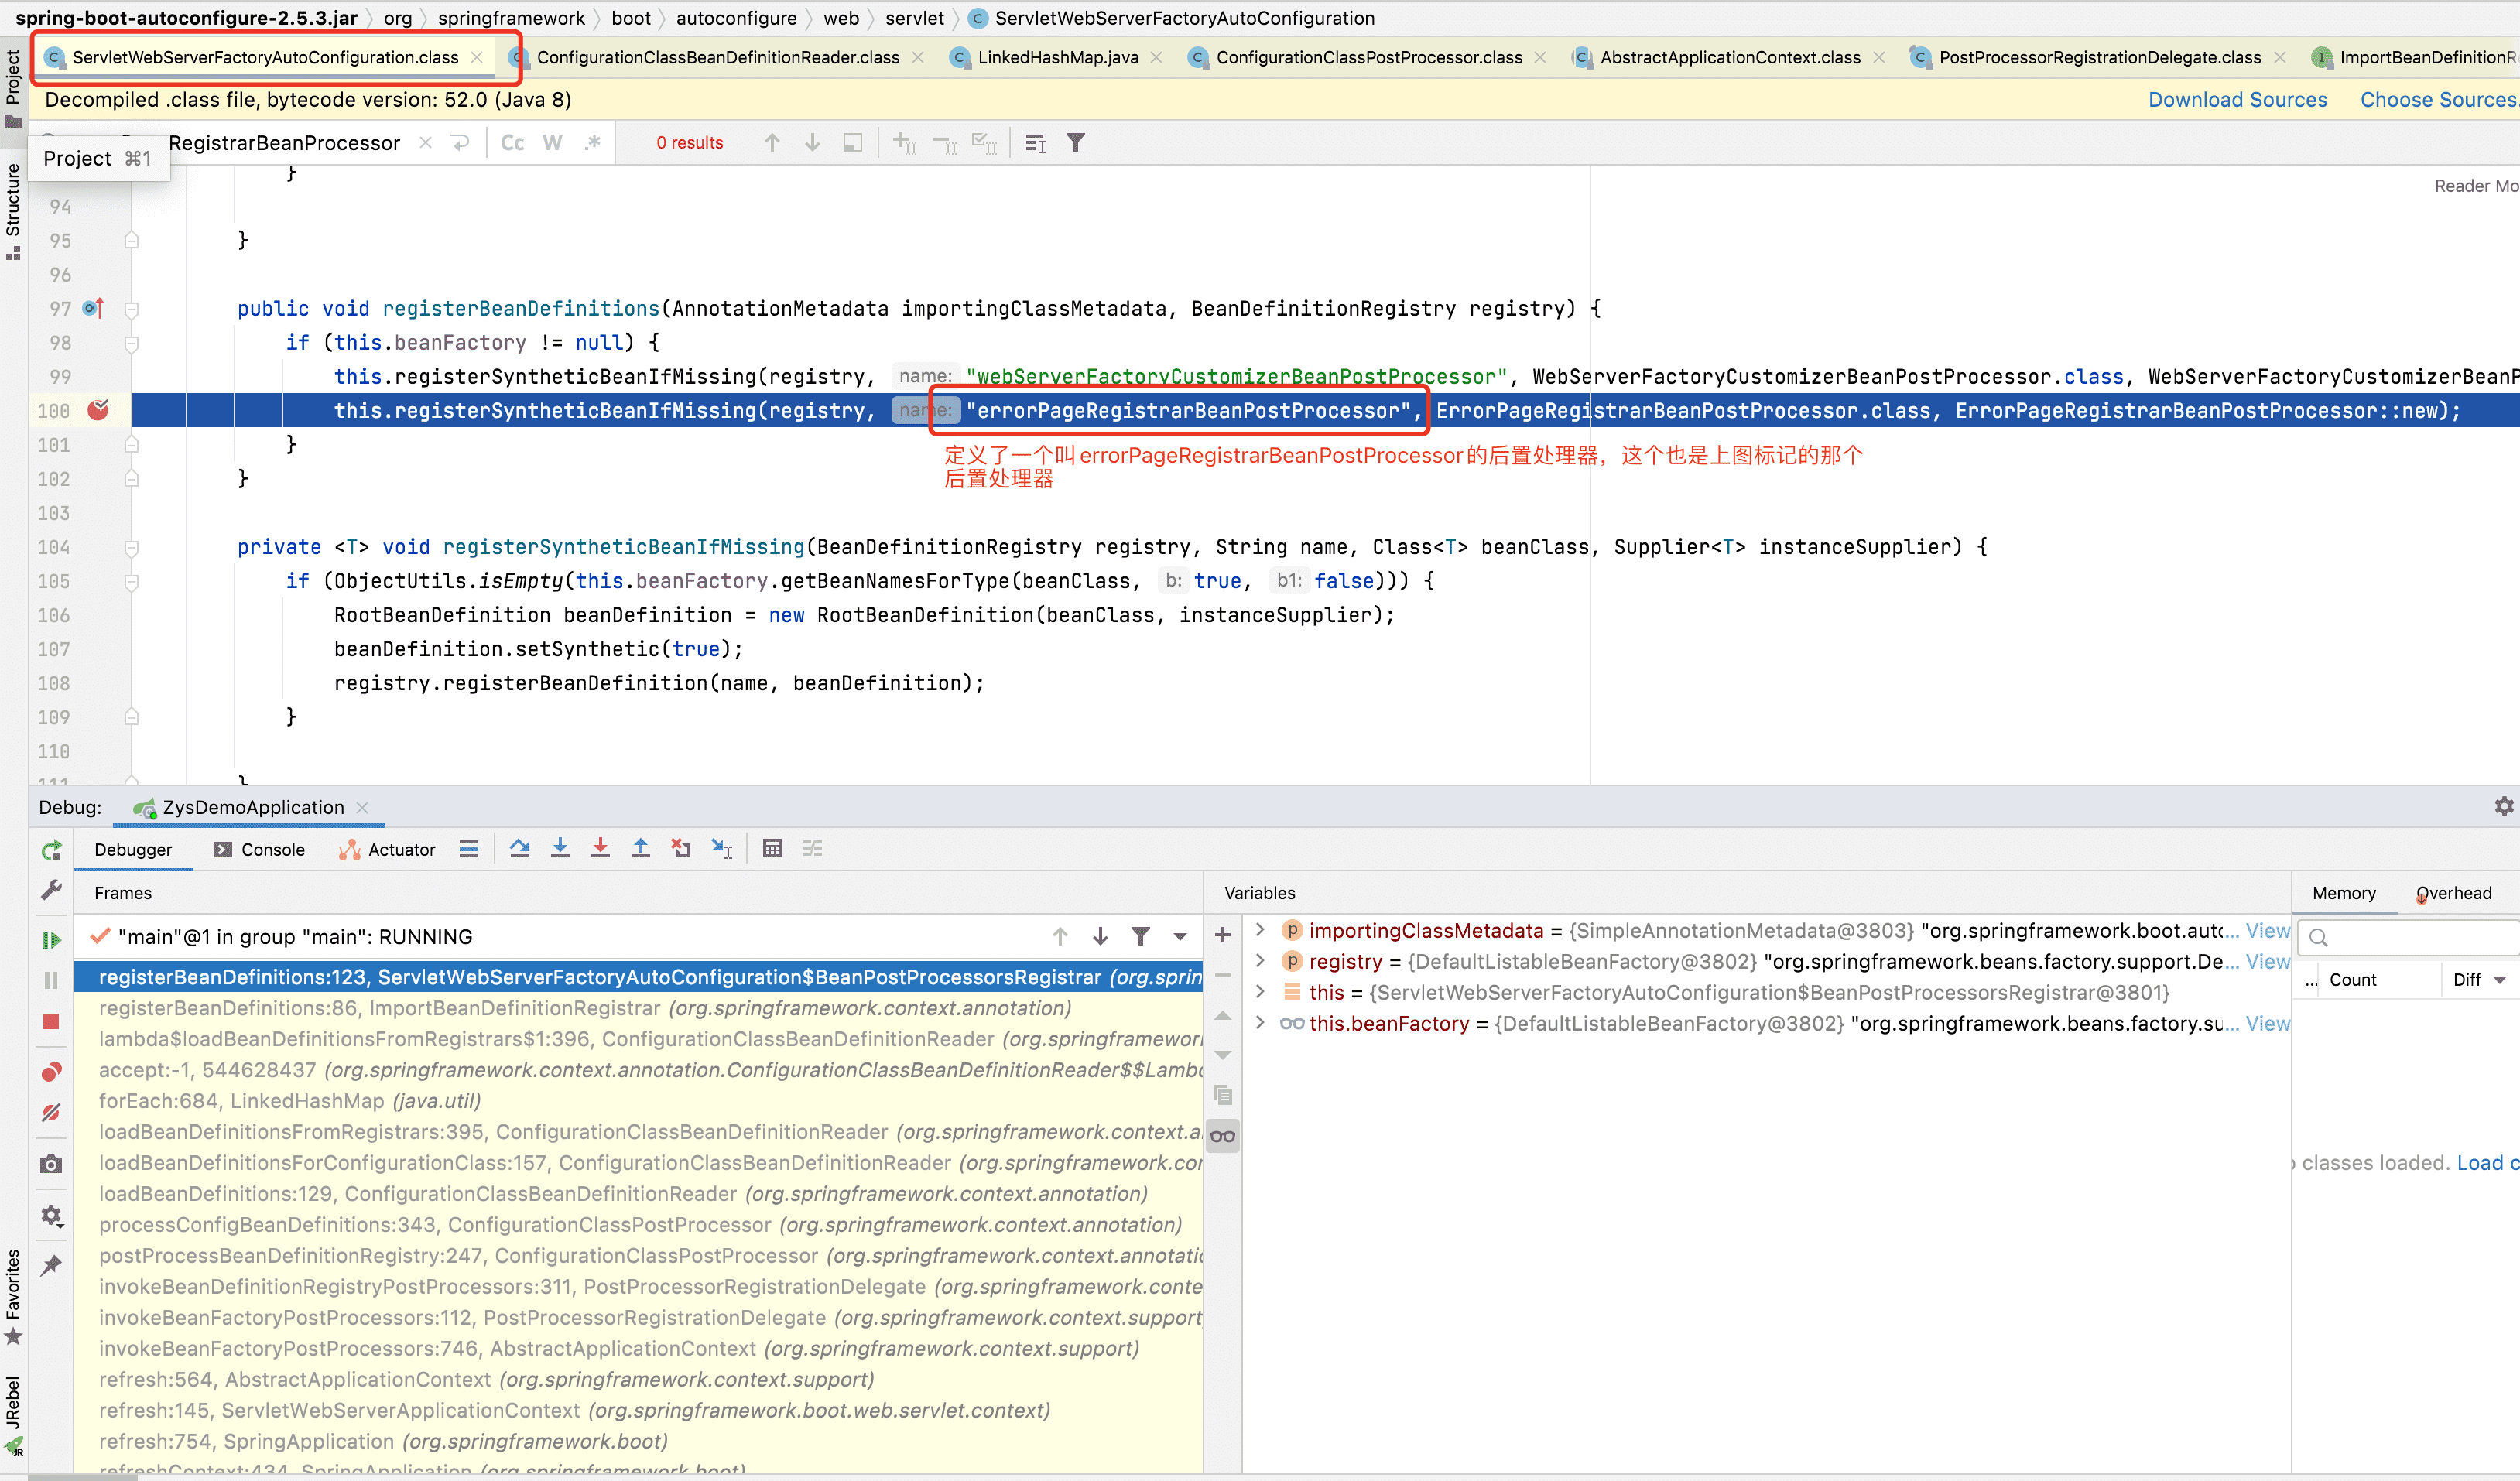
Friends with better memory may see the above reading spring Is there an automatic configuration class of servletwebserverfactory autoconfiguration in factories, and there is an annotation @ autoconfiguraeafter on the configuration class of DispatcherServletAutoConfiguration, marking servletwebserverfactory autoconfiguration
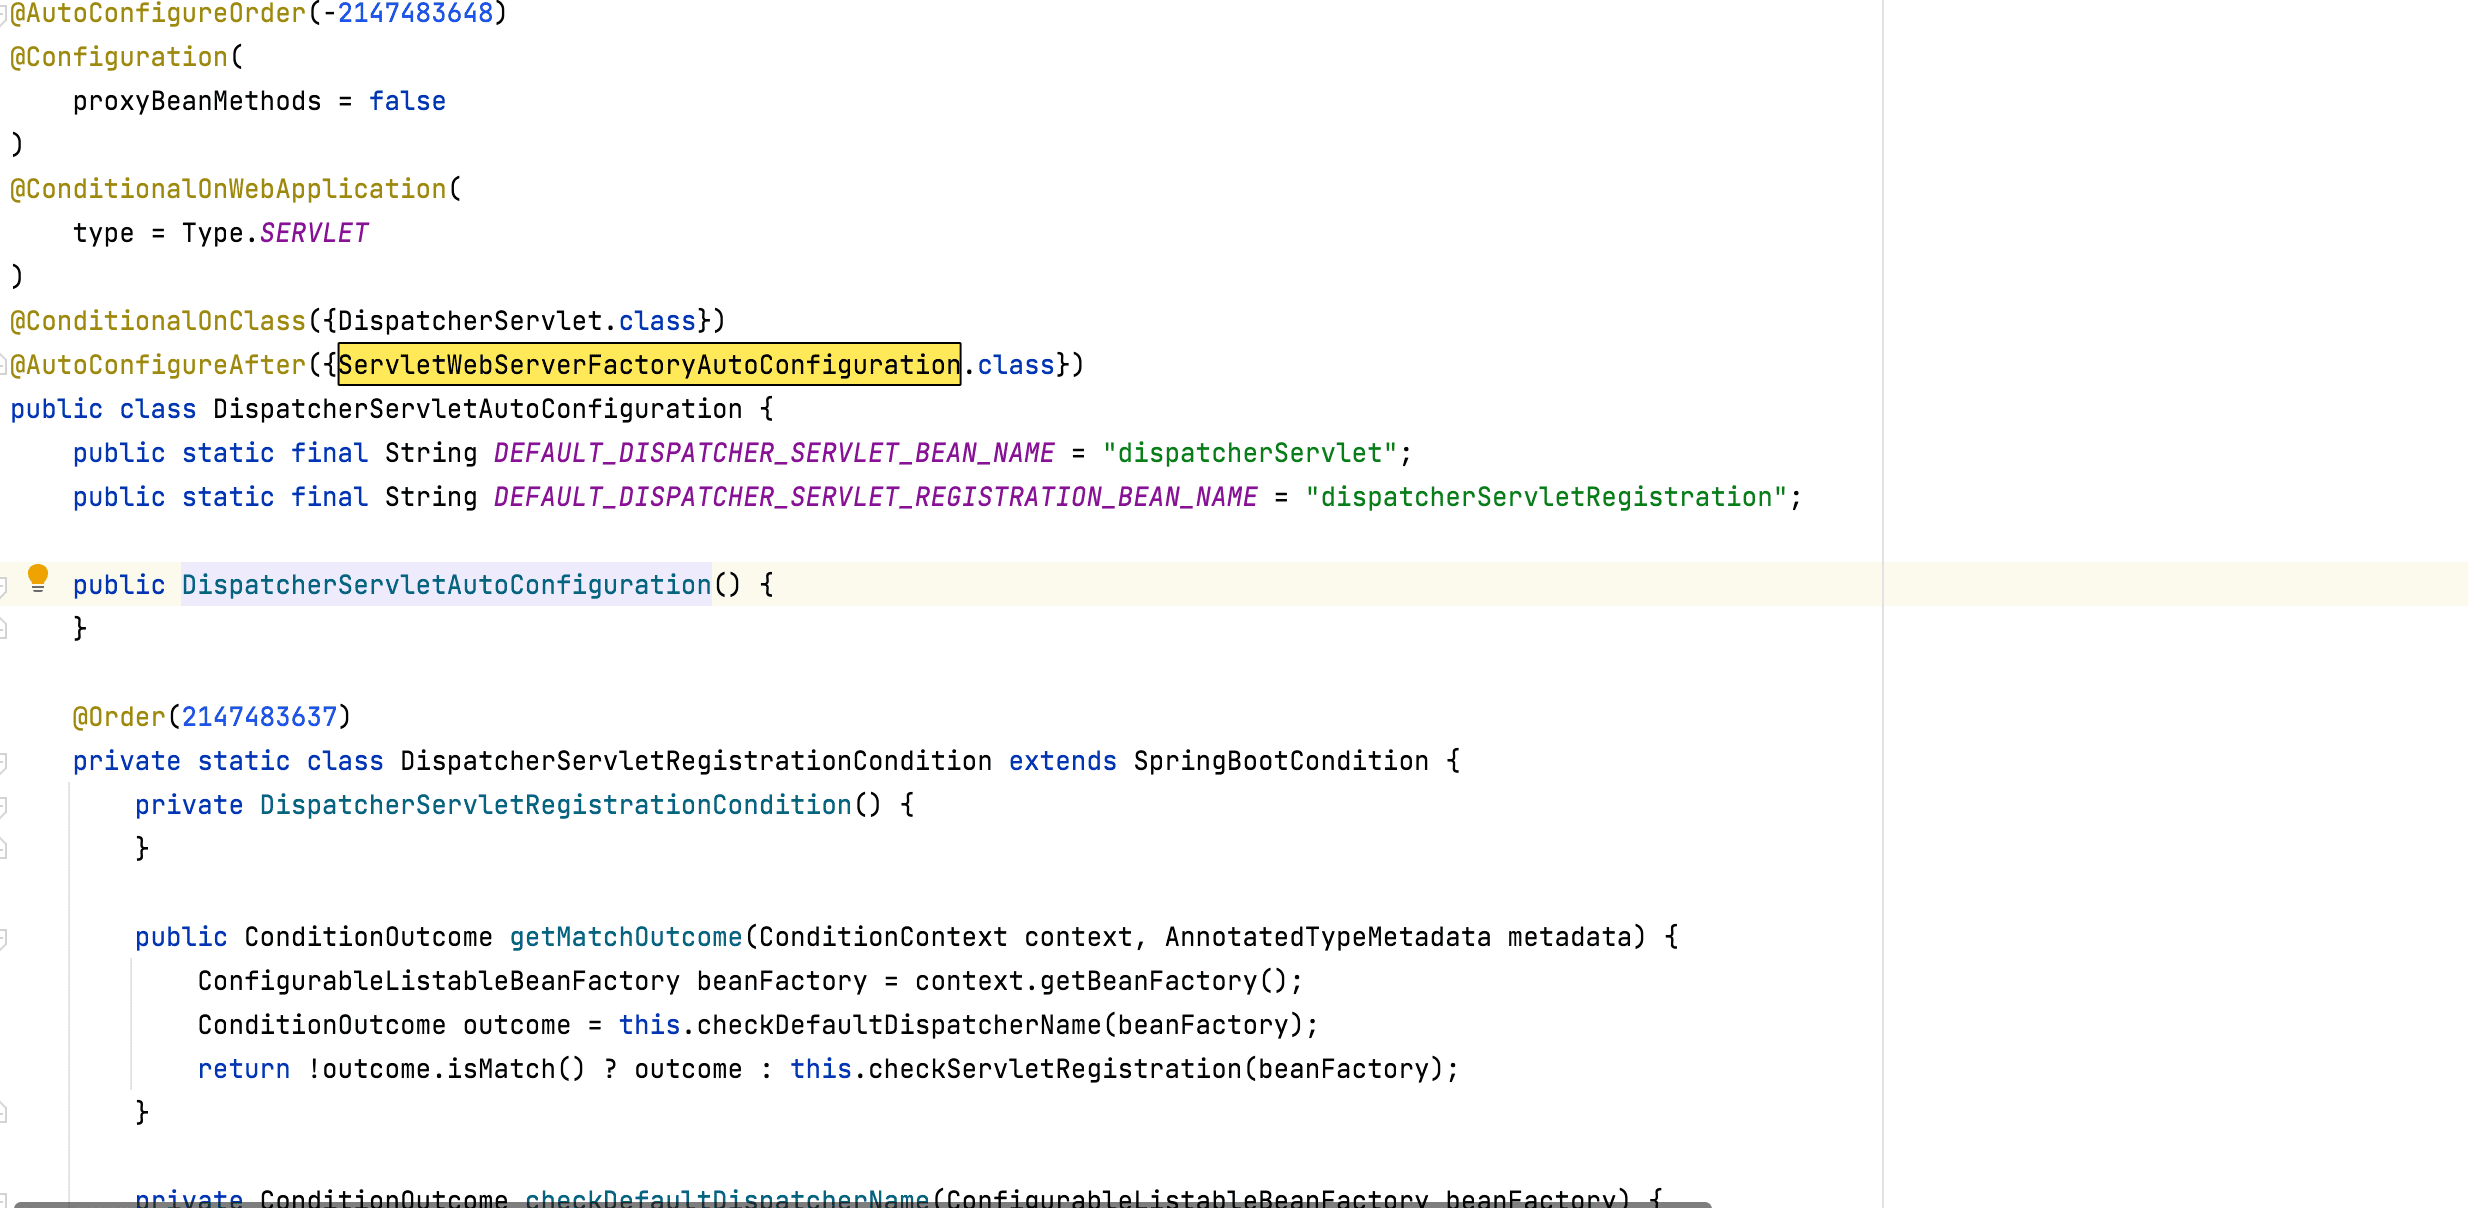
The @ AutoConfigureAfter annotation indicates that the loading starts after the servletwebserverfactory autoconfiguration configuration class. Therefore, the dispatcher servlet instantiated in the process of reading the source code is not loaded through the dispatcher servlet autoconfiguration configuration class, and how the servletwebserverfactory autoconfiguration is loaded should not be discussed, There are some in the above automatic configuration. So do you think 90% of the blogs on the Internet are right or my DEBUG is right?
Maybe some friends here don't know very well. Then I think you can follow the steps above to DEBUG the source code. After all, the text is not very good to describe the DEBUG process. The subsequent conditions can be displayed in the form of video. Here's the process of SpringBoot initializing SpringMvc. Some unclear friends pay attention to: Java geeks help me open a small stove for you
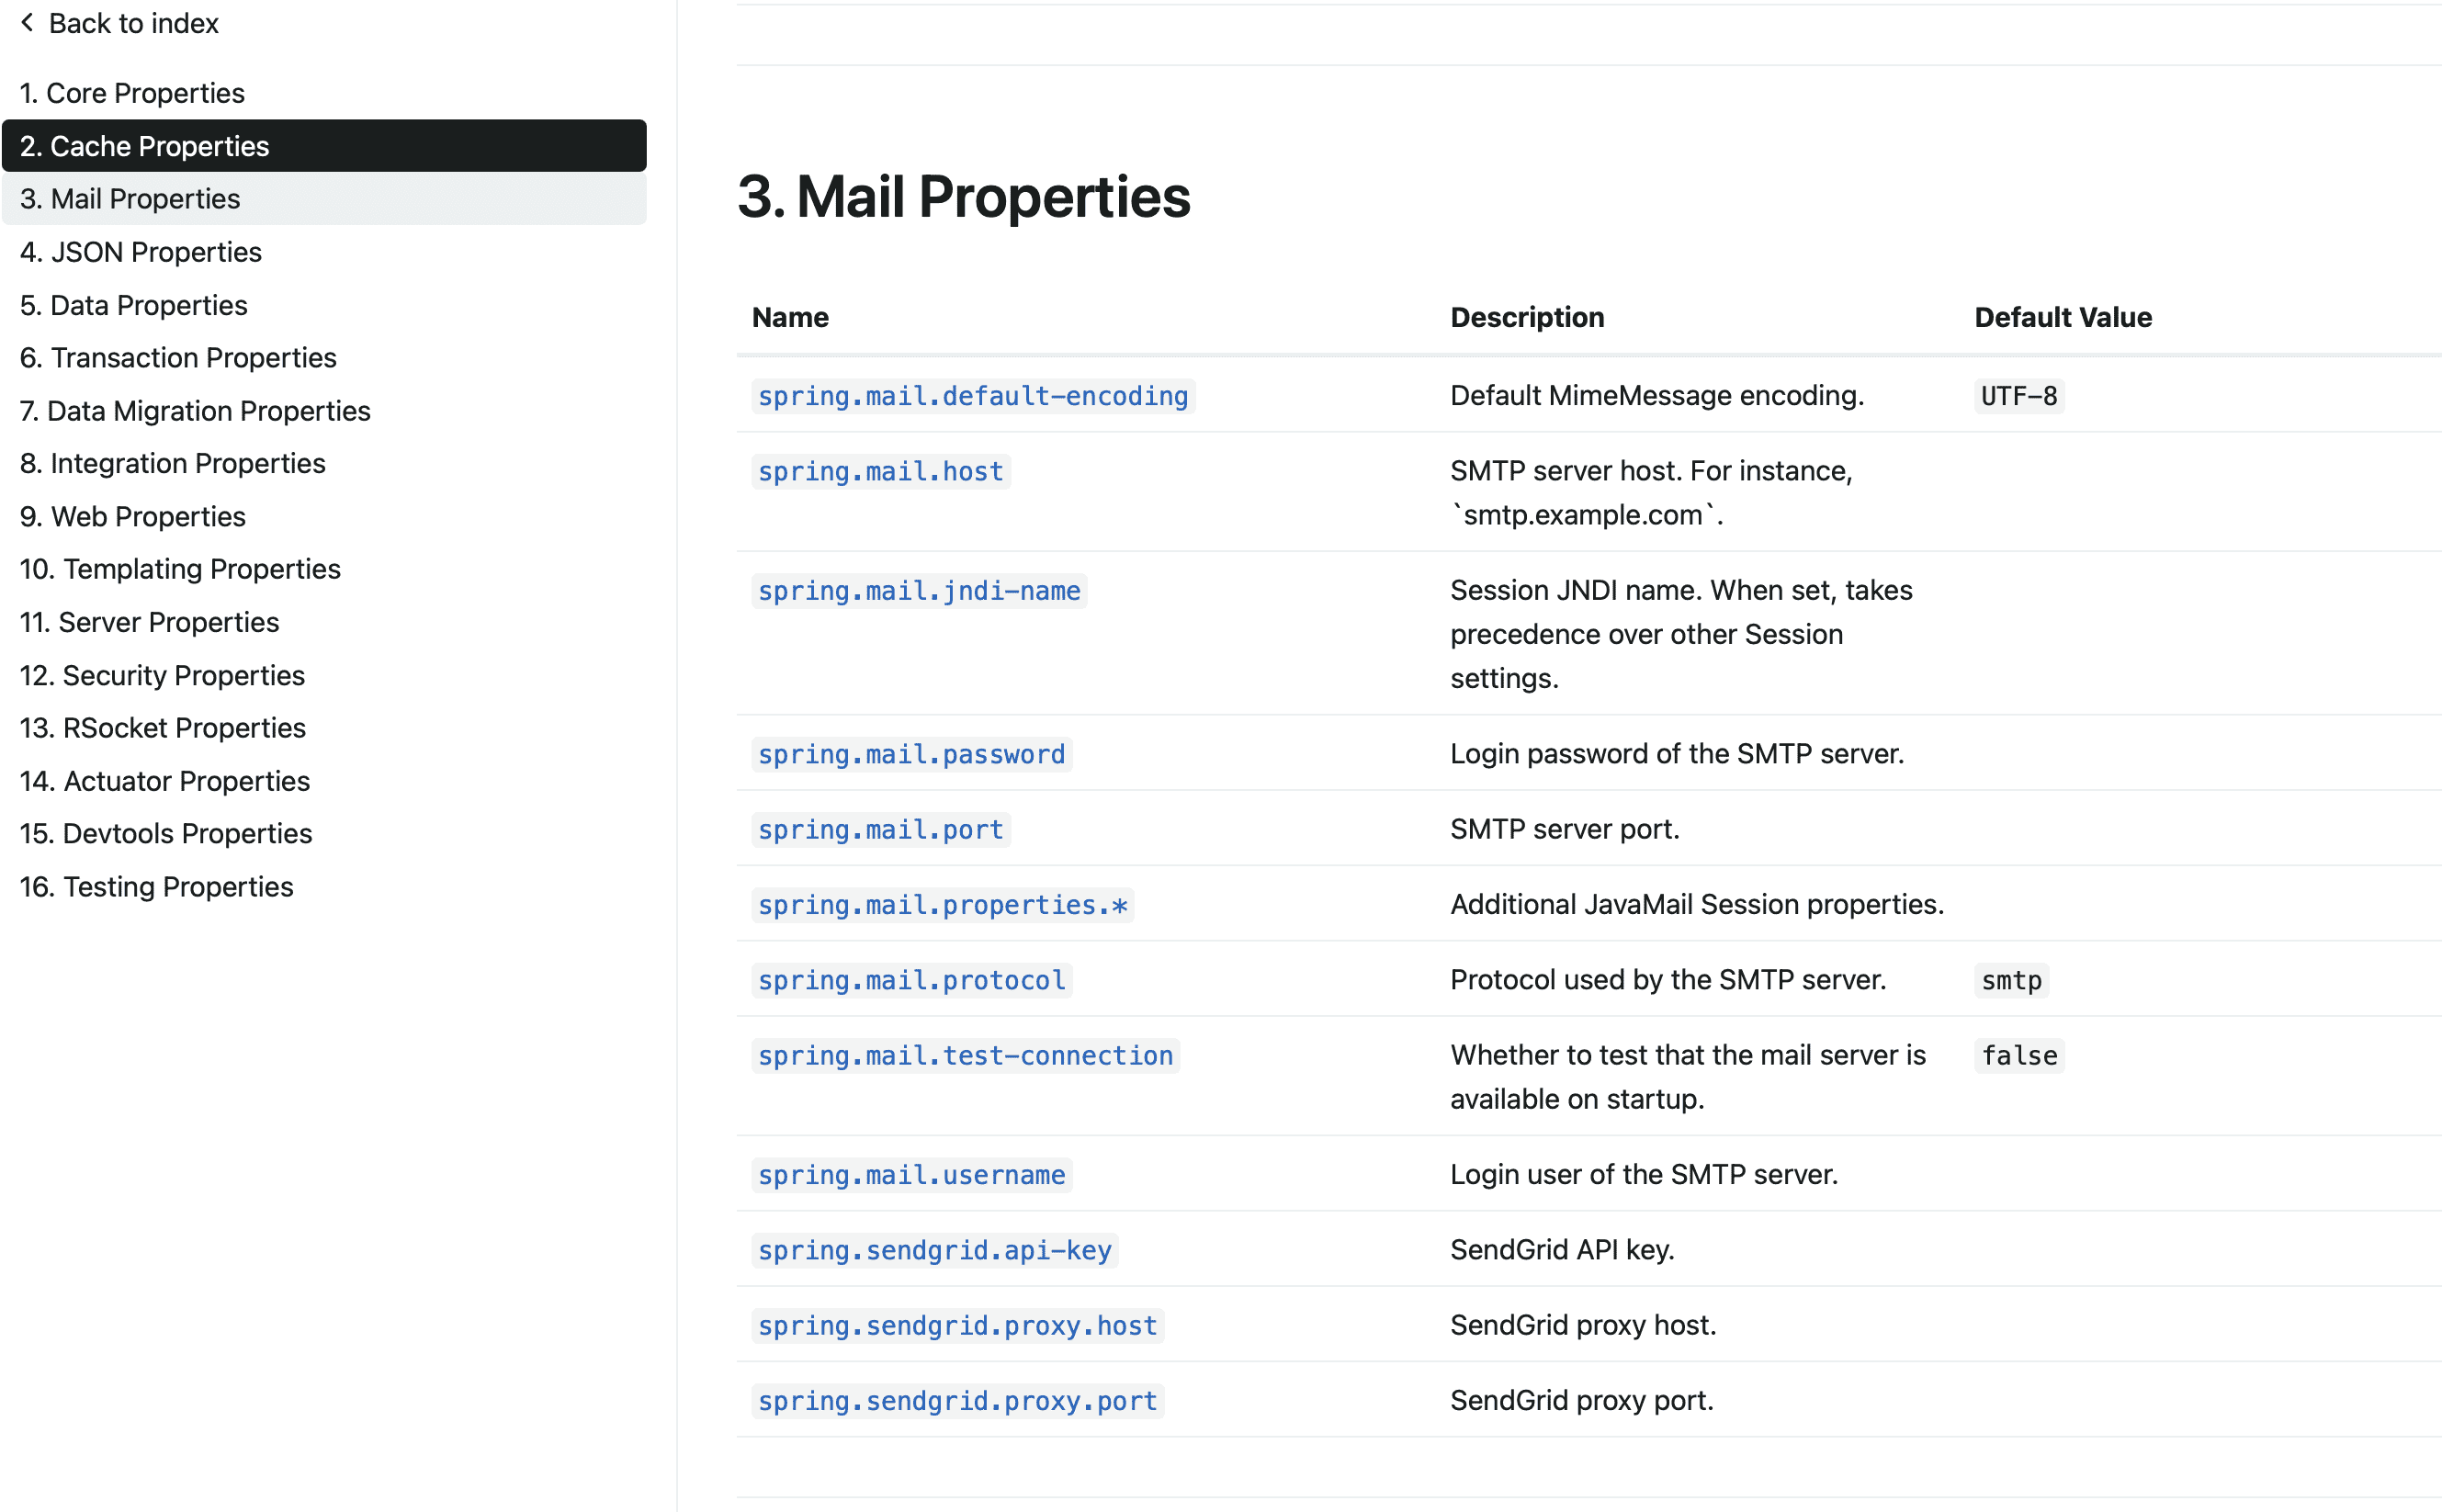
Here I've talked about two automatic configuration classes, AOP and SpringMvc. Have you found a rule that SpringBoot automatic configuration actually does what the original Spring XML configuration did, that is to hand over the core configuration classes of components to spring for management, and there are many configuration parameters in the configuration process of spring management, such as the size of uploaded files and application ports, contextPath, etc. a friend wants to ask. How can I remember so many configurations? Don't worry, I'm ready for you
Official license plate https://docs.spring.io/spring-boot/docs/current/reference/html/application-properties.html#application-properties
SpringBoot monitoring
The features of springBoot are described in detail above, including built-in Tomcat, simplified configuration, automatic configuration, and how to remove xml configuration. Now let's talk about another highlight of springBoot, multi-dimensional monitoring. Later, customize a monitoring point to practice.
Monitoring configuration
The monitoring configuration of SpringBoot is also very simple. Just introduce the following dependencies into the SpringBoot project
<dependency>
  <groupId>org.springframework.boot</groupId>
  <artifactId>spring-boot-starter-actuator</artifactId>
</dependency>
Then you can see the following output in the startup log to prove that a simple monitoring is configured
Exposing 1 endpoint(s) beneath base path '/actuator'
Tomcat started on port(s): 8080 (http) with context path ''
Started Demo2Application in 4.704 seconds (JVM running for 12.593)
You can see that SpringBoot exposes a / actor interface by default, so it can be accessed after startup http://localhost:8080/actuator Yes, you can see the default three links, but only these three are enough. They must be full! Configure parameter management endpoints. web. exposure. Include = * indicates that all monitoring extension points are enabled
{
"_links": {
"self": {
"href": "http://localhost:8080/actuator",
"templated": false
},
"loggers-name": {
"href": "http://localhost:8080/actuator/loggers/{name}",
"templated": true
},
"loggers": {
"href": "http://localhost:8080/actuator/loggers",
"templated": false
},
"mappings": {
"href": "http://localhost:8080/actuator/mappings",
"templated": false
},
"metrics-requiredMetricName": {
"href": "http://localhost:8080/actuator/metrics/{requiredMetricName}",
"templated": true
},
"metrics": {
"href": "http://localhost:8080/actuator/metrics",
"templated": false
},
"threaddump": {
"href": "http://localhost:8080/actuator/threaddump",
"templated": false
},
"configprops": {
"href": "http://localhost:8080/actuator/configprops",
"templated": false
},
"configprops-prefix": {
"href": "http://localhost:8080/actuator/configprops/{prefix}",
"templated": true
},
"info": {
"href": "http://localhost:8080/actuator/info",
"templated": false
},
"env": {
"href": "http://localhost:8080/actuator/env",
"templated": false
},
"env-toMatch": {
"href": "http://localhost:8080/actuator/env/{toMatch}",
"templated": true
},
"scheduledtasks": {
"href": "http://localhost:8080/actuator/scheduledtasks",
"templated": false
},
"beans": {
"href": "http://localhost:8080/actuator/beans",
"templated": false
},
"caches": {
"href": "http://localhost:8080/actuator/caches",
"templated": false
},
"caches-cache": {
"href": "http://localhost:8080/actuator/caches/{cache}",
"templated": true
},
"conditions": {
"href": "http://localhost:8080/actuator/conditions",
"templated": false
},
"heapdump": {
"href": "http://localhost:8080/actuator/heapdump",
"templated": false
},
"health-path": {
"href": "http://localhost:8080/actuator/health/{*path}",
"templated": true
},
"health": {
"href": "http://localhost:8080/actuator/health",
"templated": false
}
}
}There are all kinds of monitoring points. For example, check the application and the application status of each dependent component through health, package and download the dump file of HotSpot JVM through heapdump, see the bean object of spring container through beans, and see the environment variables, operating system, port, etc. through env. Is it more monitoring than previous applications
In fact, these monitoring are very sensitive, so if you want to start monitoring in the production environment, you need to make some security policies, such as integrating with Spring Security, or turning off some sensitive monitoring. I won't talk about protecting monitoring points in detail here.
Integrate other extended monitoring
Next, let's talk about some extended information. Some experienced little cute may have opinions on these indicator monitoring. What's the use of these? I don't want to see the static data. Can you give me a cockpit visual monitoring? Coincidentally, there are really arrangements!
The monitoring suite that can be integrated is displayed on the official website. Address:
https://docs.spring.io/spring-boot/docs/current/reference/html/actuator.html#actuator.metrics.export
The following packages are specifically supported. I'll choose one at random, Prometheus, because the name is better, Prometheus
Integrating Prometheus is also relatively simple. First, introduce relevant dependencies
<dependency>
    <groupId>io.prometheus</groupId>
    <artifactId>simpleclient_pushgateway</artifactId>
</dependency>
Then start the SpringBoot project, and you can see that there are more links to the monitoring point, which is Prometheus's monitoring point
// Omit some other monitoring points
"metrics": {
  "href": "http://localhost:8080/actuator/metrics",
  "templated": false
},
"prometheus": {
  "href": "http://localhost:8080/actuator/prometheus",
  "templated": false
},
"configprops": {
  "href": "http://localhost:8080/actuator/configprops",
  "templated": false
}
Click the Prometheus monitoring point link to see many monitoring indicators, such as thread related, jvm related, etc.
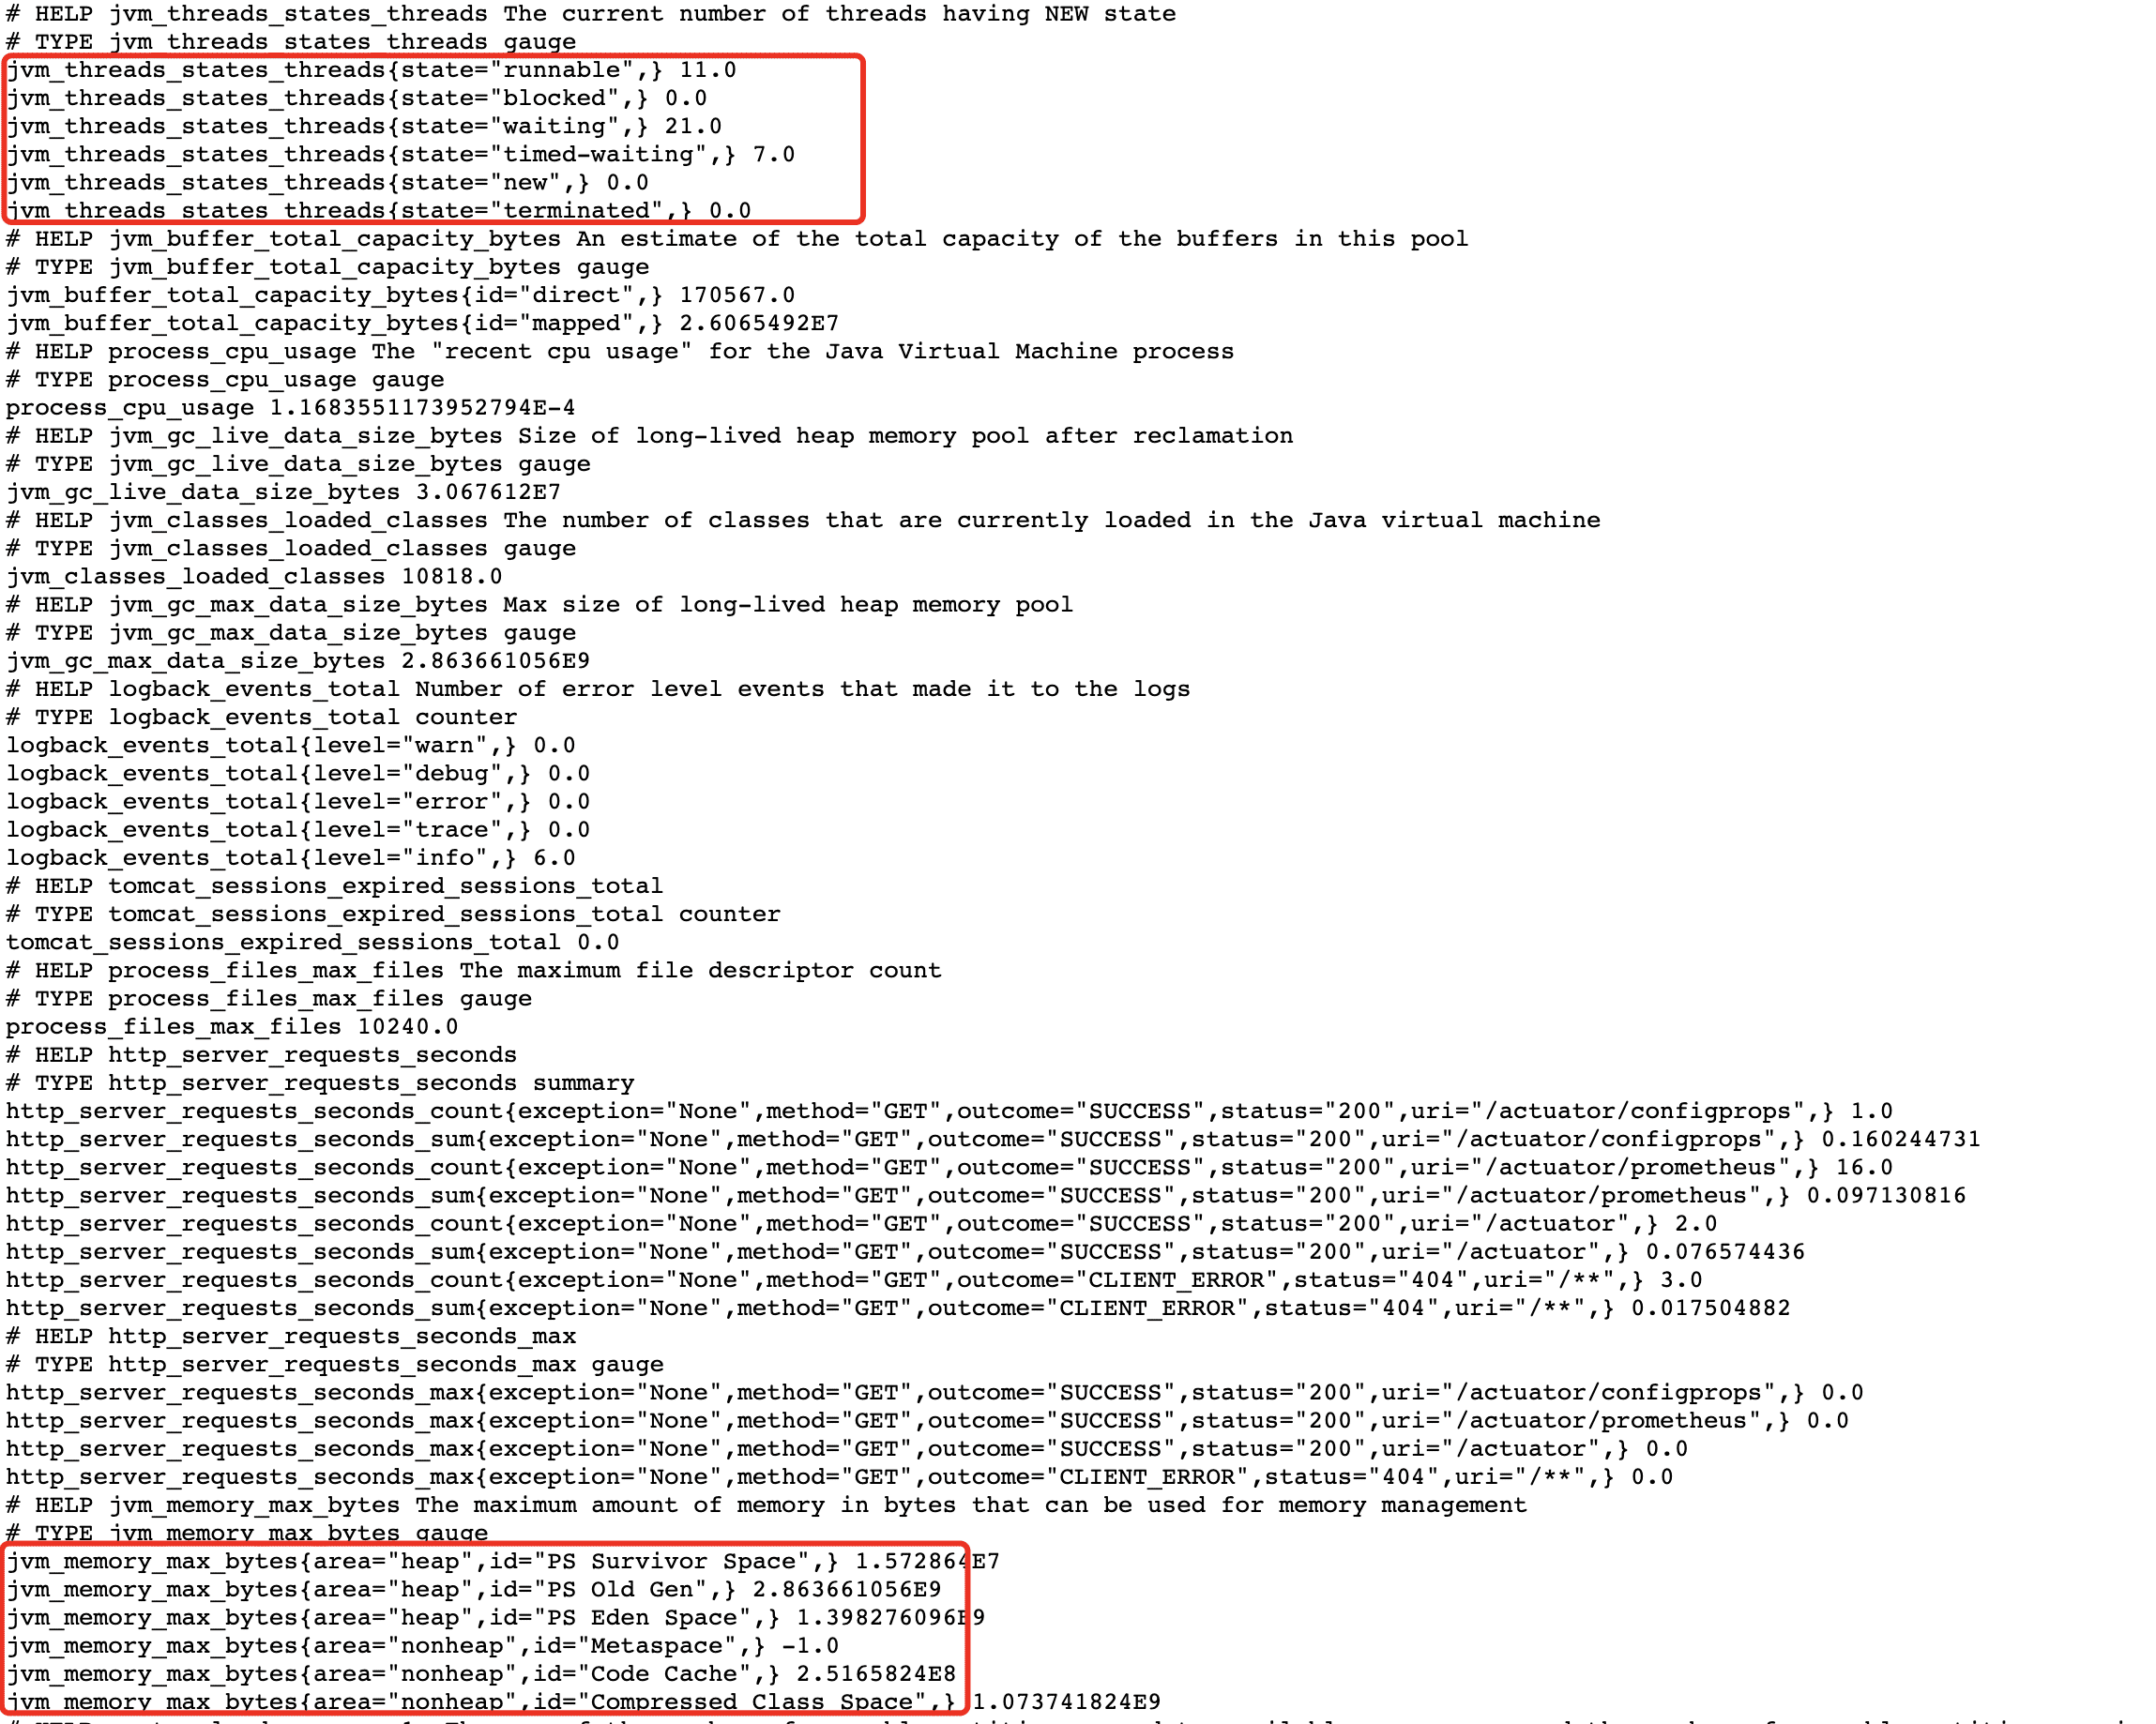
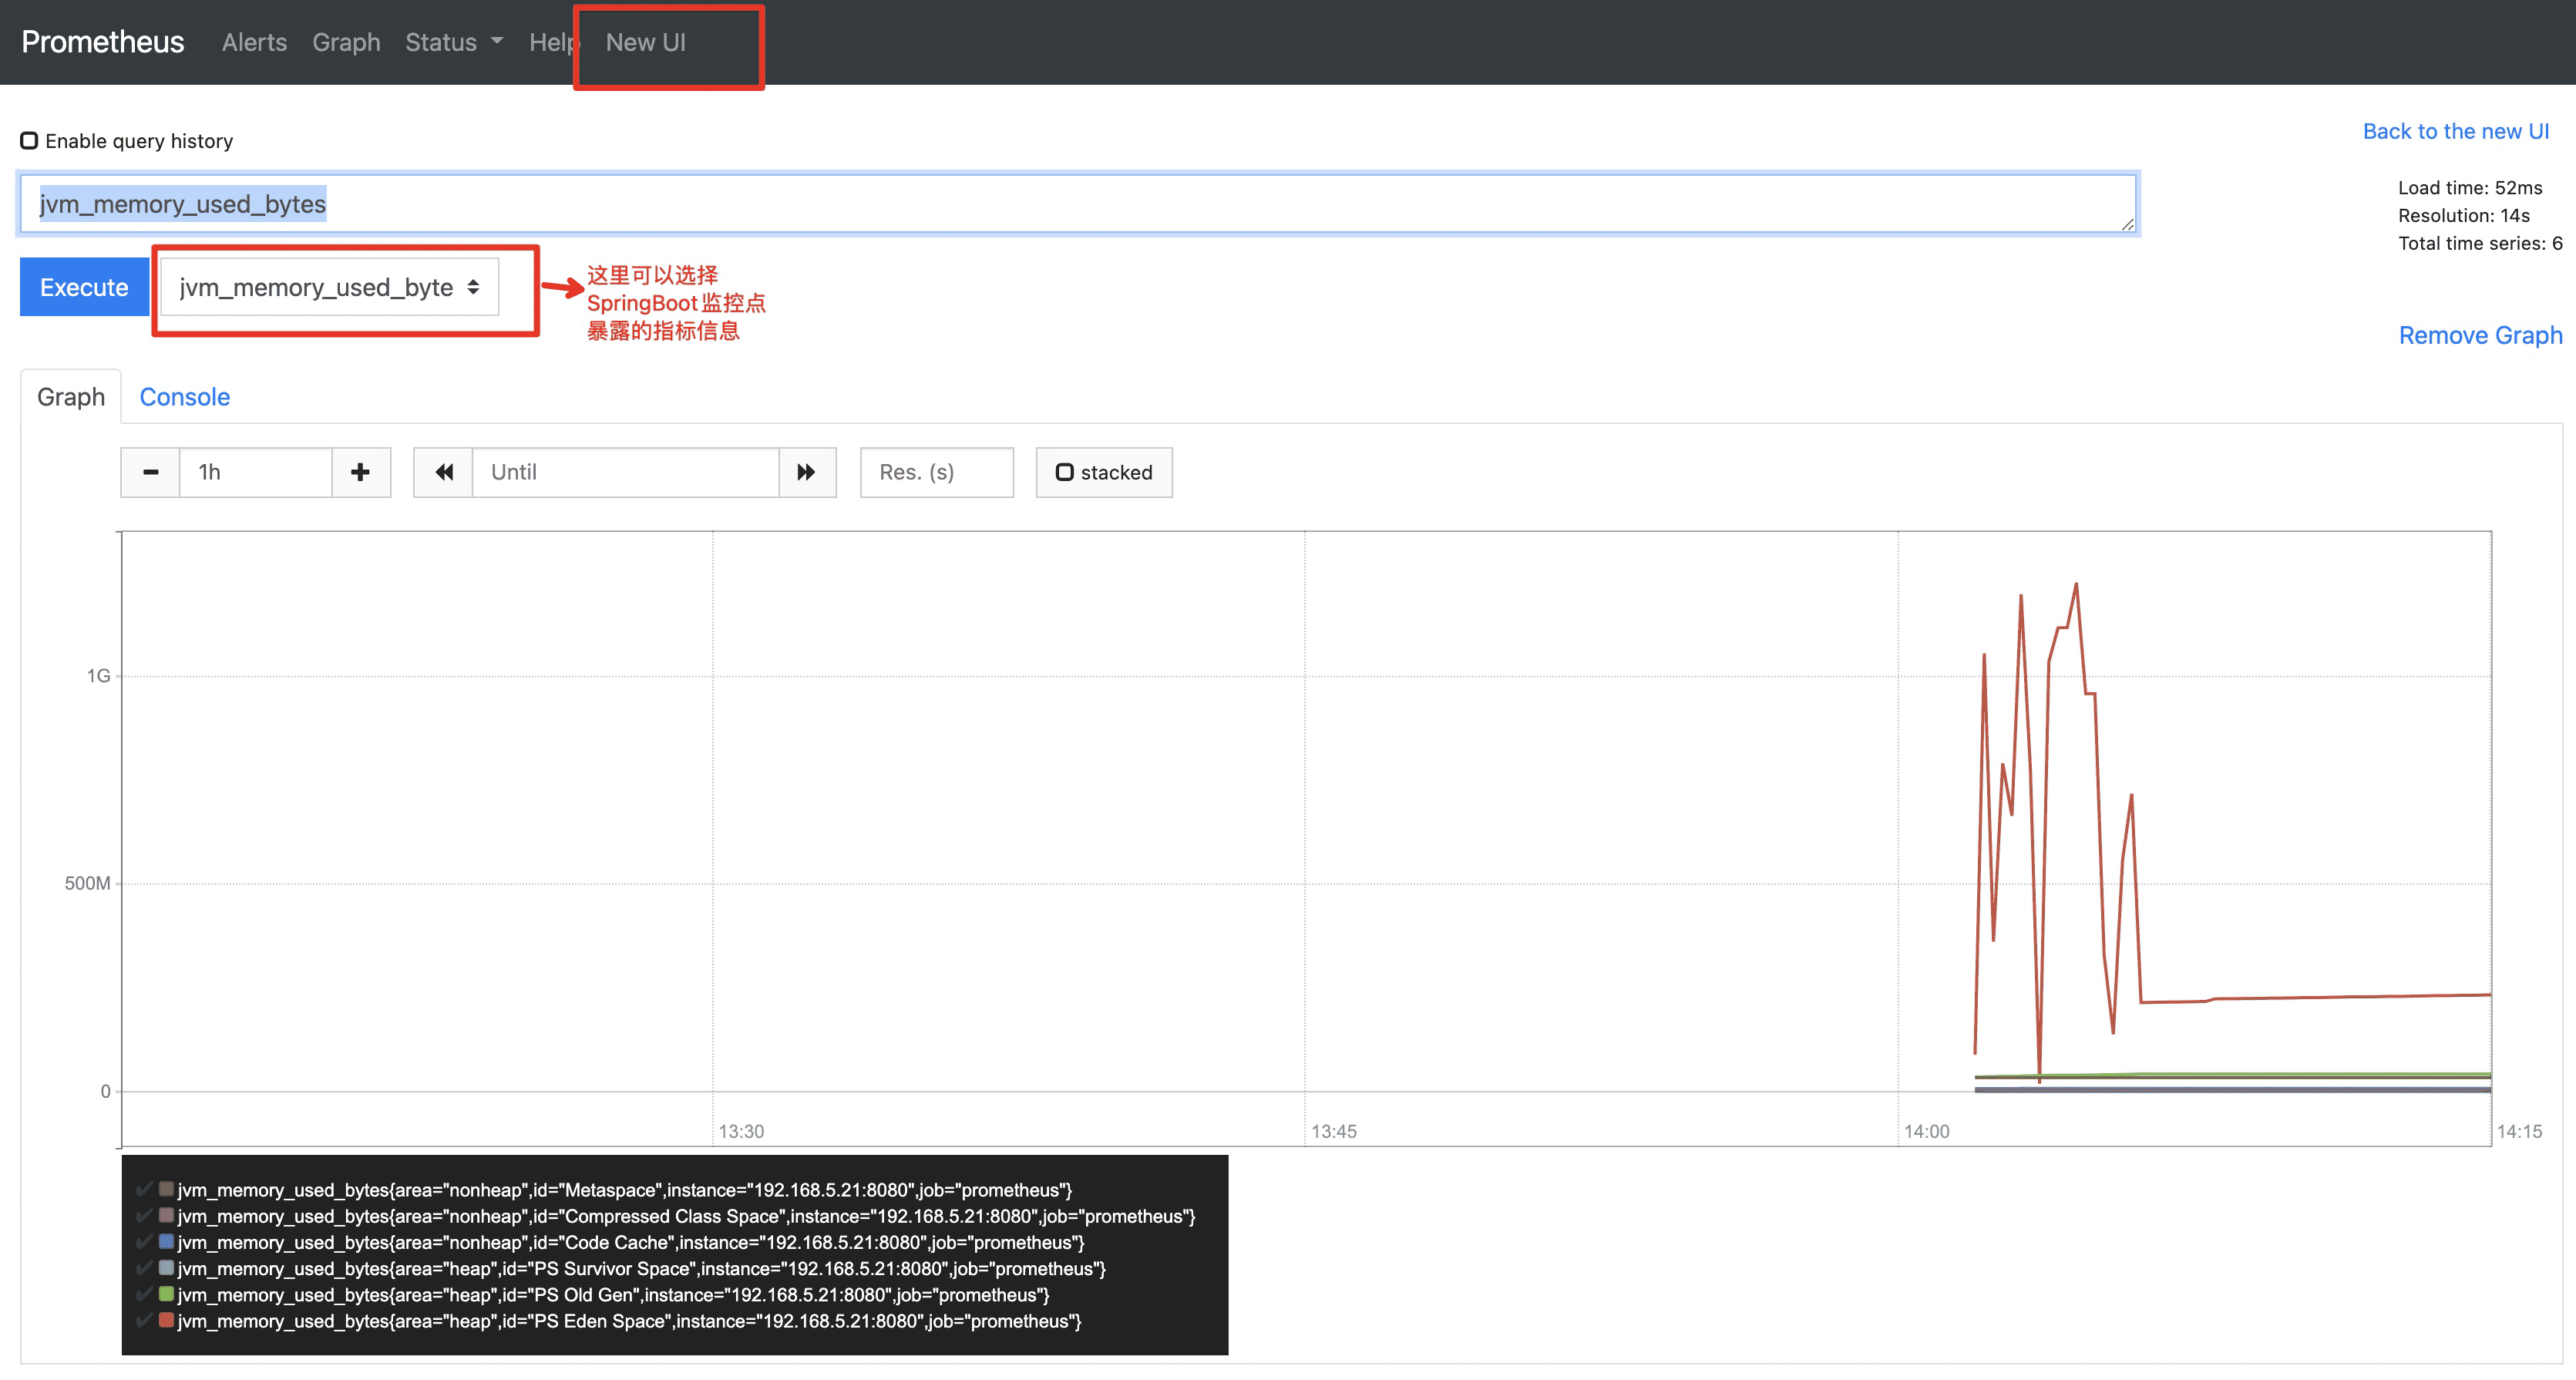
Of course, these data indicators are certainly not intuitive, right? Then click the chart to show it. Next, let's see how to integrate Prometheus. You can see the above information on the SpringBoot side. Prometheus is a third-party monitoring software. I will mainly talk about the monitoring function of SpringBoot here, and the actual operation of other components will be omitted. Interested friends can pay attention to VX: Java geek help. I should read it and open a small stove.
Prometheus official website: https://prometheus.io
Download the corresponding version and modify Prometheus YML configuration file. I posted my changes
scrape_configs: # The job name is added as a label `job=<job_name>` to any timeseries scraped from this config. - job_name: "prometheus" # metrics_path defaults to '/metrics' # scheme defaults to 'http'. # Prometheus monitoring point of springBoot metrics_path: 'actuator/prometheus' static_configs: # springboot project address - targets: ["192.168.5.21:8080"]

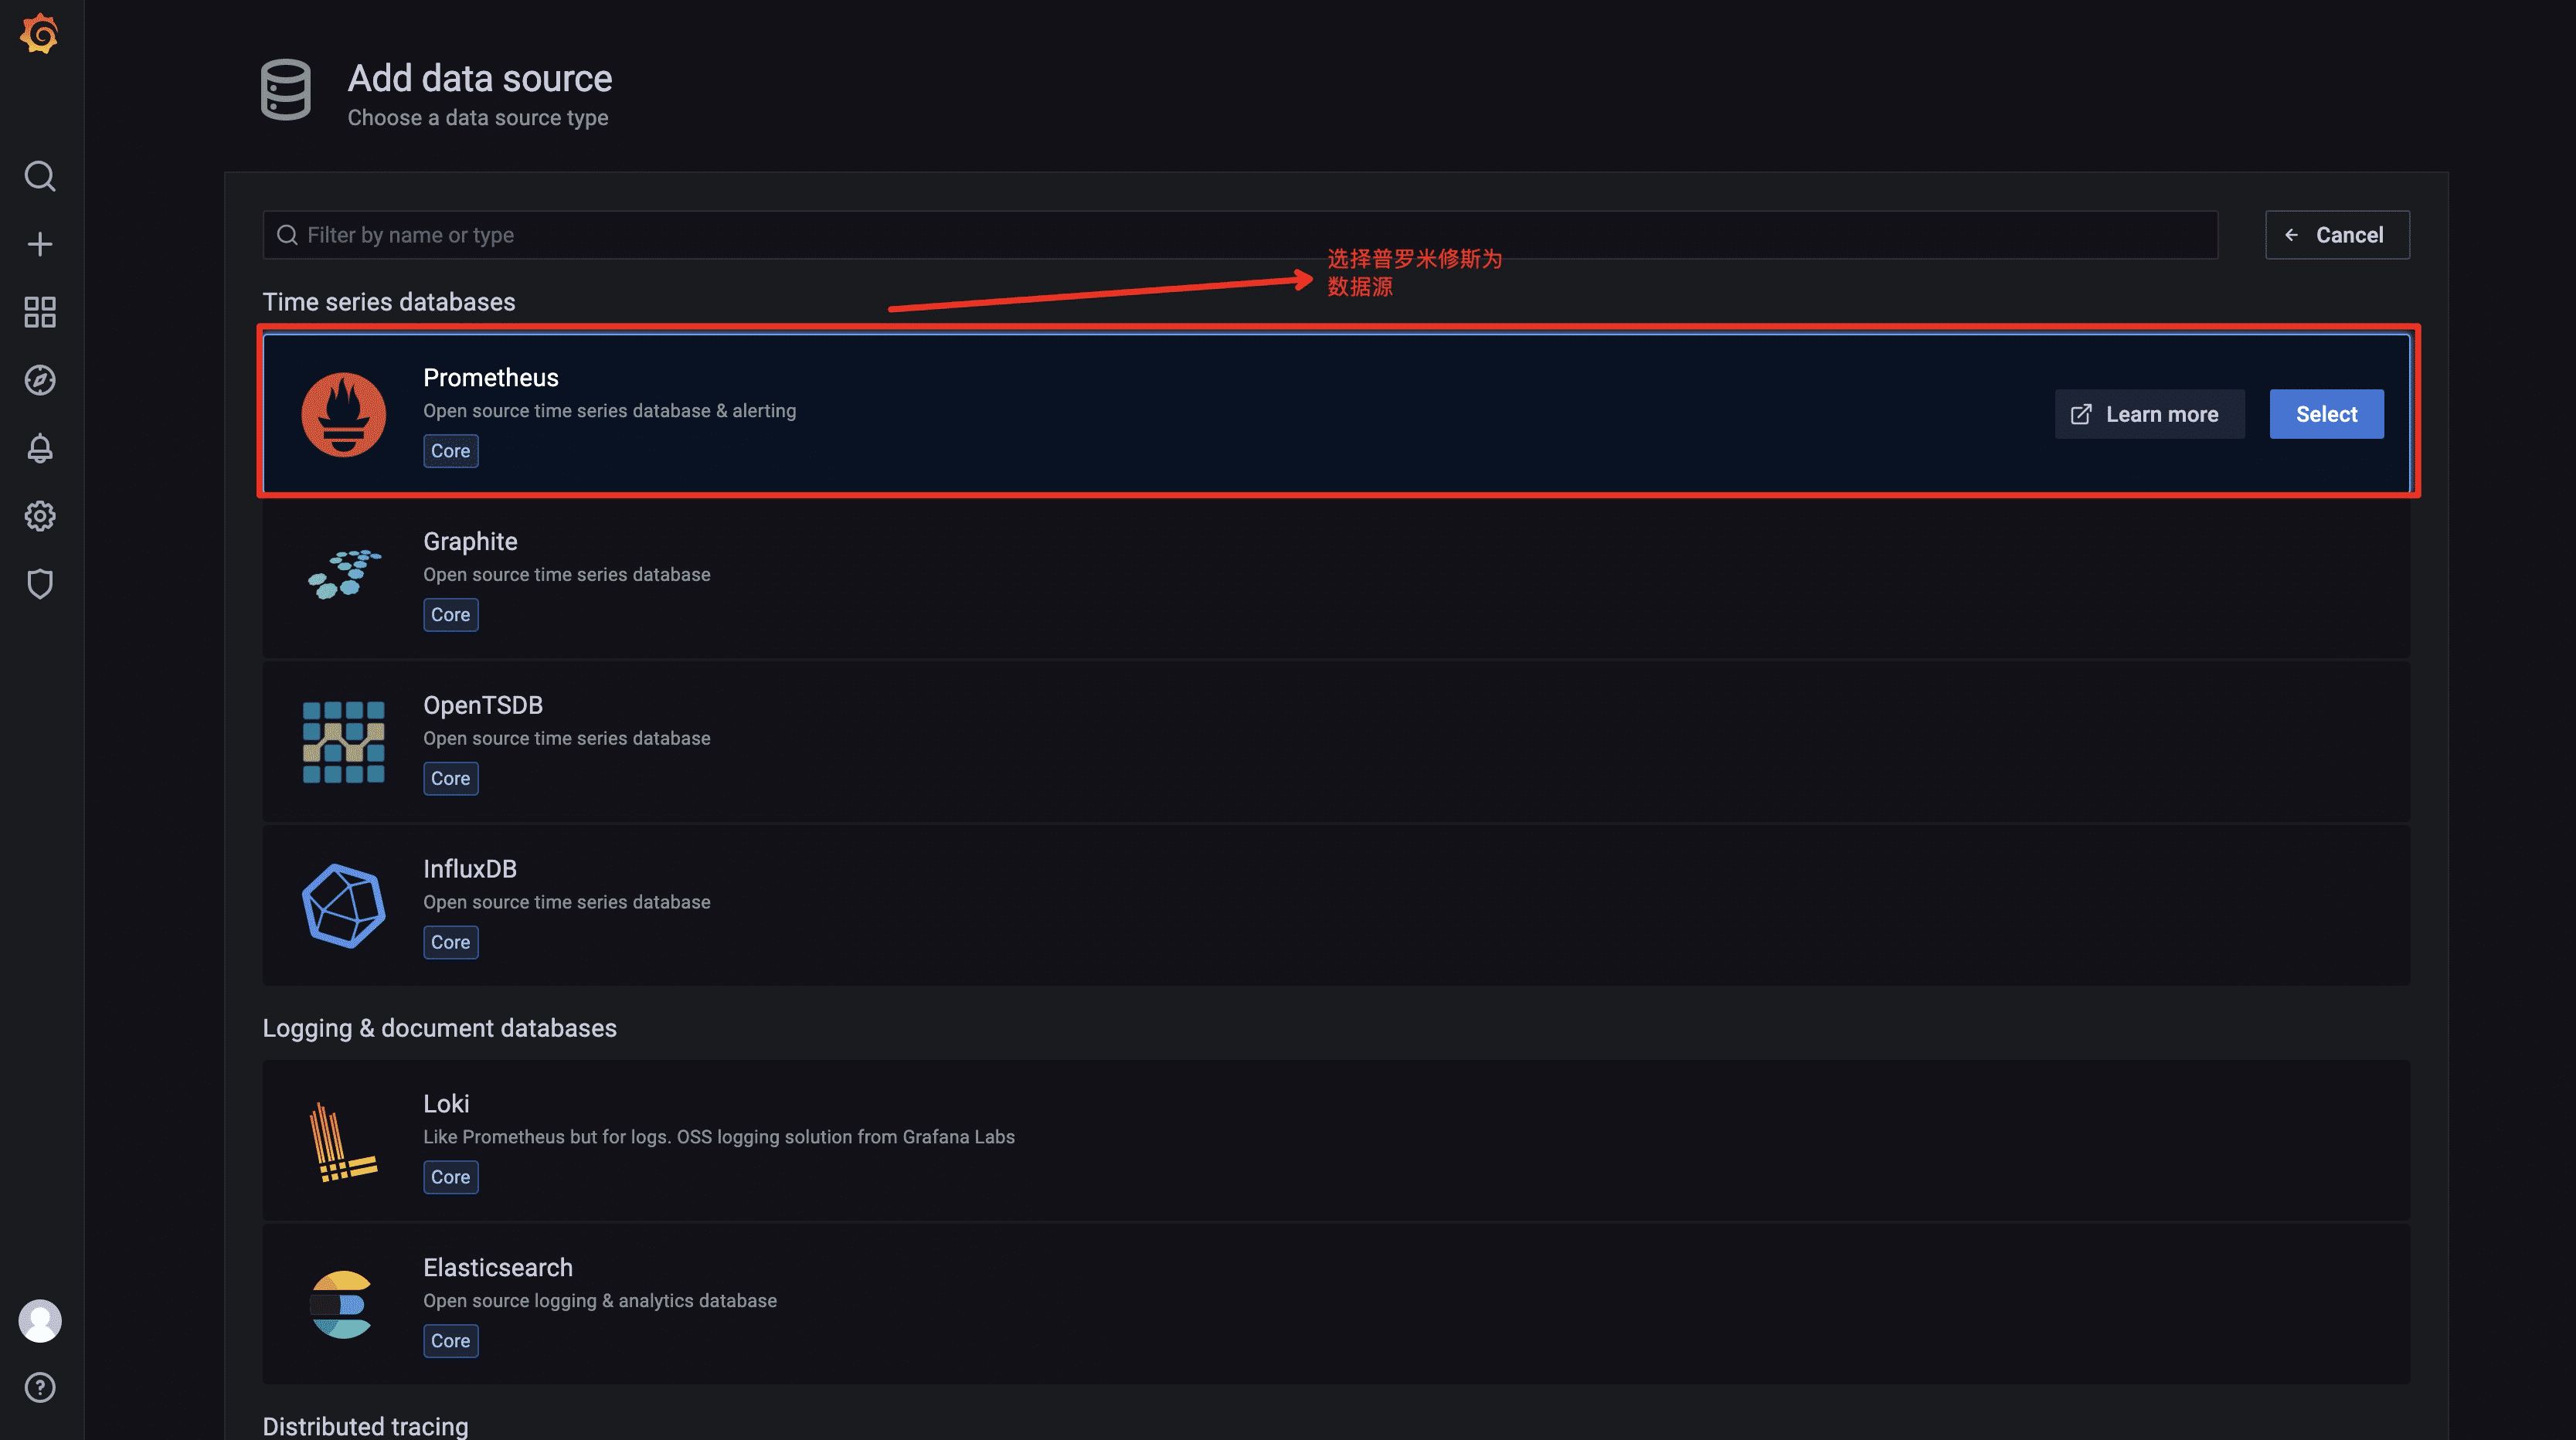
Grafana presentation and integration
Seeing this, Prometheus's monitoring point is displayed. Is it still very simple? But some extreme friends must want to say that such a monitoring icon is the cockpit experience? So I also prepared a hand for you. Let's see the effect drawing first
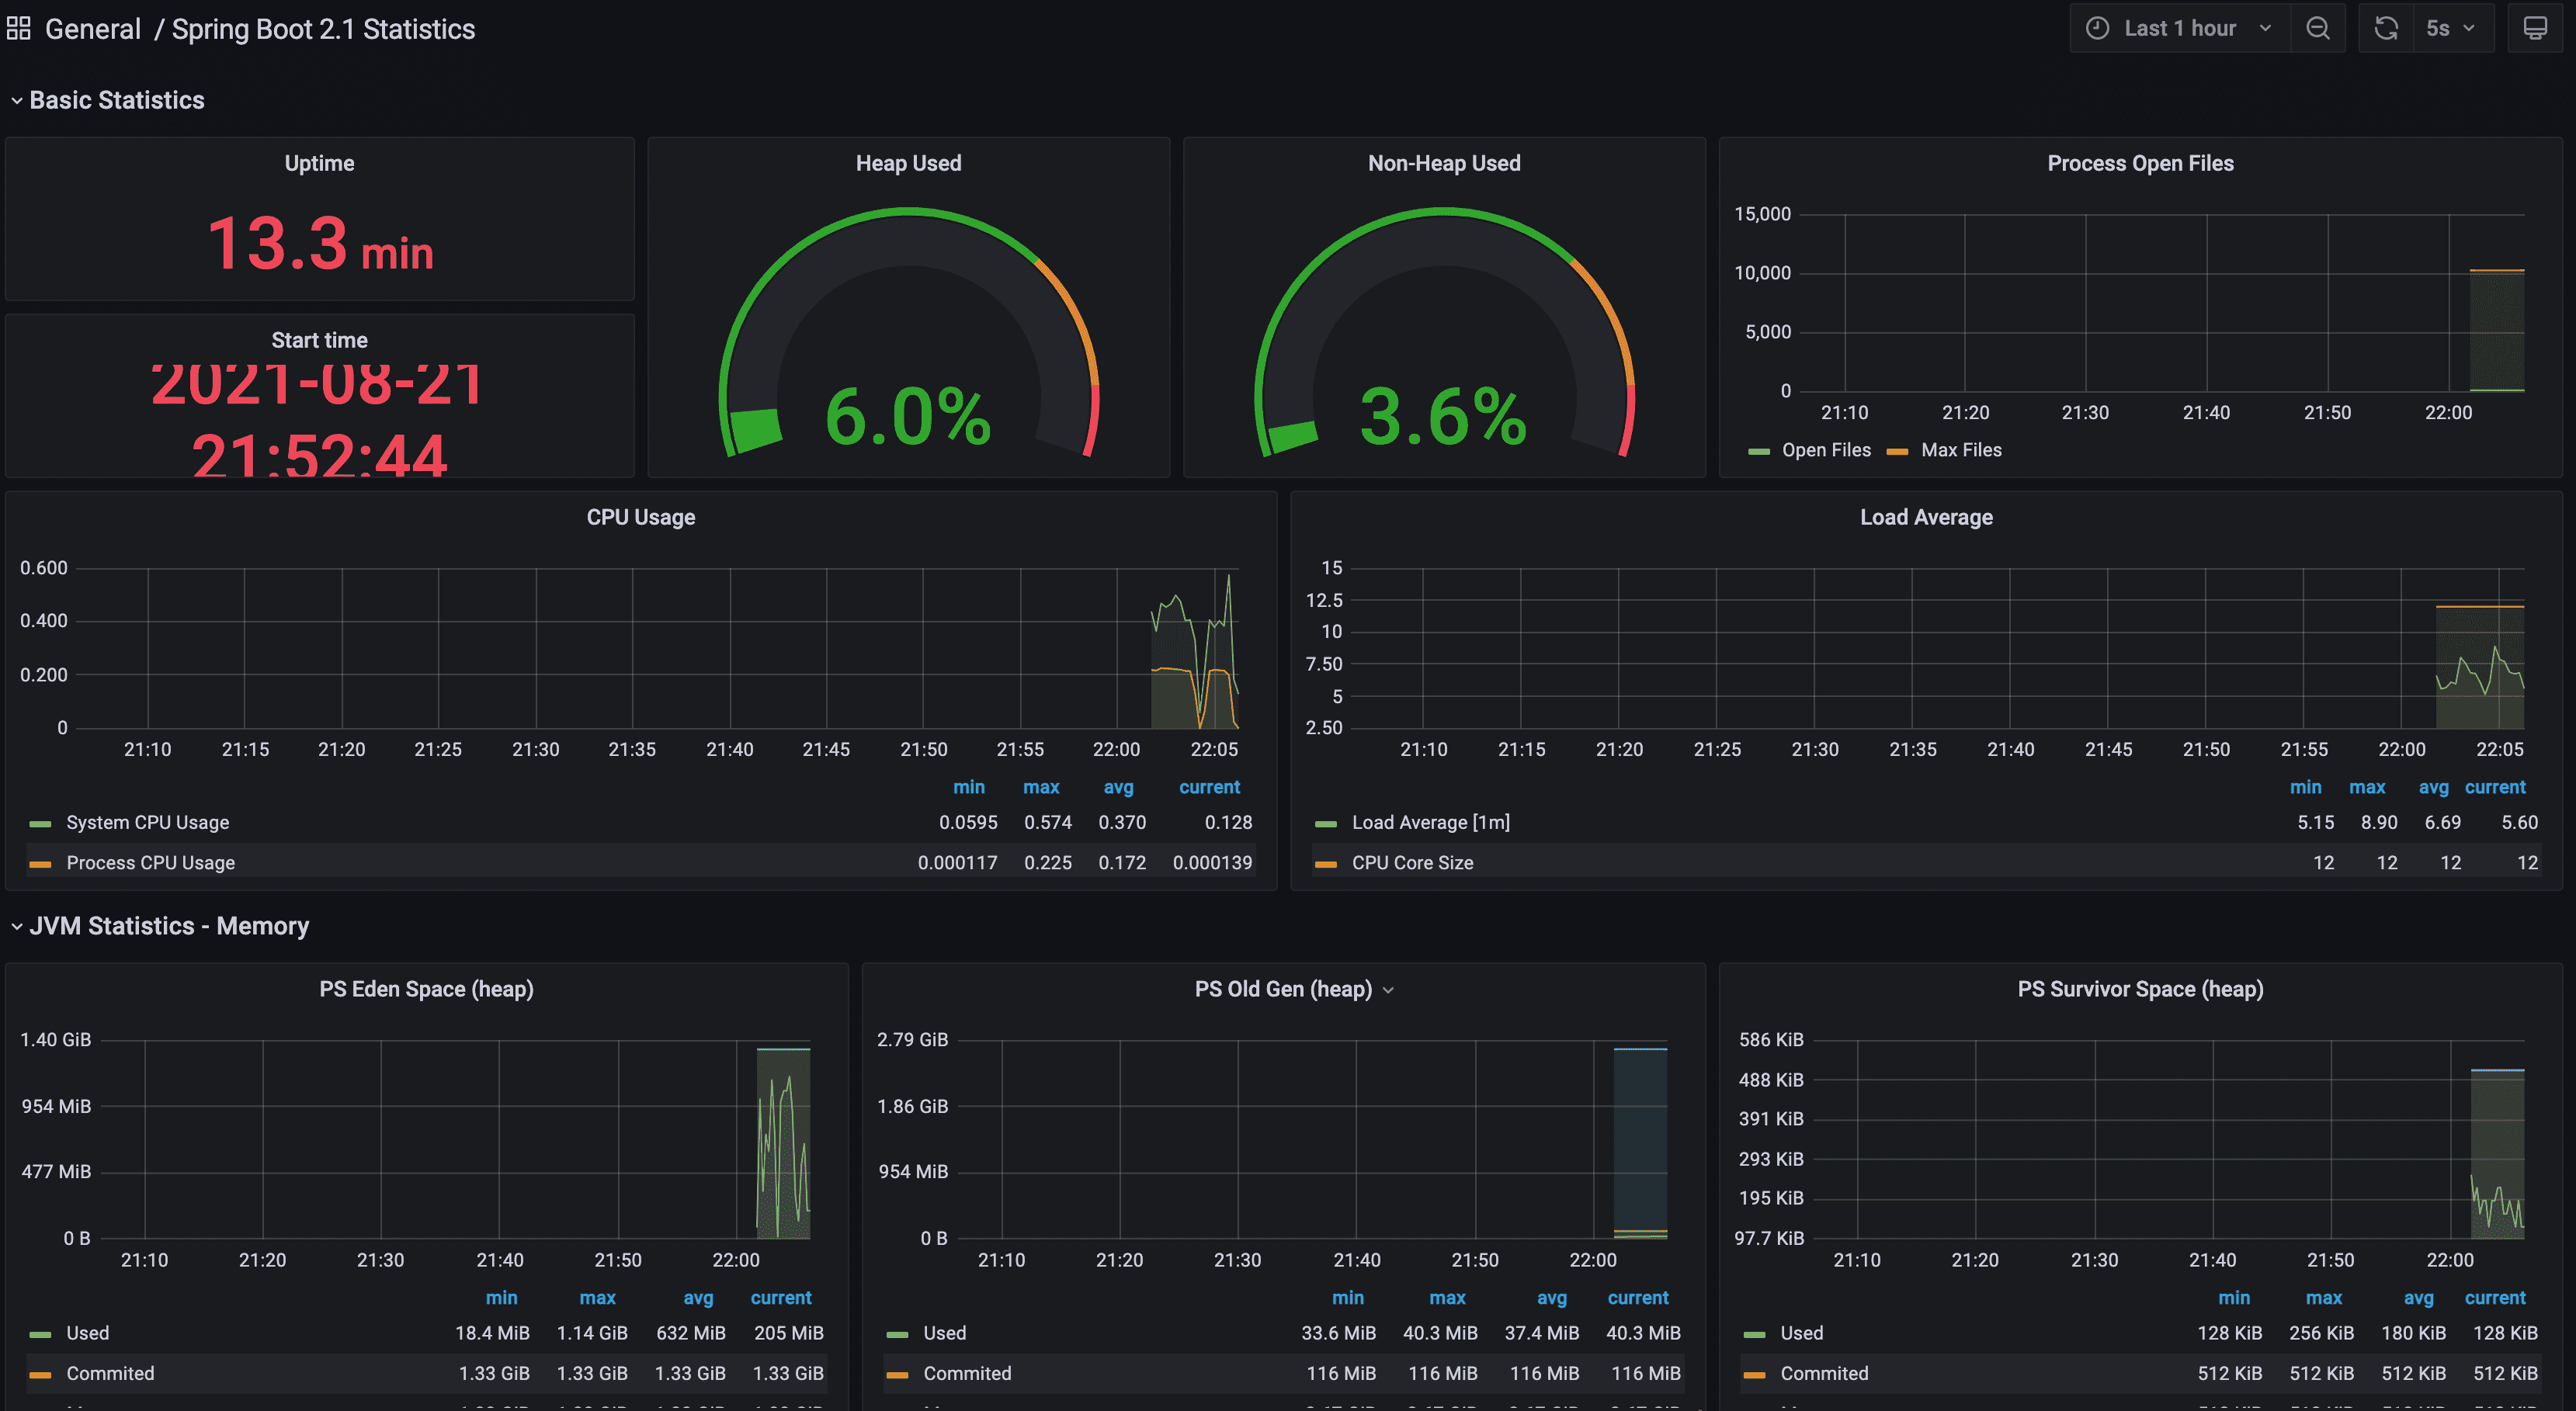
This is very intuitive. Various dimensions have been configured. We don't need to add them one by one. The default basic report shows the monitoring information of various dimensions. The jvm has everything. This is grafana, the shoulder of the monitoring community. Similarly, the theme here is SpringBoot. Grafana, I'll simply talk about the configuration, which proves that SpringBoot monitoring is still very powerful. We all have to bear it 🤪
I installed Grafana using Docker
Specific execution command
docker run -d -p 3000:3000 --name grafana grafana/grafana
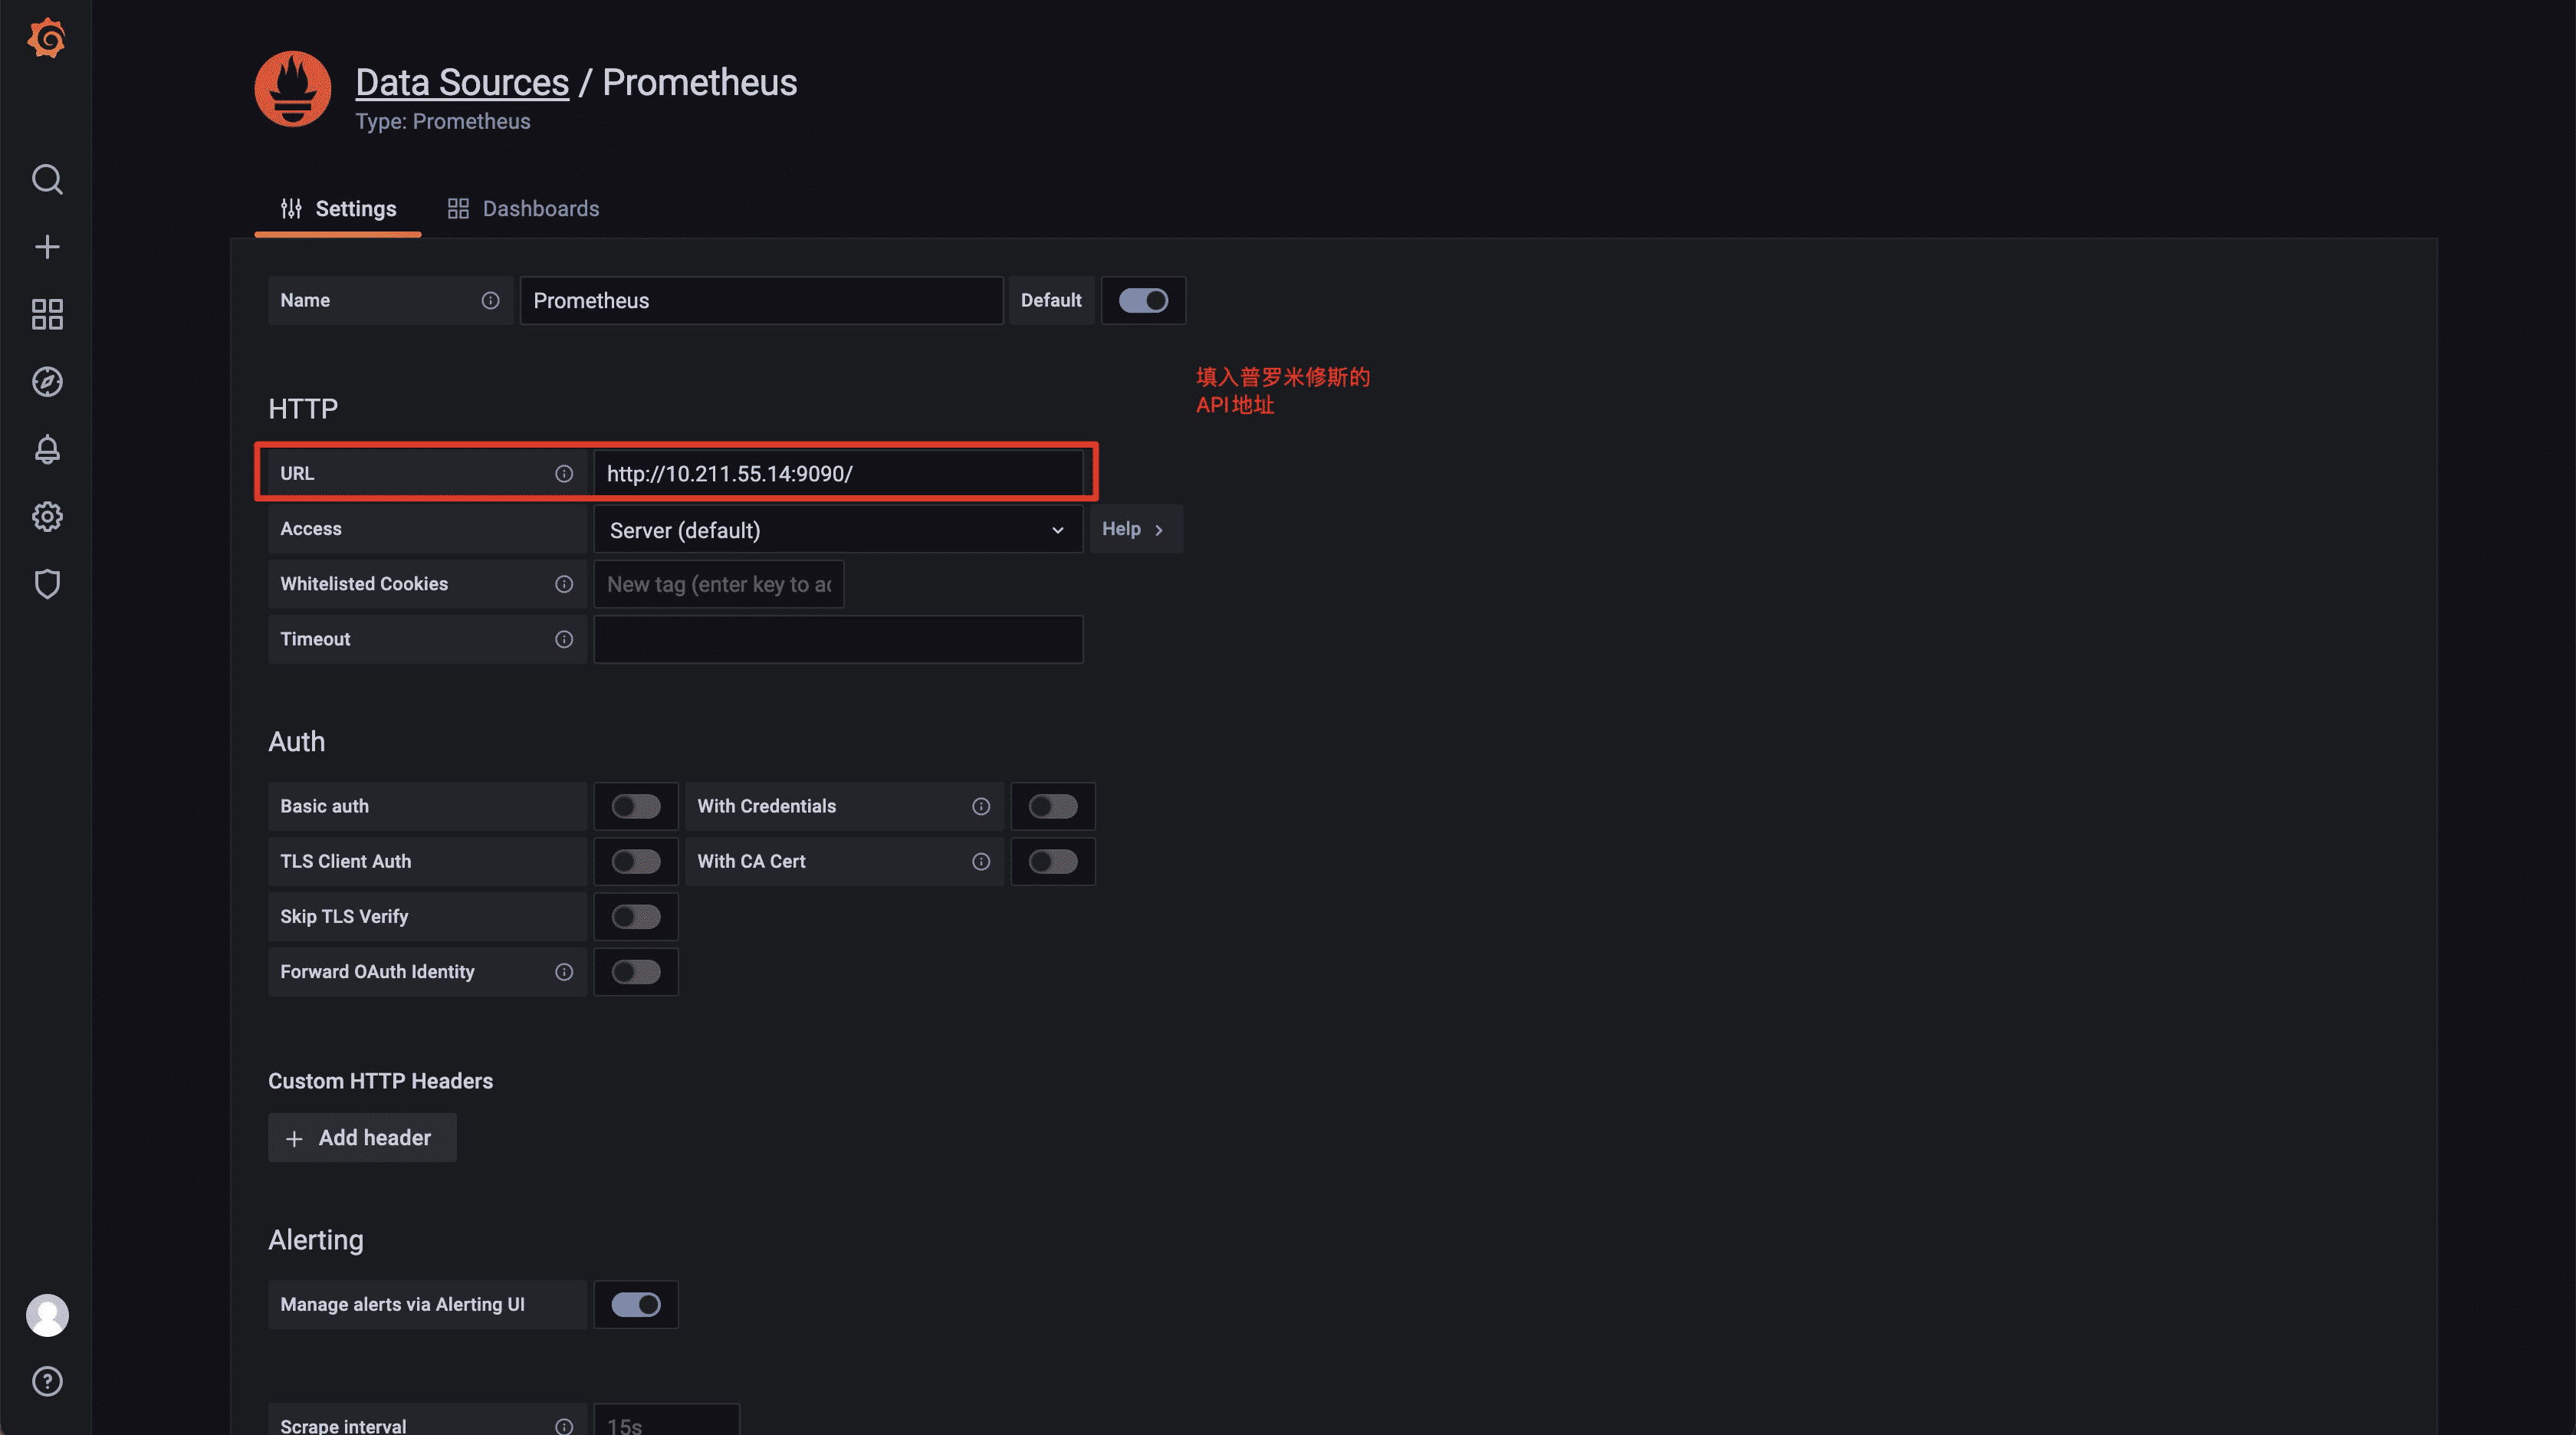
Then select your favorite template or add your own form to achieve the above dimension monitoring.
summary
Starting from the characteristics of SpringBoot, this paper explains each feature and a personal point of view in detail. If you want to understand several characteristics of SpringBoot from the perspective of source code, you still need the foundation of Spring source code. In particular, the interpretation of the source code of automatic configuration is essential to the Spring Bean life cycle, Spring extension points, containers and other knowledge. Of course, I also wrote this sharing with a learning attitude. If there are mistakes in the content, please correct them.
If you have just graduated or worked for a short time, you may not have experienced XML configuration. Just use SpringBoot as the starting point. Personally, I think the project development must be very efficient, out of the box. But for developers, it is a blind box. They don't know how the bottom layer works, why maven can configure starter dependency to achieve the purpose of configuration integration, and how to solve integration problems. Therefore, it is necessary to properly understand how SpirngBoot realizes these points. Of course, I will continue to share relevant knowledge from the perspective of learning.
If you like, please pay attention to my VX: Java geek help