1, Install vmbox and vagrant
1. Download address
Vagrant: https://releases.hashicorp.com/vagrant/2.2.5/vagrant_2.2.5_x86_64.msi
==VirtualBox: == https://download.virtualbox.org/virtualbox/6.0.10/VirtualBox-6.0.10-132072-Win.exe
Remember to turn on cpu virtualization
2. vagrant initializes the virtual machine
CUHK mirror station, such as: https://mirrors.ustc.edu.cn/centos-cloud/centos/7/vagrant/x86_64/images/CentOS-7.box
Start a CentOS 7 virtual machine to quickly download CentOS 7
vagrant init centos7 https://mirrors.ustc.edu.cn/centos-cloud/centos/7/vagrant/x86_64/images/CentOS-7.box
3. Start the virtual machine
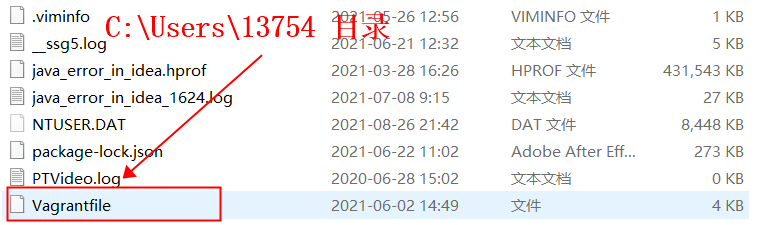
cmd directly into the directory where vagrant is located, because we put the vagrant file in the C: \ users \ 13754 > directory during initialization
//Start the virtual machine or operate directly on the vmbox interface
vagrant up
4. Exit the command because the vmbox is already started
ctrl c
5. Connect to virtual machine
//Connect vagrant to virtual machine
vagrant ssh

//Exit virtual machine
exit
6. Virtual machine network settings
Network address translation, port forwarding
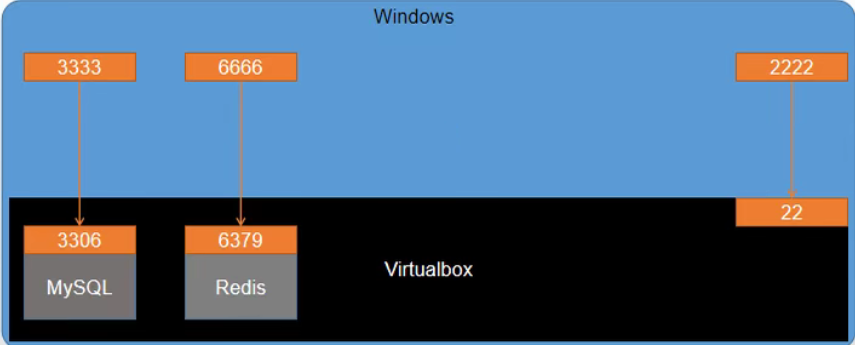
1. virtualbox is installed on windows system
2. Inside the virtualbox is the linux system
3. mysql, redis and other software will be installed in linux system
4. mysql and redis also have their own default ports, such as 3306 and 6379
5. virtualbox needs to bind the port of its software in linux system with the port of windows system. For example, accessing port 3333 of windows is equivalent to accessing port 3306 of linux
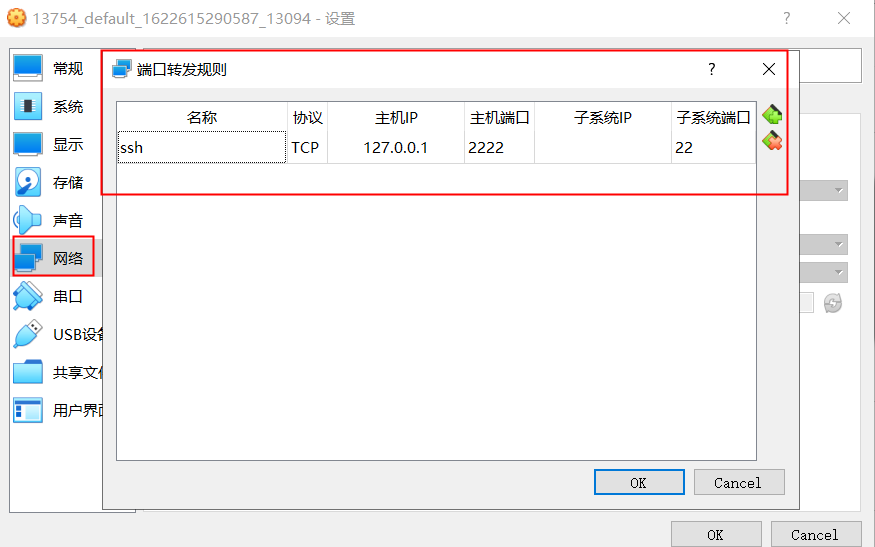
6. After installing a software in virtualbox linux, you need to set port forwarding rules in virtualbox
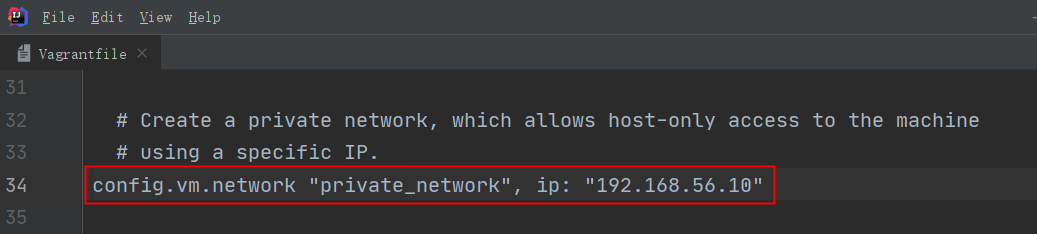
7. But this is too troublesome. We will give the virtual machine a fixed ip address
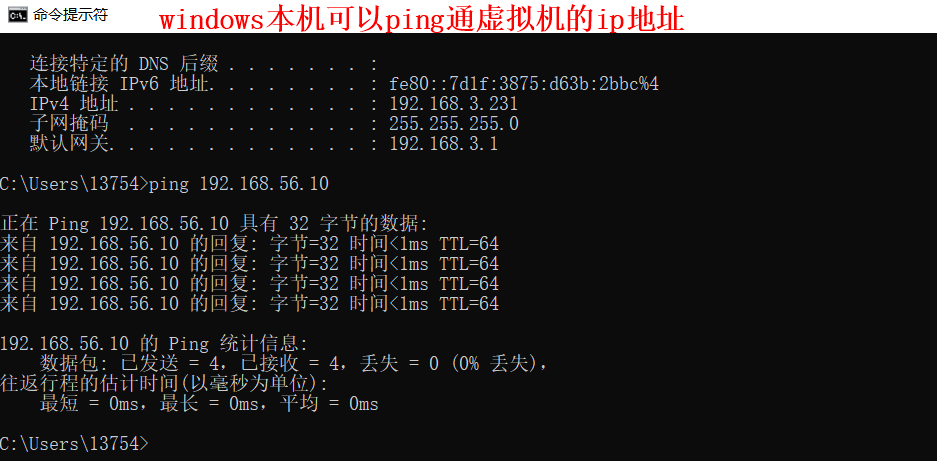
8. Windows and linux virtual machines ping each other, so that linux installs the software and windows
Just use the ip address to access it directly
The virtual machine is created using vagrant, so you can directly configure the vagrant file
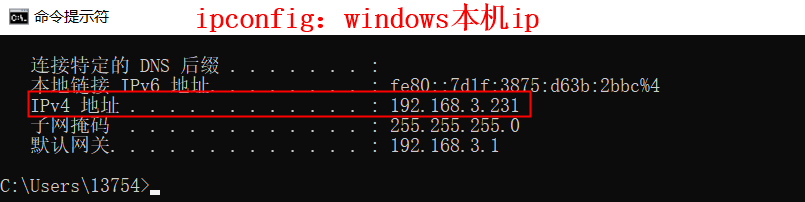
View the virtualbox ip address on windows native

vagrant automatically generated files
Modify the vagrant file to configure the virtualbox port on the windows host
# Connecting virtual machines
C:\Users\13754>vagrant ssh
Last login: Wed Jun  2 06:28:49 2021 from 10.0.2.2

#Exit virtual machine
[vagrant@localhost ~]$ exit
logout
Connection to 127.0.0.1 closed.

# Restart the virtual machine
C:\Users\13754>vagrant reload

Test whether the windows host and virtual machine can ping each other
View the ip address of windows native

2, Installing docker for linux virtual machine
docker official website document:
https://docs.docker.com/engine/install/centos/
Install packages that docker depends on
Tell Linux docker where to install
sudo yum-config-manager \
    --add-repo \
    https://download.docker.com/linux/centos/docker-ce.repo
Install docker engine
sudo yum install docker-ce docker-ce-cli containerd.io
After installation of docker, start docker
Start docker
sudo systemctl start docker
Check whether docker is started by viewing the docker version
docker -v
Check the image list downloaded by the virtual machine. At this time, it is an empty list
[vagrant@localhost ~]$ sudo docker images
REPOSITORY   TAG       IMAGE ID   CREATED   SIZE
[vagrant@localhost ~]$
docker is set to start automatically, and virtual machine starts automatically
[vagrant@localhost ~]$ sudo systemctl enable docker
Created symlink from /etc/systemd/system/multi-user.target.wants/docker.service to /usr/lib/systemd/system/docker.service.
[vagrant@localhost ~]$
Configure docker alicloud image acceleration. By default, images are downloaded from the docker hub. Downloading from foreign websites is slow
Alibaba cloud image service website:
https://cr.console.aliyun.com/cn-hangzhou/instances/mirrors
sudo mkdir -p /etc/docker
sudo tee /etc/docker/daemon.json <<-'EOF'
{
  "registry-mirrors": ["https://8yssw3d6.mirror.aliyuncs.com"]
}
EOF
sudo systemctl daemon-reload
sudo systemctl restart docker
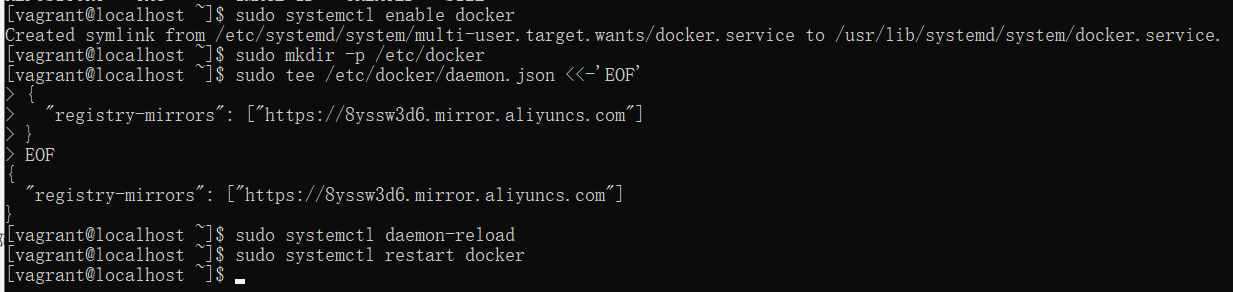
This completes the Alibaba cloud image acceleration operation. In the future, the downloaded images will be downloaded directly to the Alibaba cloud image service. The speed is accelerated
1. docker installing mysql
Download the mysql image without writing the version. The default version is the latest
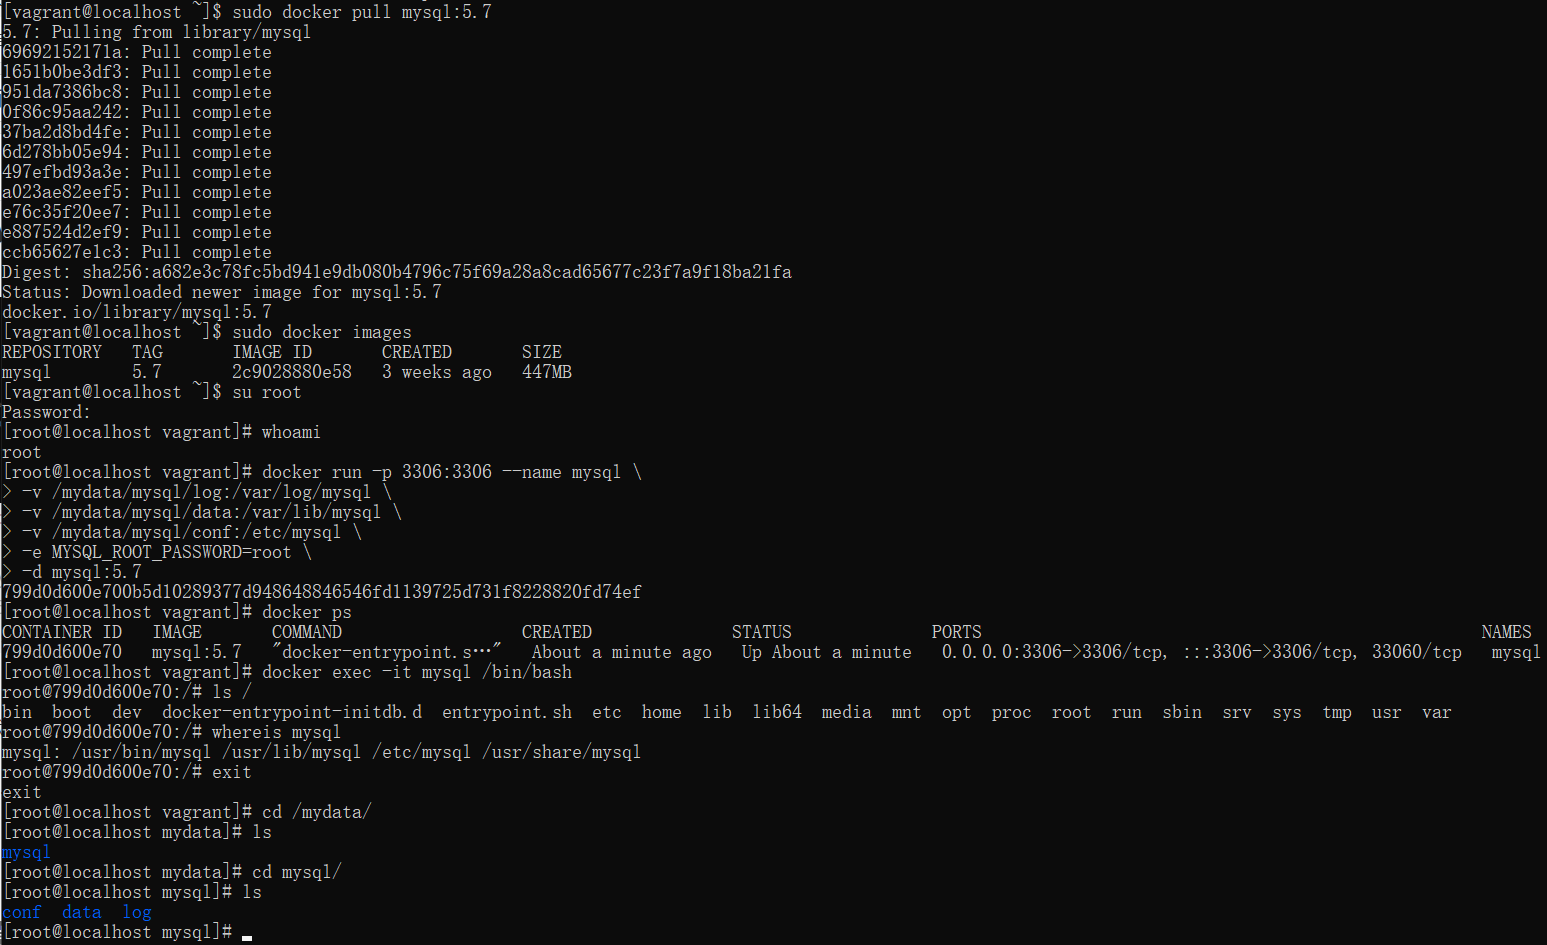
sudo docker pull mysql:5.7
Check all currently downloaded images
sudo docker images
Sudo is used to have root permission, but it is too troublesome to use sudo every time. Switch directly to root user
[vagrant@localhost ~]$ su root
#The default password is vagrant
Password:
[root@localhost vagrant]# whoami
root
[root@localhost vagrant]#
Start mysql container
docker run -p 3306:3306 --name mysql \
-v /mydata/mysql/log:/var/log/mysql \
-v /mydata/mysql/data:/var/lib/mysql \
-v /mydata/mysql/conf:/etc/mysql \
-e MYSQL_ROOT_PASSWORD=root \
-d mysql:5.7
Check the running container of docker and check whether mysql is successfully installed
docker ps
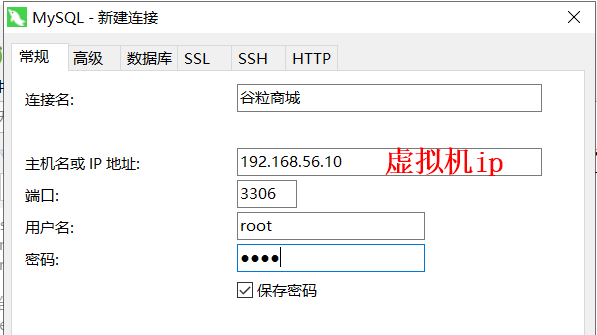
Connect to mysql
Enter the mysql container and verify that the mysql container is a complete linux
docker exec -it mysql /bin/bash
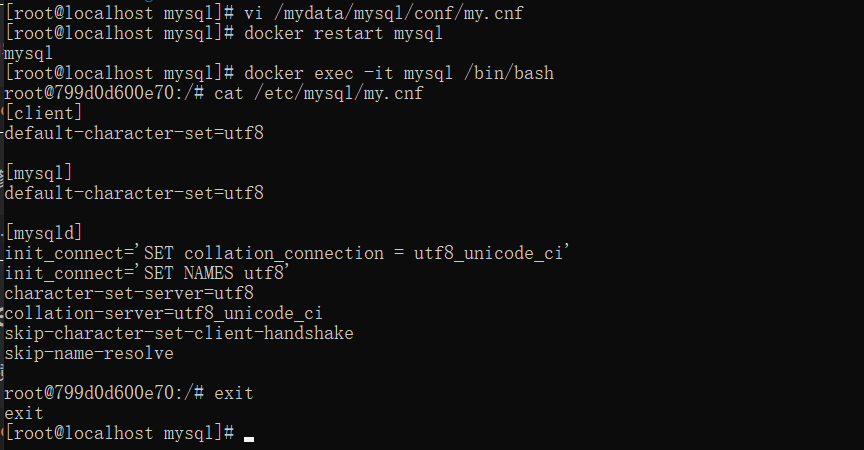
Modify profile
vi /mydata/mysql/conf/my.cnf
Configuration content
[client]
default-character-set=utf8

[mysql]
default-character-set=utf8

[mysqld]
init_connect='SET collation_connection = utf8_unicode_ci'
init_connect='SET NAMES utf8'
character-set-server=utf8
collation-server=utf8_unicode_ci
skip-character-set-client-handshake
skip-name-resolve
Restart mysql
docker restart mysql
Enter mysql container
docker exec -it mysql /bin/bash
Check whether the modification is successful
cat /etc/mysql/my.cnf
2. docker installs redis
1. Download the redis image, the latest version by default
docker pull redis

2. Create profile
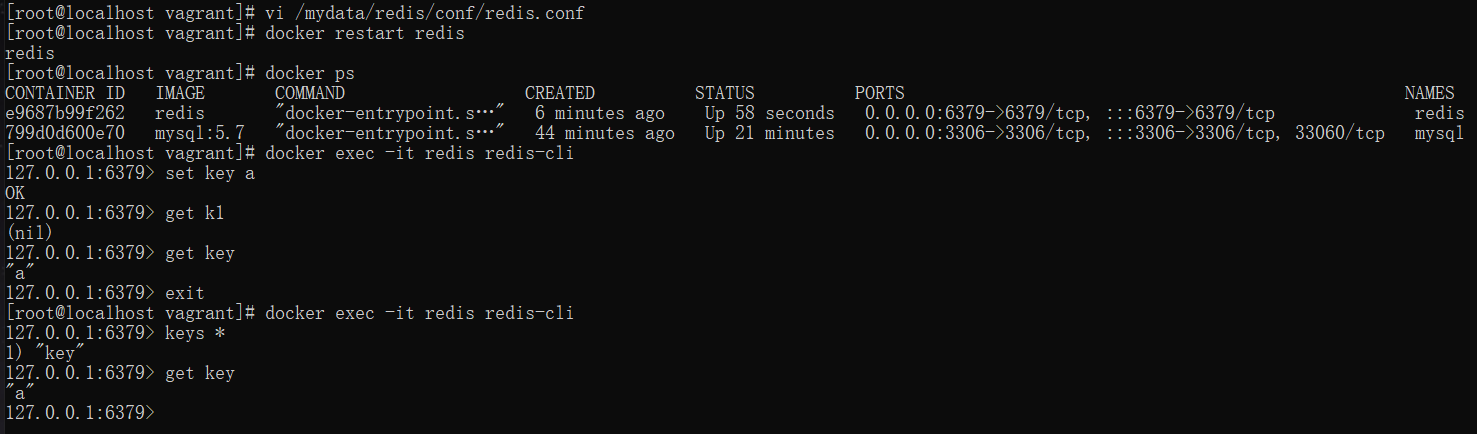
mkdir -p /mydata/redis/conf
touch /mydata/redis/conf/redis.conf
3. Start container
docker run -p 6379:6379 --name redis \
-v /mydata/redis/data:/data \
-v /mydata/redis/conf/redis.conf:/etc/redis/redis.conf \
-d redis redis-server /etc/redis/redis.conf
4. Run redis
docker exec -it redis redis-cli
5. Enable aof persistence
vi /mydata/redis/conf/redis.conf
# Add the following
appendonly yes
6. Restart redis
docker restart redis
7. Set the Docker startup service to start
docker update mysql --restart=always

docker update redis --restart=always
3, Configure git
1. Installing and configuring git
1. Configure git author information
13754@DESKTOP-BMA0VDI MINGW32 ~/Desktop
$ git config --global user.name "muzhen"

13754@DESKTOP-BMA0VDI MINGW32 ~/Desktop
$ git config --global user.email "376536577@qq.com"

13754@DESKTOP-BMA0VDI MINGW32 ~/Desktop
2. Configure ssh password free login
#Enter three consecutive times after entering the command
13754@DESKTOP-BMA0VDI MINGW32 ~/Desktop
$ ssh-keygen -t rsa -C "376536577@qq.com"
Generating public/private rsa key pair.

Enter file in which to save the key (/c/Users/13754/.ssh/id_rsa): Created directory '/c/Users/13754/.ssh'.
Enter passphrase (empty for no passphrase):
Enter same passphrase again:
Your identification has been saved in /c/Users/13754/.ssh/id_rsa.
Your public key has been saved in /c/Users/13754/.ssh/id_rsa.pub.
The key fingerprint is:
SHA256:t1eyJa+HlF0F6UyU2/5rFlmmW8xkCa5k1DFv+5V0pvg 376536577@qq.com
The key's randomart image is:
+---[RSA 3072]----+
|            .+++ |
|           . o* .|
|          . .+.*=|
|           o o*+@|
|        S + =o+%+|
|         . ooOooB|
|          ..o.Eo+|
|           ...oo.|
|            ..o..|
+----[SHA256]-----+

13754@DESKTOP-BMA0VDI MINGW32 ~/Desktop
3. View ssh public key
13754@DESKTOP-BMA0VDI MINGW32 ~/Desktop
$ cat ~/.ssh/id_rsa.pub
ssh-rsa AAAAB3NzaC1yc2EAAAADAQABAAABgQDzqI5Xn47P8cFGkh9jb+wKvICTHcYNDJ4//G1kD26T+TNlL7b5vbdzNfZcuLUp/A8ZF6CxJJyhEUhHEd7XP++DSymoZEDZ7TpifQtUvhw5t7AB7HhWdmZDXyt4C5xgFFSeALjNrmHlZ5Qby/JdEZaIQqOvH7q8/JzRhmMHQ4r+eaa8mfsGzU5C9LqhuYtHKCwxHvAEHmmQBbk7pE7CnSpgqjk0cTp4hPP/2NlO+p40+ogBck1TqrlKM1yWyVMrY7p8I+Nj+rjYfXK8hTyH8383eOSD7RgrLuo7MR+3Hl1KYYZ7d73Lt/E1qSMe/tL4EYnn17V3NiPHDiSf//DCWoiSA/soNSr25IEu0lAxsQC7Q5a+Q/LTLoMKWXXtryDVhrqUkEYA5xbhMi4MJk0OAdkSzGKNB0ge2/iYMjf5GdfTefyk3snSRUwQu1M0j/CVPLyeul3otK3x0UBN1rYjQOAjOEsTY6V8sKPYbqdsNZgydjBYH+PyrCb7R+sF92QiUhU= 376536577@qq.com

13754@DESKTOP-BMA0VDI MINGW32 ~/Desktop
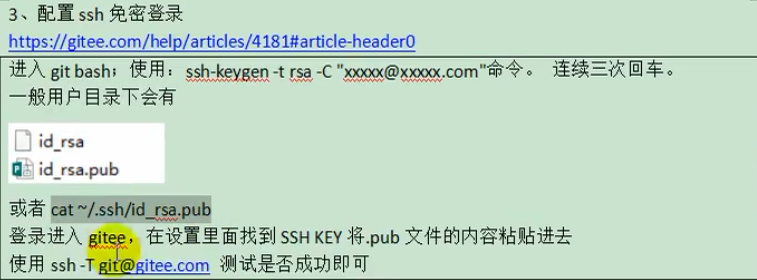
4. Log in to gitee, find the ssh key in the settings, and Paste the file of pub and use ssh -T git@gitee.com Whether the test is successful or not

13754@DESKTOP-BMA0VDI MINGW32 ~/Desktop
$ ssh -T git@gitee.com
The authenticity of host 'gitee.com (212.64.62.183)' can't be established.
ECDSA key fingerprint is SHA256:FQGC9Kn/eye1W8icdBgrQp+KkGYoFgbVr17bmjey0Wc.
Are you sure you want to continue connecting (yes/no/[fingerprint])? yes
Warning: Permanently added 'gitee.com,212.64.62.183' (ECDSA) to the list of known hosts.
Hi Lian Xiaoyu! You've successfully authenticated, but GITEE.COM does not provide shell access.

13754@DESKTOP-BMA0VDI MINGW32 ~/Desktop
5. Code cloud warehouse configuration
2. New project microservice
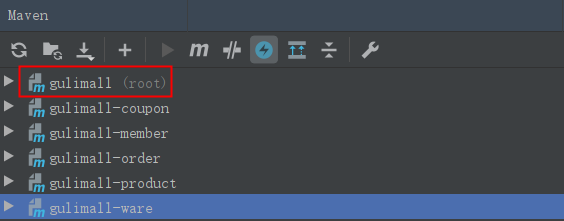
Commodity services, warehousing services, order services, coupon services, user services
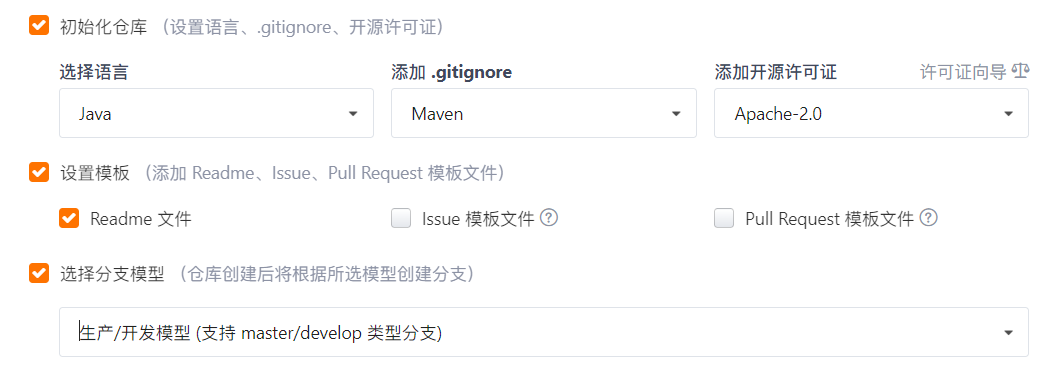
1. Create a project in the warehouse created in the code cloud

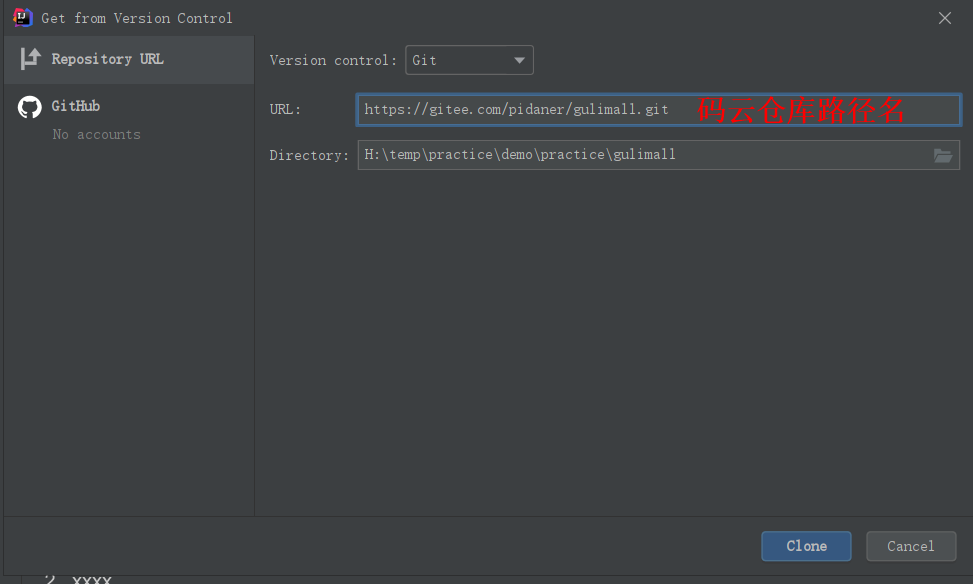
After configuration, click clone to generate a project from the code cloud warehouse, which is downloaded from the code cloud
2. Generate the first service, goods and services
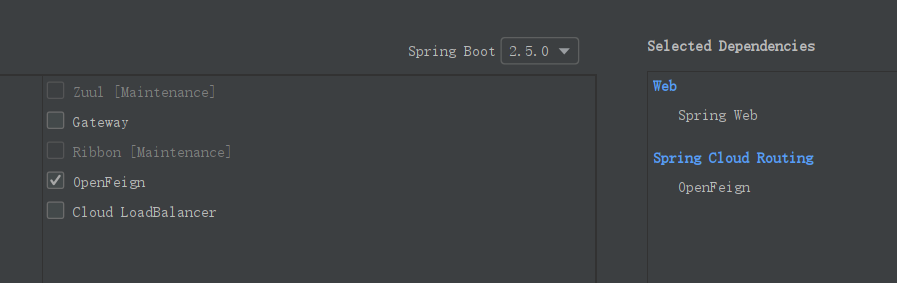
Select spring initiator mouse
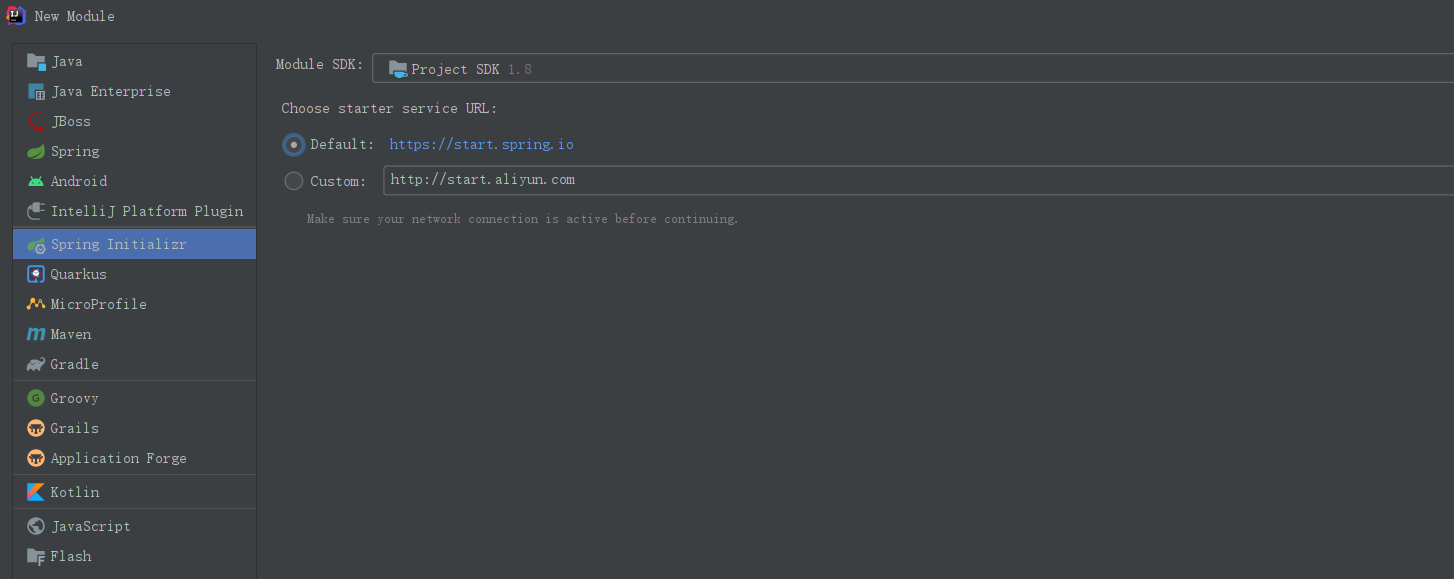
3. Configuring a Moodle
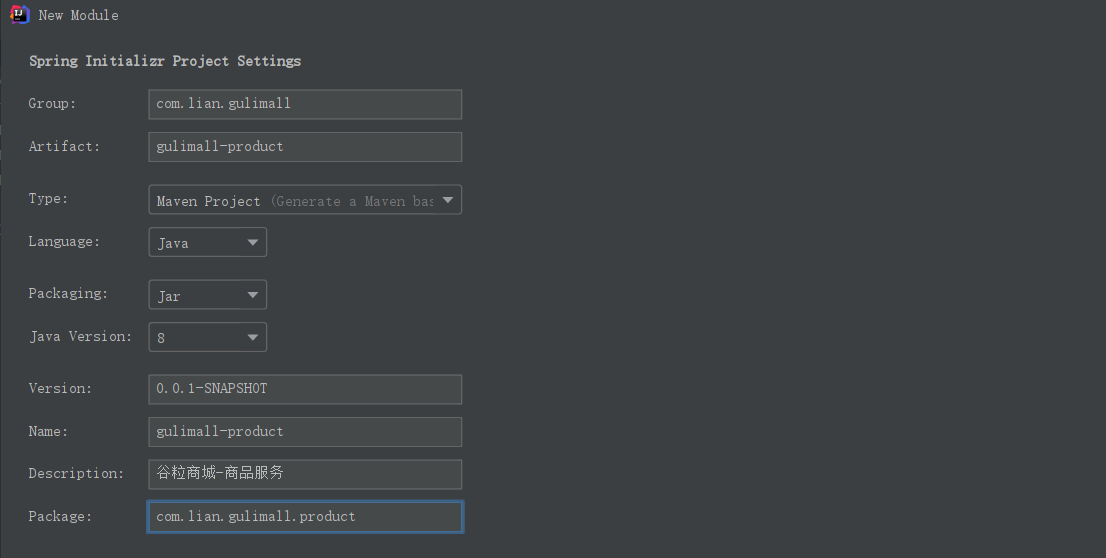
4. Select pom, and the boot version of the course is 2.1 eight
Other services are the same as above;
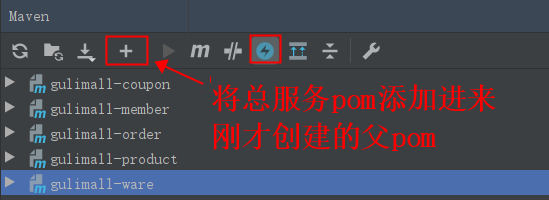
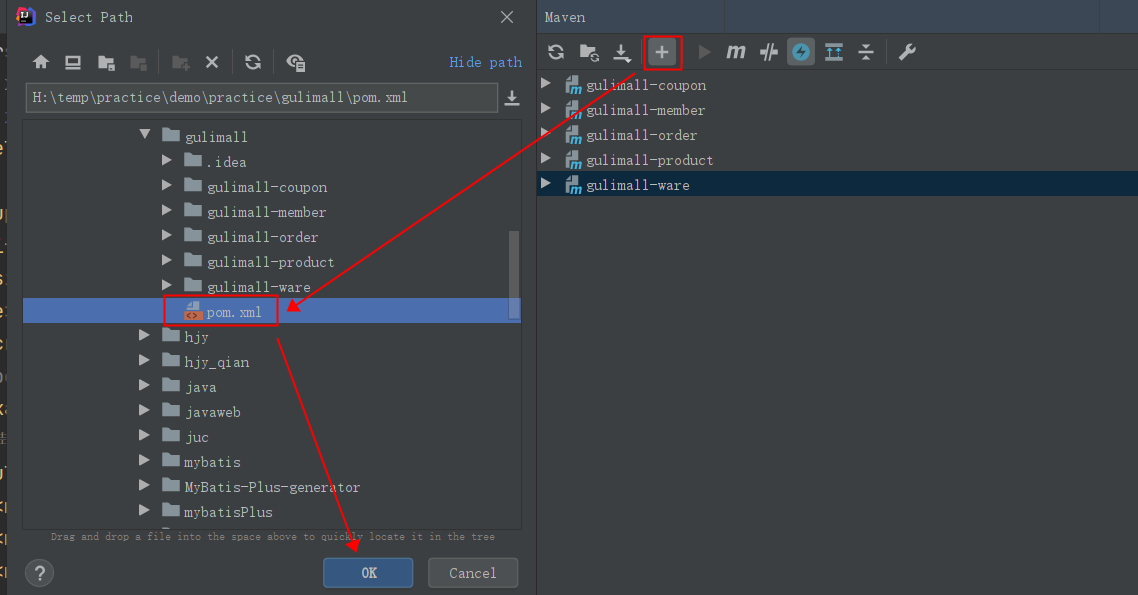
5. Copy a pom file of any project and paste it under the general engineering of gulimall
<?xml version="1.0" encoding="UTF-8"?>
<project xmlns="http://maven.apache.org/POM/4.0.0" xmlns:xsi="http://www.w3.org/2001/XMLSchema-instance"
         xsi:schemaLocation="http://maven.apache.org/POM/4.0.0 https://maven.apache.org/xsd/maven-4.0.0.xsd">
    <modelVersion>4.0.0</modelVersion>

    <groupId>com.lian.gulimall</groupId>
    <artifactId>gulimall</artifactId>
    <version>0.0.1-SNAPSHOT</version>
    <name>gulimall</name>
    <description>Grain mall-Aggregate services</description>
    <!--pom Represents a parent aggregate item-->
    <packaging>pom</packaging>
    <!--Declare your children-->
    <modules>
        <module>gulimall-order</module>
        <module>gulimall-coupon</module>
        <module>gulimall-member</module>
        <module>gulimall-product</module>
        <module>gulimall-ware</module>
    </modules>

</project>
6. Modify the of the total project gitignore template to ignore the garbage files in small projects
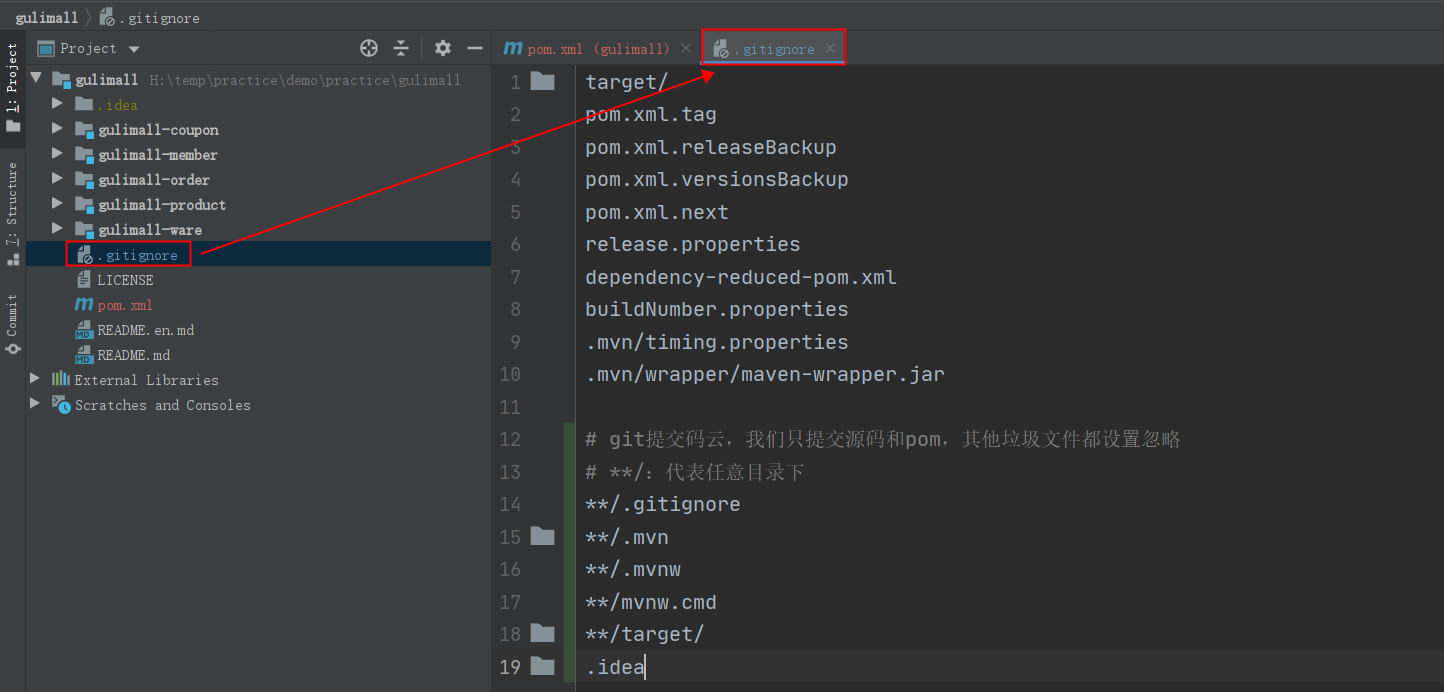
After ignoring these files, git will not be submitted to the warehouse when it is submitted. We only submit the source code and pom files to the code cloud
2. Database initialization
Database address: https://share.weiyun.com/RjvNIVbE
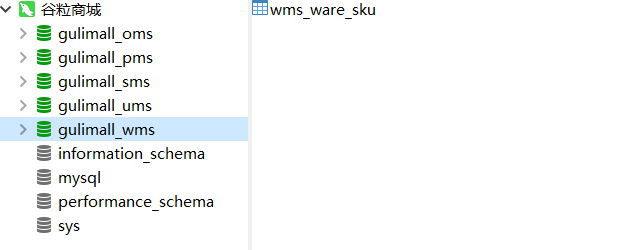
navicat creates a new database and stores the data in databases of different services