1, Foreword
🚀 My environment:
- Locale: Python 3 six point five
- compiler: jupyter notebook
- Deep learning environment: tensorflow2 four point one
🚀 In depth learning newcomers must see: Introduction to Xiaobai deep learning
- Xiaobai introduction to in-depth learning Chapter 1: configuring in-depth learning environment
- Introduction to Xiaobai deep learning | Chapter 2: use of compiler - Jupiter notebook
- Introduction to Xiaobai's in-depth learning Chapter 3: initial experience of in-depth learning
🚀 Previous Highlights - convolutional neural network:
- 100 cases of deep learning convolutional neural network (CNN) to realize mnist handwritten numeral recognition | day 1
- 100 cases of deep learning - convolutional neural network (CNN) color picture classification | day 2
- 100 cases of deep learning - convolutional neural network (CNN) garment image classification | day 3
- 100 cases of deep learning - convolutional neural network (CNN) flower recognition | day 4
- 100 cases of deep learning - convolutional neural network (CNN) weather recognition | day 5
- 100 cases of deep learning - convolutional neural network (VGG-16) to identify the pirate king straw hat group | day 6
- 100 cases of deep learning - convolutional neural network (VGG-19) to identify the characters in the spirit cage | day 7
- 100 cases of deep learning - convolutional neural network (ResNet-50) bird recognition | day 8
- 100 cases of deep learning - convolutional neural network (AlexNet) hand-in-hand teaching | day 11
- 100 cases of deep learning - convolutional neural network (CNN) identification verification code | day 12
- 100 cases of deep learning - convolutional neural network (perception V3) recognition of sign language | day 13
- 100 cases of deep learning - convolution neural network (Inception-ResNet-v2) recognition of traffic signs | day 14
- 100 cases of deep learning - convolutional neural network (CNN) for license plate recognition | day 15
- 100 cases of in-depth learning - convolutional neural network (CNN) to identify the Magic Baby Xiaozhi group | day 16
- 100 cases of deep learning - convolutional neural network (CNN) attention detection | day 17
🚀 Highlights of previous issues - cyclic neural network:
- 100 cases of deep learning - circular neural network (RNN) to achieve stock prediction | day 9
- 100 cases of deep learning - circular neural network (LSTM) to realize stock prediction | day 10
🚀 Highlights of previous periods - generate confrontation network:
- 100 cases of deep learning - generation confrontation network (GAN) handwritten numeral generation | day 18
- 100 cases of deep learning - generation countermeasure network (DCGAN) handwritten numeral generation | day 19
🚀 This article is selected from the column: 100 cases of deep learning
🚀 Recommended columns: Writing algorithm in the dead of night
2, What is the generation of confrontation networks?
Generating confrontation network (GAN) is one of the most interesting ideas in the field of computer science today. Two models are trained simultaneously through the confrontation process. One generator model ("artist") learns to create images that look real, while the discriminator model ("art critic") learns to distinguish between true and false images.
GAN has a wide range of applications, including image synthesis, style migration, photo repair, photo editing, data enhancement, etc. this time I will explain how to use generation against network to generate little sister.
Take a look at my little sister first

1. Set GPU
import tensorflow as tf

gpus = tf.config.list_physical_devices("GPU")

if gpus:
    tf.config.experimental.set_memory_growth(gpus[0], True)  #Set the amount of GPU video memory and use it on demand
    tf.config.set_visible_devices([gpus[0]],"GPU")

# Print the graphics card information and confirm that the GPU is available
print(gpus)
[PhysicalDevice(name='/physical_device:GPU:0', device_type='GPU')]
from tensorflow.keras  import layers
from IPython           import display
import numpy             as np
import glob,imageio,os,PIL,time,pathlib

import matplotlib.pyplot as plt
# Support Chinese
plt.rcParams['font.sans-serif'] = ['SimHei']  # Used to display Chinese labels normally
plt.rcParams['axes.unicode_minus'] = False  # Used to display negative signs normally
2. Load and prepare datasets
You will use the MNIST dataset to train generators and discriminators. The generator generates handwritten digits similar to MNIST data sets.
data_dir = "D:/jupyter notebook/DL-100-days/datasets/020_cartoon_face"
data_dir = pathlib.Path(data_dir)

pictures_paths = list(data_dir.glob('*'))
pictures_paths = [str(path) for path in pictures_paths]
pictures_paths[:3]
['D:\\jupyter notebook\\DL-100-days\\datasets\\020_cartoon_face\\1.png',
 'D:\\jupyter notebook\\DL-100-days\\datasets\\020_cartoon_face\\10.png',
 'D:\\jupyter notebook\\DL-100-days\\datasets\\020_cartoon_face\\100.png']
image_count = len(list(pictures_paths))

print("The total number of pictures is:",image_count)
Total number of pictures: 21551
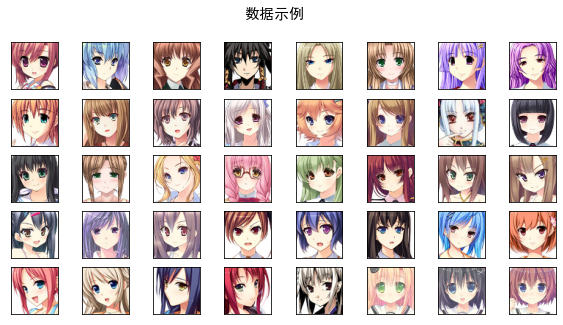
plt.figure(figsize=(10,5))
plt.suptitle("sample data",fontsize=15)

for i in range(40):
    plt.subplot(5,8,i+1)
    plt.xticks([])
    plt.yticks([])

    # display picture
    images = plt.imread(pictures_paths[i])
    plt.imshow(images)

# plt.show()
def preprocess_image(image):
    image = tf.image.decode_jpeg(image, channels=3)
    image = tf.image.resize(image, [64, 64])
    return (image - 127.5) / 127.5

def load_and_preprocess_image(path):
    image = tf.io.read_file(path)
    return preprocess_image(image)

AUTOTUNE = tf.data.experimental.AUTOTUNE

path_ds  = tf.data.Dataset.from_tensor_slices(pictures_paths)
image_ds = path_ds.map(load_and_preprocess_image, num_parallel_calls=AUTOTUNE)
BUFFER_SIZE = 60000
BATCH_SIZE = 256

# Batch and disrupt data
train_dataset = image_ds.shuffle(BUFFER_SIZE).batch(BATCH_SIZE)
3, Create model
1. Generator
The generator uses TF keras. layers. The conv2drange layer is used to generate pictures from seeds (random noise). Start with a density layer that uses the seeds as input, and then up sample several times until the desired picture size of 28x28x1 is reached. Note that each layer uses tf.keras.layers.LeakyReLU as the activation function, except that the output layer uses tanh.
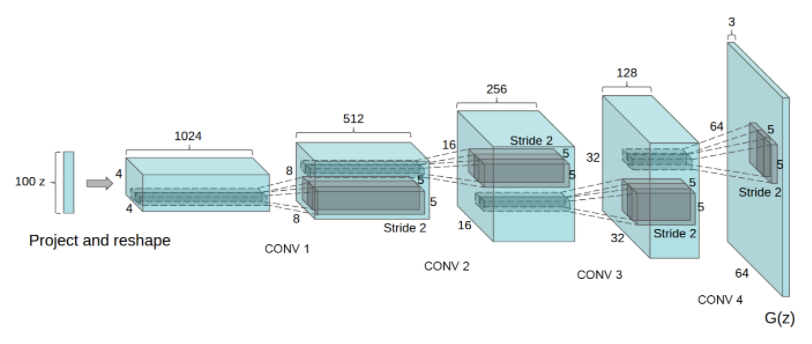
def make_generator_model():
    model = tf.keras.Sequential()
    model.add(layers.Dense(4*4*1024, use_bias=False, input_shape=(100,)))
    model.add(layers.BatchNormalization())
    model.add(layers.LeakyReLU())

    model.add(layers.Reshape((4, 4, 1024)))
    assert model.output_shape == (None, 4, 4, 1024)

    # first floor
    model.add(layers.Conv2DTranspose(512, (5, 5), strides=(2, 2), padding='same', use_bias=False))
    assert model.output_shape == (None, 8, 8, 512)
    model.add(layers.BatchNormalization())
    model.add(layers.LeakyReLU())

    # The second floor
    model.add(layers.Conv2DTranspose(256, (5, 5), strides=(2, 2), padding='same', use_bias=False))
    assert model.output_shape == (None, 16, 16, 256)
    model.add(layers.BatchNormalization())
    model.add(layers.LeakyReLU())

    # Third floor
    model.add(layers.Conv2DTranspose(128, (5, 5), strides=(2, 2), padding='same', use_bias=False))
    assert model.output_shape == (None, 32, 32, 128)
    model.add(layers.BatchNormalization())
    model.add(layers.LeakyReLU())

    # Fourth floor
    model.add(layers.Conv2DTranspose(3, (5, 5), strides=(2, 2), padding='same', use_bias=False, activation='tanh'))
    assert model.output_shape == (None, 64, 64, 3)

    return model

generator = make_generator_model()
generator.summary()
Model: "sequential_4"
_________________________________________________________________
Layer (type)                 Output Shape              Param #
=================================================================
dense_4 (Dense)              (None, 16384)             1638400
_________________________________________________________________
batch_normalization_8 (Batch (None, 16384)             65536
_________________________________________________________________
leaky_re_lu_16 (LeakyReLU)   (None, 16384)             0
_________________________________________________________________
reshape_2 (Reshape)          (None, 4, 4, 1024)        0
_________________________________________________________________
conv2d_transpose_8 (Conv2DTr (None, 8, 8, 512)         13107200
_________________________________________________________________
batch_normalization_9 (Batch (None, 8, 8, 512)         2048
_________________________________________________________________
leaky_re_lu_17 (LeakyReLU)   (None, 8, 8, 512)         0
_________________________________________________________________
conv2d_transpose_9 (Conv2DTr (None, 16, 16, 256)       3276800
_________________________________________________________________
batch_normalization_10 (Batc (None, 16, 16, 256)       1024
_________________________________________________________________
leaky_re_lu_18 (LeakyReLU)   (None, 16, 16, 256)       0
_________________________________________________________________
conv2d_transpose_10 (Conv2DT (None, 32, 32, 128)       819200
_________________________________________________________________
batch_normalization_11 (Batc (None, 32, 32, 128)       512
_________________________________________________________________
leaky_re_lu_19 (LeakyReLU)   (None, 32, 32, 128)       0
_________________________________________________________________
conv2d_transpose_11 (Conv2DT (None, 64, 64, 3)         9600
=================================================================
Total params: 18,920,320
Trainable params: 18,885,760
Non-trainable params: 34,560
_________________________________________________________________
2. Discriminator
Discriminator is an image classifier based on CNN.
def make_discriminator_model():
    model = tf.keras.Sequential([
        layers.Conv2D(128, (5, 5), strides=(2, 2), padding='same', input_shape=[64, 64, 3]),
        layers.LeakyReLU(),
        layers.Dropout(0.3),

        layers.Conv2D(128, (5, 5), strides=(2, 2), padding='same'),
        layers.LeakyReLU(),
        layers.Dropout(0.3),

        layers.Conv2D(256, (5, 5), strides=(2, 2), padding='same'),
        layers.LeakyReLU(),
        layers.Dropout(0.3),

        layers.Conv2D(512, (5, 5), strides=(2, 2), padding='same'),
        layers.LeakyReLU(),
        layers.Dropout(0.3),

        layers.Flatten(),
        layers.Dense(1)
    ])

    return model

discriminator = make_discriminator_model()
discriminator.summary()
Model: "sequential_5"
_________________________________________________________________
Layer (type)                 Output Shape              Param #
=================================================================
conv2d_8 (Conv2D)            (None, 32, 32, 128)       9728
_________________________________________________________________
leaky_re_lu_20 (LeakyReLU)   (None, 32, 32, 128)       0
_________________________________________________________________
dropout_8 (Dropout)          (None, 32, 32, 128)       0
_________________________________________________________________
conv2d_9 (Conv2D)            (None, 16, 16, 128)       409728
_________________________________________________________________
leaky_re_lu_21 (LeakyReLU)   (None, 16, 16, 128)       0
_________________________________________________________________
dropout_9 (Dropout)          (None, 16, 16, 128)       0
_________________________________________________________________
conv2d_10 (Conv2D)           (None, 8, 8, 256)         819456
_________________________________________________________________
leaky_re_lu_22 (LeakyReLU)   (None, 8, 8, 256)         0
_________________________________________________________________
dropout_10 (Dropout)         (None, 8, 8, 256)         0
_________________________________________________________________
conv2d_11 (Conv2D)           (None, 4, 4, 512)         3277312
_________________________________________________________________
leaky_re_lu_23 (LeakyReLU)   (None, 4, 4, 512)         0
_________________________________________________________________
dropout_11 (Dropout)         (None, 4, 4, 512)         0
_________________________________________________________________
flatten_2 (Flatten)          (None, 8192)              0
_________________________________________________________________
dense_5 (Dense)              (None, 1)                 8193
=================================================================
Total params: 4,524,417
Trainable params: 4,524,417
Non-trainable params: 0
_________________________________________________________________
4, Defining loss functions and optimizers
Define the loss function and optimizer for both models.
# This method returns the auxiliary function for calculating the cross entropy loss
cross_entropy = tf.keras.losses.BinaryCrossentropy(from_logits=True)
1. Discriminator loss
This method quantifies the ability to judge true and false pictures. It compares the predicted value of the discriminator on the real picture with the array with all values of 1, and compares the predicted value of the discriminator on the forged (generated) picture with the array with all values of 0.
def discriminator_loss(real_output, fake_output):
    real_loss = cross_entropy(tf.ones_like(real_output), real_output)
    fake_loss = cross_entropy(tf.zeros_like(fake_output), fake_output)
    total_loss = real_loss + fake_loss
    return total_loss
2. Generator loss
The generator loses the ability to quantify its deception discriminator. Intuitively, if the generator performs well, the discriminator will judge the forged picture as the real picture (or 1). Here, we will compare the judgment result of the discriminator on the generated picture with an array with all values of 1.
def generator_loss(fake_output):
    return cross_entropy(tf.ones_like(fake_output), fake_output)
Since we need to train two networks respectively, the optimizers of discriminator and generator are different.
generator_optimizer     = tf.keras.optimizers.Adam(1e-4)
discriminator_optimizer = tf.keras.optimizers.Adam(1e-4)
5, Save checkpoint
tf.train.Checkpoint only saves the parameters of the model and does not save the calculation process of the model. Therefore, it is generally used to recover the previously trained model parameters when there is model source code.
# Define model save path
checkpoint_dir = './model/model_20/training_checkpoints'
checkpoint_prefix = os.path.join(checkpoint_dir, "ckpt")

checkpoint = tf.train.Checkpoint(generator_optimizer=generator_optimizer,
                                 discriminator_optimizer=discriminator_optimizer,
                                 generator=generator,
                                 discriminator=discriminator)
6, Define training cycle
EPOCHS = 600
noise_dim = 100
num_examples_to_generate = 16

# We will reuse this seed (it is easier to visualize progress in GIF)
seed = tf.random.normal([num_examples_to_generate, noise_dim])
The training cycle begins when the generator receives a random seed as input. The seed is used to produce a picture. The discriminator is then used to distinguish between real pictures (selected from the training set) and forged pictures (generated by the generator). The loss function is calculated for each model here, and the gradient is calculated to update the generator and the discriminator.
# Note ` TF Use of function '
# This annotation causes the function to be "compiled"
@tf.function
def train_step(images):
    # Generate noise
    noise = tf.random.normal([BATCH_SIZE, noise_dim])

    with tf.GradientTape() as gen_tape, tf.GradientTape() as disc_tape:
        generated_images = generator(noise, training=True)

        real_output = discriminator(images, training=True)
        fake_output = discriminator(generated_images, training=True)

        # Calculate loss
        gen_loss = generator_loss(fake_output)
        disc_loss = discriminator_loss(real_output, fake_output)

    #Calculated gradient
    gradients_of_generator = gen_tape.gradient(gen_loss, generator.trainable_variables)
    gradients_of_discriminator = disc_tape.gradient(disc_loss, discriminator.trainable_variables)

    #Update model
    generator_optimizer.apply_gradients(zip(gradients_of_generator, generator.trainable_variables))
    discriminator_optimizer.apply_gradients(zip(gradients_of_discriminator, discriminator.trainable_variables))
def train(dataset, epochs):
    for epoch in range(epochs):
        start = time.time()

        for image_batch in dataset:
            train_step(image_batch)

        # Update generated pictures in real time
        display.clear_output(wait=True)
        generate_and_save_images(generator, epoch + 1, seed)

        # Save the model every 15 epoch s
        if (epoch + 1) % 100 == 0:
            checkpoint.save(file_prefix = checkpoint_prefix)

        print ('Time for epoch {} is {} sec'.format(epoch + 1, time.time()-start))

    # Generate a picture after the last epoch
    display.clear_output(wait=True)
    generate_and_save_images(generator, epochs, seed)
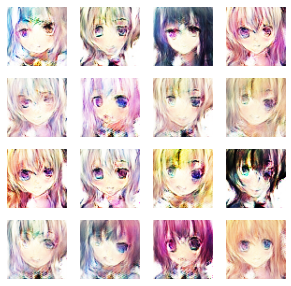
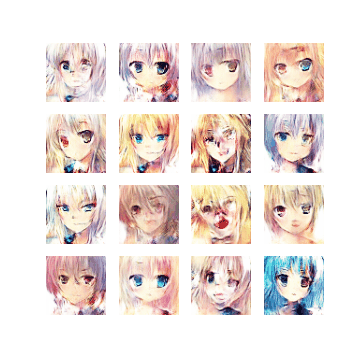
Generate and save pictures
def generate_and_save_images(model, epoch, test_input):
    # Note that training ` is set to False
    # Therefore, all layers run in batch norm.
    predictions = model(test_input, training=False)

    fig = plt.figure(figsize=(5,5))

    for i in range(predictions.shape[0]):
        plt.subplot(4, 4, i+1)
        plt.imshow(predictions[i] * 0.5 + 0.5) # Note the need to restore standardized images
        plt.axis('off')

    plt.savefig('./images/images_20/image_at_epoch_{:04d}.png'.format(epoch+600))
    plt.show()
7, Training model
Call the train() method defined above to train the generator and discriminator at the same time. At the beginning of training, the generated image looks like random noise. As the training process progresses, the generated numbers will become more and more real. After about 50 epoch s, these pictures look like MNIST numbers.
1. Restore model parameters
Returns the file name of the last checkpoint in the directory. For example, if there is a model in the save directory ckpt-1. Index to model ckpt-10. Index's 10 saved files, TF train. latest_ Checkpoint ('. / save') is returned/ save/model.ckpt-10 .
checkpoint.restore(tf.train.latest_checkpoint(checkpoint_dir))
<tensorflow.python.training.tracking.util.CheckpointLoadStatus at 0x20498267128>
2. Training model
%%Time: the time taken for the cell code to run once will be given.
%%time
train(train_dataset, EPOCHS)
Time for epoch 201 is 17.364601135253906 sec
3. Create GIF
import imageio,pathlib

def compose_gif():
    # Picture address
    data_dir = "./images/images_20"
    data_dir = pathlib.Path(data_dir)
    paths    = list(data_dir.glob('*'))

    gif_images = []
    for path in paths:
        gif_images.append(imageio.imread(path))
    imageio.mimsave("MINST_DCGAN_20.gif",gif_images,fps=8)

compose_gif()
print("GIF Dynamic graph generation completed!")
GIF Dynamic graph generation completed!
8, Works of the same series
🚀 In depth learning newcomers must see: Introduction to Xiaobai deep learning
- Xiaobai introduction to in-depth learning Chapter 1: configuring in-depth learning environment
- Introduction to Xiaobai deep learning | Chapter 2: use of compiler - Jupiter notebook
- Introduction to Xiaobai's in-depth learning Chapter 3: initial experience of in-depth learning
🚀 Previous Highlights - convolutional neural network:
- 100 cases of deep learning convolutional neural network (CNN) to realize mnist handwritten numeral recognition | day 1
- 100 cases of deep learning - convolutional neural network (CNN) color picture classification | day 2
- 100 cases of deep learning - convolutional neural network (CNN) garment image classification | day 3
- 100 cases of deep learning - convolutional neural network (CNN) flower recognition | day 4
- 100 cases of deep learning - convolutional neural network (CNN) weather recognition | day 5
- 100 cases of deep learning - convolutional neural network (VGG-16) to identify the pirate king straw hat group | day 6
- 100 cases of deep learning - convolutional neural network (VGG-19) to identify the characters in the spirit cage | day 7
- 100 cases of deep learning - convolutional neural network (ResNet-50) bird recognition | day 8
- 100 cases of deep learning - convolutional neural network (AlexNet) hand-in-hand teaching | day 11
- 100 cases of deep learning - convolutional neural network (CNN) identification verification code | day 12
- 100 cases of deep learning - convolutional neural network (perception V3) recognition of sign language | day 13
- 100 cases of deep learning - convolution neural network (Inception-ResNet-v2) recognition of traffic signs | day 14
- 100 cases of deep learning - convolutional neural network (CNN) for license plate recognition | day 15
- 100 cases of in-depth learning - convolutional neural network (CNN) to identify the Magic Baby Xiaozhi group | day 16
- 100 cases of deep learning - convolutional neural network (CNN) attention detection | day 17
🚀 Highlights of previous issues - cyclic neural network:
- 100 cases of deep learning - circular neural network (RNN) to achieve stock prediction | day 9
- 100 cases of deep learning - circular neural network (LSTM) to realize stock prediction | day 10
🚀 Highlights of previous periods - generate confrontation network:
- 100 cases of deep learning - generation confrontation network (GAN) handwritten numeral generation | day 18
- 100 cases of deep learning - generation countermeasure network (DCGAN) handwritten numeral generation | day 19
🚀 This article is selected from the column: 100 cases of deep learning
🚀 Recommended columns: Writing algorithm in the dead of night
9, Data + model
Link: https://pan.baidu.com/s/1ZSOidGKbly5yDkiODsmn6A
Extraction code: qt7h
Tip: remember to replace the path in the code with your own local path!
Finally, I'll give you another copy to help you get the data structure brush notes of offer s from first-line manufacturers such as BAT. It was written by the bosses of Google and Alibaba. It is very useful for students who have weak algorithms or need to improve (extraction code: 9go2):
Leetcode notes of Google and Alibaba
And the 7K + open source e-books I sorted out, there is always one that can help you 💖 (extraction code: 4eg0)