preface
A powerful framework requires a variety of packages. When we dive into it, it is easy to be confused by all kinds of jumps, design patterns, packaging, etc. in the source code;
In this case, we can only understand the general process, but it is easy to forget. Why?
Because we haven't really understood it!
We don't turn it into our knowledge points, so it's easy to forget it after a period of time;
So how do we turn it into our knowledge?
I don't know if you have found that it is difficult for our human brain to remember a very long thing at once, but a noun or a thing can be easily remembered;
Next, I will break up the source code into small parts, and then from simplicity to depth, use this perspective to understand Glide source code, so that you can add strength to the tiger!
The article is long. It is recommended to like the collection and watch it slowly!
implementation 'com.github.bumptech.glide:glide:4.12.0'
annotationProcessor 'com.github.bumptech.glide:compiler:4.12.0'
1. First version implementation
One day, Xiao Ming wanted to realize a function of loading pictures, so he divided three into five and realized the function;
The function is very simple;
Step 1: download pictures;
Step 2: set the picture to imageView;
The code is also very simple. It can be implemented in just a few lines. Please see the following pseudo code:
public class MainActivity extends Activity {

    @Override
    protected void onCreate(Bundle savedInstanceState) {
        super.onCreate(savedInstanceState);
        setContentView(R.layout.activity_main);

        ImageView image = findViewById(R.id.image);
        String url = "pictures linking";
        // Visit the Internet and download pictures
        Bitmap bitmap = downLoadImage(url);
        // Set picture bitmap to ImageView
        image.setImageBitmap(bitmap);
    }

    public Bitmap downLoadImage(String url) {
        // Visit the Internet and download pictures
        ...
       return bitmap;

    }
}
Does this function seem to be remembered all at once? This function is so simple that you can remember it without even thinking;
However, this function is not universal, so Xiao Ming decided to take it out and design it into a framework. If it is useful on other pages in the future, it can be used directly;
2. Implementation of the second version
So Xiao Ming first made the first step of transformation and designed a RequestManager to manage request operations. It has the operations of opening, pausing and closing network requests. At the same time, it also has life cycle monitoring to close network requests when the life cycle is destroyed;
Therefore, after encapsulation, the following methods are available:
public class RequestManager {

    public void startRequest() {
        // Open network request
    }

    public void paustRequest() {
        // Pause network request
    }

    public void onStart() {
        // Lifecycle onStart
    }

    public void onStop() {
        // Lifecycle onStop
    }

    public void onDestroy() {
        // Lifecycle onDestroy
    }
}
Of course, you will have questions here. How does the life cycle of RequestManager callback?
There are many implementation methods. The simplest method is to manually callback in Activity or fragment!
The second step is to design a request builder to build the request;
A complex request must have various parameters, such as callback monitoring, setting of loading failed pictures, etc;
Then the design is almost the following effect:
public class RequestBuilder {

    public RequestBuilder load(@Nullable Object model) {
        // Parameters loaded by assignment
        return this;
    }

    public RequestBuilder listener(@Nullable RequestListener requestListener) {
        // Add listening operation
        return this;
    }

    public RequestBuilder error(@DrawableRes int resourceId) {
        // Set error picture
        return this;
    }
}
Now that RequestBuilder is available, Xiaoming has to design a Request for obtaining pictures in order to build the Request. The effects are as follows:
public interface Request {
    // Start request
    void begin();

    // Clear request
    void clear();

    // Pause request
    void pause();
}
After the Request class has been designed, you can start to get the picture at the begin ning of the Request;
After the picture request is completed, or the loading fails, the booth map needs to be loaded. Therefore, a class needs to be designed to set the picture control;
So Xiaoming designed an ImageViewTarget to set the picture control. Please see the pseudo code below;
public class ImageViewTarget {

    public void onLoadStarted(@Nullable Drawable placeholder) {
        // Start loading and set the picture booth map
    }

    public void onLoadFailed(@Nullable Drawable errorDrawable) {
        // Failed to load, failed to set the picture booth map
    }

    public void onResourceReady(@NonNull Drawable resource) {
        // Loading succeeded, set picture
    }
}
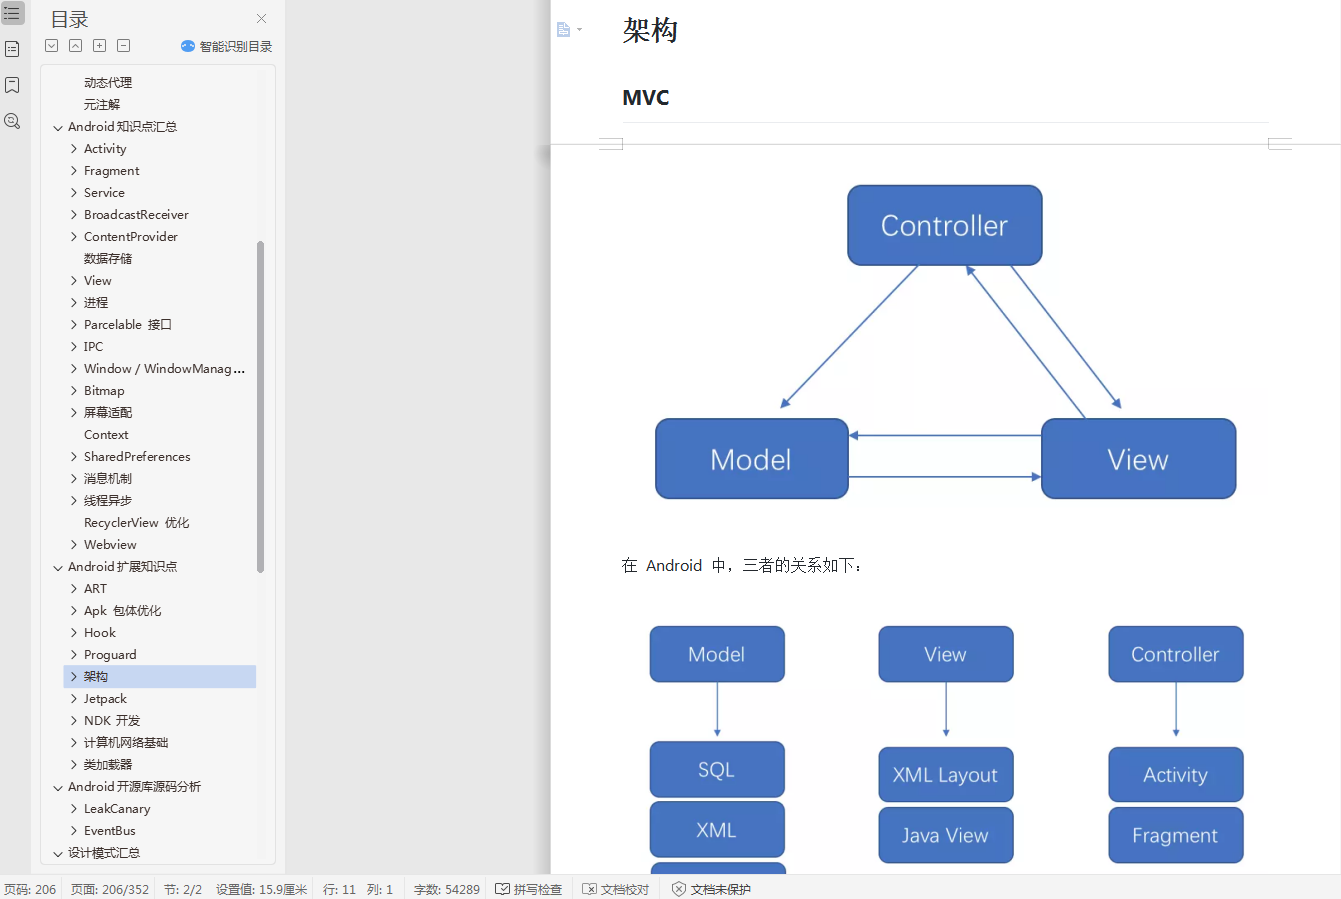
Then simply combine this into a small "framework" with the function of obtaining pictures for loading;
Of course, I have omitted some code here. You only need to know the general loading process without going into details;
(1) Build Request through RequestBuilder;
(2) Manage requests through RequestManager;
(3) If the Request succeeds or fails, callback ImageViewTarget to set it to the picture control;
Very simple, three steps to achieve a small picture "framework";
3. Implementation of the third version
The first step we have simply implemented is to load the picture and set it to the control through the network request;
But it is very unreasonable to get pictures from the network every time;
Because every time you get it from the network, it will not only lead to a waste of network resources, but also affect the loading speed. In case of bad network, it is easy to load it for a long time;
Then we will further transform the above framework;
How to transform it? Very simple, the introduction of caching mechanism;
As we all know, Android's cache mechanism can be divided into several types: network disk cache, disk cache and memory cache;
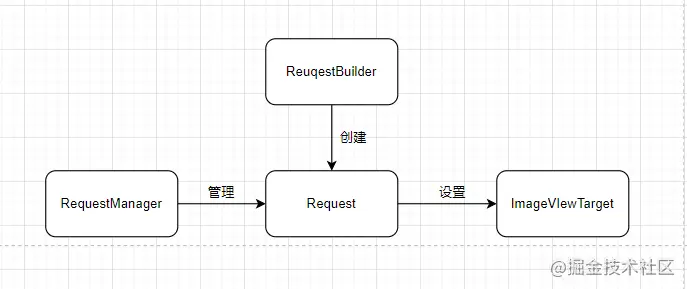
Then we can design a picture loading mechanism with three-level cache according to these three situations;
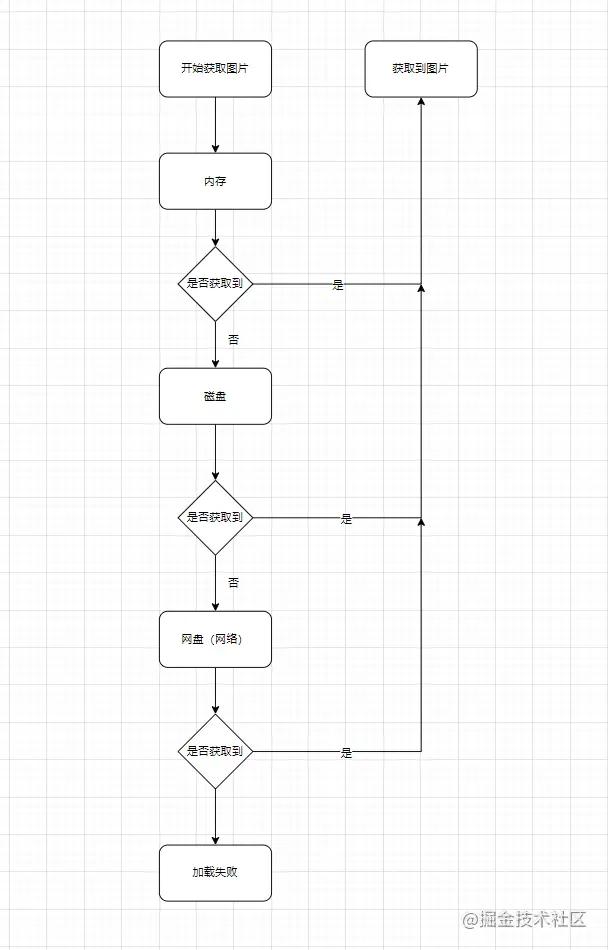
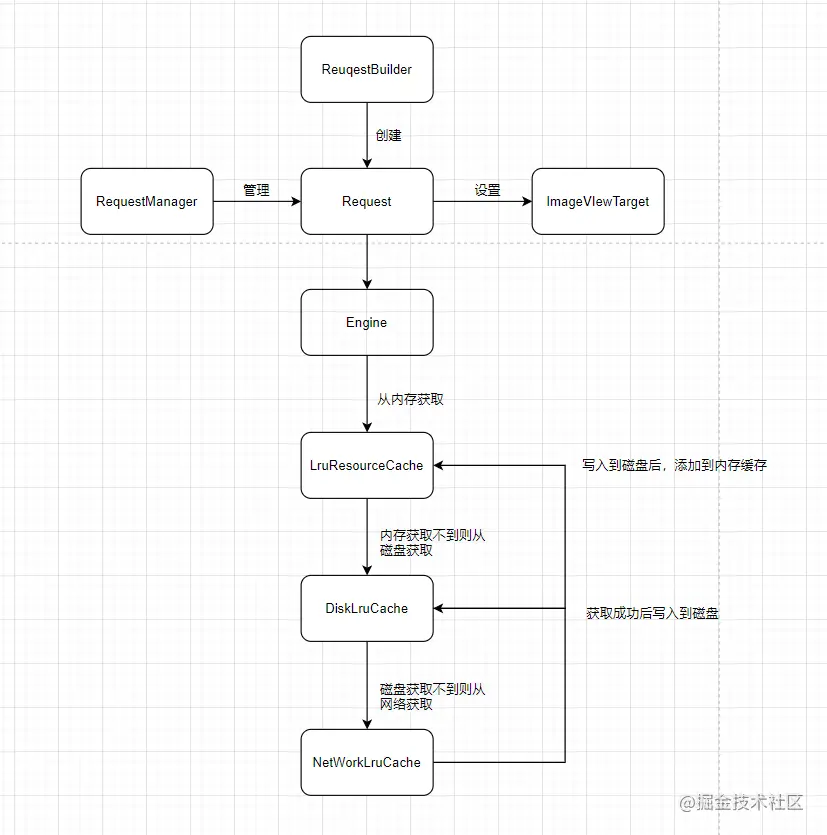
A simple caching mechanism is designed, and then the code is implemented;
To load the picture cache mechanism, we can first design an Engine class Engine to load the three-level cache of pictures;
After the design, it will look like this:
public class Engine {

    public void load() {
        // Load pictures from L3 cache

    }

    private Bitmap loadFromMemory() {
        // Get pictures from cache
        return null;
    }

    private Bitmap loadFromCache() {
        // Get pictures from disk
        return null;
    }

    private Bitmap loadFromNetWork() {
        // Get pictures from the Internet
        return null;
    }
}
3.1. Design of memory cache
The first is memory cache. The design of memory cache is very important because it involves the recycling of pictures;
If the recovery is early, the memory cache will not play a practical role. If the recovery is slow, it will occupy memory and waste memory space;
So how to design the image caching algorithm?
There is a famous algorithm, the least recently used algorithm, which is very suitable for memory cache recycling;
What is the least recently used algorithm? Of course, the word is as its name;
That is, data that has not been used for a long time is unlikely to be used in the future. Therefore, when the memory occupied by data reaches a certain threshold, the least recently used data should be removed.
The specific algorithm logic can be seen as follows: What is the LRU (least recently used) algorithm?
Then we can use this algorithm to design image cache;
public class LruResourceCache<T, Y> {

    private final Map<T, Y> cache = new LinkedHashMap<>(100, 0.75f, true);

    public synchronized Y put(@NonNull T key, @Nullable Y item) {
        // Cache picture
        return null;
    }

    public synchronized Y get(@NonNull T key) {
        // Get picture
        return null;
    }

    public void clearMemory() {
        // Clear all caches
        trimToSize(0);
    }

    protected synchronized void trimToSize(long size) {
        // Reclaim the memory to the specified size and remove the least recently used memory to the specified size
    }
}
Several methods are designed here, including the operation of saving and fetching, as well as the operation of clearing the cache and reclaiming the picture memory;
Do you have any questions at this time? Which key do I use to access the picture?
Very simply, use the url of the image. Because the url of each image is different, you can use this as the only key;
Then this simple memory cache is designed;
Next, let's take a look at how to design disk cache;
3.2 design of disk cache
In fact, the design of disk cache is not so complex. It is nothing more than storing picture files in the mobile phone memory card and reading from the memory card;
Different from the memory, the speed of reading and writing from the disk is slow. The advantage is that the disk can store more and larger picture files than the memory;
Because compared with memory, the capacity of memory card is much higher than the size of memory;
And memory meaning, we design a read and a write operation; Read: be responsible for reading picture files from disk; write: be responsible for writing picture files to disk
public class DiskLruCache {

    public synchronized <T> T get(String key){
        // Get disk data
        return null;
    }

    public synchronized <T> void put(String key, T value){
        // Store picture data to disk
    }
}
3.3 design of network cache
The design of network cache is very simple, that is, directly access and obtain image files;
public class NetWorkLruCache {

    public synchronized <T> T request(String url){
        // Get network data
        return null;
    }
}
So here, a simple caching mechanism is designed;
3.4 summary
Then a simple picture framework is implemented. Compared with the previous framework, there is more caching mechanism, which greatly improves the utilization of pictures;
If I tell you, Congratulations, you have successfully mastered the implementation of Glide source code, I think I may be beaten flat by a slap;
But what I want to tell you is that the above principle is a simplification of Glide source code. After you understand the logic above, you can basically understand the basic process of Glide source code;
The rest is basically more detailed implementation;
In fact, the implementation of a picture framework is basically inseparable from these steps. The more detailed implementation is nothing more than expansion and encapsulation based on these steps;
Understand the basic principles, and then in-depth study of the source code will be meaningful;
4. Glide version implementation
We implemented a simple picture framework through extraction above. Although we have all the functions, we always feel that something is missing!
What's missing?
Lack of more details, such as the encapsulation of design patterns, how to decouple and better reuse!
There is also performance optimization. Although the above framework introduces caching mechanism, there are still more performance optimization points to be mined;
Next, I will talk about the details of the implementation of Glide framework according to the above simple picture framework, and what further optimization points have been made compared with our framework;
4.1,RequestManager
When we implemented RequestManager above, we mentioned the implementation idea of RequestManager. We manually callback in Activity or Fragment;
The implementation of Glide is more ingenious. It realizes the callback of the life cycle by creating an invisible Fragment;
Glide is calling glide When the with (this) method is used, a created RequestManager will be returned. When the RequestManager is created, an invisible Fragment will be created and set to the RequestManager to enable it to monitor the life cycle;
The implementation logic of creating Fragment is in the ragmentGet method of RequestManagerRetriever;
Take a look at the general implementation;
private RequestManager fragmentGet(
    @NonNull Context context,
    @NonNull android.app.FragmentManager fm,
    @Nullable android.app.Fragment parentHint,
    boolean isParentVisible) {
    // Create an invisible RequestManagerFragment through the passed in fragment manager
  RequestManagerFragment current = getRequestManagerFragment(fm, parentHint);
  // Get RequestManager through RequestManagerFragment
  RequestManager requestManager = current.getRequestManager();
  if (requestManager == null) {
    Glide glide = Glide.get(context);
    // If the RequestManager is empty, the RequestManger is created through the abstract factory
    requestManager =
        factory.build(
            glide, current.getGlideLifecycle(), current.getRequestManagerTreeNode(), context);
    // Judge whether the current page is visible. If yes, call back the start method;
    if (isParentVisible) {
      requestManager.onStart();
    }
    // Set RequestManager to fragment
    current.setRequestManager(requestManager);
  }
  return requestManager;
}
The implementation is not very complicated, so we do two things: create an invisible RequestManagerFragment, create a RequestManager, and set the RequestManger to the RequestManagerFragment, and the callback of the life cycle in the RequestManagerFragment will be called back to the RequestManager;
In this way, the RequestManager has life cycle monitoring;
The Lifecycle here is not a Lifecycle component of Jectpack, but a self-defined listener used to callback the Lifecycle;
What optimization details are worth discussing here?
This detail lies in the creation of RequestManagerFragment;
The RequestManagerFragment is not created every time it is acquired;
There are three steps in logic. Please see the source code below
private RequestManagerFragment getRequestManagerFragment(
    @NonNull final android.app.FragmentManager fm, @Nullable android.app.Fragment parentHint) {
    // First, get the corresponding fragment through the fragment manager
  RequestManagerFragment current = (RequestManagerFragment) fm.findFragmentByTag(FRAGMENT_TAG);
  // If the acquisition is empty, it is obtained from a HashMap collection;
  if (current == null) {
    current = pendingRequestManagerFragments.get(fm);
    // If it is empty from the collection, create a new Fragment and add it to the page, then put it into the HashMap, and send a message to remove the Fragment from the HashMap;
    if (current == null) {
      current = new RequestManagerFragment();
      current.setParentFragmentHint(parentHint);
      ...
      fm.beginTransaction().add(current, FRAGMENT_TAG).commitAllowingStateLoss();
      ...
    }
  }
  return current;
}
There are two steps:
Step 1: find the Fragment through the Fragment manager. If it is obtained, it will be returned;
Step 2: if no Fragment is obtained in step 1, create a new Fragment and add it to the page;
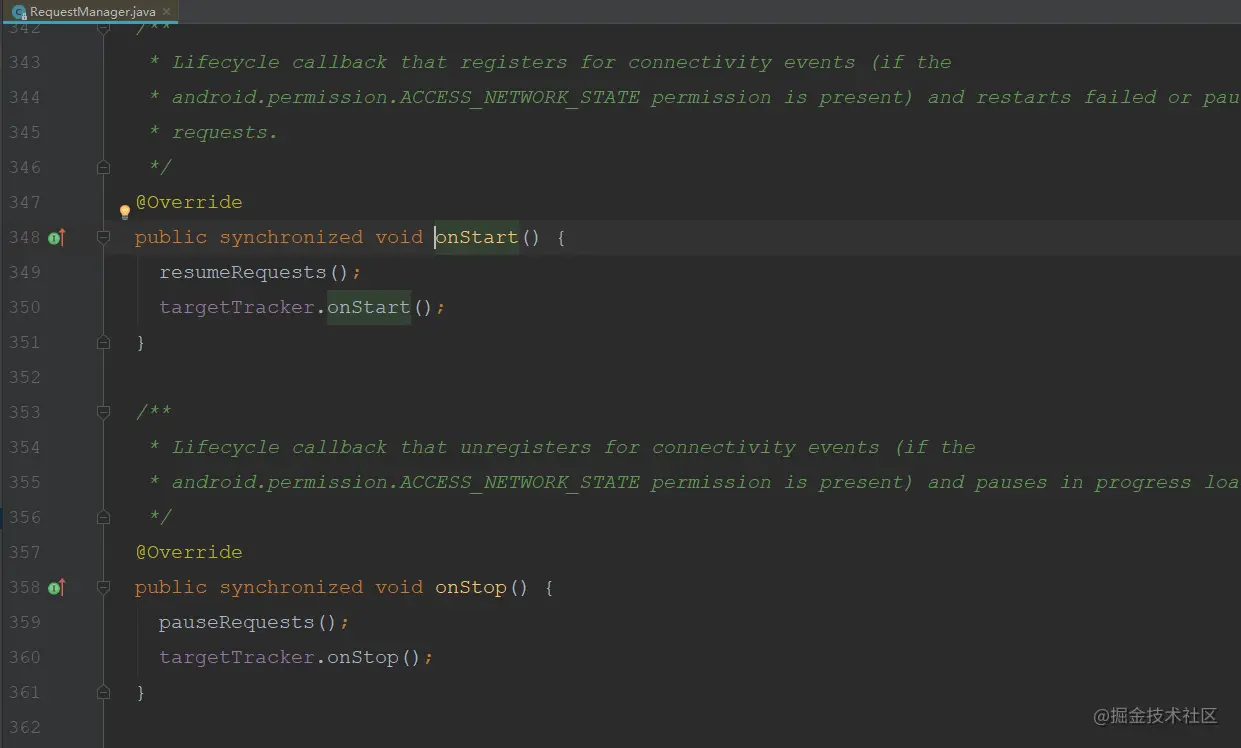
In the life cycle method of RequestManagerFragment, call back through the lifecycle, and RequestManger registers this listener, then the life cycle can be obtained;
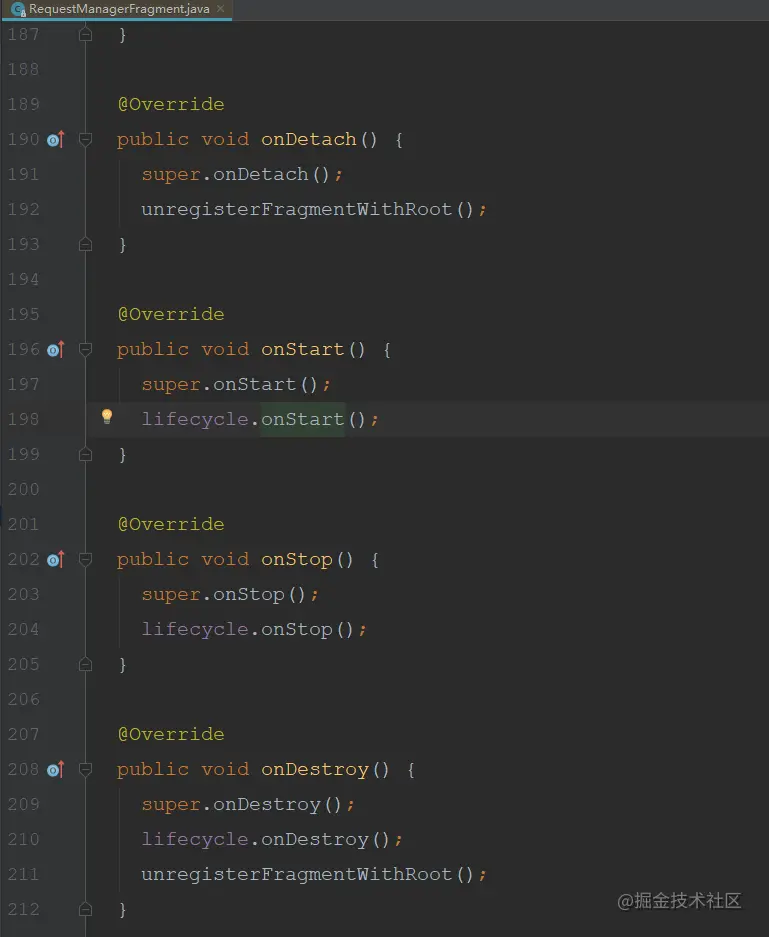
Finally, in the life cycle of RequestManger, the operation of loading and stopping images is started;
4.2,RequestBuilder
The responsibility of RequestBuilder is very clear, which is used to create requests for obtaining pictures;
This class uses the builder pattern to build parameters. One advantage is that it can easily add a variety of complex parameters;
This RequestBuilder does not have a build method, but has an into method. The principle is actually the same. It does not say that it must be written as a build;
Finally, the logic of loading pictures is implemented in the into method;
private <Y extends Target<TranscodeType>> Y into(
    @NonNull Y target,
    @Nullable RequestListener<TranscodeType> targetListener,
    BaseRequestOptions<?> options,
    Executor callbackExecutor) {
...
  // Create picture request
  Request request = buildRequest(target, targetListener, options, callbackExecutor);

  // Gets whether the current picture control has been requested to set the picture. If so, and the loading has not been completed,
  // Or if the loading is completed but the loading fails, call begin again for the request and make the request again;
  Request previous = target.getRequest();
  if (request.isEquivalentTo(previous)
      && !isSkipMemoryCacheWithCompletePreviousRequest(options, previous)) {
   ...
    if (!Preconditions.checkNotNull(previous).isRunning()) {
      ...
      previous.begin();
    }
    return target;
  }

//Clear the picture request for the current picture control
  requestManager.clear(target);
  // Set request to control
  target.setRequest(request);
  // Then add the request to the request manager
  requestManager.track(target, request);

  return target;
}
Here are two details:
First detail:
Before starting the request, the previous request will be obtained. If the previous request has not been loaded, or the loading is completed but the loading fails, the request will be retried again;
Second detail:
What are the benefits of setting the request to the target that encapsulates the picture control?
Most of our pages are list pages, so we will basically use the list control of RecycleView to load data. When loading pictures, the list will be loaded disorderly when sliding quickly. The reason is the reuse of items in RecycleView;
Glide is here to avoid such problems through such operations;
When calling setRequest, set the current Request as a tag to the View, so there will be no confusion when obtaining the Request for loading;
private void setTag(@Nullable Object tag) {
  ...
  view.setTag(tagId, tag);
}
4.3,Engine
From the above, we know that all requests start in the begin of the Request, and its implementation is in the begin of the SingleRequest. Finally, we will go to the onSizeReady of the SingleRequest and load the image data through the load of the Engine;
This method is mainly divided into two steps:
Step 1: load data from memory
Step 2: load data from disk or network
public <R> LoadStatus load(...) {
  ...
  synchronized (this) {
  // First step
    memoryResource = loadFromMemory(key, isMemoryCacheable, startTime);

// Step 2
    if (memoryResource == null) {
      return waitForExistingOrStartNewJob(
          glideContext,
          model,
          signature,
          width,
          height,
          resourceClass,
          transcodeClass,
          priority,
          diskCacheStrategy,
          transformations,
          isTransformationRequired,
          isScaleOnlyOrNoTransform,
          options,
          isMemoryCacheable,
          useUnlimitedSourceExecutorPool,
          useAnimationPool,
          onlyRetrieveFromCache,
          cb,
          callbackExecutor,
          key,
          startTime);
    }
  }
...
  return null;
}
For a brief review, I designed a LruResourceCache class for memory cache, which uses LRU algorithm;
Compared with the logic designed above to load data from memory, where are the details of Glide?
private EngineResource<?> loadFromMemory(
    EngineKey key, boolean isMemoryCacheable, long startTime) {
  ...

  // Get image resources from weak references
  EngineResource<?> active = loadFromActiveResources(key);
  if (active != null) {
    ...
    return active;
  }

 // Get picture resources from LRU cache
  EngineResource<?> cached = loadFromCache(key);
  if (cached != null) {
    ...
    return cached;
  }

  return null;
}
First, the first detail:
Glide designs a weak reference cache. When loading from memory, it will first obtain image resources from the weak reference;
Why design an extra layer of weak reference cache?
Let's talk about the mechanism of weak reference in memory. When the GC is triggered by the Java virtual machine, the weak reference object will be recycled, regardless of whether the memory is enough at this time!
Then, the advantage of designing a weak reference cache is that during the period when GC is not triggered, image resources can be reused and operations from LruCache can be reduced;
Take a look at the final call of the source code:
synchronized EngineResource<?> get(Key key) {
  // A weak reference object was obtained according to the Key
  ResourceWeakReference activeRef = activeEngineResources.get(key);
  if (activeRef == null) {
    return null;
  }

  EngineResource<?> active = activeRef.get();
  ...
  return active;
}
Second detail:
Get the picture resources from LruCache and store them in the weak reference cache;
private EngineResource<?> loadFromCache(Key key) {
 //
  EngineResource<?> cached = getEngineResourceFromCache(key);
  if (cached != null) {
    cached.acquire();
    activeResources.activate(key, cached);
  }
  return cached;
}
Another operation is that after the picture is loaded, the picture resources will be stored in the weak reference cache for subsequent reuse;
Its source code location is called here: onEngineJobComplete of Engine;
This method is called in the callback of image loading, that is, onResourceReady of EngineJob
public synchronized void onEngineJobComplete(
    EngineJob<?> engineJob, Key key, EngineResource<?> resource) {
  ...
  if (resource != null && resource.isMemoryCacheable()) {
   // Store in weak reference cache
    activeResources.activate(key, resource);
  }

  ...
}
In fact, these two details are introduced by the weak reference cache. It is precisely because of the addition of a weak reference cache that the picture loading performance can be squeezed to the extreme;
Some people will say, what's the use of adding this? Not much faster.
As the saying goes: the performance is squeezed step by step. Optimize a little where it can be optimized, and gradually accumulate, it will become a river!
If the above picture resources cannot be obtained, then the data will be loaded from the disk or network;
4.4,DecodeJob
Reading from disk or network must be a time-consuming task, so it must be executed in sub threads, and Glide is implemented in this way;
Let's look at the general source code:
Finally, an asynchronous task called DecodeJob will be created. Let's see what the run method of this DecordJob does?
public void run() {

 ...
    runWrapped();
 ...
}
The run method mainly has a runWrapped method, which is the final execution place;
On this com bumptech. glide. load. engine. In the decodejob#getnextgenerator method, the memory producer Generator will be obtained, and these content producers correspond to different cached data respectively;
private DataFetcherGenerator getNextGenerator() {
  switch (stage) {
    case RESOURCE_CACHE:
      return new ResourceCacheGenerator(decodeHelper, this);
    case DATA_CACHE:
      return new DataCacheGenerator(decodeHelper, this);
    case SOURCE:
      return new SourceGenerator(decodeHelper, this);
    case FINISHED:
      return null;
    ...
  }
}
4.5,DataCacheGenerator
ResourceCacheGenerator: corresponding to the transformed picture resource producer;
DataCacheGenerator: corresponds to a native image resource producer that has not been converted;
SourceGenerator: corresponds to the content producer of network resources;
Here, we only care about the data obtained from the disk, which corresponds to the ResourceCacheGenerator and the manufacturer of the DataCacheGenerator;
The implementation of these two methods is almost the same. They both obtain a File object, and then load the corresponding picture data according to the File object;
From the above, we can know that Glide's disk cache is obtained from DiskLruCache;
Let's take a look at the startNext method of the DataCacheGenerator;
public boolean startNext() {
while (modelLoaders == null || !hasNextModelLoader()) {
sourceIdIndex++;
...
Key originalKey = new DataCacheKey(sourceId, helper.getSignature());
// Obtain the File object from DiskLruCache through the generated key
cacheFile = helper.getDiskCache().get(originalKey);
if (cacheFile != null) {
this.sourceKey = sourceId;
modelLoaders = helper.getModelLoaders(cacheFile);
modelLoaderIndex = 0;
}
}
...
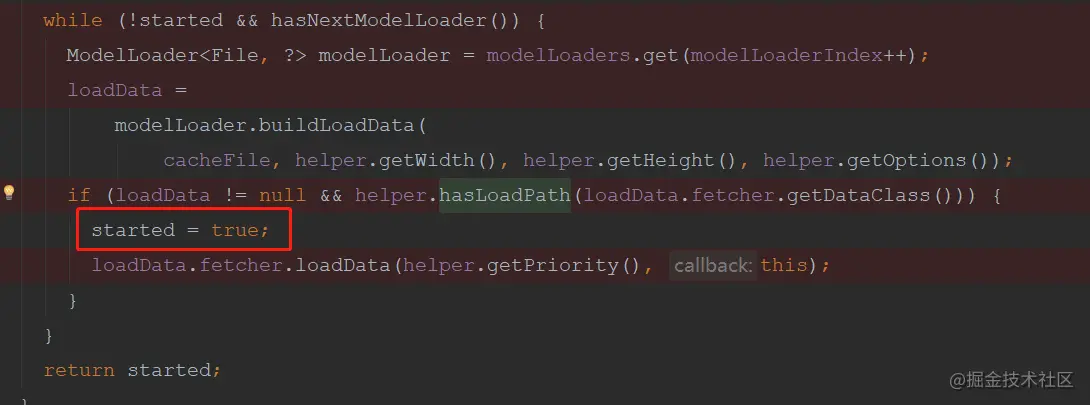
while (!started && hasNextModelLoader()) {
ModelLoader<File, ?> modelLoader = modelLoaders.get(modelLoaderIndex++);
loadData =
modelLoader.buildLoadData(
cacheFile, helper.getWidth(), helper.getHeight(), helper.getOptions());
if (loadData != null && helper.hasLoadPath(loadData.fetcher.getDataClass())) {
started = true;
loadData.fetcher.loadData(helper.getPriority(), this);
}
}
return started;
}
There are two main steps:
The first step is to obtain the File object from DiskLruCache through the generated key;
The second step is to convert the File object into a Bitmap object through LoadData;
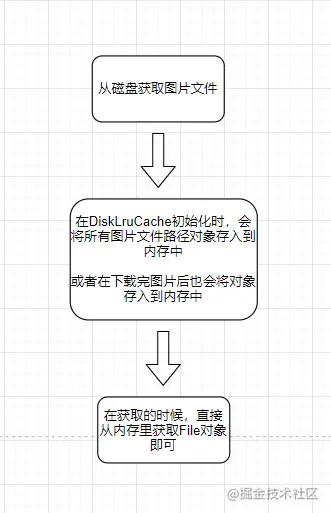
Step 1: get the File object
When Glide loads DiskLruCache, it will load the path information corresponding to all pictures into memory. When calling the get method of DiskLruCache, it is actually obtained directly from an Lru memory cache maintained in DiskLruCache;
Therefore, the first step of the get method is actually to obtain the File object from the LruCache memory cache;
This processing logic is operated in the open method of DiskLruCache, which will trigger an operation to read local files, that is, the readJournal method of DiskLruCache;
Finally, we came to the readJournalLine method;
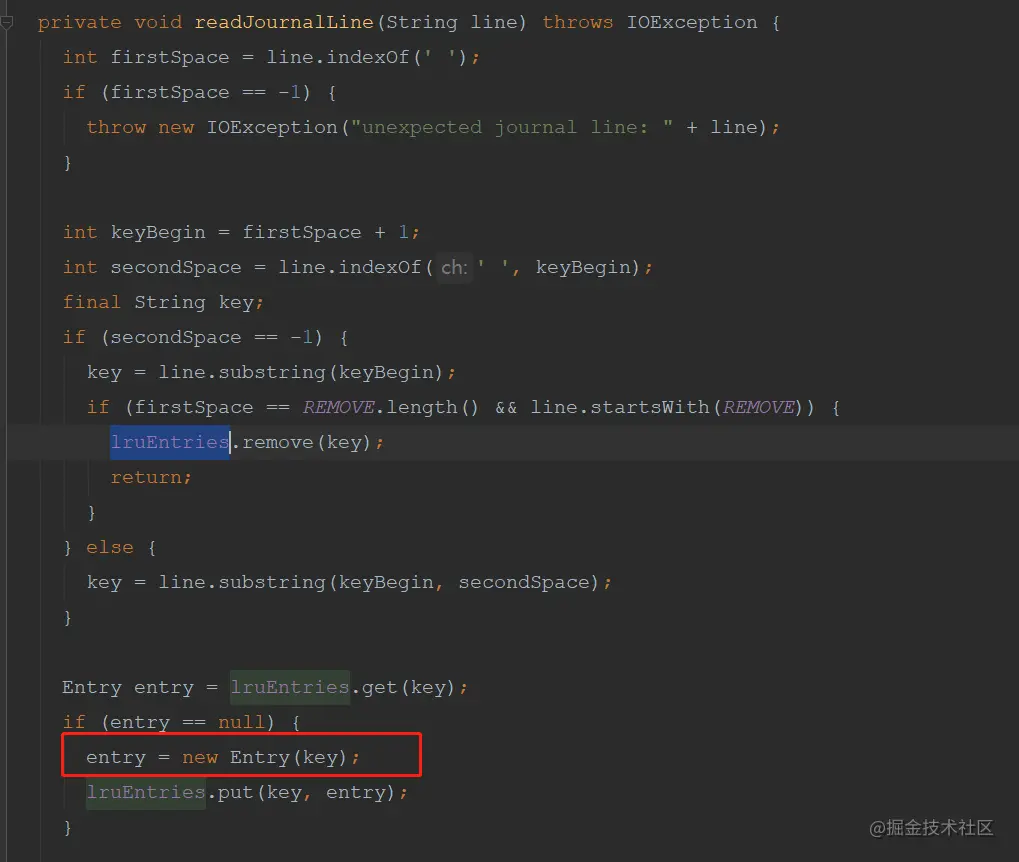
This file mainly stores the key of the picture resource, which is used to obtain the file of the local picture path;
Finally, an Entry object is created in the readJournalLine method of DiskLruCache, and a File object is created in the construction method of the Entry object;
private Entry(String key) {
  ...
  for (int i = 0; i < valueCount; i++) {
      // Create a picture File object
      cleanFiles[i] = new File(directory, fileBuilder.toString());
      fileBuilder.append(".tmp");
      dirtyFiles[i] = new File(directory, fileBuilder.toString());
      ...
  }
}
Here, do you have any questions? If I downloaded the picture after DiskLruCache initialization? At this time, there must be no data in the Lru memory of DiskLruCache. Where does the data come from?
I believe you have guessed that even when the image file is saved locally, it will be added to the Lru memory of DiskLruCache;
Its implementation is in the edit() method of DiskLruCache;
private synchronized Editor edit(String key, long expectedSequenceNumber) throws IOException {
  ...
  Entry entry = lruEntries.get(key);
  ...
  if (entry == null) {
    entry = new Entry(key);
    lruEntries.put(key, entry);
  }
  ...
  Editor editor = new Editor(entry);
  entry.currentEditor = editor;
  ...
  return editor;
}
Here, first add the generated Entry object to the memory, and then write the picture file locally through the Editor. Through IO operation, I won't repeat it here;
There are storage methods. Take a look at the get method of DiskLruCache;
public synchronized Value get(String key) throws IOException {
 ...
 // Get the Entry object directly from memory;
  Entry entry = lruEntries.get(key);
  ...

  return new Value(key, entry.sequenceNumber, entry.cleanFiles, entry.lengths);
}
Step 2: File object conversion
When the File object is obtained according to the key, the next step is to convert the File file into bitmap data;
The design of this code is very interesting. Let's see how it is implemented!
startNext method of DataCacheGenerator:
public boolean startNext() {
while (modelLoaders == null || !hasNextModelLoader()) {
...
modelLoaders = helper.getModelLoaders(cacheFile);
...
}
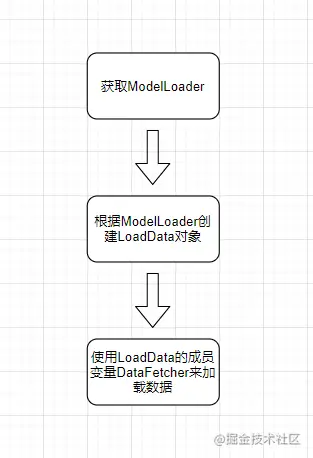
while (!started && hasNextModelLoader()) {
// Traverse to get ModelLoader
ModelLoader<File, ?> modelLoader = modelLoaders.get(modelLoaderIndex++);
// Get LoadData
loadData =
modelLoader.buildLoadData(
cacheFile, helper.getWidth(), helper.getHeight(), helper.getOptions());
if (loadData != null && helper.hasLoadPath(loadData.fetcher.getDataClass())) {
// Load data
started = true;
loadData.fetcher.loadData(helper.getPriority(), this);
}
}
return started;
}
4.6,ModelLoader
Here, the ModelLoader class is designed to load data logic;
This code is implemented based on the interface and does not depend on the specific implementation. The advantage is that it is very decoupled and flexible. The disadvantage is that the code reading ability is reduced, because it is very difficult for you to find out which implementation class is here for a while and a half!
What are the responsibilities of this ModelLoader class? We can look at the notes first;

The factory interface that converts any complex data model into specific data types;
How do you understand this sentence? It can be understood as the adapter mode, which converts one type of data into another type of data;
public interface ModelLoader<Model, Data> {

  ...
  class LoadData<Data> {
    public final Key sourceKey;
    public final List<Key> alternateKeys;
    public final DataFetcher<Data> fetcher;

    public LoadData(@NonNull Key sourceKey, @NonNull DataFetcher<Data> fetcher) {
      this(sourceKey, Collections.<Key>emptyList(), fetcher);
    }

    public LoadData(
        @NonNull Key sourceKey,
        @NonNull List<Key> alternateKeys,
        @NonNull DataFetcher<Data> fetcher) {
      this.sourceKey = Preconditions.checkNotNull(sourceKey);
      this.alternateKeys = Preconditions.checkNotNull(alternateKeys);
      this.fetcher = Preconditions.checkNotNull(fetcher);
    }
  }

...
  @Nullable
  LoadData<Data> buildLoadData(
      @NonNull Model model, int width, int height, @NonNull Options options);

 ...
  boolean handles(@NonNull Model model);
This class has few methods. It holds the internal class loaddata, and the loaddata holds the interface DataFetcher. The function of the DataFetcher is to load data, and the interface method loaddata is held in it;
This is a typical composition pattern, which can make this class have more functions without changing the class structure;
ModelLoader also has an interface method buildLoadData, which is used to build LoadData objects;
See here, do you feel understood, but you don't fully understand!
Yes, although we know the implementation logic here, we don't know where the specific implementation is!
Two interfaces are used here, one is ModelLoader and the other is DataFetcher. After finding the implementation of ModelLoader, you have to find the implementation of DataFetcher. It looks very windy!
And all this still has to start with ModelLoader;
By implementing ModelLoader, the method of building LoadData is realized. When building LoadData, the DataFetcher object is also built. In fact, the LoadData object here is only responsible for maintaining DataFetcher and other related variables. The final place to load data is the DataFetcher;
In other words, when we find the ModelLoader, we find the corresponding DataFetcher, and we know the corresponding loading logic;
What is this called in design? High cohesion! The same kind of related implementations are put together to realize high cohesive encapsulation;
Just a few lines of code, Daniel explained what is called high cohesion and low coupling. Let's worship it first!

Next, let's take a look at how ModelLoader gets the data;
From the above source code, we can see that ModelLoader is obtained through the getModelLoaders method of DecodeHelper, and through the File object passed in;
The final call is to obtain the ModelLoader list through the getModelLoaders method of Registry;
Here, it is necessary to talk about the Registry class;
4.7,Registry
The main function of this class is to save all kinds of data for external use. You can understand it here as a Map collection, which stores all kinds of data and obtains it through the Key value;
However, the Registry is more powerful and can save more content;
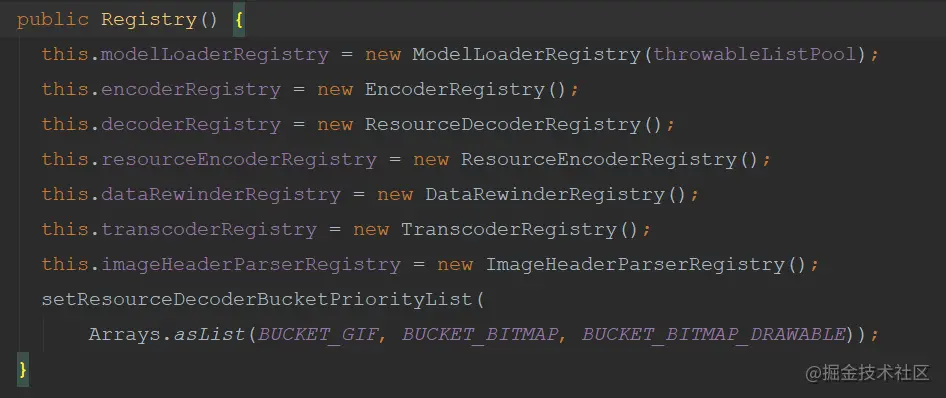
Take a look at the construction method of this class and create a pile of registration classes to store the corresponding data;
The initialization of this class is in the Glide constructor, and the corresponding data registered is also in the Glide constructor;
At a glance, you don't need to understand it too deeply. You just need to know that this class is used to store registered data and provide it for external use;
After we get the ModelLoader list through Registry, we will traverse to determine whether the current LoadData has a LoadPath. We will talk about this LoadPath later;
Here, you only need to understand that this class is used for resource conversion, such as converting resource files into Bitmap or Drawable, etc;
When there is a match, it will be executed only once;
The final class we execute here is ByteBufferFileLoader;
This class converts the File object into byte data ByteBuffer when the loadData method is executed;
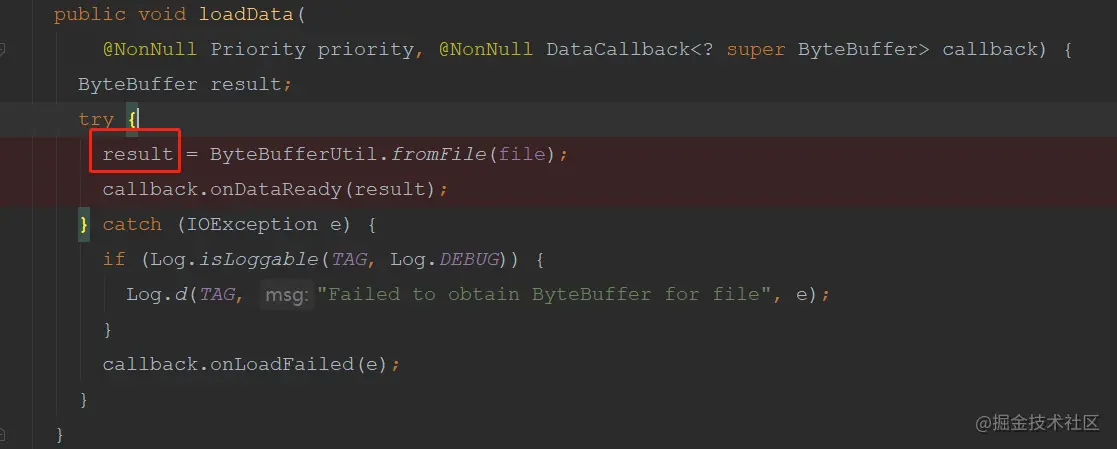
Take a look at the general implementation, and you don't have to understand it too deeply;
We have obtained the stream data of the file above, so how to convert it into bitmap data that can be displayed next?
Here comes the decoding stage;
The byte data ByteBuffer obtained above will eventually be called back to the class DecodeJob, where the decoding logic is implemented;
Take a look at the ondatafetcherread method of DecodeJob:
public void onDataFetcherReady(
    Key sourceKey, Object data, DataFetcher<?> fetcher, DataSource dataSource, Key attemptedKey) {
      ...
      decodeFromRetrievedData();
      ...
}
It calls the decodeFromRetrievedData method to decode the picture stream data;
Here, the decoding function is realized through the LoadPath class,
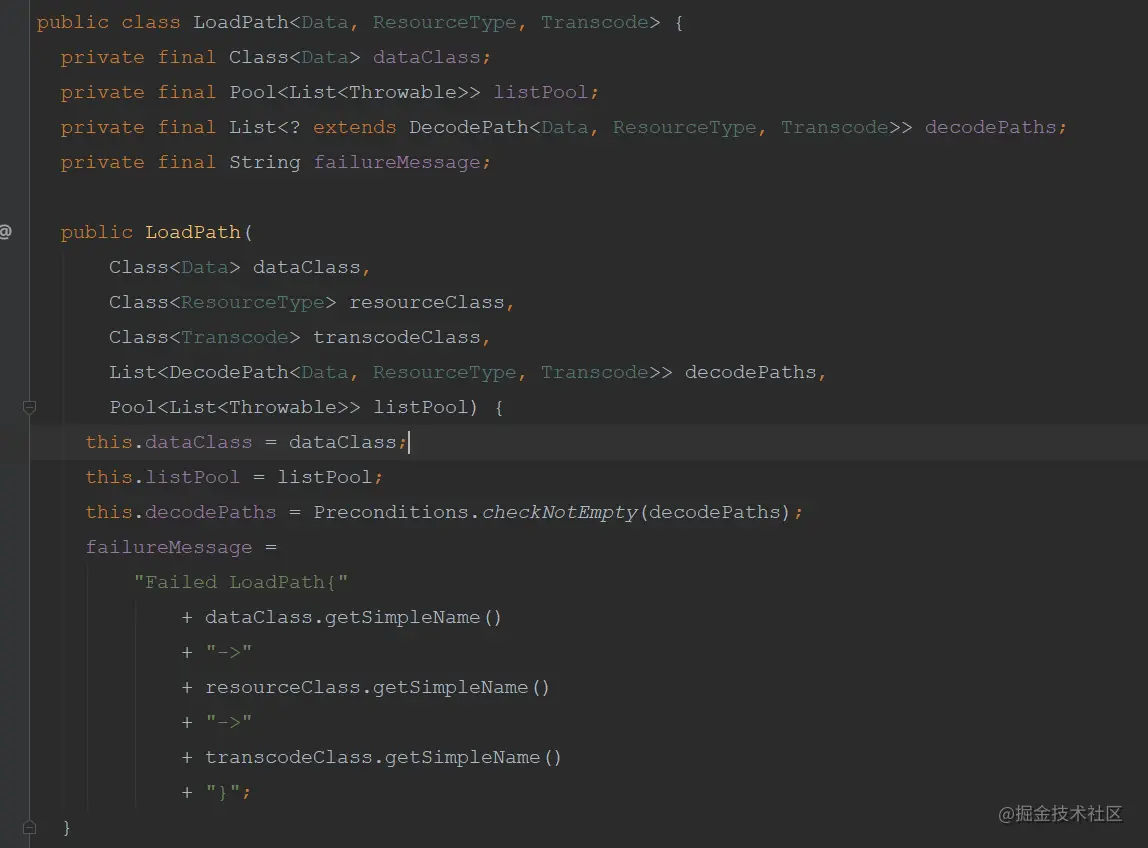
4.8,LoadPath
In fact, the implementation of this LoadPath class is not complex. It holds various abstract variables, such as Pool and DecodePath. This class is also a combination mode, and it does not hold a specific implementation;
Instead, it is called through the combined class to abstract the implementation, so that this class can be used more flexibly;
The decoding place is in the load method of LoadPath of this class, and finally through the DecodePath's decode method. The specific implementation is not in this class;
In fact, the design of this DecodePath is similar to that of LoadPath. It does not involve specific implementation, but calls through the interface held inside, and then abstracts the specific implementation to the outside, which is controlled by external input;
Let's take a look at the member variables and construction methods of this class:
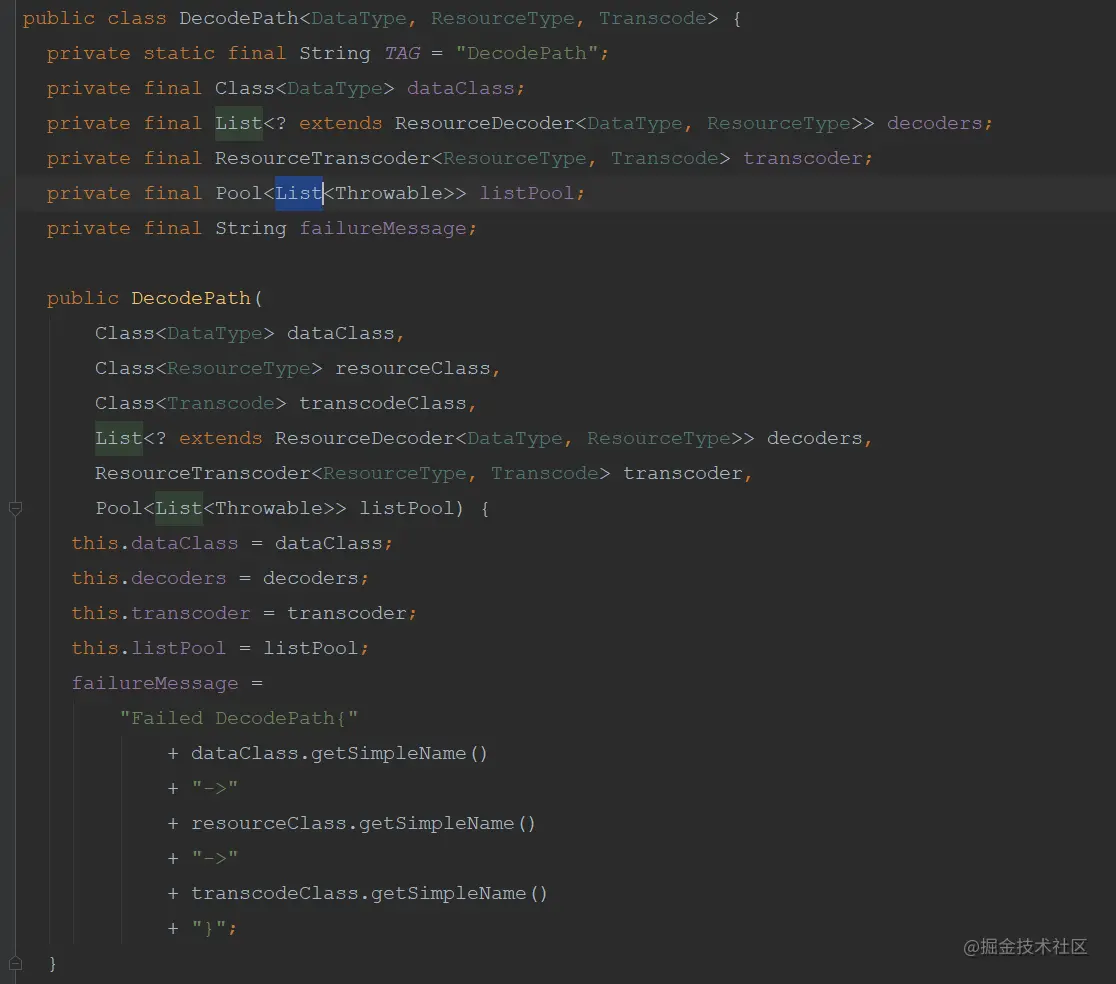
Decode in the DecodePath's decode method, and the final call is decoded through the ResourceDecoder's decode method;
Take a look at the general implementation;
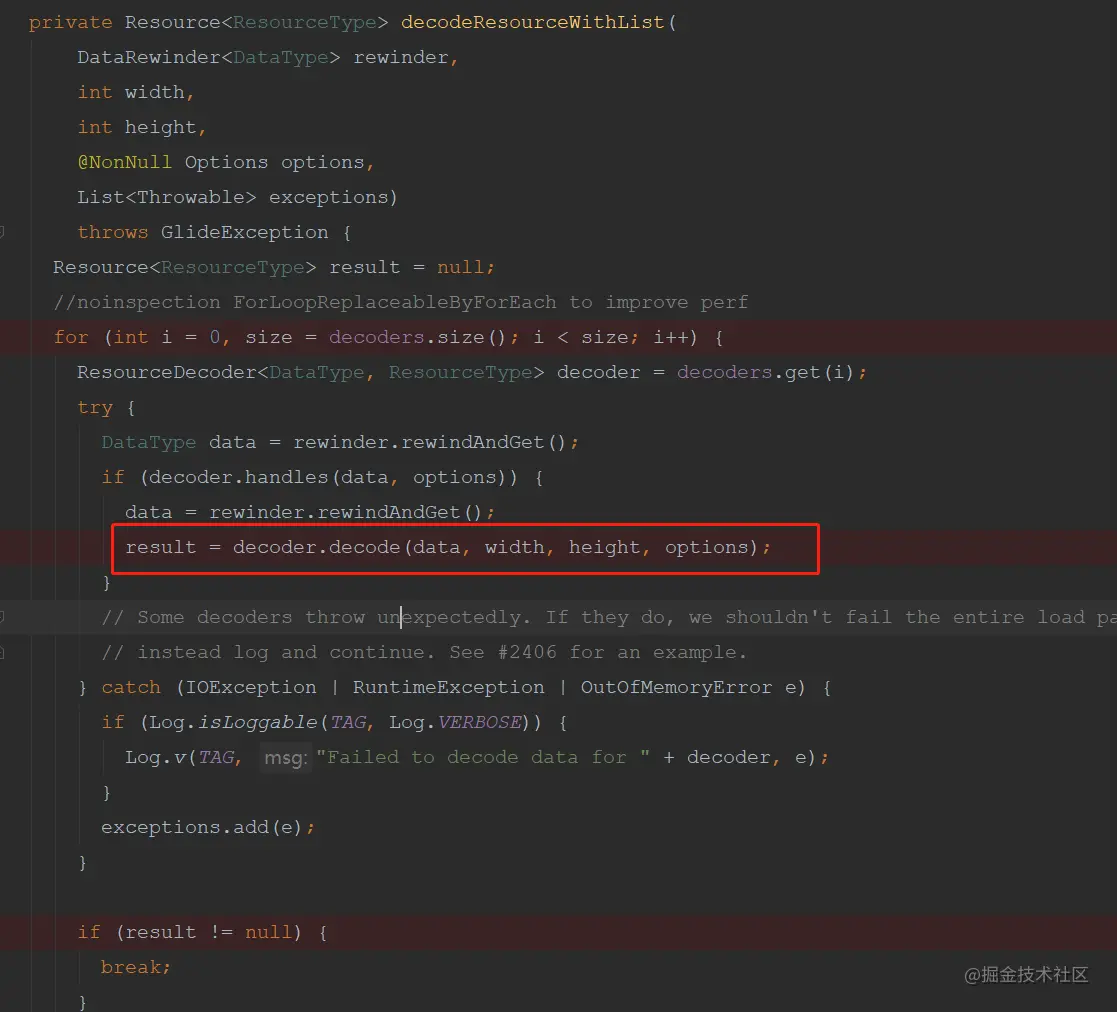
The ResourceDecoder is an interface, and there are many classes for specific implementation. See the screenshot below:

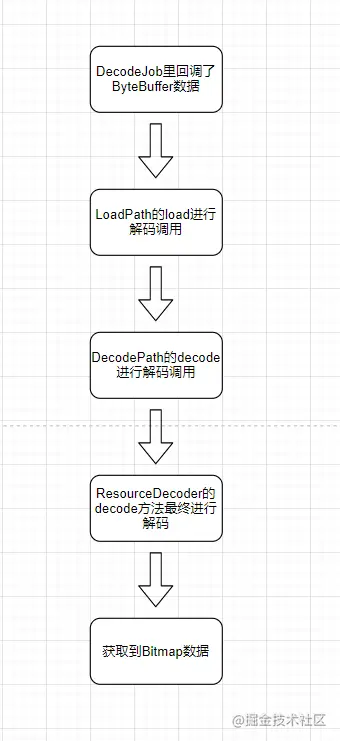
The final implementation is in these classes;
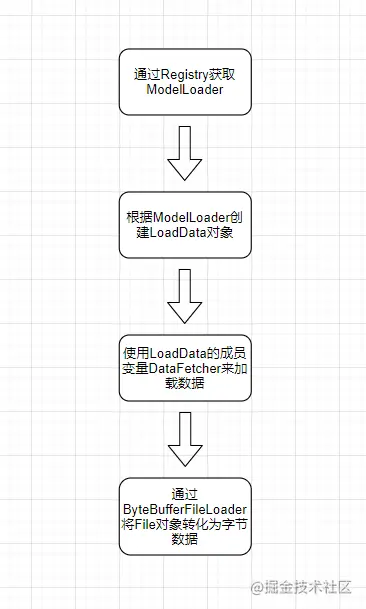
Take a look at the general flow chart:
Where were these classes created?
We can know from the above construction method that this class is passed in step by step from the outside;
First, when creating a LoadPath, we will pass in the DecodePath, and when creating a DecodePath, we will pass in the ResourceDecoder, so we can start from the place where the LoadPath is created;
First, in the decodeFromFetcher method of DecodeJob, use the getLoadPath method of DecodeHelper;
private <Data> Resource<R> decodeFromFetcher(Data data, DataSource dataSource)
    throws GlideException {
  LoadPath<Data, ?, R> path = decodeHelper.getLoadPath((Class<Data>) data.getClass());
  return runLoadPath(data, dataSource, path);
}
In getLoadPath of DecodeHelper, you can see that the LoadPath is finally obtained through the Registry class;
<Data> LoadPath<Data, ?, Transcode> getLoadPath(Class<Data> dataClass) {
  return glideContext.getRegistry().getLoadPath(dataClass, resourceClass, transcodeClass);
}
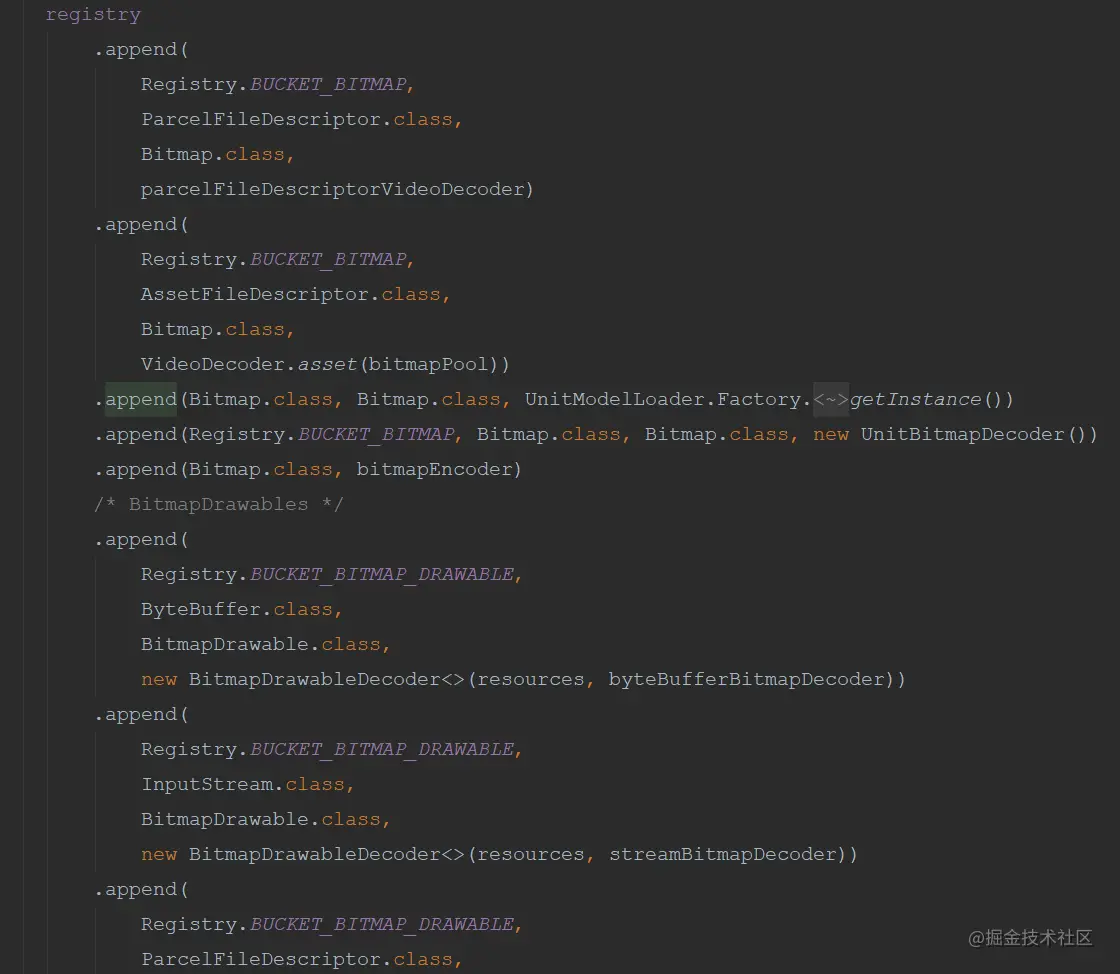
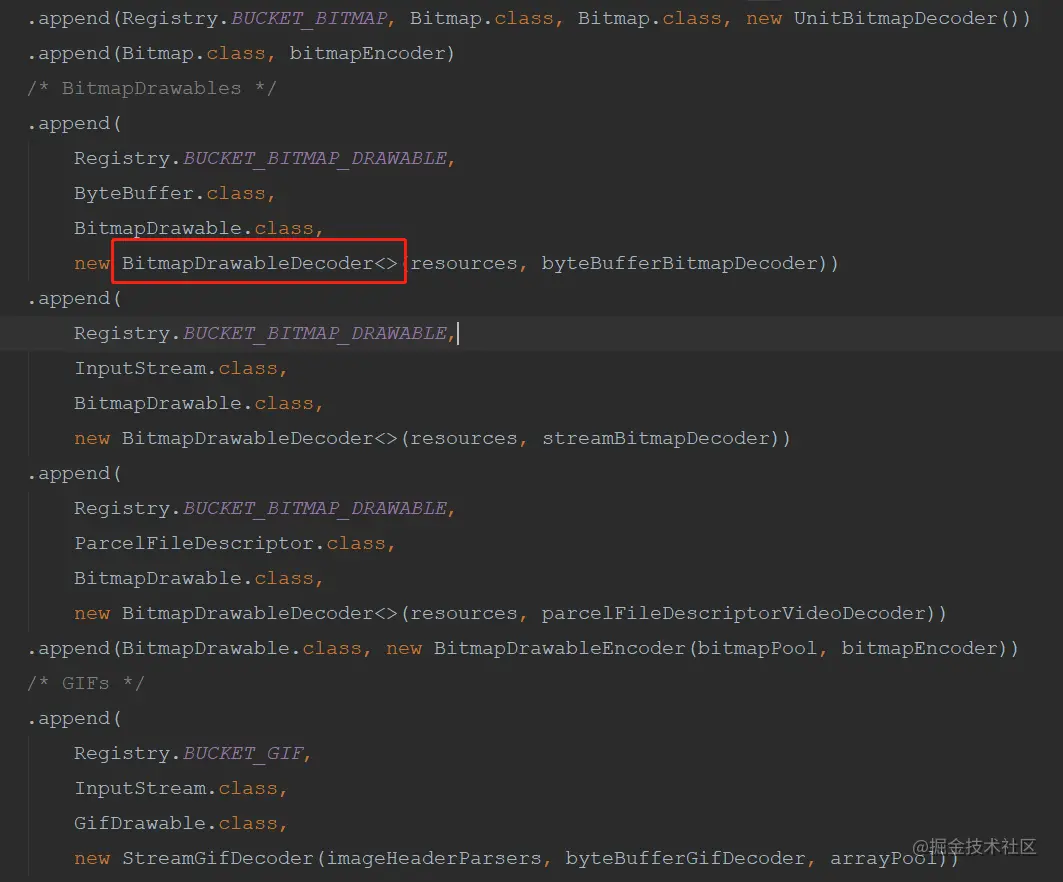
We talked about the Registry class above. This class is used to save data and provide it to external calls. The place to add data is the constructor of Glide;
Let's take a look at the getLoadPath method of Registry;
public <Data, TResource, Transcode> LoadPath<Data, TResource, Transcode> getLoadPath(
    @NonNull Class<Data> dataClass,
    @NonNull Class<TResource> resourceClass,
    @NonNull Class<Transcode> transcodeClass) {
  // Get LoadPath from cache
  LoadPath<Data, TResource, Transcode> result =
      loadPathCache.get(dataClass, resourceClass, transcodeClass);
  if (loadPathCache.isEmptyLoadPath(result)) {
    return null;
  } else if (result == null) {
   // Gets the DecodePath collection
    List<DecodePath<Data, TResource, Transcode>> decodePaths =
        getDecodePaths(dataClass, resourceClass, transcodeClass);
    // It's possible there is no way to decode or transcode to the desired types from a given
    // data class.
    if (decodePaths.isEmpty()) {
      result = null;
    } else {
     // Create LoadPath through DecodePath and save it to the cache for next use
      result =
          new LoadPath<>(
              dataClass, resourceClass, transcodeClass, decodePaths, throwableListPool);
    }
    loadPathCache.put(dataClass, resourceClass, transcodeClass, result);
  }
  return result;
}
This method mainly does three things:
(1) Get the LoadPath from the cache. It can be seen that optimization is everywhere, and those that can be reused will not be created multiple times;
(2) Get the DecodePath set;
(3) Create a LoadPath according to the DecodePath and save it to the cache;
The implementation here is not complicated. Let's take a look at the acquisition of DecodePath, specifically in the getDecodePaths method of Registry;
private <Data, TResource, Transcode> List<DecodePath<Data, TResource, Transcode>> getDecodePaths(
    @NonNull Class<Data> dataClass,
    @NonNull Class<TResource> resourceClass,
    @NonNull Class<Transcode> transcodeClass) {
  ...

  for (Class<TResource> registeredResourceClass : registeredResourceClasses) {
    ...

    for (Class<Transcode> registeredTranscodeClass : registeredTranscodeClasses) {

      // Create a DecodePath from the ResourceDecoder data registered by the Glide constructor
      List<ResourceDecoder<Data, TResource>> decoders =
          decoderRegistry.getDecoders(dataClass, registeredResourceClass);
      ResourceTranscoder<TResource, Transcode> transcoder =
          transcoderRegistry.get(registeredResourceClass, registeredTranscodeClass);
      @SuppressWarnings("PMD.AvoidInstantiatingObjectsInLoops")
      DecodePath<Data, TResource, Transcode> path =
          new DecodePath<>(
              dataClass,
              registeredResourceClass,
              registeredTranscodeClass,
              decoders,
              transcoder,
              throwableListPool);
      decodePaths.add(path);
    }
  }
  return decodePaths;
}
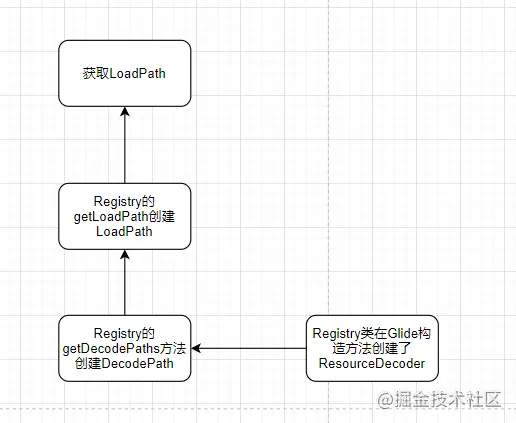
So it's clear that both LoadPath and DecodePath are created at the time of acquisition. For the ResourceDecoder data saved through the Registry class, the DecodePath is created first, and then the LoadPath is created;
Let's take a look at how the ResourceDecoder class is created;
It's clear that ResourceDecoder is created by Registry class in Glide's constructor and saved in the collection;
Then, when decoding, obtain the LoadPath and then the DecodePath, which is created through the ResourceDecoder data saved by the Registry class;
Take a look at the general flow chart:
After reading the logic of obtaining image data from disk cache, let's take a look at how to obtain image data from the network;
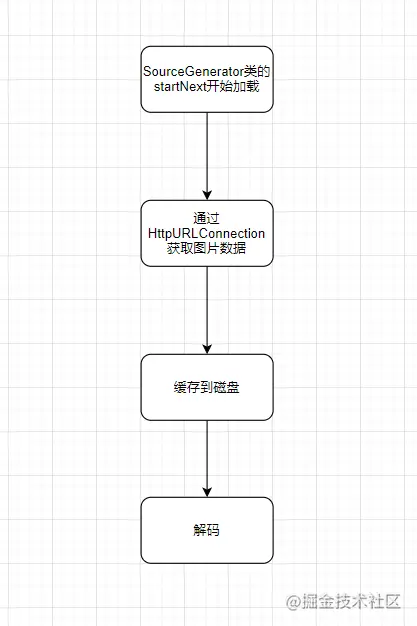
4.9,SourceGenerator
The place to load the network cache is the startNext method of the SourceGenerator class. Let's take a look at the general implementation;
public boolean startNext() {
  if (dataToCache != null) {
    Object data = dataToCache;
    dataToCache = null;
    // Cache data
    cacheData(data);
  }

  ...
  loadData = null;
  boolean started = false;
  while (!started && hasNextModelLoader()) {
    loadData = helper.getLoadData().get(loadDataListIndex++);
    if (loadData != null
        && (helper.getDiskCacheStrategy().isDataCacheable(loadData.fetcher.getDataSource())
            || helper.hasLoadPath(loadData.fetcher.getDataClass()))) {
      started = true;
      startNextLoad(loadData);
    }
  }
  return started;
}
This method has two steps. The first step is to cache data, and the second step is to download image resources from the network;
Does the following implementation seem familiar? Like the logic of disk cache, it also loads data through ModelLoader;
The ModelLoader is also obtained through Registry, and the created place is also created in Glide's construction method through Registry and cached in the cache;
The ModelLoader finally called here is HttpGlideUrlLoader, and the place to load network data is the loadData method of HttpUrlFetcher;
Let's take a look at the implementation of this method;
public void loadData(
    @NonNull Priority priority, @NonNull DataCallback<? super InputStream> callback) {
     ...
    InputStream result = loadDataWithRedirects(glideUrl.toURL(), 0, null, glideUrl.getHeaders());
    callback.onDataReady(result);
  } catch (IOException e) {
    ...
    callback.onLoadFailed(e);
  }
  ...

}
The final call is in the loadDataWithRedirects method;
The implementation of this is actually the native network request of Android, which obtains image data from the network by creating HttpURLConnection;
After successful acquisition, it will be saved to disk;
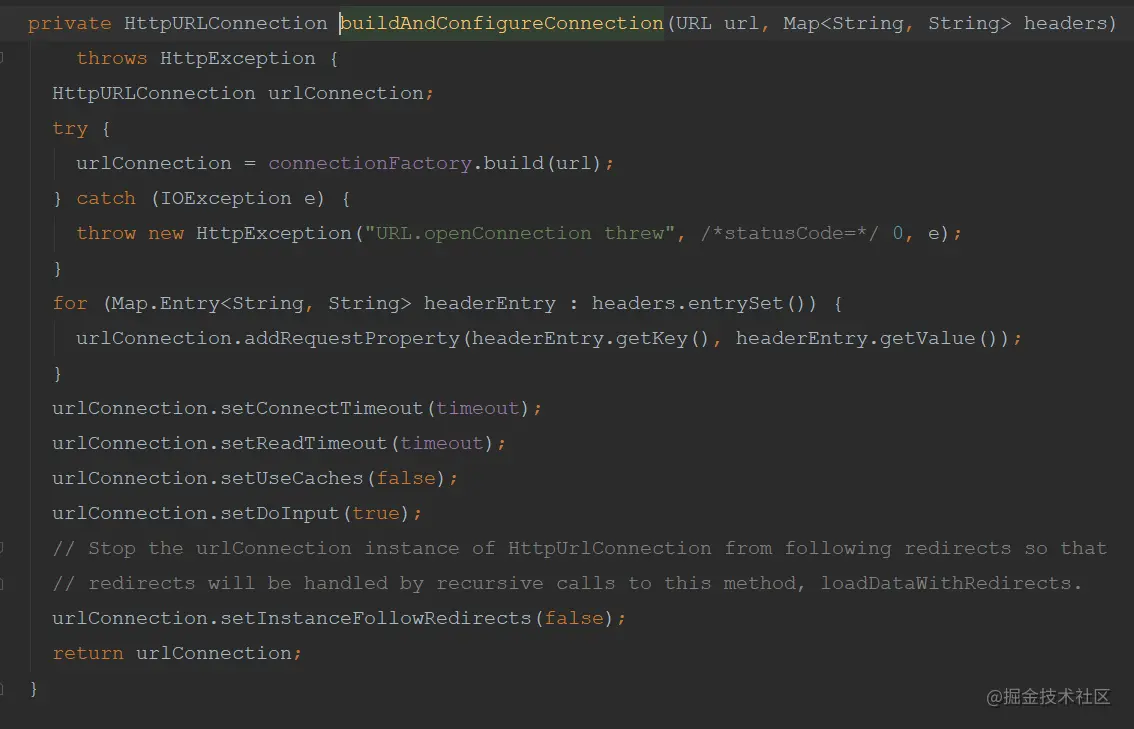
Because it is a native network request, there is no network optimization here. Then we can switch Glide's network request to OKHttp framework by customizing ModelLoader. OKHttp will not be introduced in detail. It is the strongest network request framework in history!
After the acquisition is completed, the decoding logic is the same as the disk cache, which decodes through LoadPath and converts it into Bitmap data;
Part of the source code is omitted in the article. It is suggested to follow the logic of the source code, which can deepen the impression;
There are some details. In view of the length of the article, we won't discuss them in depth here;
So here's the Glide source code. If you have other ideas, please discuss them with me in the comment area;
last
When Xiaobian learned to improve, he collected and sorted out some learning documents, interview questions, Android core notes and other documents related to Android development from the Internet, hoping to help you learn and improve. If you need reference, you can go to me directly CodeChina address: https://codechina.csdn.net/u012165769/Android-T3 Access.