The sad final week finally passed. I want to continue to do scientific and technological innovation in the college. I downloaded a yolov5 to play.
Basic concepts
-
Pictures of individual objects \ (\ Longrightarrow \) object classification
Multiple object \ (\ Longrightarrow \) target detection
-
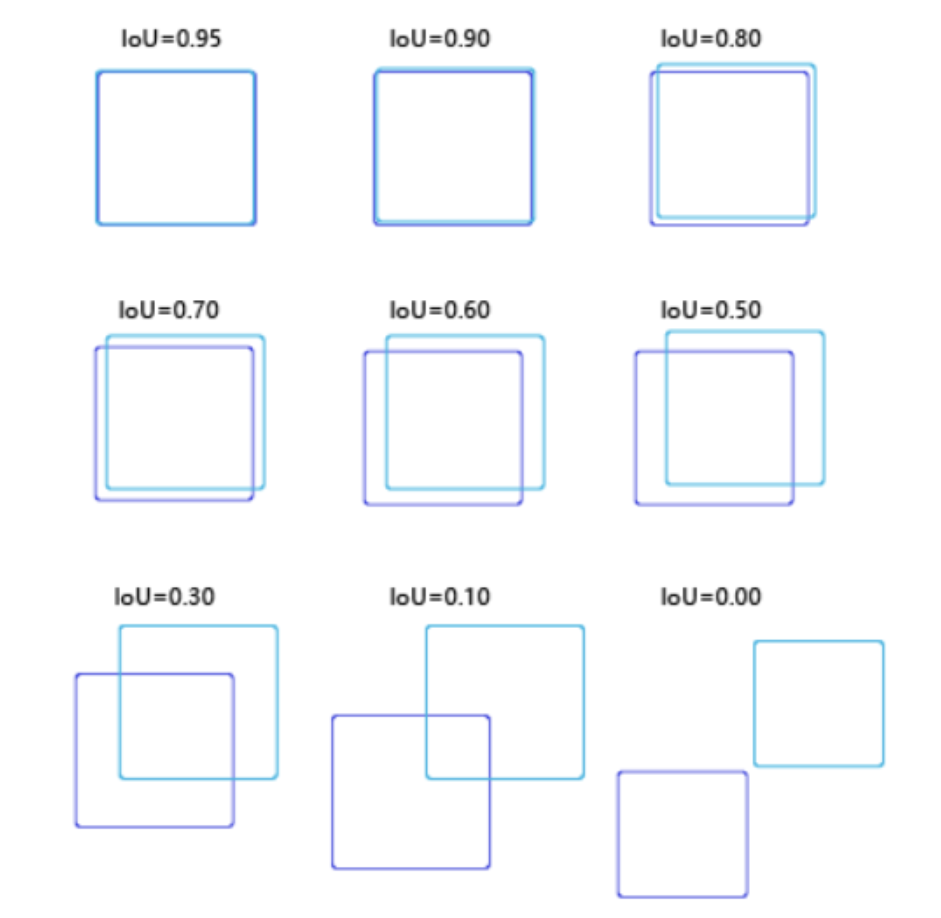
NMS (non maximum suppression) and IOU(Intersection over Union): during target detection, many candidate frames will be generated on the image, and then these candidate frames will be sent to the classifier after feature extraction to obtain the score of the candidate frame. Sort all the scores, select the box with the highest score, and then calculate the coincidence degree between other boxes and the current box, measured by iou: $$IOU = \frac{A\cap B}{A\cup B} $$if the coincidence degree is greater than a certain threshold, delete it.
-
ONNX
ONNX is an open file format designed for machine learning to store trained models. It makes different artificial intelligence frameworks (such as pytoch, mxnet) can store model data in the same format and interact with each other. ONNX specifications and codes are mainly developed by Microsoft, Amazon, Facebook, IBM and other companies and hosted on Github in the form of open source code. At present, the in-depth learning frameworks that officially support loading ONNX models and reasoning include Caffe2, PyTorch, MXNet, ML.NET, TensorRT and micro Soft cntk, and TensorFlow also unofficially supports ONNX--- Wikipedia
detect.py file
- Run: specify parameters on the command line or set run parameters in pycharm
 python detect.py --source 0  # webcam
                            file.jpg  # image
                            file.mp4  # video
                            path/  # directory
                            path/*.jpg  # glob
                            'https://youtu.be/NUsoVlDFqZg'  # YouTube video
                            'rtsp://example. com/media. Mp4 '# RTSP, RTMP and HTTP stream # can be used for real-time camera detection
- parse_opt() parameter:
def parse_opt():
    parser = argparse.ArgumentParser()
    parser.add_argument('--weights', nargs='+', type=str, default=ROOT / 'yolov5s.pt', help='model path(s)') # Weight loaded (selected model)
    parser.add_argument('--source', type=str, default=ROOT / 'data/images', help='file/dir/URL/glob, 0 for webcam') # Address of test data
    parser.add_argument('--imgsz', '--img', '--img-size', nargs='+', type=int, default=[640], help='inference size h,w') #The image is resize d and then sent to the neural network, which is best matched with the selected model
    parser.add_argument('--conf-thres', type=float, default=0.25, help='confidence threshold') # Confidence, which displays the minimum probability of the detection box
    parser.add_argument('--iou-thres', type=float, default=0.45, help='NMS IoU threshold') # NMS IOU threshold, size of intersection between flag boxes
    parser.add_argument('--max-det', type=int, default=1000, help='maximum detections per image')  #Maximum number of detected targets
    parser.add_argument('--device', default='', help='cuda device, i.e. 0 or 0,1,2,3 or cpu') # Equipment number
    # The following parameters have no default values, which is true if specified on the command line; You can also set run / debug parameters in pycharm
    parser.add_argument('--view-img', action='store_true', help='show results') # Display the pictures after reasoning and see the detection effect in real time
    parser.add_argument('--save-txt', action='store_true', help='save results to *.txt') # Save results as txt
    parser.add_argument('--save-conf', action='store_true', help='save confidences in --save-txt labels') # Save the corresponding confidence in txt
    parser.add_argument('--save-crop', action='store_true', help='save cropped prediction boxes')
    parser.add_argument('--nosave', action='store_true', help='do not save images/videos')
    parser.add_argument('--classes', nargs='+', type=int, help='filter by class: --classes 0, or --classes 0 2 3') # Filter types and only see the pictures classified by classes
    parser.add_argument('--agnostic-nms', action='store_true', help='class-agnostic NMS') # NMS can also be done between different categories
    parser.add_argument('--augment', action='store_true', help='augmented inference') # Reasoning enhancement
    parser.add_argument('--visualize', action='store_true', help='visualize features')
    parser.add_argument('--update', action='store_true', help='update all models') # Remove unnecessary parts such as optimizer and ema in the model to reduce the size of the model
    parser.add_argument('--project', default=ROOT / 'runs/detect', help='save results to project/name') # Directory where the results are saved
    parser.add_argument('--name', default='exp', help='save results to project/name') # The name of the folder where the results are saved
    parser.add_argument('--exist-ok', action='store_true', help='existing project/name ok, do not increment') # Do not create a new folder, save the results in the previous folder
    parser.add_argument('--line-thickness', default=3, type=int, help='bounding box thickness (pixels)') # Thickness of bounding box
    parser.add_argument('--hide-labels', default=False, action='store_true', help='hide labels') # Hide labels for each target
    parser.add_argument('--hide-conf', default=False, action='store_true', help='hide confidences') # Hide the confidence of each target
    parser.add_argument('--half', action='store_true', help='use FP16 half-precision inference') # Using FP16 semi precision reasoning to improve speed
    parser.add_argument('--dnn', action='store_true', help='use OpenCV DNN for ONNX inference')
    opt = parser.parse_args()
    opt.imgsz *= 2 if len(opt.imgsz) == 1 else 1  # expand
    print_args(FILE.stem, opt)
    return opt
Debugging tips: View opt at breakpoint and preview parameters
Debug
1. Solution to download model error: when downloading the model, you need to set the environment variable in detect Import the os library from the start of Py and set the environment variable.
import os
os.environ['<Variable name>'] = True
2. Prompt "AssertionError: Image Not Found C: \ retained file \ yolov5 master \ data \ images \ bus Jpg ", because the path contains Chinese folder name, just change it to English.
First attempt
For the first time, use the video I played in trampoline park. First, use the default parameters:
--source data/images/me.mp4 --view-img
It can be seen that the effect is not ideal, the detection box is intermittent, and sometimes it will be detected as a chair.. Reset the lower confidence and iou threshold and try again:
--source data/images/me.mp4 --weight 'yolov5l.pt' --conf 0.1 --iou 0.15 --view-img

It is found that it is easier to be detected, but it is always detected as a chair. Maybe this shape is more like a chair than a person.. Try using a larger model:
--source data/images/me.mp4 --weight yolov5m.pt --conf 0.15 --view-img
It can be felt that although the confidence is increased, the reasoning speed is still much slower.

Although I still can't recognize me when I lie on the wall, it's good that I won't be detected as a chair anymore, and the display of the detection box is much more stable.
To be continued