Spring
1, Spring overview
1.1 coupling degree of Web project
- In the Servlet, you need to call the method in the service, and you need to create a new service instance in the Servlet class. At the same time, in the service implementation class, you also need to call the methods in DAO, and you also need to new an object of DAO implementation class in the service implementation class. This has coupling and loses flexibility.
- Interface oriented programming
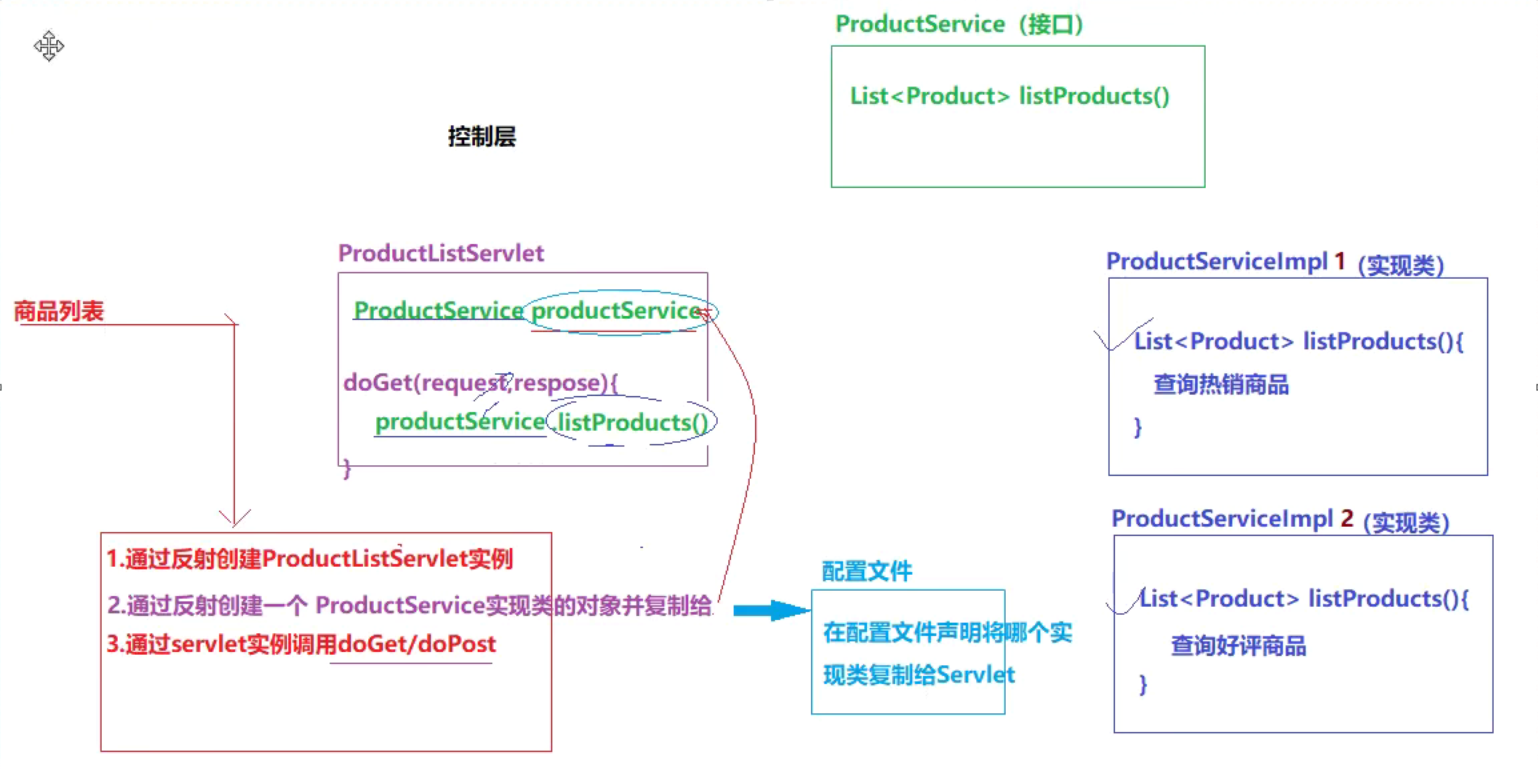
When defining the object variable of the service interface in the servlet, the new keyword is not used to create it. Second, when the servlet is instantiated, the service object variable is dynamically assigned by reflection.
Spring does this.
1.2 introduction to spring
Spring is a lightweight, inversion of control, aspect oriented framework, which is used to solve the complexity problem of enterprise project development - decoupling.
- Lightweight: small size, no invasion to the original code of the project
- Inversion of control: IoC(Inverse of Control), which reverses the control, and leaves the creation of the object to spring. Spring can complete the assignment (DI) of object attributes when creating the object.
- Aspect oriented programming: AOP(Aspect Oriented Programming) can enhance the business without changing the original business.
- Container: the container of the instance, which manages the created objects.
1.3 Spring architecture
Official website: spring io
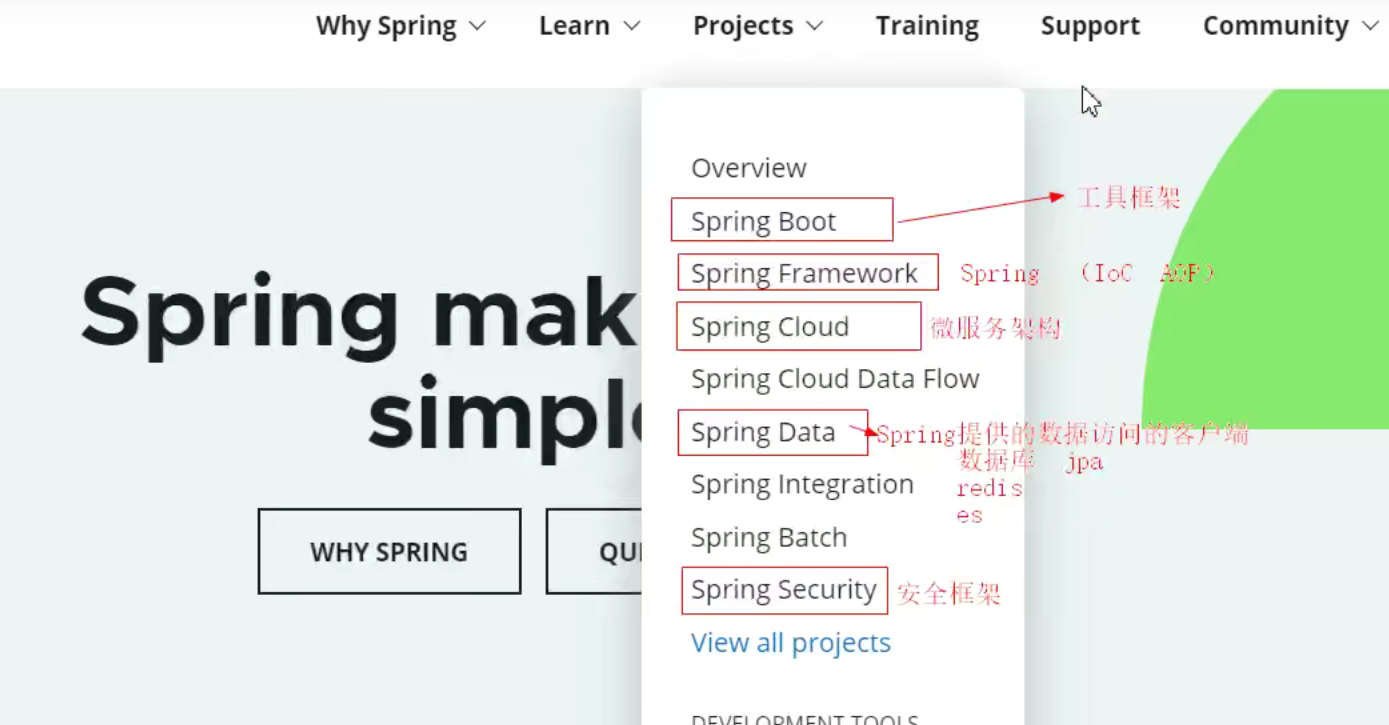
Spring architecture diagram
[external chain picture transfer failed. The source station may have anti-theft chain mechanism. It is recommended to save the picture and upload it directly (img-wizv6fuq-1640669694890) (IMGs / SRC = http% 3A% 2F% 2fwww.51dev. Com% 2ffileupload% 2fnews% 2f202003% 2f20200329113352482. PNG & refer = http% 3A% 2F% 2fwww.51dev. Com & app = 2002 & size = f99910000 & Q = A80 & n = 0 & G = 0n & FMT = JPEG)]
1.3.1 Core Container
Spring container component, which is used to complete the creation and management of instances.
- Core, core. The following components all depend on core
- beans, object management, instance management
- Context, Spring container context
1.3.2 AOP,Aspects
Spring AOP components do not implement aspect oriented programming
- AOP
- Aspects
1.3.3 web
Spring web component actually refers to the framework of spring MVC, which realizes MVC control of web projects.
- Web, Spring's support for web projects
- webmvc, spring MVC component
1.3.4 Data Access
The component of Spring data access is also a persistence layer framework based on JDBC encapsulation. Even without MyBatis, Spring itself can complete the persistence operation.
- tx component, do transaction management, and hand over other persistence layer operations to MyBatis
1.3.5 Test
Spring unit test component provides unit test support in spring environment.
- test
2, Spring IoC
Spring IoC container components can complete object creation, object attribute assignment and object management.
Benefits of Spring IoC: the construction of objects may depend on many other objects, and the level is very deep. The construction of outer objects is very troublesome, and you don't necessarily know how to build so many levels of objects. IoC helps us manage the creation of objects. We only need to specify how to build them in the configuration pricing. The configuration file of each object is formulated when the class is written, so the outer layer does not need to care about how to create deep-seated objects. Predecessors have written it.
2.1 Spring framework deployment (IoC)
2.1. 1 create Maven project
- java project
- web project
2.1. 2 add dependency
Only IoC dependency is added here
- core
- beans
- aop
- expression
- context, you only need to import this one, and others will be imported recursively
<!-- https://mvnrepository.com/artifact/org.springframework/spring-context -->
<dependency>
    <groupId>org.springframework</groupId>
    <artifactId>spring-context</artifactId>
    <version>5.3.8</version>
</dependency>
Maven will introduce the package recursively, so only one context package can be introduced.
2.1.3 Spring configuration
Tell the Spring container what object to create and what value to assign to the object property through configuration pricing.
- Create an ApplicationContext in the resources directory XML file (the file name can be customized). Follow the specification of Spring configuration file.
2.2 use of springioc
Creating objects using SpringIoC components
2.2. 1 create entity class
public class Student {
    private String stuNum;
    private String stuName;
    private String stuGender;
    private int stuAge;
    private Date entranceTime;
}
2.2. 2 configure the entity class in the Spring configuration file
<!-- adopt bean Label configures the entity class to Spring Management, id Is the unique identification of the entity class -->
<bean id="stu" class="com.gsjt.ioc.beans.Student">
    <property name="stuNum" value="10002"/>
    <property name="stuName" value="Li Si"/>
    <property name="stuAge" value="19"/>
    <property name="stuGender" value="female"/>
    <property name="entranceTime" ref="date"/>
</bean>

<bean id="date" class="java.util.Date"/>
2.2. 3. Failed to get the object when initializing the Spring factory
ClassPathXMLApplicationContext
// 1. Initialize the Spring container and load the Spring configuration file
ClassPathXmlApplicationContext context = new ClassPathXmlApplicationContext("applicationContext.xml");
// 2. Get the Student object through the Spring container
Student student2 = (Student) context.getBean("stu");
System.out.println(student2);
2.3 IoC and DI
- IoC controls inversion and completes the creation of objects through the Spring object factory
- DI (Dependency Injection), which relies on the Spring container to complete the assignment of the redemption attribute while Spring completes the object creation;
When we need to create an instance of a class through the Spring object factory, we need to hand over the class to Spring management - configured through bean tags.
2.4 DI dependency injection
After the Spring container loads the configuration file, it creates the object of the class through reflection and assigns a value to the attribute.
Benefits of dependency injection: DI and IoC are actually the same idea. Their advantage is that if the dependent class changes, such as modifying the constructor, if there is no dependency injection, the dependent object caller needs to be modified. If it is dependency injection, it is not necessary.
2.4. There are three methods of dependency injection
- set method injection
- Constructor Injection
- Interface injection (not commonly used)
2.4.2 set method injection
In the bean tag, by configuring the property tag, you can complete the property injection by reflecting the set method of the calling object. Therefore, the set method must be implemented for the property used, otherwise an error will be reported.
String classPath = "com.gsjt.ioc.beans.Student";
Class<?> c = Class.forName(classPath);
Object obj = c.newInstance();

// Get properties in a class through reflection
Field[] fields = c.getDeclaredFields();
for (Field field : fields) {
    String fieldName = field.getName();
    String setMethodName = "set" + fieldName.substring(0, 1).toUpperCase(Locale.ROOT)
        + fieldName.substring(1);

    if ("stuName".equals(fieldName)) {
        Method setMethod = c.getDeclaredMethod(setMethodName, field.getType());
        setMethod.invoke(obj, "10001");
    }
}
-
For the set assignment of simple type and string, Spring will automatically determine the type of the attribute and convert it automatically.
<property name="stuName" value="10001"/>
<property name="stuAge" value="20"/>
-
Complex objects have two ways of initializing
-
Beans that introduce complex objects:
<bean id="stu" class="com.gsjt.ioc.beans.Student"> <property name="entranceTime" ref="date"/> </bean> <bean id="date" class="java.util.Date"/> -
Initialize in the property tag
<property name="entranceTime">
	<bean class="java.util.Date"/>
</property>
-
-
Collection object
-
List object:
<property name="language">
    <list>
        <value>english</value>
        <value>chinese</value>
        <value>Japanese</value>
    </list>
</property>
<property name="language"> <list> <bean class="..."></bean> <bean class="..."></bean> </list> </property>For basic data class type or string type:
<property name="num" value="1,2,3,4"/>
-
Set object:
<property name="language"> <set> <!-- And List Same object --> </set> </property> -
Map object:
<property name="maps">
	<map>
    	<entry>
        	<key>
            	<value>key</value>
            </key>
            <value>
            	val
            </value>
        </entry>
    </map>
</property>
-
2.4. 3 constructor injection
The properties injected by the constructor method do not need to implement the set method.
-
Simple type, string, object type
<bean id="date" class="java.util.Date"/>

<bean id="clazz" class="com.gsjt.ioc.beans.Clazz"/>

<bean id="stu2" class="com.gsjt.ioc.beans.Student2">
    <constructor-arg value="10001"/>
    <constructor-arg value="Zhang San"/>
    <constructor-arg value="male"/>
    <constructor-arg value="23"/>
    <constructor-arg value="90"/>
    <constructor-arg ref="date"/>
    <constructor-arg ref="clazz"/>   <!-- Custom type -->
</bean>
Or for custom object types
<constructor-arg>
    <bean class="com.gsjt.ioc.beans.Clazz"/>
</constructor-arg>
The above methods need to correspond to the parameters in the constructor one by one, otherwise the index should be specified in order
<constructor-arg>
    <constructor-arg index="0" value="10001"/>
    <constructor-arg index="1" value="Zhang San"/>
    <constructor-arg index="2" value="male"/>
    ...
</constructor-arg>
-
Collection type:
<constructor-arg>
    <list>
    	<!-- and set The injection method is similar-->
    </list>
</constructor-arg>
2.5 scope of bean
In the bean tag, you can specify the scope of the object through the scope attribute. Spring defaults to singleton.
-
Singleton: indicates that the current bean instance is in singleton mode, and the default mode is hungry Han mode. The object creation will be completed in the Spring container initialization phase.
If you want to use lazy mode, you should add the lazy init attribute to the bean tag to be true.
-
prototype: non singleton mode. Each time an object is created through a bean, an object is created.
2.6 Bean's life cycle approach
In the bean tag, specify the initialization method of the current bean through the init method attribute. The initialization method is executed after the constructor is executed.
Specify the destruction method of the current bean through the destroy method attribute, which will be executed before the object is destroyed.
public class Book {
    private int bookId;
    private String bookName;

    // Life cycle approach
    public void init() {
        System.out.println("---------init");
    }

    public void destroy() {
        System.out.println("---------destroy");
    }
}
<bean id="book" class="com.gsjt.ioc.beans.Book"
      scope="prototype"
      init-method="init"
      destroy-method="destroy"
/>
2.7 automatic assembly
In the process of manually configuring xml, errors such as missing letters, case and so on often occur, and the five major check them, which makes the development efficiency low. Therefore, semi-automatic assembly is used to avoid these errors and simplify the configuration. When configuring, use autowired in the bean tag for configuration. There are two main assembly strategies.
- byName: find a matching object in the Spring container according to the property name of the current property. If the name is found but the object type does not match, an exception will be thrown
- byType: find matching objects in the Spring container according to the type of the current attribute. If multiple matching type bean s are found, an exception will be thrown
2.8 Spring IoC workflow
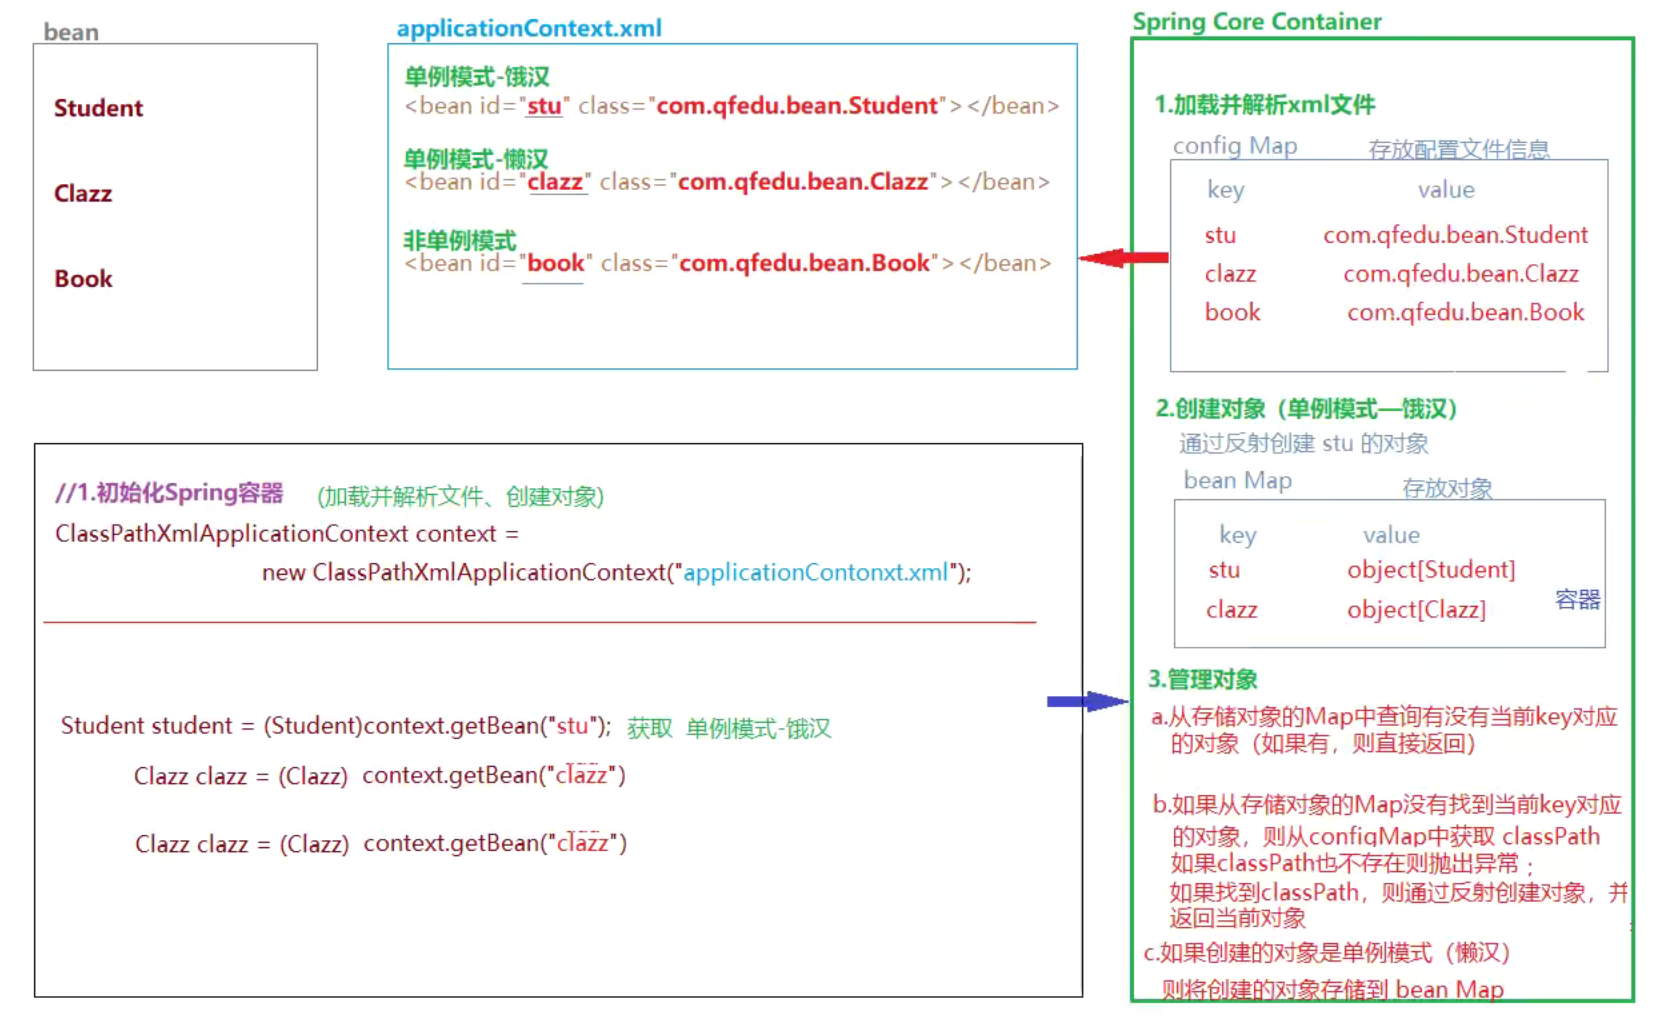
3, Spring IoC - annotation based
The use of Spring IoC requires us to manage the Spring container through xml file class declaration, so as to complete the creation of objects and the injection of attribute values through the Spring factory.
In addition to providing XML based configuration, Spring also provides annotation based configuration: the annotation declaration of the secret in the entity class is directly managed by the Spring container to simplify the development steps.
3.1 Spring framework deployment
3.1. 1-3.1. 2. Create a new project and add dependencies
Ibid., chap
3.2.3 Spring configuration file
- Because only the configuration file will be loaded when the Spring container is initialized, the annotations added in the entity class will not be scanned by Spring. Therefore, the scanning range of Spring should be declared in the configuration file to scan the annotated entity class and complete the initial chemical work during Spring initialization.
<?xml version="1.0" encoding="UTF-8"?>
<beans xmlns="http://www.springframework.org/schema/beans"
       xmlns:xsi="http://www.w3.org/2001/XMLSchema-instance"
       xmlns:context="http://www.springframework.org/schema/context"
       xsi:schemaLocation="http://www.springframework.org/schema/beans http://www.springframework.org/schema/beans/spring-beans.xsd
        http://www.springframework.org/schema/context
        http://www.springframework.org/schema/context/spring-context-4.0.xsd">

    <!-- Declare using annotation configuration -->
    <context:annotation-config/>

    <!-- statement Spring Scan range of factory notes -->
    <context:component-scan base-package="com.gsjt.beans"/>

</beans>
3.2 common notes of IOC
3.2.1 @Component
- Class annotation, which declares that this class is managed by the Spring container, which is equivalent to the role of bean tags
- @Component(value = "stu"), the value attribute specifies the id of the current bean, which is equivalent to the id attribute of the bean tag; If the value attribute is omitted, the id defaults to the first letter of the class name and changes to lowercase.
- @The class annotations of Service, @ Controller and @ Repository can also declare classes to Spring for management. They are mainly semantically different.
- @The Controller annotation mainly declares that the Controller class is managed by Spring, such as Servlet
- @Service annotation, the main life business processing class is configured to Spring management, such as the implementation class of service interface
- @The repository annotation mainly declares that the persistence class is configured for Spring management, such as DAO interface implementation class
- @Component. All classes except controller, service and DAO implementation use this annotation
3.2.2 @Scope
- Class annotation, which is used to declare the singleton or non singleton mode of the current class, which is equivalent to the scope attribute of the bean tag
- @Scope(value = "prototype") indicates that the declared class is in non singleton mode (singleton mode by default)
3.2.3 @Lazy
- Class annotation, which is used to declare whether a bean in singleton mode is in starvation mode
- @Lazy(true) indicates that life is in lazy mode, false by default, and hungry mode
3.2.4 @PostConstruct and @ PreDestroy
- Method annotation, which declares that the method is a life cycle method, which is equivalent to the init method and destroyMethod attributes of the bean
3.2.5 Autowired
-
Property annotation is also a method annotation (only set method can be marked). It declares that the current property is automatically assembled, which is byType by default, and must be assembled by default (an exception will be thrown if no bean with matching type is found)
-
@Autowired(required = false) sets whether the current automatic assembly is required through the required attribute. It is required by default.
-
Important, if you want to match names, you need to use the @ Qualifier annotation
@Autowired
public void setClazz(@Qualifier("className") Clazz clazz) {
    this.clazz = clazz;
}
3.2.6 Resource
- Attribute annotations are also method annotations (only set methods can be annotated), and are also used for automatic attribute assembly
- The default assembly method is byName. If no corresponding class is found according to byName, continue to find beans by type. If no bean is found or more than one type matching bean is found, an exception is thrown.
4, Agent design pattern
The advantage of agent design pattern is that the general work is handed over to the proxy object, and the proxy object only needs to focus on its own core business. In JAVA, the proxy mode can be divided into static proxy and dynamic proxy.
Benefits of using agents:
- The proxy class only needs to focus on the implementation of the core business and separate the general management logic (transaction management, log management, etc.) from the business logic;
- The general code is implemented in the proxy class, which improves the reusability of the code;
- By adding business logic to the agent class, the original business logic can be extended (enhanced) without modifying the original class.
4.1 static proxy
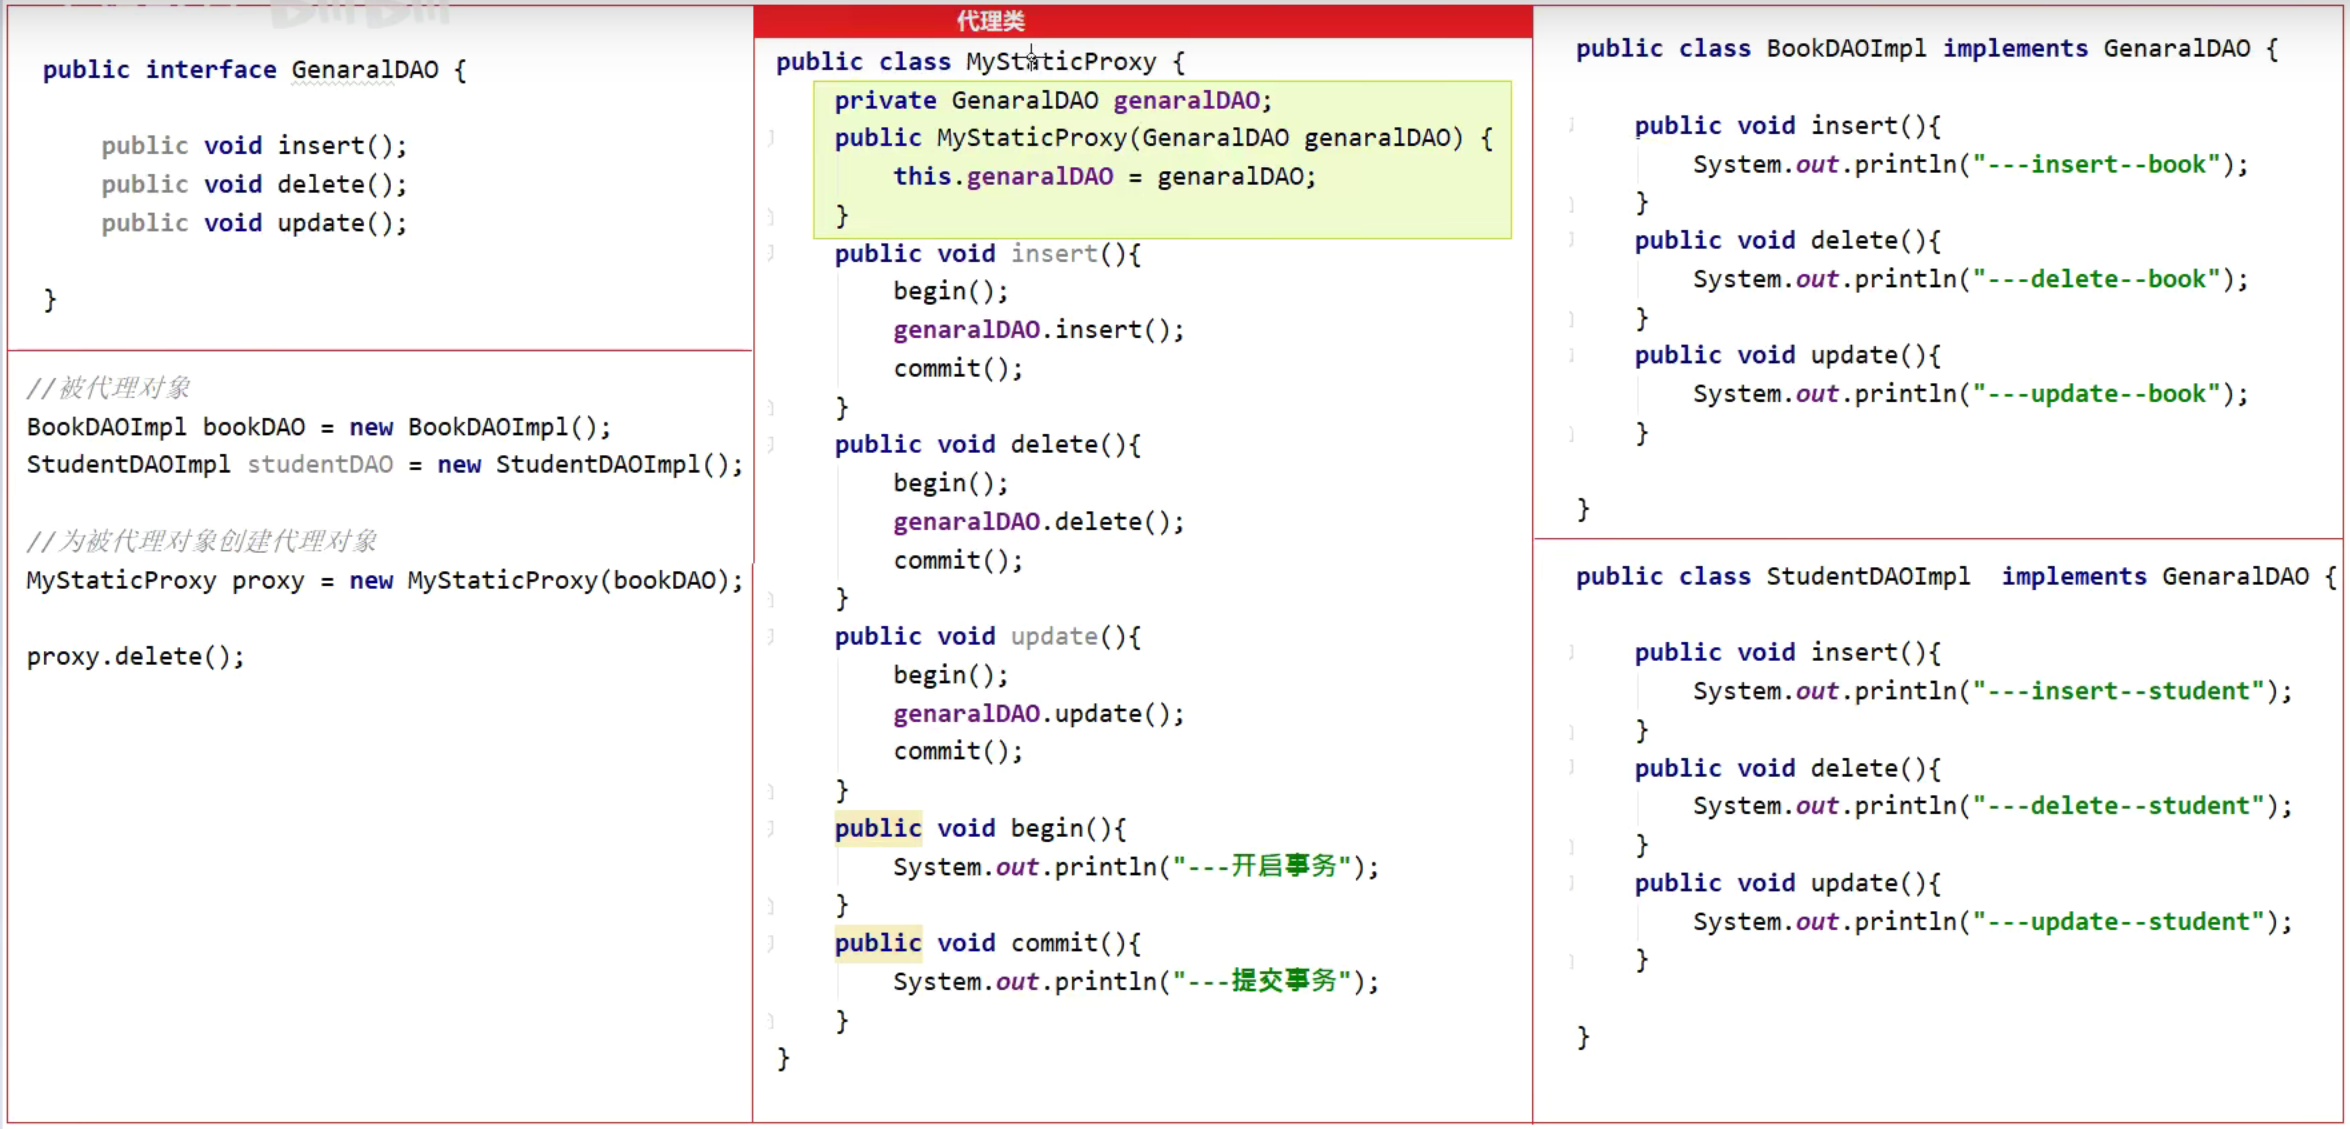
As shown in the figure above, it is an example of a static proxy, in which the proxy class can only proxy objects of specific classes. In this example, it can only proxy objects of classes that implement the GeneralDAO interface, not any classes.
4.2 dynamic agent
Dynamic proxy can generate proxy objects for almost all classes. In JAVA, there are two ways to implement dynamic agent:
- JDK dynamic proxy: it can only proxy objects of classes that implement interfaces
- CGLib dynamic proxy: an object that can implement an implementation class that does not implement any interface. It creates an object through a subclass of the proxy class.
4.2.1 JDK dynamic agent
- Create a class, implement the InvocationHandler interface, and override the invoke method
- Define a variable of type Object in the class, and provide a parameterized constructor of this variable, which is used to pass in the back proxy Object
- Create a getProxy method to create a proxy object and return it
/**
 * JDK Dynamic proxy: the interface generator proxy object implemented by the proxy object
 * 1. Create a class, implement the InvocationHandler interface, and override the invoke method
 * 2. Define a variable of type Object in the class, and provide a parameterized constructor of this variable, which is used to pass in the back proxy Object
 * 3. Create a getProxy method to create a proxy object and return it
 */
public class JDKDynamicProxy implements InvocationHandler {

    // Proxied object
    private  Object obj;

    public JDKDynamicProxy(Object obj) {
        this.obj = obj;
    }

    // Return proxy object
    public Object getProxy() {
        // 1. Get the class loader of the proxy object
        ClassLoader classLoader = obj.getClass().getClassLoader();
        // 2. Get the interface implemented by the class of the proxy object
        Class<?>[] interfaces = obj.getClass().getInterfaces();
        // 3. Generate proxy object
        // The first parameter: the class loader of the proxy object
        // The second parameter: the class loader of the proxy object
        // The third parameter: the method interceptor used to intercept when calling a method using the generated proxy object
        Object o = Proxy.newProxyInstance(classLoader, interfaces, this);
        return o;

    }

    @Override
    public Object invoke(Object proxy, Method method, Object[] args) throws Throwable {
        begin();
        method.invoke(obj, args);
        commit();
        return null;
    }

    private void begin() {
        System.out.println("Open transaction---------------");
    }

    private void commit() {
        System.out.println("Transaction commit---------------");
    }
}
test method
BookDAOImpl bookDAO = new BookDAOImpl();
GeneralDAO proxy = (GeneralDAO) new JDKDynamicProxy(bookDAO).getProxy();
// When calling a Method using a proxy class, you enter the invoke Method of the proxy class, and the called Method is passed to the invoke Method as a Method parameter
proxy.insert();
Emphasis: JDK dynamic proxy can only proxy the class object that implements the interface, because it is implemented with the help of the interface implemented by the proxy class. If a class does not implement any interface, how to generate a proxy object?
4.2.2 CGLib dynamic agent
CGLib dynamic proxy creates proxy objects by creating subclasses of the proxy class. Therefore, even classes that do not implement any interface can generate proxy objects through CGLib.
Note: CGLib dynamic proxy cannot create proxy object for final class
-
Add CGLib dependency
<!-- https://mvnrepository.com/artifact/cglib/cglib --> <dependency> <groupId>cglib</groupId> <artifactId>cglib</artifactId> <version>3.3.0</version> </dependency> -
CGLib implementation class
/** * CGLib Dynamic agent * 1. Add cglib dependency * 2. Create a class that implements the MethodInterceptor interface * 3. Define a variable of Object type in the class, and provide a parameterized constructor of this variable, which is used to pass parameters to the proxy class * 4. Define the getProxy method to create and return the proxy object (the proxy object is created through the subclass of the proxy class) */ public class CGLibDynamicProxy implements MethodInterceptor { private Object obj; public CGLibDynamicProxy(Object obj) { this.obj = obj; } public Object getProxy() { Enhancer enhancer = new Enhancer(); enhancer.setSuperclass(obj.getClass()); enhancer.setCallback(this); return enhancer.create(); } @Override public Object intercept(Object o, Method method, Object[] objects, MethodProxy methodProxy) throws Throwable { begin(); Object returns = method.invoke(obj, objects); commit(); return returns; } private void begin() { System.out.println("Open transaction---------------"); } private void commit() { System.out.println("Transaction commit---------------"); } } -
test
BookDAOImpl bookDAO = new BookDAOImpl();
GeneralDAO proxy = (GeneralDAO) new
    // The proxy object is actually a subclass of the proxied object, so the proxy object can directly force the type of the non proxied object
    BookDAOImpl cgLibProxy = (BookDAOImpl) new CGLibDynamicProxy(bookDAO).getProxy();
// Using the object invocation method does not actually implement this method. Two, it implements the interceptor method in the proxy class, passing the parameters in the current calling method to the interceptor method.
cgLibProxy.delete();
5, Spring AOP
5.1 AOP
Aspect Oriented Programming, It is a technology that uses "cross-section" (the bottom layer is to use dynamic agent) to intercept the original business, and can add specific business logic to the cross-section of interception to enhance the original business. Based on dynamic agent, it can expand the business without changing the business logic of the original code.

5.2 Spring AOP framework deployment
5.2. 1 create Maven project
5.2. 2 add dependency
Two dependencies need to be added
- context
- aspects
<!-- https://mvnrepository.com/artifact/org.springframework/spring-context -->
<dependency>
    <groupId>org.springframework</groupId>
    <artifactId>spring-context</artifactId>
    <version>5.3.8</version>
</dependency>
<!-- https://mvnrepository.com/artifact/org.springframework/spring-aspects -->
<dependency>
    <groupId>org.springframework</groupId>
    <artifactId>spring-aspects</artifactId>
    <version>5.3.13</version>
</dependency>
5.2. 3. Create Spring configuration file
The namespace of aop needs to be introduced
<?xml version="1.0" encoding="UTF-8"?>
<beans xmlns="http://www.springframework.org/schema/beans"
       xmlns:xsi="http://www.w3.org/2001/XMLSchema-instance"
       xmlns:context="http://www.springframework.org/schema/context"
       xmlns:aop="http://www.springframework.org/schema/aop"

       xsi:schemaLocation="
       http://www.springframework.org/schema/aop
       http://www.springframework.org/schema/aop/spring-aop-4.0.xsd
       http://www.springframework.org/schema/beans
       http://www.springframework.org/schema/beans/spring-beans.xsd

       http://www.springframework.org/schema/context
       http://www.springframework.org/schema/context/spring-context-4.0.xsd">


</beans>
5.3 AOP configuration - XML based
Add an AOP function for transaction management
5.3. 1 add a class to define the business logic to be added
public class TxManager {
    public void begin() {
        System.out.println("Transaction start--------------------");
    }
    public void commit() {
        System.out.println("Transaction commit--------------------");
    }
}
5.3. 2. Configure AOP
<!-- First, define a facet class bean -->
<bean id="txManager" class="com.gsjt.utils.TxManager"/>
<aop:config>
    <aop:pointcut id="book_all" expression="execution(* com.gsjt.dao.BookDAOImpl.*(..))"/>

    <!-- statement txManager Cut class -->
    <aop:aspect ref="txManager">
        <!-- notice -->
        <aop:before method="begin" pointcut-ref="book_all"/>
        <aop:after method="commit" pointcut-ref="book_all"/>
    </aop:aspect>
</aop:config>
5.3.3 AOP development steps
- Create a facet class and define the tangent point method in the facet class;
- Configure the facet class to the Spring container;
- Declare entry points;
- Configure the notification policy for AOP.
5.4 declaration of entry point
5.4. 1 common pointcut declarations
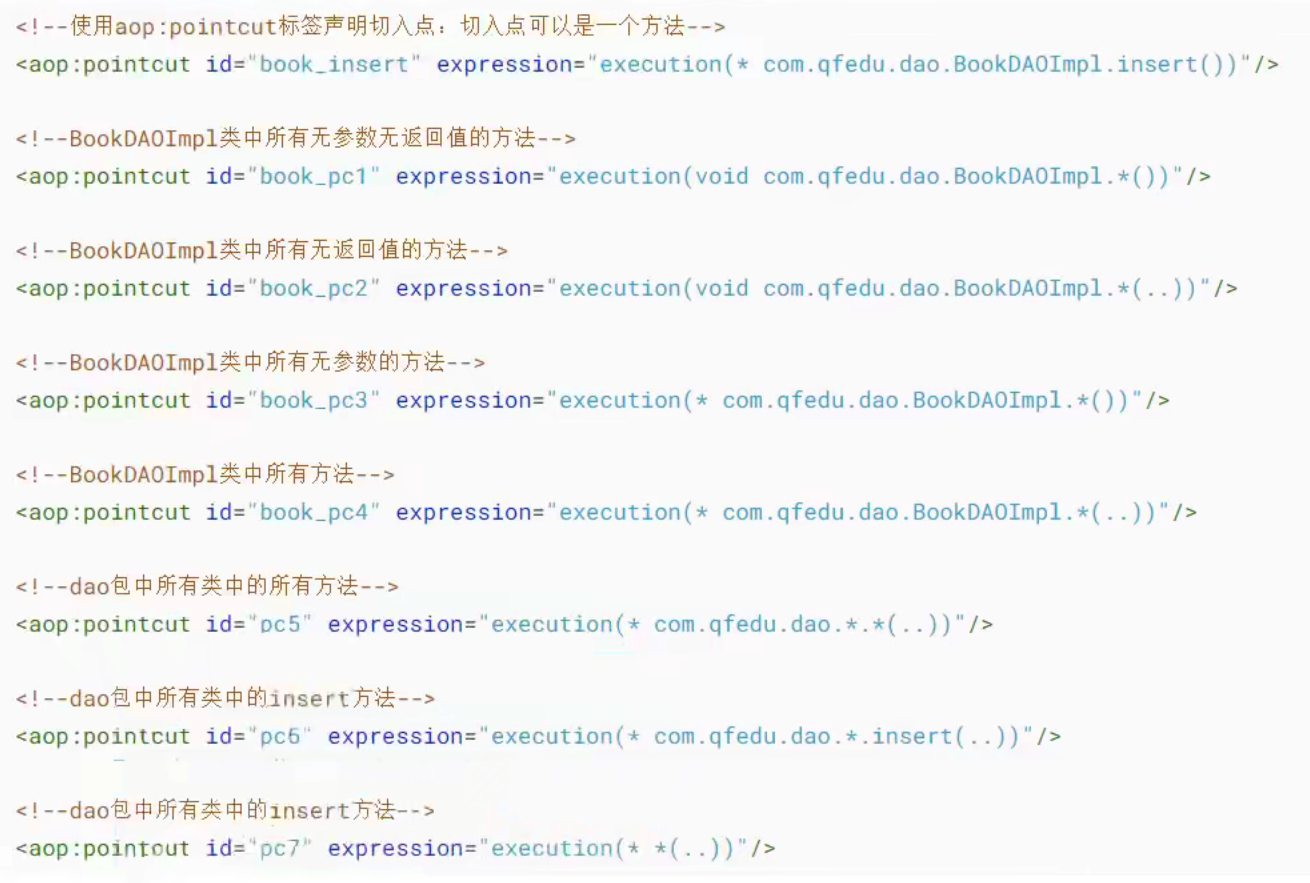
5.4. 2 entry point considerations
-
If you want to use Spring AOP aspect oriented programming, the object calling the pointcut method must be obtained through the Spring container;
-
If the method in a class is declared as a pointcut and woven into the pointcut, the class object is obtained through the Spring container, in fact, a proxy object is obtained;
-
If a method in a class is not declared as a pointcut, what is obtained through the Spring container is the real creation object of the class, not the proxy object, which cannot be strengthened.
5.5 notification strategy
The AOP notification strategy is to weave the pointcut methods in the facet class into the pointcut
-
aop:before: before
-
aop:after: post, triggered after the method is executed
-
AOP: after throwing: after throwing an exception
-
AOP: after returning: for a java method after the method returns, the return value is also a part of the method. Therefore, "after the method returns" and "method execution ends" are the same time point. Therefore, after and after returning determine the trigger order according to the configured order.
-
aop:around: surround trigger, which can execute the notification of additional code before and after the execution of the target method. The target method must be explicitly called in the surround notification, otherwise the target method will not be executed.
// The pointcut approach around notifications must follow the following definition rules
// 1. Must have a parameter of type ProceedingJoinPoint
// 2. There must be a return value of Object type
// 3. Execute object v = point between the enhanced business logic before and after proceed();
// 4. Return v after the method ends
public 	Object method(ProceedingJoinPoint point) throws Throwable {
    System.out.println("-------before");
    Object v = point.proceed();
    System.out.println("-------after");
    return v;
}
6, Spring AOP -- Annotation Based
6.1 framework deployment
Add in Spring main configuration file
<context:annotation-config></context:annotation-config>
<context:component-scan base-package="com.gsjt"/>

<!-- Annotation based configuration -->
<aop:aspectj-autoproxy/>
6.2 annotation configuration
@Component
@Aspect
public class TxManager {

    @Pointcut("execution(* com.gsjt.dao.*.*(..))")
    public void pc1() {}

    @Before("pc1()")
    public void begin() {
        System.out.println("Open transaction------------------------");
    }
    @After("pc1()")
    public void commit() {
        System.out.println("Commit transaction------------------------");
    }

    @Around("pc1()")
    public Object printExeTime(ProceedingJoinPoint point) throws Throwable {
        System.out.println("Start time:" + System.currentTimeMillis());
        Object v = point.proceed();
        System.out.println("End time:" + System.currentTimeMillis());
        return v;
    }
}
Note: Although annotations are easy to use, they can only be added to the source code. Therefore, our custom classes advocate annotation configuration. However, the classes provided by third-party class libraries need to be configured with xml.
7, Spring integrates MyBatis
Spring's two core ideas: IoC and AOP are designed to decouple.
IoC: control inversion. Spring container can complete object creation, attribute injection, object management, etc;
AOP: aspect oriented, it can enhance the original business without modifying the original business logic.
7.1 support that spring can provide
- For Spring IoC
- Need to create DataSource datasource
- SqlSessionFactory object needs to be created
- SqlSession object needs to be created
- Need to create DAO object (Mapper)
- For spring AOP
- Transaction management for database operations
7.2 integration
7.2. 1 add dependency
- mysql-connector-java
- mybatis
- spring-context
- spring-aspects
- spring-jdbc
<!-- https://mvnrepository.com/artifact/mysql/mysql-connector-java -->
<dependency>
    <groupId>mysql</groupId>
    <artifactId>mysql-connector-java</artifactId>
    <version>5.1.47</version>
</dependency>

<!-- https://mvnrepository.com/artifact/org.mybatis/mybatis -->
<dependency>
    <groupId>org.mybatis</groupId>
    <artifactId>mybatis</artifactId>
    <version>3.4.6</version>
</dependency>

<!-- https://mvnrepository.com/artifact/org.springframework/spring-context -->
<dependency>
    <groupId>org.springframework</groupId>
    <artifactId>spring-context</artifactId>
    <version>5.3.8</version>
</dependency>
<!-- https://mvnrepository.com/artifact/org.springframework/spring-aspects -->
<dependency>
    <groupId>org.springframework</groupId>
    <artifactId>spring-aspects</artifactId>
    <version>5.3.13</version>
</dependency>
<!-- https://mvnrepository.com/artifact/org.springframework/spring-jdbc -->
<dependency>
    <groupId>org.springframework</groupId>
    <artifactId>spring-jdbc</artifactId>
    <version>5.3.13</version>
</dependency>
7.2. 2 configuration file
- mybatis-config.xml
- applicationContext.xml
7.2. 3 add Spring integration MyBatis dependency
-
MyBatis Spring is a Spring compatible patch provided by MyBatis
<!-- https://mvnrepository.com/artifact/org.mybatis/mybatis-spring -->
<dependency>
    <groupId>org.mybatis</groupId>
    <artifactId>mybatis-spring</artifactId>
    <version>2.0.6</version>
</dependency>
7.2. 4 consolidate Druid connection pool (if required)
-
Add Druid dependency
<!-- https://mvnrepository.com/artifact/com.alibaba/druid --> <dependency> <groupId>com.alibaba</groupId> <artifactId>druid</artifactId> <version>1.2.8</version> </dependency> -
Create Druid Properties property file
druid.driver=com.mysql.jdbc.Driver
druid.url=jdbc:mysql://localhost:3306/testdb?characterEncoding=utf-8
druid.username=root
druid.password=123456

## Connection pool parameters
druid.pool.init=2
druid.pool.minIdle=5
druid.pool.maxActive=20
druid.pool.timeout=30000
-
In ApplicationContext Configure DruidDataSource in XML
<!-- load druid.properties Properties file -->
<context:property-placeholder location="classpath:druid.properties"/>

<!-- rely on Spring Container configuration Druid data source -->
<bean id="druidDataSource" class="com.alibaba.druid.pool.DruidDataSource">
    <property name="driverClassName" value="${druid.driver}"/>
    <property name="url" value="${druid.url}"/>
    <property name="username" value="${druid.username}"/>
    <property name="password" value="${druid.password}"/>

    <property name="initialSize" value="${druid.pool.init}"/>
    <property name="minIdle" value="${druid.pool.minIdle}"/>
    <property name="maxActive" value="${druid.pool.maxActive}"/>
    <property name="maxWait" value="${druid.pool.timeout}"/>
</bean>
7.2.5 SqlSessionFactory configuration
<!-- rely on Spring Container complete MyBatis of SqlSessionFactory Object creation -->
<bean id="sqlSessionFactory" class="org.mybatis.spring.SqlSessionFactoryBean">
    <!-- Configuration database -->
    <property name="dataSource" ref="druidDataSource"/>
    <!-- to configure mapper File location -->
    <property name="mapperLocations" value="classpath:mappers/*Mappers.xml"/>
    <!-- Configure the package of the entity class that defines the alias -->
    <property name="typeAliasesPackage" value="com.gsjt.pojo"/>
    <!-- Optional: Configuration MyBatis Master profile for -->
    <property name="configLocation" value="classpath:mybatis-config.xml"/>
</bean>
7.2. 6 create Mapper
<!-- For loading dao All in the package DAO Interface, via sqlSessionFactory obtain SqlSession,Then create all DAO Interface object, stored in Spring In container -->
<bean class="org.mybatis.spring.mapper.MapperScannerConfigurer">
    <property name="sqlSessionFactoryBeanName" value="sqlSessionFactory"/>
    <property name="basePackage" value="com.gsjt.dao"/>
</bean>
After the above configuration, you can get DAO directly.
7.3 MyBatis and AOP - transaction management
Use the transaction management aspect class provided by Spring to complete the transaction management of adding, deleting, modifying and querying operations in DAO-
-
Namespace to add tx:
xmlns:tx="http://www.springframework.org/schema/tx"

http://www.springframework.org/schema/tx
http://www.springframework.org/schema/tx/spring-tx.xsd
-
Add the transaction management configuration in the Spring main configuration file
<!-- 1. take Spring The provided transaction management class is configured to Spring container --> <bean id="txManager" class="org.springframework.jdbc.datasource.DataSourceTransactionManager"> <property name="dataSource" ref="druidDataSource"/> </bean> <!-- 2. adopt Spring jdbc Provided tx Label that declares the transaction management policy --> <tx:advice id="txAdvance" transaction-manager="txManager"> <tx:attributes> <!-- isolation Set transaction isolation level propagation Set the propagation mechanism of the transaction --> <tx:method name="insert*" isolation="REPEATABLE_READ" propagation="REQUIRED"/> <tx:method name="query*" isolation="REPEATABLE_READ" propagation="SUPPORTS"/> </tx:attributes> </tx:advice>-
Isolation: there are four isolation levels for transactions

-
Propagation: there are seven propagation mechanisms for transactions
When we call a spring based Service interface method (such as UserService#addUser()), it will run in the transaction environment managed by spring. The Service interface method may internally call other Service interface methods to complete a complete business operation together. Therefore, nested calls of Service interface methods will occur, Spring controls how the current transaction is propagated to the nested target Service interface method through the transaction propagation behavior.
-
REQUIRED: if the upper layer method has no transaction, create a new transaction; If there are already transactions, join them;
-
SUPPORTS: if the upper layer method has no transaction, it will be executed in a non transaction manner; If a transaction already exists, join it;
-
REQUIRED_NEW: if there is no transaction in the upper layer, a new transaction is created; If there is a transaction in the upper layer, suspend the current transaction;
-
NOT_SUPPORTED: executed in a non transactional manner if the upper layer is 55; If there is a transaction in the upper layer, suspend the current transaction;
-
NEVER: if the upper layer method has no transaction, it will be executed in a non transaction manner; If a transaction already exists, throw an exception;
-
MANDATORY: if there is a transaction in the upper layer, join it. If there is no transaction, throw an exception;
-
NESTED: if there is no transaction in the upper layer, create a new transaction; If the upper layer exists, it is NESTED into the current transaction.
Focus on REQUIRED and reports
-
-
7.3. 1. Configuration of transaction management
<!-- 1. take Spring The provided transaction management class is configured to Spring container -->
<bean id="txManager" class="org.springframework.jdbc.datasource.DataSourceTransactionManager">
    <property name="dataSource" ref="druidDataSource"/>
</bean>

<!-- 2. adopt Spring jdbc Provided tx Label that declares the transaction management policy -->
<tx:advice id="txAdvice" transaction-manager="txManager">
    <tx:attributes>
        <!--
                isolation There are four transaction isolation levels
                propagation Set the propagation mechanism of the transaction
            -->
        <tx:method name="insert*" isolation="REPEATABLE_READ" propagation="REQUIRED"/>
        <tx:method name="query*" isolation="REPEATABLE_READ" propagation="SUPPORTS"/>
        <tx:method name="update*" isolation="REPEATABLE_READ" propagation="REQUIRED"/>
        <tx:method name="delete*" isolation="REPEATABLE_READ" propagation="REQUIRED"/>
    </tx:attributes>
</tx:advice>

<!-- 3. Set transaction management policy to aop Configuration applies to service Layer operation -->
<aop:config>
    <aop:pointcut id="crud" expression="execution(* com.gsjt1.service.*.*(..))"/>
    <aop:advisor advice-ref="txAdvice" pointcut-ref="crud"/>
</aop:config>
7.3. 2 annotation configuration of transaction management
-
Configure transactions in the Spring main configuration file and declare the following comments:
<!-- 1. take Spring The provided transaction management class is configured to Spring container --> <bean id="txManager" class="org.springframework.jdbc.datasource.DataSourceTransactionManager"> <property name="dataSource" ref="druidDataSource"/> </bean> <!-- 2. The declaration is used for transaction configuration in the form of annotation --> <tx:annotation-driven transaction-manager="txManager"/> -
Use the annotation @ Transactional in the implementation class:
@Transactional(isolation = Isolation.REPEATABLE_READ, propagation = Propagation.REQUIRED)
public List<User> listUsers() {
    return userDAO.listUsers();
}