Because the Keil interface looks old, the functions of code prompt and automatic formatting are not very easy to use. In order to beautify and standardize our code, here is a development method using MinGW+GNU Arm Embedded Toolchain+Makefile+OpenOCD. Of course, the editor is also a powerful VSCode
1, Required tools
- First of all, we need STM32CubeMX for project creation, function configuration and code generation. You can download it directly from the official website of France semiconductor.
- Then, of course, the lightweight and concise editor Visual Studio Code. In fact, it is just a text editor, but the rich plug-ins give it the ability to compete with the IDE. We can find and download it directly at Microsoft.
- Then there is MinGW. We need it to execute the make compilation command. Download it from this link MinGW.
- Next is the tool chain of cross compilation GNU Arm Embedded Toolchain.
- The last is the burning tool OpenOCD. Of course, you have to have an arm emulator such as St link or Jlink to successfully download the program OpenOCD.
Just download the latest board directly. Note that after all the above tools are installed successfully, the bin files in the root directory of MinGW, GNU Arm Embedded Toolchain and OpenOCD should be added with environment variables, so that we can use the command line to control compilation, burning and other operations through the terminal.
2, Configure development environment
1. Install the plug-in
If you want to use VSCode for code editing and obtain code checking, compilation and other functions, you can't just have a text editor shell. We need to install some plug-ins to expand its functions. Here I directly paste the plug-ins I have installed:
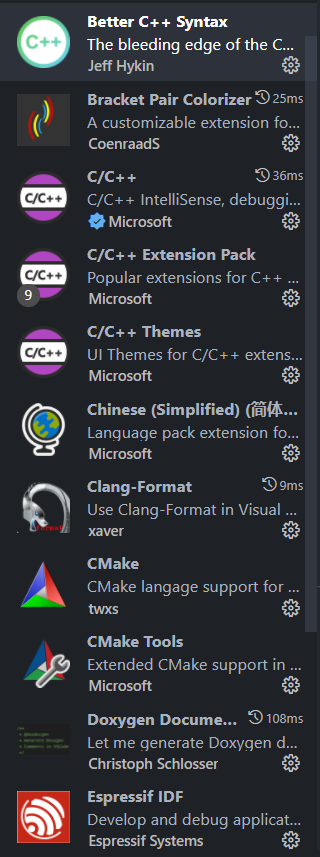
In fact, only one C/C + + can be installed here. Other plug-ins are installed by other projects I develop. It is recommended to install One Dark Pro, change the black theme, and the code color is more beautiful.
If you want your code to be more beautiful, it is recommended to install a clang format plug-in. You can define your own formatting style, and install LLVM style for code formatting. You can search for the specific use method. Here I directly post my own configuration. After you install the plug-in and configure Path, create a new one Clang format file and paste the following contents inside:
---
Language:        Cpp
# BasedOnStyle:  LLVM
AccessModifierOffset: -4
AlignAfterOpenBracket: Align
AlignConsecutiveMacros: None
AlignConsecutiveAssignments: true
AlignConsecutiveBitFields: None
AlignConsecutiveDeclarations: true
AlignEscapedNewlines: Left
AlignOperands:   Align
AlignTrailingComments: true
AllowAllArgumentsOnNextLine: true
AllowAllConstructorInitializersOnNextLine: true
AllowAllParametersOfDeclarationOnNextLine: true
AllowShortEnumsOnASingleLine: true
AllowShortBlocksOnASingleLine: Empty
AllowShortCaseLabelsOnASingleLine: false
AllowShortFunctionsOnASingleLine: All
AllowShortLambdasOnASingleLine: All
AllowShortIfStatementsOnASingleLine: Never
AllowShortLoopsOnASingleLine: false
AlwaysBreakAfterDefinitionReturnType: None
AlwaysBreakAfterReturnType: None
AlwaysBreakBeforeMultilineStrings: false
AlwaysBreakTemplateDeclarations: MultiLine
AttributeMacros:
  - __capability
BinPackArguments: true
BinPackParameters: true
BraceWrapping:
  AfterCaseLabel:  false
  AfterClass:      false
  AfterControlStatement: Never
  AfterEnum:       false
  AfterFunction:   false
  AfterNamespace:  false
  AfterObjCDeclaration: false
  AfterStruct:     false
  AfterUnion:      false
  AfterExternBlock: false
  BeforeCatch:     false
  BeforeElse:      false
  BeforeLambdaBody: false
  BeforeWhile:     false
  IndentBraces:    false
  SplitEmptyFunction: true
  SplitEmptyRecord: true
  SplitEmptyNamespace: true
BreakBeforeBinaryOperators: None
BreakBeforeConceptDeclarations: true
BreakBeforeBraces: Attach
BreakBeforeInheritanceComma: false
BreakInheritanceList: BeforeColon
BreakBeforeTernaryOperators: true
BreakConstructorInitializersBeforeComma: false
BreakConstructorInitializers: BeforeColon
BreakAfterJavaFieldAnnotations: false
BreakStringLiterals: true
ColumnLimit:     180
CommentPragmas:  '^ IWYU pragma:'
CompactNamespaces: false
ConstructorInitializerAllOnOneLineOrOnePerLine: false
ConstructorInitializerIndentWidth: 4
ContinuationIndentWidth: 4
Cpp11BracedListStyle: true
DeriveLineEnding: true
DerivePointerAlignment: false
DisableFormat:   false
EmptyLineBeforeAccessModifier: LogicalBlock
ExperimentalAutoDetectBinPacking: false
FixNamespaceComments: true
ForEachMacros:
  - foreach
  - Q_FOREACH
  - BOOST_FOREACH
StatementAttributeLikeMacros:
  - Q_EMIT
IncludeBlocks:   Preserve
IncludeCategories:
  - Regex:           '^"(llvm|llvm-c|clang|clang-c)/'
    Priority:        2
    SortPriority:    0
    CaseSensitive:   false
  - Regex:           '^(<|"(gtest|gmock|isl|json)/)'
    Priority:        3
    SortPriority:    0
    CaseSensitive:   false
  - Regex:           '.*'
    Priority:        1
    SortPriority:    0
    CaseSensitive:   false
IncludeIsMainRegex: '(Test)?$'
IncludeIsMainSourceRegex: ''
IndentCaseLabels: false
IndentCaseBlocks: false
IndentGotoLabels: true
IndentPPDirectives: None
IndentExternBlock: AfterExternBlock
IndentRequires:  false
IndentWidth:     4
IndentWrappedFunctionNames: false
InsertTrailingCommas: None
JavaScriptQuotes: Leave
JavaScriptWrapImports: true
KeepEmptyLinesAtTheStartOfBlocks: true
MacroBlockBegin: ''
MacroBlockEnd:   ''
MaxEmptyLinesToKeep: 1
NamespaceIndentation: None
ObjCBinPackProtocolList: Auto
ObjCBlockIndentWidth: 4
ObjCBreakBeforeNestedBlockParam: true
ObjCSpaceAfterProperty: false
ObjCSpaceBeforeProtocolList: true
PenaltyBreakAssignment: 2
PenaltyBreakBeforeFirstCallParameter: 19
PenaltyBreakComment: 300
PenaltyBreakFirstLessLess: 120
PenaltyBreakString: 1000
PenaltyBreakTemplateDeclaration: 10
PenaltyExcessCharacter: 1000000
PenaltyReturnTypeOnItsOwnLine: 60
PenaltyIndentedWhitespace: 0
PointerAlignment: Right
ReflowComments:  true
SortIncludes:    true
SortJavaStaticImport: Before
SortUsingDeclarations: true
SpaceAfterCStyleCast: false
SpaceAfterLogicalNot: false
SpaceAfterTemplateKeyword: true
SpaceBeforeAssignmentOperators: true
SpaceBeforeCaseColon: false
SpaceBeforeCpp11BracedList: false
SpaceBeforeCtorInitializerColon: true
SpaceBeforeInheritanceColon: true
SpaceBeforeParens: ControlStatements
SpaceAroundPointerQualifiers: Default
SpaceBeforeRangeBasedForLoopColon: true
SpaceInEmptyBlock: false
SpaceInEmptyParentheses: false
SpacesBeforeTrailingComments: 1
SpacesInAngles:  false
SpacesInConditionalStatement: false
SpacesInContainerLiterals: true
SpacesInCStyleCastParentheses: false
SpacesInParentheses: false
SpacesInSquareBrackets: false
SpaceBeforeSquareBrackets: false
BitFieldColonSpacing: Both
Standard:        Latest
StatementMacros:
  - Q_UNUSED
  - QT_REQUIRE_VERSION
TabWidth:        8
UseCRLF:         false
UseTab:          Never
WhitespaceSensitiveMacros:
  - STRINGIZE
  - PP_STRINGIZE
  - BOOST_PP_STRINGIZE
  - NS_SWIFT_NAME
  - CF_SWIFT_NAME
...
Remember not to have Chinese. Put this file in your project root directory, then open the VSCode setting, search Editor in the search box, find the options Format On Save, and configure it according to the following figure:
In this way, when we press the shortcut key shift+s, we can save and format the code according to the configuration in our format file
2. New construction
Because it is too troublesome to configure according to the Template in the software package, we directly use the official graphical configuration tool of STMicroelectronics to create new projects and configure functions. Remember that the installation directory of stm32subdexx cannot have Chinese.
After selecting your target chip, configure the system and functions
First of all, we need to choose to enable the external crystal oscillator in RCC. STM32 provides internal crystal oscillator, but the accuracy is very low. No normal person will use the low-speed crystal oscillator in STM32. Usually, our development board is equipped with 8M or 25M external crystal oscillator, so STM32F1 series can be up to 72MHz and frequency doubled through internal PLL, Here we choose to enable the external quartz crystal.
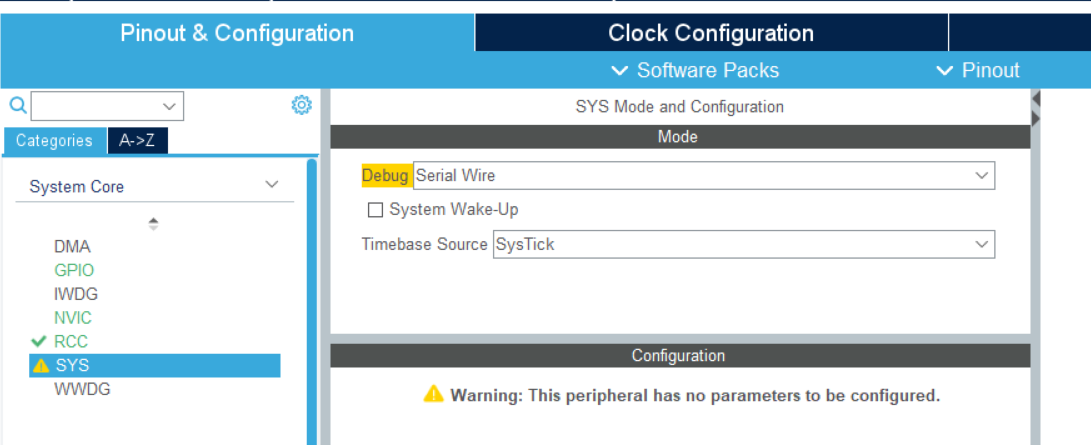
Secondly, we should choose to enable Serial Wire in the Debug of SYS. Otherwise, if you misuse the SWDIO and SWCLK pins, your chip will no longer be able to burn the program through the SWD pin.
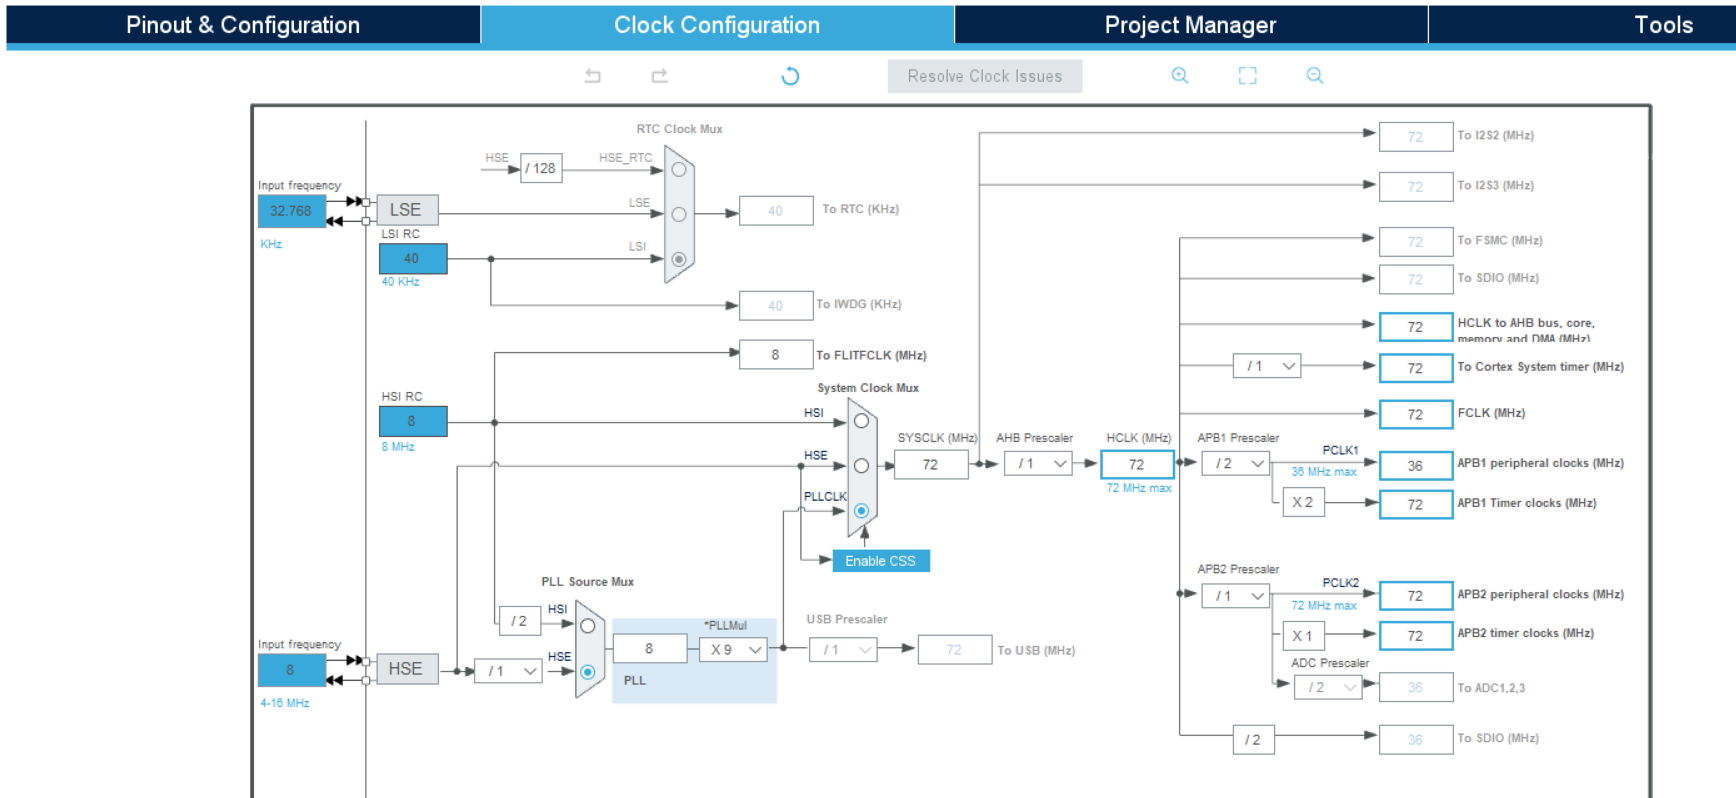
Next, let's configure the clock tree and select the external high-speed crystal oscillator and PLL frequency doubling for configuration. If you don't know much about the clock tree, you can directly set it to 72MHz to help you configure it automatically.
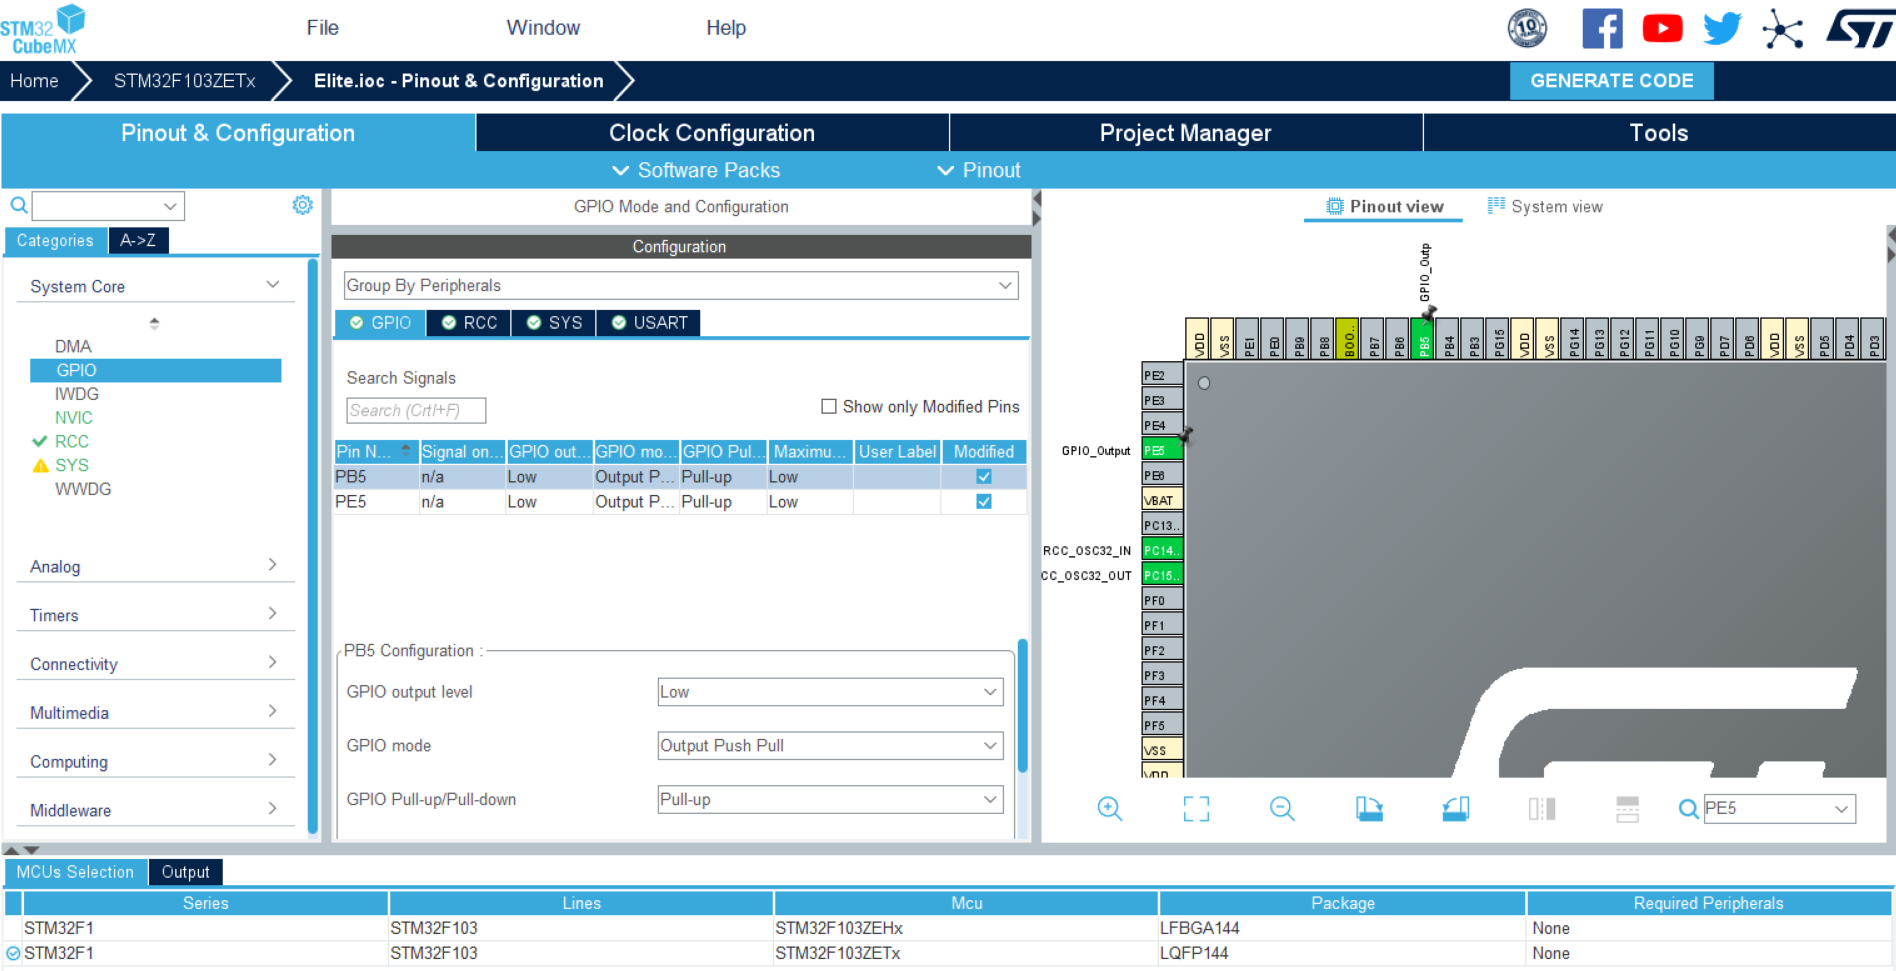
Here we have finished the configuration. The next step is to configure the peripherals you need to use. Here we only do a lighting experiment, so we find the GPIO peripherals and select them according to the pins connected to your Led. If you are also a chip with many pins like me, you can search in the search box below. Here I use PB5 and PE5 pins. Select it and select the function of this pin. In GPIO configuration, we can configure output, input, multiplexing, push-pull, pull-up or pull-down, open drain and other functions.
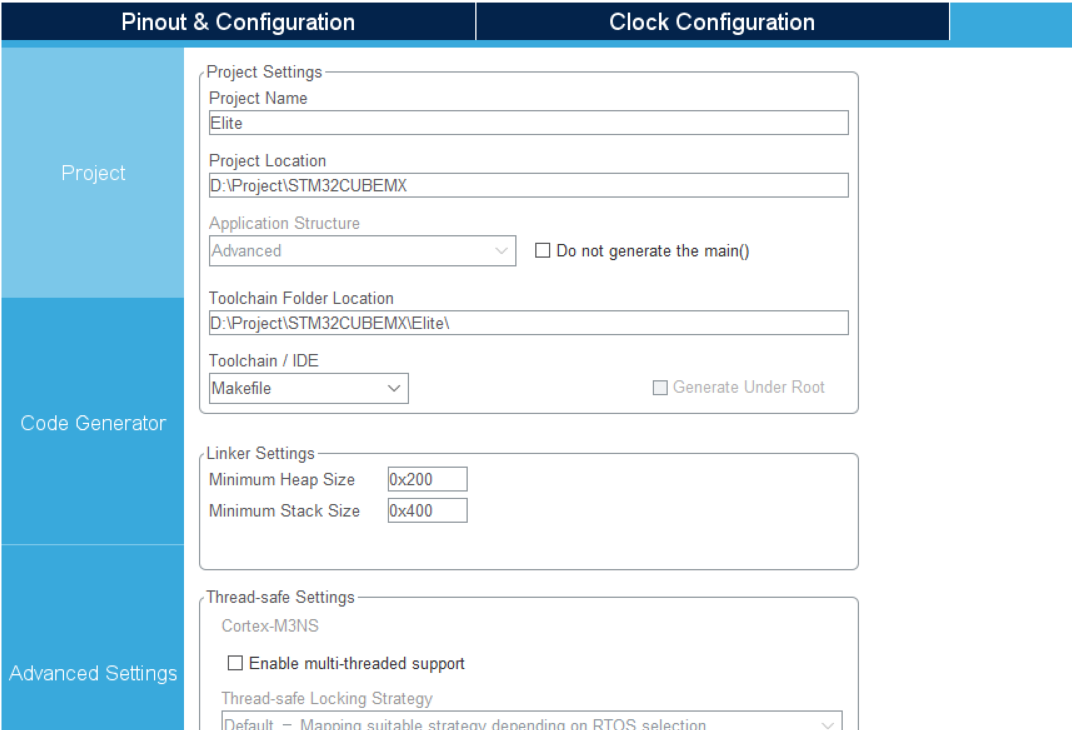
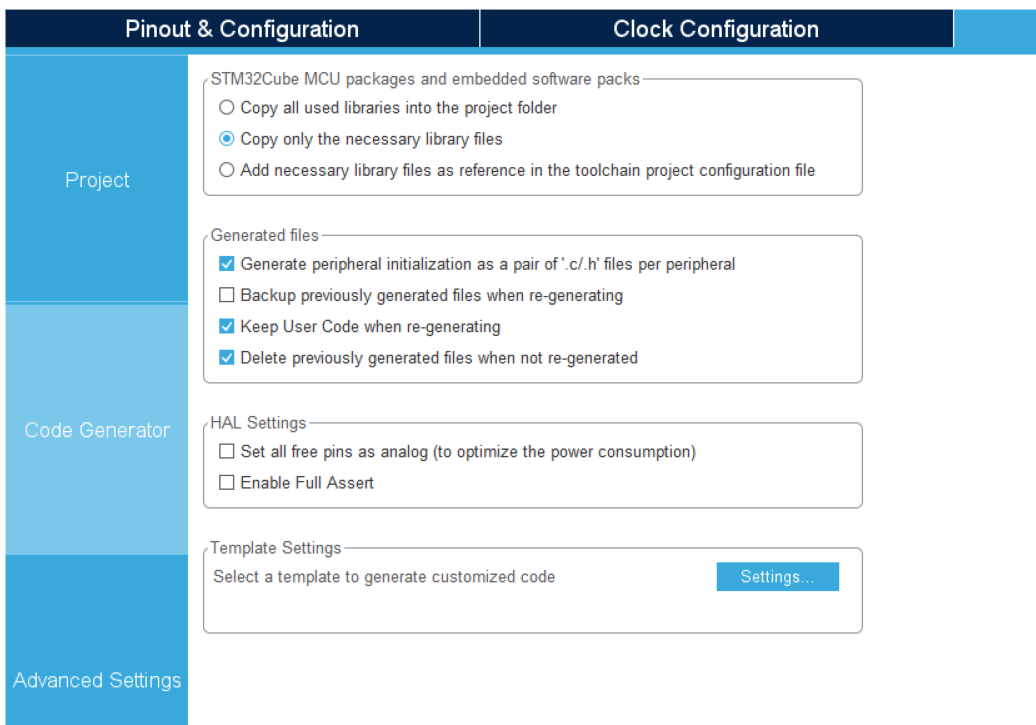
Finally, we go to the Project Manager menu to configure the project name, project directory and development tools. Remember that the directory cannot have Chinese. You can use Keil, stm32cube ide or CLion here. We use Mekefile, so we choose Makefile here. Then, configure the Code Generator to generate code. Here, I choose to copy only the necessary library files and generate separate C files and header files to facilitate our project development.
Finally, we can click GENERATE CODE to automatically GENERATE CODE. After generation, we can find this folder, open it, and right-click VSCode to open it. You can also open VSCode first, select the open folder, and then locate it.
When you first open it, you will find a lot of red line errors. This is because the C/C + + plug-in can't find these header file directories. We need to make some configuration.
Here, click CTRL+SHIFT+P, then search C/C + + in the search box, select edit configuration (json), and configure according to the generated Makefile. Here, I directly paste my configuration:
{
    "configurations": [
        {
            "name": "Win32",
            "includePath": [
                "${workspaceFolder}/**",
                "${workspaceFolder}/Core/Inc",
                "${workspaceFolder}/Drivers/STM32F1xx_HAL_Driver/Inc",
                "${workspaceFolder}/Drivers/STM32F1xx_HAL_Driver/Inc/Legacy",
                "${workspaceFolder}/Drivers/CMSIS/Device/ST/STM32F1xx/Include",
                "${workspaceFolder}/Drivers/CMSIS/Include"
            ],
            "defines": [
                "_DEBUG",
                "UNICODE",
                "_UNICODE",
                "USE_HAL_DRIVER",
                "STM32F103xE"
            ],
            "windowsSdkVersion": "10.0.19041.0",
            "compilerPath": "C:/Program Files (x86)/GNU Arm Embedded Toolchain/10 2021.10/bin/arm-none-eabi-gcc.exe",
            "cStandard": "c17",
            "cppStandard": "c++17",
            "intelliSenseMode": "windows-gcc-arm",
            "browse": {
                "path": [
                    "${workspaceFolder}/**",
                    "${workspaceFolder}/Core/Inc",
                    "${workspaceFolder}/Drivers/STM32F1xx_HAL_Driver/Inc",
                    "${workspaceFolder}/Drivers/STM32F1xx_HAL_Driver/Inc/Legacy",
                    "${workspaceFolder}/Drivers/CMSIS/Device/ST/STM32F1xx/Include",
                    "${workspaceFolder}/Drivers/CMSIS/Include",
                    "${workspaceFolder}/Component/**"
                ]
            }
        }
    ],
    "version": 4
}
The specific path should be based on your installation directory and file directory, and can not be copied blindly.
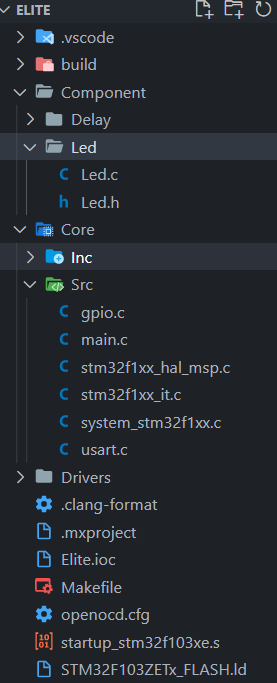
You can see that there is a Component path here. We create a new Component folder in the project directory for the code and functional components we added. In order not to destroy the project directory generated by CubeMX for us. Create a new Led folder below, and create a new Led in the Led folder C and Led H file.
Let's click on main C can see that the comments inside are very standard. Why don't we copy them directly for use? Specify the location where we place header file inclusion, macro definition, variable declaration, etc.
Here, for the sake of code portability and standardization, I use the object-oriented idea of C + +. Of course, C language does not have the concept of class and object, but don't forget that C + + comes from C. in C, we can use structs to encapsulate our classes. Function declarations cannot be placed in the structs, but we can declare function pointers, Assign the function value to the function pointer in the C file, so it can be regarded as putting the prototype of the function in the class and the implementation of the function in the C file. Then the whole structure is Public, so there is no concept of private, which is also a part of the defect. By globalizing the structure variable, we can use it in other C files.
Here I post my code directly:
/**
******************************************************************************
* @file : main.c
* @brief : Main program body
******************************************************************************
* @attention
*
* <h2><center>© Copyright (c) 2021 STMicroelectronics.
* All rights reserved.</center></h2>
*
* This software component is licensed by ST under BSD 3-Clause license,
* the "License"; You may not use this file except in compliance with the
* License. You may obtain a copy of the License at:
* opensource.org/licenses/BSD-3-Clause
*
******************************************************************************
*/
/* Includes ------------------------------------------------------------------*/
#include "Led.h"
/* Private includes ----------------------------------------------------------*/
/* Private typedef -----------------------------------------------------------*/
/* Private define ------------------------------------------------------------*/
/* Private macro -------------------------------------------------------------*/
/* Private variables ---------------------------------------------------------*/
/* Private function prototypes -----------------------------------------------*/
static void Led_SetState(LedNumber ledNum, LedStatus ledState);
/* Private user code ---------------------------------------------------------*/
Led_TypeDef Led = {
Led_SetState /* Led set status function */
};
/**
* @brief The application entry point.
* @param ledNum: ledNum_0 | ledNum_1
* @param ledState: ledOn | ledOff
* @retval int
*/
static void Led_SetState(LedNumber ledNum, LedStatus ledState) {
switch (ledState) {
case ledOn:
if (ledNum == ledNum_0)
LED0_GPIO_PORT->BSRR = (uint32_t)LED0_PIN_NUM << 16u;
else
LED1_GPIO_PORT->BSRR = (uint32_t)LED1_PIN_NUM << 16u;
break;
case ledOff:
if (ledNum == ledNum_0)
LED0_GPIO_PORT->BSRR = LED0_PIN_NUM;
else
LED1_GPIO_PORT->BSRR = LED1_PIN_NUM;
break;
}
}
/**
******************************************************************************
* @file : main.h
* @brief : Header for main.c file.
* This file contains the common defines of the application.
******************************************************************************
* @attention
*
* <h2><center>© Copyright (c) 2021 STMicroelectronics.
* All rights reserved.</center></h2>
*
* This software component is licensed by ST under BSD 3-Clause license,
* the "License"; You may not use this file except in compliance with the
* License. You may obtain a copy of the License at:
* opensource.org/licenses/BSD-3-Clause
*
******************************************************************************
*/
/* Define to prevent recursive inclusion -------------------------------------*/
#ifndef __LED_H
#define __LED_H
#ifdef __cplusplus
extern "C" {
#endif
/* Includes ------------------------------------------------------------------*/
#include "stm32f1xx_hal.h"
/* Private includes ----------------------------------------------------------*/
/* Exported types ------------------------------------------------------------*/
/* Exported constants --------------------------------------------------------*/
/* Exported macro ------------------------------------------------------------*/
#define LED0_GPIO_PORT GPIOB
#define LED0_PIN_NUM GPIO_PIN_5
#define LED1_GPIO_PORT GPIOE
#define LED1_PIN_NUM GPIO_PIN_5
/* Exported variables ---------------------------------------------------------*/
typedef enum {
ledOn = 0, /* Led turn on */
ledOff /* Led turn off */
} LedStatus;
typedef enum {
ledNum_0 = 0, /* Led 0 */
ledNum_1 /* Led 1 */
} LedNumber;
typedef struct {
void (*SetState)(LedNumber ledNum, LedStatus ledState);
} Led_TypeDef;
/* Exported functions prototypes ---------------------------------------------*/
extern Led_TypeDef Led;
/* Private defines -----------------------------------------------------------*/
#ifdef __cplusplus
}
#endif
#endif /* __LED_H */
/************************ (C) COPYRIGHT STMicroelectronics *****END OF FILE****/
/* USER CODE BEGIN Header */
/**
******************************************************************************
* @file : main.c
* @brief : Main program body
******************************************************************************
* @attention
*
* <h2><center>© Copyright (c) 2021 STMicroelectronics.
* All rights reserved.</center></h2>
*
* This software component is licensed by ST under BSD 3-Clause license,
* the "License"; You may not use this file except in compliance with the
* License. You may obtain a copy of the License at:
* opensource.org/licenses/BSD-3-Clause
*
******************************************************************************
*/
/* USER CODE END Header */
/* Includes ------------------------------------------------------------------*/
#include "main.h"
#include "gpio.h"
#include "usart.h"
/* Private includes ----------------------------------------------------------*/
/* USER CODE BEGIN Includes */
#include "Led.h"
/* USER CODE END Includes */
/* Private typedef -----------------------------------------------------------*/
/* USER CODE BEGIN PTD */
/* USER CODE END PTD */
/* Private define ------------------------------------------------------------*/
/* USER CODE BEGIN PD */
/* USER CODE END PD */
/* Private macro -------------------------------------------------------------*/
/* USER CODE BEGIN PM */
/* USER CODE END PM */
/* Private variables ---------------------------------------------------------*/
/* USER CODE BEGIN PV */
/* USER CODE END PV */
/* Private function prototypes -----------------------------------------------*/
void SystemClock_Config(void);
/* USER CODE BEGIN PFP */
/* USER CODE END PFP */
/* Private user code ---------------------------------------------------------*/
/* USER CODE BEGIN 0 */
/* USER CODE END 0 */
/**
* @brief The application entry point.
* @retval int
*/
int main(void) {
/* USER CODE BEGIN 1 */
/* USER CODE END 1 */
/* MCU Configuration--------------------------------------------------------*/
/* Reset of all peripherals, Initializes the Flash interface and the Systick. */
HAL_Init();
/* USER CODE BEGIN Init */
/* USER CODE END Init */
/* Configure the system clock */
SystemClock_Config();
/* USER CODE BEGIN SysInit */
/* USER CODE END SysInit */
/* Initialize all configured peripherals */
MX_GPIO_Init();
MX_USART1_UART_Init();
/* USER CODE BEGIN 2 */
/* USER CODE END 2 */
/* Infinite loop */
/* USER CODE BEGIN WHILE */
while (1) {
/* USER CODE END WHILE */
/* USER CODE BEGIN 3 */
Led.SetState(ledNum_0, ledOn);
HAL_Delay(200);
Led.SetState(ledNum_1, ledOn);
HAL_Delay(200);
Led.SetState(ledNum_0, ledOff);
HAL_Delay(200);
Led.SetState(ledNum_1, ledOff);
HAL_Delay(200);
}
/* USER CODE END 3 */
}
/**
* @brief System Clock Configuration
* @retval None
*/
void SystemClock_Config(void) {
RCC_OscInitTypeDef RCC_OscInitStruct = {0};
RCC_ClkInitTypeDef RCC_ClkInitStruct = {0};
/** Initializes the RCC Oscillators according to the specified parameters
* in the RCC_OscInitTypeDef structure.
*/
RCC_OscInitStruct.OscillatorType = RCC_OSCILLATORTYPE_HSE;
RCC_OscInitStruct.HSEState = RCC_HSE_ON;
RCC_OscInitStruct.HSEPredivValue = RCC_HSE_PREDIV_DIV1;
RCC_OscInitStruct.HSIState = RCC_HSI_ON;
RCC_OscInitStruct.PLL.PLLState = RCC_PLL_ON;
RCC_OscInitStruct.PLL.PLLSource = RCC_PLLSOURCE_HSE;
RCC_OscInitStruct.PLL.PLLMUL = RCC_PLL_MUL9;
if (HAL_RCC_OscConfig(&RCC_OscInitStruct) != HAL_OK) {
Error_Handler();
}
/** Initializes the CPU, AHB and APB buses clocks
*/
RCC_ClkInitStruct.ClockType = RCC_CLOCKTYPE_HCLK | RCC_CLOCKTYPE_SYSCLK | RCC_CLOCKTYPE_PCLK1 | RCC_CLOCKTYPE_PCLK2;
RCC_ClkInitStruct.SYSCLKSource = RCC_SYSCLKSOURCE_PLLCLK;
RCC_ClkInitStruct.AHBCLKDivider = RCC_SYSCLK_DIV1;
RCC_ClkInitStruct.APB1CLKDivider = RCC_HCLK_DIV2;
RCC_ClkInitStruct.APB2CLKDivider = RCC_HCLK_DIV1;
if (HAL_RCC_ClockConfig(&RCC_ClkInitStruct, FLASH_LATENCY_2) != HAL_OK) {
Error_Handler();
}
}
/* USER CODE BEGIN 4 */
/* USER CODE END 4 */
/**
* @brief This function is executed in case of error occurrence.
* @retval None
*/
void Error_Handler(void) {
/* USER CODE BEGIN Error_Handler_Debug */
/* User can add his own implementation to report the HAL error return state */
__disable_irq();
while (1) {}
/* USER CODE END Error_Handler_Debug */
}
#ifdef USE_FULL_ASSERT
/**
* @brief Reports the name of the source file and the source line number
* where the assert_param error has occurred.
* @param file: pointer to the source file name
* @param line: assert_param error line source number
* @retval None
*/
void assert_failed(uint8_t *file, uint32_t line) {
/* USER CODE BEGIN 6 */
/* User can add his own implementation to report the file name and line number,
ex: printf("Wrong parameters value: file %s on line %d\r\n", file, line) */
/* USER CODE END 6 */
}
#endif /* USE_FULL_ASSERT */
/************************ (C) COPYRIGHT STMicroelectronics *****END OF FILE****/
Compile and burn
Finally, all we have to do is compile and burn the code. First, find your MinGW installation directory and copy MinGW make. In the bin file Exe, paste a copy and rename it to make Exe, and then create an openocd. Exe in your project root directory Cfg file, put the following contents
source [find interface/stlink-v2.cfg]
source [find target/stm32f1x.cfg]
Of course, the specific configuration depends on your chip model and emulator model. We can see the optional target chip and emulator in the interface and target folder in the root directory of openocd.
Finally, we need to make some changes to the makefile:
Make these changes in the clean up location:
#######
clean:
	del /q $(BUILD_DIR)

#######################################
# flash
#######################################
load: all
	openocd -f ./openocd.cfg -c init -c halt -c "program $(BUILD_DIR)/$(TARGET).hex verify reset exit"
reset:
	openocd -f ./openocd.cfg -c init -c halt -c reset -c shutdown
erase:
	openocd -f ./openocd.cfg -c init -c halt -c "flash erase_sector 0 0 last" -c shutdown

#######################################
# dependencies
#######################################
-include $(wildcard $(BUILD_DIR)/*.d)

$(BUILD_DIR)/%.o: %.c Makefile | $(BUILD_DIR)
	@echo "build $<"
	@$(CC) -c $(CFLAGS) -Wa,-a,-ad,-alms=$(BUILD_DIR)/$(notdir $(<:.c=.lst)) $< -o $@

$(BUILD_DIR)/%.o: %.s Makefile | $(BUILD_DIR)
	@echo "build $<"
	@$(AS) -c $(CFLAGS) $< -o $@

$(BUILD_DIR)/$(TARGET).elf: $(OBJECTS) Makefile
	@echo "generate elf file"
	@$(CC) $(OBJECTS) $(LDFLAGS) -o $@
	$(SZ) $@
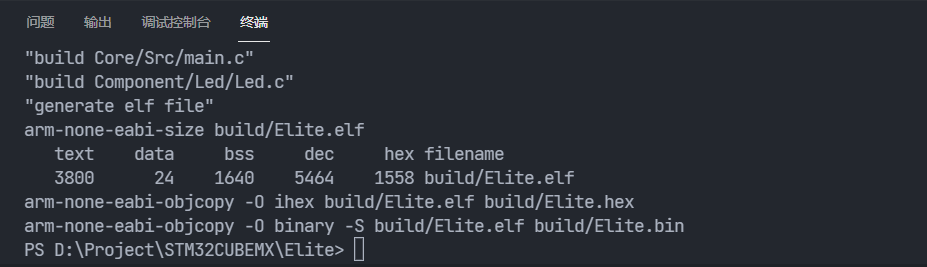
Then we click the terminal. The terminal here is equivalent to CMD. Enter make in it to see that our code and compilation are successful:
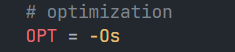
We can configure the code optimization levels - Og, - Os, etc. in the makefile. We can search to see the difference. Here, I choose - Os for the sake of smaller code.
Then we enter make load to download it to our board
Enter make clean to clear Build
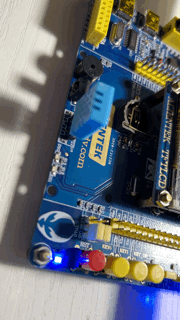
You can see that the Led is flashing normally