Android MVVM framework construction (VIII) Gaode map positioning, weather query and BottomSheetDialog
- preface
- text
preface
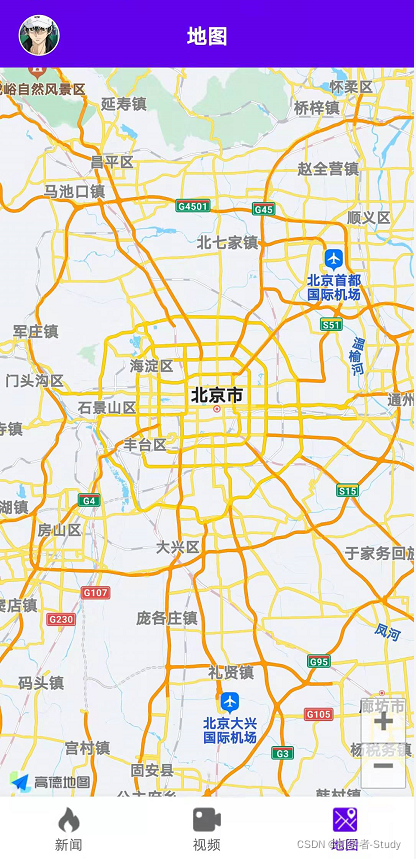
in the previous article, I completed the modification of personal user information, and described the processing of pop-up data and the use of permissions. This article will access a map SDK in the App and complete the weather query at the same time. The effect after completion is shown in the following figure:

text
in fact, I have written about maps and weather on the previous good weather App. There are more and more complex ones. The first one here is to enrich the use scenarios of MVVM and meet the needs of using maps in Fragment. The third is the combination of bottom pop-up window and MVVM.
1, Integrated SDK
I will use maps in this article. Here I choose to use Gaode maps. I need to integrate the SDK. First, I need to log in to the Gaode open platform to register, create applications and obtain key s. Because I have written such articles before, I don't need to repeat them. I can see what I don't know Android Gaode map API , after reading step 1, you can get the key. If you have no problem, come back to this article.
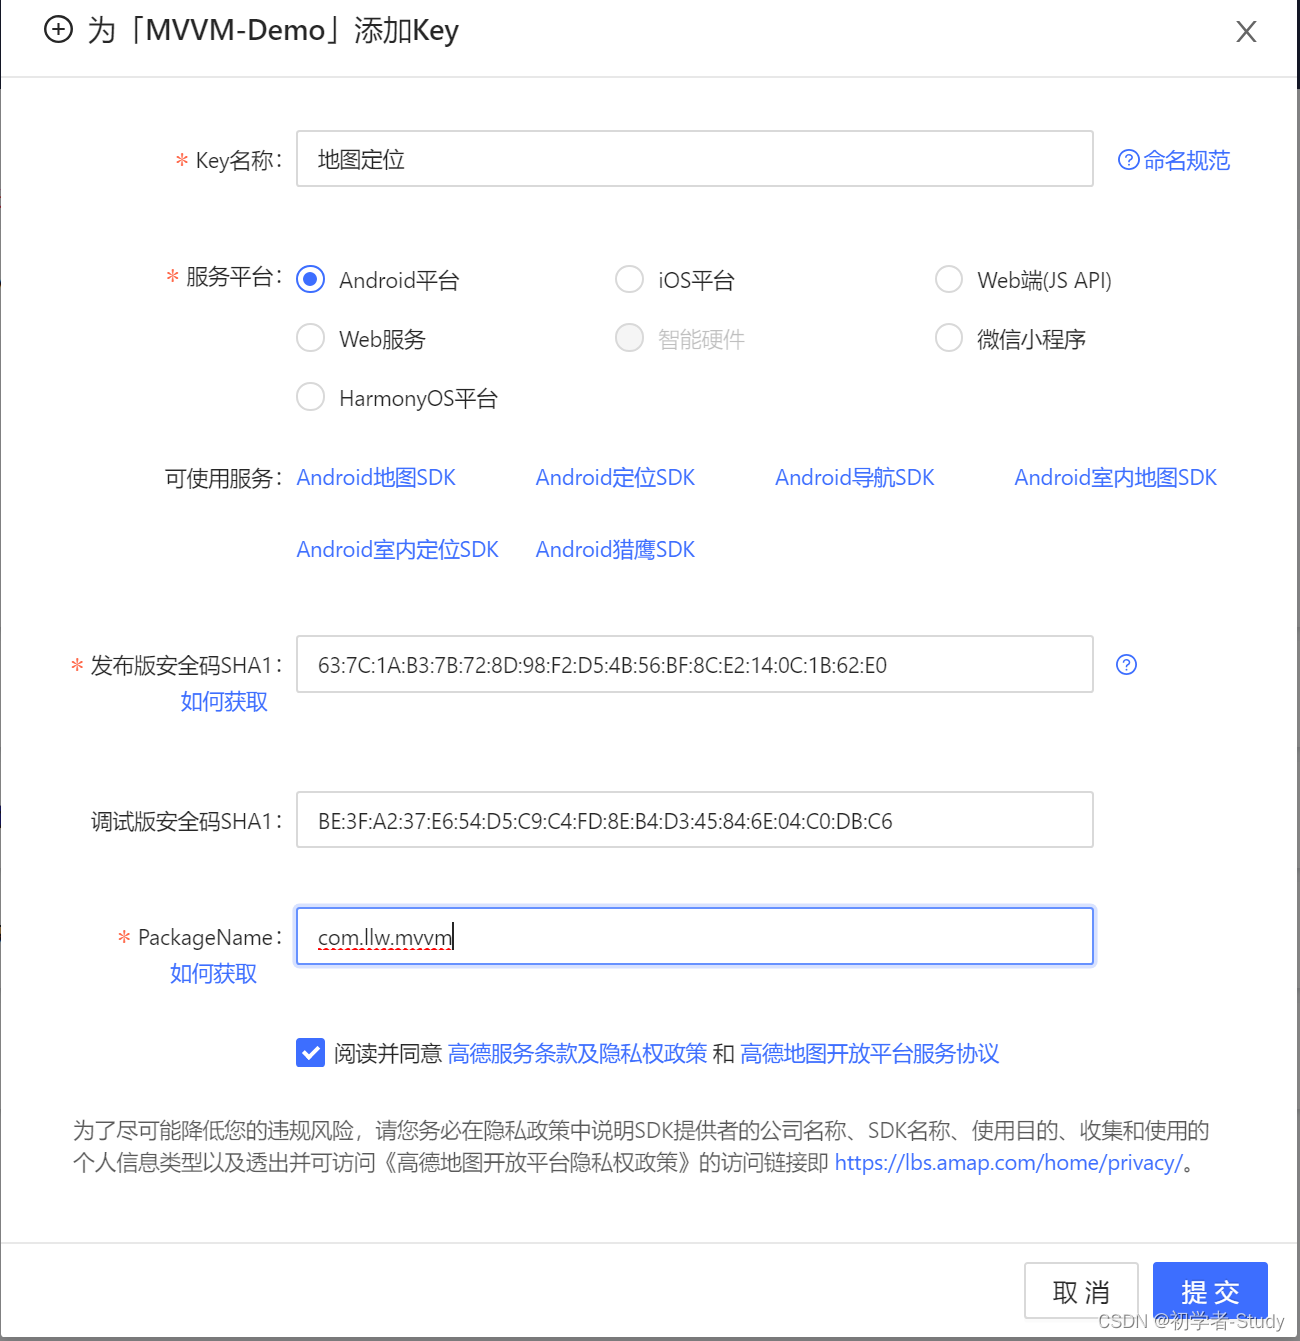
Click submit to have a key.

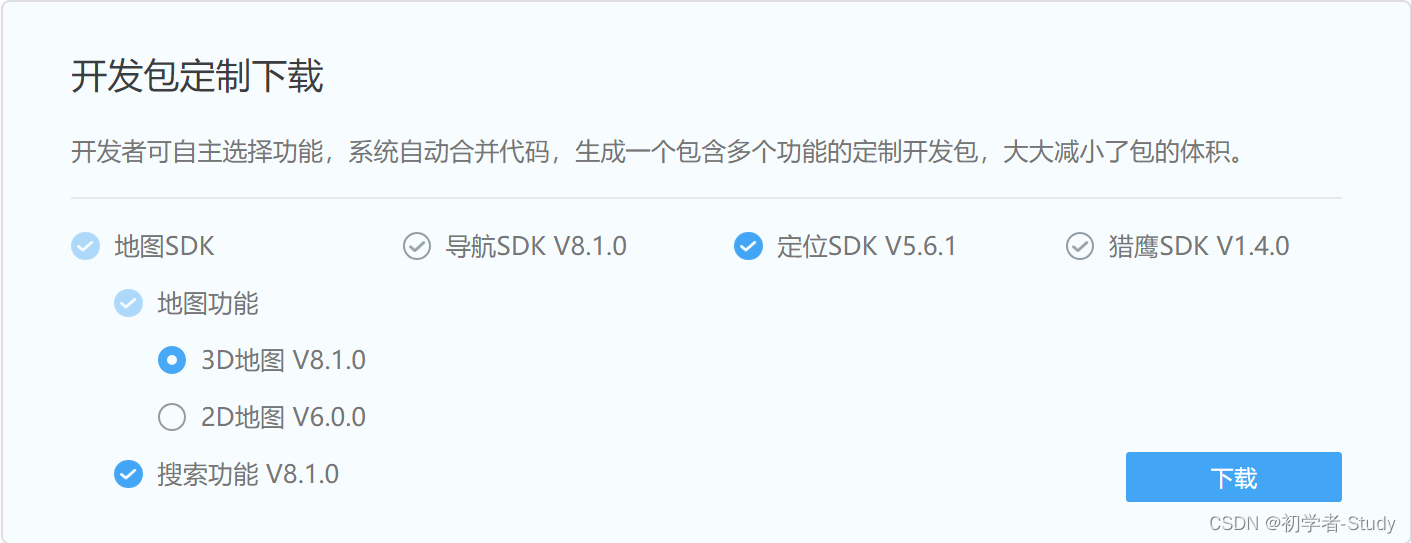
click Download SDK , select the SDK, as shown in the following figure:
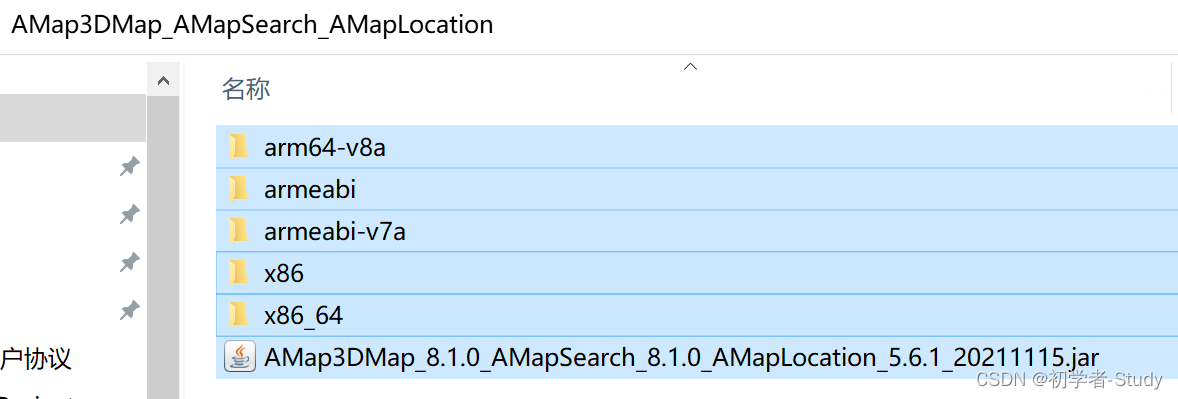
Click download and unzip it locally, as shown in the following figure:
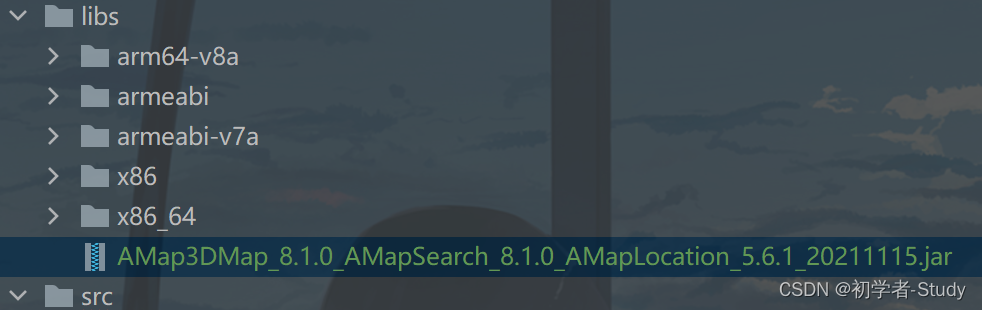
Copy these files to libs of your project, as shown in the following figure:
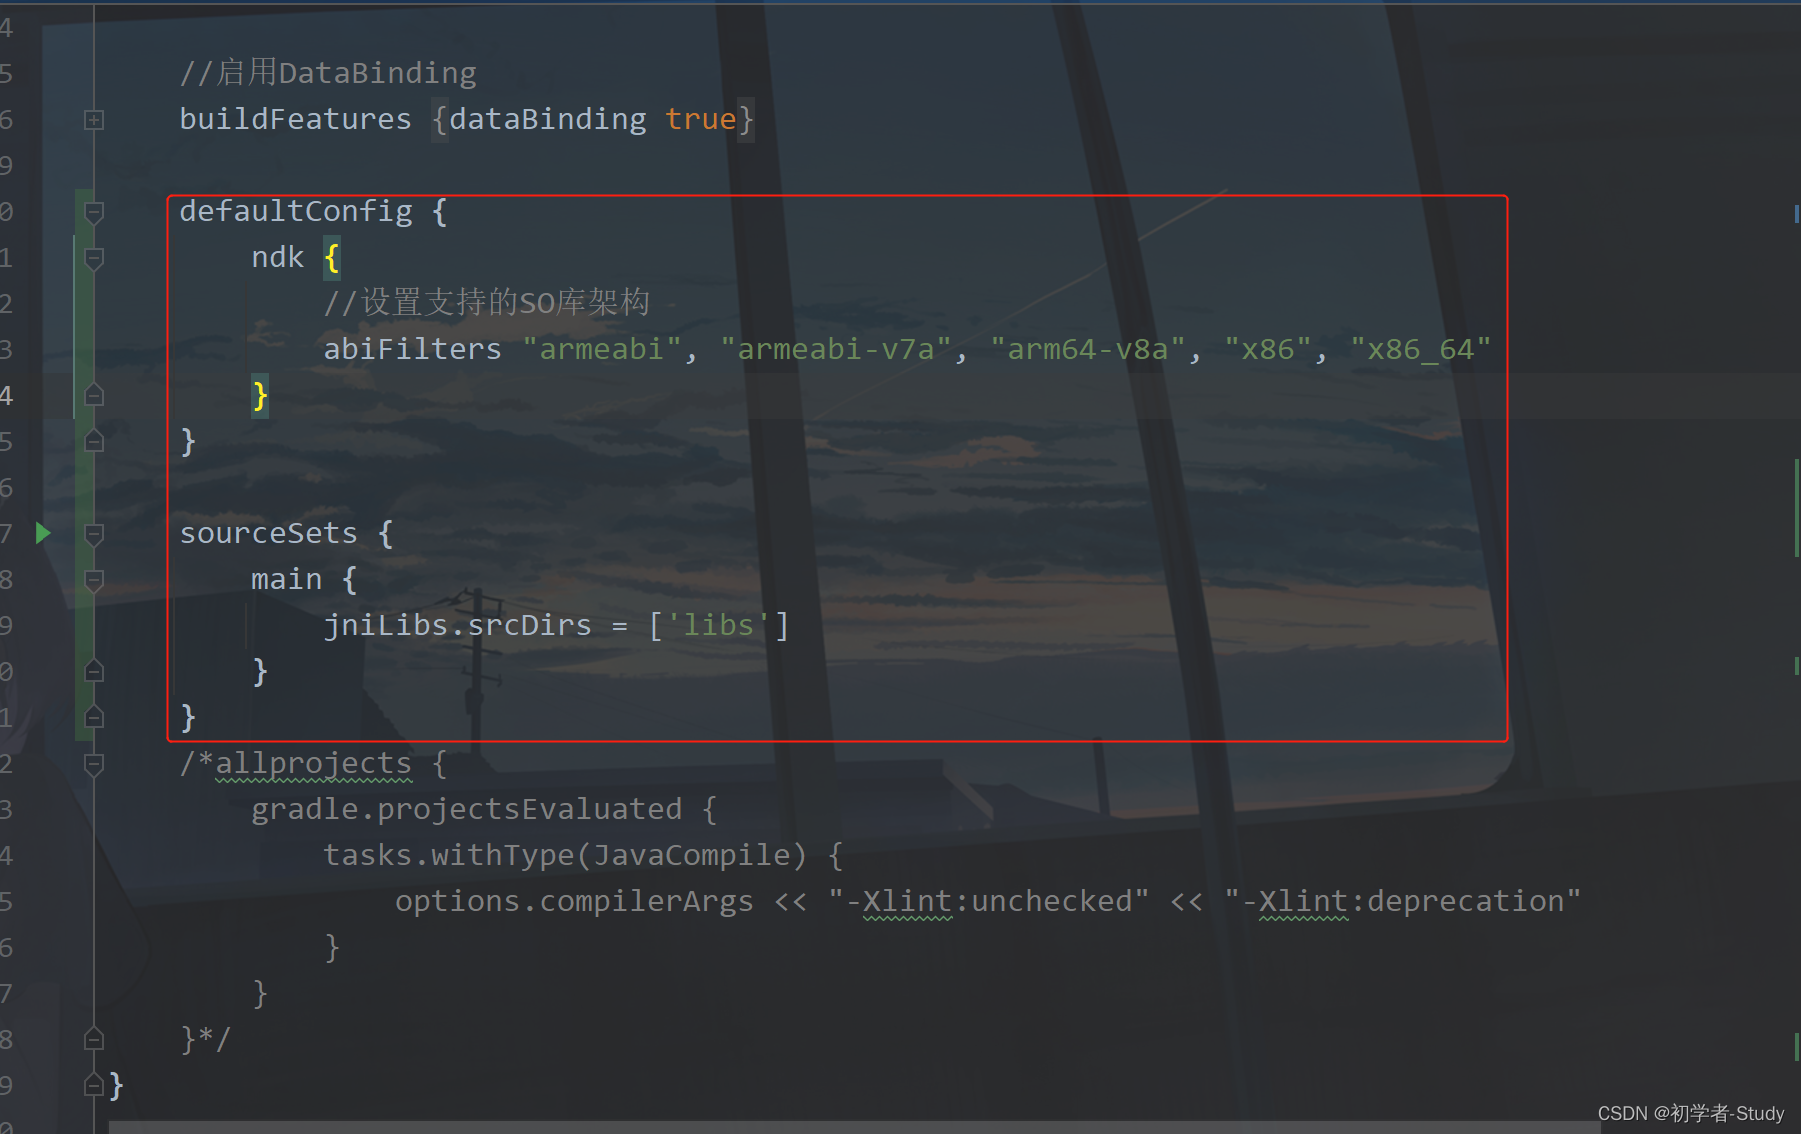
Now the SDK has not been integrated. You just put it into the project and open build under the app module Gradle, add the following code under the android {} closure:
	defaultConfig {
        ndk {
            //Set the supported SO library schema
            abiFilters "armeabi", "armeabi-v7a", "arm64-v8a", "x86", "x86_64"
        }
    }

    sourceSets {
        main {
            jniLibs.srcDirs = ['libs']
        }
    }
As shown in the figure below:
Then add the following code under the dependencies {} closure:
	//Load the jar file under lib
    implementation fileTree(include: '*.jar', dir: 'libs')
The added location is AS follows: this line of code comes with the old version of AS, but not the new version.

Then click Sync Now in the upper right corner to synchronize the dependency Library Download configuration. At this time, your jar package can be expanded, which indicates that the SDK integration is successful.
2, Basic configuration
SDK has been introduced, and some configurations are needed to use it. The first is permission configuration.
① Permission configuration
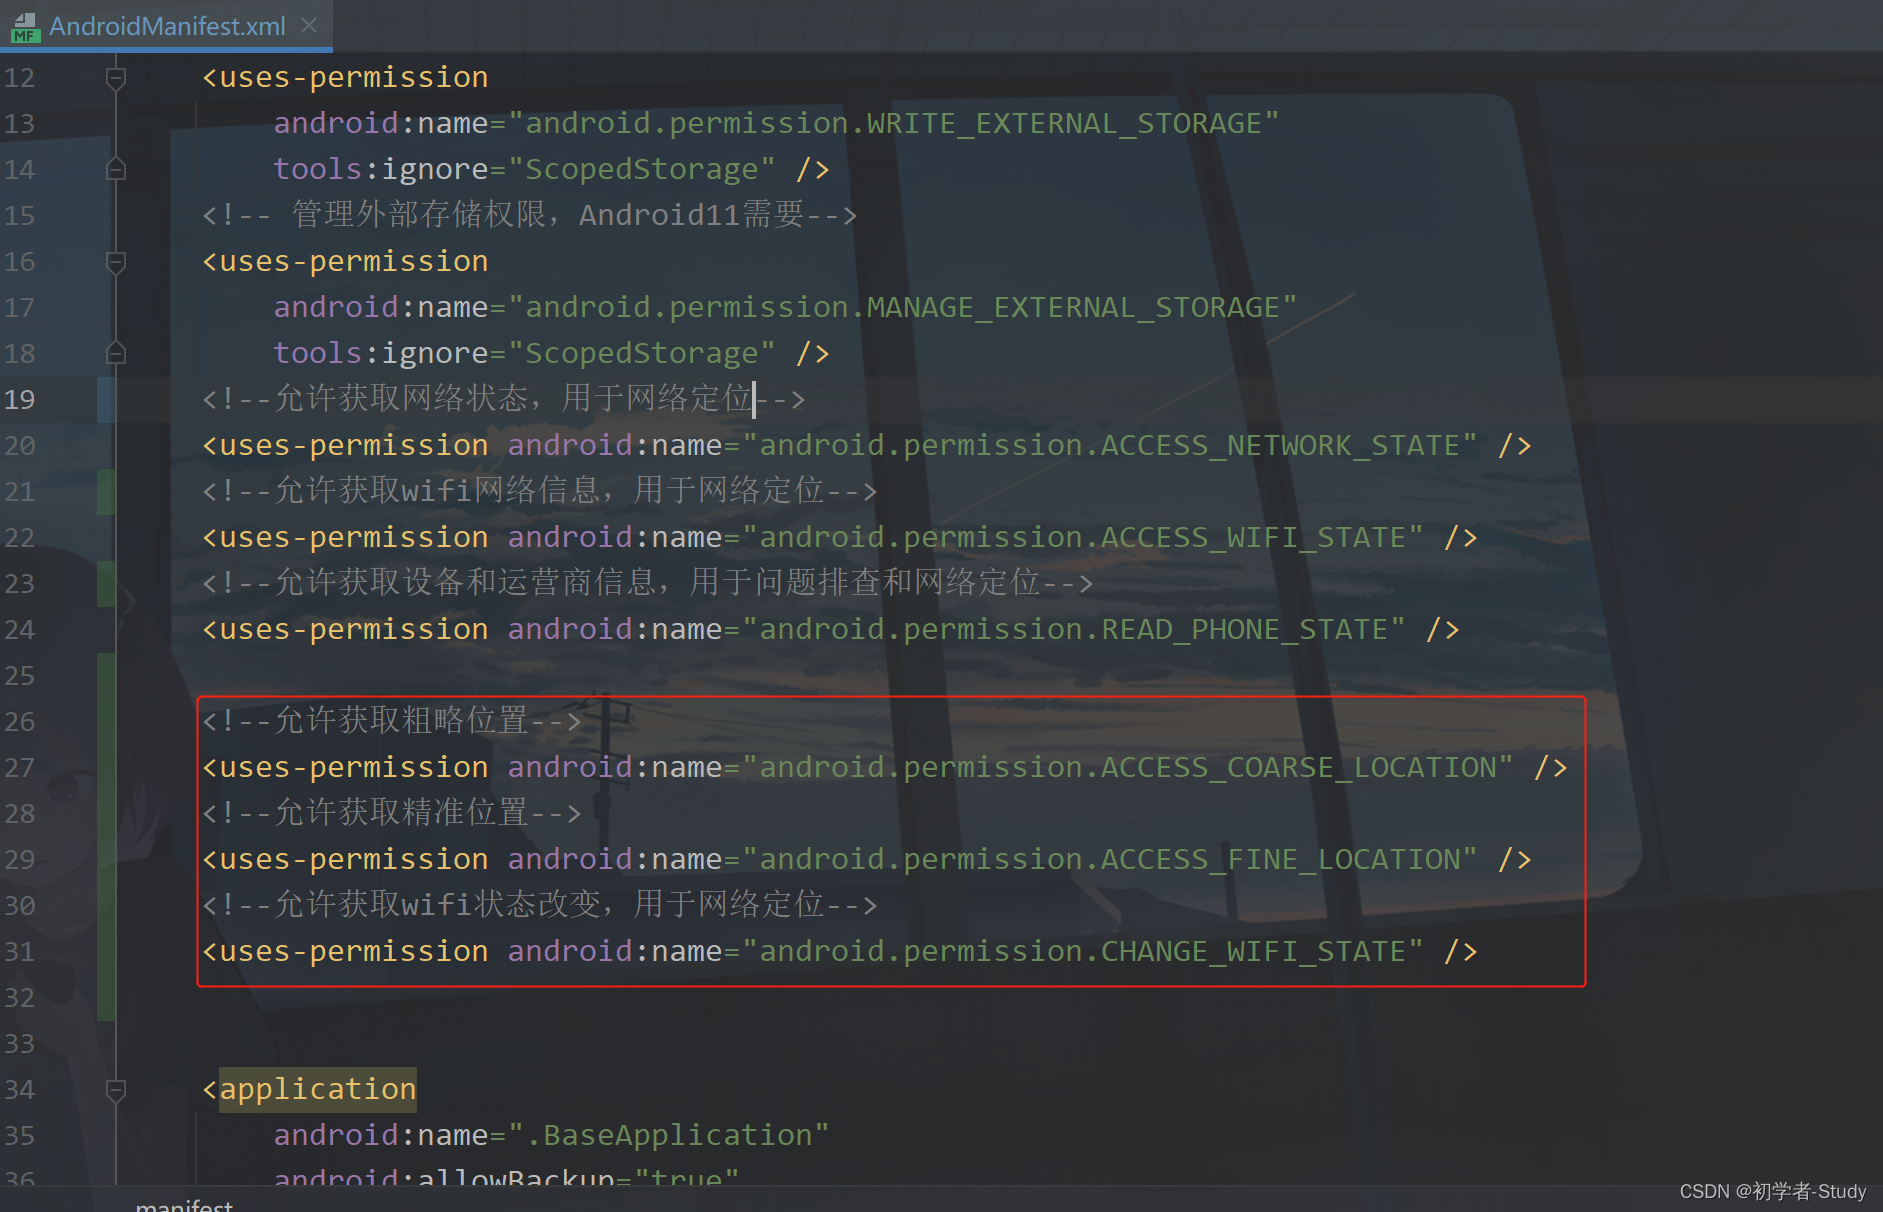
At androidmanifest Add the following permissions under XML:
	<!--Allow coarse location-->
    <uses-permission android:name="android.permission.ACCESS_COARSE_LOCATION" />
    <!--Allow accurate location-->
    <uses-permission android:name="android.permission.ACCESS_FINE_LOCATION" />
    <!--Allow access wifi Status change for network positioning-->
    <uses-permission android:name="android.permission.CHANGE_WIFI_STATE" />
Other required permissions have been added before writing corresponding functions, so there is no need to add them repeatedly. The adding location is shown in the figure below:
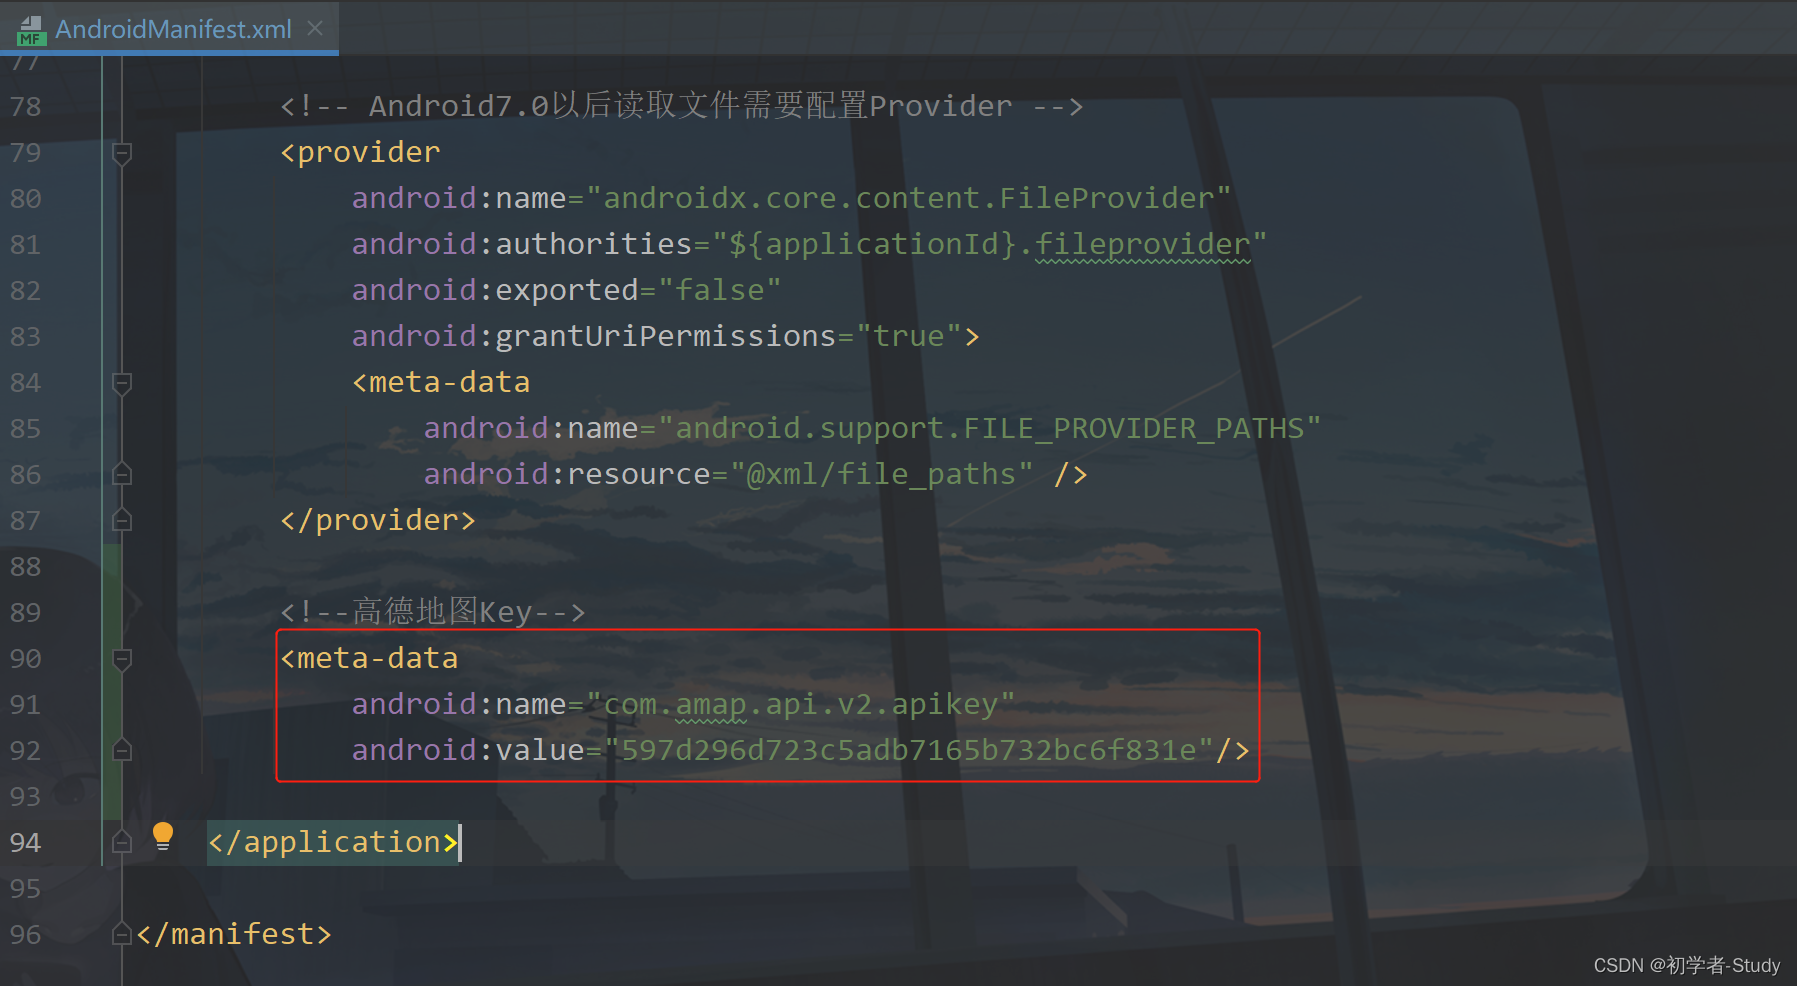
Next, configure the Key
② Configure Key
Then configure the Gaode map Key in the application tab
		<!--Gaude map Key-->
        <meta-data
            android:name="com.amap.api.v2.apikey"
            android:value="597d296d723c5adb7165b732bc6f831e"/>
Add location as shown in the figure below:
Now, the preparatory work is almost done. Now we are going to realize map display and positioning.
3, Display map
we let the map be displayed on HomeActivity, so we need to create a MapFragment to load the map. Some readers only see that I have loaded the map with Activity, but it won't work if I change to Fragment. I'm very sad. After learning from the experience, I decided to demonstrate how to operate the map on the Fragment. Of course, it is very simple, and I will gradually improve the difficulty. Are you ready?
① MapFragment
First, create a new MapFragment under the fragment package. The corresponding layout is map_fragment.xml, the layout code is as follows:
<?xml version="1.0" encoding="utf-8"?>
<layout xmlns:android="http://schemas.android.com/apk/res/android"
    xmlns:tools="http://schemas.android.com/tools">

    <FrameLayout
        android:layout_width="match_parent"
        android:layout_height="match_parent"
        tools:context=".ui.fragment.MapFragment">

        <com.amap.api.maps.MapView
            android:id="@+id/map_view"
            android:layout_width="match_parent"
            android:layout_height="match_parent"/>

    </FrameLayout>
</layout>
It's simple, just a map. Now back to MapFragment, the code is as follows:
public class MapFragment extends BaseFragment {

    private MapFragmentBinding binding;

    public static MapFragment newInstance() {
        return new MapFragment();
    }

    @Override
    public View onCreateView(@NonNull LayoutInflater inflater, @Nullable ViewGroup container,
                             @Nullable Bundle savedInstanceState) {
        binding = DataBindingUtil.inflate(inflater,R.layout.map_fragment,container,false);
        return binding.getRoot();
    }

    @Override
    public void onActivityCreated(@Nullable Bundle savedInstanceState) {
        super.onActivityCreated(savedInstanceState);

        // TODO: Use the ViewModel
    }

}
Here is just a simple inheritance of BaseFragment, and then the binding of DataBinding.
② Navigation binding
Then we need to be in nav_ graph. Add this layout to the XML.
	<!--Map-->
    <fragment
        android:id="@+id/map_fragment"
        android:name="com.llw.mvvm.ui.fragment.MapFragment"
        android:label="map_fragment"
        tools:layout="@layout/map_fragment" />
if it is configured here, the menu at the bottom should also be configured. After all, we control the switching of Fragment through the menu and open navigation_menu.xml, add an item in it, and the code is as follows:
	<item
        android:id="@+id/map_fragment"
        android:icon="@mipmap/ic_map"
        android:title="Map" />
This icon can be found in my source code or on the Internet.
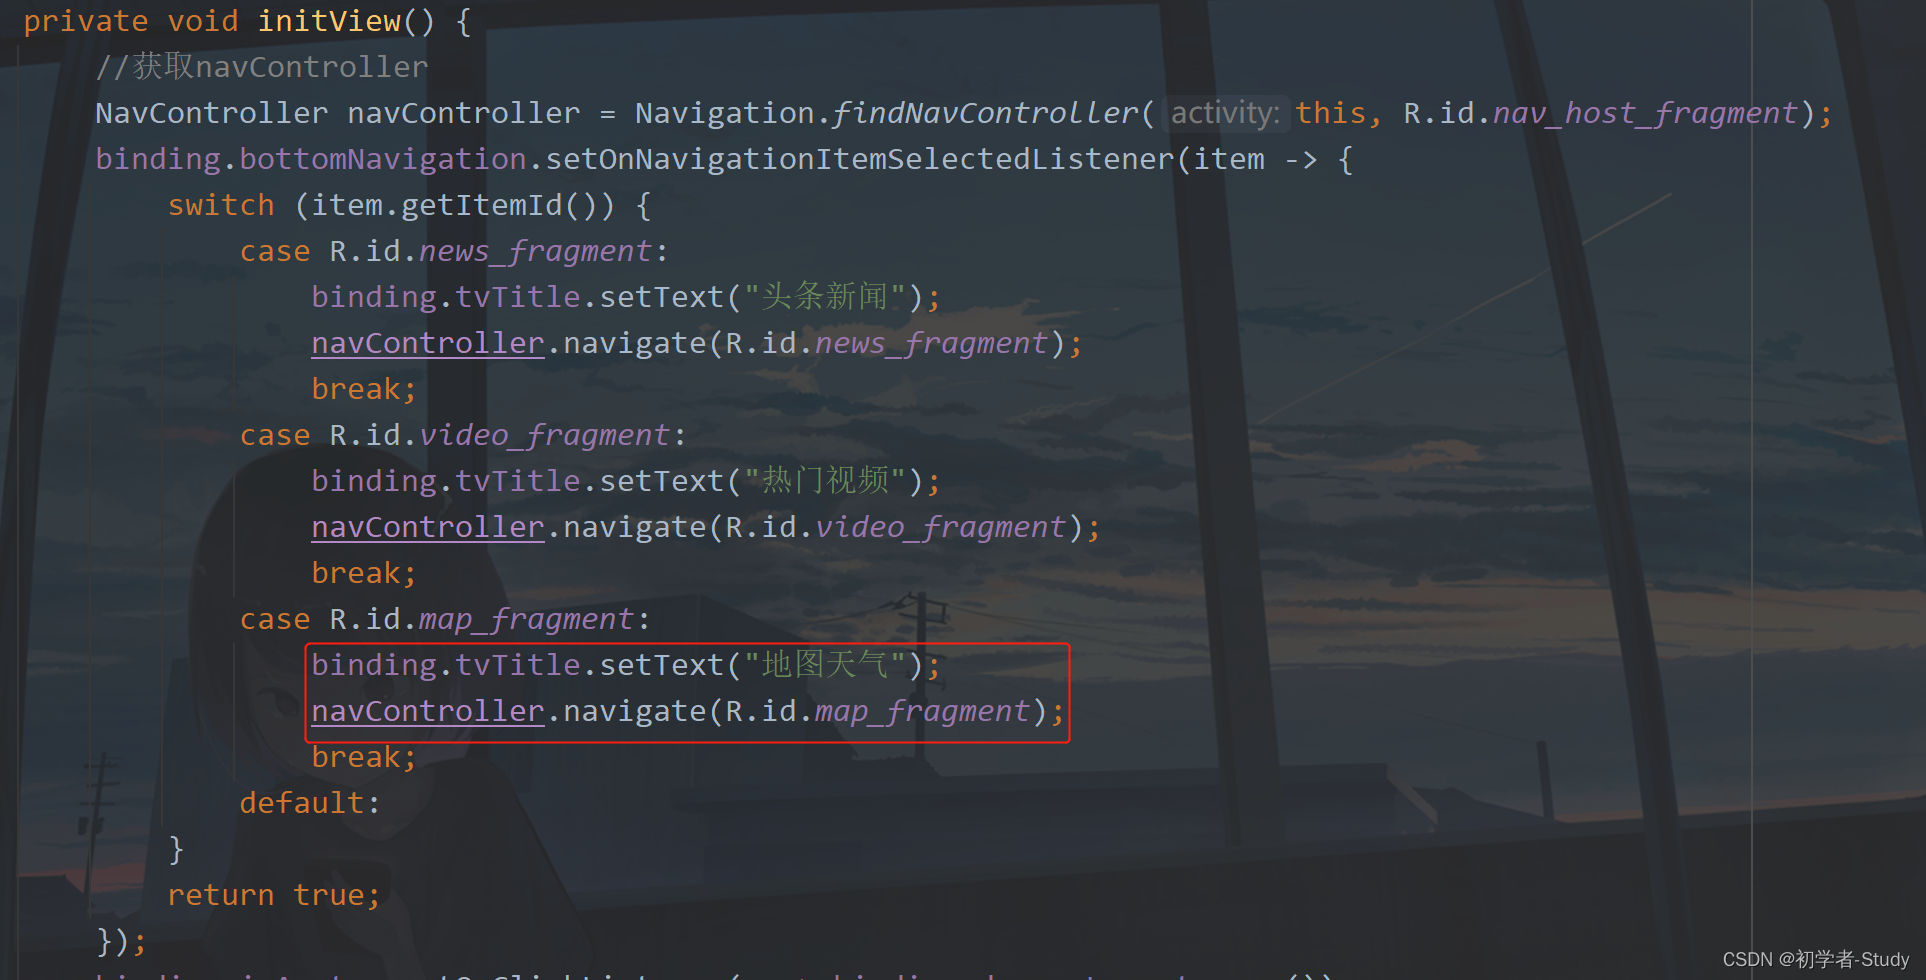
Next, go to HomeActivity to configure. The Fragment layout changes when configuring the switching menu, as shown in the following figure:
③ Map lifecycle binding in Fragment
To display a map, you need to bind the life cycle of the map with the life cycle of the Fragment, as shown in the following figure:
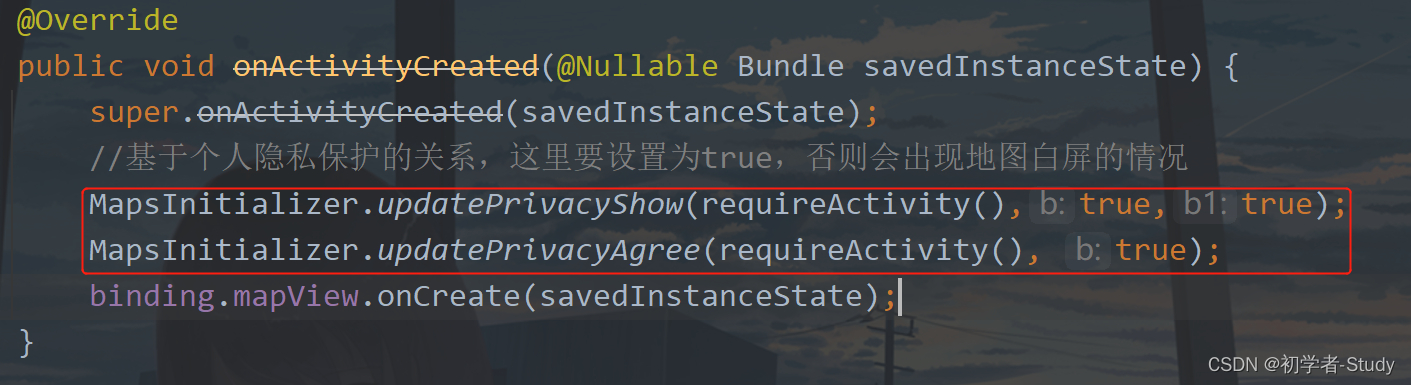
If you are an online project, you need to introduce the description of Gaode SDK into the privacy policy, and then bind the life cycle of the map in MapFragment.
	@Override
    public void onSaveInstanceState(@NonNull @NotNull Bundle outState) {
        super.onSaveInstanceState(outState);
        binding.mapView.onSaveInstanceState(outState);
    }

	@Override
    public void onResume() {
        super.onResume();
        binding.mapView.onResume();
    }

    @Override
    public void onPause() {
        super.onPause();
        binding.mapView.onPause();
    }

    @Override
    public void onDestroy() {
        super.onDestroy();
        binding.mapView.onDestroy();
    }
Run the following:
Now I just display the map, but I can't locate my current location, of course.
4, Show current location
to display the current location, you need to locate the permission, which was previously in androidmanifest XML has been configured. Now you need to dynamically request in the code.
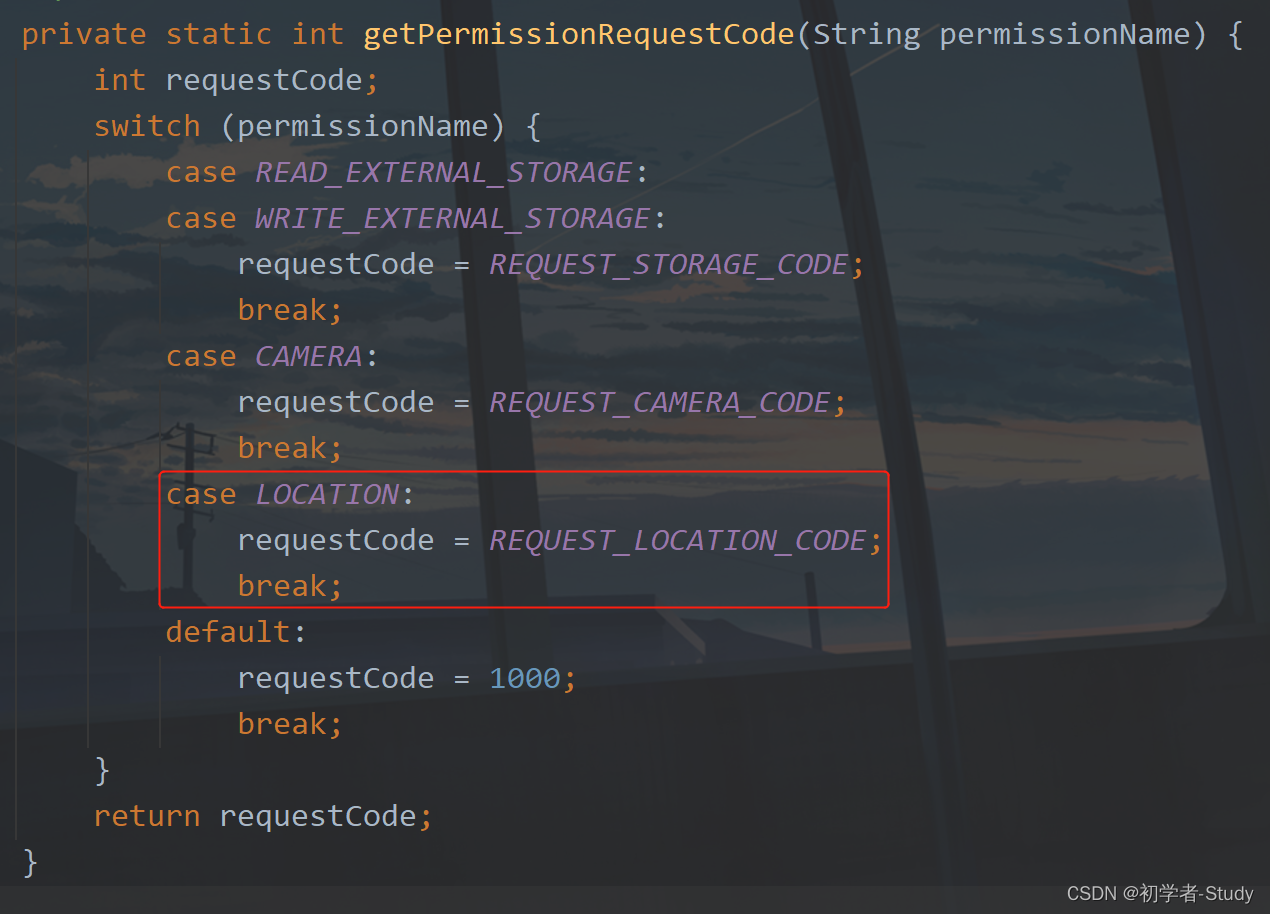
① Locate dynamic permission request
In the previous article, I wrote a PermissionUtils class. Here, I add something to this class, and add the following code in PermissionUtils:
	public static final String LOCATION = Manifest.permission.ACCESS_FINE_LOCATION;
    public static final int REQUEST_LOCATION_CODE = 1003;
Then add a case in the getPermissionRequestCode method, as shown in the following figure:
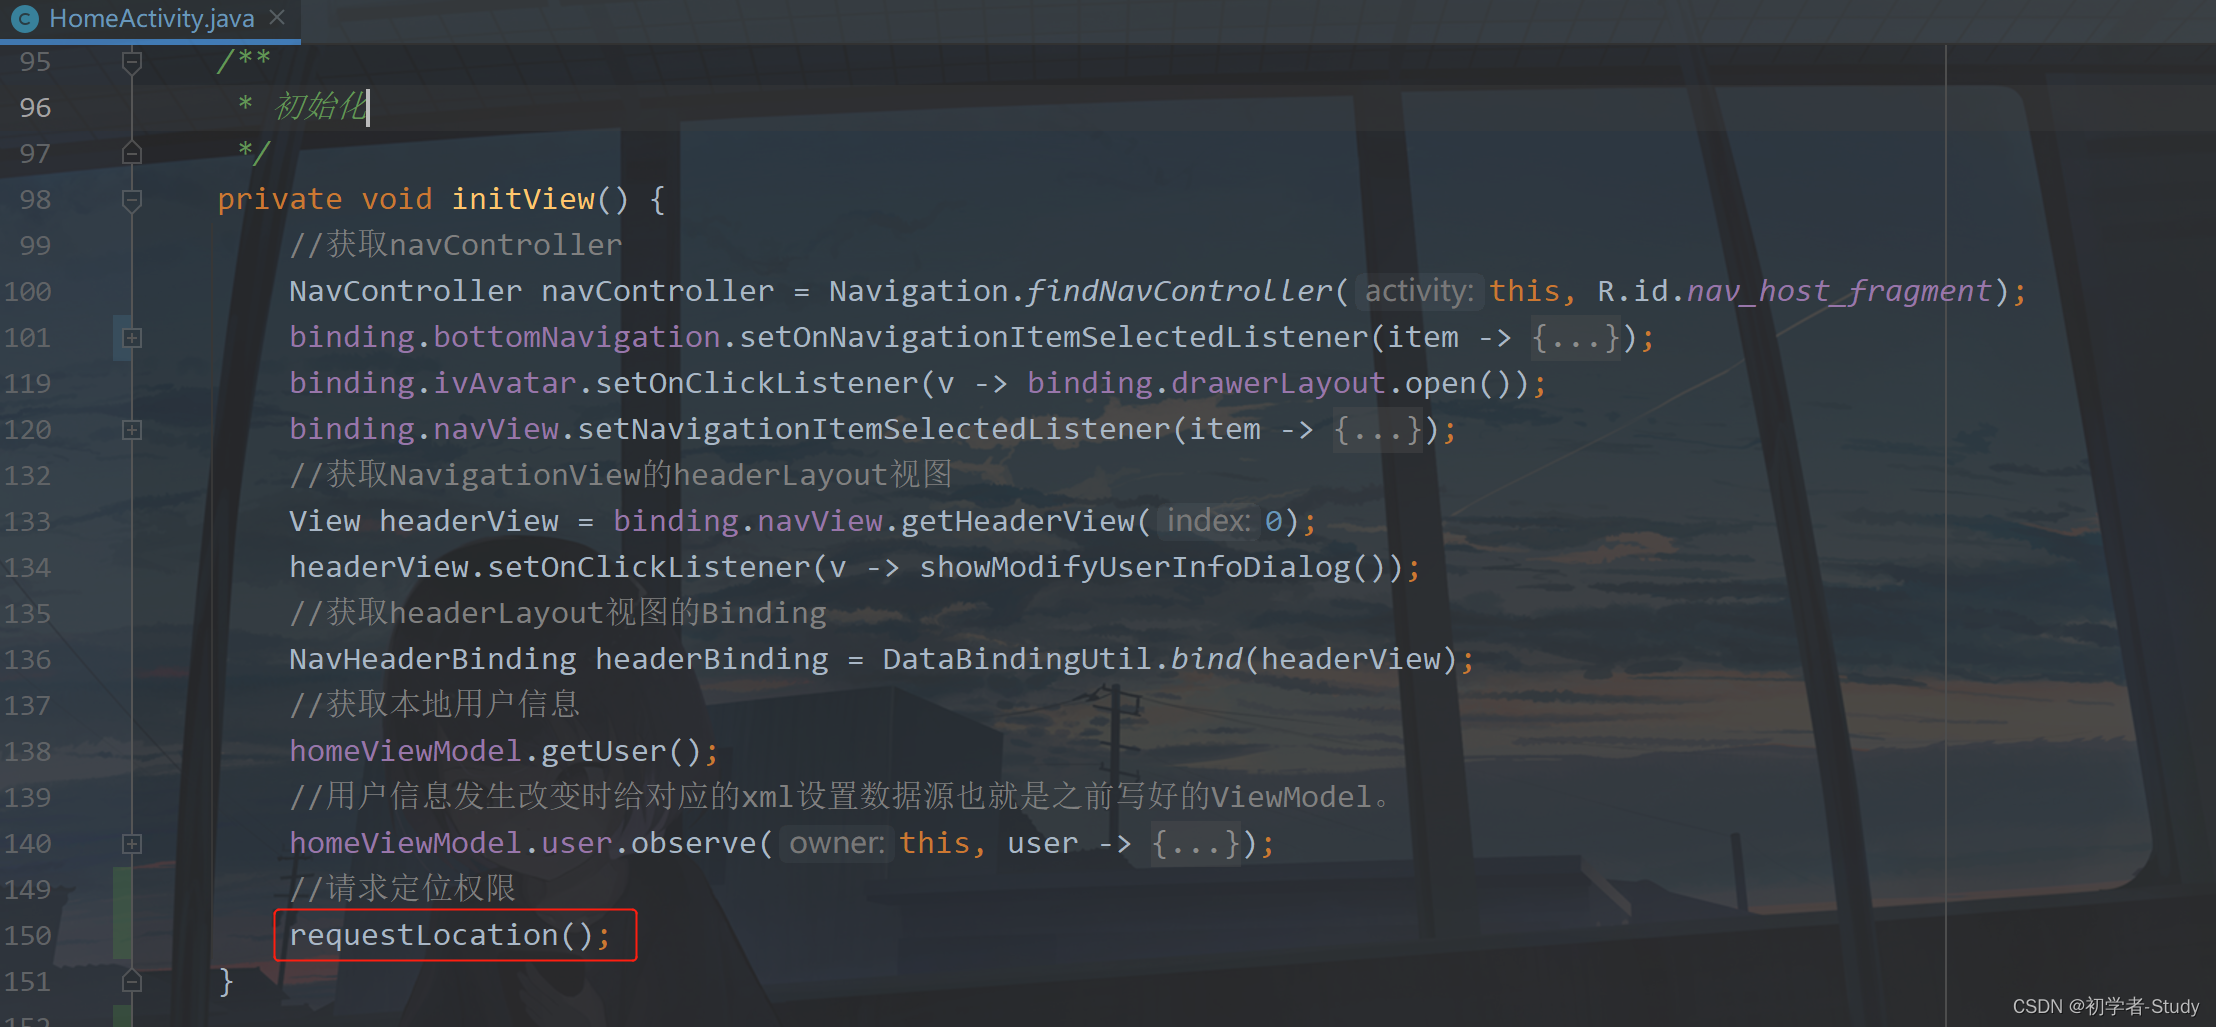
The following is how to request dynamic permissions in HomeActivity. Add the following methods in HomeActivity:
	/**
     * Request location permission
     */
    private void requestLocation() {
        if (isAndroid6()) {
            if (!hasPermission(PermissionUtils.LOCATION)) {
                requestPermission(PermissionUtils.LOCATION);
            }
        } else {
            showMsg("You do not need to request permissions dynamically");
        }
    }
Then call it in the initView method, as shown in the following figure:
② Map location current location
Now go back to MapFragment and add the following code:
private static final String TAG = MapFragment.class.getSimpleName();
/**
* Initialize map
*/
private void initMap() {
//Initialize map controller object
AMap aMap = binding.mapView.getMap();
// Set to true to display the positioning layer and trigger positioning. False to hide the positioning layer and not trigger positioning. The default is false
aMap.setMyLocationEnabled(true);
MyLocationStyle style = new MyLocationStyle();//Initialize the locating blue dot style class mylocationstyle myLocationType(MyLocationStyle.LOCATION_TYPE_LOCATION_ROTATE);// Continuously locate and move the viewing angle to the center point of the map. The positioning point rotates according to the direction of the device and will follow the device. (positioning once every 1 second) if mylocationtype is not set, this mode will also be executed by default.
style.myLocationType(MyLocationStyle.LOCATION_TYPE_LOCATE) ;//Locate once and move the view to the center of the map.
aMap.setMyLocationStyle(style);//Set the Style to locate the blue dot
aMap.getUiSettings().setMyLocationButtonEnabled(true);//It is not required to set whether the default positioning button is displayed.
aMap.setMyLocationEnabled(true);// Set to true to enable the display of positioning blue dots, false to hide positioning blue dots without positioning, and the default is false.
//Set the SDK's own location message listening
aMap.setOnMyLocationChangeListener(this);
}
@Override
public void onMyLocationChange(Location location) {
// Location callback listening
if(location != null) {
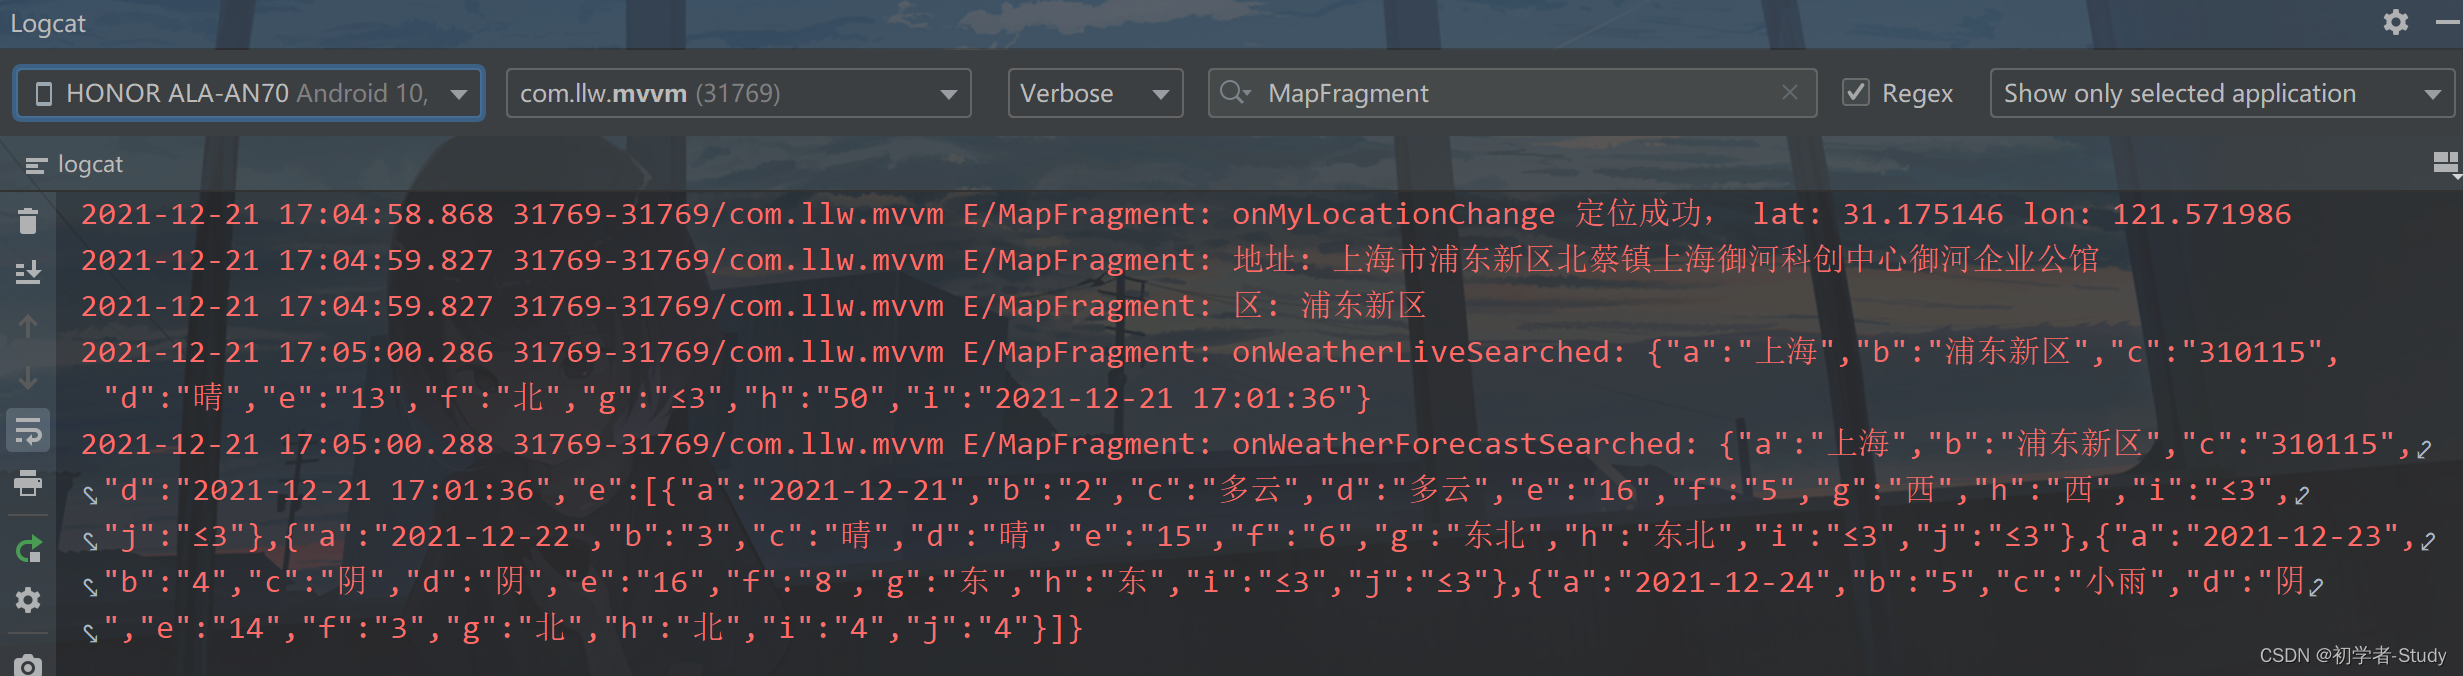
Log.e(TAG, "onMyLocationChange Successful positioning, lat: " + location.getLatitude() + " lon: " + location.getLongitude());
} else {
Log.e(TAG, "seek failed");
}
}Implement location monitoring

Call initMap()
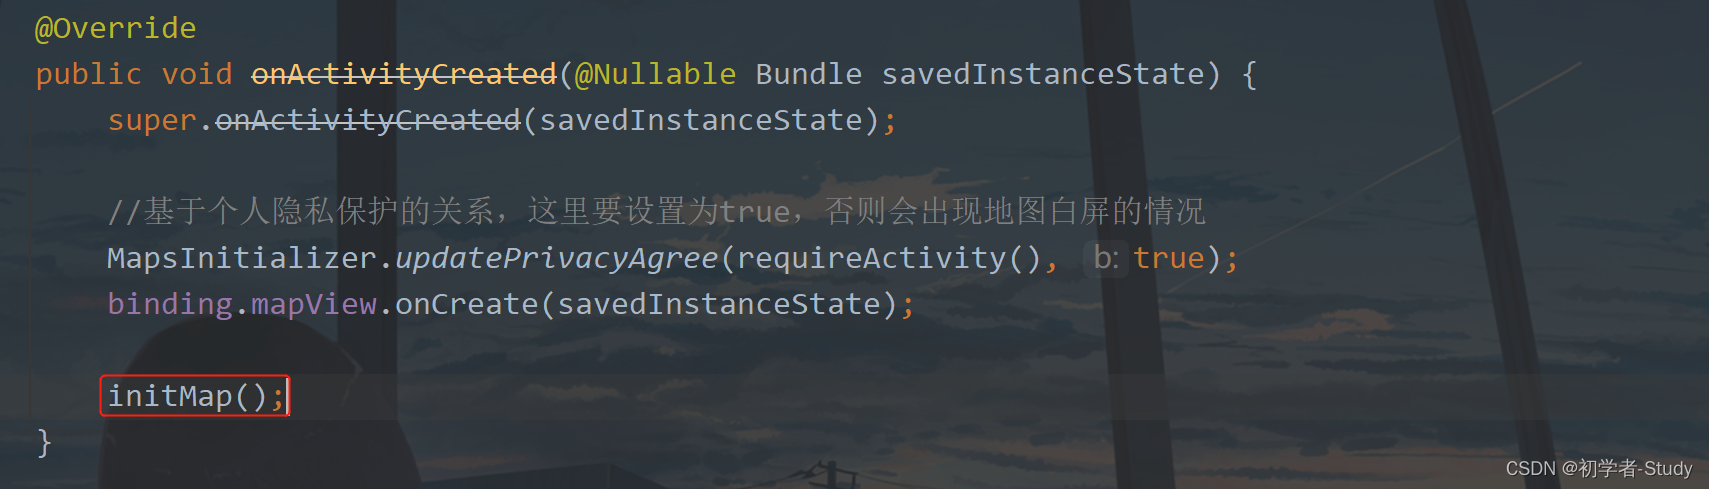
Run it

5, Get detailed address information
the current location is located through map positioning, but the location of onMyLocationChange only has the longitude and latitude of the current location. What should we do if we need to get detailed address information? Through the search SDK, the coordinates are converted into detailed addresses through inverse geocoding. Still in MapFragment, inherit geocodesearch Ongeocodesearchlistener, which implements two callback methods. The code is as follows:
	/**
     * Coordinate to address
     */
    @Override
    public void onRegeocodeSearched(RegeocodeResult regeocodeResult, int rCode) {

    }

    /**
     * Address to coordinate
     */
    @Override
    public void onGeocodeSearched(GeocodeResult geocodeResult, int rCode) {

    }
Then this also needs to be initialized. The code is as follows:
	//Successfully resolved identification code
    private static final int PARSE_SUCCESS_CODE = 1000;

    private GeocodeSearch geocoderSearch = null;
    private String district = null;// District / county
Write a method to initialize the search
/**
* Initialize search
*/
private void initSearch() {
try {
geocoderSearch = new GeocodeSearch(requireActivity());
geocoderSearch.setOnGeocodeSearchListener(this);
} catch (AMapException e) {
e.printStackTrace();
}
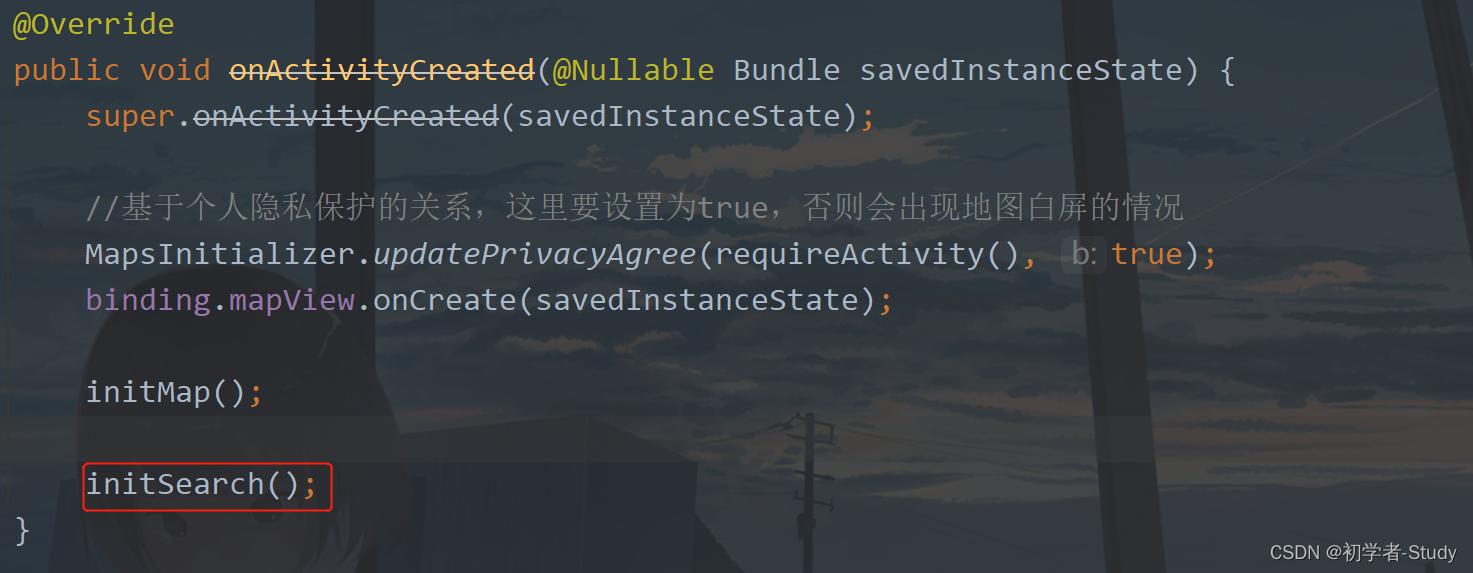
}The calling place is shown in the figure below:
When the receiving location information changes, search the coordinates, and add the following code in onMyLocationChange:
			//Create a longitude and latitude point. The first parameter is latitude and the second parameter is longitude
            LatLonPoint latLonPoint = new LatLonPoint(location.getLatitude(), location.getLongitude());
            // The first parameter represents a Latlng, the second parameter represents the range of meters, and the third parameter represents whether it is a fire coordinate system or a GPS native coordinate system
            RegeocodeQuery query = new RegeocodeQuery(latLonPoint, 20, GeocodeSearch.AMAP);
            //Obtain address information through longitude and latitude
            geocoderSearch.getFromLocationAsyn(query);
Add location as follows:

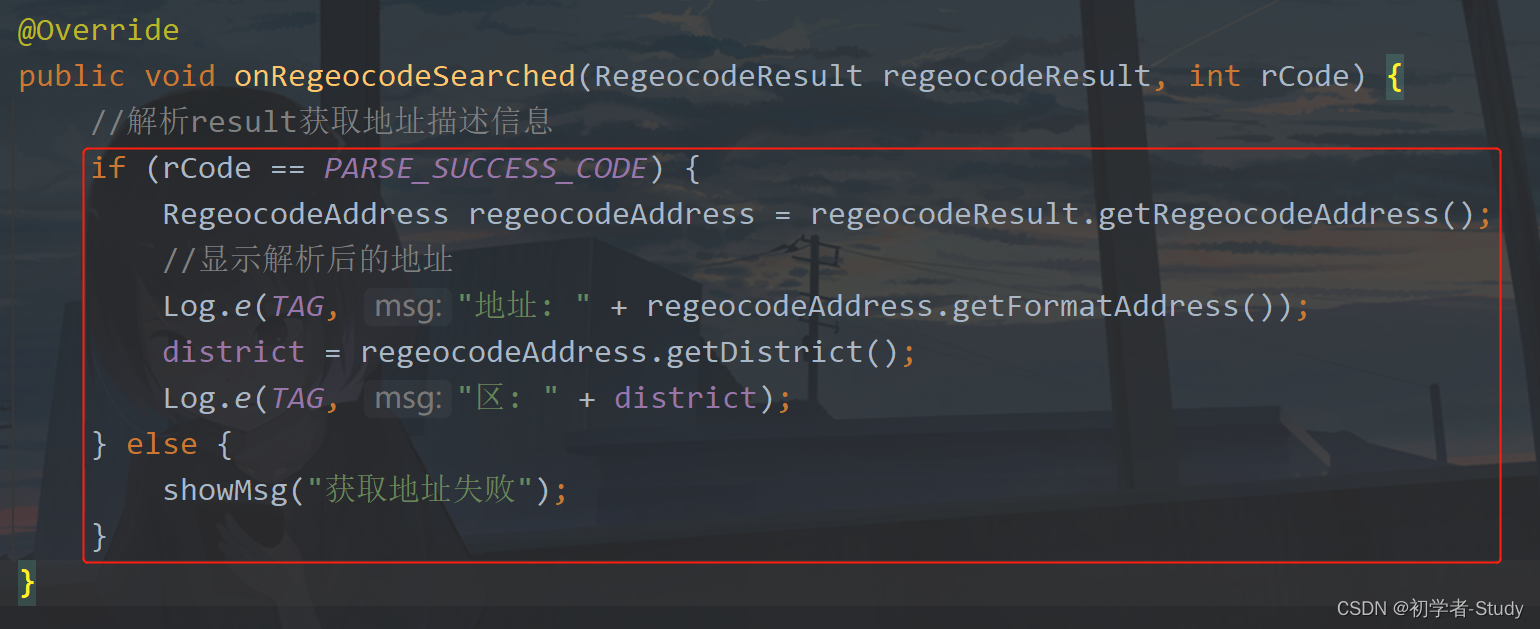
then the callback of onRegeocodeSearched will be triggered. In onRegeocodeSearched, the information of the location will be printed and the simple district / county assignment will be performed. The following code will be added to the onRegeocodeSearched method:
		//Parse result to obtain address description information
        if (rCode == PARSE_SUCCESS_CODE) {
            RegeocodeAddress regeocodeAddress = regeocodeResult.getRegeocodeAddress();
            //Displays the resolved address
            Log.e(TAG, "address: " + regeocodeAddress.getFormatAddress());
            district = regeocodeAddress.getDistrict();
            Log.e(TAG, "area: " + district);
        } else {
            showMsg("Failed to get address");
        }
Add location as follows:
Run the following:

This gives you detailed location information.
6, Get weather data
Gaode has its own weather data interface, which can be used, but there is not much data. If you need more data, you can connect to the weather API, such as Hefeng and Caiyun. Create variables in MapFragment
	private LocalWeatherLive liveResult;
    private LocalWeatherForecast forecastResult;
Then MapFragment inherits weathersearch Onweathersearchlistener, which implements two methods.
	/**
     * Real time weather return
     */
    @Override
    public void onWeatherLiveSearched(LocalWeatherLiveResult localWeatherLiveResult, int code) {
        liveResult = localWeatherLiveResult.getLiveResult();
        if (liveResult != null) {
            Log.e(TAG, "onWeatherLiveSearched: " + new Gson().toJson(liveResult));
        } else {
            showMsg("Real time weather data is empty");
        }
    }

    /**
     * Weather forecast return
     */
    @Override
    public void onWeatherForecastSearched(LocalWeatherForecastResult localWeatherForecastResult, int code) {
        forecastResult = localWeatherForecastResult.getForecastResult();
        if (forecastResult != null) {
            Log.e(TAG, "onWeatherForecastSearched: " + new Gson().toJson(forecastResult));
        } else {
            showMsg("The weather forecast data is empty");
        }
    }
Print the returned data in the method callback, and then write a weather search method to search different weather data according to different weather types. The code is as follows:
/**
* Search weather
*
* @param type WEATHER_TYPE_LIVE Real time WEATHER_TYPE_FORECAST weather
*/
private void searchWeather(int type) {
WeatherSearchQuery weatherSearchQuery = new WeatherSearchQuery(district, type);
try {
WeatherSearch weatherSearch = new WeatherSearch(requireActivity());
weatherSearch.setOnWeatherSearchListener(this);
weatherSearch.setQuery(weatherSearchQuery);
weatherSearch.searchWeatherAsyn(); //Asynchronous search
} catch (AMapException e) {
e.printStackTrace();
}
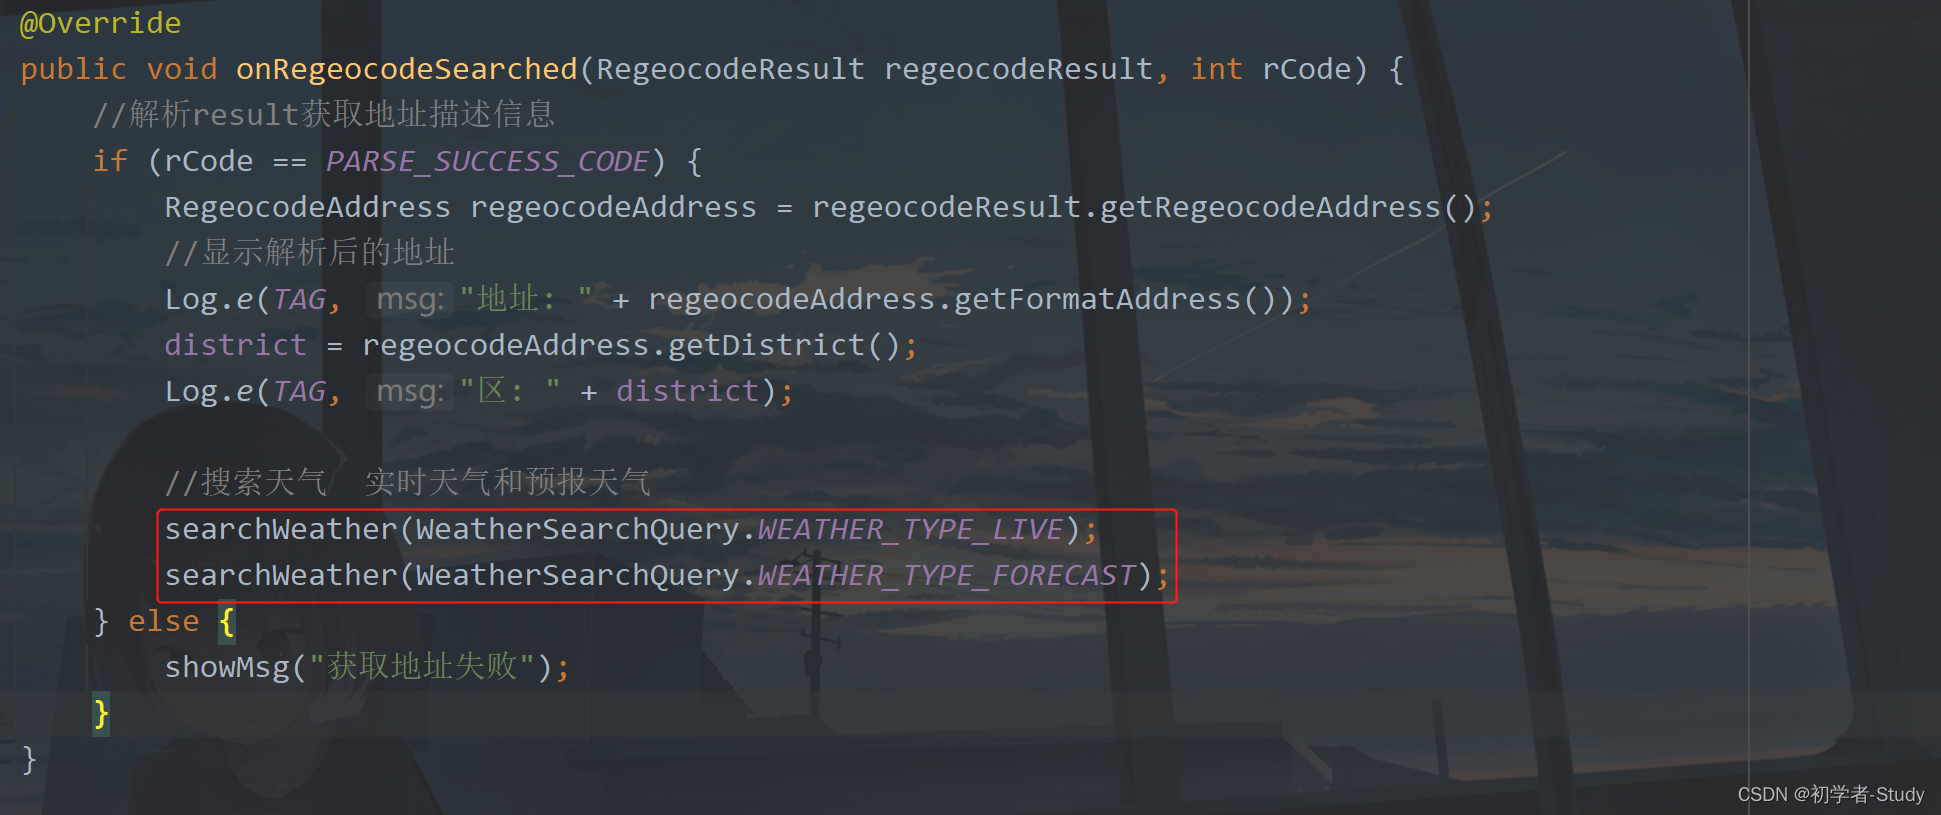
}Finally, in onRegeocodeSearched, call the searchWeather method when you get the address information. The code is as follows:
			//Search for real-time weather and forecast weather
            searchWeather(WeatherSearchQuery.WEATHER_TYPE_LIVE);
            searchWeather(WeatherSearchQuery.WEATHER_TYPE_FORECAST);
Add location as follows:
Now run it, check the log, and you'll have the weather data
7, Display weather data
after the weather data is available, the weather data will be displayed. Here we can do this by adding a floating button in the MapFragment. Click it and a pop-up will pop up at the bottom of the screen. First, modify the map_ For the code in fragment, we add a floating button.
	<com.google.android.material.floatingactionbutton.FloatingActionButton
            android:id="@+id/fab_weather"
            android:layout_width="wrap_content"
            android:layout_height="wrap_content"
            android:layout_gravity="end|bottom"
            android:layout_margin="20dp"
            android:visibility="gone"
            android:contentDescription="weather"
            android:src="@mipmap/ic_weather"
            app:backgroundTint="@color/white"
            app:fabSize="auto"
            tools:ignore="UsingOnClickInXml" />
The added location is shown in the following figure:

here I hide this button first. When the current location is obtained on the map and the weather is queried, this button will be displayed. Now go back to MapFragment and add a line of code in initMap method,
		//Change the position of the zoom in / out button
        aMap.getUiSettings().setZoomPosition(AMapOptions.ZOOM_POSITION_RIGHT_CENTER);
This is to make our floating button not block the zoom in and zoom out button of the map.
Add a variable to the MapFragment
	//Weather forecast list
    private List<LocalDayWeatherForecast> weatherForecast;
Then assign a value to a variable in the onWeatherForecastSearched callback, which is the actual weather data
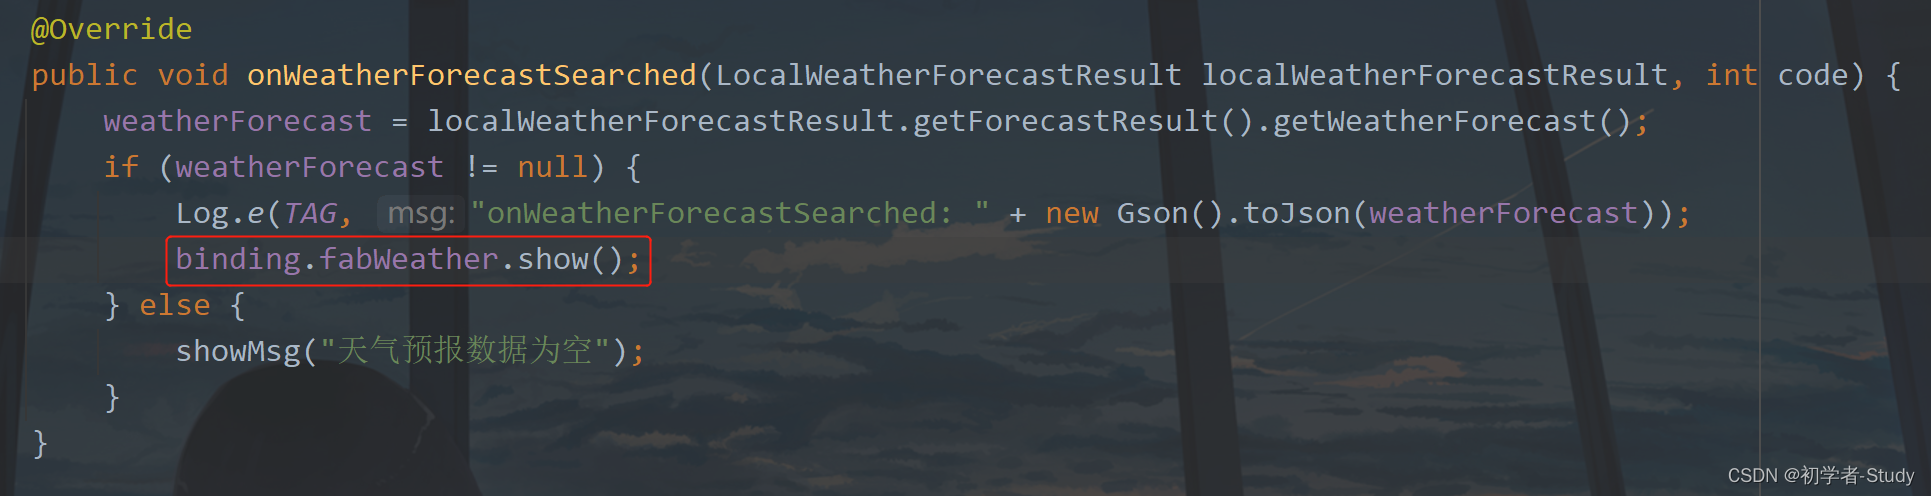
After querying the weather forecast data, this button is displayed.
① Real time weather data
now you can see the local weather. When you need to display it, you will find that there is no district / county in the data, only province and city. Therefore, create a new LiveWeather under the model package and put in the district / county value when we return through your geocode. The code is as follows:
public class LiveWeather {
    private String district;
    private LocalWeatherLive localWeatherLive;

    public LiveWeather(String district, LocalWeatherLive localWeatherLive) {
        this.district = district;
        this.localWeatherLive = localWeatherLive;
    }

    public String getDistrict() {
        return district;
    }

    public void setDistrict(String district) {
        this.district = district;
    }

    public LocalWeatherLive getLocalWeatherLive() {
        return localWeatherLive;
    }

    public void setLocalWeatherLive(LocalWeatherLive localWeatherLive) {
        this.localWeatherLive = localWeatherLive;
    }
}
This data will be bound to our weather pop-up window. Now let's create the layout of this pop-up window.
② Weather pop-up layout
the pop-up window layout is divided into two links, one is real-time weather and the other is weather forecast. First, colors XML to create a color value as follows:
<color name="translucent">#90000000</color>
Then create a shape under drawable_ translucent_ radius_ 12. XML style file, the code is as follows:
<?xml version="1.0" encoding="utf-8"?>
<shape xmlns:android="http://schemas.android.com/apk/res/android">
    <corners android:radius="12dp"/>
    <solid android:color="@color/translucent"/>
</shape>
Next, create a pop-up window layout and create a new dialog under layout_ weather. XML, the code is as follows:
<?xml version="1.0" encoding="utf-8"?>
<layout xmlns:android="http://schemas.android.com/apk/res/android">

    <data>

        <variable
            name="liveWeather"
            type="com.llw.mvvm.model.LiveWeather" />
    </data>

    <RelativeLayout
        android:layout_width="match_parent"
        android:layout_height="wrap_content"
        android:background="#00000000"
        android:orientation="vertical"
        android:paddingStart="12dp"
        android:paddingEnd="12dp"
        android:paddingBottom="?attr/actionBarSize">

        <TextView
            android:id="@+id/tv_city"
            android:layout_width="match_parent"
            android:layout_height="wrap_content"
            android:layout_marginBottom="12dp"
            android:background="@drawable/shape_translucent_radius_12"
            android:gravity="center"
            android:padding="12dp"
            android:text="@{liveWeather.district}"
            android:textColor="@color/white"
            android:textSize="28sp" />

        <TextView
            android:id="@+id/tv_weather"
            android:layout_width="wrap_content"
            android:layout_height="wrap_content"
            android:layout_above="@+id/tv_report_time"
            android:layout_below="@+id/tv_city"
            android:layout_alignParentStart="true"
            android:layout_marginEnd="12dp"
            android:layout_marginBottom="12dp"
            android:background="@drawable/shape_translucent_radius_12"
            android:gravity="center"
            android:padding="12dp"
            android:text="@{liveWeather.localWeatherLive.weather}"
            android:textColor="@color/white"
            android:textSize="24sp" />

        <LinearLayout
            android:id="@+id/wind_lay"
            android:layout_width="wrap_content"
            android:layout_height="44dp"
            android:layout_below="@+id/tv_city"
            android:layout_toStartOf="@+id/tv_temp"
            android:layout_toEndOf="@+id/tv_weather"
            android:background="@drawable/shape_translucent_radius_12"
            android:gravity="center"
            android:orientation="horizontal">

            <TextView
                android:id="@+id/tv_wind_direction"
                android:layout_width="wrap_content"
                android:layout_height="wrap_content"
                android:layout_marginEnd="12dp"
                android:text="@{liveWeather.localWeatherLive.windDirection+`wind`}"
                android:textColor="@color/white" />

            <TextView
                android:id="@+id/tv_wind_power"
                android:layout_width="wrap_content"
                android:layout_height="wrap_content"
                android:layout_marginStart="12dp"
                android:text="@{liveWeather.localWeatherLive.windPower+`level`}"
                android:textColor="@color/white" />
        </LinearLayout>


        <LinearLayout
            android:id="@+id/humidity_lay"
            android:layout_width="wrap_content"
            android:layout_height="44dp"
            android:layout_below="@+id/wind_lay"
            android:layout_marginTop="12dp"
            android:layout_toStartOf="@+id/tv_temp"
            android:layout_toEndOf="@+id/tv_weather"
            android:background="@drawable/shape_translucent_radius_12"
            android:gravity="center"
            android:orientation="horizontal">

            <TextView
                android:layout_width="wrap_content"
                android:layout_height="wrap_content"
                android:layout_marginEnd="24dp"
                android:text="humidity"
                android:textColor="@color/white" />

            <TextView
                android:id="@+id/tv_humidity"
                android:layout_width="wrap_content"
                android:layout_height="wrap_content"
                android:text="@{liveWeather.localWeatherLive.humidity+`%`}"
                android:textColor="@color/white" />
        </LinearLayout>

        <TextView
            android:id="@+id/tv_temp"
            android:layout_width="100dp"
            android:layout_height="100dp"
            android:layout_below="@+id/tv_city"
            android:layout_alignParentEnd="true"
            android:layout_marginStart="12dp"
            android:layout_marginBottom="12dp"
            android:background="@drawable/shape_translucent_radius_12"
            android:gravity="center"
            android:padding="12dp"
            android:text="@{liveWeather.localWeatherLive.temperature+`℃`}"
            android:textColor="@color/white"
            android:textSize="32sp" />

        <TextView
            android:id="@+id/tv_report_time"
            android:layout_width="match_parent"
            android:layout_height="wrap_content"
            android:layout_below="@+id/tv_temp"
            android:background="@drawable/shape_translucent_radius_12"
            android:gravity="center"
            android:padding="12dp"
            android:text="@{liveWeather.localWeatherLive.reportTime+`release`}"
            android:textColor="@color/white" />

        <androidx.recyclerview.widget.RecyclerView
            android:id="@+id/rv_forecast"
            android:layout_width="match_parent"
            android:layout_height="wrap_content"
            android:layout_below="@+id/tv_report_time"
            android:layout_marginTop="12dp" />

    </RelativeLayout>
</layout>
If there is a list, there is a corresponding item layout. Create an item under layout_ forecast. XML layout, the code is as follows:
<?xml version="1.0" encoding="utf-8"?>
<layout xmlns:android="http://schemas.android.com/apk/res/android">

    <data>

        <variable
            name="forecast"
            type="com.amap.api.services.weather.LocalDayWeatherForecast" />
        <!--Introduce a tool class-->
        <import type="com.llw.mvvm.utils.EasyDate" />
    </data>

    <RelativeLayout
        android:layout_width="match_parent"
        android:layout_height="wrap_content"
        android:layout_marginBottom="12dp"
        android:background="@drawable/shape_translucent_radius_12"
        android:padding="12dp">

        <TextView
            android:id="@+id/tv_date"
            android:layout_width="wrap_content"
            android:layout_height="wrap_content"
            android:text="@{forecast.date}"
            android:textColor="@color/white" />

        <TextView
            android:id="@+id/tv_week"
            android:layout_width="wrap_content"
            android:layout_height="wrap_content"
            android:layout_marginStart="12dp"
            android:layout_toEndOf="@+id/tv_date"
            android:text="@{EasyDate.getWeek(forecast.date)}"
            android:textColor="@color/white" />

        <TextView
            android:id="@+id/tv_temp"
            android:layout_width="wrap_content"
            android:layout_height="wrap_content"
            android:layout_alignParentEnd="true"
            android:text="@{forecast.dayTemp+`° /`+ forecast.nightTemp+`°`}"
            android:textColor="@color/white" />
    </RelativeLayout>
</layout>
The data source I introduced here is Gao De, and I also inserted a tool class, which is used to process dates, and can be called directly in xml, such as converting 2021-12-22 into a Wednesday.
The layout has been written, and the following is in themes Add a style in XML, and the code is as follows:
	<style name="BottomSheetDialogStyle_Light" parent="Theme.Design.BottomSheetDialog">
        <item name="android:windowFrame">@null</item>
        <item name="android:windowIsFloating">true</item>
        <item name="android:windowIsTranslucent">true</item>
        <item name="android:background">@android:color/transparent</item>
        <item name="android:backgroundDimEnabled">false</item>
    </style>
This means that the pop-up window at the bottom will not darken our screen.
③ BottomSheetDialog uses
Before writing, we first write a ForecastAdapter, which is the list adapter of weather forecast. Create it under the adapter package. The code is as follows:
public class ForecastAdapter extends BaseQuickAdapter<LocalDayWeatherForecast, BaseDataBindingHolder<ItemForecastBinding>> {

    public ForecastAdapter(@Nullable List<LocalDayWeatherForecast> data) {
        super(R.layout.item_forecast, data);
    }

    @Override
    protected void convert(@NotNull BaseDataBindingHolder<ItemForecastBinding> bindingHolder, LocalDayWeatherForecast localDayWeatherForecast) {
        ItemForecastBinding binding = bindingHolder.getDataBinding();
        if (binding != null) {
            binding.setForecast(localDayWeatherForecast);
            binding.executePendingBindings();
        }
    }
}
Next, add a method in MapFragment. The code is as follows:
	/**
     * Show weather pop-up
     */
    private void showWeatherDialog() {
        //Hide float button
        binding.fabWeather.hide();

        BottomSheetDialog dialog = new BottomSheetDialog(requireActivity(), R.style.BottomSheetDialogStyle_Light);
        DialogWeatherBinding weatherBinding = DataBindingUtil.inflate(LayoutInflater.from(requireActivity()), R.layout.dialog_weather, null, false);
        //set up data sources
        weatherBinding.setLiveWeather(new LiveWeather(district,liveResult));
        //Configure weather forecast list
        ForecastAdapter forecastAdapter = new ForecastAdapter(weatherForecast);
        weatherBinding.rvForecast.setLayoutManager(new LinearLayoutManager(requireActivity()));
        weatherBinding.rvForecast.setAdapter(forecastAdapter);

        dialog.setContentView(weatherBinding.getRoot());
        dialog.getWindow().findViewById(R.id.design_bottom_sheet).setBackgroundColor(Color.TRANSPARENT);
        //Show float button when pop-up window is closed
        dialog.setOnDismissListener(dialog1 -> binding.fabWeather.show());
        dialog.show();
    }
this pop-up window will appear when you click the floating button. After the pop-up window appears, the floating button will be hidden. Then we modify the style of the pop-up window, bind the data, set the data to xml, reconfigure the list data and adapter, and finally set the background transparency, and display the floating button when the pop-up window disappears.
Finally, click the floating button in the onActivityCreated method. The code is as follows:
		//Click the button to display the weather pop-up window
        binding.fabWeather.setOnClickListener(v -> showWeatherDialog());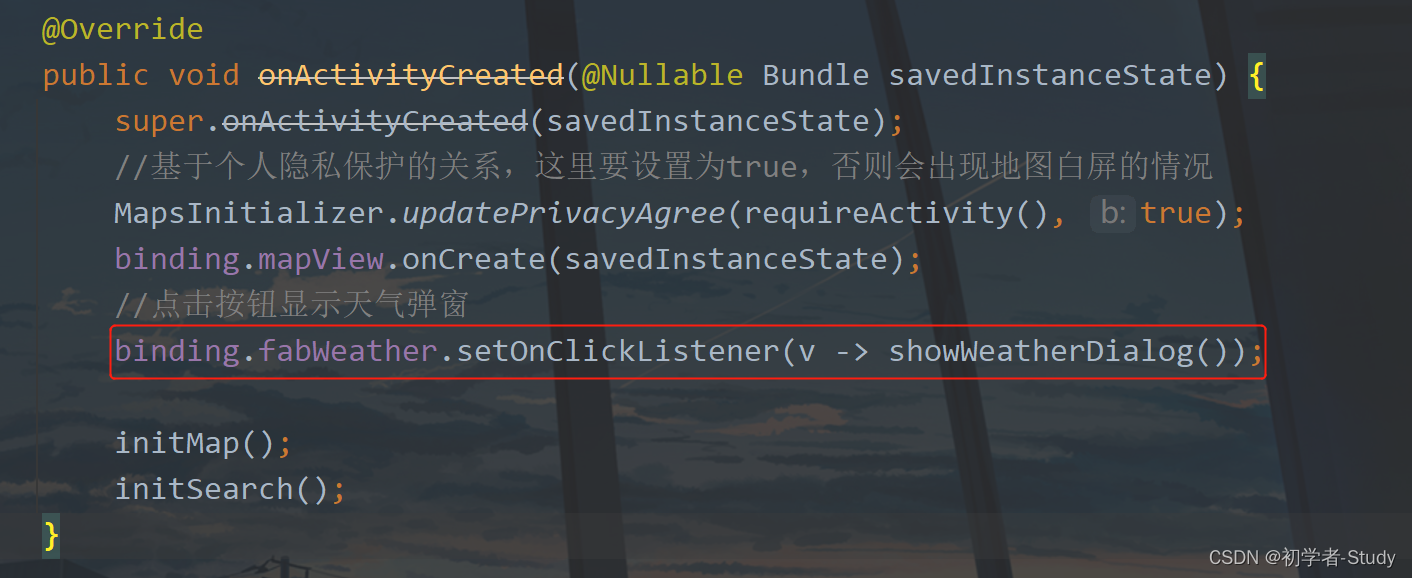
Let's run:
The effect is like this. It should be obvious.
8, Source code
GitHub: MVVM-Demo CSDN: MVVMDemo_8.rar