1, Python email
Sending e-mail is a common development requirement. For example, if you write a script to monitor the weather and find that it is going to rain the next day, or a commodity concerned on the website is reduced in price, you can send an email to remind yourself.
1. Modules used
SMTP lib: it is an operation module about SMTP (Simple Mail Transfer Protocol). It plays a role in communication between servers in the process of sending mail.
email: in short, the information communicated between servers, including information header, information subject, etc.
For a simple example, when you log in to the mailbox, write the email and click send, this part is taken over by SMTP; Writing email and adding attachments are controlled by the email module.
2. Front needs (take mailbox 163 as an example)
Before using script to send email, we need to turn on the SMTP function of our mailbox

3. Simple code
The script is divided into three steps:
1. Set the server-side information
2. Email subject information
3. Login and send
In addition, when dealing with text, we need to use the MIMEText class.
The code is as follows
import smtplib
from email.mime.text import MIMEText
#Set up the information required by the server
#163 mailbox server address
mail_host = 'smtp.163.com'
#163 user name
mail_user = '192*****82'
#Password (some mailboxes are authorization codes)
mail_pass = '7******x'
#Email address of mail sender
sender = 'py*****21@163.com'
#The email address of the mail recipient. Note that [] packages are required, which means you can write multiple email addresses for mass sending
receivers = ['19*****82@qq.com']

#Set email information
#Mail content settings
message = MIMEText('content','plain','utf-8')
#Mail subject
message['Subject'] = 'title'
#sender information
message['From'] = sender
#Recipient information
message['To'] = receivers[0]

#Sign in and send mail
try:
    smtpObj = smtplib.SMTP()
    #Connect to server
    smtpObj.connect(mail_host,25)
    #Log in to the server
    smtpObj.login(mail_user,mail_pass)
    #send out
    smtpObj.sendmail(
        sender,receivers,message.as_string())
    #sign out
    smtpObj.quit()
    print('success')
except smtplib.SMTPException as e:
    print('error',e) #Print error
We encapsulate the above code into functions
Store in a new file named mail py
You can call it directly
Calling code
import mail
mail.sendMail('your program has finished running, please go to the pagoda panel to view the log results')
import smtplib
from email.mime.text import MIMEText
def sendMail(msg):
    #Set up the information required by the server
    #163 mailbox server address
    mail_host = 'smtp.163.com'
    #163 user name
    mail_user = 'py******21'
    #Password (some mailboxes are authorization codes)
    mail_pass = 'O*****BL'
    #Email address of mail sender
    sender = 'p*****21@163.com'
    #The email address of the mail recipient. Note that [] packages are required, which means you can write multiple email addresses for mass sending
    receivers = ['19*****82@qq.com']

    #Set email information
    #Mail content settings
    message = MIMEText(msg,'plain','utf-8')
    #Mail subject
    message['Subject'] = 'Program completion'
    #sender information
    message['From'] = sender
    #Recipient information
    message['To'] = receivers[0]

    #Sign in and send mail
    try:
        smtpObj = smtplib.SMTP()
        #Connect to server
        smtpObj.connect(mail_host,25)
        #Log in to the server
        smtpObj.login(mail_user,mail_pass)
        #send out
        smtpObj.sendmail(
            sender,receivers,message.as_string())
        #sign out
        smtpObj.quit()
        print('success')
    except smtplib.SMTPException as e:
        print('error',e) #Print error
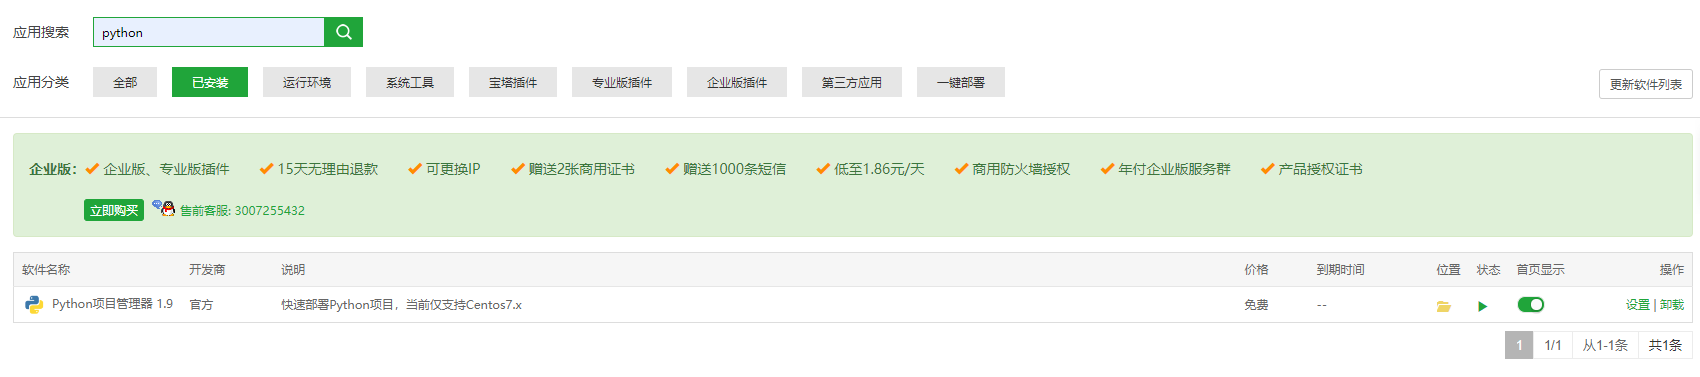
2, Python scripts are deployed on the pagoda panel
1. Install Python Project Manager
Pagoda panel - Software Store - Search - python
2. Create a new python script
According to personal preference, create a new directory for storing python files under the root directory of the pagoda panel, named python part, and the name is optional
After creation, click create a new blank file. Set the name to requirements txt. One more word, one less letter and one more space are not enough
After creation, select the same method to create a hello Py file, enter the following code and print a hello world
# -*- coding: UTF-8 -*-
if __name__ == "__main__":
	for i in range(100)
		print("hello world")
3. Create a new project in Python project manager
Project name -----------: customized according to preferences
Path --------------: select the python part folder you just created
Python version ---------: default
Framework ------------- python
Startup method ------------- python
Startup file folder -----: select the hello to run Py file
Port --------------: enter the project port, no port is left blank
Whether to install module dependency -- check if you use a python library
4. Operation project
Click the "OK" green button to run the python project.
tip: since our project stops running, it must indicate that the creation fails,
Because the project can be completed in a short time, only those projects that take a long time will remind the project of successful creation.
But these have no impact on our creation of the project.
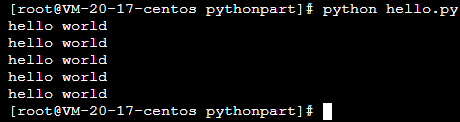
Because the hello world project we created runs too fast,
We need to go to the pagoda ssh terminal to run the project,
You can see that we have successfully printed out hello world!
So far, we have completed the running of the python project on the ECS.
5. Add module
For example, I want to use something in a python library,
We are not using pip to install in Linux environment at this time (of course, if you have to),
We can first select whether to install module dependencies when creating a project,
Then click the "module" button in the item you created,
Enter the name of the library you want to create
(I install the time library here, enter time directly, click add directly, and the installation can be completed without entering the version number)
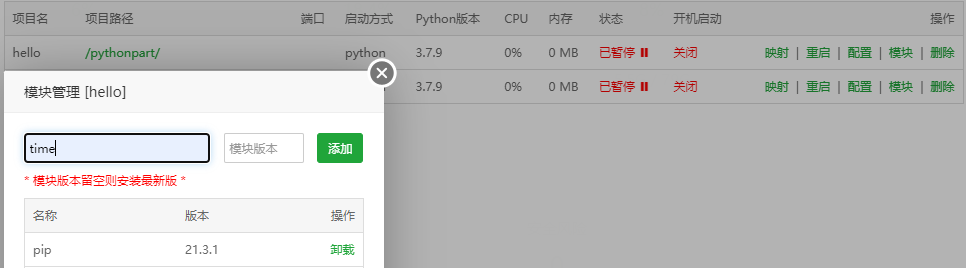
import directly after successful installation
6. Here we have completed the deployment of python project on the pagoda panel
3, Bilibili automatic experience acquisition script
1. Script function
Sign in
Video viewing
5 coins (5 coins needed)
Share video (not posted in personal space)
The above daily experience is 65 points in total.
2. Preconditions
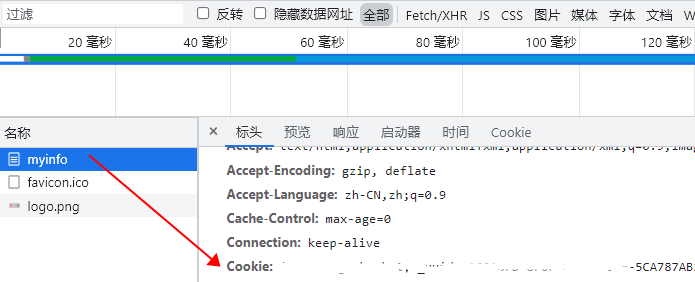
Get personal Cookie of station B
1. Log in to the Bili website with a browser
2. Visit http://api.bilibili.com/x/space/myinfo
3. F12 see the value of the cookie and paste it
3. The code is as follows:
# -*- coding: utf-8 -*-
# date: 2021/12/13

import requests
import json
import time
import random
import mail


# Fill in the cookie to run
'''
1,Log in to the Bili website with a browser
2,visit http://api.bilibili.com/x/space/myinfo
3,F12 notice cookie Paste the value of
'''
cookies = ""
coin_operated = 1  # (coin switch, 0 no coin, 1 coin)


# cookie to dictionary
def extract_cookies(cookies):
    global csrf
    cookies = dict([l.split("=", 1) for l in cookies.split("; ")])
    csrf = cookies['bili_jct']
    return cookies


# Number of silver coins
def getCoin():
    cookie = extract_cookies(cookies)
    url = "http://account.bilibili.com/site/getCoin"
    r = requests.get(url, cookies=cookie).text
    j = json.loads(r)
    money = j['data']['money']
    return int(money)


# personal information
def getInfo():
    global uid
    url = "http://api.bilibili.com/x/space/myinfo"
    cookie = extract_cookies(cookies)
    j = requests.get(url, cookies=cookie).json()
    username = j['data']['name']
    uid = j['data']['mid']
    level = j['data']['level']
    current_exp = j['data']['level_exp']['current_exp']
    next_exp = j['data']['level_exp']['next_exp']
    sub_exp = int(next_exp) - int(current_exp)
    if coin_operated:
        days = int(int(sub_exp) / 65)
    else:
        days = int(int(sub_exp) / 15)
    coin = getCoin()
    msg = f"welcome {username}! Current level:" + str(level) + " ,Current experience:" + \
          str(current_exp) + ",The upgrade is not good " + str(sub_exp) + \
          "Experience, still need" + str(days) + "God," + "Current number of coins:" + str(coin)
    return current_exp, msg


# Recommended dynamics
def getActiveInfo():
    url = "http://api.bilibili.com/x/web-interface/archive/related?aid=" + \
          str(7)
    cookie = extract_cookies(cookies)
    r = requests.get(url, cookies=cookie).text
    j = json.loads(r)
    return j


# The second dynamic mode is recommended
def getVideo():
    random_page = random.randint(0, 167)
    url = "http://api.bilibili.cn/recommend?page=" + str(random_page)
    cookie = extract_cookies(cookies)
    r = requests.get(url, cookies=cookie).text
    j = json.loads(r)
    return j


# Coin sharing 5 times
def Task():
    coin_num = getCoin()
    num = 5
    if coin_num <= num:
        num = coin_num
    coin_count = 0
    for i in range(0, 10):
        j = getVideo()
        list_len = len(j['list'])
        random_list = random.randint(1, list_len-1)
        bvid = j['list'][random_list]['bvid']
        aid = j['list'][random_list]['aid']
        print(str(i)+' ---- '+str(bvid)+' ---- '+str(aid))
        toview(bvid)
        time.sleep(3)
        shareVideo(bvid)
        time.sleep(3)
        if coin_count < num:
            coin_code = tocoin(bvid)
            if coin_code == -99:
                return
        if coin_code == 1:
            coin_count = coin_count+1
        if coin_count == num:
            break
        print('----------------------')


# Watch the video [do not like coin]
def toview(bvid):
    playedTime = random.randint(10, 100)
    url = "https://api.bilibili.com/x/click-interface/web/heartbeat"
    data = {
        'bvid': bvid,
        'played_time': playedTime,
        'csrf': csrf
    }
    cookie = extract_cookies(cookies)
    j = requests.post(url, data=data, cookies=cookie).json()
    code = j['code']
    if code == 0:
        print('Watch the video successfully!')
    else:
        print('Failed to watch video!')


# Share video
def shareVideo(bvid):
    url = "https://api.bilibili.com/x/web-interface/share/add"
    data = {
        'bvid': bvid,
        'csrf': csrf
    }
    cookie = extract_cookies(cookies)
    # Request header required
    header = {
        "Content-Type": "application/x-www-form-urlencoded",
        "Connection": "keep-alive",
        "User-Agent": "Mozilla/5.0 (Macintosh; Intel Mac OS X 10_15_7) AppleWebKit/537.36 (KHTML, like Gecko) Chrome/93.0.4577.63 Safari/537.36 Edg/93.0.961.38",
    }
    r = requests.post(url, data=data, cookies=cookie, headers=header).text
    j = json.loads(r)
    code = j['code']
    if code == 0:
        print('Share success!')
    else:
        print('Sharing failed!')


# Coin function
def tocoin(bvid):
    coinNum = getCoin()
    if coinNum == 0:
        print('Too poor, not enough coins!')
        return -99
    url = "http://api.bilibili.com/x/web-interface/coin/add"
    data = {
        'bvid': bvid,
        'multiply': 1,
        'select_like': 1,
        'csrf': csrf
    }
    cookie = extract_cookies(cookies)
    r = requests.post(url, data=data, cookies=cookie).text
    j = json.loads(r)
    code = j['code']
    if code == 0:
        print(str(bvid) + ' Successful coin insertion!')
        return 1
    else:
        print(str(bvid) + ' Coin insertion failed!')
        return 0


# Start task running
def run():
    exp1, msg = getInfo()
    print(msg)
    Task()
    exp2, c = getInfo()
    print(f'Complete the task and gain experience{int(exp2) - int(exp1)}')


# Cloud function usage
def main_handler(event, context):
    print("Received event: " + json.dumps(event, indent=2))
    print("Received context: " + str(context))
    run()
    return "------ end ------"


if __name__ == '__main__':
    run()
    mail.sendMail('Your program has finished running. Please go to the pagoda panel to view the log results')
4. Conclusion
The automatic email script just written is added to the above code
After the program runs, I immediately send an email to remind me that the program is finished. Let's see the effect first
