Hello, my name is little bald monk
This article is to explain how cloud development can upload, download, preview and delete images, and display the functions of images in a nine house grid
1. Realization effect
Don't talk nonsense. Look at the effect first
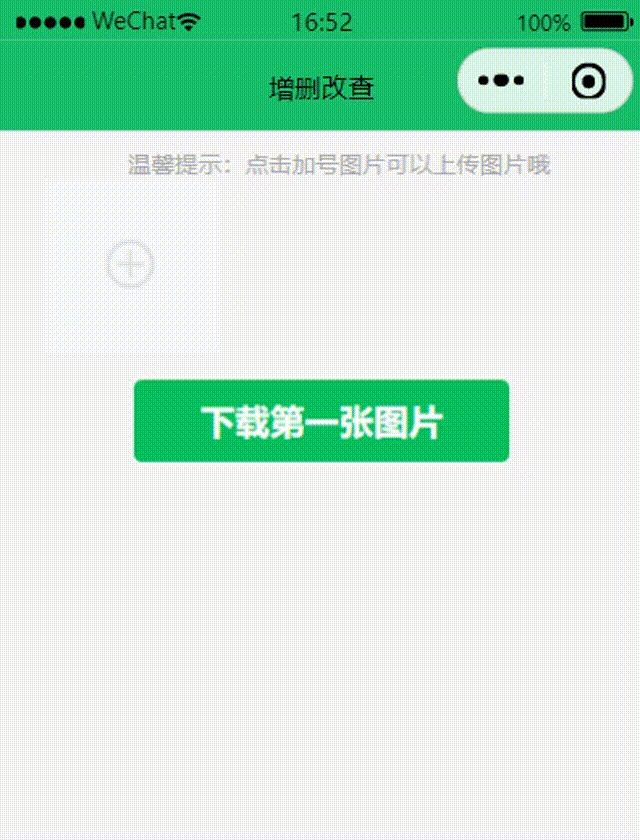
explain:
In the middle of the pause, I was choosing to upload photos. Click the "x" in the upper right corner to delete the picture. Click the "download first picture" button to download and open the first picture, because I pass in the cloud stored picture address of the first picture in the download() function.
2. JavaScript code
First, we need to define fileList and linshi arrays in the data object of the page
     /**
   * Initial data of the page
   */
  data: {
    fileList:[],      //Image array with image address
    linshi:[],   //A temporary array of selected pictures
  },
There are very detailed code comments, which are easy to understand and very simple. This is the code of the upload picture function
  // Upload pictures
  uploadToCloud() {
        let that = this;
        wx.chooseImage({
          count: 9,         //The count attribute determines that up to 9 pieces can be uploaded. You can see the official description of the attributes below, so you won't explain them one by one
          sizeType: ['original', 'compressed'],
          sourceType: ['album', 'camera'],
          success (res) {
            wx.showLoading({
              title: 'Uploading',
            })
            console.log(res)
            //The temporary array assigned to linshi is temporarily stored
            that.setData({
              linshi:that.data.linshi.concat(res.tempFilePaths)
            })
            console.log(that.data.linshi)
            //Set the location and name of the picture stored in the cloud
            let lujin = "img/" + new Date().getTime() +"-"+ Math.floor(Math.random() * 1000);
            //The image upload function Wx is called here cloud. uploadFile()
            //To Wx cloud. The value of cloudPath property of UploadFile cannot be duplicate!!! Giant pit, add an index to avoid repetition
            const uploadTasks = that.data.linshi.map((item, index)  =>  that.uploadFilePromise(index+lujin, item));
            //promise. The all method will wait until the map method is fully executed before continuing to execute the code in the then method
            Promise.all(uploadTasks)
              .then(data => {
                console.log(data)
                wx.hideLoading()
                wx.showToast({
                  title: 'Upload succeeded',
                  icon: 'none'
                });
                const newFileList = data.map(item => ({ url: item.fileID,isImage: true,}));
                console.log(newFileList)
                //After each successful upload, empty the temporary array once to avoid repeated uploads and waste of storage resources,
                that.setData({
                  fileList: that.data.fileList.concat(newFileList),
                  linshi:[],
                });

              })
              .catch(e => {
                wx.showToast({ title: 'Upload failed', icon: 'none' });
                console.log(e);
              });

          }
        })
    },
      //Upload to cloud storage and get the picture address
      uploadFilePromise(fileName, chooseResult) {
        return wx.cloud.uploadFile({
          cloudPath: fileName,
          filePath: chooseResult
        });
      },
Below is the delete function:
    //Delete picture
    delete:function(event){
      let that = this;
      console.log(event)
      let inde = event.currentTarget.dataset.id
      //Delete the values in the array
      that.data.fileList.splice(inde,1)
      that.setData({
          fileList:that.data.fileList,
      })
    },
Below is the preview function:
    //preview pictures
    previewImage:function(event){
      console.log(event)
      wx.previewImage({
        urls: [event.currentTarget.dataset.url] // http link list of pictures to preview
      })
    },
You will find that both the delete function and previewImage function have a receive parameter event. The event of the delete function is used to receive the id we bind in wxml, and the value of the id is equal to the index of the image array, which is used to distinguish which image is deleted
Preview is the same logic. The event of the previewImage function is used to receive the url we bind in wxml, and the value of the url is equal to the image address url. It is used to distinguish which image to preview and pass the value to Wx Preview with previewImage() method
Clicking will trigger the corresponding function, and our bound data will be transmitted to the event parameter of the corresponding function for reception. It's simple!
This is how we bind data in wxml, as shown in the following figure:
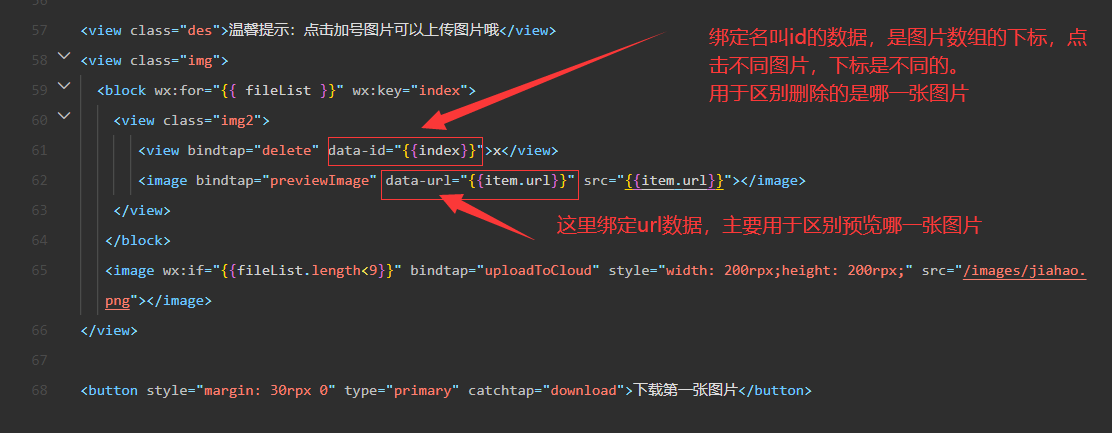
id and url can be customized. The fixed format of binding data is data XXX
Below is the download function:
  //Download pictures
    download:function(){
      let url = this.data.fileList[0].url;
      //Download File
      wx.cloud.downloadFile({
        fileID: url,
        success: res => {
          console.log("File downloaded successfully",res);
          //Open file
          const filePath = res.tempFilePath
          wx.showModal({
            title: 'Tips',
            content: 'Download succeeded, please open save as',
            showCancel:false,
            confirmText:'Go to save as',
            success (res) {
              if (res.confirm) {
                console.log('The user clicks OK')
                wx.openDocument({
                  filePath: filePath,
                  success: function (re) {
                    console.log('File opened successfully',re)
                  }
                })
              } else if (res.cancel) {
                console.log('The user clicks cancel')
              }
            }
          })
        }
      })
    },
Use the official Wx cloud. The downloadfile method is used to download. In this example, I downloaded the first image, so the fileID we passed in is the address of the first image in the image array.
After downloading successfully, we can use the official Wx OpenDocument method to open the image just downloaded.
Very easy to understand!
3. wxml code
<view class="des">Warm tip: click the plus sign picture to upload the picture</view>
<view class="img">
  <block wx:for="{{ fileList }}" wx:key="index">
    <view class="img2">
       <view bindtap="delete" data-id="{{index}}">x</view>
       <image bindtap="previewImage" data-url="{{item.url}}" src="{{item.url}}"></image>
    </view>
   </block>
   <image wx:if="{{fileList.length<9}}" bindtap="uploadToCloud" style="width: 200rpx;height: 200rpx;" src="/images/jiahao.png"></image>
</view>

<button style="margin: 30rpx 0" type="primary" catchtap="download">Download the first picture</button>
In wxml, delete() delete function, previewImage() preview function, uploadToCloud() upload function and download() download function are bound respectively. Clicking will trigger different functions to realize corresponding functions
4. wxss code
This wxss specifies how to display the content of wxml, that is, write some styles, such as the width and height of the picture, etc
.img{
  margin-left: 5%;
  width: 90%;
  display: flex;
   flex-direction: row;
   flex-wrap: wrap;
}
.img2{
   width: 210rpx;
   height: 210rpx;
}
.img2 view{
  color: red;
  z-index: 5;
  position: relative;
  width: 20rpx;
  height: 20rpx;
  margin-top:0rpx;
  margin-left: 90%;
}
.img2 image{
  width: 190rpx;
  height: 190rpx;
  position: relative;
  z-index: 5;
}
.des {
  padding-left: 40rpx;
  padding-top: 20rpx;
  font-size: 26rpx;
  color: #acacac;
  letter-spacing: 2rpx;
  line-height: 42rpx;
}
That's it. There are detailed code comments. Is it very simple
Need source code can click here
Learn children's shoes, one key three times for respect! Thank you very much... Hahaha, welcome to pay attention to the little bald monk!
end