Article catalog
- preface
- 1. Server
- 2. Server selection and configuration
- 3. Let's start configuring the java environment
- 4. We install Hadoop
- hadoop2. X (update)
- 5. Next, you need to use vim to operate core site and HDFS site
- 6. Note: next, you need to open your firewall port before you can access it on the browser, otherwise you can't access it anyway
- Hdfsapi (New)
- Postscript
preface
Recently, in the communication with fans, it was said that the white whoring server has not been used yet. Here I provide a way to use it:

She inspired me by the concept of pseudo distributed Hadoop deployment.
Because my private work often needs to use Hadoop cluster, local startup has been criticized for slow startup speed, troublesome operation and memory occupation,
In view of this, why not deploy the cloud cluster and choose Hadoop 3 Pseudo distributed deployment method of X.
1. Server
2. Server selection and configuration
The lightweight server is selected here. The system image and application image do not need to be changed. Just keep the default value (WordPress, CentOS 7.3)

You need to set the root permission and password here
After setting successfully, ssh is built through local terminal (MAC) or cmd (Windows)
ssh root@****
Then enter the password of the root permission set previously (Note: the password here will not be displayed)
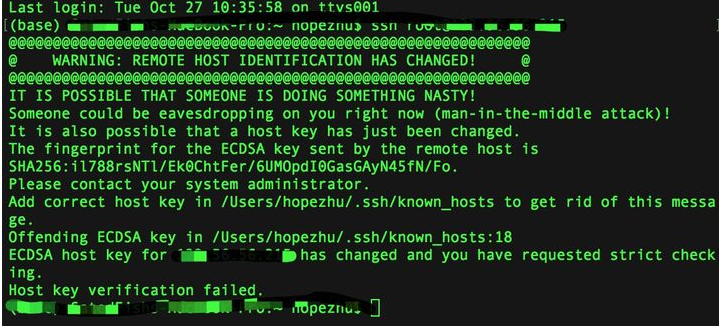
If the above situation occurs, you need to clean up the previous key
ssh-keygen -R XX.XX.XX.XX
Then ssh again, and then yes

OK, here we go to the Alibaba cloud server
3. Let's start configuring the java environment
First, download the java jdk
wget https://download.java.net/openjdk/jdk8u41/ri/openjdk-8u41-b04-linux-x64-14_jan_2020.tar.gz
Then unzip
tar -zxvf openjdk-8u41-b04-linux-x64-14_jan_2020.tar.gz
Move location and configure java path
mv java-se-8u41-ri/ /usr/java8
echo 'export JAVA_HOME=/usr/java8' >> /etc/profile
echo 'export PATH=$PATH:$JAVA_HOME/bin' >> /etc/profile
source /etc/profile
Check whether the installation is successful
java -version
This is an ideal situation. If the installation is successful, the following results will appear

4. We install Hadoop
# Download Hadoop with Tsinghua source
wget https://mirrors.tuna.tsinghua.edu.cn/apache/hadoop/common/hadoop-3.2.2/hadoop-3.2.2.tar.gz
#Here is the image source of Tsinghua University. Domestic partners download faster
Unzip as usual
tar -zxvf hadoop-3.2.2.tar.gz -C /opt/
mv /opt/hadoop-3.2.2 /opt/hadoop
hadoop2. X (update)
wget https://mirrors.tuna.tsinghua.edu.cn/apache/hadoop/common/hadoop-2.10.1/hadoop-2.10.1.tar.gz
tar -zxvf hadoop-2.10.1.tar.gz -C /opt/
mv /opt/hadoop-2.10.1 /opt/hadoop
Configuration address
echo 'export HADOOP_HOME=/opt/hadoop/' >> /etc/profile
echo 'export PATH=$PATH:$HADOOP_HOME/bin' >> /etc/profile
echo 'export PATH=$PATH:$HADOOP_HOME/sbin' >> /etc/profile
source /etc/profile
Configure yarn and hadoop
echo "export JAVA_HOME=/usr/java8" >> /opt/hadoop/etc/hadoop/yarn-env.sh
echo "export JAVA_HOME=/usr/java8" >> /opt/hadoop/etc/hadoop/hadoop-env.sh
View Hadoop installation
hadoop version
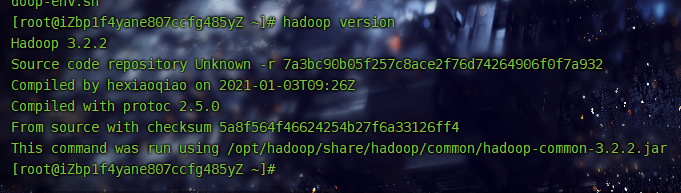
If the above situation occurs, the installation is successful
5. Next, you need to use vim to operate core site and HDFS site
vim /opt/hadoop/etc/hadoop/core-site.xml
Enter vim environment
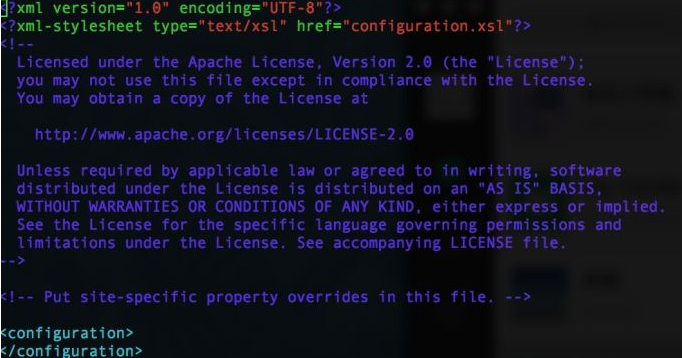
Press i (insert) to modify
Move the cursor between configuration and copy the following information
        hadoop.tmp.dir
        file:/opt/hadoop/tmp
        location to store temporary files


        fs.defaultFS
        hdfs://localhost:9000
Then press esc to stop the modification, and then press ": wq" (actually no "") to exit vim modification
Similarly, operate HDFS site
vim /opt/hadoop/etc/hadoop/hdfs-site.xml
        dfs.replication
        1


        dfs.namenode.name.dir
        file:/opt/hadoop/tmp/dfs/name


        dfs.datanode.data.dir
        file:/opt/hadoop/tmp/dfs/data
Configure the master and slave connections, run the following commands, and press enter until the following figure appears
ssh-keygen -t rsa
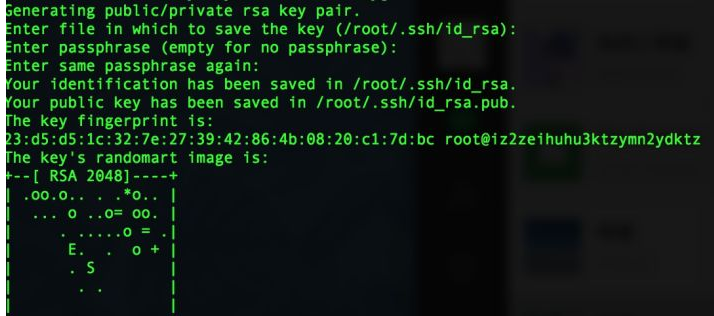
Run the following code
cd .ssh
cat id_rsa.pub >> authorized_keys
Start Hadoop
hadoop namenode -format
start-dfs.sh
start-yarn.sh
Stepping pit:
ERROR: but there is no YARN_NODEMANAGER_USER defined. Aborting operation
There's a small hole here,
Solution:
https://blog.csdn.net/ystyaoshengting/article/details/103026872
Check whether the configuration is successful
jps
Success diagram

6. Note: next, you need to open your firewall port before you can access it on the browser, otherwise you can't access it anyway
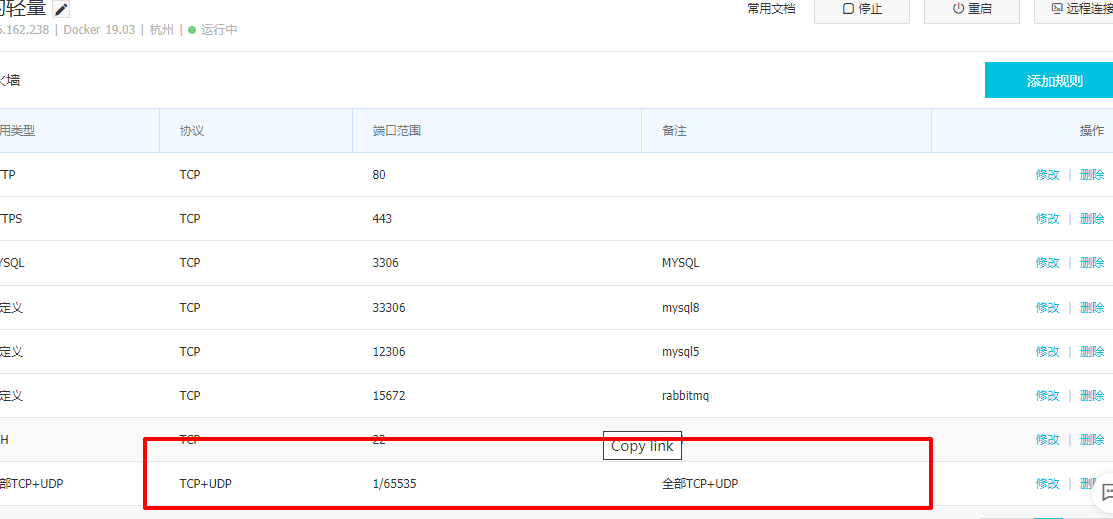
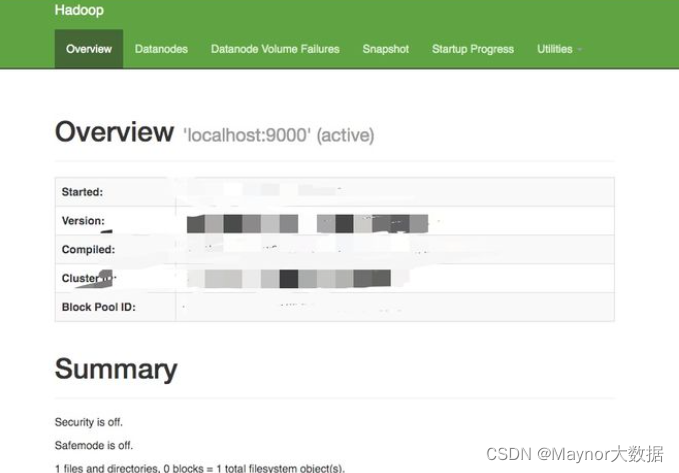
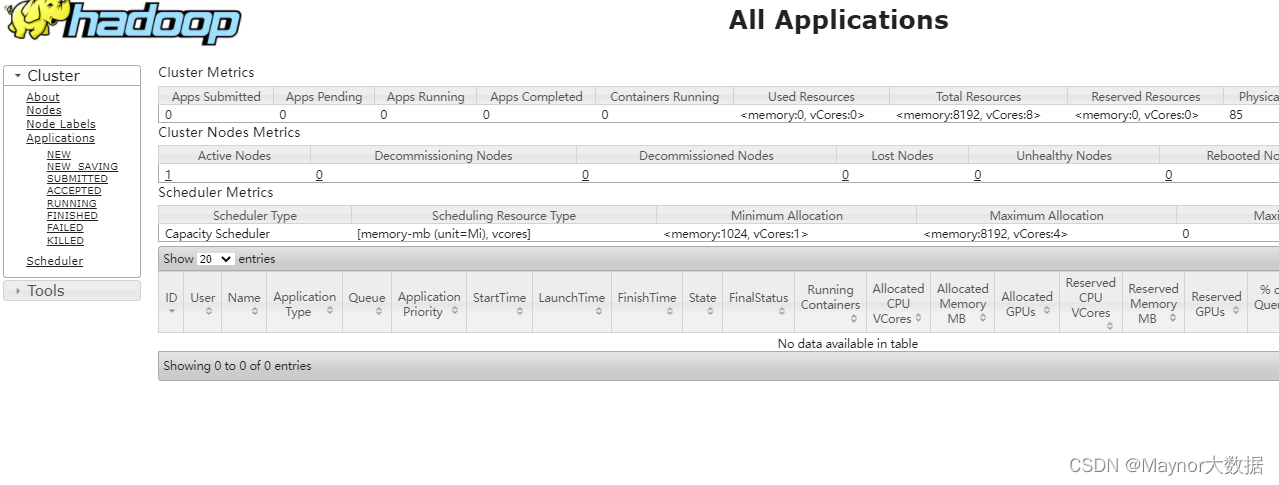
Finally, you can enter XX in the browser XX. XX. XX * *: 9870 or * * XX XX. XX. 20: 8088 to access your Hadoop on the browser
The renderings are as follows
as well as
Hdfsapi (New)
Format it
hdfs namenode -format
hadoop-daemon.sh start namenode
https://manor.blog.csdn.net/article/details/122017204

Postscript
Blog home page: https://manor.blog.csdn.net Welcome to like collection ⭐ If there is any error in the message, please correct it! This article was originally written by manor and started on CSDN blog ⚠️ If the pictures or relevant references used in this article infringe your legitimate rights and interests, please contact me to delete them.