1. Block storage application case
1.1 problems
Continue the experiment content of Day03, demonstrate the application case of block storage, and realize the following functions:
- Create mirror snapshot
- Restore data using snapshots
- Clone mirrors using snapshots
- Delete snapshot
1.2 steps
To implement this case, you need to follow the following steps.
Step 1: create a mirror snapshot
- View mirror snapshots (all mirrors have no snapshots by default).
 [root@node1 ~]# rbd snap ls jacob
#Check whether an image has a snapshot. jacob is the name of the image and ls is the list
- Create a snapshot of the mirror.
[root@node1 ~]# rbd snap create jacob --snap jacob-snap1
#Create a snapshot for the Jacob image, - snap specify the snapshot name, the snapshot name is jacob-snap1, and the snapshot name can be arbitrary
[root@node1 ~]# rbd snap ls jacob
SNAPID NAME            SIZE
     4 jacob-snap1 15360 MB
- Delete the test file written by the client
[root@client ~]# rm  -rf   /mnt/test.txt
[root@client ~]# umount  /mnt
- Restore snapshot
[root@node1 ~]# rbd snap rollback jacob --snap jacob-snap1
# Rollback means rollback. Use jacob-snap1 snapshot to rollback data and rollback data of Jacob image
[root@client ~]# mount /dev/rbd0 /mnt/        #Client remount partition
[root@client ~]# ls  /mnt                      #Check whether the data has been recovered
Step 2: create a snapshot clone
1) Clone snapshot
[root@node1 ~]#  rbd snap protect jacob --snap jacob-snap1    #Protect snapshots
#Jacob is the image name, and jacob-snap1 is the snapshot created earlier (the protected snapshot cannot be deleted)
[root@node1 ~]#  rbd snap rm jacob --snap jacob-snap1    #Deleting a protected snapshot will fail
[root@node1 ~]#  rbd clone \
jacob --snap jacob-snap1 jacob-clone --image-feature layering
#Use the snapshot of Jacob image jacob-snap1 to clone a new image named Jacob clone
#The name of the new image can be arbitrary
2) View the relationship between the clone mirror and the parent mirror snapshot
[root@node1 ~]#  rbd info jacob-clone
rbd image 'jacob-clone':
    size 15360 MB in 3840 objects
    order 22 (4096 kB objects)
    block_name_prefix: rbd_data.d3f53d1b58ba
    format: 2
    features: layering
    flags:
    parent: rbd/jacob@jacob-snap1
#A lot of data of clone image comes from snapshot chain (equivalent to the concept of soft link of file)
#If you want the clone image to work independently, you need to copy all the data in the parent snapshot, but it is time-consuming!!!
[root@node1 ~]#  rbd flatten jacob-clone        #Detach the newly cloned mirror from the snapshot
[root@node1 ~]#  rbd info jacob-clone            #View image information
rbd image 'jadob-clone':
    size 15360 MB in 3840 objects
    order 22 (4096 kB objects)
    block_name_prefix: rbd_data.d3f53d1b58ba
    format: 2
    features: layering
    flags:
#Note that the parent snapshot information is gone!
3) Delete snapshot
[root@node1 ~]#  rbd snap unprotect jacob --snap jacob-snap1     #Unprotect snapshot
[root@node1 ~]#  rbd snap rm jacob --snap jacob-snap1            #Snapshots can be deleted
2. Ceph file system
2.1 problems
Continue the previous experiment to realize the function of Ceph file system. The specific functions are as follows:
- Deploy MDSs nodes
- Create Ceph file system
- Client mount file system
2.2 scheme
In the previous block sharing, only one client is allowed to access at the same time, and multiple people cannot use block devices at the same time.
Ceph's file system sharing allows multiple people to use it at the same time.
Let's assume that the MDS node is deployed using the virtual machine node3.
The host name and corresponding IP address of the host are shown in TABLE-1.
TABLE-1 host name and corresponding IP address

2.3 steps
To implement this case, you need to follow the following steps.
1) Add a virtual machine node3. The requirements are as follows:
IP address: 192.168 four point one three
Host name: node3
Configure yum source (including operating system source and ceph source)
Synchronize time with Client host
node1 allows remote node3 without password
Modify / etc/hosts of node1 and synchronize to all node hosts
2) Deploy metadata server
Log in to node3 and install CEPH MDS package (if the previous course has been installed, this step can be ignored)
[root@node3 ~]# yum -y install ceph-mds
Log in to node1 deployment node
[root@node1 ~]# cd  /root/ceph-cluster
#This directory is the directory created when the ceph cluster was first deployed
[root@node1 ceph-cluster]# ceph-deploy mds create node3
#Remote nod3, copy the cluster configuration file, and start the mds service
3) Create storage pool
Note: a file system is composed of inode and block. The effect is shown in figure-1.
inode stores the description information (metadata) of the file, and block stores the real data.
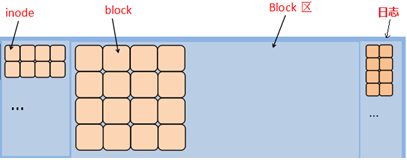
Figure-1
[root@node3 ~]# ceph osd pool create cephfs_data 64
#Create a storage pool named cephfs_data, corresponding to 64 PG
#The shared pool name can be arbitrary
[root@node3 ~]# ceph osd pool create cephfs_metadata 64
#Create a storage pool named cephfs_metadata, corresponding to 64 PG
PG topology is shown in figure-2.
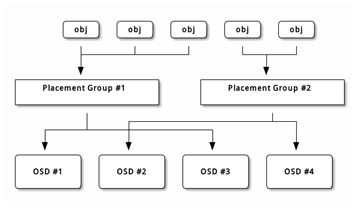
Figure-2
PG is a logical concept without corresponding material form. It is designed to facilitate the management of OSD.
For ease of understanding, you can think of PG as a directory. You can create 32 directories to store OSD or 64 directories to store OSD.
4) Create Ceph file system
[root@node3 ~]# ceph fs new myfs1 cephfs_metadata cephfs_data
#myfs1 is the name. The name can be arbitrary. Note: write the metadata pool first, and then the data pool
#fs is the abbreviation of file system, and file system is the file system in Chinese
#By default, only one file system can be created, and an error will be reported if it is redundant
[root@node3 ~]# ceph fs ls
name: myfs1, metadata pool: cephfs_metadata, data pools: [cephfs_data ]
5) Client mount (the client needs to install CEPH common, which has been installed in the previous course)
[root@client ~]# mount -t ceph 192.168.4.11:6789:/  /mnt  \
-o name=admin,secret=AQBTsdRapUxBKRAANXtteNUyoEmQHveb75bISg==
#Note: - t (type) specifies the file system type, which is ceph
#-o (option) specify the options of mount command, including name, account name and secret password
#192.168. 4.11 is the IP of MON node (not MDS node), and 6789 is the port number of MON service
#admin is the user name and secret is followed by the key
#The key can be in / etc / CEPH / CEPH client. admin. Found in Keyring
Question: what is the difference between lsblk and df commands?
If the NFS experiment is done, can the client mount successfully without installing NFS utils?
##Expand knowledge: create ceph users and view users##
    [root@node1 ~]# ceph auth get-or-create client.nb \
    osd  'allow *' \
    mds  'allow *' \
    mon  'allow *'      > file name
# >It is a redirected export. The following file name can be arbitrary. If there is no file, it will be created. If there is a file, it will overwrite the contents of the file
    [root@node1 ~]# ceph auth list              #View a list of all users
3. Create an object storage server
3.1 problems
Continue the previous experiment to realize the function of Ceph object storage. The specific functions are as follows:
- Installing and deploying Rados Gateway
- Start RGW service
- Set the front-end service and port of RGW
- Client test
3.2 steps
Step 1: deploy the object storage server
1) The requirements for preparing the experimental environment are as follows:
IP address: 192.168 four point one three
Host name: node3
Configure yum source (including operating system source and ceph source)
Synchronize time with Client host
node1 allows remote node3 without password
Modify / etc/hosts of node1 and synchronize to all node hosts
2) Deploy RGW package
[root@node3 ~]# yum -y install ceph-radosgw
3) New gateway instance
Copy the configuration file and start a rgw service
[root@node1 ~]# cd /root/ceph-cluster
[root@node1 ~]# ceph-deploy rgw create node3        #Start rgw service in remote mode 3
Log in to node3 to verify whether the service is started
[root@node3 ~]# ps aux |grep radosgw
ceph      4109  0.2  1.4 2289196 14972 ?       Ssl  22:53   0:00 /usr/bin/radosgw -f --cluster ceph --name client.rgw.node3 --setuser ceph --setgroup ceph
[root@node3 ~]# systemctl  status ceph-radosgw@\*
4) Modify service port
Log in to node3, the default service port of RGW is 7480, which is modified to 8000 or 80, which is more convenient for the client to remember and use
[root@node3 ~]#  vim  /etc/ceph/ceph.conf
[client.rgw.node3]
host = node3
rgw_frontends = "civetweb port=8000"
#node3 is the host name
#civetweb is a web service built into RGW
[root@node3 ~]# systemctl  restart ceph-radosgw@\*
Step 2: client test (choose experiment for extension)
1) curl test
[root@client ~]# curl 192.168.4.13:8000
2) Access using third-party software
Log in to node3 (RGW) to create an account
[root@node3 ~]#  radosgw-admin user create \
--uid="testuser" --display-name="First User"
... ...
"keys": [
        {
            "user": "testuser",
            "access_key": "5E42OEGB1M95Y49IBG7B",
            "secret_key": "i8YtM8cs7QDCK3rTRopb0TTPBFJVXdEryRbeLGK6"
        }
    ],
[root@node5 ~]# radosgw-admin user info --uid=testuser
//testuser is the user name, access_key and secret_key is the account key
3) Client installation software (the software needs to be searched and downloaded on the Internet)
[root@client ~]# yum install s3cmd-2.0.1-1.el7.noarch.rpm
Modify the software configuration (note that except for the following settings, other prompts default to enter)
[root@client ~]#  s3cmd --configure
Access Key: 5E42OEGB1M95Y49IBG7BSecret Key: i8YtM8cs7QDCK3rTRopb0TTPBFJVXdEryRbeLGK6
S3 Endpoint [s3.amazonaws.com]: 192.168.4.13:8000
[%(bucket)s.s3.amazonaws.com]: %(bucket)s.192.168.4.13:8000
Use HTTPS protocol [Yes]: No
Test access with supplied credentials? [Y/n] n
Save settings? [y/N] y
#Note that other prompts default to enter
4) Create a bucket for storing data (similar to a directory for storing data)
[root@client ~]# s3cmd ls
[root@client ~]# s3cmd mb s3://my_bucket
Bucket 's3://my_bucket/' created
[root@client ~]# s3cmd ls
2018-05-09 08:14 s3://my_bucket
[root@client ~]# s3cmd put /var/log/messages s3://my_bucket/log/
[root@client ~]# s3cmd ls s3://my_bucket
DIR s3://my_bucket/log/
[root@client ~]# s3cmd ls s3://my_bucket/log/
2018-05-09 08:19 309034 s3://my_bucket/log/messages
5) Test download function
[root@client ~]# s3cmd get s3://my_bucket/log/messages /tmp/
6) Test deletion function
[root@client ~]# s3cmd del s3://my_bucket/log/messages
Summary of additional knowledge: (Ceph operation idea)
1, Preparation:
IP, hostname, hosts resolution, ssh key, time synchronization, yum source, firewall, selinux
2, Deploy ceph:
1. Install software
  ceph-deploy(script)
  ceph-mon  ceph-osd  ceph-mds  ceph-radosgw(colony)
2. Modify the configuration and start the service mon
  mkdir  catalogue cd catalogue
  ceph-deploy  new  node1   node2   node3  (Generate profile)
  ceph-deploy  mon  create-initial  (Start service)
3. Start osd shared hard disk
  ceph-deploy  disk  zap   host name:Disk name  ...  ...
  ceph-deploy  osd  create  host name:disk   ...  ...
3, Using Ceph ideas:
1. Block sharing
  The server: rbd  create  Create a shared image
  client: install cpeh-common;  cp Profiles and keys
          rbd  map  |  rbd  unmap
2. File system sharing (file system consists of inode and block)
Server: create two shared pools (any name)
Merge a file system using two shared pools
Install CEPH MDS software and start the service (CEPH deploy MDS create node3)
client: mount -t MON of IP:6789:/ /Mount point -o name=user name,secret=password
3. Object storage
The server starts a radosgw (RGW)
ceph-deploy rgw create node3
4, Usage of CEPH deploy script:
   ceph-deploy  new   node1  node2  node3    #Generate profile
   ceph-deploy  mon   create-initial         #Start mon service on all remote hosts
   ceph-deploy  disk zap  host name:Disk name       #Initialize disk
   ceph-deploy  osd   create  host name:Disk name   #Remote host and start osd service
   ceph-deploy  mds   create   host name        #Remote host and start mds service
   ceph-deploy  rgw  create  host name          #Remote host and start RGW service
Additional knowledge (how to delete an OSD, the following assumption is to delete osd.4)
ceph osd tree
ceph osd out osd.4
ceph osd tree
ceph -s
ceph osd crush remove osd.4
ceph auth del osd.4
ceph -s
ceph osd rm osd.4
 Finally, find the corresponding host, umount hold osd.4 Corresponding disk unmount
Exercise
1. How can I prevent a ceph image snapshot from being deleted?
- Protect snapshots with protect
2 what is CephFS?
Distributed File System means that the physical storage resources managed by the file system are not necessarily directly connected to the local node, but connected to the node through the computer network;
CephFS uses Ceph cluster to provide POSIX compatible file system;
Allows Linux to store Ceph directly locally.
3 what is the metadata of a storage device?
Data in any file system is divided into data and metadata;
Data refers to the actual data in ordinary documents;
Metadata refers to the system data used to describe the characteristics of a file;
For example, access rights, file owners, and distribution information of file data blocks (inode...).
In case of infringement, please contact the author to delete