A junior partner of SCM asked me to recommend C language books. Because the basis of C language is relatively poor, I want to learn C language again and learn SCM again. I had this idea when I first learned SCM before. In fact, C language can be learned while learning MCU. In some routines of learning MCU, if you encounter C language knowledge you don't understand, check the relevant knowledge points, so that you will be more impressed.
The following is a list of some important C language knowledge points in STM32. Beginners can read them several times, most of which have been written before. Here you can rearrange them and analyze and explain them in more detail. You can read the attached links.
assert_param
Assertions are used to capture these assumptions in code. Assertions can be regarded as a high-level form of exception handling.
Assertions are expressed as some Boolean expression , the programmer believes that the expression value is true at a particular point in the program. Assertion validation can be enabled and disabled at any time, so you can enable assertions at test time and disable assertions at deployment time. Similarly, after the program is put into operation, end users can re enable assertions when they encounter problems.
Note that assert() is a macro, not a function.In STM32, you often see similar codes:
assert_param(IS_ADC_ALL_INSTANCE(hadc->Instance));
assert_param(IS_ADC_SINGLE_DIFFERENTIAL(SingleDiff));
This is used to check the validity of the parameters passed in by the function. Assert in STM32_ Param is not used by default, that is:
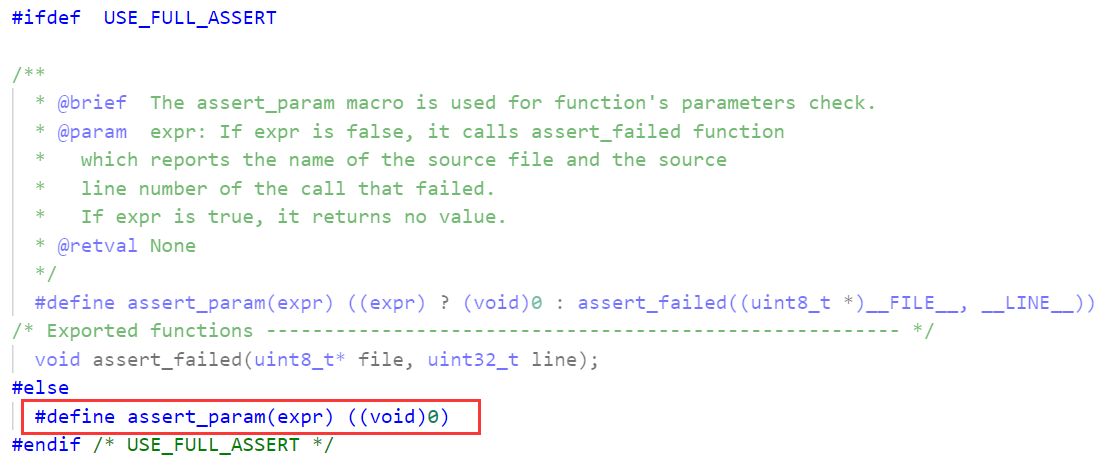
If you want to use, you need to define USE_FULL_ASSERT macro, and you need to implement it yourself assert_failed function . In particular, if you use STM32CubeMX to generate code, it will be in main C generation:
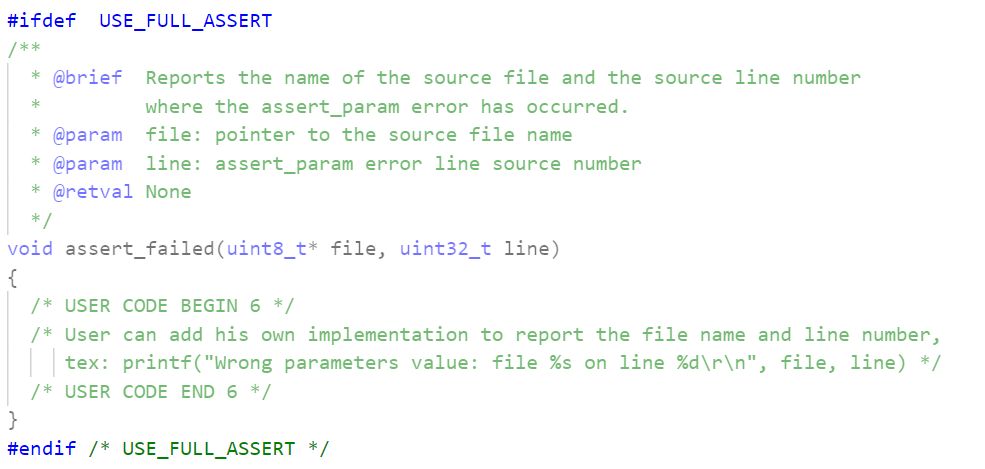
Let's just fill it here.
Here are some examples of assert application:
#include <stdio.h>
#include <assert.h>

int main(void)
{
    int a, b, c;
    printf("Please enter b, c Value of:");
    scanf("%d %d", &b, &c);
    a = b / c;
    printf("a = %d", a);
    return 0;
}
Here, the variable c as the denominator cannot be equal to 0. If we enter 2 0, what is the result? As a result, the program will jump:
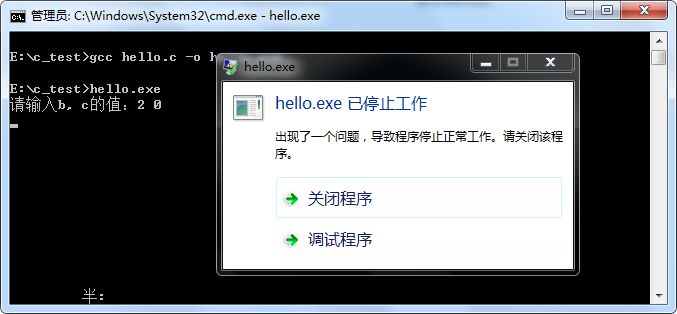
There are only a few lines of code in this example, and we can quickly find that the reason for the program error is that the value of variable c is 0. However, if the amount of code is large, can we find the problem point so quickly?
At this time, assert() comes in handy. In the above code, we can use a = b / c; Add assert(c) before this code; This code is used to judge the validity of variable C. At this time, compile and run again, and the result is:
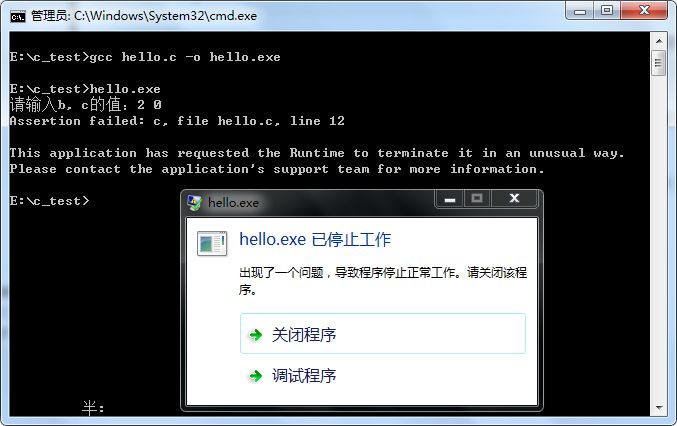
It can be seen that the program will print an error message in the standard error stream at the same time:
Assertion failed: c, file hello.c, line 12This message contains some information that is very helpful for us to find the bug: the problem lies in the variable c, in hello c line 12 of the document. In this way, we can quickly locate the problem point.
At this time, careful friends will find that in our introduction to assert(), there is a statement: if the value of the expression is false, the assert() macro will call_ assert function Print an error message in the standard error stream and call abort() (the prototype of the abort() function is in stdlib H (in the header file) function terminates the program.
Therefore, for our example, our assert() macro can also be replaced by the following code:
if (0 == c)
{
    puts("c The value of cannot be 0, please re-enter!");
    abort();
}
In this way, it can also give us hints:

However, using assert() has at least several benefits:
1) It can automatically identify the file and the line number of the problem.
2) It can be turned on or off without changing the code assert mechanism (whether to open or not is related to the size of the program). If you think you have eliminated the bug of the program, you can write the following macro definition in include assert In front of the position of H:
#define NDEBUG
And recompile the program so that the editor disables all assert() statements in the project file. If the program has problems again, you can remove the #define instruction (or comment it out) and recompile the program so that the assert() statement can be re enabled.
Related articles: [C language note] how to use assert()?
preprocessor directives
1,#error
#error "Please select first the target STM32L4xx device used in your application (in stm32l4xx.h file)"
#The error instruction causes the preprocessor to issue an error message and interrupts the compilation process.
#Example of error:
// WeChat official account: embedded chop chop
#include <stdio.h>
#define RX_BUF_IDX 100
#if RX_BUF_IDX == 0
static const unsigned int rtl8139_rx_config = 0;
#elif RX_BUF_IDX == 1
static const unsigned int rtl8139_rx_config = 1;
#elif RX_BUF_IDX == 2
static const unsigned int rtl8139_rx_config = 2;
#elif RX_BUF_IDX == 3
static const unsigned int rtl8139_rx_config = 3;
#else
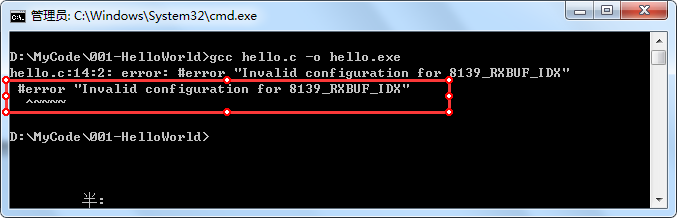
#error "Invalid configuration for 8139_RXBUF_IDX"
#endif
int main(void)
{
printf("hello world\n");
return 0;
}This sample code is very simple when RX_ BUF_ When the value of IDX macro is not 0 ~ 3, an error message will be output through #error instruction in preprocessing stage:
"Invalid configuration for 8139_RXBUF_IDX"Let's take a look at the compilation results:
2,#if,#elif,#else,#endif,#ifdef,#ifndef
(1)#if
#if (USE_HAL_ADC_REGISTER_CALLBACKS == 1)
  void (* ConvCpltCallback)(struct __ADC_HandleTypeDef *hadc);
  // ......
#endif /* USE_HAL_ADC_REGISTER_CALLBACKS */
#The general format of if is as follows
#if integer constant expression 1
  Segment 1
#elif integer constant expression 2
  Segment 2
#else
  Segment 3
#endif
If the integer constant expression is true, the program segment 1 will be executed, and so on. The last #endif is the end flag of #if.
(2)#ifdef,#ifndef
#ifdef HAL_RTC_MODULE_ENABLED
  #include "stm32l4xx_hal_rtc.h"
#endif /* HAL_RTC_MODULE_ENABLED */
#ifdef is used to judge whether a macro is defined. If the macro is already defined, execute the following code. The general format is as follows:
#ifdef macro name
  Segment 1
#else
  Segment 2
#endif
It means that if the macro has been defined, compile program segment 1, otherwise compile program segment 2. Like #if, #endif is also the end flag of #ifdef.
#ifndef __STM32L4xx_HAL_ADC_EX_H
#define __STM32L4xx_HAL_ADC_EX_H
// ......
#endif
#ifndef is the opposite of #ifdef. It is used to judge whether a macro has not been defined.
(3)#if defined,#if !defined
Defined is used to determine whether a macro is defined! Defined is the opposite of defined. In this way #if defined can achieve the same effect as #ifdef. For example:
#if defined(STM32L412xx)
  #include "stm32l412xx.h"
#elif defined(STM32L422xx)
  #include "stm32l422xx.h"
//........
#elif defined(STM32L4S9xx)
  #include "stm32l4s9xx.h"
#else
 #error "Please select first the target STM32L4xx device used in your application (in stm32l4xx.h file)"
#endif
If the stm32l42xx macro is defined, the header file stm32l42xx is included h. And so on. Now that there are #ifdef and #ifndef, #if defined and #if! Is defined redundant? No, #ifdef and #ifndef can only judge one macro name at a time, while defined can judge multiple macro names at a time, for example:
#if defined(STM32L4R5xx) || defined(STM32L4R7xx) || defined(STM32L4R9xx) || defined(STM32L4S5xx) || defined(STM32L4S7xx) || defined(STM32L4S9xx)
// ......
#endif /* STM32L4R5xx || STM32L4R7xx || STM32L4R9xx || STM32L4S5xx || STM32L4S7xx || STM32L4S9xx */
Further, some closer causal processing can be constructed, such as:
#if defined(__ARMCC_VERSION) && (__ARMCC_VERSION < 400677)
  #error "Please use ARM Compiler Toolchain V4.0.677 or later!"
#endif
#define PI (3.14)
#define R  (6)

#if defined(PI) && defined(R)
#define AREA (PI*R*R)
#endif
3,#pragma instruction
#The pragma instruction provides a way for us to let the compiler perform some special operations. This instruction is useful for very large programs or programs that need to use the special functions of a specific compiler# The general form of pragma instruction is: #pragma para, where para is a parameter. as
#if defined ( __GNUC__ )
#pragma GCC diagnostic push
#pragma GCC diagnostic ignored "-Wsign-conversion"
#pragma GCC diagnostic ignored "-Wconversion"
#pragma GCC diagnostic ignored "-Wunused-parameter"
#endif
The purpose of this paragraph is to ignore some gcc warnings# pragma command The command sets in are different in different compilers. When using, you must consult the documentation of the compiler used to understand which commands are available and the functions of these commands.
Let's take a brief look at the common usage of the #pragma command.
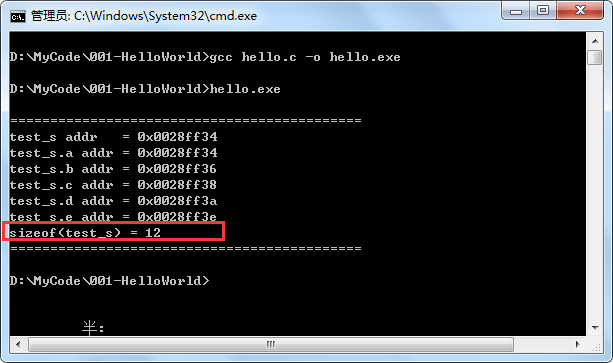
(1),#pragma pack
We can use #pragma pack to change the alignment of the compiler:
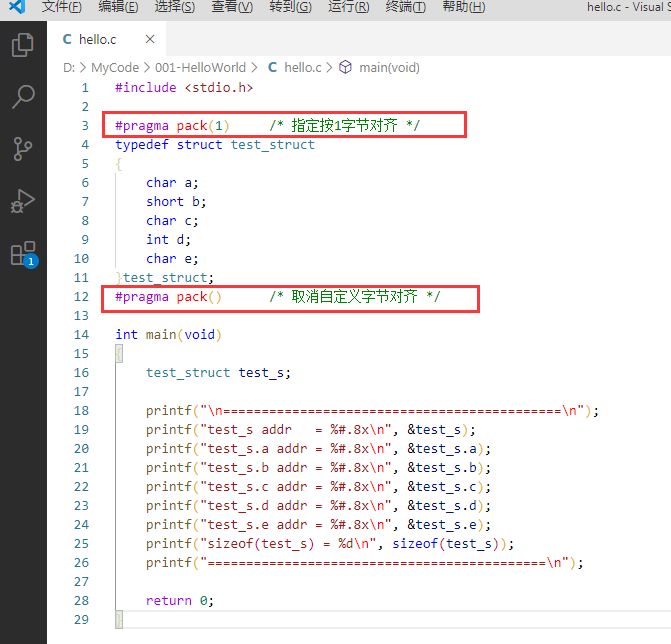
#pragma pack(n) / * specifies alignment by N bytes*/
#pragma pack() / * cancel custom byte alignment*/
We use the #pragma pack instruction to specify the number of bytes to align. example:
① Specifies alignment by 1 byte
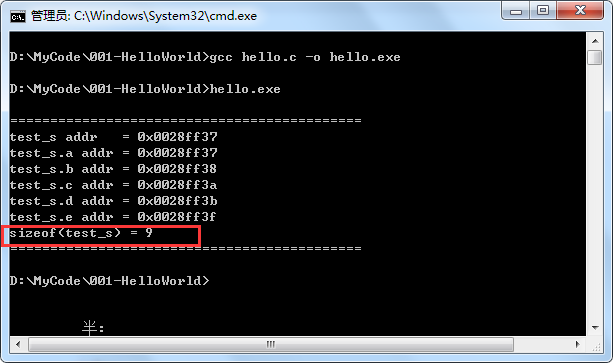
The operation result is:
② Specifies 2-byte alignment
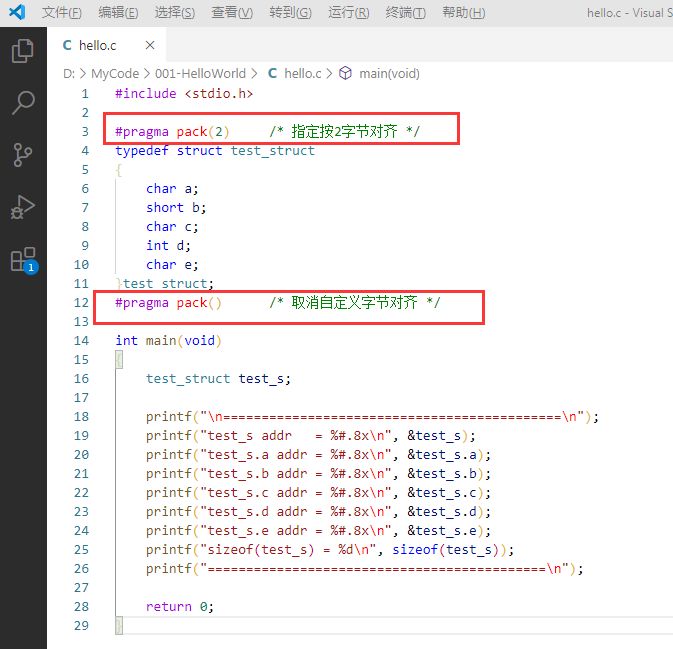
The operation result is:
It can be seen that the specified number of aligned bytes is different, and the results are also different. What's the use of specifying alignment? It probably avoids the code hidden dangers caused by compiler differences in the migration process. For example, the default alignment of the two compilers is different, which may lead to some bug s.
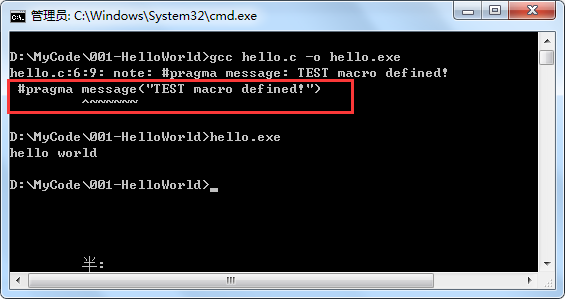
(2)#pragma message
This instruction is used to output some useful prompt information during preprocessing, such as:
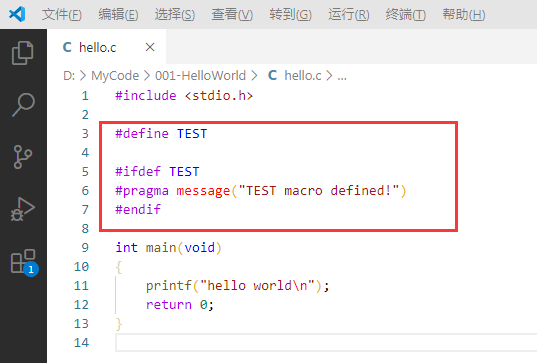
The operation result is:
As mentioned above, we can usually add similar information to some conditional compilation blocks, because when some macros are selected more, the code may be confused. But now some compilers and editors will make some obvious distinctions between these situations. For example, the background color of which code is not used will be gray.
(3)#pragma warning
This directive allows you to selectively modify compiler warnings.
example:
#pragma warning( disable : 4507 34; once : 4385; error : 164 )
Equivalent to:
#pragma warning(disable:4507 34) / / no 4507 and 34 warnings are displayed
#Pragma warning (once: 4385) / / warning 4385 is only reported once
#pragma warning(error:164) / / take warning No. 164 as an error
Let's know so much about this instruction for the time being. Just know that there is such a thing.
There are still many uses of #pragma instruction, but it is popular. It is not listed here for the time being. Interested friends can learn by themselves.
Related articles: Recognize #pragma and #error instructions
extern "C"
#ifndef __STM32L4S7xx_H
#define __STM32L4S7xx_H

#ifdef __cplusplus
 extern "C" {
#endif /* __cplusplus */

#ifdef __cplusplus
}
#endif /* __cplusplus */

#endif /* __STM32L4S7xx_H */
After adding extern "C", the compiler will be instructed to compile this part of the code in C language (not c + +). Because the compilation processing of functions by C and C + + compilers is not exactly the same, especially for C + +, it supports function overloading. The compiled functions are generally named by function name and formal parameter type.
For example, the compiled function void fun(int, int) may be_ fun_ int_ Int (different compilers may be different, but they all use a similar mechanism to name the compiled function name with function name and parameter type); C language does not have a similar overload mechanism. It usually uses the function name to indicate the compiled function name. The corresponding function above may be_ A name like fun.
Related articles: Usage analysis of dry goods | extern "C"
#And ## operators
#define __STM32_PIN(index, gpio, gpio_index) \
{ \
index, GPIO##gpio##_CLK_ENABLE, GPIO##gpio, GPIO_PIN_##gpio_index \
}
1. # operator
When we usually use macro with parameters, the macro parameters in the string are not replaced. For example:
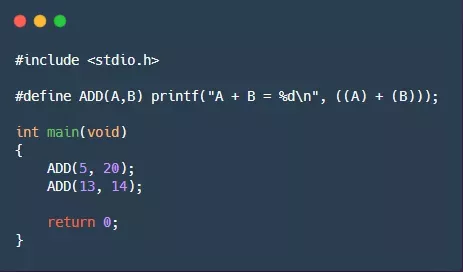
The output result is:
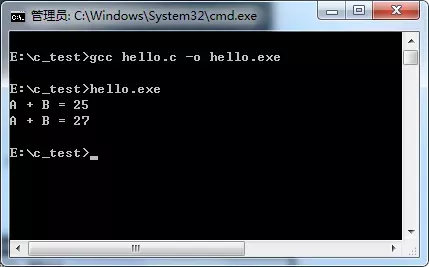
However, we expect the output to be:
5 + 20 = 25
13 + 14 = 27
What should I do? In fact, C language allows macro parameters to be included in strings. In class function macros (macros with parameters), # sign is used as A preprocessing operator to convert tokens into strings. For example, if A is A macro parameter, then #A is the parameter name converted to the string "A". This process is called stringing. The following procedure demonstrates this process:
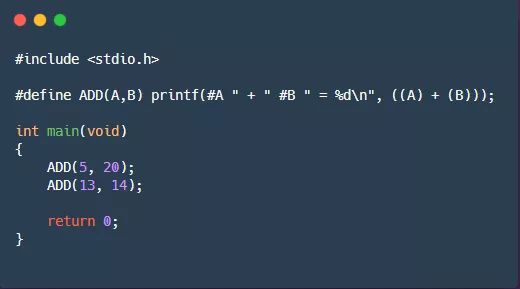
The output result is:
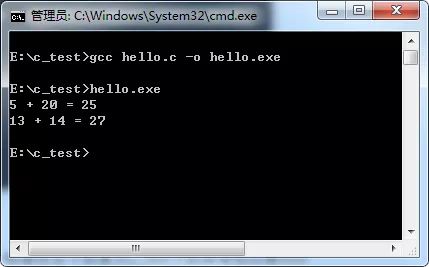
That's what we want. Therefore, # operators can complete the process of stringing.
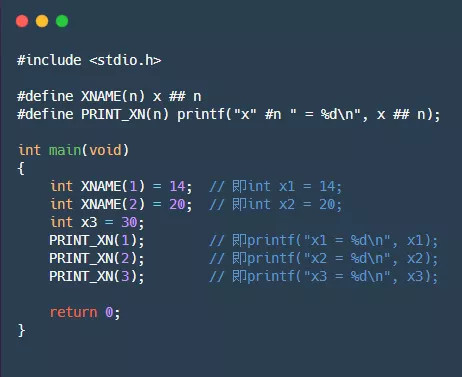
2. ## operator
Like the # operator, ## operator can be used in the replacement part of a class function macro (macro with parameters)## Operator can combine two tokens into one token. For example, you can do this:
#define XNAME(n) x##n
The macro XNAME(4) will then expand x4. The following procedure demonstrates ## operator usage:
The output result is:

In fact, ## operators do not seem to be very convenient here, but make us feel uncomfortable. However, using ## operators can sometimes improve encapsulation and program readability.
Related articles: You may not have used these two C operators, but they are very useful~
_IO, _I, _O,volatile
It is often used in some underlying structure members_ IO, _ O, _ I modify these three macros, such as:
typedef struct
{
  __IO uint32_t TIR;  /*!< CAN TX mailbox identifier register */
  __IO uint32_t TDTR; /*!< CAN mailbox data length control and time stamp register */
  __IO uint32_t TDLR; /*!< CAN mailbox data low register */
  __IO uint32_t TDHR; /*!< CAN mailbox data high register */
} CAN_TxMailBox_TypeDef;
These three macros are actually the replacement of volatile, that is:
#define     __I     volatile             /*!< Defines 'read only' permissions */
#define     __O     volatile             /*!< Defines 'write only' permissions */
#define     __IO    volatile             /*!< Defines 'read / write' permissions */
Volatile is used to prevent the compiler from optimizing, that is, every time a value is read or modified, it must be read or modified from memory or registers again. In our embedded system, volatile is used in the following places:
- Variables modified in the interrupt service program for detection by other programs need to be added volatile;
- In multi task environment, the flag shared among tasks should be volatile;
- The hardware register of memory mapping usually needs volatile description, because every time it is read and written, it may have different meanings;
For example:
/* Suppose REG is the address of the register */
uint32 *REG;
*REG = 0;  /* Light up */
*REG = 1;  /* Lights out */
At this time, if REG is not modified with volatile, the lighting operation will be optimized and only the lighting operation will be executed.
Bit operation
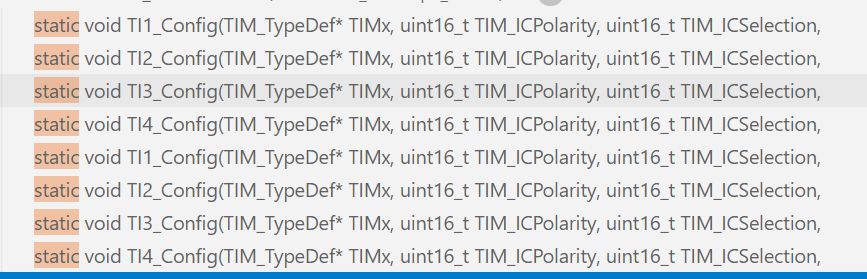
In STM32, the relevant registers must be configured before using peripherals, and some bit operations are used. For example, the internal implementation of library functions is some bit operations:
static void TI4_Config(TIM_TypeDef* TIMx, uint16_t TIM_ICPolarity, uint16_t TIM_ICSelection,
                       uint16_t TIM_ICFilter)
{
  uint16_t tmpccmr2 = 0, tmpccer = 0, tmp = 0;

  /* Disable the Channel 4: Reset the CC4E Bit */
  TIMx->CCER &= (uint16_t)~TIM_CCER_CC4E;
  tmpccmr2 = TIMx->CCMR2;
  tmpccer = TIMx->CCER;
  tmp = (uint16_t)(TIM_ICPolarity << 12);

  /* Select the Input and set the filter */
  tmpccmr2 &= ((uint16_t)~TIM_CCMR1_CC2S) & ((uint16_t)~TIM_CCMR1_IC2F);
  tmpccmr2 |= (uint16_t)(TIM_ICSelection << 8);
  tmpccmr2 |= (uint16_t)(TIM_ICFilter << 12);

  /* Select the Polarity and set the CC4E Bit */
  tmpccer &= (uint16_t)~(TIM_CCER_CC4P | TIM_CCER_CC4NP);
  tmpccer |= (uint16_t)(tmp | (uint16_t)TIM_CCER_CC4E);

  /* Write to TIMx CCMR2 and CCER registers */
  TIMx->CCMR2 = tmpccmr2;
  TIMx->CCER = tmpccer ;
}
It seems very complicated, but it can be configured according to the specification. Although the method of directly configuring registers is rarely used in practical applications, it also needs to be mastered that registers can be directly manipulated in some special places, such as interrupt.
Simple example of bit operation:
First, here are bitwise operators:
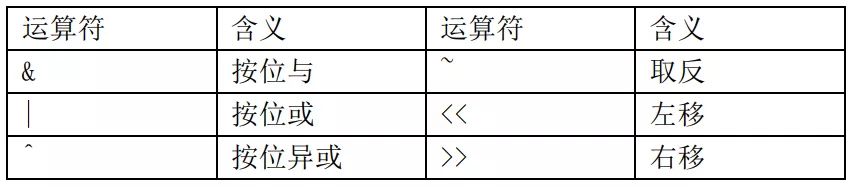
In embedded programming, it is often necessary to configure some registers. In some cases, it is necessary to change a bit or several bits in a byte, but do not want to change the original value of other bits. At this time, bitwise operator can be used for operation. For example, if there is an 8-bit TEST register:

When we want to set the value of bit 0 of bit 0 to 1, it may be set as follows:
TEST = 0x01;
However, this setting is not accurate enough, because it has been operated to the top 7 bits at the same time: bit1~bit7. If the top 7 bits are not used, this setting will have no impact; However, if these seven bits are being used, the result is not what we want.
In this case, we can borrow bitwise operators for configuration.
about binary digit In terms of operation, no matter whether the original value of the bit is 0 or 1, if it performs & operation with 0, the result will be 0, and if it performs & operation with 1, the original value will remain unchanged; No matter whether the original value of this bit is 0 or 1, if it performs | operation with 1, the result will be 1. If | operation with 0, the original value will remain unchanged.
Therefore, it can be set as:
TEST = TEST | 0x01;
The meaning is: the upper 7 bits of the TEST register remain unchanged, and the lowest bit becomes 1. In actual programming, it is often rewritten as:
TEST |= 0x01;
This writing method can simplify the code to a certain extent. It is a common programming style of C language. There is another operation method for setting a bit of the register. The above equivalent methods are as follows:
TEST |= (0x01 << 0);
If you want to set the first bit to 1, move it to the left.
Similarly, to clear 0 for the lower 4 bits of TEST and keep the upper 4 bits unchanged, the following configuration can be carried out:
TEST &= 0xF0;
Related articles: C language, embedded bit operation essence skills summary
do {}while(0)
This is used in the macro definition. This usage is not used in the standard library of STM32. There are a lot of usage examples in the HAL library, such as:
#define __HAL_FLASH_INSTRUCTION_CACHE_RESET()   do { SET_BIT(FLASH->ACR, FLASH_ACR_ICRST);   \
                                                     CLEAR_BIT(FLASH->ACR, FLASH_ACR_ICRST); \
                                                   } while (0)
Here is an example to analyze the usage of do {}while(0):
// WeChat official account: embedded chop chop
#define  DEBUG   1

#if DEBUG
  #define DBG_PRINTF(fmt, args...)  \
  {\
    printf("<<File:%s  Line:%d  Function:%s>> ", __FILE__, __LINE__, __FUNCTION__);\
    printf(fmt, ##args);\
  }
#else
  #define DBG_PRINTF(fmt, args...)
#endif
What's wrong with this macro print?
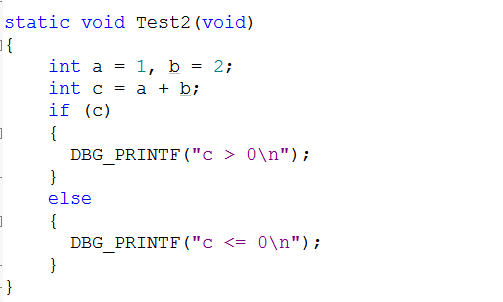
When we use it with if and else, there will be such a use case:
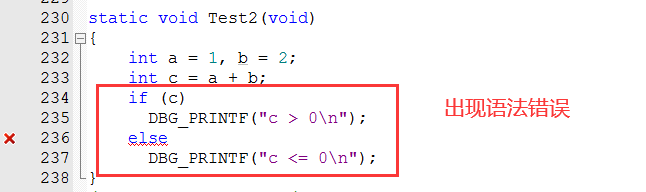
A syntax error will be reported. Why?
Similarly, we can first take a look at our demo code. After preprocessing, the corresponding Macro code Will be converted why. For example:
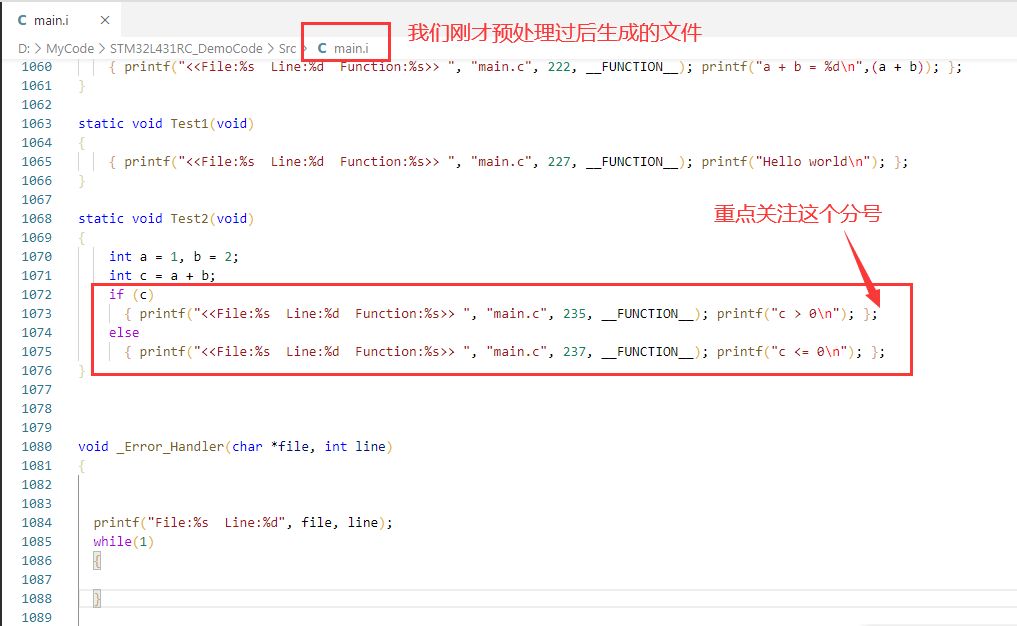
Here we can see that our if and else structure codes are replaced with the following forms:
if(c)
{ /* ....... */ };
else
{ /* ....... */ };
Obviously, there was a syntax error. The semicolon cannot be added after the braces after the if. The semicolon here can actually be regarded as an empty statement. This empty statement will separate if from else, resulting in that else cannot correctly match if, resulting in syntax errors.
There are several ways to solve this problem. The first method is to remove the semicolon. The code becomes:
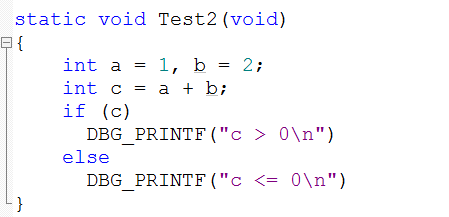
The second method is to use DBG after if_ Printf always adds {} when printing and debugging. The code becomes:
The above two methods can be compiled and run normally.
However, in our C language, each statement often ends with a semicolon; Moreover, some people are used to not enlarging parentheses when there is only one sentence after if judgment; And the DBG we created_ The purpose of the printf macro function is for benchmarking printf function , the use of the printf function plus the semicolon is no problem anywhere.
For these reasons, it is necessary for us to conduct further research on our DBG_PRINTF macro function for a transformation.
Let's introduce do{}while(0) to our DBG_PRINTF makes a simple transformation. Modified DBG_PRINTF macro functions are as follows:
#define DBG_PRINTF(fmt, args...)  \
do\
{\
    printf("<<File:%s  Line:%d  Function:%s>> ", __FILE__, __LINE__, __FUNCTION__);\
    printf(fmt, ##args);\
}while(0)
The do here While loop Circulatory body Executing only once has the same effect as not adding a loop. Moreover, the above problems can be avoided. Preprocessing file:

In our macro function entity, while(0) is not followed by a semicolon, and a semicolon is added when actually calling, which is not only in line with the habit of ending semicolons in C language statements, but also in line with do Syntax rules for while.
Using do{}while(0) to encapsulate macro functions may make many beginners unaccustomed, but it must be admitted that this is indeed a very common method.
Related articles: Several very practical macro skills in C language and embedded system
static and extern
1,static
static can be used in three ways: to modify variables in functions, to modify functions, and to modify books c file global variables. The latter two are easy to understand and are used to modify functions and global variables, indicating that variables and functions are used in this module.
Let's take a look at the example of static modifying variables in functions:
#include <stdio.h>

void test(void)
{
    int normal_var = 0;
    static int static_var = 0;

    printf("normal_var:%d  static_var:%d\n", normal_var, static_var);
    normal_var++;
    static_var++;
}

int main(void)
{
     int i;

     for ( i = 0; i < 3; i++)
     {
       test();
     }

     return 0;
}
Operation results:
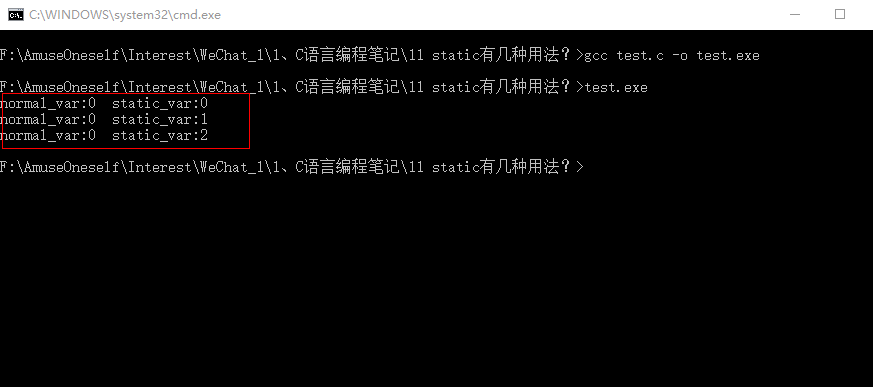
It can be seen that every time the function is called, the ordinary local variables are reassigned, while the static modified variables keep the value of the last call unchanged, that is, they are initialized only once.
2,extern
extern is simple to use. It is used to declare global variables and declarations shared by multiple modules External function.
