Test requirements:
1. Data set:
a) training data set: "experimental image" - training set "contains 10 subdirectories of" 0 "," 1 ",...," 9 ", and each subdirectory contains corresponding digital images. For each number, there are 20 64 × 64 training images.
b) test data set: "experimental image" - test set "directory, including 10 subdirectories of" 0 "," 1 ",...," 9 ", and each subdirectory contains corresponding digital images. For each number, there are 5 64 × 64 test image.
2. Basic requirements: identification of two numbers (6 'and' 9 '), i.e. a 64 digit picture containing a single number ('6' or '9') is given × 64 images, the program automatically recognizes the numbers.
3. Additional requirements: identification of ten numbers ('0 ',' 1 ',' 9 '), i.e. a 64 character picture containing a single number ('0', '1', '9') is given × 64 images, the program automatically recognizes the numbers.
Experimental analysis:
For the identification of two numbers (6 ',' 9 '):
First, read in the picture and binarize it. The principle is to calculate the sum of pixel RGB. If the sum is greater than 300, it is determined as a blank area and set it to 0, otherwise set it to 1.

Perceptron algorithm:

ρ Take the value by yourself. In this experiment, I take 0.14 as the best.
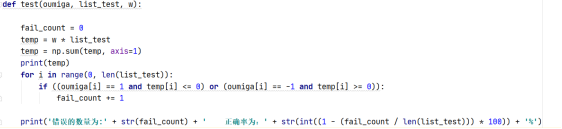
Next, the test set is tested, and the test function code is implemented as follows
When p is 0.14, the results are as follows:

That is, for the classification of 6 and 9, the classification accuracy of the augmented weight vector obtained when p is 0.14 is 100%. In the second classification experiment, because the accuracy can reach 100%, there is no preprocessing of the pictures.
Additional requirements: identification of ten numbers ('0 ',' 1 ',' 9 '), i.e. a 64 character picture containing a single number ('0', '1', '9') is given × 64 images, the program automatically recognizes the numbers.
The implementation is as follows:
Firstly, the read image is preprocessed and segmented.
The whole process is divided into two parts, left-right segmentation and up-down segmentation. The basic idea is to find four points, that is, connect them into four straight lines, so that the four straight lines contain numbers at least. The following code is to find the leftmost and rightmost column numbers, as well as the top and bottom column numbers.
Due to shallow knowledge, the pretreatment is rough.
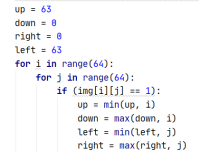
After that, the selected surrounding pixels are reconstructed into a 32 * 32 picture by using the resize of OpenCV to complete the preprocessing.

There are three methods of multi classification. The methods I adopt are:
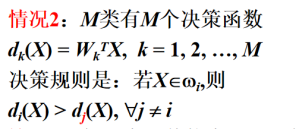
The reason is that this method only divides M classifications into M classifications, and there are no uncertain areas and other situations.
The main training codes are as follows, and the basic process is similar to the second classification
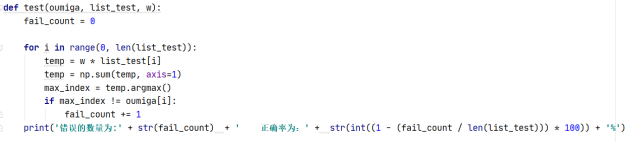
test code is as follows:
Using each weighting vector × Test set, find the subscript of w with the largest result, and judge whether the classification is correct.
Multiple classification results:
When p is 0.01:

Among several p values selected manually, the optimal accuracy is 96%.
If the image is not preprocessed, the accuracy rate is about 60%, and the accuracy rate is very low, so I think of image segmentation and reconstruction.
Experiment code:
II. Classification:
import numpy as np
from matplotlib import pyplot as plt
import cv2
def test(oumiga, list_test, w):
fail_count = 0
temp = w * list_test
temp = np.sum(temp, axis=1)
for i in range(0, len(list_test)):
if ((oumiga[i] == 1 and temp[i] <= 0) or (oumiga[i] == -1 and temp[i] >= 0)):
fail_count += 1
print('The number of errors is:' + str(fail_count) + ' The accuracy is:' + str(int((1 - (fail_count / len(list_test))) * 100)) + '%')
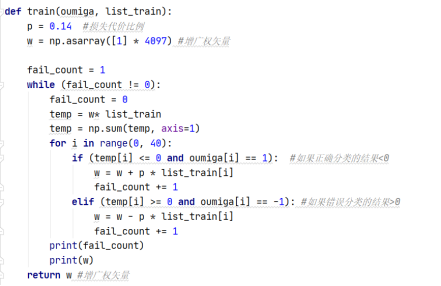
def train(oumiga, list_train):
p = 0.14 #Loss cost ratio
w = np.asarray([1] * 4097) #Augmented weight vector
fail_count = 1
while (fail_count != 0):
fail_count = 0
temp = w * list_train
temp = np.sum(temp, axis=1)
for i in range(0, 40):
if (temp[i] <= 0 and oumiga[i] == 1): #If it is 6 and less than 0
w = w + p * list_train[i]
fail_count += 1
elif (temp[i] >= 0 and oumiga[i] == -1): #If 9 and greater than 0
w = w - p * list_train[i]
fail_count += 1
print(fail_count)
print('Augmented weight vector w Is:')
print(w)
return w #Augmented weight vector
if __name__ == "__main__":
PATH = 'C:/Users/lishu/Desktop/code/PatternRecognition/experience3/'
list_img = []
for j in [6,9]:
for i in range(1,21):
img = cv2.imread(PATH + 'train/' + str(j) + '/' + str(j) + '-' + str(i) + '.png')
#Binarization of picture 01
temp = np.asarray(img)
temp = temp.reshape(-1, 3)
temp = np.sum(temp, axis=1)
temp = np.where(temp > 300, 0, 1) #If the RGB sum is greater than 300, it is determined as a blank area and set to 0, otherwise it is 1
temp = np.append(temp,1)
list_img.append(temp.tolist())
#Type II multiply-1 processing
# temp_list1 = [[1] * 4096] * 20
# temp_list2 = [[-1] * 4096] * 20
# temp_list1 = [[1]] * 20
# temp_list2 = [[-1]] * 20
# temp_fen = temp_list1 + temp_list2
# temp_fen = np.asarray(temp_fen).reshape(40,-1)
#
#
list_img = np.asarray(list_img)
# temp = temp_fen * list_img
oumiga = [1] * 20 + [-1] * 20 #Store the class to which the corresponding training set belongs
w = train(oumiga,list_img) #The augmented weight vector is obtained
#Test set test
list_test = []
for j in [6,9]:
for i in range(1,6):
img = cv2.imread(PATH + 'test/' + str(j) + '/' + str(j) + '-' + str(i) + '.png')
temp = np.asarray(img)
temp = temp.reshape(-1, 3)
temp = np.sum(temp, axis=1)
temp = np.where(temp > 300, 0, 1)
temp = np.append(temp,1)
list_test.append(temp.tolist())
list_test = np.asarray(list_test)
oumiga_test = [1]*5 + [-1]*5
test(oumiga_test,list_test,w)
list_img = np.asarray(list_img)
Multi classification:
import numpy as np
from matplotlib import pyplot as plt
import cv2
def test(oumiga, list_test, w):
fail_count = 0
for i in range(0, len(list_test)):
temp = w * list_test[i]
temp = np.sum(temp, axis=1)
max_index = temp.argmax()
if max_index != oumiga[i]:
fail_count += 1
print('The number of errors is:' + str(fail_count) + ' The accuracy is:' + str(int((1 - (fail_count / len(list_test))) * 100)) + '%')
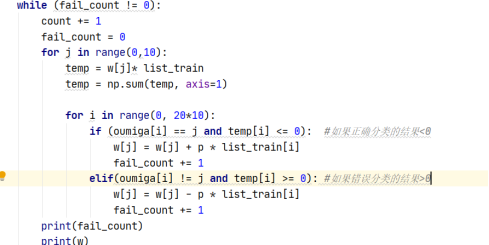
def train(oumiga, list_train):
p = 0.01 #Loss cost ratio
w = np.asarray([[1] * 1025] * 10) #Augmented weight vector
w = w.astype(float)
fail_count = 1
count = 0
while (fail_count != 0):
count += 1
fail_count = 0
for j in range(0,10):
temp = w[j]* list_train
temp = np.sum(temp, axis=1)
for i in range(0, 20*10):
if (oumiga[i] == j and temp[i] <= 0): #If the result of correct classification is < 0
w[j] = w[j] + p * list_train[i]
fail_count += 1
elif(oumiga[i] != j and temp[i] >= 0): #If the result of misclassification is > 0
w[j] = w[j] - p * list_train[i]
fail_count += 1
print(fail_count)
print(w)
print('The number of iterations is:' + str(count))
return w
def preprocess(img):
img = img.reshape(64,64)
#The rows and columns with available points corresponding to the top, bottom, left and right of the picture are stored respectively
up = 63
down = 0
right = 0
left = 63
for i in range(64):
for j in range(64):
if (img[i][j] == 1):
up = min(up, i)
down = max(down, i)
left = min(left, j)
right = max(right, j)
#Reconfiguration preprocessing
new_img = []
for i in range(up, down+1):
temp = []
for j in range(left, right+1):
if (img[i][j] == 0):
temp.append([255,255,255])
else:
temp.append([0,0,0])
new_img.append(temp)
#Binarization of pictures
new_img = np.asarray(new_img).astype("uint8")
#Image resize reconstruction
new_img = cv2.resize(new_img, (32,32))
new_img = new_img.reshape(-1, 3)
new_img = np.sum(new_img, axis=1)
new_img = np.where(new_img > 300, 0, 1)
new_img = np.append(new_img, 1)
return new_img
# cv2.imwrite('C:/Users/lishu/Desktop/code/PatternRecognition/experience3/img.png', new_img, [int(cv2.IMWRITE_JPEG_QUALITY), 100])
if __name__ == "__main__":
PATH = 'C:/Users/lishu/Desktop/code/PatternRecognition/experience3/'
list_img = []
for j in [x for x in range(0,10)]:
for i in range(1,21):
img = cv2.imread(PATH + 'train/' + str(j) + '/' + str(j) + '-' + str(i) + '.png')
# Binarization of picture 01
temp = np.asarray(img)
temp = temp.reshape(-1, 3)
temp = np.sum(temp, axis=1)
temp = np.where(temp > 300, 0, 1)
# Preprocessing removes excess white space and reconstructs the picture
temp = preprocess(temp)
list_img.append(temp.tolist())
list_img = np.asarray(list_img)
oumiga = [] #Store the class to which the corresponding training set belongs
for x in range(0,10):
oumiga = oumiga + [x] * 20
w = train(oumiga,list_img) #The augmented weight vector is obtained
#Test set test
list_test = []
for j in [x for x in range(0,10)]:
for i in range(1,6):
img = cv2.imread(PATH + 'test/' + str(j) + '/' + str(j) + '-' + str(i) + '.png')
temp = np.asarray(img)
temp = temp.reshape(-1, 3)
temp = np.sum(temp, axis=1)
temp = np.where(temp > 300, 0, 1)
temp = preprocess(temp) # Pretreatment
list_test.append(temp.tolist())
list_test = np.asarray(list_test)
oumiga_test = []
for x in range(0,10):
oumiga_test = oumiga_test + [x] * 5
test(oumiga_test,list_test,w)
If you need experimental pictures or have questions, you can contact me.