(1) Preparation:
Linux uses CentOS-7-x86
Official website download address: https://archive.kernel.org/centos-vault/7.6.1810/isos/x86_64/
Virtual machine VMware Workstation 16 Pro
I know everything on this website
Hadoop installation package version: hadoop-2.7.4
Official website download address: https://archive.apache.org/dist/hadoop/core/hadoop-2.7.6/
JDK installation version: jdk-8u211-linux-x64
Official website download address: Java Archive | Oracle
ZooKeeper installation version: ZooKeeper 3.4.12
Official website download address: https://archive.apache.org/dist/zookeeper/zookeeper-3.4.12/
Xshell installation version: Xshell 7
Official website download address: https://www.netsarang.com/zh/free-for-home-school/
(1) Free license for home and school users, free authorization page:
https://www.netsarang.com/zh/free-for-home-school/
(2) Fill in your name and email address on the above page, and then click the download button.
(3) Enter the mailbox and click the hyperlink in the received email to download and use it for free.
(2) Network configuration:
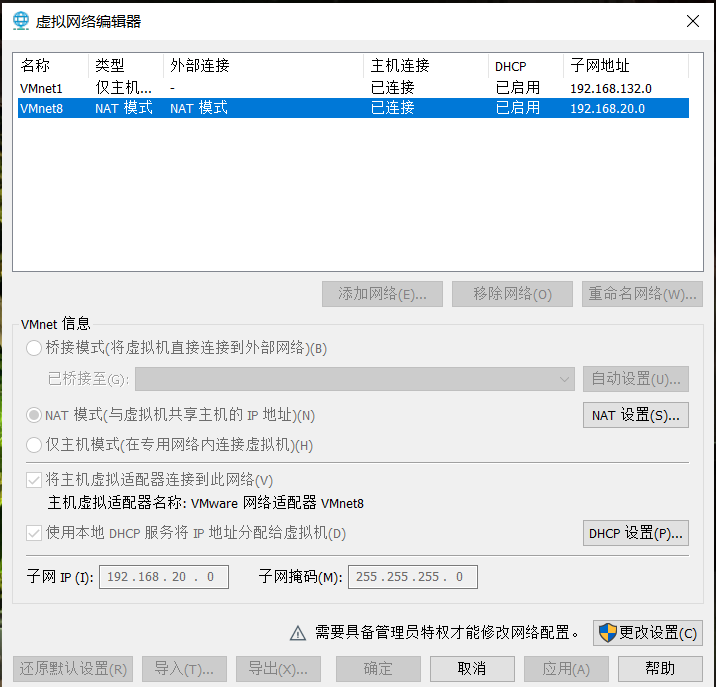
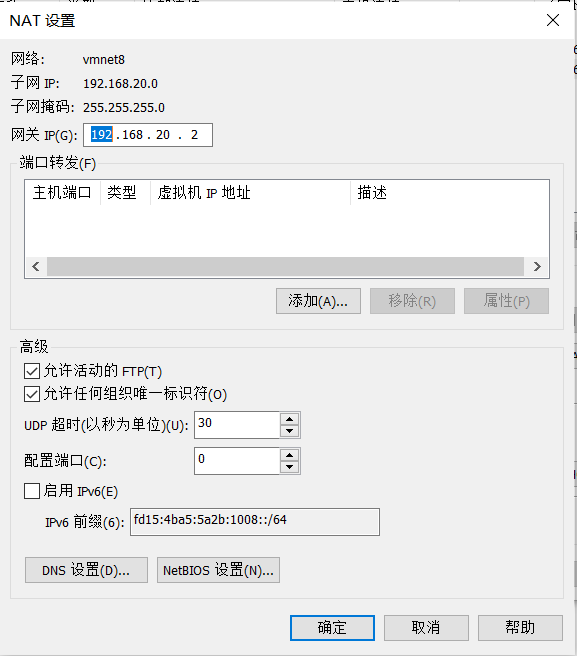
1. Open VMware Edit - virtual network editor - select NAT mode to view the subnet IP. I'm 192.168.20.0 here. Each device is different. Open NAT settings to view the gateway according to their own. The following network settings need to be used
2. Open the network card configuration option for the virtual machine
vi /etc/sysconfig/network-scripts/ifcfg-ens33
3. Change the network configuration (ip and gateway must be set according to the above)
TYPE="Ethernet"
PROXY_METHOD="none"
BROWSER_ONLY="no"
BOOTPROTO="static"  #Static is static IP and DHCP is dynamic IP
DEFROUTE="yes"
IPV4_FAILURE_FATAL="no"
IPV6INIT="yes"
IPV6_AUTOCONF="yes"
IPV6_DEFROUTE="yes"
IPV6_FAILURE_FATAL="no"
IPV6_ADDR_GEN_MODE="stable-privacy"
NAME="ens33"
UUID="ea26c532-6b6f-4450-bb36-27e516bf031b"
DEVICE="ens33"
ONBOOT="yes"            #The following configurations are enabled automatically after power on
IPADDR=192.168.20.201    #ip is set according to the subnet above
PREFIX=24        #Subnet mask, equivalent to NETMASK=255.255.255.0
GATEWAY=192.168.20.2        #Gateway, fill in according to the above
Refresh the network after setting (you can refresh several times)
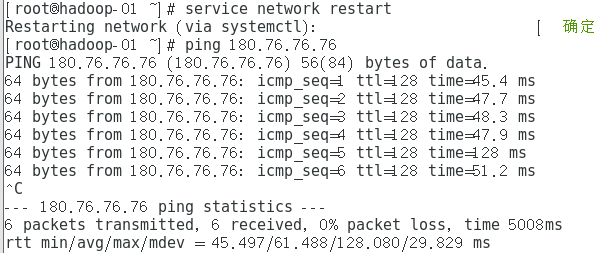
service network restart
After setting, ping the external network (here is the ip address of the ping Baidu server)
ping 180.76.76.76
After completion, you can try to restart the virtual machine to see if the IP is set by you (the following is the command to view the IP)
ifconfig
3. Turn off the firewall
Check the firewall status (not running is off, running is on)
firewall-cmd --state
Turn off firewall
systemctl stop firewalld.service
Prohibit the firewall from starting automatically (be sure to turn off the firewall!!!, you can restart to confirm)
systemctl disable firewalld.service
4. Use Xshell to connect to the virtual machine (the host is your IP address, and you will be reminded of the user and password to connect)
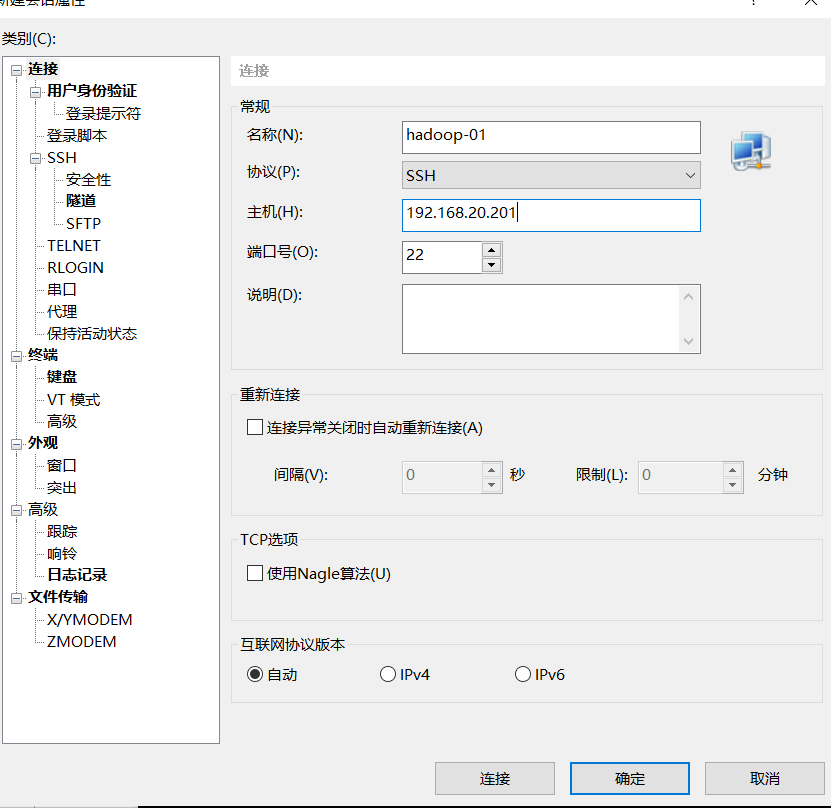
The connection is successful (subsequent operations can be performed on the Xshell)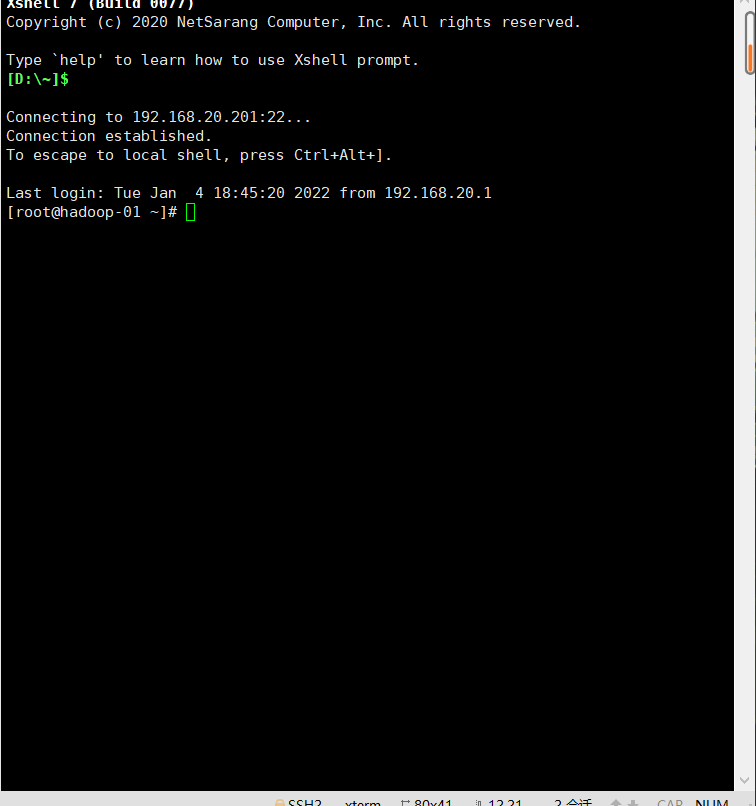
(3) JDK installation
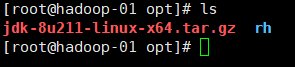
1. Open the opt file
cd /opt/
2. Drag the file into the Xshell (a dialog box will pop up, and then use ls to check whether it is uploaded to the folder)

3. Unzip the file
tar -zxvf jdk-8u211-linux-x64.tar.gz -C /opt/
4. Set Java environment
vi /etc/profile
Add at the end of the file (modify as needed)
export JAVA_HOME=/opt/jdk1.8.0_221
export PATH=$JAVA_HOME/bin:$PATH
export CLASSPATH=.:$JAVA_HOME/lib/dt.jar:$JAVA_HOME/lib/tools.jar
Refresh profile
source /etc/profile
Check the JDK (as shown in the figure, it is successful)
java -version

(IV) clone virtual machine and configuration
1. Turn off virtual machine} virtual machine - Management - Clone (the last option is full clone and named hadoop-02)

2. Similarly, hadoop-03 was cloned
3. Turn on three virtual machines in turn
4. Modify the host names of hadoop-02 and hadoop-03 (the host names of the three are hadoop-01, hadoop-02 and hadoop-03 in turn)
vi /etc/hostname
5. Modify the IP addresses of hadoop-02 and hadoop-03 (the IP addresses of the three virtual machines must be modified to be continuous. The three here are 192.168.20.201192.168.20.202192.168.20.203 respectively)
vi /etc/sysconfig/network-scripts/ifcfg-ens33
6. Restart to make the host name effective
reboot
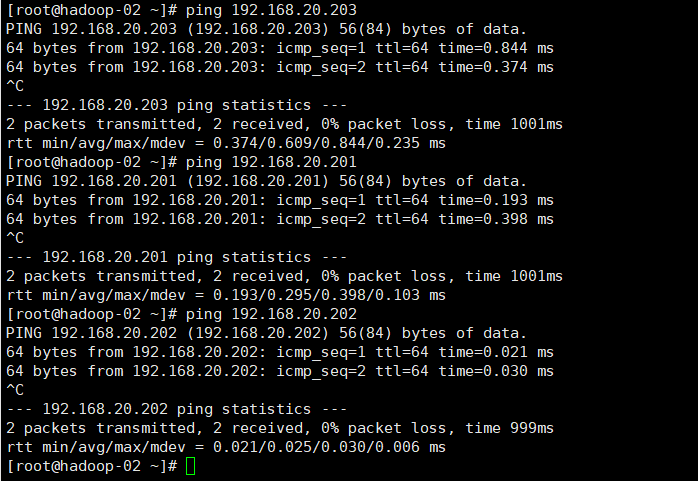
7. Add host mapping (all three virtual machines need to be added)
vi /etc/hosts
Add the following
192.168.20.201  hadoop-01
192.168.20.202  hadoop-02
192.168.20.203  hadoop-03
Check whether the mapping is successfully added by ping each node
(5) SSH password free login of each node of the cluster
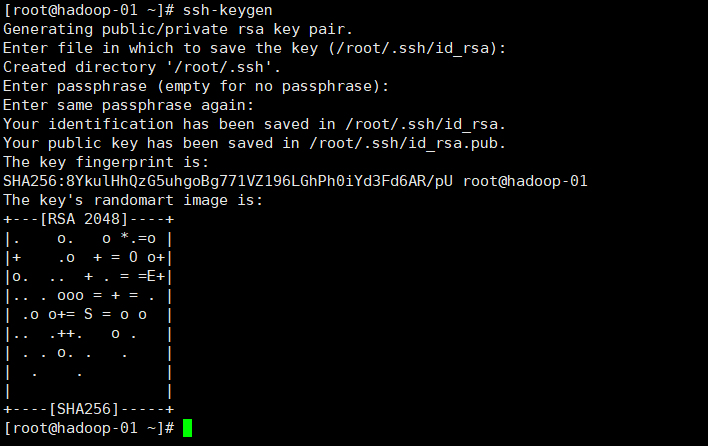
1. Execute the following commands in each node to generate the key file by acoustic measurement (press three carriage returns)
ssh-keygen
2. Use in each node (copy your own public key to each node, and execute all three commands in each node)
 ssh-copy-id hadoop-01
 ssh-copy-id hadoop-02
 ssh-copy-id hadoop-03
After completion, the node can be switched without password (ssh host name)
(6) ZooKeeper installation configuration
1. Enter the opt folder in hadoop-01 and use Xshell to import the installation package
2. Unzip ZooKeeper
tar -zxvf zookeeper-3.4.12.tar.gz -C /opt/
3. Enter the ZooKeeper folder
cd /opt/zookeeper-3.4.12/
4. Create two folders: data and logs
mkdir data
mkdir logs
5. Enter the data file
cd data
6. Create a new file named myid and write it with id 1
echo '1'>myid
7. Enter the conf file in the ZooKeeper installation directory to zoom_ sample. CFG copy renamed zoo cfg
cd /opt/zookeeper-3.4.12/conf/
cp zoo_sample.cfg zoo.cfg
8. Modify zoo CFG find "dataDir =" in the original code and modify it to
dataDir=/opt/zookeeper-3.4.12/data
Add the following code at the end of the code
dataLogDir=/opt/zookeeper-3.4.12/logs
server.1=hadoop-01:2888:3888
server.2=hadoop-02:2888:3888
server.3=hadoop-03:2888:3888
9. Distribute the ZooKeeper of hadoop-01 to the other two nodes
scp -r /opt/zookeeper-3.4.12 root@hadoop-02:/opt/
scp -r /opt/zookeeper-3.4.12 root@hadoop-03:/opt/
10. Set environment variables
vi /etc/profile
Add at the end
export ZOOKEEPER_HOME=/opt/zookeeper-3.4.12
export PATH=$PATH:$JAVA_HOME/bin:$ZOOKEEPER_HOME/bin
Refresh file
source /etc/profile
11. Modify the myid of hadoop-02 and hadoop-03 to 2 and 3 respectively
vi /opt/zookeeper-3.4.12/data/myid
12. Execute commands on three nodes in turn to start ZooKeeper
zkServer.sh start

13. Check whether ZooKeeper is installed successfully
Enter the following codes for the three nodes
zkServer.sh status
Renderings


(VII) Hadoop installation configuration
1. Import the Hadoop installation package into hadoop-01 with Xshell
2. Unzip Hadoop
tar -zxvf hadoop-2.7.6.tar.gz -C /opt/
3. Modify the core site xml
Enter the core site XML folder·
cd /opt/hadoop-2.7.6/etc/hadoop/
Enter core site xml
vi core-site.xml
Delete the original < configuration > < / configuration > and insert the following
<configuration>
        <!--appoint hdfs Connection address, cluster mode (high availability)-->
        <property>
                <name>fs.defaultFS</name>
                <value>hdfs://cluster</value>
        </property>

        <!-- appoint ZooKeeper Address and port of the cluster. Note that the number must be odd and not less than three nodes-->
        <property>
                <name>ha.zookeeper.quorum</name>
                <value>hadoop-01:2181,hadoop-02:2181,hadoop-03:2181</value>
        </property>
</configuration>
4. Enter HDFS site XML to modify the configuration (the < configuration > tag should be deleted and then inserted in the following)
vi hdfs-site.xml
<configuration>
        <!--appoint HDFS Number of copies,The number of machine nodes cannot be exceeded-->
        <property>
                <name>dfs.replication</name>
                <value>3</value>
        </property>
        <!-- by namenode Cluster definition services name -->
        <property>
                <name>dfs.nameservices</name>
                <value>cluster</value>
        </property>
        <!-- nameservice What does it contain namenode,For each namenode Name -->
        <property>
                <name>dfs.ha.namenodes.cluster</name>
                <value>nn01,nn02</value>
        </property>
        <!-- be known as nn01 of namenode of rpc Address and port number, rpc Used with datanode communication -->
        <property>
                <name>dfs.namenode.rpc-address.cluster.nn01</name>
                <value>hadoop-01:9000</value>
        </property>
        <!--be known as nn01 of namenode of http Address and port number for and web Client communication -->
        <property>
                <name>dfs.namenode.http-address.cluster.nn01</name>
                <value>hadoop-01:50070</value>
        </property>
        <!-- be known as nn02 of namenode of rpc Address and port number, rpc Used with datanode communication -->
        <property>
                <name>dfs.namenode.rpc-address.cluster.nn02</name>
                <value>hadoop-02:9000</value>
        </property>
        <!--be known as nn02 of namenode of http Address and port number for and web Client communication -->
        <property>
                <name>dfs.namenode.http-address.cluster.nn02</name>
                <value>hadoop-02:50070</value>
        </property>
        <!-- namenode For sharing editing logs between journal Node list -->
        <property>
                <name>dfs.namenode.shared.edits.dir</name>
                <value>qjournal://hadoop-01:8485;hadoop-02:8485;hadoop-03:8485/cluster</value>
        </property>
    <!-- journalnode Upper for storage edits Directory of logs -->
        <property>
                <name>dfs.journalnode.edits.dir</name>
                <value>/opt/hadoop-2.7.6/journaldata</value>
        </property>
        <!-- Specifies whether to automatically switch to another cluster when the cluster fails namenode -->
        <property>
                <name>dfs.ha.automatic-failover.enabled.cluster</name>
                <value>true</value>
        </property>
        <!-- Implementation mode of automatic switching in case of configuration failure -->
        <property>
        <name>dfs.client.failover.proxy.provider.cluster</name>
                <value>org.apache.hadoop.hdfs.server.namenode.ha.ConfiguredFailoverProxyProvider</value>
        </property>
        <!-- Configure isolation mechanism, using ssh In the same way Namenode switch -->
        <property>
                <name>dfs.ha.fencing.methods</name>
                <value>
                        sshfence
                        shell(/bin/true)
                </value>
        </property>
        <!-- If used ssh Failover, using ssh Location of key storage for communication -->
        <property>
                <name>dfs.ha.fencing.ssh.private-key-files</name>
                <value>/root/.ssh/id_rsa</value>
        </property>
        <!-- connect-timeout Timeout -->
        <property>
                <name>dfs.ha.fencing.ssh.connect-timeout</name>
                <value>30000</value>
        </property>
        <property>
                <name>dfs.name.dir</name>
                <value>/opt/hadoop-2.7.6/tmp/dfs/name</value>
                 <!-- This position is determined according to your own needs. Generally, this is it -->
        </property>
        <property>
                <name>dfs.data.dir</name>
                <value>/opt/hadoop-2.7.6/tmp/dfs/data</value>
                 <!-- This position is determined according to your own needs. Generally, this is it -->
        </property>
</configuration>
5. Modify mapred site XML, at first there was no need for this file to put mapred site xml. Template copy renamed mapred site xml
cp mapred-site.xml.template mapred-site.xml
<configuration>
        <!-- use yarn As mapreduce Resource scheduling framework -->
        <property>
                <name>mapreduce.framework.name</name>
                <value>yarn</value>
        </property>
</configuration>
6. Modify Yard site xml
vi yarn-site.xml
<configuration>
        <!-- Enable Resource Manager HA High availability -->
        <property>
                <name>yarn.resourcemanager.ha.enabled</name>
                <value>true</value>
        </property>
        <!-- appoint resourcemanager Name of -->
        <property>
                <name>yarn.resourcemanager.cluster-id</name>
                <value>yrc</value>
        </property>
        <!-- Two were used resourcemanager,Specify separately Resourcemanager Address of -->
        <property>
                <name>yarn.resourcemanager.ha.rm-ids</name>
                <value>rm1,rm2</value>
        </property>
        <!-- appoint rm1 Address of -->
        <property>
                <name>yarn.resourcemanager.hostname.rm1</name>
                <value>hadoop-01</value>
        </property>
        <!-- appoint rm2 Address of  -->
        <property>
                <name>yarn.resourcemanager.hostname.rm2</name>
                <value>hadoop-02</value>
        </property>
        <!-- appoint zookeeper Cluster machine -->
        <property>
                <name>yarn.resourcemanager.zk-address</name>
                <value>hadoop-01:2181,hadoop-02:2181,hadoop-03:2181</value>
        </property>
        <!-- NodeManager Ancillary services running on. The default is mapreduce_shuffle -->
        <property>
                <name>yarn.nodemanager.aux-services</name>
                <value>mapreduce_shuffle</value>
        </property>
</configuration>
7. Modify slaves (after Hadoop 3.0, slaves will be renamed workers)
vi slaves
Delete the original content and insert the following content
hadoop-01
hadoop-02
hadoop-03
8, in Hadoop env sh , mapred-env.sh , yarn-env. Add java to JAVA_HOME environment variable (best added last):
export JAVA_HOME=/opt/jdk1.8.0_221
9. Copy the file to the other two nodes
scp -r /opt/hadoop-2.7.6 root@hadoop-02:/opt/
scp -r /opt/hadoop-2.7.6 root@hadoop-03:/opt/
10. Configure Hadoop environment variables and perform the following operations on three nodes
vi /etc/profile
export HADOOP_HOME=/opt/hadoop-2.7.6
export PATH=$PATH:$HADOOP_HOME/bin:$HADOOP_HOME/sbin:$HADOOP_HOME/lib
Make environment variables take effect immediately
source /etc/profile
(VIII) start Hadoop
1. Start the journalnode on the three nodes respectively (it needs to be started manually for the first time, but not later)
hadoop-daemon.sh start journalnode

You can also use jps to check whether the process exists (if you have not started ZooKeeper before, you also need to start ZooKeeper)
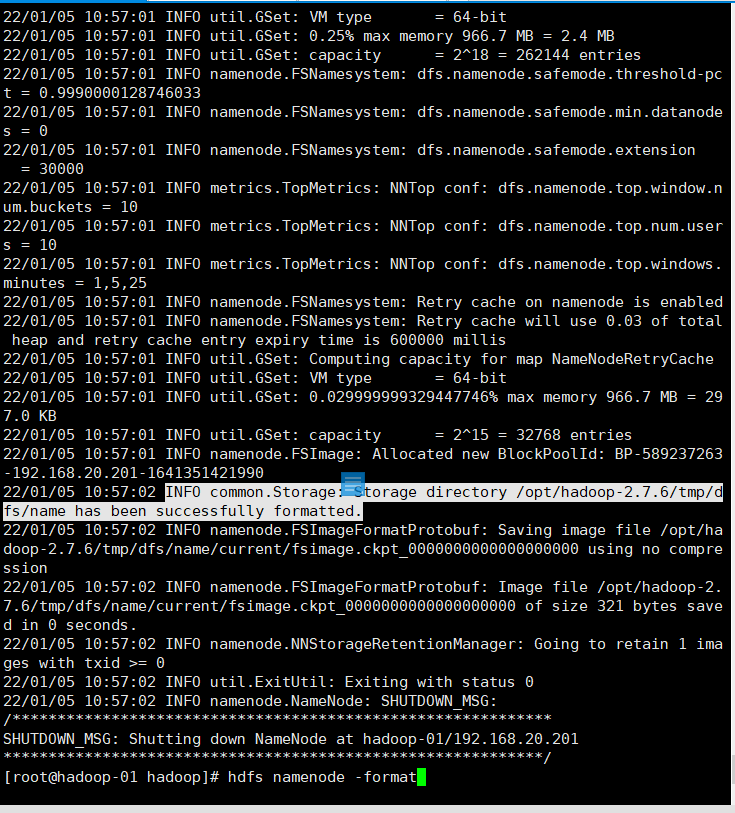
2. namenode in hadoop-01 format
hdfs namenode -format
See info common Storage: Storage directory /opt/hadoop-2.7.6/tmp/dfs/name has been successfully formatted. Description format succeeded
3. Send the file generated by the format of namenode of hadoop-01 to hadoop-02
scp -r /opt/hadoop-2.7.6/tmp/ root@hadoop-02:/opt/hadoop-2.7.6
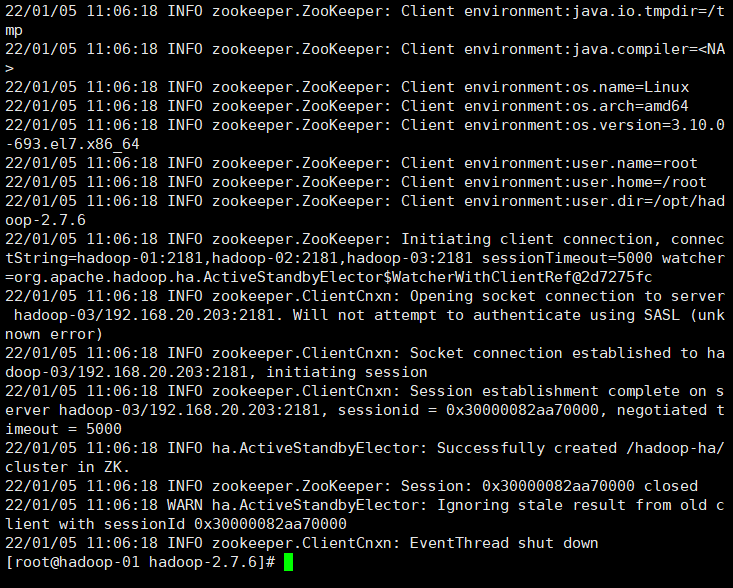
4. Format ZKFC (only need to be executed on hadoop-01)
hdfs zkfc -formatZK
Seeing the following indicates success
INFO ha.ActiveStandbyElector: Successfully created /hadoop-ha/cluster in ZK.
INFO zookeeper.ZooKeeper: Session: 0x30000082aa70000 closed
INFO zookeeper.ClientCnxn: EventThread shut down
5. Start hdfs (only need to be executed on hadoop-01)
start-dfs.sh
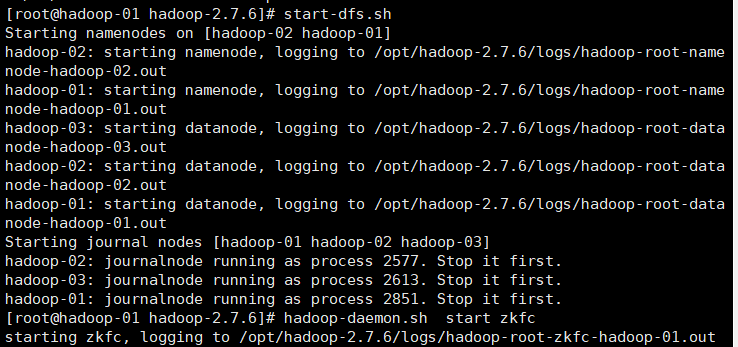
6. Start DFSZKFailoverController (only need to be executed on hadoop-01)
hadoop-daemon.sh start zkfc

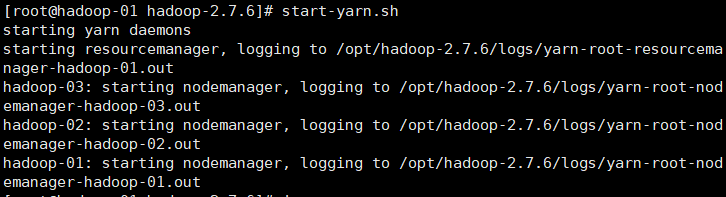
7. Start yarn (only need to be executed on hadoop-01)
start-yarn.sh
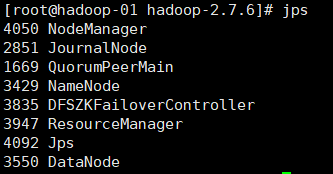
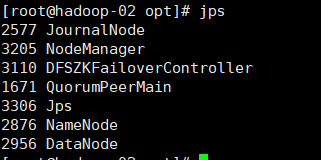
(IX) check whether Hadoop configuration is completed
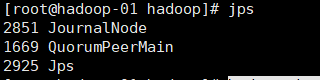
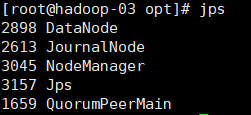
1. Check the process using jps
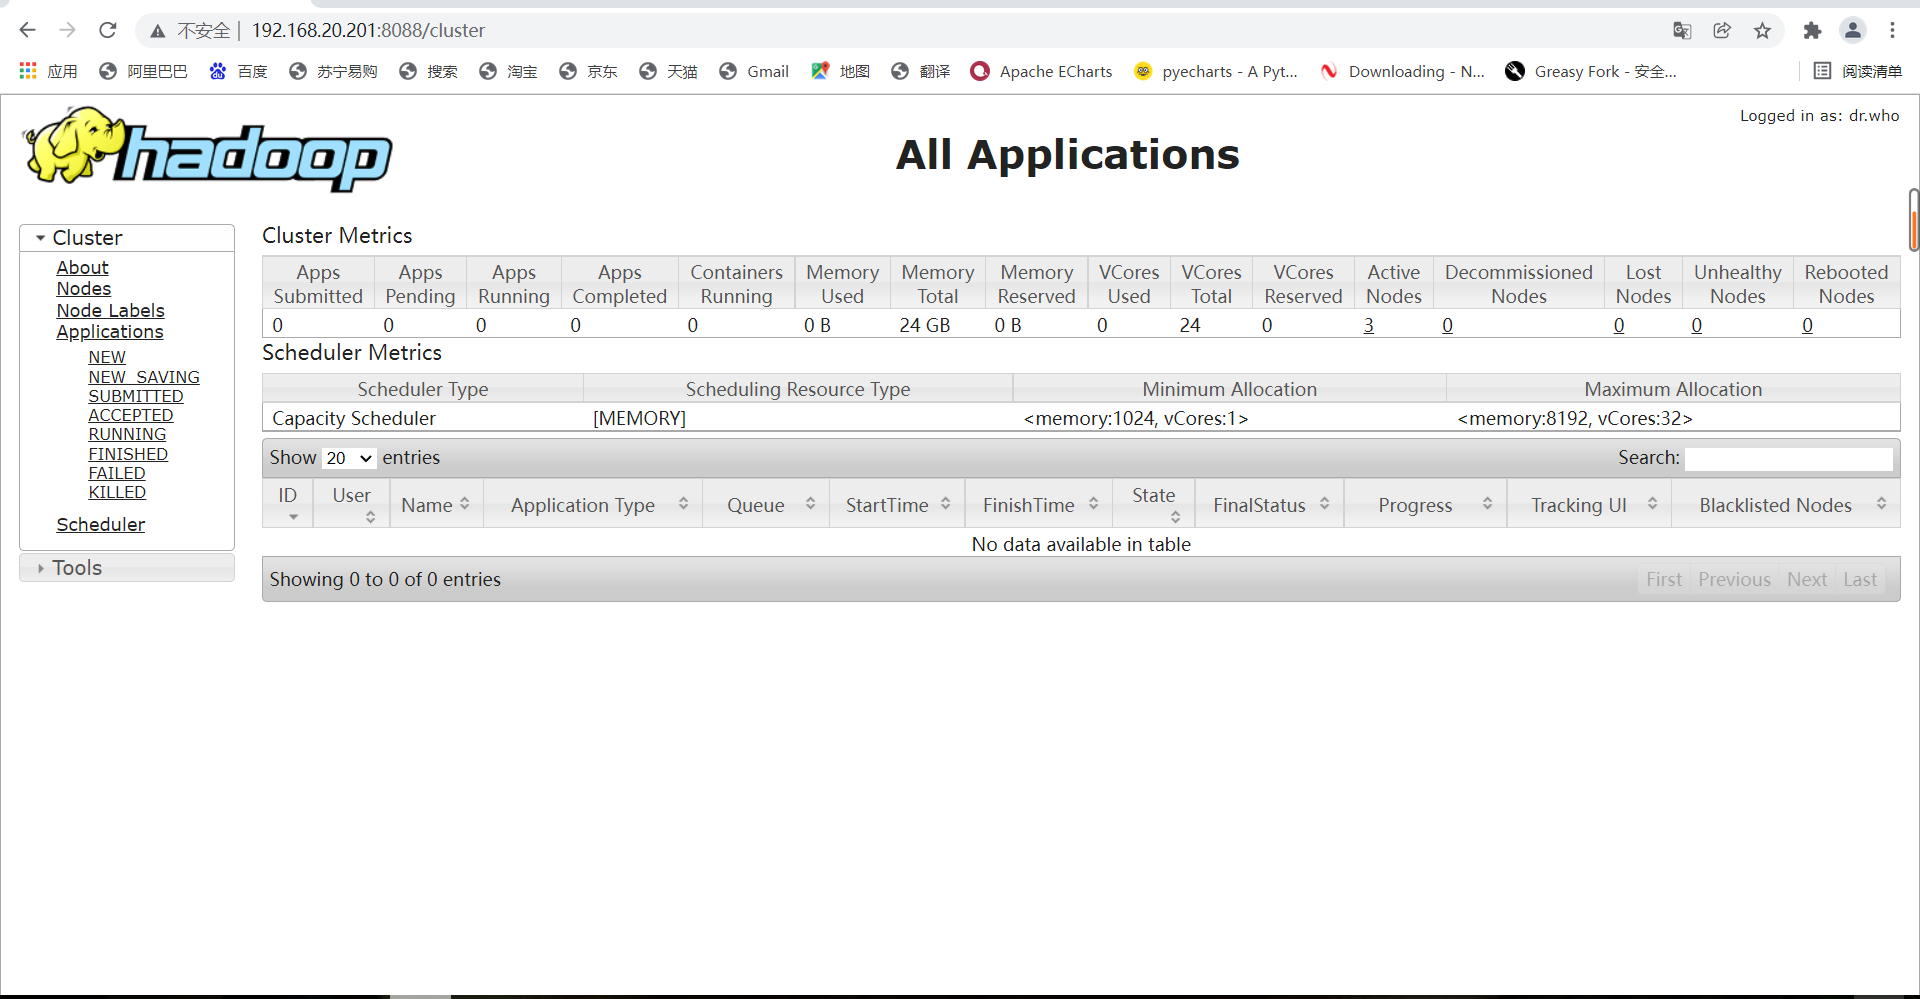
2. Enter the IP address of hadoop-01 in the computer browser and add: 8088 to view
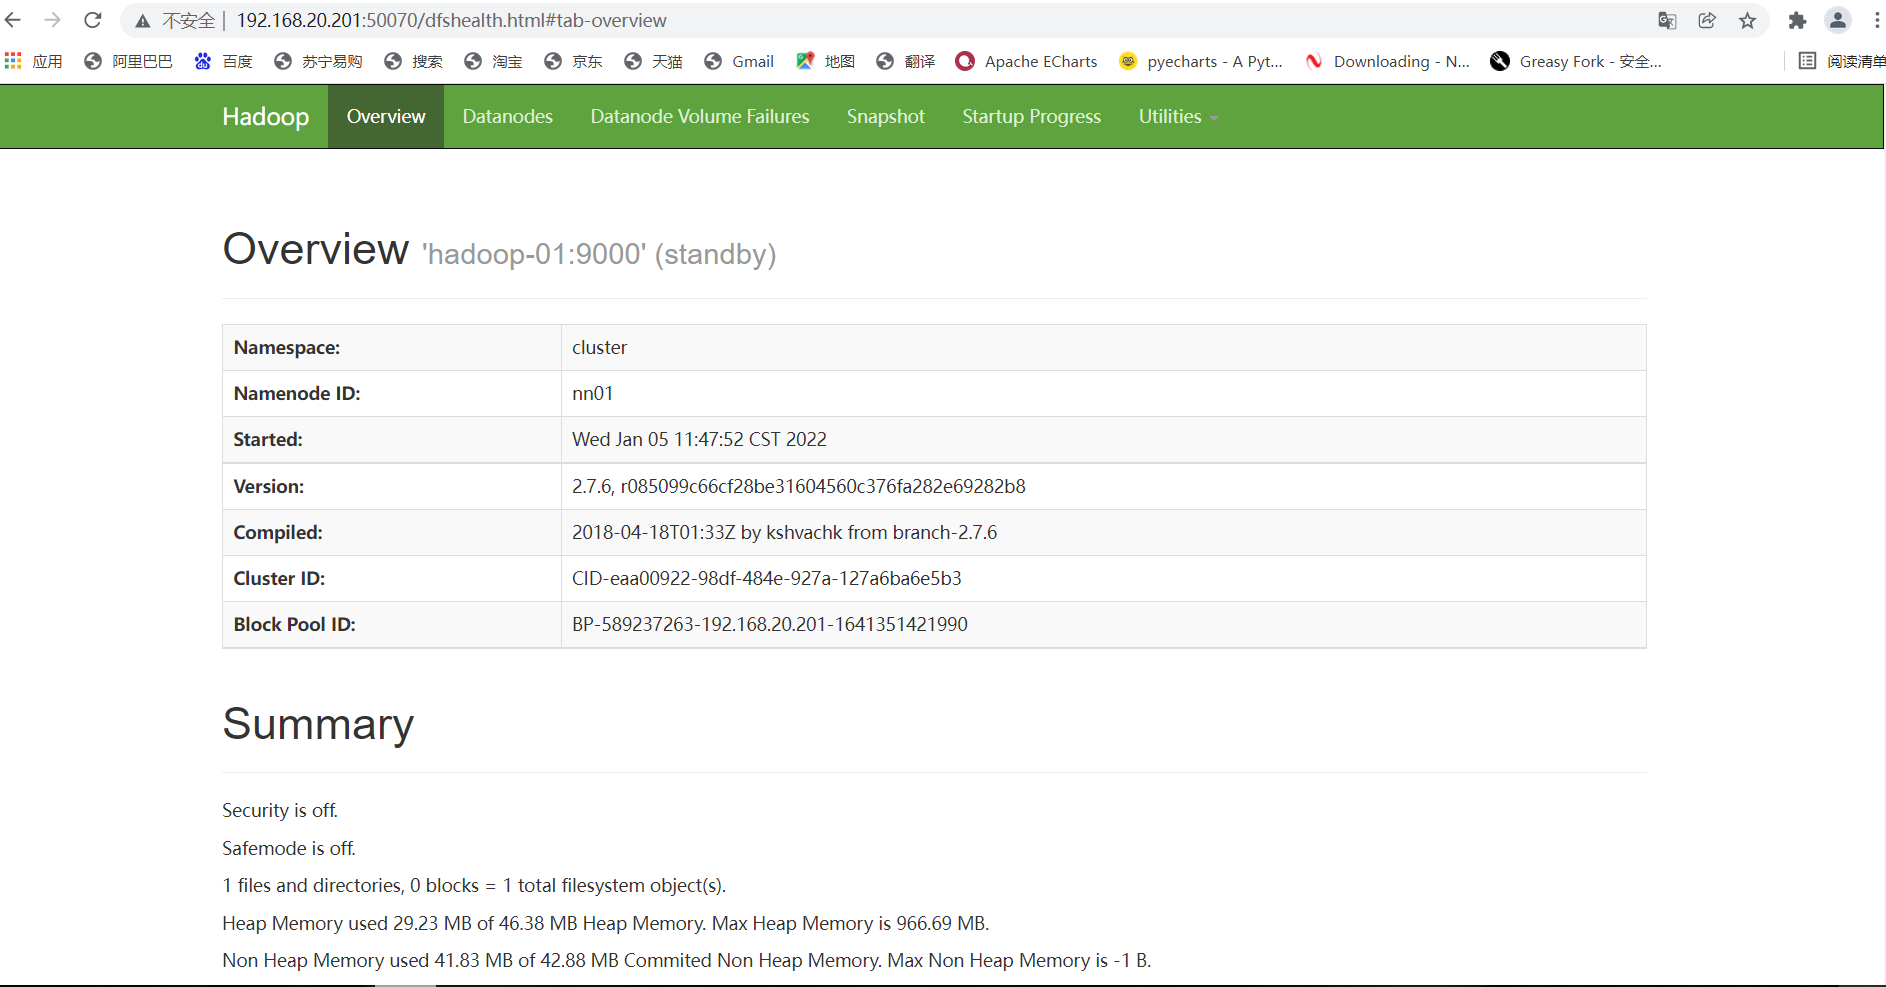
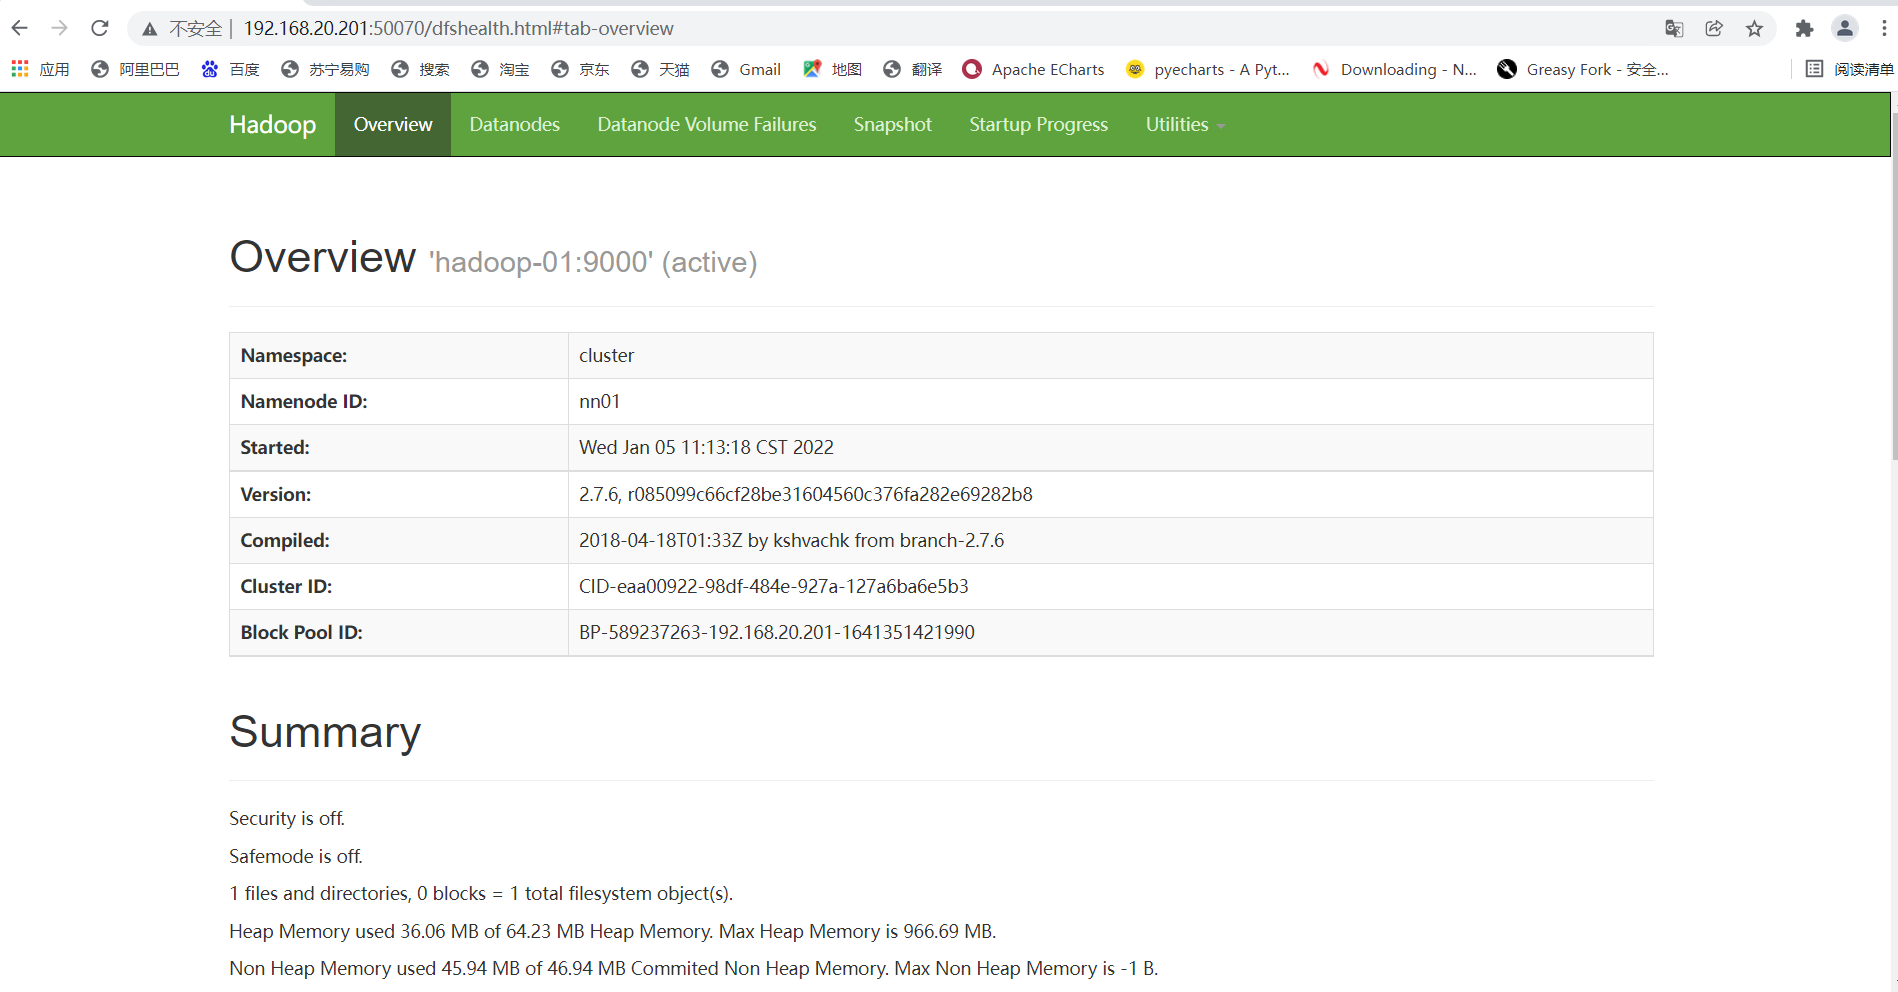
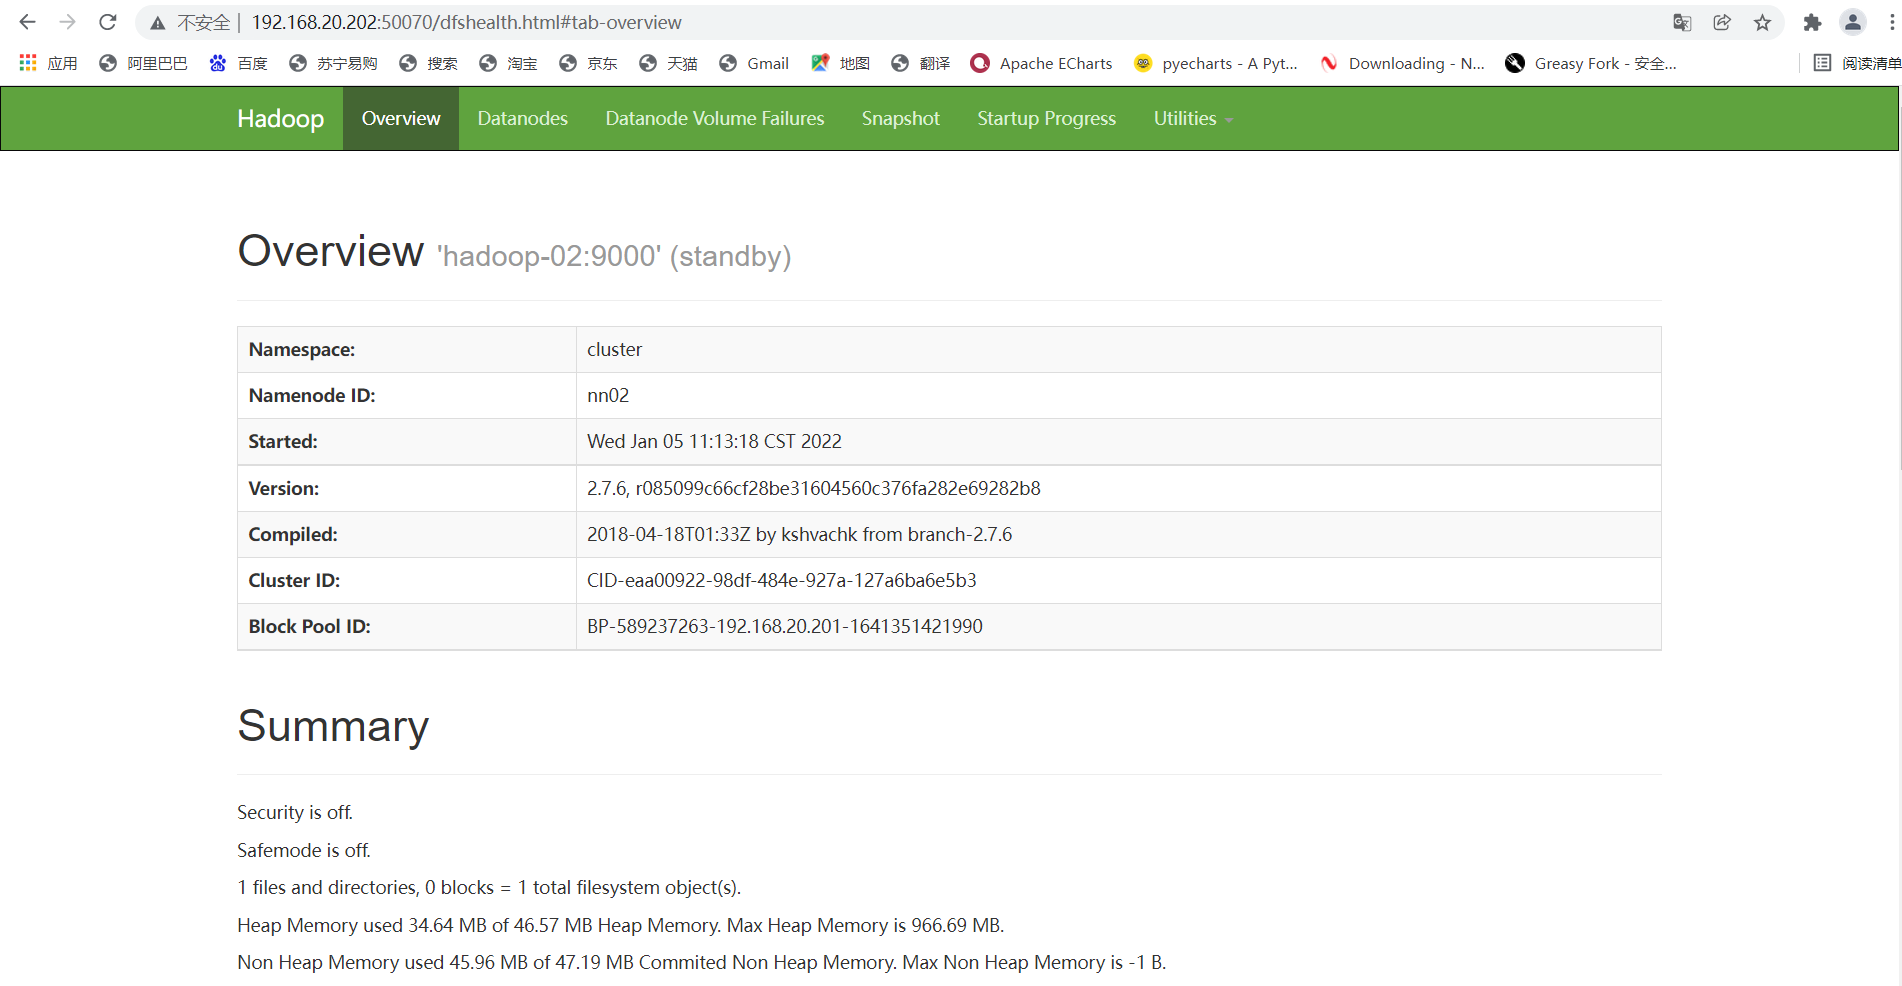
3. Check the status of the two namenode, using the IP of hadoop-01 and hadoop-02 plus 50070 respectively (the status must be active and standby)
4. Check whether the high availability is successful (here is the key to really check whether the high availability is successful and whether the failover can be realized)
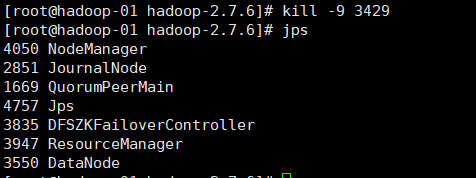
Use jps to view the namenode process and kill the namenode of hadoop-01
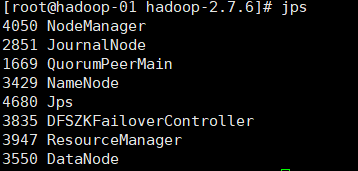
Stop the process (the command is kill -9, followed by the process number. Here I am 3429, and each device is different)
kill -9 3429
After stopping, jps can't see the process
At the same time, the web side of hadoop-01 will also become like this

If the web side of hadoop-02 becomes like this, it means success
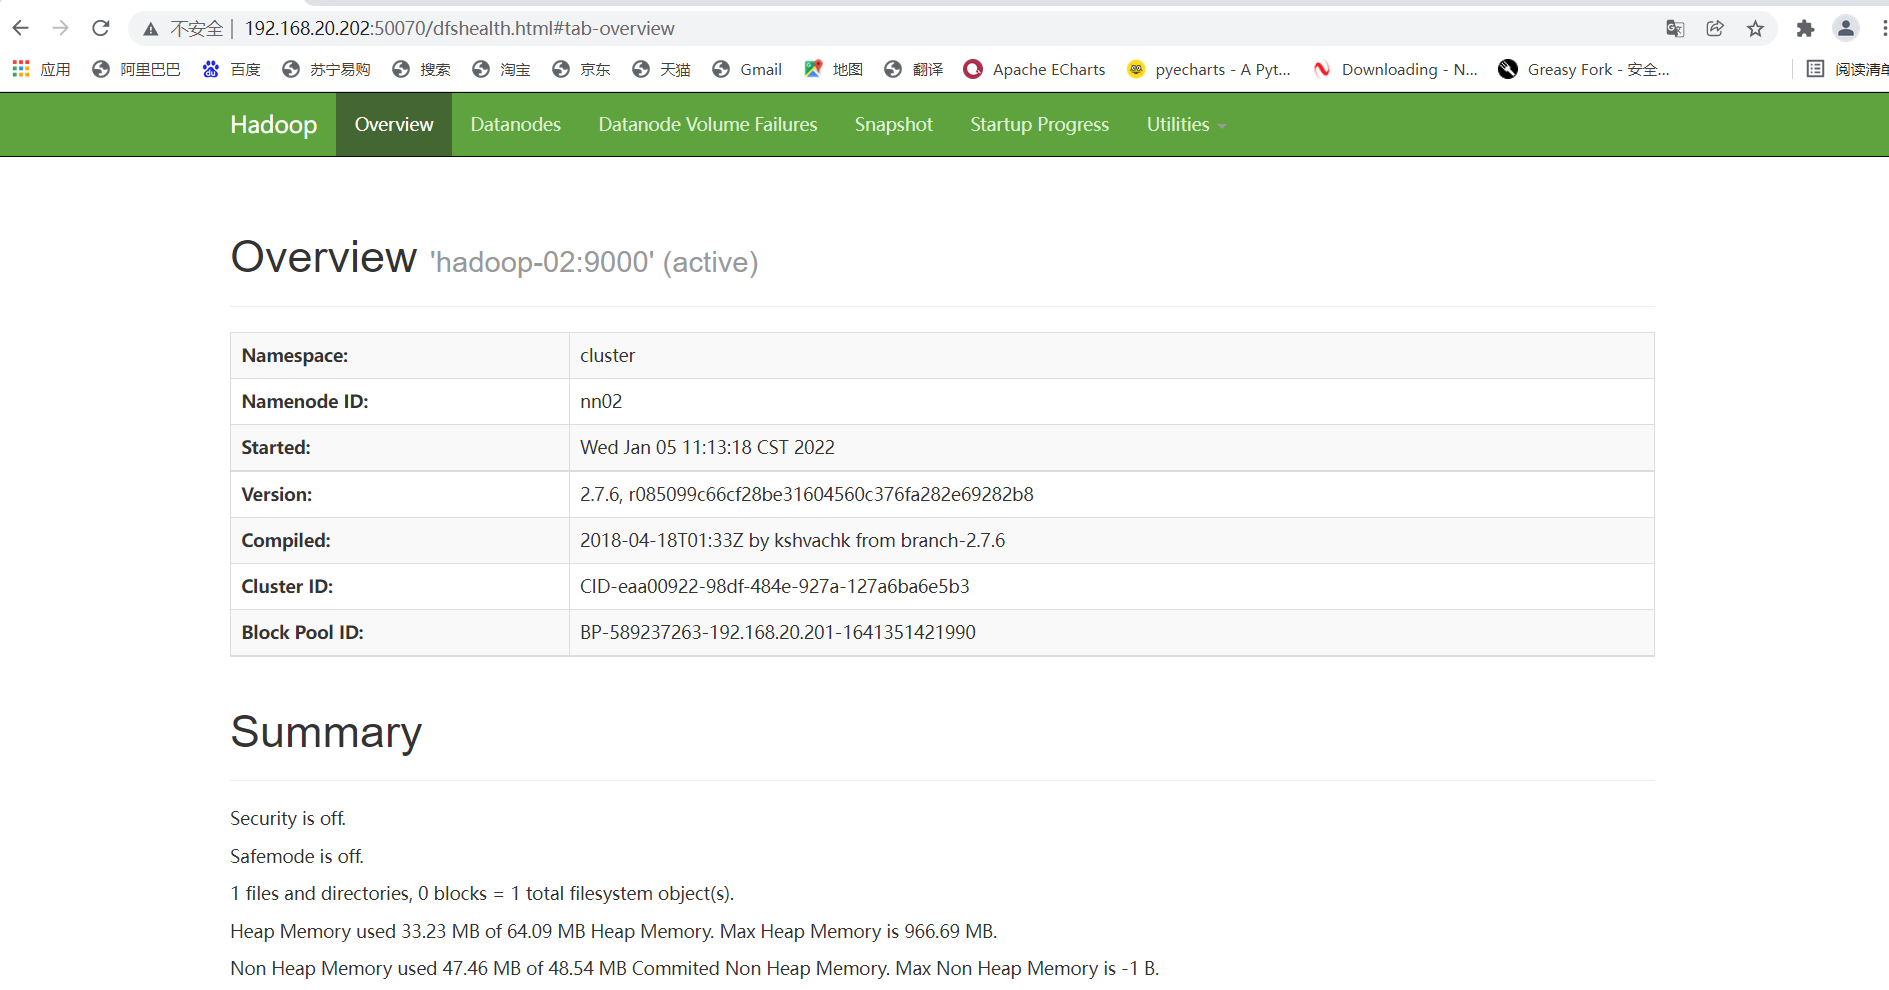
Start hadoop-01 again and it will become a standby node (if you are interested, you can kill each other, laugh and hehe)