This article is aimed at the developers of xuerchain, which is an introduction to the zero blockchain foundation. It introduces how to deploy the basic available environment of xuerchain and the basic operation and configuration of xuerchain service deployment, so as to help developers quickly understand the deployment process and basic functions of xuerchain and complete the first step of the chain.
This paper is mainly divided into two modules: xuerchain environment deployment and xuerchain service deployment.
XuperChain environment deployment
Step 1 prepare the environment
XuperChain is mainly developed by Golang language. First, you need to prepare the environment for compilation and operation:
(1) According to your computer operating system, install the go language compilation environment (the recommended version is 1.14 or 1.15): https://go.dev/dl/
(2) Install Git to help complete project version management effectively and at a high speed: https://git-scm.com/download
Step 2: compile XuperChain
(1) After compiling the running environment for XuperChain, download the XuperChain source code to the local using Git: https://github.com/xuperchain...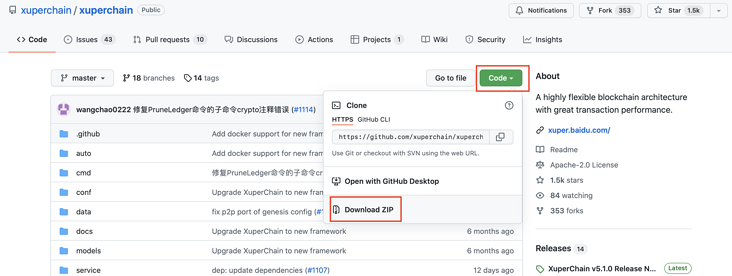
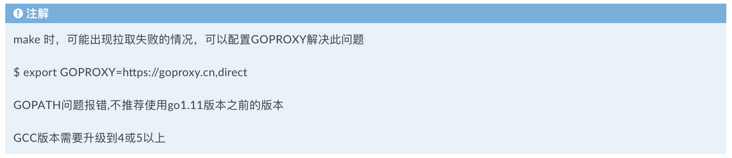
(2) After downloading the source code, execute the following command in the XuperChain Directory:
$ cd xuperchain
$ git checkout v5.1.0
$ make
After executing the command, you can get three folders of bin, conf and data and a control SH script. The functions of each directory are shown in the following table: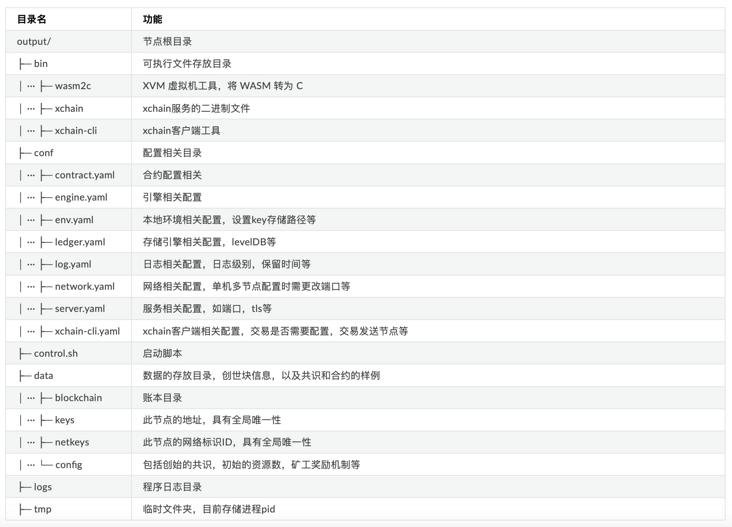
After the above operations, the basic deployment of the XuperChain compilation environment has been completed.
Xuperchain service deployment
After completing the deployment of the basic environment of XuperChain, the XuperChain service will be deployed. This part will take the chain of single node single consensus of XuperChain as an example to teach you how to quickly start a chain and use some basic functions on the chain.
Start a single node single consensus chain
The latest version of XuperChain provides a convenient script for starting the service. You only need to execute a command [controll.sh] under output to start the single node single consensus chain.
# Start xuper chain
$ bash control.sh start
/home/ubuntu/go/src/github.com/xuperchain/output/bin/xchain
/home/ubuntu/go/src/github.com/xuperchain/output/conf/env.yaml
2021/08/10 19:26:57 start create chain.bc_name:xuper genesis_conf:./data/genesis/xuper.json env_conf:./conf/env.yaml
2021/08/10 19:26:57 create ledger succ.bc_name:xuper start xchain. cmd:nohup /home/ubuntu/go/src/github.com/xuperchain/output/bin/xchain startup --conf /home/ubuntu/go/src/github.com/xuperchain/output/conf/env.yaml >/home/ubuntu/go/src/github.com/xuperchain/output/logs/nohup.out 2>&1 &
.start proc succ.
start finish.pid:17242
Done!
The [control.sh] script provides four commands: start, stop, restart and forcestop, which can be viewed by executing the [bash control.sh help] command.
According to the default configuration, xuprechain service will listen to port 37101. You can use the following command to view the running status of xuprechain service:
# check service health
 $ bin/xchain-cli status -H 127.0.0.1:37101
 {
   "blockchains": [
   {
     "name": "xuper",
     "ledger": {
       "rootBlockid": "d93c260ea5639a55e1fcad3df494495efad5c65d46e846b6db3a9194a4212886",
       "tipBlockid": "9555ca5af579db67734f27013dfaae48d93e4c3e8adcf6ca8f3dc1adb06d0b6f",
       "trunkHeight": 137
     },
     ....
         "9555ca5af579db67734f27013dfaae48d93e4c3e8adcf6ca8f3dc1adb06d0b6f"
      ]
     }
   ],
  "peers": null,
  "speeds": {}
}
Basic functions of XuperChain
Step 1: create an account
In XuperChain, account types are divided into "ordinary account" and "contract account".
Ordinary accounts are generated offline by the program and saved locally; The contract account is the unit used for smart contract management in XuperChain. The transaction is initiated by the ordinary account. A 16 digit account is generated on the chain and stored on the chain. When initiating contract related transactions, such as contract call, you need to use the contract account.
To create an account:
# Create an ordinary user. The generated address, public key and private key are at the location specified by -- output
$ bin/xchain-cli account newkeys --output data/bob
create account using crypto type default
create account in data/bob

## Create contract account
bin/xchain-cli account new --account 1111111111111111 --fee 2000
After the account is created, you will see the files address, publickey and privatekey generated in the data/bob directory. These are the address, public key and private key of the account created this time, which will be used in the following operations.
Step 2: query resource balance
Take an ordinary account as an example, use the following command to query the account resource balance, where - H parameter is the address of Xuperchain service.
# Query the account balance according to the account storage path-- keys is the address of the account to be queried
$ bin/xchain-cli account balance --keys data/keys
100000000000338000000

# Query the account balance according to the address
$ bin/xchain-cli account balance TeyyPLpp9L7QAcxHangtcHTu7HUZ6iydY
100000000000401000000
Step 3 transfer
The transfer operation needs to provide the private key directory of the source account, which is similar to the directory generated in "create new account". It is noted here that there is no need to provide any key of the target account, but only the address. The return of the command is the transaction id (txid) of the transfer operation.
# --keys transfer from this address to -- to address -- amount amount
$ bin/xchain-cli transfer --to czojZcZ6cHSiDVJ4jFoZMB1PjKnfUiuFQ --amount 10 --keys data/keys/ -H 127.0.0.1:37101
24d53ea6e61ede8dc4fe65a04fd30da17c079a359e700738f8795dfddc55ffb4
Step 4: query account transaction information
The following commands can be used to query transaction information, including transaction status, target account number of transaction, transaction amount, block (if linked), etc.
# You can query the transaction information of txid generated in the previous step
$ bin/xchain-cli tx query 24d53ea6e61ede8dc4fe65a04fd30da17c079a359e700738f8795dfddc55ffb4 -H 127.0.0.1:37101
{
   "txid": "24d53ea6e61ede8dc4fe65a04fd30da17c079a359e700738f8795dfddc55ffb4",
   "blockid": "e83eae0750d0f48cc2b45f25d853fb587d124552851bf6693757e0715837b377",
   "txInputs": [
    {
      "refTxid": "2650aa0c0e8088def98093a327b475fa7577fa8e266c5775435f7c022fe0f463",
      "refOffset": 0,
      "fromAddr": "TeyyPLpp9L7QAcxHangtcHTu7HUZ6iydY",
      "amount": "1000000"
    }
   ],
  ......
  "authRequireSigns": [
   {
      "publickey": "{\"Curvname\":\"P-256\",\"X\":36505150171354363400464126431978257855318414556425194490762274938603757905292,\"Y\":79656876957602994269528255245092635964473154458596947290316223079846501380076}",
      "sign": "30460221009509e35b1341284b5d1f22b48c862ecfe2856056196c5650bc203b8a4ed0d454022100f8d286c63ad8eb3bc605bc08da4ff417aaff3c0433a31039f608bb47a90b1267"
    }
   ],
  "receivedTimestamp": 1628596303271475925,
  "modifyBlock": {
    "marked": false,
    "effectiveHeight": 0,
    "effectiveTxid": ""
  }
}
Step 5: query block information
Through the block id, you can query the relevant information of the block, including the transactions packaged in the block, the height of the chain, the id of the precursor / successor block, etc.
# You can query the block id information of the previous transaction
$ bin/xchain-cli block e83eae0750d0f48cc2b45f25d853fb587d124552851bf6693757e0715837b377 -H 127.0.0.1:37101

{
"version": 1,
"blockid": "e83eae0750d0f48cc2b45f25d853fb587d124552851bf6693757e0715837b377",
"preHash": "41c74e22ccea7dcf1db6ba0d7e1eefd6cfbd7bac7659c3d8cd33d2a009201003",
"proposer": "TeyyPLpp9L7QAcxHangtcHTu7HUZ6iydY",
"sign": "3044021f349da2d5c238175a6e7df23262eeb122014f0a0040fc4ce109a3ab2c22b2700221009d92198061193fcd47e25c8f5c2b54e1ea2ffb4aaab675384c4d6408ab2b63de",
"pubkey": "{\"Curvname\":\"P-256\",\"X\":36505150171354363400464126431978257855318414556425194490762274938603757905292,\"Y\":79656876957602994269528255245092635964473154458596947290316223079846501380076}",
"merkleRoot": "d22d2423a93911e42f96370167d878f6780fea44fac6a13771c7532e1969c949",
"height": 492,
  ......
"txCount": 2,
"merkleTree": [
"4a7e42654cf79d6525f6b6d55673b57a92048ee96de950e962db99b102e048a4",
"24d53ea6e61ede8dc4fe65a04fd30da17c079a359e700738f8795dfddc55ffb4",
"d22d2423a93911e42f96370167d878f6780fea44fac6a13771c7532e1969c949"
  ],
"inTrunk": true,
"nextHash": "a541ed97789537166bec5778aad7ba0f68e52a04d1073b244ee1ea6cd38d8f63",
"failedTxs": null,
"curTerm": 0,
"curBlockNum": 0,
"justify": {}
}
Here, you have completed the deployment of the environment for compiling and running XuperChain, built the first chain and completed some basic operations after building the chain! If you have any questions about the above operations, welcome to add Baidu super chain assistant and enter the technical exchange group to discuss with us!