1. Set up zookeeper cluster
1.1 problems
This case requires:
- Set up zookeeper cluster
- 1 leader
- 2 follower s
- 1 observer
1.2 steps
To implement this case, you need to follow the following steps.
Step 1: install Zookeeper
1) Edit / etc/hosts and all cluster hosts can ping each other (configured on Hadoop 1 and synchronized to node-0001, node-0002 and node-0003)
[root@hadoop1 hadoop]# vim /etc/hosts
192.168.1.50  hadoop1
192.168.1.51  node-0001
192.168.1.52  node-0002
192.168.1.53  node-0003
192.168.1.56  newnode
[root@nn01 hadoop]# for i in {52..54}  \
do    \
scp /etc/hosts 192.168.1.$i:/etc/    \
done        //Synchronous configuration
hosts       100%  253   639.2KB/s   00:00
hosts       100%  253   497.7KB/s   00:00
hosts       100%  253   662.2KB/s   00:00
2) Install java-1.8.0-openjdk-devel. Since hadoop has been installed before, it will not be installed here. If it is a new machine, it will be installed
3) Extract and copy zookeeper to / usr/local/zookeeper
[root@hadoop1 ~]# tar -xf zookeeper-3.4.13.tar.gz
[root@hadoop1 ~]# mv zookeeper-3.4.13 /usr/local/zookeeper
4) Change the name of the configuration file and add the configuration at the end
[root@hadoop1 ~]# cd /usr/local/zookeeper/conf/
[root@hadoop1 conf]# ls
configuration.xsl  log4j.properties  zoo_sample.cfg
[root@hadoop1 conf]# mv zoo_sample.cfg  zoo.cfg
[root@hadoop1 conf]# chown root.root zoo.cfg
[root@hadoop1 conf]# vim zoo.cfg
server.1=node-0001:2888:3888
server.2=node-0002:2888:3888
server.3=node-0003:2888:3888
server.4=hadoop1:2888:3888:observer
5) Copy / usr/local/zookeeper to another cluster host
[root@hadoop1 conf]# for i in {52..54}; do rsync -aSH --delete /usr/local/zookeeper/ 192.168.1.$i:/usr/local/zookeeper  -e 'ssh' & done
[4] 4956
[5] 4957
[6] 4958
6) Create mkdir /tmp/zookeeper, each
[root@hadoop1 conf]# mkdir /tmp/zookeeper
[root@hadoop1 conf]# ssh node-0001 mkdir /tmp/zookeeper
[root@hadoop1 conf]# ssh node-0002 mkdir /tmp/zookeeper
[root@hadoop1 conf]# ssh node-0003 mkdir /tmp/zookeeper
7) Create a myid file. The id must be the server corresponding to the hostname in the configuration file (id) consistent
[root@hadoop1 conf]# echo 4 >/tmp/zookeeper/myid
[root@hadoop1 conf]# ssh node-0001 'echo 1 >/tmp/zookeeper/myid'
[root@hadoop1 conf]# ssh node-0002 'echo 2 >/tmp/zookeeper/myid'
[root@hadoop1 conf]# ssh node-0003 'echo 3 >/tmp/zookeeper/myid'
8) Start the service. You can't view the status of a single machine. You need to start all clusters before you can view the status. Each machine should be started manually (take Hadoop 1 as an example)
[root@hadoop1 conf]# /usr/local/zookeeper/bin/zkServer.sh start
ZooKeeper JMX enabled by default
Using config: /usr/local/zookeeper/bin/../conf/zoo.cfg
Starting zookeeper ... STARTED
Note: when you start zookeeper to check the status, an error is reported. The number of starts should be more than half. Then you can see it again
9) View status
[root@hadoop1 conf]# /usr/local/zookeeper/bin/zkServer.sh status
ZooKeeper JMX enabled by default
Using config: /usr/local/zookeeper/bin/../conf/zoo.cfg
Mode: observe
[root@hadoop1 conf]# /usr/local/zookeeper/bin/zkServer.sh stop
//View status after shutdown roles of other servers
ZooKeeper JMX enabled by default
Using config: /usr/local/zookeeper/bin/../conf/zoo.cfg
Stopping zookeeper ... STOPPED
2. Test the remote management and high availability of the cluster
2.1 problems
This case requires:
- Test the remote management and high availability of the cluster
2.2 steps
To implement this case, you need to follow the following steps.
Step 1: test the remote management and high availability of the cluster
[root@hadoop1 conf]# socat - TCP:node1:2181
stat
... ...
Outstanding: 0
Zxid: 0x0
Mode: follower
Node count: 4
[root@hadoop1 conf]# vim api.sh
#!/bin/bash
function getstatus(){
    exec 9<>/dev/tcp/$1/2181 2>/dev/null
    echo stat >&9
    MODE=$(cat <&9 |grep -Po "(?<=Mode:).*")
    exec 9<&-
    echo ${MODE:-NULL}
}
for i in node{1..3} hadoop1;do
    echo -ne "${i}\t"
    getstatus ${i}
done
[root@hadoop1 conf]# chmod 755 api.sh
[root@hadoop1 conf]# ./api.sh
node-0001        follower
node-0002        leader
node-0003        follower
hadoop1        observer
3. Build three kafka on the node
3.1 problems
This case requires:
- Build 3 kafka on node
- node-0001
- node-0002
- node-0003
- Publish subscribe message test
3.2 steps
To implement this case, you need to follow the following steps.
Step 1: build Kafka cluster
1) Unzip the kafka package
Kafka can operate on node-0001, node-0002 and node-0003
[root@node-0001 hadoop]# tar -xf kafka_2.12-2.1.0.tgz
2) Copy kafka to / usr/local/kafka
[root@node-0001 ~]# mv kafka_2.12-2.1.0 /usr/local/kafka
3) Modify the configuration file / usr / local / Kafka / config / server properties
[root@node-0001 ~]# cd /usr/local/kafka/config
[root@node-0001 config]# vim server.properties
broker.id=22
zookeeper.connect=node-0001:2181,node-0002:2181,node-0003:2181
4) Copy kafka to another host and modify the broker ID, cannot be repeated
[root@node-0001 config]# for i in 53 54; do rsync -aSH --delete /usr/local/kafka 192.168.1.$i:/usr/local/; done
[1] 27072
[2] 27073
[root@node-0002 ~]# vim /usr/local/kafka/config/server.properties
//node-0002 host modification
broker.id=23
[root@node-0003 ~]# vim /usr/local/kafka/config/server.properties
//node-0003 host modification
broker.id=24
5) Start kafka cluster (node-0001, node-0002, node-0003 start)
[root@node-0001 local]# /usr/local/kafka/bin/kafka-server-start.sh -daemon /usr/local/kafka/config/server.properties
[root@node-0001 local]# jps / / kafka appears
26483 DataNode
27859 Jps
27833 Kafka
26895 QuorumPeerMain
6) Verify the configuration and create a topic
[root@node-0001 local]# /usr/local/kafka/bin/kafka-topics.sh --create --partitions 1 --replication-factor 1 --zookeeper localhost:2181 --topic mymsg

Created topic "mymsg".
\7) Simulate producers and release messages
[root@node-0002 ~]# /usr/local/kafka/bin/kafka-console-producer.sh --broker-list  localhost:9092 --topic mymsg
        //Write a data
ccc
ddd
9) Simulate consumers and receive messages
[root@node-0003 ~]# /usr/local/kafka/bin/kafka-console-consumer.sh --bootstrap-server localhost:9092 --topic mymsg
        //This side will synchronize directly
ccc
ddd
Note: kafka eats more memory. You can stop it after this kafka experiment
4. Prepare the experimental environment
4.1 problems
This case requires:
- All nodes
- 192.168.1.50 hadoop1
- 192.168.1.56 hadoop2
- 192.168.1.51 node-0001
- 192.168.1.52 node-0002
- 192.168.1.53 node-0003
- Install java-1.8.0-openjdk-devel on the new machine
- New machine configuration / etc/hosts
- Configure ssh key free login for the new machine
- Modify profile
4.2 scheme
Configure the high availability of Hadoop to solve the single point of failure of NameNode. Use the Hadoop cluster built before, and add a Hadoop 2 with an ip of 192.168.1.56. The specific requirements are shown in figure-1:
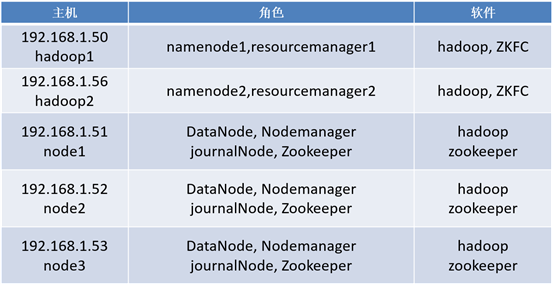
Figure-1
4.3 steps
To implement this case, you need to follow the following steps.
Step 1: high availability of hadoop
1) Stop all services (since kafka's experiment has been stopped after it is completed, it will not be repeated here)
[root@hadoop1 ~]# cd /usr/local/hadoop/
[root@hadoop1 hadoop]# ./sbin/stop-all.sh / / stop all services
2) Start zookeeper (you need to start one by one). Here, take Hadoop 1 as an example
[root@hadoop1 hadoop]# /usr/local/zookeeper/bin/zkServer.sh start
[root@hadoop1 hadoop]# sh /usr/local/zookeeper/conf/api.sh / / use the previously written script to view
node-0001        follower
node-0002        leader
node-0003        follower
hadoop1        observer
3) Add a new machine Hadoop 2. There was a new node here, which can be used as Hadoop 2
[root@newnode ~]# echo hadoop2 > /etc/hostname
[root@newnode ~]# hostname hadoop2
4) Modify vim /etc/hosts
[root@hadoop1 hadoop]# vim /etc/hosts
192.168.1.50  hadoop1
192.168.1.56  hadoop2
192.168.1.51  node-0001
192.168.1.52  node-0002
192.168.1.53  node-0003
5) Synchronize to Hadoop 2, node-0001, node-0002, node-0003
[root@hadoop1 hadoop]# for i in {51..53} 56; do rsync -aSH --delete /etc/hosts 192.168.1.$i:/etc/hosts  -e 'ssh' & done
[1] 14355
[2] 14356
[3] 14357
[4] 14358
6) Configure SSH trust
Note: Hadoop 1 and Hadoop 2 do not need a password to connect with each other. Hadoop 2 does not need a password to connect itself with node-0001, node-0002 and node-0003
[root@hadoop2 ~]# vim /etc/ssh/ssh_config
Host *
        GSSAPIAuthentication yes
        StrictHostKeyChecking no
[root@hadoop1 hadoop]# cd /root/.ssh/
[root@hadoop1 .ssh]# scp id_rsa id_rsa.pub  hadoop2:/root/.ssh/
//Give Hadoop 2 the public key and private key of Hadoop 1
7) Delete / var/hadoop from all hosts/*
[root@hadoop1 .ssh]# rm -rf /var/hadoop/*
5. Configure namenode and resource manager for high availability
5.1 problems
This case requires:
- Configure namenode and resource manager high availability
- hadoop-env.sh
- core-site.xml
- hdfs-site.xml
- mapred-site.xml
- yarn-site.xml
- slaves
5.2 steps
To implement this case, you need to follow the following steps.
Step 1: high availability of hadoop
1) Configure core site
[root@hadoop1 .ssh]# vim /usr/local/hadoop/etc/hadoop/core-site.xml
<configuration>
<property>
        <name>fs.defaultFS</name>
        <value>hdfs://nsdcluster</value>
//nsdcluster is a casual name. It is equivalent to a group. You can access this group when accessing
    </property>
    <property>
        <name>hadoop.tmp.dir</name>
        <value>/var/hadoop</value>
    </property>
    <property>
        <name>ha.zookeeper.quorum</name>
        <value>node-0001:2181,node-0002:2181,node-0003:2181</value>    //zookeepe's address
    </property>
    <property>
        <name>hadoop.proxyuser.nfs.groups</name>
        <value>*</value>
    </property>
    <property>
        <name>hadoop.proxyuser.nfs.hosts</name>
        <value>*</value>
    </property>
</configuration>
2) Configure HDFS site
[root@hadoop1 ~]# vim /usr/local/hadoop/etc/hadoop/hdfs-site.xml
<configuration>
    <property>
        <name>dfs.replication</name>
        <value>2</value>
    </property>
    <property>
        <name>dfs.nameservices</name>
        <value>nsdcluster</value>
    </property>
    <property>
        <name>dfs.ha.namenodes.nsdcluster</name>
//nn1 and nn2 have fixed names and are built-in variables. There are nn1 and nn2 in nsdcluster
        <value>nn1,nn2</value>
    </property>
    <property>
        <name>dfs.namenode.rpc-address.nsdcluster.nn1</name>
//Declare nn1 8020 as the communication port, which is the rpc communication port of Hadoop 1
        <value>hadoop1:8020</value>
    </property>
    <property>
        <name>dfs.namenode.rpc-address.nsdcluster.nn2</name>
//Declare who nn2 is and the rpc communication port of Hadoop 2
        <value>hadoop2:8020</value>
    </property>
    <property>
        <name>dfs.namenode.http-address.nsdcluster.nn1</name>
//http communication port of Hadoop 1
        <value>hadoop1:50070</value>
    </property>
    <property>
        <name>dfs.namenode.http-address.nsdcluster.nn2</name>
//http communication ports of Hadoop 1 and Hadoop 2
        <value>hadoop2:50070</value>
    </property>
    <property>
        <name>dfs.namenode.shared.edits.dir</name>
//Specify the path where the namenode metadata is stored in the journalnode
        <value>qjournal://node-0001:8485;node-0002:8485;node-0003:8485/nsdcluster</value>
    </property>
    <property>
        <name>dfs.journalnode.edits.dir</name>
//Specifies the path to the journalnode log file store
        <value>/var/hadoop/journal</value>
    </property>
    <property>
        <name>dfs.client.failover.proxy.provider.nsdcluster</name>
//Specifies the java class of HDFS client connection active namenode
        <value>org.apache.hadoop.hdfs.server.namenode.ha.ConfiguredFailoverProxyProvider</value>
    </property>
    <property>
        <name>dfs.ha.fencing.methods</name>                    //Configure the isolation mechanism as ssh
        <value>sshfence</value>
    </property>
    <property>
        <name>dfs.ha.fencing.ssh.private-key-files</name>    //Specify the location of the key
        <value>/root/.ssh/id_rsa</value>
    </property>
    <property>
        <name>dfs.ha.automatic-failover.enabled</name>        //Turn on automatic failover
        <value>true</value>
    </property>
</configuration>
3) Configure yarn site
[root@hadoop1 ~]# vim /usr/local/hadoop/etc/hadoop/yarn-site.xml
<configuration>
<!-- Site specific YARN configuration properties -->
    <property>
        <name>yarn.nodemanager.aux-services</name>
        <value>mapreduce_shuffle</value>
    </property>
    <property>
        <name>yarn.resourcemanager.ha.enabled</name>
        <value>true</value>
    </property>
    <property>
        <name>yarn.resourcemanager.ha.rm-ids</name>        //RM1 and RM2 represent Hadoop 1 and Hadoop 2
        <value>rm1,rm2</value>
    </property>
    <property>
        <name>yarn.resourcemanager.recovery.enabled</name>
        <value>true</value>
    </property>
    <property>
        <name>yarn.resourcemanager.store.class</name>
        <value>org.apache.hadoop.yarn.server.resourcemanager.recovery.ZKRMStateStore</value>
    </property>
    <property>
        <name>yarn.resourcemanager.zk-address</name>
        <value>node-0001:2181,node-0002:2181,node-0003:2181</value>
    </property>
    <property>
        <name>yarn.resourcemanager.cluster-id</name>
        <value>yarn-ha</value>
    </property>
    <property>
        <name>yarn.resourcemanager.hostname.rm1</name>
        <value>hadoop1</value>
    </property>
    <property>
        <name>yarn.resourcemanager.hostname.rm2</name>
        <value>hadoop2</value>
    </property>
</configuration>
6. Start the service and verify high availability
6.1 problems
This case requires:
- Start the service and verify high availability
- Stop an active node while analyzing data
- Verify high availability status and data
6.2 steps
To implement this case, you need to follow the following steps.
Step 1: hadoop high availability verification
1) Synchronize to Hadoop 2, node-0001, node-0002, node-0003
[root@hadoop1 ~]# for i in {51..53} 56; do rsync -aSH --delete /usr/local/hadoop/ 192.168.1.$i:/usr/local/hadoop  -e 'ssh' & done
[1] 25411
[2] 25412
[3] 25413
[4] 25414
2) Delete / user/local/hadoop/logs on all machines to facilitate troubleshooting
[root@hadoop1 ~]# for i in {50..53} 56; do ssh 192.168.1.$i rm -rf /usr/local/hadoop/logs ; done
3) Synchronous configuration
[root@hadoop1 ~]# for i in {51..53} 56; do rsync -aSH --delete /usr/local/hadoop 192.168.1.$i:/usr/local/hadoop -e 'ssh' & done
[1] 28235
[2] 28236
[3] 28237
[4] 28238
4) Initialize ZK cluster
[root@hadoop1 ~]# /usr/local/hadoop/bin/hdfs zkfc -formatZK
...
18/09/11 15:43:35 INFO ha.ActiveStandbyElector: Successfully created /hadoop-ha/nsdcluster in ZK    //Successful is success
...
5) Start the journalnode service on node-0001, node-0002 and node-0003 (take node-0001 as an example)
[root@node-0001 ~]# /usr/local/hadoop/sbin/hadoop-daemon.sh start journalnode
starting journalnode, logging to /usr/local/hadoop/logs/hadoop-root-journalnode-node-0001.out
[root@node-0001 ~]# jps
29262 JournalNode
26895 QuorumPeerMain
29311 Jps
6) For formatting, start journalnode on node-0001, node-0002 and node-0003 before formatting
[root@hadoop1 ~]# /usr/local/hadoop//bin/hdfs  namenode  -format
//Successful is success
[root@hadoop1 hadoop]# ls /var/hadoop/
dfs
7) Hadoop 2 data synchronization to local / var/hadoop/dfs
[root@hadoop2 ~]# cd /var/hadoop/
[root@hadoop2 hadoop]# ls
[root@hadoop2 hadoop]# rsync -aSH  hadoop1:/var/hadoop/  /var/hadoop/
[root@hadoop2 hadoop]# ls
dfs
8) Initialize JNS
[root@hadoop1 hadoop]# /usr/local/hadoop/bin/hdfs namenode -initializeSharedEdits
18/09/11 16:26:15 INFO client.QuorumJournalManager: Successfully started new epoch 1        //Successfully appears, and a node is successfully opened
9) Stop the journalnode service (node-0001, node-0002, node-0003)
[root@node-0001 hadoop]# /usr/local/hadoop/sbin/hadoop-daemon.sh stop journalnode
stopping journalnode
[root@node-0001 hadoop]# jps
29346 Jps
26895 QuorumPeerMain
Step 2: start the cluster
1) Hadoop 1 operation above
[root@hadoop1 hadoop]# /usr/local/hadoop/sbin/start-all.sh / / start all clusters
This script is Deprecated. Instead use start-dfs.sh and start-yarn.sh
Starting namenodes on [hadoop1 hadoop2]
hadoop1: starting namenode, logging to /usr/local/hadoop/logs/hadoop-root-namenode-hadoop1.out
hadoop2: starting namenode, logging to /usr/local/hadoop/logs/hadoop-root-namenode-hadoop2.out
node-0002: starting datanode, logging to /usr/local/hadoop/logs/hadoop-root-datanode-node-0002.out
node-0003: starting datanode, logging to /usr/local/hadoop/logs/hadoop-root-datanode-node-0003.out
node-0001: starting datanode, logging to /usr/local/hadoop/logs/hadoop-root-datanode-node-0001.out
Starting journal nodes [node-0001 node-0002 node-0003]
node-0001: starting journalnode, logging to /usr/local/hadoop/logs/hadoop-root-journalnode-node-0001.out
node-0003: starting journalnode, logging to /usr/local/hadoop/logs/hadoop-root-journalnode-node-0003.out
node-0002: starting journalnode, logging to /usr/local/hadoop/logs/hadoop-root-journalnode-node-0002.out
Starting ZK Failover Controllers on NN hosts [hadoop1 hadoop2]
hadoop1: starting zkfc, logging to /usr/local/hadoop/logs/hadoop-root-zkfc-hadoop1.out
hadoop2: starting zkfc, logging to /usr/local/hadoop/logs/hadoop-root-zkfc-hadoop2.out
starting yarn daemons
starting resourcemanager, logging to /usr/local/hadoop/logs/yarn-root-resourcemanager-hadoop1.out
node-0002: starting nodemanager, logging to /usr/local/hadoop/logs/yarn-root-nodemanager-node-0002.out
node-0001: starting nodemanager, logging to /usr/local/hadoop/logs/yarn-root-nodemanager-node-0001.out
node-0003: starting nodemanager, logging to /usr/local/hadoop/logs/yarn-root-nodemanager-node-0003.out
2) Hadoop 2 operation above
[root@hadoop2 hadoop]# /usr/local/hadoop/sbin/yarn-daemon.sh start resourcemanager
starting resourcemanager, logging to /usr/local/hadoop/logs/yarn-root-resourcemanager-hadoop2.out
3) View cluster status
[root@hadoop1 hadoop]# /usr/local/hadoop/bin/hdfs haadmin -getServiceState nn1
active
[root@hadoop1 hadoop]# /usr/local/hadoop/bin/hdfs haadmin -getServiceState nn2
standby
[root@hadoop1 hadoop]# /usr/local/hadoop/bin/yarn rmadmin -getServiceState rm1
active
[root@hadoop1 hadoop]# /usr/local/hadoop/bin/yarn rmadmin -getServiceState rm2
standby
4) Check whether the node is joined
[root@hadoop1 hadoop]# /usr/local/hadoop/bin/hdfs dfsadmin -report
...
Live datanodes (3):    //There will be three nodes
...
[root@hadoop1 hadoop]# /usr/local/hadoop/bin/yarn  node  -list
Total Nodes:3
         Node-Id         Node-State    Node-Http-Address    Number-of-Running-Containers
     node-0002:43307            RUNNING           node-0002:8042                               0
     node-0001:34606            RUNNING           node-0001:8042                               0
     node-0003:36749            RUNNING           node-0003:8042
Step 3: access the cluster
1) View and create
[root@hadoop1 hadoop]# /usr/local/hadoop/bin/hadoop  fs -ls  /
[root@hadoop1 hadoop]# /Usr / local / Hadoop / bin / Hadoop FS - MKDIR / aa / / create aa
[root@hadoop1 hadoop]# /Usr / local / Hadoop / bin / Hadoop FS - LS / / view again
Found 1 items
drwxr-xr-x   - root supergroup          0 2018-09-11 16:54 /aa
[root@hadoop1 hadoop]# /usr/local/hadoop/bin/hadoop  fs -put *.txt /aa
[root@hadoop1 hadoop]# /usr/local/hadoop/bin/hadoop  fs -ls hdfs://nsdcluster/aa
//You can also view it this way
Found 3 items
-rw-r--r--  2 root supergroup 86424 2018-09-11 17:00 hdfs://nsdcluster/aa/LICENSE.txt
-rw-r--r--  2 root supergroup 14978 2018-09-11 17:00 hdfs://nsdcluster/aa/NOTICE.txt
-rw-r--r--  2 root supergroup 1366 2018-09-11 17:00 hdfs://nsdcluster/aa/README.txt
2) Verify high availability and close active namenode
[root@hadoop1 hadoop]# /usr/local/hadoop/bin/hdfs haadmin -getServiceState nn1
active
[root@hadoop1 hadoop]# /usr/local/hadoop/sbin/hadoop-daemon.sh stop namenode
stopping namenode
[root@hadoop1 hadoop]# /usr/local/hadoop/bin/hdfs haadmin -getServiceState nn1
//If you check it again, an error will be reported
[root@hadoop1 hadoop]# /usr/local/hadoop/bin/hdfs haadmin -getServiceState nn2
//Hadoop 2 has changed from standby to active
active
[root@hadoop1 hadoop]# /usr/local/hadoop/bin/yarn rmadmin -getServiceState rm1
active
[root@hadoop1 hadoop]# /usr/local/hadoop/sbin/yarn-daemon.sh stop resourcemanager
//Stop resourcemanager
[root@hadoop1 hadoop]# /usr/local/hadoop/bin/yarn rmadmin -getServiceState rm2
active
3) Recovery node
[root@hadoop1 hadoop]# /usr/local/hadoop/sbin/hadoop-daemon.sh start namenode
//Start namenode
[root@hadoop1 hadoop]# /usr/local/hadoop/sbin/yarn-daemon.sh start resourcemanager
//Start resourcemanager
[root@hadoop1 hadoop]# /usr/local/hadoop/bin/hdfs haadmin -getServiceState nn1
//see
[root@hadoop1 hadoop]# /usr/local/hadoop/bin/yarn rmadmin -getServiceState rm1
//see
Exercise
1 briefly describe what Zookeeper is and its role
What is Zookeeper:
Zookeeper is an open source distributed application coordination service
effect:
It is used to ensure the transaction consistency of data between clusters
2. Briefly describe the role and characteristics of Zookeeper
Leader: accept the proposal requests of all followers, coordinate the voting of the proposal uniformly, and be responsible for internal data exchange with all followers
Follower: directly serve the client, participate in the voting of the proposal, and exchange data with the Leader
Observer: directly serves the client, but does not participate in the voting of the proposal, and also exchanges data with the Leader
3 how to view the status of Zookeeper using api
[root@nn01 conf]# /usr/local/zookeeper/bin/zkServer.sh start
[root@nn01 conf]# vim api.sh
#!/bin/bash
function getstatus(){
    exec 9<>/dev/tcp/$1/2181 2>/dev/null
    echo stat >&9
    MODE=$(cat <&9 |grep -Po "(?<=Mode:).*")
    exec 9<&-
    echo ${MODE:-NULL}
}
for i in node{1..3} nn01;do
    echo -ne "${i}\t"
    getstatus ${i}
done
[root@nn01 conf]# chmod 755 api.sh
[root@nn01 conf]# ./api.sh
node1    follower
node2    leader
node3    follower
nn01    observer
4 how to create a topic in Kafka cluster
[root@node1 local]# /usr/local/kafka/bin/kafka-topics.sh --create --partitions 1 --replication-factor 1 --zookeeper node3:2181 --topic aa
Created topic "aa".
In case of infringement, please contact the author to delete