1, Interface idempotency
Interface idempotency means that the results of one request or multiple requests initiated by the user for the same operation are consistent, and there will be no side effects due to multiple clicks. The simplest example is payment. The user pays after purchasing goods, and the payment is deducted successfully. However, when the result is returned, the network is abnormal. At this time, the money has been deducted. The user clicks the button again, and the second deduction will be made. The result is returned successfully. The user queries the balance and finds that more money has been deducted, and the daily record has become two, This does not guarantee the idempotency of the interface.
The core idea of idempotency: ensure idempotency through a unique business order number. In non concurrent cases, query whether the business order number has been operated. If not, perform the operation. In concurrent cases, this operation process needs to be locked.
1. Idempotency of Update operation
1) Update the data according to the unique business number
The idempotency of the update operation is controlled by the version number. The user queries the data to be modified. The system returns the data to the page and puts the data version number into the hidden field. The user modifies the data and clicks submit to submit the version number to the background. The background uses the version number as the update condition
update set version = version +1 ,xxx=${xxx} where id =xxx and version = ${version};
2. The Token mechanism is used to ensure the idempotency of update and insert operations
1) update and insert operations without unique business number
When entering the registration page, the background generates Token uniformly, and returns to the hidden area of the foreground. When the user clicks and submits the page, the simultaneous interpreting of Token is introduced into the background. The Token is used to get the distributed lock and complete the Insert operation. After successful execution, the lock is not released, and the automatic release is delayed.
2, Distributed current limiting
1. Several dimensions of distributed current limiting
Time flow restriction is based on a certain time range or a certain time point, which is often referred to as "time window". For example, time windows per minute and per second are limited. Resources are limited based on available resources, such as setting the maximum number of accesses or the maximum number of available connections
When the above two dimensions are combined, flow restriction is to restrict resource access in a certain time window, such as setting a maximum of 100 access requests per second. However, in the real scenario, we will not only set one current limit rule, but also set multiple current limit rules to work together. The main current limit rules are as follows:
1) QPS and connection number control
For the number of connections and QPS(query per second) flow limit in the figure above, we can set the flow limit of IP dimension or based on a single server. In the real environment, current limiting rules of multiple dimensions are usually set. For example, set the access frequency per second of the same IP to be less than 10 and the number of connections to be less than 5, and then set the maximum QPS of each machine to be 1000 and the maximum number of connections to be 200.
Further, we can take the servers of a server group or the whole computer room as a whole and set higher-level flow restriction rules. All these flow restriction rules will work together in flow control.
2) Transmission rate
Everyone is familiar with "transmission rate", such as the download speed of resources. Some websites have more detailed flow restriction logic in this regard. For example, the download speed of ordinary registered users is 100k/s and 10M/s after purchasing members. Behind this is the flow restriction logic based on user groups or user labels.
3) Black and white list
Black and white list is a very common means of flow restriction and release in various large enterprise applications, and the black and white list often changes dynamically. For example, if an IP is accessed too frequently over a period of time and is identified by the system as a robot user or traffic attack, the IP will be added to the blacklist to limit its access to system resources, which is commonly known as "blocking IP".
The crawler programs we usually see, such as the beautiful pictures of crawling Zhihu, or the stock time-sharing information of the securities company system, must realize the function of changing IP to prevent being added to the blacklist. Sometimes we also find that the company's network cannot access large public websites such as 12306. This is also because the outgoing IP of some companies is the same address. Therefore, when the traffic is too high, this IP address is recognized by the other party's system and added to the blacklist. Students who use home broadband should know that most network operators will assign users to different outgoing IP segments, or dynamically change users' IP addresses from time to time.
The white list is better understood. It is equivalent to a royal gold medal. You can freely shuttle through various flow restriction rules. For example, some e-commerce companies will add the accounts of super sellers to the white list, because such sellers often have their own set of operation and maintenance system, and need to connect with the company's IT system to do a lot of commodity release, replenishment and other operations.
4) Distributed environment
The so-called distributed current limiting actually has a very simple truth, which can be explained in a sentence. Distributed is different from the single machine current limiting scenario. It considers all servers in the whole distributed environment as a whole. For example, for IP flow restriction, we limit the maximum access of one IP to 10 per second. No matter which machine the request from this IP falls on, as long as it accesses the service node in the cluster, it will be restricted by the flow restriction rules.
It is not difficult to see from the above example that we must save the current limit information on a "centralized" component, so that it can obtain the access status of all machines in the cluster. At present, there are two mainstream current limit schemes:
Gateway layer current limiting
- Apply flow restriction rules to all flow inlets
Middleware current limiting
- Store the flow restriction information in a middleware (such as Redis cache) in the distributed environment, from which each component can obtain the traffic statistics at the current time, so as to decide whether to refuse service or release traffic
2. Explanation of common algorithms of current limiting scheme
1) Token bucket algorithm
Token Bucket token bucket algorithm is the most widely used current limiting algorithm. As the name suggests, it has the following two key roles:
- The token will be processed only when the token is obtained, and other Requests will either be queued or directly discarded
- Where the bucket is used to hold tokens, all requests obtain tokens from this bucket
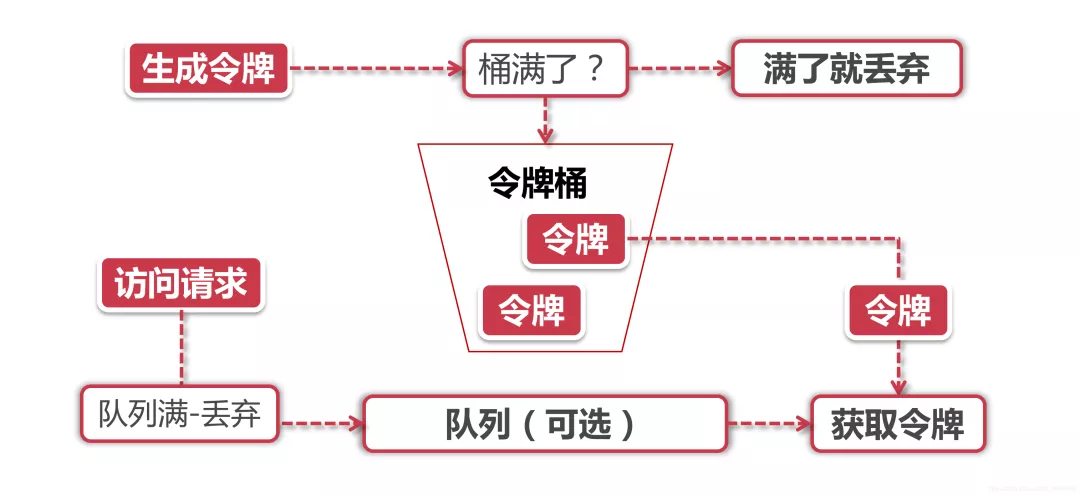
Token generation
This process involves token generator and token bucket. We mentioned earlier that token bucket is a place to hold tokens. Since it is a bucket, it must have a capacity, that is, the number of tokens that can be held in the token bucket is a fixed value.
For the token generator, it will add tokens to the bucket according to a predetermined rate. For example, we can configure it to issue tokens at the rate of 100 requests per second or 50 requests per minute. Note that the issuing speed here is uniform, that is, the 50 tokens are not issued at the beginning of each time window, but will be issued at a uniform speed within this time window.
The token dispenser is a faucet. If the bucket receiving water below is full, the water (token) will naturally flow out. In the process of token issuance, the capacity of the token bucket is limited. If the token with rated capacity has been filled, the new token will be discarded.
Token acquisition
After each access request arrives, a token must be obtained to execute the following logic. If the number of tokens is small and there are many access requests, some requests naturally cannot obtain tokens, then we can set a "buffer queue" to temporarily store these redundant tokens at this time.
Buffer queue is actually an optional option. Not all programs that apply token bucket algorithm will implement queue. When a cache queue exists, those requests that have not obtained a token will be queued in this queue until a new token is generated, and then a request will be taken out from the queue head to match the token.
When the queue is full, these access requests will be discarded. In practical application, we can also add a series of special effects to this queue, such as setting the survival time of requests in the queue, or transforming the queue into a PriorityQueue, which is sorted according to a certain priority rather than first in first out. Algorithms are dead, people are alive, and advanced productivity comes from continuous creation, especially in the field of technology.
2) Leaky bucket algorithm
Leaky Bucket
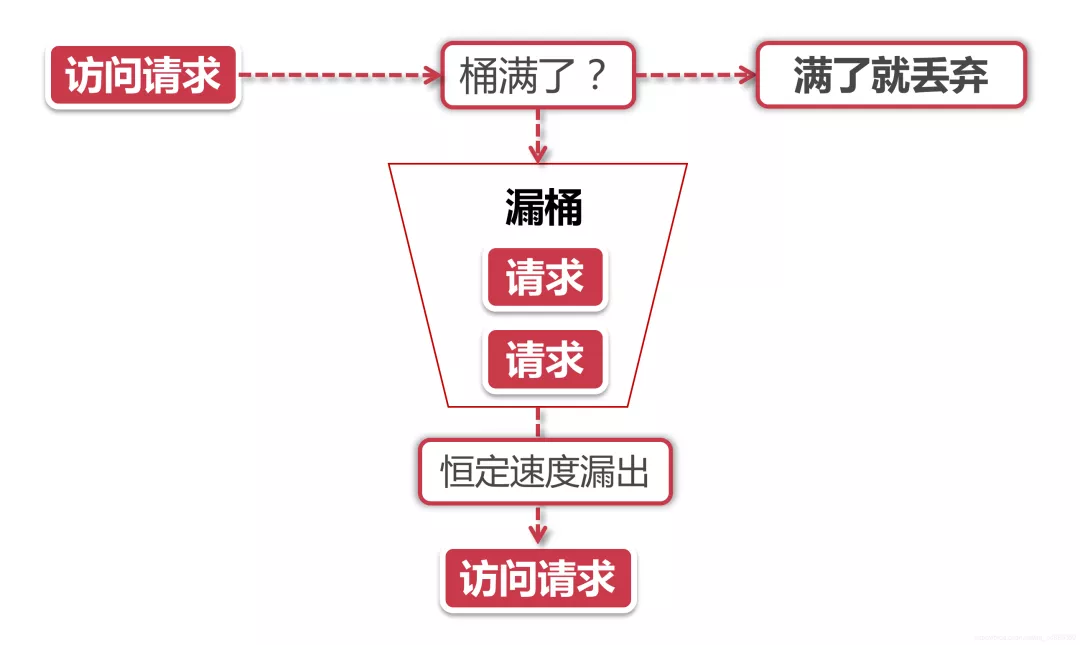
The first half of the leaky bucket algorithm is similar to the token bucket, but the objects of operation are different. The token bucket puts the token into the bucket, while the leaky bucket puts the data packet of the access request into the bucket. Similarly, if the bucket is full, the subsequent new packets will be discarded.
The second half of the leaky bucket algorithm has distinct characteristics. It will always flow packets out of the bucket at a constant rate. For example, if I set the leaky bucket to store 100 packets, and then the outflow speed is 1s, no matter what rate the packets flow into the bucket and how many packets there are in the bucket, the leaky bucket can ensure that these packets will always be processed at a constant speed of 1s.
Difference between leaky bucket and token bucket
According to their respective characteristics, it is not difficult to see that both algorithms have a "constant" rate and an "uncertain" rate. The token bucket creates tokens at a constant rate, but the rate at which the access request obtains tokens is "uncertain". Anyway, how many tokens are sent, and when the tokens are gone, etc. The leaky bucket processes requests at a "constant" rate, but the rate at which these requests flow into the bucket is "variable".
From these two characteristics, the natural characteristics of the vulnerability determine that it will not have burst traffic. Even if 1000 requests arrive per second, its access rate to the background service output will always be constant. The token bucket is different. Its characteristics can "pre store" a certain amount of tokens. Therefore, when dealing with burst traffic, all tokens can be consumed in a short time. Its burst traffic processing efficiency will be higher than that of leaky bucket, but the pressure directed to the background system will increase accordingly.
3. Mainstream scheme of distributed current limiting
This is mainly about the current limiting of nginx and lua. gateway and hystrix will be discussed later in spring cloud
1) Guava RateLimiter client current limiting
1. Introduce maven
<dependency>
    <groupId>com.google.guava</groupId>
    <artifactId>guava</artifactId>
    <version>18.0</version>
</dependency>
2. Write Controller
@RestController
@Slf4j
public class Controller{
    //Two tokens can be created per second
    RateLimiter limiter = RateLimiter.create(2.0);

    //Non blocking current limiting
    @GetMapping("/tryAcquire")
    public String tryAcquire(Integer count){
        //count tokens consumed each time
        if(limiter.tryAcquire(count)){
            log.info("Successful, allowed to pass, rate is{}",limiter.getRate());
            return "success";
        }else{
            log.info("Error, not allowed to pass, rate is{}",limiter.getRate());
            return "fail";
        }
    }

    //Time limited non blocking current limiting
    @GetMapping("/tryAcquireWithTimeout")
    public String tryAcquireWithTimeout(Integer count, Integer timeout){
        //count the timeout waiting time of the token consumed each time
        if(limiter.tryAcquire(count,timeout,TimeUnit.SECONDS)){
            log.info("Successful, allowed to pass, rate is{}",limiter.getRate());
            return "success";
        }else{
            log.info("Error, not allowed to pass, rate is{}",limiter.getRate());
            return "fail";
        }
    }

    //Synchronous blocking current limiting
    @GetMapping("/acquire")
    public String acquire(Integer count){
        limiter.acquire(count);
        log.info("Successful, allowed to pass, rate is{}",limiter.getRate());
        return "success";
    }
}
2) Current limiting based on Nginx
1.iP current limiting
1. Write Controller
@RestController
@Slf4j
public class Controller{
    //nginx test usage
    @GetMapping("/nginx")
    public String nginx(){
        log.info("Nginx success");
    }
}
2. Modify the host file and add a web address and domain name
127.0.0.1 www.test.com
3. Modify nginx and add the domain name in step 2 to the routing rule
Open the configuration file for nginx
vim /usr/local/nginx/conf/nginx.conf
Add a service
#Limit speed based on IP address
#1)$binary_remote_addr   binary_ The purpose is to abbreviate memory occupation, remote_addr means to limit the current through the IP address
#2) Zone = iplimit: 20m iplimit refers to a memory area (recording access frequency information), and 20m refers to the size of this memory area
#3) rate=1r/s release 1 request per second
limit_req_zone $binary_remote_addr zone=iplimit:20m rate=1r/s;

server{
    server_name www.test.com;
    location /access-limit/ {
        proxy_pass http://127.0.0.1:8080/;

        #ip address based restrictions
        #1) zone=iplimit reference limit_rep_zone variable in zone
        #2) burst=2 sets a buffer area with a size of 2. When a large number of requests arrive and the number of requests exceeds the current limit frequency, it will be put into the buffer area
        #3) After the nodelay buffer is full, 503 exception is returned directly
        limit_req zone=iplimit burst=2 nodelay;
    }
}
4. Access the address and test whether the current is limited
www.test.com/access-limit/nginx
2. Multi dimensional current limiting
1. Modify nginx configuration
#Limit speed based on IP address
limit_req_zone $binary_remote_addr zone=iplimit:20m rate=10r/s;
#Limit the current according to the server level
limit_req_zone $server_name zone=serverlimit:10m rate=1r/s;
#Limit the current according to the number of links of the ip address
limit_conn_zone $binary_remote_addr zone=perip:20m;
#Limit the current according to the number of connections to the server
limit_conn_zone $server_name zone=perserver:20m;


server{
    server_name www.test.com;
    location /access-limit/ {
        proxy_pass http://127.0.0.1:8080/;

        #ip address based restrictions
        limit_req zone=iplimit burst=2 nodelay;
        #Current limiting based on server level
        limit_req zone=serverlimit burst=2 nodelay;
        #The number of links based on ip address is limited to 100 links at most
        limit_conn zone=perip 100;
        #Limit the current based on the number of connections to the server, and maintain a maximum of 100 links
        limit_conn zone=perserver 1;
        #The exception of the configuration request returns 504 (503 by default)
        limit_req_status 504;
        limit_conn_status 504;
    }

     location /download/ {
        #No speed limit for the first 100m
        limit_rate_affer 100m;
        #The speed limit is 256k
        limit_rate 256k;
     }
}
3) Distributed current limiting based on Redis+Lua
1.Lua script
Lua is a very small and exquisite language. Its birth (1993) was even earlier than JDK 1.0. Lua is written in standard C language. Its source code is only more than 20000 lines of C code, and even a complete Lua interpreter is 200k in size.
Lua is a new programming language at large and a scripting language at small. For students with programming experience, they can guess the business logic by getting a Lua script.
Redis has built-in Lua interpreter, and the execution process ensures atomicity
2.Lua installation
Installing Lua:
1. Reference http://www.lua.org/ftp/ Tutorial, Download 5.3.5_ Version 1, local installation
If you are using a Mac, it is recommended to use brew tool to directly execute brew install lua to install smoothly. For the installation of brew tool, please refer to https://brew.sh/ Website. The directory after brew installation is / usr / local / cell / Lua / 5.3.5_ one
2. Install the IDEA plug-in. On the IDEA - > Preferences panel, Browse repositories, search for lua, and then select the plug-in lua with the same name. Restart IDEA after installation
3. Configure the location of Lua SDK: Idea - > file - > project structure, select Add Lua, and the path points to the bin folder of Lua SDK
4. After configuration, right-click to create the Module in the project, select Lua in the left column, click next, select the sdk of lua, and then enter the name of lua project to complete
3. Write hello lua
print 'Hello Lua'
4. Prepare analog current limiting
-- Analog current limiting

-- Used as current limiting key
local key = 'my key'

-- Maximum threshold of current limiting
local limit = 2

-- Current current limit size
local currentLimit = 2

-- Whether the current limit standard is exceeded
if currentLimit + 1 > limit then
    print 'reject'
    return false
else
    print 'accept'
    return true
end
5. Current limiting assembly packaging
1. Add maven
<dependency>
    <groupId>org.springframework.boot</groupId>
    <artifactId>spring-boot-starter-data-redis</artifactId>
</dependency>
<dependency>
    <groupId>org.springframework.boot</groupId>
    <artifactId>spring-boot-starter-aop</artifactId>
</dependency>
<dependency>
    <groupId>com.google.guava</groupId>
    <artifactId>guava</artifactId>
    <version>18.0</version>
</dependency>
2. Add Spring configuration
If it's not important, just write something. The main thing is to configure reids
server.port=8080

spring.redis.database=0
spring.redis.host=localhost
spring.redis.port=6376
3. Write current limiting script
Just put the lua script in the resource directory
-- Get method signature feature
local methodKey = KEYS[1]
redis.log(redis.LOG_DEBUG,'key is',methodKey)

-- Current limit size passed in by calling script
local limit = tonumber(ARGV[1])

-- Get current traffic size
local count = tonumber(redis.call('get',methodKey) or "0")

--Is the current limit exceeded
if count + 1 >limit then
    -- access denied
    return false
else
    -- The threshold was not exceeded
    -- Set the current number of accesses+1
    redis.call('INCRBY',methodKey,1)
    -- Set expiration time
    redis.call('EXPIRE',methodKey,1)
    -- Release
    return true
end
4. Use the spring data Redis component to integrate Lua and Redis
Create current limiting class
@Service
@Slf4j
public class AccessLimiter{
    @Autowired
    private StringRedisTemplate stringRedisTemplate;
    @Autowired
    private RedisScript<Boolean> rateLimitLua;

    public void limitAccess(String key,Integer limit){
        boolean acquired = stringRedisTemplate.execute(
            rateLimitLua,//lua script
            Lists.newArrayList(key),//key list in lua script
            limit.toString()//value list of lua script
        );

        if(!acquired){
            log.error("Your access is blocked,key={}",key);
            throw new RuntimeException("Your access is blocked");
        }
    }
}
Create configuration class
@Configuration
public class RedisConfiguration{
    public RedisTemplate<String,String> redisTemplate(RedisConnectionFactory factory){
        return new StringRedisTemplate(factory);
    }

    public DefaultRedisScript loadRedisScript(){
        DefaultRedisScript redisScript = new DefaultRedisScript();
        redisScript.setLocation(new ClassPathResource("rateLimiter.lua"));
        redisScript.setResultType(java.lang.Boolean.class);
        return redisScript;
    }
}
5. Add a test method in the Controller to verify the current limiting effect
@RestController
@Slf4j
public class Controller{
    @Autowired
    private AccessLimiter accessLimiter;

    @GetMapping("test")
    public String test(){
        accessLimiter.limitAccess("ratelimiter-test",1);
        return "success";
    }
}
6. Prepare current limiting notes
1. Add notes
@Target({ElementType.METHOD})
@Retention(RetentionPolicy.RUNTIME)
@Documented
public @interface AccessLimiterAop{
    int limit();

    String methodKey() default "";
}
2. New section
@Slf4j
@Aspect
@Component
public class AccessLimiterAspect{
    @Autowired
    private AccessLimiter  accessLimiter;

    //Modify it yourself according to the position of the annotation
    @Pointcut("@annotation(com.gyx.demo.annotation.AccessLimiter)")
    public void cut(){
        log.info("cut");
    }

    @Before("cut()")
    public void before(JoinPoint joinPoint){
        //Obtain the method signature as the methodkey
        MethodSignature signature =(MethodSignature) joinPoint.getSignature();
        Method method = signature.getMethod();
        AccessLimiterAop annotation = method.getAnnotation(AccessLimiterAop.class);

        if(annotation == null){
            return;
        }
        String key = annotation.methodKey();
        Integer limit = annotation.limit();
        //If the methodKey is not set, one will be added automatically
        if(StringUtils.isEmpty(key)){
            Class[] type = method.getParameterType();
            key = method.getName();
            if (type != null){
                String paramTypes=Arrays.stream(type)
                    .map(Class::getName)
                    .collect(Collectors.joining(","));
                    key += "#"+paramTypes;
            }
        }

        //Call redis
        return accessLimiter.limitAccess(key,limit);
    }
}
3. Add a test method in the Controller to verify the current limiting effect
@RestController
@Slf4j
public class Controller{
    @Autowired
    private AccessLimiter accessLimiter;

    @GetMapping("test")
    @AccessLImiterAop(limit =1)
    public String test(){
        return "success";
    }
}