God's destiny is not afraid, and ancestors are not law—— Wang Anshi
preface
This article is not a title party, but a real hard core article. If you want to learn from Vue3, you can browse this article. Generally speaking, this blog covers most of the contents of Vue3, including common composition APIs (composite APIs), other composition APIs and some new features: Fragment, report, suspend, provide and input.
Project construction
Since you are learning Vue3, the first thing you need is how to initialize the project. Here are two ways for your reference
- Method 1: Vue cli scaffold initializes Vue3 project
Official documents: https://cli.vuejs.org/zh/guid...
//    Check the version of @ vue/cli and ensure that the version of @ vue/cli is above 4.5.0
vue --version
//    Install or upgrade your @ vue/cli
npm install -g @vue/cli
//     establish
vue create vue_test
// start-up
cd vue_test
npm run serve
- Method 2: vite initializes Vue3 project
vite official website: https://vitejs.cn/
//     Create project
npm init vite-app <project-name>
//    Enter project directory
cd <project-name>
//     Installation dependency
npm install
//    function
npm run dev
Project directory structure analysis
The analysis of the project directory structure here is mainly main JS file
Main in Vue2 js
new Vue({
el: '#app',
components: {},
template: ''
});
Main in Vue3 js
import { createApp } from 'vue'
import App from './App.vue'
createApp(App).mount('#app')
In Vue2, the application instance object is created through the new Vue({}) constructor, while Vue3 no longer introduces the Vue constructor, but introduces a factory function called createApp to create the application instance object.
Vue3 devtool get
devtool:https://chrome.zzzmh.cn/info?...
Composition API
setup
- Understanding: vue3 A new configuration item in 0 with the value of a function
- setup is the entry point for all composition APIs
- The data and methods used in the component should be configured in setup
Two return values of setup function
- If an object is returned, the properties and methods in the object can be used directly in the template
- If you return a rendering function, you can customize the rendering content
Execution timing of setup
- Execute once before beforeCreate, and this is undefined
Parameters of setup
props: the value is an object, including the attributes passed from outside the component and declared and received inside the component
Context: context object
- Attrs: the value is an object, including attributes passed from outside the component but not declared in the props configuration, which is equivalent to this$ attrs
- Slots: received slot contents, equivalent to this$ slots
- Emit: a function that distributes custom events, equivalent to this$ emit
matters needing attention:
Try not to use with Vue2x configuration
- Vue2x configurations (data, methods, computed) can access properties and methods in setup
- Vue2x configuration (data, methods, computed) cannot be accessed in setup
- If the attribute in data has the same name as the attribute in setup, setup takes precedence
- setup cannot be an async function, because the return value is no longer the return object, but Promise. The template cannot see the properties in the return object, but it can also return a Promise instance later, which requires the cooperation of suspend and asynchronous components
Example 1: two return values of the setup function
<template>
    <h2>practice setup Related content</h2>
    <!--<h2>setup Returns an object and uses the properties and methods in the object</h2>-->
    <!--<p>full name:{{student.name}}</p>-->
    <!--<p>Age:{{student.age}}</p>-->
    <!--<button @click="hello">Click to view console information</button>-->
    <hr>
    <h2>setup Returns a function</h2>
</template>

<script>
    import {h} from 'vue'
    export default {
        name: "setupComponent",
        setup(){
            // attribute
             let student={
                name:'Zhang San',
                age:18,
             }
            // method
        function hello() {
               console.log(`Hello, my name is ${student.name},this year ${student.age}`)
             }
             return{    // Returns an object
                 student,
                 hello,
             }
            // Return() = > H ('h1 ',' hello ') / / returns a function
        }
    }
</script>

<style scoped>

</style>
It should be noted that the attributes and methods defined in setup must be return ed, otherwise they cannot be used
Example 2: the parameters and methods in setup are mixed with configuration items
<template>
    <h2>setup Mixed with configuration items</h2>
    <h2>full name:{{name}}</h2>
    <h2>Age:{{age}}</h2>
    <h2>Gender:{{sex}}</h2>
    <button @click="sayHello">sayHello(Vue3 (method inside)</button>
    <button @click="sayWelcome">sayWelcome(Vue2 (method inside)</button>
</template>

<script>
    export default {
        name: "setup01_component",
        data(){
          return{
            sex:'male',
            sum:0,
          }
        },
        methods:{
            sayWelcome(){
                console.log(`sayWelcome`)
            },
        },
        setup(){
            let sum=100;
            let name='Zhang San';
            let age=18;
            function sayHello() {
                console.log(`My name is ${name},this year ${age}`)
            }
            return{
                name,
                age,
                sayHello,
                test02,
                sum
            }
        }
    }
</script>

<style scoped>

</style>
This code first implements the properties and methods in setup and the properties and methods in the configuration items in Vue2. Next, add the corresponding blending method
<template>
    <h2>setup Mixed with configuration items</h2>
    <h2>full name:{{name}}</h2>
    <h2>Age:{{age}}</h2>
    <h2>Gender:{{sex}}</h2>
    <button @click="sayHello">sayHello(Vue3 (method inside)</button>
    <button @click="sayWelcome">sayWelcome(Vue2 (method inside)</button>
    <br>
    <br>
    <button @click="test01">test Vue2 Inside call Vue3 Properties and methods inside</button>
    <br>
    <br>
    <button @click="test02">test Vue3setup Inside call Vue2 Properties and methods inside</button>
    <br>
    <h2>sum The values are:{{sum}}</h2>
</template>

<script>
    export default {
        name: "setup01_component",
        data(){
          return{
            sex:'male',
            sum:0,
          }
        },
        methods:{
            sayWelcome(){
                console.log(`sayWelcome`)
            },
            test01(){
                console.log(this.sex);  // Properties in Vue2 (properties in data)
                // Properties in setup
                console.log(this.name);
                console.log(this.age);
                // Methods in setup
                this.sayHello();
            }
        },
        setup(){
            let sum=100;
            let name='Zhang San';
            let age=18;
            function sayHello() {
                console.log(`My name is ${name},this year ${age}`)
            }
            function test02() {
                // Properties in setup
                console.log(name);
                console.log(age);

                // Attributes in data
                console.log(this.sex);
                console.log(this.sayWelcome);
            }
            return{
                name,
                age,
                sayHello,
                test02,
                sum
            }
        }
    }
</script>

<style scoped>

</style>
Test01 and test02 methods are added here. Click them respectively, and the console can see that when you click the test01 method in the configuration item, in addition to the value of its own sex attribute, the attributes defined in setup also have values and methods can be called. When you click the test02 method defined in setup, the console can only output the attributes and methods defined in setup, The attribute and method values defined in the configuration item are undefined.
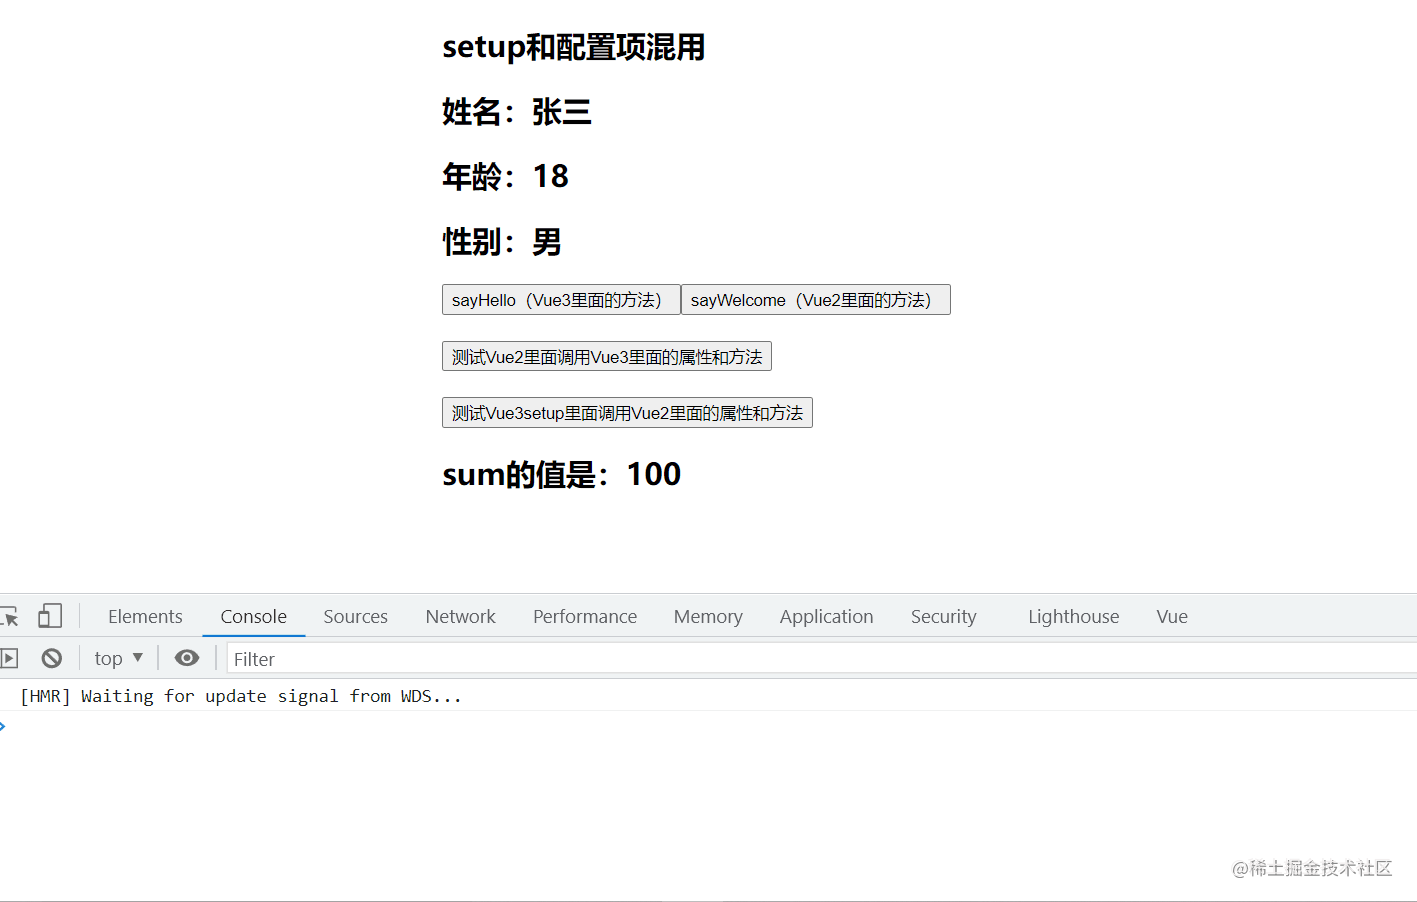
- The properties and methods defined in setup can be used in configuration items (methods, computed, watch, etc.), while the properties and methods defined in configuration items cannot be called in setup
- If the attribute in setup has the same name as the attribute in data, the attribute in setup takes precedence
Example 3: execution timing of setup
setup will be executed once before beforeCreate
<template>
    <h2>setup Implementation mechanism</h2>
</template>

<script>
    export default {
        name: "setup_component03",
        setup(){
            console.log('setup')
        },
        beforeCreate(){
            console.log('beforeCreate')
        }
    }
</script>

<style scoped>

</style>
When viewing the console, the order we see is setup > before create
Use of context and props in setup
Use of props and slot s in Vue2
Before explaining the two parameters in setup, first review the relevant knowledge in Vue2
- Use of props and custom events
- attrs
- Slot
Example 1: use of Vue2props and custom events
Prepare two components, parent Vue components and child Vue component
parent.vue
<template>
    <div class="parent">
      I am the parent component
      <child msg="Transmit information" name="Zhang San" @sendParentMsg="getMsg"/>
    </div>
</template>
<script>
    import Child from "./Child";
    export default {
        name: "Parent",
      components: {Child},
      methods:{
        getMsg(msg){
          console.log(msg)
        }
      }
    }
</script>
<style scoped>
  .parent{
    padding: 10px;
    background-color: red;
  }
</style>
child.vue
<template>
    <div class="child">
      <h2>I am a subcomponent</h2>
      <p>The message passed by the parent component is:{{msg}}</p>
      <p>The message passed by the parent component is:{{name}}</p>
      <button @click="sendMsg">Pass information to parent component</button>
    </div>
</template>
<script>
    export default {
        name: "Child",
        props:{
          msg:{
            type:String,
            default:''
          },
          name:{
            type:String,
            default:''
          }
        },
        mounted(){
          console.log(this);
        },
        methods:{
          sendMsg(){
            this.$emit("sendParentMsg",'Notify parent component updates')
          }
        }
    }
</script>
<style scoped>
  .child{
    padding: 10px;
    background-color: orange;
  }
</style>
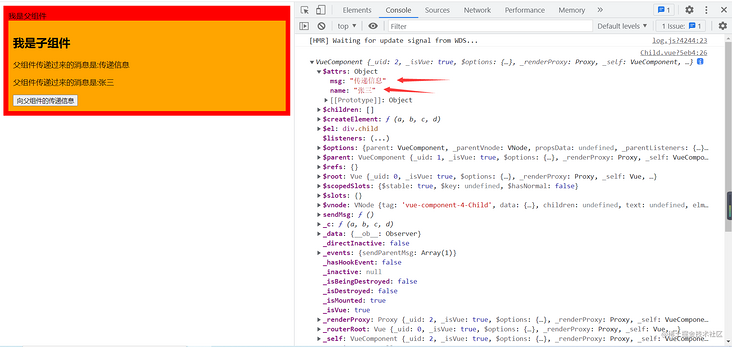
The code corresponding to the child component is as follows:
<template>
    <div class="child">
      <h2>I am a subcomponent</h2>
      <!--<p>The message passed by the parent component is:{{msg}}</p>-->
      <!--<p>The message passed by the parent component is:{{name}}</p>-->
      <p>The message passed by the parent component is:{{$attrs.msg}}</p>
      <p>The message passed by the parent component is:{{$attrs.name}}</p>
      <button @click="sendMsg">Pass information to parent component</button>
    </div>
</template>

<script>
    export default {
        name: "Child",
        // props:{
        //   msg:{
        //     type:String,
        //     default:''
        //   },
        //   name:{
        //     type:String,
        //     default:''
        //   }
        // },
        mounted(){
          console.log(this);
        },
        methods:{
          sendMsg(){
            this.$emit("sendParentMsg",'Notify parent component updates')
          }
        }
    }
</script>

<style scoped>
  .child{
    padding: 10px;
    background-color: orange;
  }
</style>
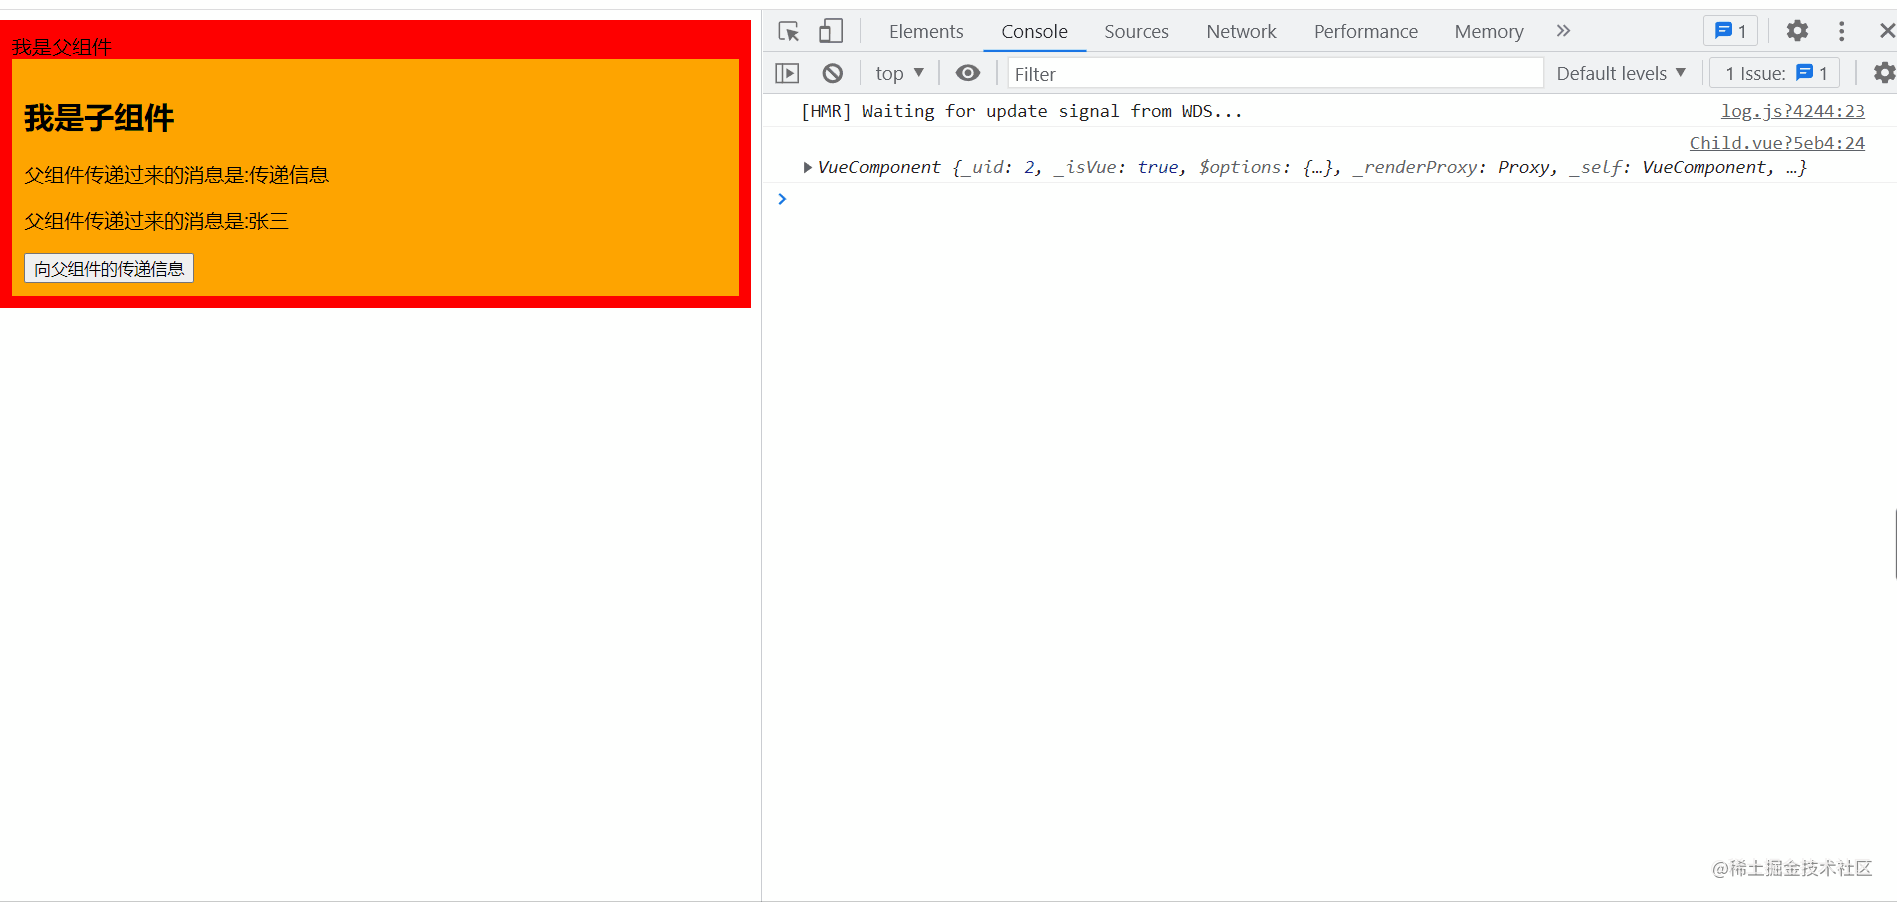
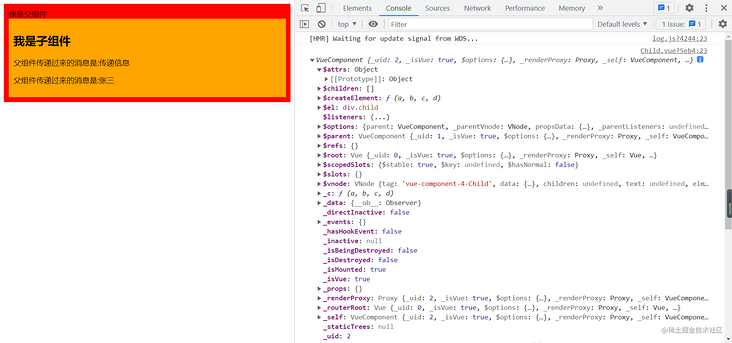
The child component receives the information transmitted by the parent component through props and through this$ The emit () custom event passes information to the parent component. When props is used to receive data, the data in attrs is empty. If props is not used to receive data, there is a value in props.
Example 2: use of slot s in Vue2
Similarly, prepare two components, one index Vue component, and the other is MySlot Vue component
Index.vue
<template>
    <div class="index">
      <h2>I am Index assembly</h2>
      <!--Writing method I-->
      <my-slot>
        <!--Contents in the slot-->
        <h2>Incoming slot parameter</h2>
        <h2>Incoming slot parameter</h2>
        <h2>Incoming slot parameter</h2>
        <h2>Incoming slot parameter</h2>
      </my-slot>
      <!--Writing method 2-->
      <my-slot>
        <template slot="header">
          <h2>I am header assembly</h2>
        </template>
        <template slot="footer">
          <h2>I am footer enclosure</h2>
        </template>
      </my-slot>
    </div>
</template>

<script>
    import MySlot from "./MySlot";
    export default {
        name: "Index",
      components: {MySlot}
    }
</script>

<style scoped>
  .index{
    padding: 10px;
    background: red;
  }
</style>
MySlot.vue
<template>
    <div class="slot">
      <h2>I am MySlot assembly</h2>
      <slot></slot>
      <br>
      <slot name="header"></slot>
      <br>
      <slot name="footer"></slot>
    </div>
</template>

<script>
    export default {
        name: "MySlot",
        mounted(){
          console.log(this);
        }
    }
</script>

<style scoped>
  .slot{
    padding: 10px;
    background: orange;
  }
</style>
ref
- Function: define a responsive data
- Syntax: const xxx=ref(initValue)
- Create a reference object (reference object) containing responsive data;
- Operation data in JS: XXX value=xxx;
Read data from template: not required value, direct: < div > {{XXX}} < / div >
remarks:
- The received data can be basic type or object type
- Basic type of data: the response type still depends on object get and set of defineproperty() are completed
Data of object type: Vue3.0 is used internally A new function in 0 - reactive function
Example<template> <h1>ref</h1> <h2>ref Define basic data types</h2> <p>full name:{{name}}</p> <p>Age:{{age}}</p> <p>Married or not:{{isMarry}}</p> <h2>ref Define object type</h2> <p>Hobbies:{{hobby}}</p> <p>Certificate type:{{user.idCard}}</p> <p>Nationality:{{user.nation}}</p> <button @click="changeName">Modify information</button> </template> <script> import {ref} from 'vue' export default { name: "refComponent", setup(){ // Use the basic data types number,string,boolean, let name=ref('Zhang San'); let age=ref(18); let isMarry=ref(false); // Using ref to define an array let hobby=ref(['having dinner','sleep','Beat beans']); // Using ref to define objects let user=ref({ idCard:'ID', nation:['China','U.S.A','britain','Russia'] }) function changeName() { // Modify basic data type name.value='Li Si'; // ref defined responsive data is required when modifying data value age.value=20; isMarry.value=true; // Modify object data type hobby.value[0]='play a game'; user.value.idCard='Hong Kong, Macao and Taiwan resident ID card'; user.value.nation[0]='Norway'; } return{ name, age, isMarry, changeName, user, hobby } } } </script> <style scoped> </style>be careful:
- ref defined responsive data is required when modifying data value
- ref defines the object data type. Vue3.0 is used internally A new function in 0 - reactive function
- Not required when using data in a template value
reactive function
- Function: define the responsive data of an object type (don't use it for basic types, use ref function)
- Syntax: const Proxy object = reactive (Proxy object) receives an object (or array) and returns a Proxy object (Proxy instance object, Proxy object for short)
- The responsive data defined by reactive is deep-seated
The internal Proxy implementation is based on ES6. Through the operation of the Proxy object, the internal data of the source object is responsive
<template>
<h2>reactive Responsive data</h2>
<p>full name:{{student.name}}</p>
<p>Age:{{student.age}}</p>
<p>Hobbies:{{student.hobbies}}</p>
<button @click="changeStuInfo">Change student information</button>
</template>

<script>
import {reactive} from 'vue'
export default {
    name: "reactiveComponent",
    setup(){
            // data
        let student=reactive({
            name:'Zhang San',
            age:19,
            hobbies:['having dinner','sleep','Beat beans']
        });
        console.log(student)
        // method
        function changeStuInfo() {
            student.name='Li Si';
            student.age=20;
            student.hobbies[0]='do housework'
        }
        return{
            student,
            changeStuInfo,
        }
    }
}
</script>

<style scoped>

</style>
reactive vs ref
Compare from the perspective of defining data
- ref is used to define basic type data
- reactive is used to define: object (or array) type data
- Note: ref can also be used to define the data of object (or array) type. It will be automatically converted into proxy object through reactive
Comparison from the perspective of principle
- ref through object get and set implementation of defineproperty() (responsive) data hijacking
- reactive implements responsive (data hijacking) by using Proxy, and operates the data inside the source object through Reflect
From the perspective of use
- ref defined data: required for operation data Value, which is not required for direct reading in the template when reading data value
- reactive defined data: neither operation data nor read data is required value
watch and watchEffect
    //    attr indicates the attribute to be monitored
    //  Scenario 1: monitor the responsive data defined by a single ref
    watch(attr,(newValue,oldValue)=>{
        console.log('attr Changed',newValue,oldValue);
    })

   //  Situation II; Monitor responsive data defined by multiple ref s
    watch([attr1,attr2,....,attrn],(newValue,oldValue)=>{
        console.log('attr1 or attrn Changed',newValue,oldValue);
    })

    // obj indicates the object to listen on
     // Scenario 3: monitor reactive defined responsive data
    //    If the watch monitors reactive defined responsive data, the oldValue cannot be obtained correctly
    //    If the watch monitors reactive defined responsive data, it is forced to turn on the deep monitoring
     watch(obj,(newValue,oldValue)=>{
        console.log('obj Changed',newValue,oldValue)

     },{immediate:true,deep:false}); // The deep configuration is no longer working here

    // Case 4: monitor an attribute in the responsive data defined by reactive
      watch(()=>person.job,(newValue,oldValue)=>{
         console.log('person of job Changed',newValue,oldValue)
      },{immediate:true,deep:true})

     //  Scenario 5: monitor some attributes in the responsive data defined by reactive
    watch([()=>person.name,()=>person.age],(newValue,oldValue)=>{
            console.log('person of job Changed',newValue,oldValue)
    })
    // exceptional case
    watch(()=>person.job,(newValue,oldValue)=>{
        console.log('person of job Changed',newValue,oldValue)
    },{deep:false});//  Here, the deep configuration is valid because it monitors a property in the object defined by reactive
watch
- When monitoring reactive defined responsive data: oldValue cannot be obtained correctly and deep monitoring is forced on (deep configuration is invalid)
The deep configuration is valid when monitoring an attribute in the reactive defined responsive data
Example 1: wath listens to the responsive data defined by ref<template> <h2>watch monitor ref Defined responsive data</h2> <h2>full name:{{userName}}</h2> <h2>Age:{{age}}</h2> <button @click="userName+='!'">Modify name</button> <button @click="age++">Modify age</button> <hr> <h2>full name:{{user.name}}</h2> <h2>Age:{{user.age}}</h2> <button @click="user.name+='!'">Modify name</button> <button @click="user.age++">Modify age</button> </template> <script> import {ref,watch} from 'vue'; export default { name: "watch_component01", setup(){ let userName=ref('Zhang San'); let age=ref(18); let user=ref({ name:'Zhang San', age:21, }) // watch listens to single responsive data defined by ref watch(userName,(newValue,oldValue)=>{ console.log(`userName Has changed,The new value is:${newValue},Old value is:${oldValue}`) }); watch(age,(newValue,oldValue)=>{ console.log(`age Has changed,The new value is:${newValue},Old value is:${oldValue}`); }); // If you need to listen to the responsive data defined by multiple ref s, the code is as follows /** * newValue And oldValue are in the form of an array, where the nth bit of the array represents the nth bit of the listening position * For example, in this example, the first bit of the listening property is userName, and so is the first bit corresponding to newValue and oldValue * userName. * If there is immediate execution, the initial value is [], not [undefined,undefined] */ watch([userName,age],(newValue,oldValue)=>{ console.log('userName or age One of them has changed,',newValue,oldValue) }) // watch monitors the responsive object data defined by ref watch(user.value,(newValue,oldValue)=>{ console.log('person Has changed',newValue,oldValue) }) watch(user,(newValue,oldValue)=>{ console.log('person Has changed',newValue,oldValue); },{deep:false}) return{ userName, age, user } } } </script> <style scoped> </style>Example 2: watch listens to the responsive data defined by reactive
<template>
<h1>watch monitor reactive Defined responsive data</h1>
<p>full name:{{user.name}}</p>
<p>Age:{{user.age}}</p>
<p>Salary:{{user.job.salary}}K</p>
<button @click="user.name+='!'">Change name</button>
<button @click="user.age++">Change age</button>
<button @click="user.job.salary++">Change salary</button>
</template>

<script>
import {watch,reactive} from 'vue'
export default {
name: "watch_component02",
setup(){
    let user=reactive({
        name:'Zhang San',
        age:18,
        job:{
           salary:20
        }
    });

    // Case 1: listening to the responsive data defined by reactive, the oldValue cannot be obtained correctly
    /**
     * At this time, newValue and oldValue are the latest data
     * By default, the depth monitoring is forced to be turned on. At this time, the depth monitoring is invalid
     */
    watch(user,(newValue,oldValue)=>{
        console.log(newValue,oldValue);
    },{deep:false});


    //  In case 2, monitor a single attribute of reactive defined responsive data
    // watch(()=>user.name,(newValue,oldValue)=>{
    //     console.log('name changed ', newValue,oldValue);
    // });
    // watch(()=>user.age,(newValue,oldValue)=>{
    //     console.log('age changed ', newValue,oldValue);
    // })


    // Scenario 3: monitor multiple attributes of reactive defined responsive data
    /**
     * newValue And oldValue are in the form of an array, where the nth bit of the array represents the nth bit of the listening position
     * For example, in this example, the first bit of the listening property is userName, and so is the first bit corresponding to newValue and oldValue
     * userName,
     */
    // Watch ([() = > user. Name, () = > user. Age], (newvalue, oldvalue) = > {/ / method 1
    //     console. Log ('a property in name or age has changed ', newValue,oldValue);
    // })
    // Watch (() = > [user. Name, user. Age], (newvalue, oldvalue) = > {/ / method 2
    //     console. Log ('a property in name or age has changed ', newValue,oldValue)
    // })

    //  Scenario 4: monitor a property of the reactive data object defined by reactive, and deep is valid at this time
    /**
     * Note: at this time, it is necessary to distinguish between the reactive defined object and an attribute in the reactive defined object
     * At this time, deep is effective and monitoring is turned off
     */
      // watch(()=>user.job,(newValue,oldValue)=>{
      //     console.log(newValue,oldValue);
      // },{deep:false});
    return{
        user
    }
}
}
</script>

<style scoped>

</style>
watchEffect
- The routine of watch is to specify both the monitored properties and the monitored callbacks
- The routine of watchEffect is: do not specify the property to be monitored. If the property is used in the monitored callback, monitor the property
watchEffect is a bit like computed
- However, computed focuses on the calculated value (the return value of the callback function), so it is necessary to write the return value
watchEffect pays more attention to the process (the function body of the callback function), so there is no need to write the return value
Example<template> <h1>watchEffect monitor ref and reactive Defined responsive data</h1> <h2>Current summation:{{sum}}</h2> <button @click="sum++">Point I add 1</button> <hr> <h2>Current information:{{msg}}</h2> <button @click="msg+='!'">Modify information</button> <hr> <h2>full name:{{person.name}}</h2> <h2>Age:{{person.age}}</h2> <h2>salary:{{person.job.j1.salary}}</h2> <button @click="person.name+='!'">Modify name</button> <button @click="person.age++">Modify age</button> <button @click="person.job.j1.salary++">Pay rise</button> </template> <script> import {ref,reactive,watchEffect} from 'vue'; export default { name: "watch_effect_component01", setup(){ let sum=ref(0); let msg=ref('Hello'); let person=reactive({ name:'Zhang San', age:18, job:{ j1:{ salary:100, } } }); /** * Write the attributes to be monitored in watchEffect, which will be executed once by default * If it is a response form for monitoring ref definition, it is required value * If you are monitoring reactive defined responsive data, monitor directly */ watchEffect(()=>{ let x1=sum.value; let x2=person.job.j1.salary; console.log('watchEffect The specified callback function executed'); }) return{ sum, msg, person } } } </script> <style scoped> </style>
Vue2 responsive principle vs vue3 responsive principle
In Vue2, the responsive principle is mainly realized through data hijacking, that is, based on object Defineproperty is implemented, while Vue3 is implemented through Proxy and Reflect (for personal understanding at the lowest level, please forgive me).
So let's compare the principle of Vue3's implementation of responsiveness with that of Vue2's implementation of responsiveness?
Vue2 responsive principle
Implementation principle
- Object type: through object Defineproperty() intercepts the reading and modification of properties (data hijacking)
- Array type: intercept by overriding a series of methods to update the array. (the change method of the array is wrapped)
Object.defineProperty(data,'count',{
  get(){}
  set(){}
})
Existing problems
- The interface will not be updated automatically when adding or deleting attributes
- Modify the array directly through subscript, and the interface will not be updated automatically
Let's start with a simple example
<!DOCTYPE html>
<html lang="en">
<head>
  <meta charset="UTF-8">
  <title>Title</title>
</head>
<body>
<div id="app">
  <h1>Student information</h1>
  <h4>full name:{{student.name}}</h4>
  <h4>Age:{{student.age}}</h4>
  <h4 v-if="student.sex">Gender:{{student.sex}}</h4>
  <h4>Hobbies:{{student.hobbies}}</h4>
  <button @click="addSex">New gender</button>
  <button @click="deleteAge">Delete age</button>
  <button @click="updateHobbies">Modify hobbies</button>
</div>
<script src="https://cdn.bootcss.com/vue/2.5.2/vue.min.js"></script>
<script>
  let vm=new Vue({
      el:'#app',
      data(){
          return{
              student:{
                  name:'Zhang San',
                  age:18,
                  hobbies:['having dinner','sleep','Beat beans']
              }
          }
      },
      methods:{
          addSex(){   // New gender
              this.student.sex='male';
              console.log(this.student);
          },
          deleteAge(){    // Delete age
              delete this.student.age;
              console.log(this.student);
          },
          updateHobbies(){   //   Modify hobbies
              this.student.hobbies[0]='play a game';
              console.log(this.student);
          }
      }
  })
</script>
</body>
</html>
Call the methods corresponding to the buttons respectively. The console can see that when adding a gender attribute, the student has the gender attribute, but does not implement the response (the view is not updated). Similarly, the methods corresponding to the other two buttons are the same.
Cause: vue2 0 if you want to implement responsive data, you must first define it in data, and the data added later cannot implement responsive data.
Solution:
Add / modify: Vue$ set(target,propName/index,value)
- {Object | Array} target
- {string | number} propertyName/index
- {any} value
Delete: Vue$ delete(target,propName/index)
- {Object | Array} target
- {string | number} propertyName/index
At this point, we modify the corresponding code as follows
    addSex(){   // New gender
        // this.student.sex='male';
        // vm.$set(this.student,'sex','male');
        this.$set(this.student,'sex',male);
        console.log(this.student);
    },
    deleteAge(){    // Delete age
        // delete this.student.age;
        // this.$delete(this.student,'age');
        vm.$delete(this.student,'age');
        console.log(this.student);
    },
     updateHobbies(){   //   Modify hobbies
         // this.student.hobbies[0] = 'play games';
         // this.$set(this.student.hobbies,0, 'play games');
         //  vm.$set(this.student.hobbies,0, 'play games');
         /**
                 * Or use array mutation
                 * push()
                 * pop()
                 * shift()
                 * unshift()
                 * splice()
                 * sort()
                 * reverse()
             */
         this.student.hobbies.splice(0,1,'play a game');
         console.log(this.student);
       }
malpractice
- The data defined in the data must be used to implement the response
- If the data added later wants to implement a response, you need to call the corresponding API
Object. Simple example of defineproperty
    let student={
        name:'Zhang San',
        age:18,
    }
    let p={}
    Object.defineProperty(p,'name',{
        get(){  // Triggered when name is read
            console.log('Read it name attribute');
            return student.name;
        },
        set(value){ // Triggered when name is modified
            console.log('name Has changed,The view has changed');
            student.name=value;
        }
    });
    console.log(p.name);
    p.name='Li Si';
    p.sex='male';
    delete p.name;
Vue3 responsive principle
The usage of Proxy and Reflect is not introduced here. If you want to know, please refer to MDN or teacher Ruan Yifeng's ES6
Example
    let user={
        name:'Zhang San',
        age:18,
    }
    let p=new Proxy(user,{
        get(target,propName){
            console.log(`Read it p Inside ${propName}attribute`);
            Reflect.get(target,propName);
            // return target[propName];
        },
        set(target,propName,value){
            console.log(`Modified p Inside ${propName}attribute`);
            // target[propName]=value;
            Reflect.set(target,propName,value);
        },
        deleteProperty(target,propName){
            console.log(`Deleted p Inside ${propName}attribute`);
            // delete target[propName];
            Reflect.deleteProperty(target,propName);
        }
    });
    console.log(p.name);
    p.name='Li Si';
    p.sex='male';
    delete p.age;
Check the console, trigger the get() method when reading the name property, trigger the set() method when adding or modifying properties, and trigger the deleteProperty() method when deleting properties. This is vue3 0 improvements to responsiveness.
Lifecycle and hook functions
Vue2.0 lifecycle and hook functions
vue3.0 lifecycle and hook functions
| Vue2 and Vue3 life cycle comparison | ||
|---|---|---|
| beforeCreate | Not needed* | |
| created | Not needed* | |
| beforeMount | onBeforeMount | |
| mounted | onMounted | |
| beforeUpdate | onBeforeUpdate | |
| updated | onUpdated | |
| beforeUnmount | onBeforeUnmount | |
| unmounted | onUnmounted | |
| activated | onActivated | |
| deactivated | onDeactivated |
Because setup runs around the beforeCreate and created lifecycle hooks, there is no need to explicitly define them. In other words, any code written in these hooks should be written directly in the setup function.
The lifecycle hooks in Vue2x can continue to be used in Vue3x, but two have been renamed
- beforeDestory is renamed beforeUnmout
destoryed renamed unmounted
<template>
<!--Vue3x Lifecycle and hook functions-->
<h3>Vue3x Lifecycle and hook functions</h3>
<h3>Number:{{num}}</h3>
<button @click="num++">Order me to add</button>
</template>

<script>
import {ref,onBeforeMount,onMounted,onBeforeUpdate,onUpdated,onBeforeUnmount,onUnmounted} from 'vue'
export default {
    name: "lifeCycleComponent",
    setup(){
        let num=ref(0);
        console.log("======setup=========");
        onBeforeUnmount(()=>{
            console.log("======onBeforeUnmount=========");
        });
        onMounted(()=>{
            console.log("======onMounted=========");
        });
        onBeforeUpdate(()=>{
            console.log("======onBeforeUpdate=========");
        });
        onUpdated(()=>{
            console.log("======onUpdated=========");
        });
        onBeforeUnmount(()=>{
            console.log("======onBeforeUnmount=========");
        })
        onUnmounted(()=>{
            console.log("======onUnmounted=========");
        });
        return{
            num,
        }
    }
}
</script>

<style scoped>

</style>
Custom hook
- What is hook: it is essentially a function that encapsulates the composition API used in the setup function
- Similar to mixin in vue2x
- Advantages of custom hook: reuse code to make the logic in setup clearer and easier to understand
As a beginner of hook, I don't know much about hook. Here are some examples from my own practice. At this stage, I can't feel the difference and advantages between export export function and hook. The example is to obtain the current coordinates when the mouse clicks
Example
<template>
    <h2>custom hook</h2>
    <h2>current x Coordinates of:{{x}},current y Coordinates of:{{y}}</h2>
</template>

<script>
    import {reactive,toRefs,onMounted,onUnmounted} from 'vue'
    export default {
        name: "hook_component01",
        setup(){
            // data
            let point=reactive({
                x:0,
                y:0,
            })
            // method
            function getPoint(event){
                console.log(event)
                point.x=event.clientX;
                point.y=event.clientY;
            }
            // Lifecycle hook function
            onMounted(()=>{
                window.addEventListener('click',getPoint);
            })
            onUnmounted(()=>{
                window.removeEventListener('click',getPoint);
            })
            return{
                ...toRefs(point)
            }
        }
    }
</script>

<style scoped>

</style>
Separate hook
- New directory hook
- Create a new file usepoint. In the hook directory js
usePoint.js
import {reactive,onMounted,onUnmounted} from 'vue'
export let getPoint=()=>{
    // data
    let point=reactive({
        x:0,
        y:0,
    })
    // method
    function getPoint(event){
        console.log(event)
        point.x=event.clientX;
        point.y=event.clientY;
    }
    // Lifecycle hook function
    onMounted(()=>{
        window.addEventListener('click',getPoint);
    })
    onUnmounted(()=>{
        window.removeEventListener('click',getPoint);
    })
    return point
}
hook needs to be introduced vue file
    import {reactive,toRefs,onMounted,onUnmounted} from 'vue'
    import {getPoint} from "./hook/usePoint";
    export default {
        name: "hook_component01",
        setup(){
            let point=getPoint();
            return{
                ...toRefs(point)
            }
        }
    }
This is the simplest use of hook. If you know the difference between export export function and hook, you can leave a message in the comment area below. Thank you!!!
Other composition APIs
toRef and toRefs
toRef
- Function: create a ref object whose value points to an attribute value in another object
- Syntax: const name=toRef(obj,'name')
- Application: when you want to provide a property in a responsive object separately for external use
- Extension: the function of toRefs is the same as that of toRef, but multiple ref objects can be created in batch. toRefs(obj)
Example 1
<template>
    <h2>toRef And toRefs</h2>
    <h2>full name:{{person.name}}</h2>
    <h2>Age:{{person.age}}</h2>
    <h2>Salary:{{person.job.salary}}k</h2>
    <button @click="person.name+='!'">Modify name</button>
    <button @click="person.age++">Modify age</button>
    <button @click="person.job.salary++">Raise your salary</button>
</template>

<script>
    import {reactive} from 'vue'
    export default {
        name: "toRef_component",
        setup(){
            let person=reactive({
                name:'Erlang Shenyang',
                age:18,
                job:{
                    salary:20
                }
            })
            return{
                person,
            }
        }
    }
</script>

<style scoped>

</style>
In example 1, the person object is directly returned, resulting in the need for person every time the value is taken XXX, this is neither beautiful nor elegant. Modify the code.
Example 2
<template>
    <h2>toRef And toRefs</h2>
    <h2>full name:{{name}}</h2>
    <h2>Age:{{age}}</h2>
    <h2>Salary:{{salary}}k</h2>
    <button @click="name+='!'">Modify name</button>
    <button @click="age++">Modify age</button>
    <button @click="salary++">Raise your salary</button>
</template>

<script>
    import {reactive,toRef} from 'vue'
    export default {
        name: "toRef_component",
        setup(){
            let person=reactive({
                name:'Erlang Shenyang',
                age:18,
                job:{
                    salary:20
                }
            })
            return{
                name:toRef(person,'name'),
                age:toRef(person,'age'),
                salary:toRef(person.job,'salary')
            }
        }
    }
</script>

<style scoped>

</style>
Example 1 of incorrect usage
<template>
    <h2>toRef And toRefs</h2>
    <h2>full name:{{name}}</h2>
    <h2>Age:{{age}}</h2>
    <h2>Salary:{{salary}}k</h2>
    <button @click="name+='!'">Modify name</button>
    <button @click="age++">Modify age</button>
    <button @click="salary++">Raise your salary</button>
</template>

<script>
    import {reactive,toRef,toRefs} from 'vue'
    export default {
        name: "toRef_component",
        setup(){
            let person=reactive({
                name:'Erlang Shenyang',
                age:18,
                job:{
                    salary:20
                }
            })
            return{
                name:person.name,
                age:person.age,
                salary:person.job.salary
            }
        }
    }
</script>

<style scoped>

</style>
Example 2 of incorrect usage
<template>
    <h2>toRef And toRefs</h2>
    <h2>full name:{{name}}</h2>
    <h2>Age:{{age}}</h2>
    <h2>Salary:{{salary}}k</h2>
    <h2>peron object{{person}}</h2>
    <button @click="name+='!'">Modify name</button>
    <button @click="age++">Modify age</button>
    <button @click="salary++">Raise your salary</button>
</template>

<script>
    import {reactive,toRef,toRefs,ref} from 'vue'
    export default {
        name: "toRef_component",
        setup(){
            let person=reactive({
                name:'Erlang Shenyang',
                age:18,
                job:{
                    salary:20
                }
            })
            return{
                person,
                name:ref(person.name),
                age:ref(person.age),
                salary:ref(person.job.salary)
            }
        }
    }
</script>

<style scoped>

</style>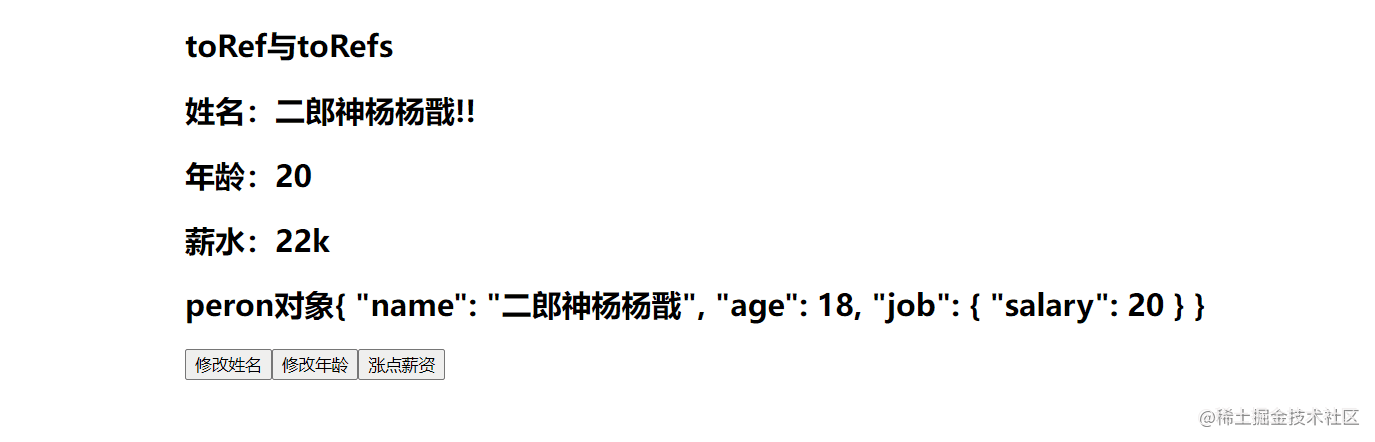
toRefs
Example 1
<template>
    <h2>toRef And toRefs</h2>
    <h2>full name:{{name}}</h2>
    <h2>Age:{{age}}</h2>
    <h2>Salary:{{job.salary}}k</h2>
    <button @click="name+='!'">Modify name</button>
    <button @click="age++">Modify age</button>
    <button @click="job.salary++">Raise your salary</button>
</template>

<script>
    import {reactive,toRef,toRefs} from 'vue'
    export default {
        name: "toRef_component",
        setup(){
            let person=reactive({
                name:'Erlang Shenyang',
                age:18,
                job:{
                    salary:20
                }
            })
            return{
                ...toRefs(person)
            }
        }
    }
</script>

<style scoped>

</style>
shallowRef and shallowReactive
- shallowReactive: only handle the response of the outermost attribute of the object (shallow response)
- shallowRef: only the response of basic data type is processed, and the response of object is not processed
When
- If there is an object data with a deep structure, but only the outer attributes change, use shallowReactive
- If there is an object data, the subsequent function will not modify the attributes in the object, but generate a new object to replace with shallowRef
shallowRef example
<template>
    <h2>shallowRef Example</h2>
    <h2>current sum The values are:{{sum}}</h2>
    <button @click="sum++">Point me sum Plus 1</button>
    <h2>current x.y The values are:{{x.y}}</h2>
    <button @click="x.y++">Point me x.y Plus 1</button>
    <button @click="x={y:100}">Click me to replace y Value of</button>
</template>

<script>
    import {shallowRef,ref} from 'vue'
    export default {
        name: "shallowRef_component",
        setup(){
            let sum=ref(0);
            let x=shallowRef({
                y:0,
            })
            return{
                sum,
                x,
            }
        }
    }
</script>

<style scoped>

</style>
Here, we compare ref and shallowRef. When you click the x.y + 1 button, the view will not trigger the update, because the value object of Y is deep-seated, and when you directly click the sum + 1 button, the update can be triggered. Sum is shallow directly. When you replace the value of Y, you replace the value of the whole x (i.e. the whole object), rather than the value in X.
shallowReactive example
<template>
    <h2>shallowReactive Example</h2>
    <h2>full name:{{name}}</h2>
    <h2>Age:{{age}}</h2>
    <h2>Salary:{{job.salary}}k</h2>
    <button @click="name+='!'">Modify name</button>
    <button @click="age++">Modify age</button>
    <button @click="job.salary++">Raise your salary</button>
</template>

<script>
    import {shallowReactive,toRefs} from 'vue'
    export default {
        name: "shallowReactive01_component",
        setup(){
            let person=shallowReactive({
                name:'Zhang San',
                age:18,
                job:{
                    salary:20,
                }
            })
            return{
                ...toRefs(person)
            }
        }
    }
</script>

<style scoped>

</style>
When you click the modify name and modify age buttons, you can see that the view changes. When you click salary increase, the view will not change, but the data changes. You can use the console to test this.
readonly and shallowReadonly
- readonly: make a responsive data read-only (deep read-only)
shallowReadonly: make a response read-only (shallow read-only)
Example 1<template> <h2>readonly And shallowReadonly</h2> <h2>full name:{{name}}</h2> <h2>Age:{{age}}</h2> <h2>Salary:{{job.salary}}</h2> <h2>current sum The values are:{{sum}}</h2> <button @click="name+='!'">Modify name</button> <button @click="age++">Modify age</button> <button @click="job.salary++">Pay rise(readonly)</button> <button @click="job.salary++">Pay rise(shallowReadonly)</button> <button @click="sum++">Point I add 1</button> </template> <script> import {ref,reactive,readonly,shallowReadonly,toRefs} from 'vue' export default { name: "shallowReadonly_component", setup(){ let sum=ref(0); let person=reactive({ name:'Er Lang Shen Yang Jian', age:21, job:{ salary:200 } }); person=readonly(person); sum=readonly(sum); // person=shallowReadonly(person); // sum=readonly(sum); return{ sum, ...toRefs(person) } } } </script> <style scoped> </style>
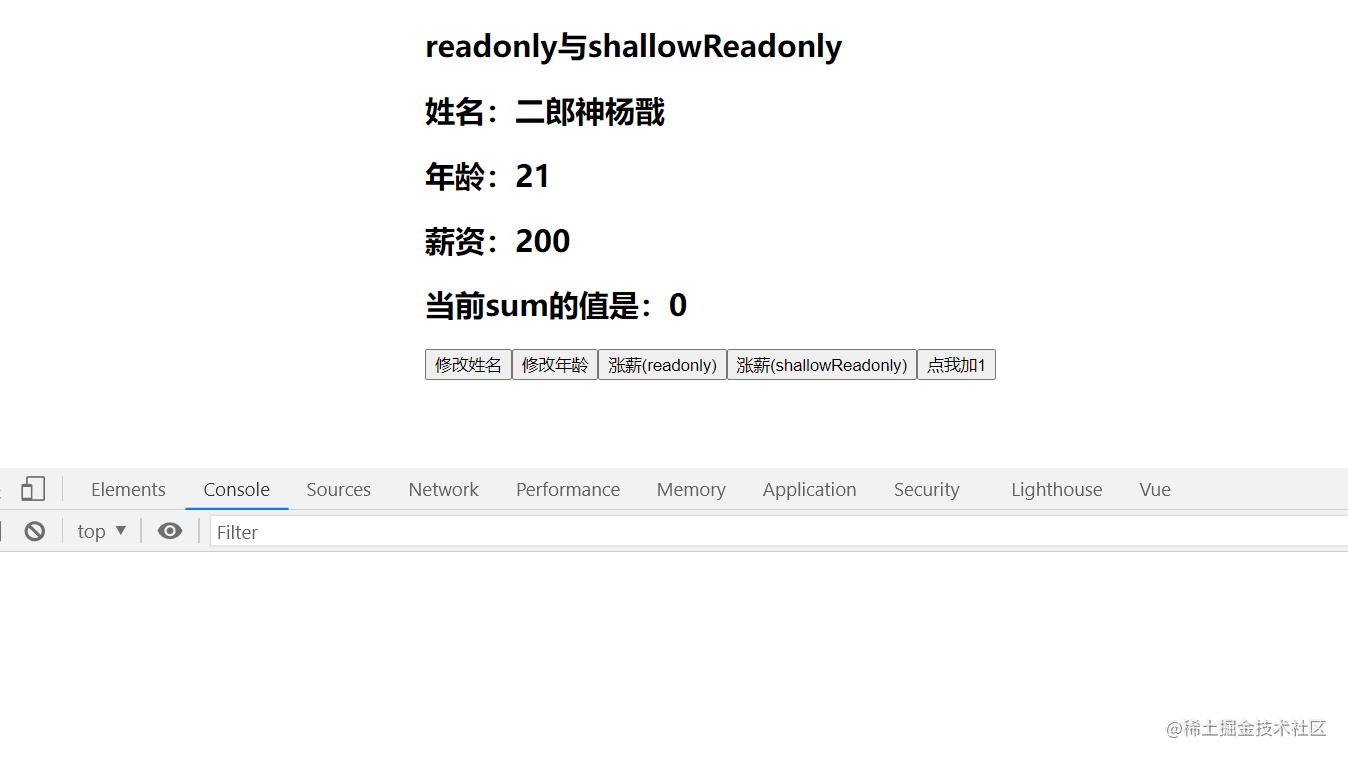
When using readonly, all the buttons are invalid. Let's see the effect of shallowReadonly
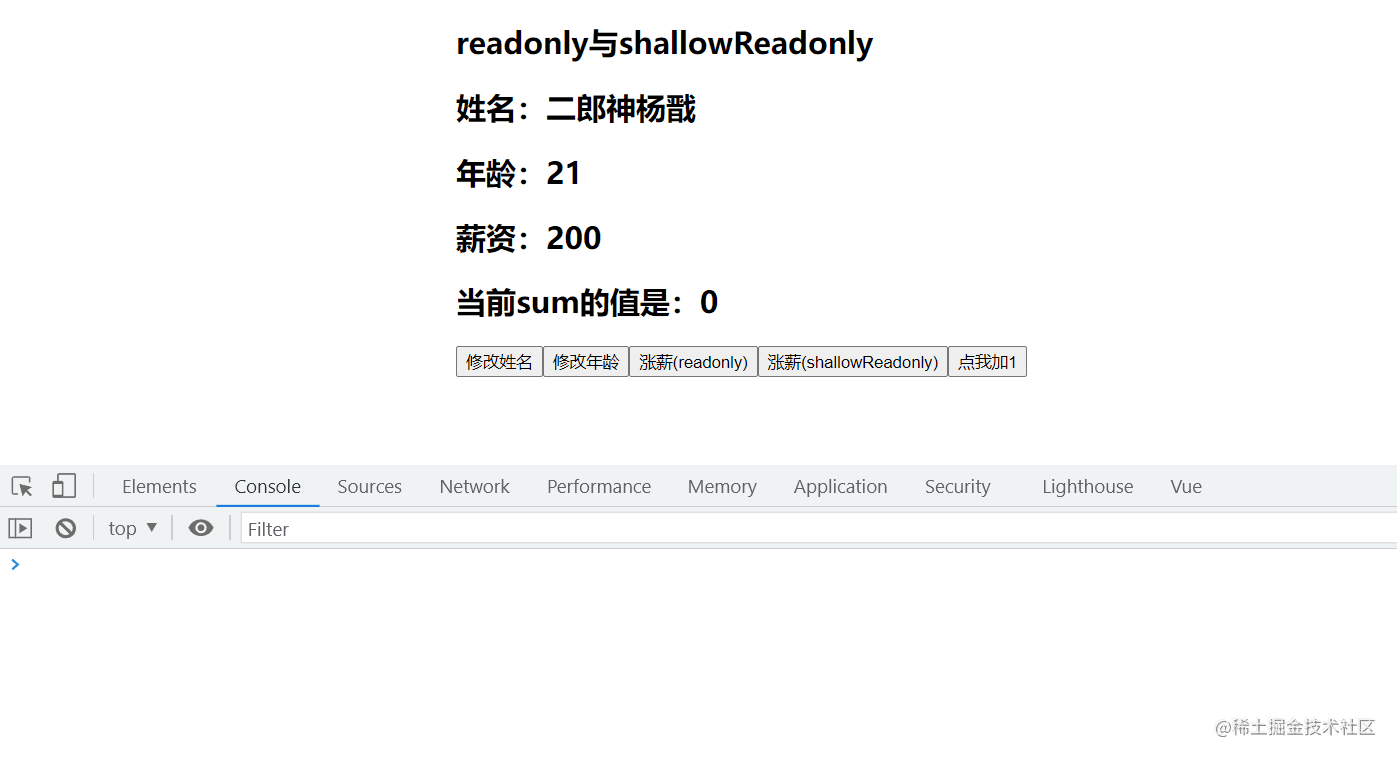
When using shallowReadonly, changing the name and age will not change, only the salary increase will change
toRaw and markRaw
toRaw
- Function: convert a reactive object into a normal object
- Usage scenario: used to read the ordinary object corresponding to the responsive object. All operations on this ordinary object will not cause page updates
markRow
Purpose: mark an object so that it will never become a responsive object again
Application scenario:
- Some values should not be set to be responsive, such as complex third-party class libraries,
- Skipping responsive transformations can improve performance when rendering large lists with immutable data sources
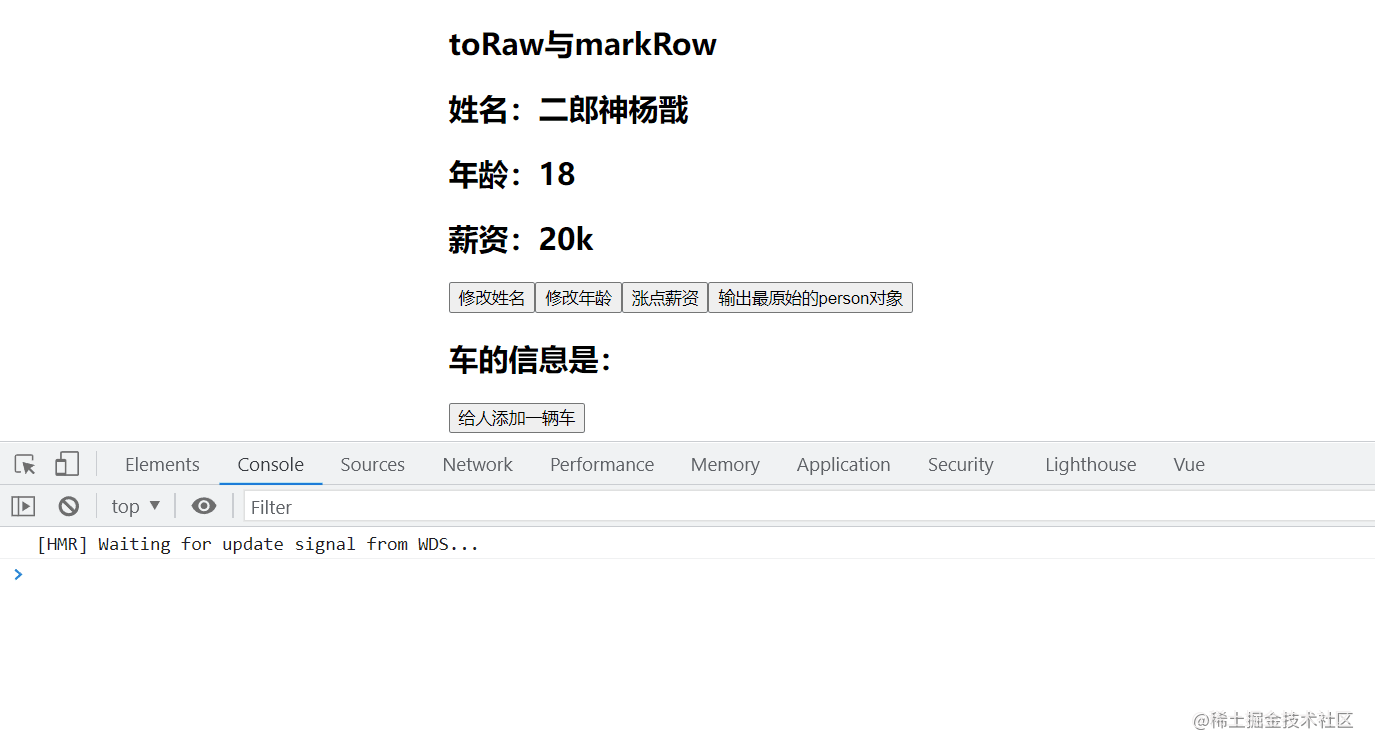
Example 1
<template>
    <div style="width: 800px;margin: 0 auto">
        <h2>toRaw And markRow</h2>
        <h2>full name:{{name}}</h2>
        <h2>Age:{{age}}</h2>
        <h2>Salary:{{job.salary}}k</h2>
        <button @click="name+='!'">Modify name</button>
        <button @click="age++">Modify age</button>
        <button @click="job.salary++">Raise your salary</button>
        <button @click="showRawPerson">Output the original person object</button>
    </div>
</template>

<script>
    import {ref,reactive,toRaw,markRaw,toRefs} from 'vue'
    export default {
        name: "toRaw01_component",
        setup(){
            let sum=ref(0);
            let person=reactive({
                name:'Er Lang Shen Yang Jian',
                age:18,
                job:{
                    salary:20
                }
            })
            function showRawPerson() {
                let p=toRaw(person)
                console.log(p);
                let sum=toRaw(sum);
                console.log(sum);   // Invalid responsive data for ref definition
            }
            return{
                sum,
                ...toRefs(person),
                showRawPerson
            }
        }
    }
</script>

<style scoped>

</style>
When calling the showRawPerson method, the console can see that the output of the original person,sum, undefined and toRaw is invalid for the response data defined by ref. next, let's see the effect of markRow
Example 2
<template>
    <div style="width: 800px;margin: 0 auto">
        <h2>toRaw And markRow</h2>
        <h2>full name:{{name}}</h2>
        <h2>Age:{{age}}</h2>
        <h2>Salary:{{job.salary}}k</h2>
        <button @click="name+='!'">Modify name</button>
        <button @click="age++">Modify age</button>
        <button @click="job.salary++">Raise your salary</button>
        <button @click="showRawPerson">Output the original person object</button>
        <h2>The vehicle information is:{{person.car}}</h2>
        <button @click="addCar">Add a car to someone</button>
        <template v-if="person.car">
            <button @click="person.car.name+='!'">Modify car name</button>
            <button @click="person.car.price++">Modify the price of the car</button>
            <button @click="changeCarPrice">Modify the price of the car</button>
        </template>
    </div>
</template>

<script>
    import {ref,reactive,toRaw,markRaw,toRefs} from 'vue'
    export default {
        name: "toRaw01_component",
        setup(){
            let sum=ref(0);
            let person=reactive({
                name:'Er Lang Shen Yang Jian',
                age:18,
                job:{
                    salary:20
                }
            })
            function showRawPerson() {
                let p=toRaw(person)
                console.log(p);
                let sum=toRaw(sum);
                console.log(sum);   // Invalid responsive data for ref definition
            }
            function addCar() {
                let car={name:'bmw',price:40}
                person.car=markRaw(car);
            }
            function changeCarPrice() {
                person.car.price++;
                console.log(person.car.price)
            }
            return{
                sum,
                person,
                ...toRefs(person),
                showRawPerson,
                addCar,
                changeCarPrice
            }
        }
    }
</script>

<style scoped>

</style>
Here, a method and related attributes of car information are added to the person object. Normally, the added data directly in reactive will be responsive, but the markRaw method is used here. Therefore, when you click to modify the car name and price, the data changes, but the view will not be updated.
customRef
- Function: create a custom ref and display and control its dependency tracking and update trigger. It requires a factory function that receives track and trigger functions as parameters and should return an object with get and set.
Achieve anti shake effect: - 1. Implement custom two-way binding first
2. After realizing bidirectional binding, anti shake is realized
Custom bidirectional binding<template> <h2>customRef Example</h2> <input type="text" v-model="msg"> <h2>{{msg}}</h2> </template> <script> import {customRef,} from 'vue' export default { name: "customRef01_component", setup(){ function myRef(msg){ // Custom ref function return customRef((track,trigger)=>{ return{ get(){ console.log('Read value') track(); return msg; }, set(newValue){ console.log(`Modified value,The modified value is: ${newValue}`); msg=newValue; trigger(); } } }) } let msg=myRef('Hello'); return{ msg } } } </script> <style scoped> </style>
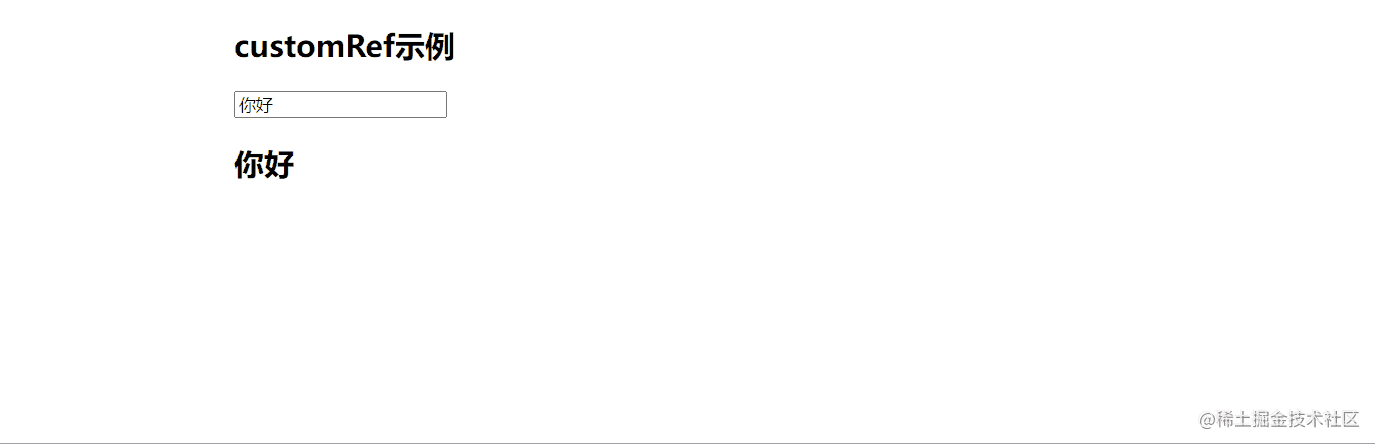
Here we realize the bidirectional binding of data, and then we realize the anti shake
<template>
    <div style="width: 800px;margin: 0 auto">
        <h2>customRef Example</h2>
        <input type="text" v-model="msg">
        <h2>{{msg}}</h2>
    </div>
</template>

<script>
    import {customRef,} from 'vue'
    export default {
        name: "customRef01_component",
        setup(){
            function myRef(msg,delay){   // Custom ref function
                let timer;
               return customRef((track,trigger)=>{
                   return{
                       get(){
                           console.log('Read value')
                           track();
                           return msg;
                       },
                       set(newValue){
                           timer=setTimeout(()=>{
                               console.log(`Modified value,The modified value is: ${newValue}`);
                               msg=newValue;
                               trigger();
                           },delay)
                       }
                   }
               })
            }
            let msg=myRef('Hello',500);
            return{
                msg
            }
        }
    }
</script>

<style scoped>

</style>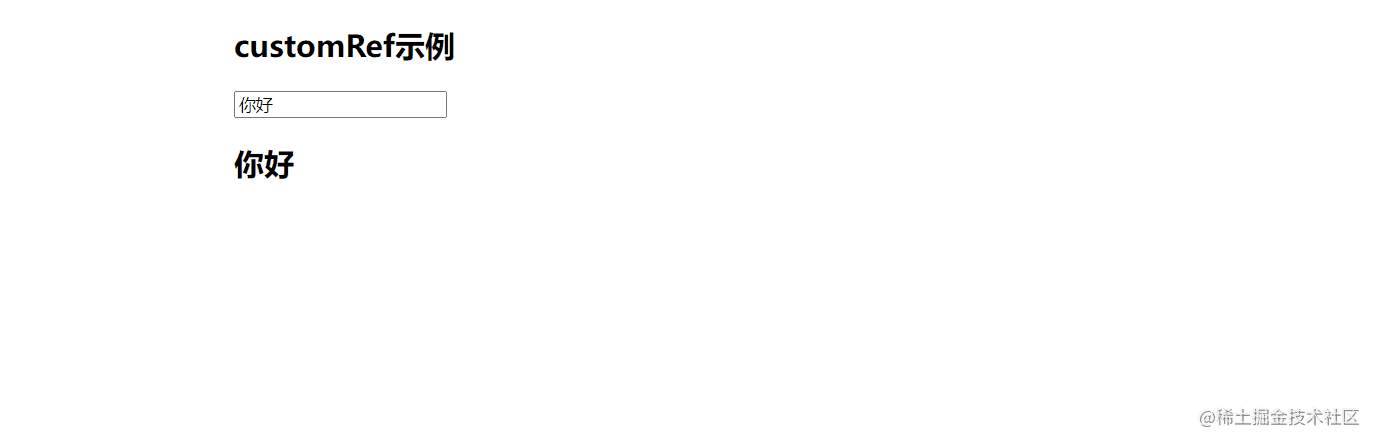
Judgment of responsive data
- isRef: checks whether a value is a ref object
- isReactive: checks whether an object is a reactive proxy created by reactive
- isReadonly: checks whether an object is a read-only proxy created by readonly
- isProxy: check whether an object is a proxy created by the reactive or readonly methods
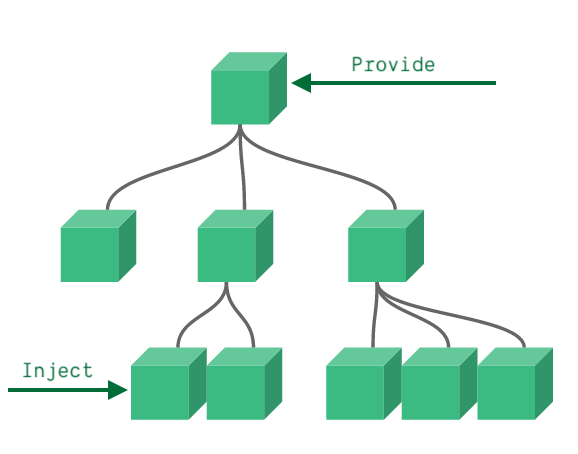
provide and inject
- Function: realize communication between progeny and descendant components
- Routine: the parent component has a provide option to provide data, and the descendant component has an inject option to start using these data
Ancestor component
<template>
    <h2>I'm Zu</h2>
    <h3>Car information</h3>
    <p>name:{{name}}</p>
    <p>Price:{{price}}</p>
    <inject_component></inject_component>
</template>

<script>
    import {reactive,toRefs,provide} from 'vue'
    export default {
        name: "provide_component",
        setup(){
            let car=reactive({
                name:'bmw',
                price:'40w'
            });
            provide('car',car);    // provide
            return{
                ...toRefs(car)
            }
        }
    }
</script>

<style scoped>

</style>
Descendant component
<template>
    <h2>I'm sun</h2>
    <h3>Car information</h3>
    <p>name:{{name}}</p>
    <p>Price:{{price}}</p>
</template>

<script>
    import {inject,toRefs,ref} from 'vue'
    export default {
        name: "inject_component",
        setup(){
            let car=inject("car");    //Receive using inject
            return{
                ...toRefs(car)
            }
        }
    }
</script>

<style scoped>

</style>
Fragment
- In vue2: the component must have a root label
- In vue3: components can have no root tags, and multiple root tags will be included in a Fragment virtual element
Benefits: reduce tag levels and memory usage
Teleport
Teleport is a technology that can move our component html structure to a specified location
<teleport to='Move position'>
<div v-if='isShow' class='mark'>
<div class="dialog">
<h3>I am a pop-up window</h3>
<button @click='isShow=true'>Close pop-up window</button>
</div>
</div>
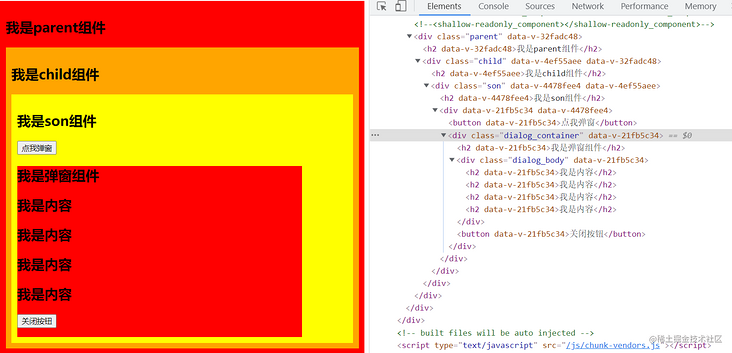
</teleport>A pop-up window is displayed in the middle. There are four components: report_ parent,teleport_child,teleport_son,teleport_dialog, and then the effect to be realized is in teleport_ Introducing teleport into the son component_ Dialog component, report_ The dialog is displayed in the middle of the screen
teleport_parent.vue
<template>
    <div class="parent">
        <h2>I am parent assembly</h2>
        <teleport_child/>
    </div>
</template>

<script>
    import Teleport_child from "./teleport_child";
    export default {
        name: "teleport_parent",
        components: {Teleport_child}
    }
</script>

<style scoped>
    .parent{
        background-color: red;
        padding: 10px;
    }
</style>
teleport_child.vue
<template>
    <div class="child">
        <h2>I am child assembly</h2>
        <teleport_son/>
    </div>
</template>

<script>
    import Teleport_son from "./teleport_son";
    export default {
        name: "teleport_child",
        components: {Teleport_son}
    }
</script>

<style scoped>
    .child{
        background-color: orange;
        padding: 10px;
    }
</style>
teleport_son.vue
<template>
    <div class="son">
        <h2>I am son assembly</h2>
        <teleport_dialog/>
    </div>
</template>

<script>
    import Teleport_dialog from "./teleport_dialog";
    export default {
        name: "teleport_son",
        components: {Teleport_dialog}
    }
</script>

<style scoped>
    .son{
        background-color: yellow;
        padding: 10px;
    }
</style>
teleport_dialog.vue
<template>
    <div>
        <button @click="isShow=true">Click me to pop up</button>
        <div class="dialog_container" v-if="isShow">
            <h2>I'm the pop-up component</h2>
            <div class="dialog_body">
                <h2>I am the content</h2>
                <h2>I am the content</h2>
                <h2>I am the content</h2>
                <h2>I am the content</h2>
            </div>
            <button @click="isShow=false">close button</button>
        </div>
    </div>
</template>

<script>
    import {ref} from 'vue'
    export default {
        name: "teleport_dialog",
        setup(){
            let isShow=ref(false);
            return{
                isShow
            }
        }
    }
</script>

<style scoped>
    .dialog_container{
        width: 500px;
        height: 300px;
        background: red;
    }
</style>
The results are as follows
When we click the button, the effect is like this
When you click the button, the pop-up window will display, but the height of son will be changed in the son component, which is not beautiful. If the pop-up window uses positioning, it can be separated from the document flow without expanding the height in son. However, position: absolute is positioned according to the nearest parent element with positioning element, so this method is unreliable, The effect we need to achieve is to locate according to the body
Modify the style of dialog
<template>
    <div>
        <button @click="isShow=true">Click me to pop up</button>
        <teleport to="body">
            <div class="mask" v-if="isShow">
                <div class="dialog_container">
                    <h2>I'm the pop-up component</h2>
                    <div class="dialog_body">
                        <h2>I am the content</h2>
                        <h2>I am the content</h2>
                        <h2>I am the content</h2>
                        <h2>I am the content</h2>
                    </div>
                    <button @click="isShow=false">close button</button>
                </div>
            </div>
        </teleport>
    </div>
</template>

<script>
    import {ref} from 'vue'
    export default {
        name: "teleport_dialog",
        setup(){
            let isShow=ref(false);
            return{
                isShow
            }
        }
    }
</script>

<style scoped>
    .mask{
        position: absolute;
        top: 0px;
        left: 0px;
        right: 0px;
        bottom: 0px;
        background: rgba(0,0,0,.5);
    }
    .dialog_container{
        width: 500px;
        height: 300px;
        background: red;
        position: absolute;
        left: 50%;
        top: 50%;
        margin-left: -250px;
        margin-top: -150px
    }
</style>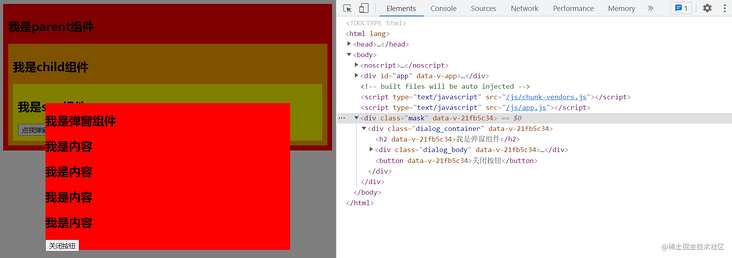
Suspense
Function: render some additional content while waiting for asynchronous components to make the application have a better user experience
Use steps:
- Asynchronous import component
import {defineAsyncComponent} from 'vue'
const child=defineAsyncComponent(()=>import('./components/Child.vue'))- Wrap the component with suspend and configure default and fallback
<template>
    <div class="app">
        <h3>I am app assembly</h3>
     <Suspense>
        <template v-slot:default>
                <Child/>
        </template>
        <template v-slot:fallback>
            <h3>Loading......</h3>
        </template>
     </Suspense>
    </div>
</template>
Example
suspense.vue
<template>
    <div class="suspense">
        <h2>I am suspense assembly</h2>
        <child/>
    </div>
</template>

<script>
    import Child from "./child";
    export default {
        name: "suspense01_component",
        components: {Child}
    }
</script>

<style scoped>
    .suspense{
        background-color: red;
        padding: 10px;
    }
</style>
child.vue
<template>
    <div class="child">
        <h2>I am child assembly</h2>
    </div>
</template>

<script>
    export default {
        name: "child"
    }
</script>

<style scoped>
    .child{
        background-color: orange;
        padding: 10px;
    }
</style>
If the above code is used to introduce, suspend and child components will be loaded at the same time. If there are other child components in the child, there are also sub components in the sub components. When the network is slow, the user may not see the child components and other components in the child. This will affect the user experience and modify the corresponding code
suspense.vue
<template>
    <div class="suspense">
        <h2>I am suspense assembly</h2>
        <suspense>
            <template v-slot:default>
                <child/>
            </template>
            <template v-slot:fallback>
                <h3>Please wait, loading...</h3>
            </template>
        </suspense>
    </div>
</template>

<script>
    // import Child from "./child"; //  Static introduction
    import {defineAsyncComponent} from 'vue'
    const Child=defineAsyncComponent(()=>import('./child')) //  Asynchronous introduction
    export default {
        name: "suspense01_component",
        components: {Child}
    }
</script>

<style scoped>
    .suspense{
        background-color: red;
        padding: 10px;
    }
</style>
child.vue
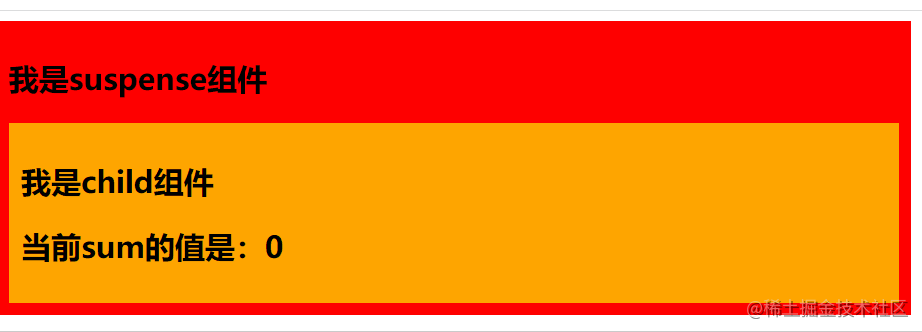
<template>
    <div class="child">
        <h2>I am child assembly</h2>
        <h2>current sum The values are:{{sum}}</h2>
    </div>
</template>

<script>
    import {ref} from 'vue'
    export default {
        name: "child",
        setup(){
            let sum=ref(0);
            return new Promise((resole,reject)=>{
                setTimeout(()=>{
                    resole({
                        sum
                    });
                },3000)
            })
        }
    }
</script>

<style scoped>
    .child{
        background-color: orange;
        padding: 10px;
    }
</style>
In order to see the effect, the component is displayed after a delay of 3 seconds
Other changes in Vue2x and Vue3x
1. Transfer of global API
vue2.x has many global API s and configurations, such as global registration components, registration global instructions, etc
- Register global components
Vue.component('MyButton',{
    data:()=>{
        count:0,
    },
        template:'<button @click="count++">clicked {{count}} times</button>'
});- Register global directives
Vue.directive('focus',{
    inserted:el=>el.foucus
})- Vue3. These API s have been adjusted in 0
The global API, Vue XXX is adjusted to the application instance app
| 2.x global API(Vue) | 3.x instance API(app) |
|---|---|
| Vue.config.xxx | app.config.xxx |
| Vue.config.productionTip | remove |
| Vue.component | app.component |
| Vue.directive | app.directive |
| Vue.mixin | app.mixin |
| Vue.use | app.use |
| Vue.prototype | app.config.globalProperties |
2. Other changes
- The data option should always be declared as a function
- Writing of transition class
Vue2. How to write x
.v-enter
.v-leave-to{
    opacity:0,
}
v-leave,
v-enter-to{
    opacity:1
}
Vue3. How to write x
.v-enter-from,
.v-leave-to{
    opacity:0
}
.v-leave-to,
.v-enter-to{
    opacity:1
}- Remove keyCode as the modifier of v-on and no longer support config keyCodes
- Remove v-on Navitive modifier
Parent component binding event
<my-component>
    v-on:close="handleComponentEvent"
v-on:click="handleNativeClickEvent"
</my-component>
Declare custom components in subcomponents
export default{
    emits:['close']
}
Remove filter
Although the filter looks convenient, it needs a custom syntax to break the assumption that the expression in braces is' just javascript ', which has not only learning cost, but also implementation cost. It is recommended to call or calculate attributes to replace the filter
Vue3x related information
| Related library name | Online address |
|---|---|
| Vue 3.0 official documents (English) | Online address |
| Vue 3.0 Chinese documents | Online address |
| Composition API manual | Online address |
| Vue 3.0 source code learning | Online address |
| Vue router official document | Online address |
| Vuex 4.0 | Github |
| vue-devtools | Github |
| Vite source code learning | Online address |
| Vite 2.0 Chinese documents | Online address |
| New developments in Vue3 | Online address |
Vue3xUI component library
Element-plus
- Warehouse address: https://github.com/element-pl...
- Document address: https://element-plus.gitee.io...
Open source project
- Background management system developed by Vue 3.0 + vite 2.0 + Vue router 4.0 + element plus + echos 5.0 + Axios: https://github.com/newbee-ltd...
- Vue3. A background management system written by 0 + typescript + nodejs + MySQL: https://github.com/xiaoxian52...
Ant Design of Vue
- Warehouse address: https://github.com/vueCompone...
- Document address: https://antdv.com/docs/vue/in...
Open source project
- AntdV background management system: https://github.com/iczer/vue-...
- vue3. X + ant design Vue (beta version, free commercial, supporting PC, tablet and mobile phone): https://github.com/chuzhixin/...
- Based on vue3 0 + Vite + Ant Design Vue: https://github.com/lirongtong...
Vant
- Warehouse address: https://github.com/youzan/vant
- Document address: https://vant-contrib.gitee.io...
Open source project
- NewBee mall vue3 version: https://github.com/newbee-ltd...
- High imitation wechat Notebook: https://github.com/Nick930826...
- Imitation of Jingdong Taobao e-commerce: https://github.com/geekskai/v...
NutUI 3
- Warehouse address: https://github.com/jdf2e/nutui
Document address: https://nutui.jd.com/#/index
Vue3X Related videos
| Related library name | Online address |
|---|---|
| Vue 3.0 actual constellation story H5 project | Online address |
| Vue 3.0 UI component library development | Online address |
| Vue 3.0 + Vite manual reading | Online address |
| Vue 3.0 introduction project construction (village head Yang) | Online address |
| Vue 3.0 Introduction (technical fat) [not recommended] | Online address |
| Vite 2.0 plug-in development guide | Online address |
| Vue 3.0 + Vite 2.0 quickly build Electron applications | Online address |
| Vue3.0 video (highly recommended) | Online address |
| Vue3.0 driver's license question bank | Online address |
reference material
Nuggets address: https://juejin.cn/post/695512...
Vue.js official website: https://v3.cn.vuejs.org/
bilibili address: https://www.bilibili.com/vide...
MDN address: https://developer.mozilla.org...
ES6 address: https://es6.ruanyifeng.com/
summary
Generally speaking, after learning this blog, it basically covers most of the content in Vue3, and the writing is particularly detailed. There are notes, supporting materials and practical videos. It mainly depends on whether you are willing to take the time to learn. I think learning is a lifelong thing. Of course, learning is also a particularly lonely thing. If this article is helpful to you, remember to praise, collect and pay attention. It's not easy to be original. Thank you for your support!