7, Show up, the home page of Python Web recipe system
7.1 menu system home page initialization
The core of the third round of snowball learning is Python Web related knowledge points, which inevitably involves the front-end technology stack. If you have no foundation for HTML and CSS, it may be difficult to learn. It is recommended to supplement some front-end knowledge for subsequent learning. You can also directly enter the Django learning stage first, which is not a big problem.
This blog starts to build the front-end page of the recipe system. The basic knowledge involved is the web template framework and front-end. It will be written first from the user authentication system. The model related content of the previous blog will be released first and will continue to be used soon.
Let's start writing some front-end code for the home page. We chose [bootstrap 3 framework], which is easier to accept.
There are two steps to implement a page in Django. The first step is to create a template HTML file, and the second step is to modify views Py file to complete the view processing function.
Create directories and files
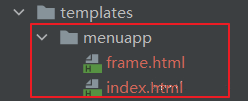
Create the templates folder under the menuapp application directory, and then continue to create a subdirectory of menuapp under this directory. It's a little windy. See the figure.

Next, create a new index in the templates/menuapp directory HTML file, which is the template file of the home page. The following is the code part, involving the front-end related knowledge points.
Someone must ask, do you knock out the code yourself? This is definitely not. If we don't have front-end knowledge, we can't learn any more. These contents are modified.
Open the [bootstrap 3 template page] and select a template, such as the following.

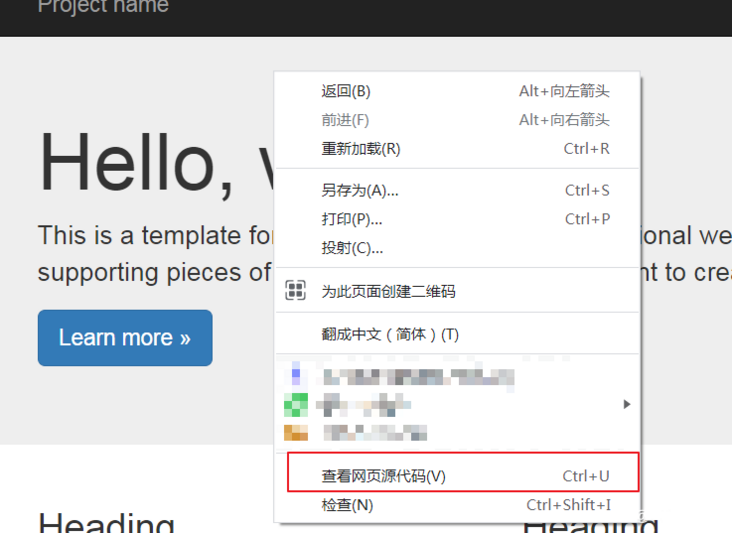
In the open page, right-click to view the source code, copy the content you want on the source code page, and remove the code related to the relative path, such as the following.
<!-- IE10 viewport hack for Surface/desktop Windows 8 bug -->
<script src="../../assets/js/ie10-viewport-bug-workaround.js"></script>
This kind of/ All of them should be removed to get the final source code.
<!DOCTYPE html>
<html lang="zh-CN">
<head>
<meta charset="utf-8" />
<meta http-equiv="X-UA-Compatible" content="IE=edge" />
<meta name="viewport" content="width=device-width, initial-scale=1" />
<!-- Above 3 meta label*must*Put it first, anything else*must*Follow! -->
<meta name="description" content="" />
<meta name="author" content="" />
<link rel="icon" href="../../favicon.ico" />
<title>Jumbotron Template for Bootstrap</title>
<!-- Bootstrap core CSS -->
<link
href="https://cdn.bootcss.com/bootstrap/3.3.7/css/bootstrap.min.css"
rel="stylesheet"
/>
</head>
<body>
<nav class="navbar navbar-inverse navbar-fixed-top">
<div class="container">
<div class="navbar-header">
<button
type="button"
class="navbar-toggle collapsed"
data-toggle="collapse"
data-target="#navbar"
aria-expanded="false"
aria-controls="navbar"
>
<span class="sr-only">Toggle navigation</span>
<span class="icon-bar"></span>
<span class="icon-bar"></span>
<span class="icon-bar"></span>
</button>
<a rel="nofollow" class="navbar-brand" href="#">Project name</a>
</div>
<div id="navbar" class="navbar-collapse collapse">
<form class="navbar-form navbar-right">
<div class="form-group">
<input type="text" placeholder="Email" class="form-control" />
</div>
<div class="form-group">
<input
type="password"
placeholder="Password"
class="form-control"
/>
</div>
<button type="submit" class="btn btn-success">Sign in</button>
</form>
</div>
<!--/.navbar-collapse -->
</div>
</nav>
<!-- Main jumbotron for a primary marketing message or call to action -->
<div class="jumbotron">
<div class="container">
Hello, world!
<p>
This is a template for a simple marketing or informational website. It
includes a large callout called a jumbotron and three supporting
pieces of content. Use it as a starting point to create something more
unique.
</p>
<p>
<a rel="nofollow" class="btn btn-primary btn-lg" href="#" role="button"
>Learn more »</a
>
</p>
</div>
</div>
<div class="container">
<!-- Example row of columns -->
<div class="row">
<div class="col-md-4">
<h2>Heading</h2>
<p>
Donec id elit non mi porta gravida at eget metus. Fusce dapibus,
tellus ac cursus commodo, tortor mauris condimentum nibh, ut
fermentum massa justo sit amet risus. Etiam porta sem malesuada
magna mollis euismod. Donec sed odio dui.
</p>
<p>
<a rel="nofollow" class="btn btn-default" href="#" role="button"
>View details »</a
>
</p>
</div>
<div class="col-md-4">
<h2>Heading</h2>
<p>
Donec sed odio dui. Cras justo odio, dapibus ac facilisis in,
egestas eget quam. Vestibulum id ligula porta felis euismod semper.
Fusce dapibus, tellus ac cursus commodo, tortor mauris condimentum
nibh, ut fermentum massa justo sit amet risus.
</p>
<p>
<a rel="nofollow" class="btn btn-default" href="#" role="button"
>View details »</a
>
</p>
</div>
</div>
<hr />
<footer>
<p>© 2016 Company, Inc.</p>
</footer>
</div>
<!-- /container -->
<!-- Bootstrap core JavaScript
================================================== -->
<!-- Placed at the end of the document so the pages load faster -->
<script src="https://cdn.bootcss.com/jquery/1.12.4/jquery.min.js"></script>
<script src="https://cdn.bootcss.com/bootstrap/3.3.7/js/bootstrap.min.js"></script>
</body>
</html>
After the template file is written, we can try to run Django website to achieve our final goal.
Before running, you still need to make some preparations. The first is to modify the default home page.
Edit URLs Py file.

The modification code is as follows:
from django.contrib import admin
from django.urls import path, include

urlpatterns = [
    path('admin/', admin.site.urls),
    # Include the URL settings of the menuapp application in the URL settings of the project
    path("", include("menuapp.urls"))
]
Django generally recommends designing a URL file separately for each different APP application, so you also need to add a URLs. URL in the menuapp file Py file, which is part of the path("", include("menuapp.urls") referenced by the above code. The code location is shown in the following figure.

The code in the file is as follows:
from django.urls import path
from . import views

urlpatterns = [
    path("", views.index, name="defalut"),
]
When accessing the default path, i.e http://127.0.0.1:8000/ , the index method in the views module will be called, so you need to modify views Py file, the code is as follows:
from django.shortcuts import render
# Create your views here.
def index(request):
    return render(request, "menuapp/index.html")
Here, I found that the template file was officially loaded.
Next, you can use Python manage Py runserver runs our application, but there is a problem again, that is, the following error.
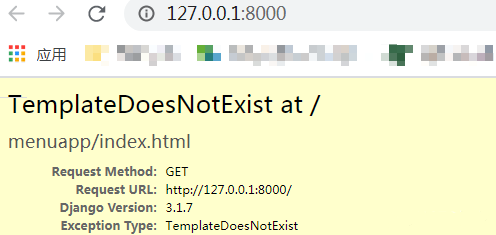
This error indicates that the template file has not been loaded. There are two reasons. The first is the location of the template file. Note that it is in the menuapp application directory. If you are not sure, please return to the above figure. The second reason is that we have not found it in settings Add menuapp to settings.py INSTALLED_ Go to apps. The import failed to load the application. Modify settings Py file, the code is as follows:
INSTALLED_APPS = [
    'django.contrib.admin',
    'django.contrib.auth',
    'django.contrib.contenttypes',
    'django.contrib.sessions',
    'django.contrib.messages',
    'django.contrib.staticfiles',

    'menuapp'
]
At this time, when running the code, if the following interface appears successfully, it indicates that the template file has been officially loaded.

7.2 static file migration of recipe system
In the above code index The following contents are used in the HTML file. These contents are the links of the called CDN acceleration website (you can supplement this knowledge after fully learning the front end). The complete decision of these addresses is not in our hands, so we need to modify the following contents into the static file of the recipe project.
<link
  href="https://cdn.bootcss.com/bootstrap/3.3.7/css/bootstrap.min.css"
  rel="stylesheet"
/>
<script src="https://cdn.bootcss.com/jquery/1.12.4/jquery.min.js"></script>
<script src="https://cdn.bootcss.com/bootstrap/3.3.7/js/bootstrap.min.js"></script>
Open the official Bootstrap 3 website and download the source material in advance,
Create static file directories and files
Copy the downloaded file to the static directory, and the final result is shown in the figure below.

The next step is how to apply the knowledge points related to static files in Django template files.
Step 1: insert the {% load static%} statement in the first line of the template page that needs to use the static file.
Step 2: use the static tag and path where the static file is used later, such as bootstrap Min.js file, the statement is {% static 'js/bootstrap.min.js'%}
Step 3: the above path will be changed because of settings Static set in PY_ The URL value plus the path value becomes the final address, such as static / JS / bootstrap min.js
Step 4: in URLs Add static file processing code in PY
The modification contents of the code file involved in the above steps are as follows:
index.html modification and improvement
{% load static %}
<!DOCTYPE html>
<html lang="zh-CN">
<head>
    <meta charset="utf-8">
    <title>Recipe system----home page</title>
    <link href="{% static 'css/bootstrap.min.css' %}" rel="stylesheet">

</head>

<body>
 <!-- The rest is consistent with the above -->

</div> <!-- /container -->

<script src="{% static 'js/bootstrap.min.js' %}"></script>

</body>
</html>
urls. The PY file is modified as follows. Note that the file is the project directory, not the menuapp application directory
from django.contrib import admin
from django.urls import path, include
from django.contrib.staticfiles.urls import staticfiles_urlpatterns

urlpatterns = [
    path('admin/', admin.site.urls),
    # Include the URL settings of the menuapp application in the URL settings of the project
    path("", include("menuapp.urls"))
]
urlpatterns += staticfiles_urlpatterns()
Reuse Python manage Py runserver run the program, browse the page and see that the data is normal.
7.3 Django template language
The {% statement part%} used above is the template language in Django. The template is different from ordinary text files in two ways. The template contains variables, which will be replaced with corresponding values when the page renders the web page. The template also includes logical processing codes. This part of knowledge is called tags.
Variables use double curly braces in the template to represent {{variable name}}. Here, the relevant knowledge of variables also involves the filter content, which will be covered later.
The tags in the template are represented by {%%}. The tags can contain business logic codes, and sometimes there are start tags and end tags.
For example, the tag that implements the if statement is written as follows:
<ul>
  {% if menu %}
  <li>{{ menu.name }}</li>
</ul>
{% endif %}
In the template language, block and extends tags are used to realize inheritance. It is simply understood as a pile of public templates.
block is used for placeholder in the parent template, and extends is used for inheritance in the child template.
7.3.1 split template
Next, split the template to index The header in the HTML file is extracted. Create a new file in the templates/menuapp directory.
Where frame The HTML code is as follows. Only the core part is shown, otherwise the article will be too long. Pay attention to frame Html is the parent template, where {% block Title%} {% endblock%} is the placeholder and {% block content%} {% endblock%} is the placeholder.
{% load static %}
<!DOCTYPE html>
<html lang="zh-CN">
  <head>
    <meta charset="utf-8" />
    <title>{% block title %}{% endblock%}</title>
    <link href="{% static 'css/bootstrap.min.css' %}" rel="stylesheet" />
  </head>

  <body>
    <nav class="navbar navbar-inverse navbar-fixed-top">
      <div class="container">
        <!-- The contents are omitted -->
      </div>
    </nav>

    <!-- Main jumbotron for a primary marketing message or call to action -->
    <div class="jumbotron">
      <!-- The contents are omitted -->
    </div>

    {% block content %}{% endblock %}

    <script src="{% static 'js/bootstrap.min.js' %}"></script>
  </body>
</html>
index. The HTML file code is as follows:
{% extends "menuapp/frame.html" %} {% block title %} Recipe system---- home page {%
endblock %} {% block content %}
<div class="container">Code content</div>
<!-- /container -->
{% endblock %}
views. The source code of Py file remains unchanged, as follows:
from django.shortcuts import render

# Create your views here.
def index(request):
    return render(request, "menuapp/index.html")
At this time, the operation effect is as follows:

7.4 blog section
This blog mainly introduces the simplest home page production in Django. Try to help you learn Python Web related knowledge without front-end knowledge. Just like it.
This article is transferred from https://www.jianshu.com/p/1c81e86252f4 , in case of infringement, please contact to delete.