
preface
Android rendering optimization can actually be divided into two parts, namely layout (UI) optimization and Caton optimization. The core problem of layout optimization is to solve the problem of application Caton caused by poor layout rendering performance, so it can be considered as a subset of Caton optimization.
This paper mainly includes the following contents:
1. Why layout optimization and android drawing, layout loading principle.
2. Get the time-consuming method for loading layout files.
3. Introduce some means and methods of layout optimization.
4. Why give up using these optimization methods?
1 why layout optimization?
Why layout optimization?
The answer is obvious. If the layout is nested too deeply, or the layout rendering performance is poor for other reasons, it may lead to application jamming.
So how does layout lead to poor rendering performance? First, we should understand the android drawing principle and layout loading principle.
android drawing principle
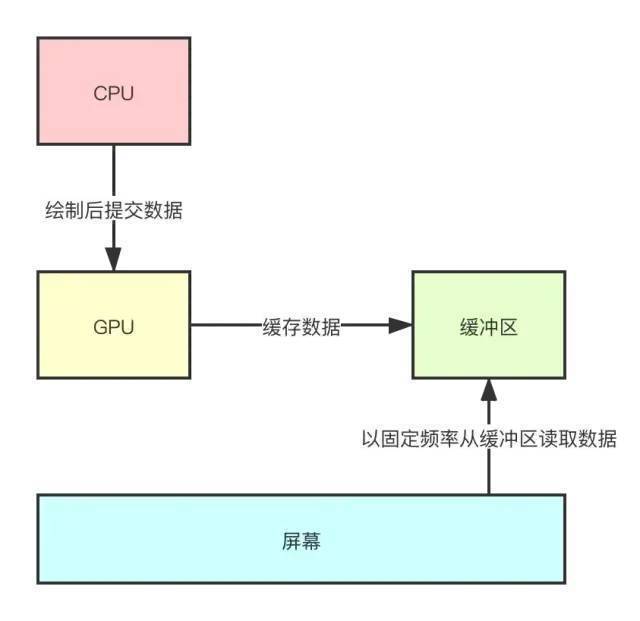
Android screen refresh involves the three most important concepts (for ease of understanding, here is a brief introduction).
1. CPU: execute measure, layout, draw and other operations of the application layer, and submit the data to the GPU after drawing.
2. GPU: further process the data and cache the data.
3. Screen: it is composed of pixels. It takes data from the buffer at a fixed frequency (16.6ms, i.e. 60 frames in 1 second) to fill the pixels.
To sum up, the CPU submits the data after drawing, the GPU further processes and caches the data, and finally the screen reads the data from the buffer and displays it.
Double buffer mechanism
After reading the above flow chart, we can easily think of a problem. The screen is refreshed at a fixed frequency of 16.6ms, but the time when our application layer triggers rendering is completely random (for example, we can touch the screen to trigger rendering at any time).
What happens if the screen reads data from the buffer while the GPU writes data to the buffer?
It is possible that some pictures of the previous frame and some pictures of another frame will appear on the screen, which is obviously unacceptable. How to solve this problem?
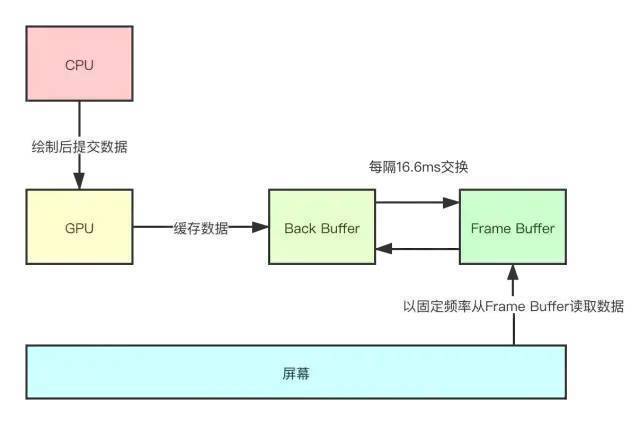
Therefore, in screen refresh, Android system introduces double buffer mechanism.
The GPU only writes drawing data to the Back Buffer, and the GPU will periodically exchange Back Buffer and Frame Buffer at a frequency of 60 times / s, which is synchronized with the refresh rate of the screen.
Although we have introduced the double buffer mechanism, we know that when the layout is complex or the equipment performance is poor, the CPU can not guarantee to complete the calculation of drawing data within 16.6ms, so the system does another processing here.
When your application is filling the Back Buffer with data, the system will lock the Back Buffer.
If your application is still filling the Back Buffer at the time when the GPU exchanges two buffers, the GPU will find that the Back Buffer is locked and will give up the exchange.
The consequence of this is that the mobile phone screen still displays the original image, which is what we often call frame dropping.
Layout loading principle
It can be seen from the above that the reason for the frame drop is that the CPU cannot complete the calculation of drawing data within 16.6ms.
The reason why layout loading may lead to frame loss is that it takes time to operate on the main thread, which may cause the CPU to fail to complete data calculation on time.
Layout loading is mainly realized through setContentView. We won't paste the source code here. Let's take a look at its timing diagram.
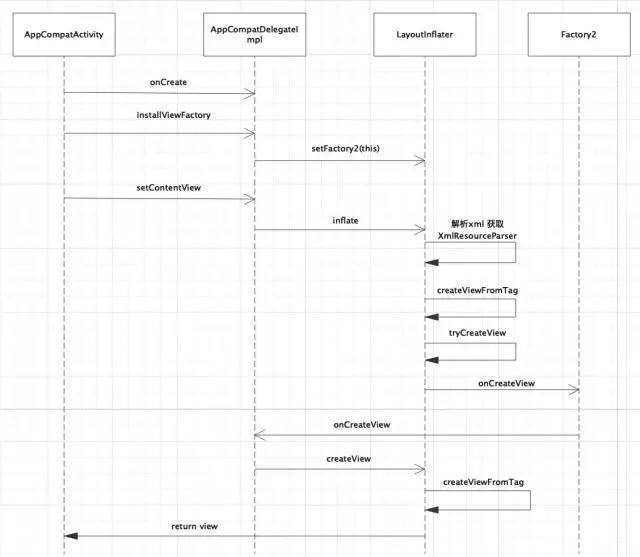
We can see that there are two time-consuming operations in setContentView:
1. Parse xml and get XmlResourceParser, which is an IO process.
2. Create a View object through createViewFromTag, using reflection.
The above two points are the reasons why layout loading may cause jamming, and they are also the performance bottleneck of layout.
2. How to get the time-consuming method of loading layout files
If we need to optimize the layout of the Caton problem, the first and most important thing is to determine the quantitative standard.
Therefore, we first introduce several time-consuming methods to obtain the loading of layout files.
General Acquisition
First, let's introduce the general methods:
val start = System.currentTimeMillis()
setContentView(R.layout.activity_layout_optimize)
val inflateTime = System.currentTimeMillis() - start
This method is very simple because setContentView is a synchronous method. If you want to calculate the time consumption, you can directly subtract the time before and after the calculation to get the result.
AOP(Aspectj,ASM)
Although the above method is simple, it is not elegant enough, and the code is invasive. If you want to measure all activities, you need to copy the relevant methods in the base class, which is troublesome.
The following describes an AOP method, which takes time to calculate.
@Around("execution(* android.app.Activity.setContentView(..))")
public void getSetContentViewTime(ProceedingJoinPoint joinPoint) {
    Signature signature = joinPoint.getSignature();
    String name = signature.toShortString();
    long time = System.currentTimeMillis();
    try {
        joinPoint.proceed();
    } catch (Throwable throwable) {
        throwable.printStackTrace();
    }
    Log.i("aop inflate",name + " cost " + (System.currentTimeMillis() - time));
}
The Aspectj used above is relatively simple. The above annotation means to call our written getSetContentViewTime method inside the execution of setContentView method.
In this way, the corresponding time consumption can be obtained.
We can see the printed log:
I/aop inflate: AppCompatActivity.setContentView(..) cost 69
I/aop inflate: AppCompatActivity.setContentView(..) cost 25
In this way, the time-consuming of each page layout loading can be monitored without intrusion.
The specific source code can be seen at the end of the article.
Time consuming to get any control
Sometimes, in order to know exactly which control takes time to load, for example, we need to monitor its performance when we add a new custom View.
We can use setFactory2 to monitor the loading time of each control.
First, let's review the setContentView method:
public final View tryCreateView(@Nullable View parent, @NonNull String name,
    ...
    View view;
    if (mFactory2 != null) {
        view = mFactory2.onCreateView(parent, name, context, attrs);
    } else if (mFactory != null) {
        view = mFactory.onCreateView(name, context, attrs);
    } else {
        view = null;
    }
    ...
    return view;
}
Before actually instantiating the xml node through reflection, the onCreateView method of mFactory2 will be called.
In this way, if we override the onCreateView method and add the time-consuming statistics before and after it, we can get the loading time of each control.
private fun initItemInflateListener(){
    LayoutInflaterCompat.setFactory2(layoutInflater, object : Factory2 {
        override fun onCreateView(
            parent: View?,
            name: String,
            context: Context,
            attrs: AttributeSet
        ): View? {
            val time = System.currentTimeMillis()
            val view = delegate.createView(parent, name, context, attrs)
            Log.i("inflate Item",name + " cost " + (System.currentTimeMillis() - time))
            return view
        }

        override fun onCreateView(name: String, context: Context, attrs: AttributeSet): View? {
            return null
        }
    })
}
As shown above, the real method to create a View is still to call delegate Createview, we just buried it before and after.
Note that initItemInflateListener needs to be called before onCreate.
In this way, it is more convenient to monitor the loading time of each control.
3 Introduction to some methods of layout loading optimization
There are two main reasons for slow layout loading, one is IO and the other is reflection.
Therefore, there are generally two optimization ideas:
1. Side release (asynchronous loading).
2. Fundamental solution (no IO, reflection process, such as X2C,Anko,Compose, etc.).
Asynclayoutinflator scheme
Asynclayouteinflator is used to help asynchronously load layouts. After the inflate (int, ViewGroup, onifflatefinishedlistener) method is run, onifflatefinishedlistener will return View in the callback of the main thread; This is aimed at lazy loading of the UI or high response to user actions.
To put it simply, we know that by default, the "setContentView" function is executed in the UI thread, including a series of time-consuming actions: Xml parsing, View reflection creation and other processes are also executed in the UI thread. Asynclayoutinterpreter is to help us execute these processes asynchronously and maintain the high response of the UI thread.
Use the following:
@Override
protected void onCreate(@Nullable Bundle savedInstanceState) {
    super.onCreate(savedInstanceState);
    new AsyncLayoutInflater(AsyncLayoutActivity.this)
            .inflate(R.layout.async_layout, null, new AsyncLayoutInflater.OnInflateFinishedListener() {
                @Override
                public void onInflateFinished(View view, int resid, ViewGroup parent) {
                    setContentView(view);
                }
            });
    // Other operations
}
The advantage of this is that the UI loading process is migrated to the sub thread to ensure the high response of the UI thread.
The drawback lies in sacrificing ease of use, and if UI is invoked during initialization, it may cause crashes.
X2C scheme
X2C is a set of layout loading framework for palm reading open source.
Its main idea is to translate the layout to be translated to generate the corresponding java file during the compilation period. In this way, for developers, the layout or the original xml is written, but for programs, the corresponding java file is loaded at runtime.
This shifts the runtime overhead to compile time.
The original xml file is as follows:
<?xml version="1.0" encoding="utf-8"?>
<RelativeLayout xmlns:android="http://schemas.android.com/apk/res/android"
  xmlns:app="http://schemas.android.com/apk/res-auto"
  xmlns:tools="http://schemas.android.com/tools"
  android:layout_width="match_parent"
  android:layout_height="match_parent"
  android:paddingLeft="10dp">

  <include
      android:id="@+id/head"
      layout="@layout/head"
      android:layout_width="wrap_content"
      android:layout_height="wrap_content"
      android:layout_centerHorizontal="true" />

  <ImageView
      android:id="@+id/ccc"
      style="@style/bb"
      android:layout_below="@id/head" />
</RelativeLayout>
X2C generated Java file:
public class X2C_2131296281_Activity_Main implements IViewCreator {
  @Override
  public View createView(Context ctx, int layoutId) {
        Resources res = ctx.getResources();

        RelativeLayout relativeLayout0 = new RelativeLayout(ctx);
        relativeLayout0.setPadding((int)(TypedValue.applyDimension(TypedValue.COMPLEX_UNIT_DIP,10,res.getDisplayMetrics())),0,0,0);

        View view1 =(View) new X2C_2131296283_Head().createView(ctx,0);
        RelativeLayout.LayoutParams layoutParam1 = new RelativeLayout.LayoutParams(ViewGroup.LayoutParams.WRAP_CONTENT,ViewGroup.LayoutParams.WRAP_CONTENT);
        view1.setLayoutParams(layoutParam1);
        relativeLayout0.addView(view1);
        view1.setId(R.id.head);
        layoutParam1.addRule(RelativeLayout.CENTER_HORIZONTAL,RelativeLayout.TRUE);

        ImageView imageView2 = new ImageView(ctx);
        RelativeLayout.LayoutParams layoutParam2 = new RelativeLayout.LayoutParams(ViewGroup.LayoutParams.MATCH_PARENT,(int)(TypedValue.applyDimension(TypedValue.COMPLEX_UNIT_DIP,1,res.getDisplayMetrics())));
        imageView2.setLayoutParams(layoutParam2);
        relativeLayout0.addView(imageView2);
        imageView2.setId(R.id.ccc);
        layoutParam2.addRule(RelativeLayout.BELOW,R.id.head);

        return relativeLayout0;
  }
}
Use X2C as shown below setContentView can replace the original setContentView.
// this.setContentView(R.layout.activity_main);X2C.setContentView(this, R.layout.activity_main);
X2C benefits
1. While retaining xml, it solves the performance problems it brings.
2. According to X2C statistics, the loading time can be reduced to 1 / 3 of the original.
X2C problem
1. Some properties cannot be set through code, and Java is incompatible.
2. The loading time is transferred to the compilation period, which increases the time-consuming of the compilation period.
3. Kotlin Android extensions plug-in is not supported, sacrificing some ease of use.
Anko scheme
Anko is a powerful library developed by JetBrains. It supports writing UI using kotlin DSL, as shown below:
class MyActivity : AppCompatActivity() {
    override fun onCreate(savedInstanceState: Bundle?, persistentState: PersistableBundle?) {
        super.onCreate(savedInstanceState, persistentState)
        MyActivityUI().setContentView(this)
    }
}

class MyActivityUI : AnkoComponent<MyActivity> {
    override fun createView(ui: AnkoContext<MyActivity>) = with(ui) {
        verticalLayout {
            val name = editText()
            button("Say Hello") {
                onClick { ctx.toast("Hello, ${name.text}!") }
            }
        }
    }
}
As shown above, Anko uses kotlin DSL to implement layout, which is much more convenient than using Java to dynamically create layout, mainly more concise. It has a hierarchical relationship with xml to create layout, which makes it easier for us to read.
At the same time, it removes IO and reflection processes and has better performance. The following is the performance comparison between Anko and XML.
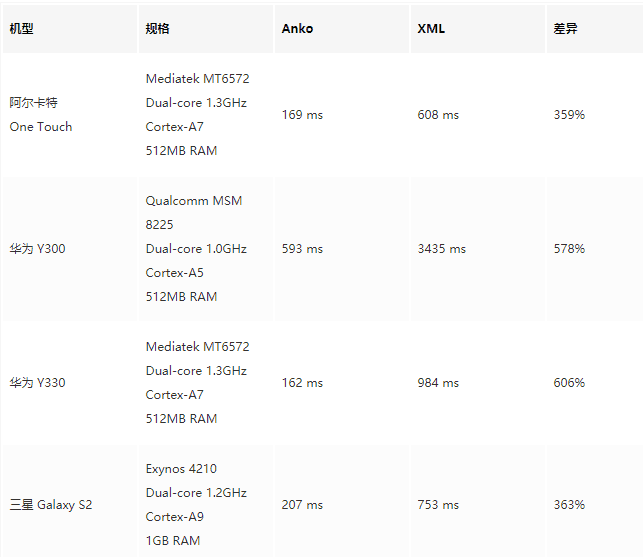
The above data comes from: https://medium.com/android-ne...
However, since AnKo has stopped maintenance, it is not recommended to use it here. Just understand the principle.
AnKo recommends that you use Jetpack Compose instead.
Compose scheme
Compose , is a new member of , Jetpack , and a new UI library announced by , Android , team at the 2019 I/O conference. It is currently in Beta stage.
Compose is developed using pure kotlin, which is simple and convenient to use, but it is not the same encapsulation of ViewGroup as Anko.
Instead of making an upper packaging for the View and ViewGroup systems to make the writing easier, Compose completely abandoned the system and made a new rendering mechanism from the inside to the outside.
To be sure, Compose is the official alternative to XML.
The main advantage of Compose lies in its simplicity and ease of use. Specifically, there are two points:
1. Its declarative UI.
2. Remove , xml and use only , Kotlin , language.
Since this article does not introduce Compose, we will not continue to introduce Compose. In general, Compose is the direction of android UI development in the future. Readers can consult relevant materials by themselves.
4 why give up using these optimization methods?
The above describes a lot of layout loading optimization methods, but I didn't use them in the project, which is from getting started to giving up.
In general, there are several reasons:
1. Some methods (such as asynclayoutinflator, X2C) sacrifice ease of use. Although the performance is improved, the development becomes troublesome.
2.Anko is easy to use and has high performance, but it has changed a lot compared with XML. At the same time, anko has given up maintenance, so it is difficult to promote in the team.
3.Compose is the direction of android UI development in the future, but it is still in the Beta stage. I believe it will become an effective means for us to replace XML after Release.
4. The most important thing is that for our project, the time-consuming place for layout loading is not the main time-consuming place, so the optimization benefit is small, and we can invest our energy in other places.
As shown below, we subtract the time before and after setConteView to get the layout loading time.
onWindowFocusChanged is the real visible time of the Activity. Subtract it from onCreate time to get the page display time.
The test results in our project are as follows:
android 5.0
I/Log: inflateTime:33
I/Log: activityShowTime:252
I/Log: inflateTime:11
I/Log: activityShowTime:642
I/Log: inflateTime:83
I/Log: activityShowTime:637

android 10.0
I/Log: inflateTime:11
I/Log: activityShowTime:88
I/Log: inflateTime:5
I/Log: activityShowTime:217
I/Log: inflateTime:27
I/Log: activityShowTime:221
I'm at Android 5 0 mobile phone and 10.0 mobile phone have been tested respectively. In our project, the layout loading time is not very long. At the same time, they do not account for a high proportion in the visible process of the whole page.
Therefore, it is concluded that for our project, the time-consuming of layout loading is not the main time-consuming place, and the benefit of optimization is small.
This is the reason from getting started to giving up.
Some conventional optimization methods
Some schemes with large changes are introduced above. In fact, we also have some conventional methods in actual development to optimize layout and loading.
For example, optimizing the layout level and avoiding over drawing, these simple methods may be applied to the project.
Optimize layout level and complexity
1. Using ConstraintLayout, you can realize a completely flat layout and reduce levels.
2.RelativeLayout itself should not be nested.
3. In the nested LinearLayout, try not to use weight, because weight will be measured twice.
4. It is recommended to use the merge tag, which can reduce one level.
5. Use ViewStub to delay loading.
Avoid over drawing
1. Remove the redundant background color and reduce the use of complex shape s.
2. Avoid hierarchical superposition.
3. The custom View uses clipRect to mask the masked View drawing.
summary
This paper mainly introduces the following contents:
1.andrid drawing principle and layout loading principle.
2. How to quantitatively obtain the loading time of android layout.
3. Introduce some methods and means of layout loading optimization (asynclayoutinflator, X2C, anko, compose, etc.).
4. It is introduced that the above optimization methods are not introduced because the layout loading in our project takes a long time and the optimization benefit is small.
Advanced notes of Android advanced development system, latest interview review notes PDF, My GitHub
end of document
Your favorite collection is my greatest encouragement!
Welcome to follow me, share Android dry goods and exchange Android technology.
If you have any opinions on the article or any technical problems, please leave a message in the comment area for discussion!