background
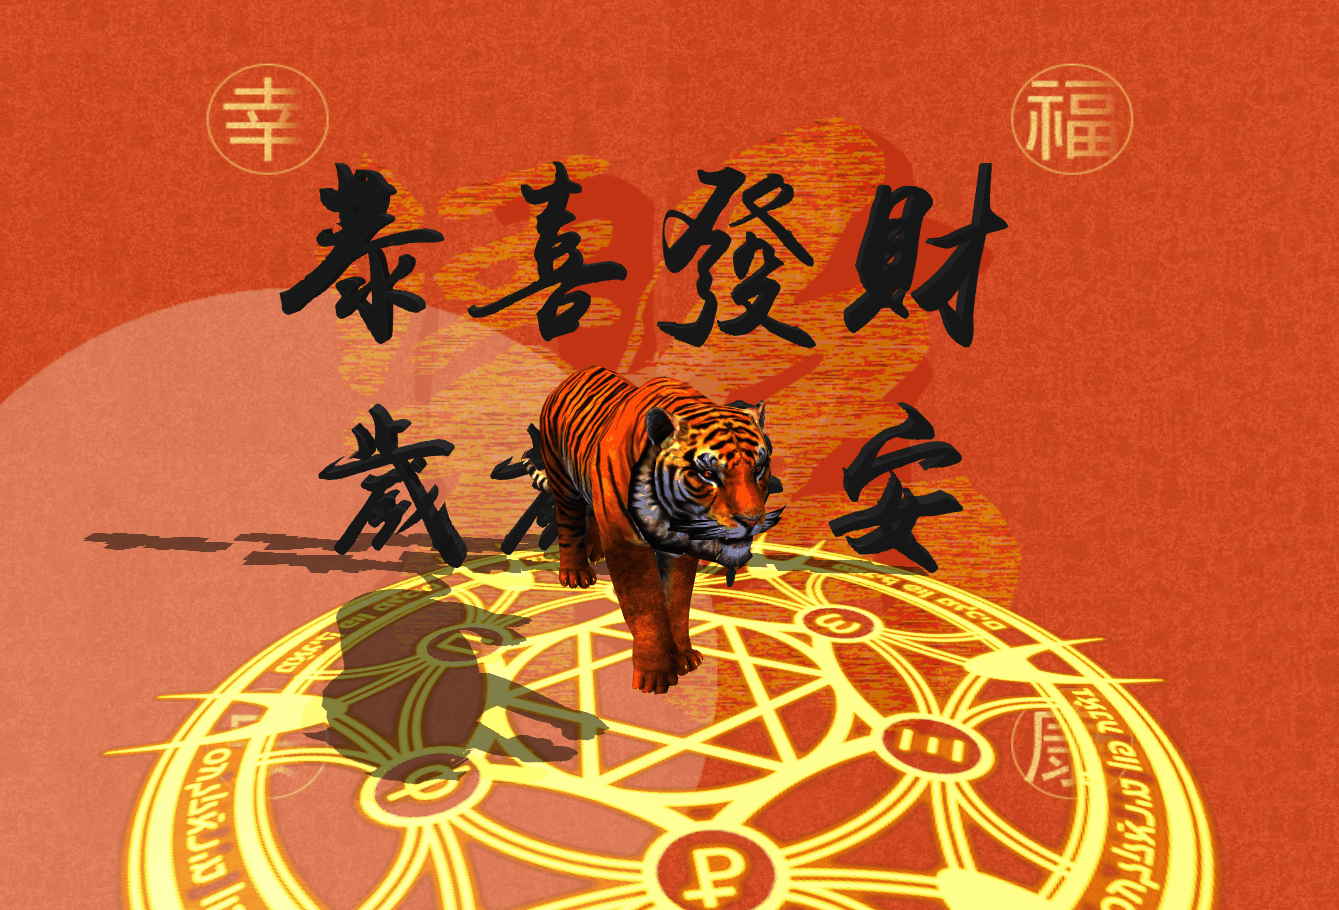
Year of the tiger 🐅 As the Spring Festival is approaching, this article uses react + three JS technology stack to realize interesting 3D creative pages. The knowledge points contained in this article mainly include: the use of two basic materials: ShadowMaterial and MeshPhongMaterial, the use of LoadingManager to display the model loading progress, the slow animation of OrbitControls, the animation effect of TWEEN simple gap, etc.
realization
👀 Online preview, adapted to mobile terminal: https://dragonir.github.io/3d...
Introduce resources
GLTFLoader and fbxlloader are used to add to the model, OrbitControls user lens track control, and TWEEN is used to generate gap animation.
import * as THREE from "three";
import { GLTFLoader } from "three/examples/jsm/loaders/GLTFLoader";
import { FBXLoader } from "three/examples/jsm/loaders/FBXLoader";
import { OrbitControls } from "three/examples/jsm/controls/OrbitControls";
import { TWEEN } from "three/examples/jsm/libs/tween.module.min.js";
Scene initialization
This part is mainly used to initialize scenarios and parameters. For detailed explanation, you can click the link at the end of the article to read my previous article, which will not be repeated in this article.
container = document.getElementById('container');
renderer = new THREE.WebGLRenderer({ antialias: true });
renderer.setPixelRatio(window.devicePixelRatio);
renderer.setSize(window.innerWidth, window.innerHeight);
renderer.shadowMap.enabled = true;
container.appendChild(renderer.domElement);
// scene
scene = new THREE.Scene();
scene.background = new THREE.TextureLoader().load(bgTexture);
// Atomization effect
scene.fog = new THREE.Fog(0xdddddd, 100, 120);
// video camera
camera = new THREE.PerspectiveCamera(60, window.innerWidth / window.innerHeight, 0.1, 1000);
camera.position.set(100, 100, 100);
camera.lookAt(new THREE.Vector3(0, 0, 0));
// Parallel light
const cube = new THREE.Mesh(new THREE.BoxGeometry(0.001, 0.001, 0.001), new THREE.MeshLambertMaterial({ color: 0xdc161a }));
cube.position.set(0, 0, 0);
light = new THREE.DirectionalLight(0xffffff, 1);
light.position.set(20, 20, 8);
light.target = cube;
scene.add(light);
// Ambient light
const ambientLight = new THREE.AmbientLight(0xffffff);
scene.add(ambientLight);
// Spotlight
const spotLight = new THREE.SpotLight(0xffffff);
spotLight.position.set(-20, 20, -2);
scene.add(spotLight);
💡 Fog scene fog
In this example, when the page is opened, the model is loaded from far to near, and the color is changed from white to color through fog. Fog class defines linear fog. The density of fog increases linearly with distance, that is, the atomization effect of objects in the scene changes linearly with distance.
Constructor: Fog(color, near, far).
- Color attribute: indicates the color of the fog. For example, if it is set to red, the distant object in the scene is black, the nearest object in the scene is its own color, and the color between the farthest and nearest object is the mixed effect of the object's own color and the fog color.
- Near attribute: indicates the minimum distance to apply the atomization effect. Objects less than near from the active camera will not be affected by the fog.
- Far attribute: indicates the maximum distance to apply the atomization effect. Objects longer than far from the active camera will not be affected by the fog.
Create ground
In this example, the background map is used. I need a material that can not only present the transparent display background, but also produce shadows to generate the ground, so I use the ShadowMaterial material.
var planeGeometry = new THREE.PlaneGeometry(100, 100);
var planeMaterial = new THREE.ShadowMaterial({ opacity: .5 });
var plane = new THREE.Mesh(planeGeometry, planeMaterial);
plane.rotation.x = -0.5 * Math.PI;
plane.position.set(0, -8, 0);
plane.receiveShadow = true;
scene.add(plane);
💡 ShadowMaterial
This material can receive shadows, but is otherwise completely transparent.
Constructor: ShadowMaterial(parameters: Object)
- parameters: (optional) an object that defines the appearance of a material, with one or more attributes.
Special properties:
- . isShadowMaterial[Boolean]: used to check whether this class or derived class is a shadow material. The default value is true. Because it is usually used for internal optimization, the value of this property should not be changed.
- . transparent[Boolean]: defines whether this material is transparent. The default value is true.
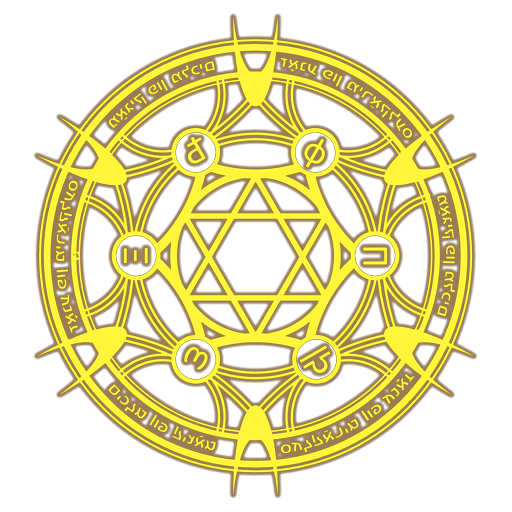
Create magic array
In the tiger 🐅 Create a cool rotating self luminous circular magic array on the bottom ground.
cycle = new THREE.Mesh(new THREE.PlaneGeometry(40, 40), new THREE.MeshPhongMaterial({
  map: new THREE.TextureLoader().load(cycleTexture),
  transparent: true
}));
cycle.rotation.x = -0.5 * Math.PI;
cycle.position.set(0, -9, 0);
cycle.receiveShadow = true;
scene.add(cycle);
Map of magic array:
💡 MeshPhongMaterial mesh material
A material used for glossy surfaces with specular highlights. The material uses a non physical Blinn Phong model to calculate reflectivity.
Constructor: MeshPhongMaterial(parameters: Object)
- parameters: (optional) an object that defines the appearance of a material, with one or more attributes.
Special properties:
- . emissive[Color]: the radiation (light) color of a material is basically an inherent color that is not affected by other lighting. The default is black.
- . emissiveMap[Texture]: sets the emissivemap. The default value is null. The radiation map color is adjusted by the radiation color and intensity. If you have a radiation map, be sure to set the radiation color to a color other than black.
- . emissiveIntensity[Float]: radiation intensity. Adjust the glow color. The default is 1.
- . shinness [float]: the degree of highlight of special. The higher the value, the brighter it will be. The default value is 30.
- . special [Color]: the specular Color of the material. The default value is 0x111111 Color. This defines the gloss and gloss Color of the material.
- . specularMap[Texture]: the specular map value affects the specular highlight and how much the environment map affects the surface. The default value is null.
Unlike the Lambertian model used in meshlambertian material, this material can simulate glossy surfaces with specular highlights (such as painted wood). When using Phong shading model to calculate shading, the shadow of each pixel is calculated. Compared with Gouraud model used by MeshLambertMaterial, the result of this model is more accurate, but at the expense of some performance.
MeshStandardMaterial and MeshPhysicalMaterial also use this shading model. When using this material on MeshStandardMaterial or MeshPhysicalMaterial, performance is usually higher, but some graphics accuracy is sacrificed.
Text model
Use FBXLoader to load the 3D text model of congratulations, fortune and peace.
const fbxLoader = new FBXLoader();
fbxLoader.load(textModel, mesh => {
  mesh.traverse(child => {
    if (child.isMesh) {
      meshes.push(mesh);
      child.castShadow = true;
      child.receiveShadow = true;
      // Adjust the metallicity, roughness, color and other styles of the material
      child.material.metalness = .2;
      child.material.roughness = .8;
      child.material.color = new THREE.Color(0x111111);
    }
  });
  mesh.position.set(4, 6, -8);
  mesh.rotation.set(-80, 0, 0);
  mesh.scale.set(.32, .32, .32);
  group.add(mesh);
});
📹 BiliBili 3D text generation tutorial portal: iBlender Chinese version plug-in foreigners teach you how to use Chinese font Font 3D Chinese And Japanese Characters Blender plug-in tutorial
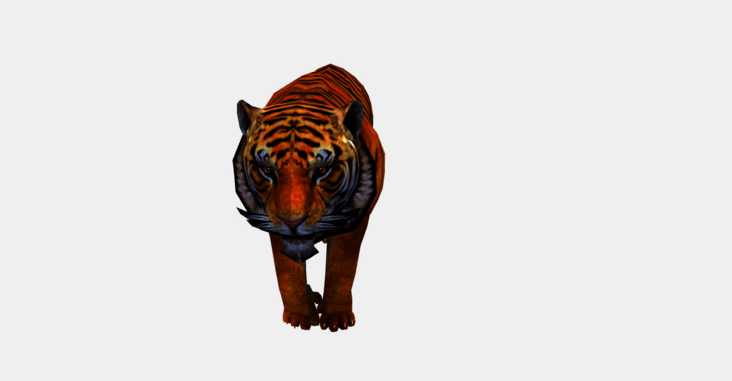
Tiger model
The tiger model is in gltf format. During the process of loading the model with GLTFLoader, some problems are found 🕷 bug, the loader cannot read the total value of the model volume, so it uses the general loader LoadingManager to manage the model loading progress.
const manager = new THREE.LoadingManager();
manager.onStart = (url, loaded, total) => {};
manager.onLoad = () => {};
manager.onProgress = async(url, loaded, total) => {
  if (Math.floor(loaded / total * 100) === 100) {
    this.setState({ loadingProcess: Math.floor(loaded / total * 100) });
  } else {
    this.setState({ loadingProcess: Math.floor(loaded / total * 100) });
  }
};
const gltfLoader = new GLTFLoader(manager);
gltfLoader.load(tigerModel, mesh => {
  mesh.scene.traverse(child => {
    if (child.isMesh) {
      child.castShadow = true;
      child.material.metalness = 0;
      child.material.roughness = .8;
      child.material.transparent = true;
      child.material.side = THREE.DoubleSide;
      child.material.color = new THREE.Color(0xffffff);
    }
  });
  mesh.scene.rotation.y = Math.PI * 9 / 8;
  mesh.scene.position.set(0, -4, 2);
  mesh.scene.scale.set(.75, .75, .75);
  // 💡  Load the model's own animation
  let meshAnimation = mesh.animations[0];
  mixer = new THREE.AnimationMixer(mesh.scene);
  let animationClip = meshAnimation;
  let clipAction = mixer.clipAction(animationClip).play();
  animationClip = clipAction.getClip();
  group.add(mesh.scene);
  scene.add(group)
});
💡 LoadingManager loader Manager
Its function is to process and track loaded and pending data. If the hardening manager is not set manually, the default global instance loader manager is created and used for the loader. Generally speaking, the default load manager is enough, but sometimes you need to set a separate loader, for example, when you want to display a separate load bar for objects and textures.
Construction method: LoadingManager(onLoad: Function, onProgress: Function, onError: Function)
- onLoad: optional. This function will be called after all loaders are loaded.
- onProgress: optional. This function will be called when each project is completed.
- onError: optional. This function will be called when a loader encounters an error.
Properties:
- . onStart[Function]: called at the beginning of loading. Parameter: url URL of the loaded item; itemsLoaded the number of currently loaded items; itemsTotal the total number of required add ons. This method is undefined by default.
- . onLoad[Function]: this function will be called after all items are loaded. By default, this method is undefined unless passed in the constructor.
- . onProgress[Function]: this method loads each item and is called when loading is complete. Parameter: url URL of the loaded item; itemsLoaded the number of currently loaded items; itemsTotal the total number of required add ons. By default, this method is undefined unless passed in the constructor.
- . onError[Function]: this method will be called when any item loads an error. Parameter: url URL of the wrong item loaded. By default, this method is undefined unless passed in the constructor.
Add shot movement gap animation
After the model is loaded, use tween JS implementation camera 📷 Mobile roaming is realized, that is, the animation effect that the model gradually becomes larger from far to near when opening the page.
const Animations = {
  animateCamera: (camera, controls, newP, newT, time = 2000, callBack) => {
    var tween = new TWEEN.Tween({
      x1: camera.position.x,
      y1: camera.position.y,
      z1: camera.position.z,
      x2: controls.target.x,
      y2: controls.target.y,
      z2: controls.target.z,
    });
    tween.to({
      x1: newP.x,
      y1: newP.y,
      z1: newP.z,
      x2: newT.x,
      y2: newT.y,
      z2: newT.z,
    }, time);
    tween.onUpdate(function (object) {
      camera.position.x = object.x1;
      camera.position.y = object.y1;
      camera.position.z = object.z1;
      controls.target.x = object.x2;
      controls.target.y = object.y2;
      controls.target.z = object.z2;
      controls.update();
    });
    tween.onComplete(function () {
      controls.enabled = true;
      callBack();
    });
    tween.easing(TWEEN.Easing.Cubic.InOut);
    tween.start();
  },
}
export default Animations;
Call example:
Animations.animateCamera(camera, controls, { x: 0, y: 5, z: 21 }, { x: 0, y: 0, z: 0 }, 2400, () => {});💡 TWEEN.js
Is a patching animation library, which can achieve many animation effects. It makes an object slowly change from one state to another within a certain period of time. TWEEN.js is essentially a series of slow function algorithms, combined with Canvas and three JS is very simple and can achieve many effects.
Basic usage:
var tween = new TWEEN.Tween({x: 1})     // position: {x: 1}
.delay(100)                             // Wait for 100ms
.to({x: 200}, 1000)                     // 1s time, x to 200
.onUpdate(render)                       // Execute render method during change
.onComplete(() => {})                   // Animation complete
.onStop(() => {})                       // Animation stop
.start();                               // Turn on animation
📌 To make the animation really move, we need to call the update method in requestAnimationFrame.
TWEEN.update()
Slug type:
TWEEN. The most powerful thing about JS is that it provides many commonly used jog animation types, which are specified by api easing(). As used in the example:
tween.easing(TWEEN.Easing.Cubic.InOut);
Chained call:
TWEEN.js supports chain calls. For example, if you want to execute animation B after animation A, you can tweet A Chain (tweetb) uses chain call to create animation of back and forth cycle:
var tweenA = new TWEEN.Tween(position).to({x: 200}, 1000);
var tweenB = new TWEEN.Tween(position).to({x: 0}, 1000);
tweenA.chain(tweenB);
tweenB.chain(tweenA);
tweenA.start();
Controller jog movement
controls. When enabledamping is set to true, it can enable the slow motion effect when the mouse moves the scene, generate motion inertia, and make 3D more realistic after opening.
controls = new OrbitControls(camera, renderer.domElement);
controls.target.set(0, 0, 0);
controls.enableDamping = true;
controls.maxDistance = 160;
💡 THREE.OrbitControls parameter control list
//Is mouse control available
controls.enabled = true;
//Focus coordinates
controls.target = new THREE.Vector3();
//Maximum and minimum camera movement distance (perspective camera depth of field)
controls.minDistance = 0;
controls.maxDistance = Infinity;
//Maximum and minimum mouse zoom size (orthographic camera)
controls.minZoom = 0;
controls.maxZoom = Infinity;
//Maximum elevation angle and elevation angle, ranging from 0 to math PI
controls.minPolarAngle = 0;
controls.maxPolarAngle = Math.PI;
//Horizontal viewing angle limit, range [- Math.PI, Math.PI]
controls.minAzimuthAngle = - Infinity;
controls.maxAzimuthAngle = Infinity;
//Inertial sliding. The sliding size is 0.25 by default. If it is enabled, then controls Update() needs to be added to the animation loop function
controls.enableDamping = false;
controls.dampingFactor = 0.25;
//Whether the roller can control zoom. Zoom speed is 1 by default
controls.enableZoom = true;
controls.zoomSpeed = 1.0;
//Rotatability, rotation speed
controls.enableRotate = true;
controls.rotateSpeed = 1.0;
//Whether it can be translated. The default moving speed is 7px
controls.enablePan = true;
// The pixel value that moves when the arrow key is clicked
controls.keyPanSpeed = 7.0;
//Whether to rotate automatically, and the automatic rotation speed. The default is 30 laps per second. If enabled, then controls Update() needs to be added to the animation loop function
controls.autoRotate = false;
// 30s per revolution when fps is 60
controls.autoRotateSpeed = 2.0;
//Can I use the keyboard
controls.enableKeys = true;
//The default keyboard controls the up, down, left and right keys
controls.keys = { LEFT: 37, UP: 38, RIGHT: 39, BOTTOM: 40 };
//Mouse click button
controls.mouseButtons = { ORBIT: THREE.MOUSE.LEFT, ZOOM: THREE.MOUSE.MIDDLE, PAN: THREE.MOUSE.RIGHT };
Finally, don't forget to add the window scaling adaptation method and the requestAnimationFrame update method.
function onWindowResize() {
  camera.aspect = window.innerWidth / window.innerHeight;
  camera.updateProjectionMatrix();
  renderer.setSize(window.innerWidth, window.innerHeight);
}
function animate() {
  requestAnimationFrame(animate);
  renderer.render(scene, camera);
  let time = clock.getDelta();
  // Tiger animation
  mixer && mixer.update(time);
  // Patching animation
  TWEEN && TWEEN.update();
  // controller
  controls && controls.update();
  // Magic array
  cycle && (cycle.rotation.z += .01);
}
Loading page 3D text style
3D text style is mainly realized by superimposing multi-layer text shadow.
.loading {
  font-size: 64px;
  color: #FFFFFF;
  text-shadow:     0 1px 0 hsl(174,5%,80%),
                   0 2px 0 hsl(174,5%,75%),
                   0 3px 0 hsl(174,5%,70%),
                   0 4px 0 hsl(174,5%,66%),
                   0 5px 0 hsl(174,5%,64%),
                   0 6px 0 hsl(174,5%,62%),
                   0 7px 0 hsl(174,5%,61%),
                   0 8px 0 hsl(174,5%,60%),
                   0 0 5px rgba(0,0,0,.05),
                  0 1px 3px rgba(0,0,0,.2),
                  0 3px 5px rgba(0,0,0,.2),
                 0 5px 10px rgba(0,0,0,.2),
                0 10px 10px rgba(0,0,0,.2),
                0 20px 20px rgba(0,0,0,.3);
}
effect
The final implementation effect is shown in the figure below. If you are interested, you can preview it online and it has been adapted to the mobile terminal. By this accelerated cerebellar axe 🐅 He laughs to death.
summary
The main knowledge points involved in this paper include:
- Fog scene fog
- ShadowMaterial
- MeshPhongMaterial mesh material
- LoadingManager loader Manager
- TWEEN.js patching animation
- THREE.OrbitControls parameter control
- CSS 3D text styles
appendix
To learn about scene initialization, lighting, shadows, and other mesh geometry, read my other articles. If you think the article is helpful to you, don't forget to click three times 😂.
- [1]. Use three JS to achieve cool acid style 3D pages
- [2]. Three.js to realize the 3D dynamic Logo of Facebook meta universe
- [3]. Three.js to achieve 3D panoramic detective games
- [4]. Model source: sketchfab
Author: dragonir