
🥝 preface
As we all know, webpack is a packaging tool. Before we configure it, it is also a packaging tool generated after a series of coding. What has been done behind this?
Today, let's use native js to write a simple packaging tool bundler to package the project code.
Let's begin with the explanation of this article~
🍉 Module analysis (entrance file analysis)
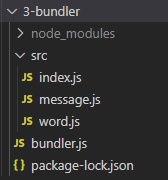
1. Project structure
Let's take a look at our project file structure. Please see the figure below 👇
2. Install third-party dependencies
We need to use four third-party dependency packages:
- @babel/parser -- help us analyze source code and generate abstract syntax tree (AST);
- @babel/traverse -- help us traverse the abstract syntax tree and analyze the statements in the syntax tree;
- @babel/core -- package and compile the original code into the code that the browser can run;
- @Babel / preset env -- used for configuration when parsing the abstract syntax tree.
The following commands are given to install the four libraries in sequence:
(1)@babel/parser
npm install @babel/parser --save
(2)@babel/traverse
npm install @babel/traverse --save
(3)@babel/core
npm install @balbel/core --save
(4)@babel/preset-env
npm install @babel/preset-env --save
3. Business code
When we package a project, we first need to analyze the modules in the project. Now we first analyze the entry file. Suppose we want to implement a business, and the output is hello monday. So let's write our business code first.
Step 1: write word JS file code. The specific codes are as follows:
export const word = 'monday';
Step 2: write message JS file code. The specific codes are as follows:
import { word } from './word.js';

const message = `hello ${word}`;

export default message;
Step 3: write index JS file code. The specific codes are as follows:
import message from "./message.js";

console.log(message);
4. Start packing
After writing the business code, now let's start with the entry file index JS. Note that we don't use any tools except babel. There are no tools such as webpack and webpack cli.
We first create a file in the root directory, named bundle JS, use this file to write our packaging logic. The specific codes are as follows:
const fs = require('fs');
const path = require('path');
const parser = require('@babel/parser');
const traverse = require('@babel/traverse').default;
const babel = require('@babel/core');

const moduleAnalyser = (filename) => {
    //1. First get the file name. After getting the file name, we read the contents of the file
    const content = fs.readFileSync(filename, 'utf-8');
    //2. With the help of Babel parser, convert the js string in the file into a js object - > this js object is what we call the abstract syntax tree
    const ast = parser.parse(content, {
        // 3. If you pass in the syntax of ES6, you need to set sourceType to module
        sourceType: 'module'
    });

    //Collect dependent files in the portal file
    const dependencies = {};

    traverse(ast, {
        /*4. After we have the abstract syntax tree, we need to analyze it,
        Where are the statements in it,
        To find the corresponding contents of these import statements
        5. With the help of @ babel/traverse,
        This tool indicates that when there are statements such as import declaration in the abstract syntax tree,
        It will continue with the following function*/
        ImportDeclaration({ node }) {
            // console.log(node);
            const dirname = path.dirname(filename);
            const newFile = './' + path.join(dirname, node.source.value);
            // console.log(newFile);
            //6. After finding the import statements, assemble these statements into an object and put them in the variable dependencies (stored as key value pairs)
            dependencies[node.source.value] = newFile;
        }
    });
    /*
    7. After analysis, compile the source code of the module. By using transformFromAst,
    Convert it from an ES module to the syntax that the browser can execute, and store it in the code,
    code The generated code is the code we can run on the browser*/
    const { code } = babel.transformFromAst(ast, null, {
        presets: ["@babel/preset-env"]
    })
    return {
        //Returns the name of the entry file
        filename,
        //Returns the dependent files in the entry file
        dependencies,
        //Returns the code that can be run on the browser
        code
    }
    // console.log(dependencies);
}

const moduleInfo = moduleAnalyser('./src/index.js');
console.log(moduleInfo);
Through the above code, I believe you have a basic understanding of the packaging entry file. After that, run node bundler on the console JS command, you can view various analyses in the packaging process.
Let's continue with the second part~
🥑 2, Dependency graph
For the above content, we are only talking about the analysis of an entry file. But this is not enough. Therefore, now we want to analyze the whole project file.
1. Result analysis
Let's first look at the above code, which only analyzes the printing of the import file. The specific codes are as follows:
{
  filename: './src/index.js',
  dependencies: { './message.js': './src\\message.js' },
  code: '"use strict";\n' +
    '\n' +
    'var _message = _interopRequireDefault(require("./message.js"));\n' +
    '\n' +
    'function _interopRequireDefault(obj) { return obj && obj.__esModule ? obj : { "default": obj }; }\n' +
    '\n' +
    'console.log(_message["default"]);'
}
You can see that after the analysis of the entry file, there are layers of dependencies and code s. Now, we need to follow these dependencies to analyze the content of the whole project.
2. Analyze the dependencies of all modules
Let's talk about bundler now JS is upgraded to depict the dependencies of all modules. The specific codes are as follows:
const fs = require('fs');
const path = require('path');
const parser = require('@babel/parser');
const traverse = require('@babel/traverse').default;
const babel = require('@babel/core');

const moduleAnalyser = (filename) => {
    //1. First get the file name. After getting the file name, we read the contents of the file
    const content = fs.readFileSync(filename, 'utf-8');
    //2. With the help of Babel parser, convert the js string in the file into a js object - > this js object is what we call the abstract syntax tree
    const ast = parser.parse(content, {
        // 3. If you pass in the syntax of ES6, you need to set sourceType to module
        sourceType: 'module'
    });

    //Collect dependent files in the portal file
    const dependencies = {};

    traverse(ast, {
        /*4. After we have the abstract syntax tree, we need to analyze it,
        Where are the statements in it,
        To find the corresponding contents of these import statements
        5. With the help of @ babel/traverse,
        This tool indicates that when there are statements such as import declaration in the abstract syntax tree,
        It will continue with the following function*/
        ImportDeclaration({ node }) {
            // console.log(node);
            const dirname = path.dirname(filename);
            const newFile = './' + path.join(dirname, node.source.value);
            // console.log(newFile);
            //6. After finding the import statements, assemble these statements into an object and put them in the variable dependencies (stored as key value pairs)
            dependencies[node.source.value] = newFile;
        }
    });
    /*
    7. After analysis, compile the source code of the module. By using transformFromAst,
    Convert it from an ES module to the syntax that the browser can execute, and store it in the code,
    code The generated code is the code we can run on the browser*/
    const { code } = babel.transformFromAst(ast, null, {
        presets: ["@babel/preset-env"]
    })
    return {
        //Returns the name of the entry file
        filename,
        dependencies,
        code
    }
    // console.log(dependencies);
}

const makeDependenciesGraph = (entry) => {
    //1. Conduct an analysis of the entrance module
    const entryModule = moduleAnalyser(entry);
    // console.log(entryModule);

    //2. Define an array to store entry files and dependencies
    const graphArray = [ entryModule ];
    //3. Traverse graphararray
    for(i = 0; i < graphArray.length; i++){
        //4. Take out each item in the graphararray
        const item = graphArray[i];
        //5. Take out the dependencies in each item
        const { dependencies } = item;
        //6. If the entry file has a dependency, the dependency is cycled
        if(dependencies) {
            /*7. Through continuous circulation, finally, its entry file and its dependencies can be,
            And its dependencies, which are traversed layer by layer and pushed to the graphararray*/
            for(let j in dependencies) {
                /*8. The recursive effect is realized by queue (first in first out);
                Why recursion? The reason for recursive analysis is that there may be dependencies under each dependency*/
                graphArray.push(
                    moduleAnalyser(dependencies[j])
                )

            }
        }
    }
    //9. The processed graphararray is an array. Now it needs to be converted in format
    const graph = {};
    graphArray.forEach(item => {
        graph[item.filename] = {
            dependencies: item.dependencies,
            code: item.code
        }
    });

    return graph;
}

// './src/index.js' is the entry file
const graphInfo = makeDependenciesGraph('./src/index.js');
console.log(graphInfo);
As you can see, we have created a new function makedependencies graph to describe the dependencies of all modules, and finally convert it into our ideal js object. Now let's look at the print out of dependencies. The printing results are as follows:
{
  './src/index.js': {
    dependencies: { './message.js': './src\\message.js' },
    code: '"use strict";\n' +
      '\n' +
      'var _message = _interopRequireDefault(require("./message.js"));\n' +
      '\n' +
      'function _interopRequireDefault(obj) { return obj && obj.__esModule ? obj : { "default": obj }; }\n' +
      '\n' +
      'console.log(_message["default"]);'
  },
  './src\\message.js': {
    dependencies: { './word.js': './src\\word.js' },
    code: '"use strict";\n' +
      '\n' +
      'Object.defineProperty(exports, "__esModule", {\n' +
      '  value: true\n' +
      '});\n' +
      'exports["default"] = void 0;\n' +
      '\n' +
      'var _word = require("./word.js");\n' +
      '\n' +
      'var message = "hello ".concat(_word.word);\n' +
      'var _default = message;\n' +
      'exports["default"] = _default;'
  },
  './src\\word.js': {
    dependencies: {},
    code: '"use strict";\n' +
      '\n' +
      'Object.defineProperty(exports, "__esModule", {\n' +
      '  value: true\n' +
      '});\n' +
      'exports.word = void 0;\n' +
      "var word = 'monday';\n" +
      'exports.word = word;'
  }
}
As you can see, the dependencies of all modules have been traversed. This shows that we have successfully carried out this step of analysis.
🍐 3, Generate code
1. Logic compilation
We have successfully generated the dependency map above. Now, let's use this dependency map to generate code that can really run on the browser. We continue to work in the bundle JS, write a logic to generate code. The specific codes are as follows:
const fs = require('fs');
const path = require('path');
const parser = require('@babel/parser');
const traverse = require('@babel/traverse').default;
const babel = require('@babel/core');

const moduleAnalyser = (filename) => {
    //1. First get the file name. After getting the file name, we read the contents of the file
    const content = fs.readFileSync(filename, 'utf-8');
    //2. With the help of Babel parser, convert the js string in the file into a js object - > this js object is what we call the abstract syntax tree
    const ast = parser.parse(content, {
        // 3. If you pass in the syntax of ES6, you need to set sourceType to module
        sourceType: 'module'
    });

    //Collect dependent files in the portal file
    const dependencies = {};

    traverse(ast, {
        /*4. After we have the abstract syntax tree, we need to analyze it,
        Where are the statements in it,
        To find the corresponding contents of these import statements
        5. With the help of @ babel/traverse,
        This tool indicates that when there are statements such as import declaration in the abstract syntax tree,
        It will continue with the following function*/
        ImportDeclaration({ node }) {
            // console.log(node);
            const dirname = path.dirname(filename);
            const newFile = './' + path.join(dirname, node.source.value);
            // console.log(newFile);
            //6. After finding the import statements, assemble these statements into an object and put them in the variable dependencies (stored as key value pairs)
            dependencies[node.source.value] = newFile;
        }
    });
    /*
    7. After analysis, compile the source code of the module. By using transformFromAst,
    Convert it from an ES module to the syntax that the browser can execute, and store it in the code,
    code The generated code is the code we can run on the browser*/
    const { code } = babel.transformFromAst(ast, null, {
        presets: ["@babel/preset-env"]
    })
    return {
        //Returns the name of the entry file
        filename,
        dependencies,
        code
    }
    // console.log(dependencies);
}

const makeDependenciesGraph = (entry) => {
    //1. Conduct an analysis of the entrance module
    const entryModule = moduleAnalyser(entry);
    // console.log(entryModule);

    //2. Define an array to store entry files and dependencies
    const graphArray = [ entryModule ];
    //3. Traverse graphararray
    for(i = 0; i < graphArray.length; i++){
        //4. Take out each item in the graphararray
        const item = graphArray[i];
        //5. Take out the dependencies in each item
        const { dependencies } = item;
        //6. If the entry file has a dependency, the dependency is cycled
        if(dependencies) {
            /*7. Through continuous circulation, finally, its entry file and its dependencies can be,
            And its dependencies, which are traversed layer by layer and pushed to the graphararray*/
            for(let j in dependencies) {
                /*8. The recursive effect is realized by queue (first in first out);
                Why recursion? The reason for recursive analysis is that there may be dependencies under each dependency*/
                graphArray.push(
                    moduleAnalyser(dependencies[j])
                )

            }
        }
    }
    //9. The processed graphararray is an array. Now it needs to be converted in format
    const graph = {};
    graphArray.forEach(item => {
        graph[item.filename] = {
            dependencies: item.dependencies,
            code: item.code
        }
    });

    return graph;
}

const generateCode = (entry) => {
    //1. Format the generated dependency map
    const graph = JSON.stringify(makeDependenciesGraph(entry));
    /** 2. Construct the require function and exports object and convert them into a string recognized by the browser
     * return require(graph[module].dependencies[relative]) The purpose is to find the real path
     */
    return `
        (function(graph){
            function require(module){
                function localRequire(relativePath) {
                    return require(graph[module].dependencies[relativePath])
                }
                var exports = {};
                (function(require, exports, code){
                    eval(code)
                })(localRequire, exports, graph[module].code);
                return exports;
            };
            require('${entry}')
        })(${graph});
    `;
}

// './src/index.js' is the entry file
const code = generateCode('./src/index.js');
console.log(code);
From the above code, we can see that we first format the generated dependency map, then construct the require function and exports object, and finally convert it into a string recognized by the browser.
2. Result analysis
Through the above business writing, we have completed the process of packaging the whole project. Now let's look at the print results:
(function(graph){
            function require(module){
                function localRequire(relativePath) {
                    return require(graph[module].dependencies[relativePath])
                }
                var exports = {};
                (function(require, exports, code){
                    eval(code)
                })(localRequire, exports, graph[module].code);
                return exports;
            };
            require('./src/index.js')
        })({"./src/index.js":{"dependencies":{"./message.js":"./src\\message.js"},"code":"\"use strict\";\n\nvar _message = _interopRequireDefault(require(\"./message.js\"));\n\nfunction _interopRequireDefault(obj) { return obj && obj.__esModule ? obj : { \"default\": obj }; }\n\nconsole.log(_message[\"default\"]);"},"./src\\message.js":{"dependencies":{"./word.js":"./src\\word.js"},"code":"\"use strict\";\n\nObject.defineProperty(exports, \"__esModule\", {\n  value: true\n});\nexports[\"default\"] = void 0;\n\nvar _word = require(\"./word.js\");\n\nvar message = \"hello \".concat(_word.word);\nvar _default = message;\nexports[\"default\"] = _default;"},"./src\\word.js":{"dependencies":{},"code":"\"use strict\";\n\nObject.defineProperty(exports, \"__esModule\", {\n  value: true\n});\nexports.word = void 0;\nvar word = 'monday';\nexports.word = word;"}});
Next, we put the print result on the browser for inspection. The inspection results are as follows:
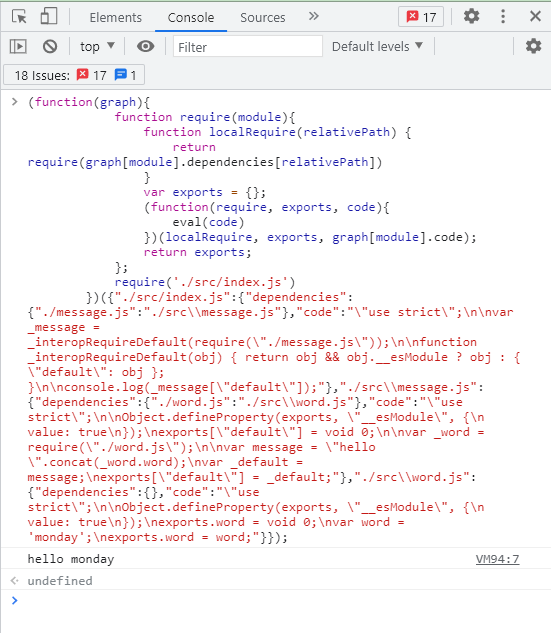
As you can see, the packaged result runs successfully on the browser and displays except hello monday. So far, it shows that our project is packaged successfully.
🍓 4, Conclusion
In the above article, from the analysis of the module entry file, to the analysis of the dependency map, and finally to the generation of the code recognized by the browser, we understand the whole operation process of the packaging tool.
Here, the explanation of this article is over! I hope it will help you~
If the article is wrong or incomprehensible, please leave a message in the comment area~ 💬
🐣 One More Thing
(: recommended in previous periods)
Getting started with webpack core knowledge 👉 No, the front end of the webpack may be picked up. Ten thousand words summarize the super entry core knowledge of webpack
Introduction and advanced knowledge of webpack 👉 Can't you enjoy the core knowledge of webpack? Come and watch 10000 words of advanced knowledge
webpack actual case configuration 👉 [ten thousand words summary] webpack can only basic configuration, but not! Come and pack the actual case configuration together
Handwritten loader and plugin 👉 The actual combat of webpack is to write a loader and plugin
(: Fan Wai Pian)
-
Pay attention to the official account of Monday's research room. First, we will focus on quality articles.
-
If this article is useful to you, remember to leave a footprint jio before you go~
-
The above is the whole content of this article! See you next time! 👋👋👋