First, the concept of IIC is omitted. It's written in detail on the Internet.
Let's start with the CUBEMX configuration code.
The project in hand is a host and seven slaves. The slave uses the middle transceiver.
The address is a big pit, and the subsequent read-write interrupt is also a pit.
Slave address:
The hardware is I2C_ ADDRESSINGMODE_ For the slave address in 7bit, the slave address needs to be shifted to the left by one bit, and the minimum is read or write. For example, the slave address I2COwnAddr = 0x0A, shifted one bit left, is configured as:
hi2c1. Init. OwnAddress1 = I2COwnAddr<<1;// The address setting of the slave needs to be shifted one bit to the left
This initializes the slave configuration function:
/* I2C1 init function */
void MX_I2C1_Init(void)
{

  /* USER CODE BEGIN I2C1_Init 0 */

  /* USER CODE END I2C1_Init 0 */

  /* USER CODE BEGIN I2C1_Init 1 */

  /* USER CODE END I2C1_Init 1 */
  hi2c1.Instance = I2C1;
  hi2c1.Init.Timing = 0x2000090E;
  hi2c1.Init.OwnAddress1 = I2COwnAddr<<1;//The address setting of the slave needs to be shifted one bit to the left
  hi2c1.Init.AddressingMode = I2C_ADDRESSINGMODE_7BIT;
  hi2c1.Init.DualAddressMode = I2C_DUALADDRESS_DISABLE;
  hi2c1.Init.OwnAddress2 = 0;
  hi2c1.Init.OwnAddress2Masks = I2C_OA2_NOMASK;
  hi2c1.Init.GeneralCallMode = I2C_GENERALCALL_DISABLE;
  hi2c1.Init.NoStretchMode = I2C_NOSTRETCH_DISABLE;
  if (HAL_I2C_Init(&hi2c1) != HAL_OK)
  {
    Error_Handler();
  }
  /** Configure Analogue filter
  */
  if (HAL_I2CEx_ConfigAnalogFilter(&hi2c1, I2C_ANALOGFILTER_ENABLE) != HAL_OK)
  {
    Error_Handler();
  }
  /** Configure Digital filter
  */
  if (HAL_I2CEx_ConfigDigitalFilter(&hi2c1, 0) != HAL_OK)
  {
    Error_Handler();
  }
  /* USER CODE BEGIN I2C1_Init 2 */

	#ifndef MASTER
//	HAL_ I2C_ Slave_ Receive_ IT(&hi2c1, I2CBuf_RxData, sizeof(I2CBuf_RxData));    //  Start interrupt reception
	HAL_I2C_Slave_Transmit_IT(&hi2c1, I2CBuf_TxData, sizeof(I2CBuf_TxData));    // Start interrupt sending
//	HAL_I2C_EnableListen_IT(&hi2c1);

	#endif
  /* USER CODE END I2C1_Init 2 */

}
Then, the address of the host can be ignored, and the data of the slave can be read in the host. If the address needs to be shifted to the left by one bit and the upper 1:
//Query and read 6 bytes of data from the slave, and the slave address is 0X0A
HAL_I2C_Master_Receive(&hi2c1,(0X0A<<1)|0x01,I2CBuf_RxData,6,1000);
Send data to slave:
HAL_I2C_Master_Transmit(&hi2c1,(0X0A<<1)|0x00,I2CBuf_TxData,6,1000);
Interrupt sending and receiving:
The of the host is relatively simple, and the query is used to read and send. It is troublesome to interrupt the use of slave.
After the HAL Library of the slave machine is configured with receive and send at the same time, only the receive interrupt is checked in the register. I don't know what's going on. I'll use it separately here. Because the slave only needs to receive the configuration once, I first configure it to receive the interrupt, and then convert it to send the interrupt after the configuration is completed. (there are other methods to solve this problem. Use the ADD address interrupt to judge the sending and receiving in the ADD callback function.)
The configuration function is the above. The slave mode can accept interrupts first:
HAL_ I2C_ Slave_ Receive_ IT(&hi2c1, I2CBuf_RxData, sizeof(I2CBuf_RxData)); // Start interrupt reception
In this function, there are receive interrupt, address terminal and listen interrupt. Called the following
    /* Enable ERR, TC, STOP, NACK, RXI interrupt */
    /* possible to enable all of these */
    /* I2C_IT_ERRI | I2C_IT_TCI | I2C_IT_STOPI | I2C_IT_NACKI |
      I2C_IT_ADDRI | I2C_IT_RXI | I2C_IT_TXI */
    I2C_Enable_IRQ(hi2c, I2C_XFER_RX_IT | I2C_XFER_LISTEN_IT);
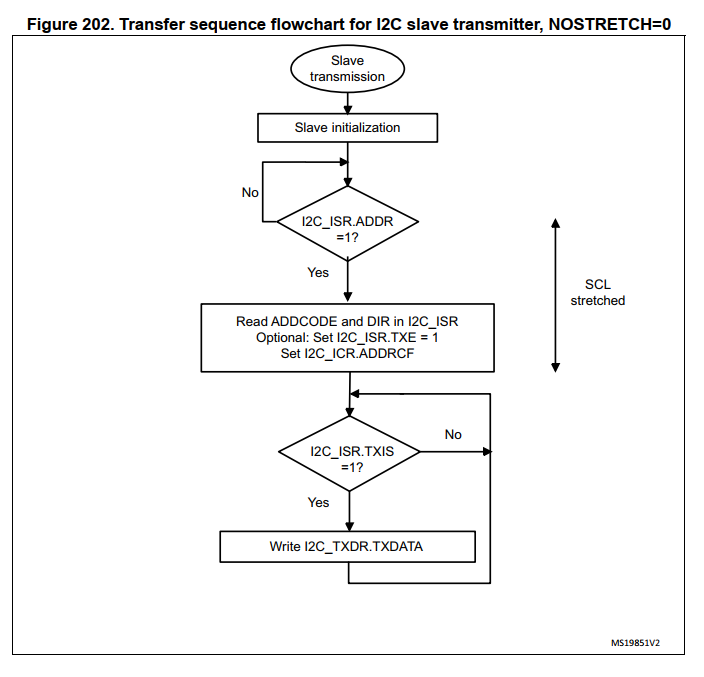
When the ADD interrupt is generated, TXIS is set and TXIE is turned on to start sending data

OK, the sending is completed, and then the comparison is completed. After completion, the interrupt will be closed...
So, ah, it needs to be opened again in the send completion callback function. In short, it wastes me a lot of days tracking (rowing)
void HAL_I2C_SlaveTxCpltCallback(I2C_HandleTypeDef *hi2c)
{
	HAL_I2C_Slave_Transmit_IT(&hi2c1, I2CBuf_TxData, sizeof(I2CBuf_TxData));    // Start interrupt sending
}
The same is true for the receiving function. If you want to accept data again, you need to open it again
void HAL_I2C_SlaveRxCpltCallback(I2C_HandleTypeDef *hi2c)
{
	if(hi2c->Instance == I2C1)
	{
		//PROGRESS READ DATA//SET Static Value
		if(I2CBuf_RxData[0] == I2CBuf_RxData[1])
		{
		//Processing data
		}
		memset(I2CBuf_RxData,0,sizeof(I2CBuf_RxData));
		HAL_I2C_Slave_Receive_IT(hi2c, I2CBuf_RxData, sizeof(I2CBuf_RxData));
	}
}
Of course, the terminal also needs an error handling function. The bus is easy to lock.
void HAL_I2C_ErrorCallback(I2C_HandleTypeDef *hi2c)
{
	if(hi2c->Instance == I2C1)
	{
		ResetFlag = 1;
		memset(I2CBuf_RxData,0,sizeof(I2CBuf_RxData));
		HAL_I2C_DeInit(hi2c);
		MX_I2C1_Init();
//		HAL_I2C_Slave_Receive_IT(hi2c, I2CBuf_RxData, sizeof(I2CBuf_RxData));
		HAL_I2C_Slave_Transmit_IT(&hi2c1, I2CBuf_TxData, sizeof(I2CBuf_TxData));    // Start interrupt sending
	}
}
After locking, the bus needs to be reset. Here, it has been changed by referring to the on-line, and the effect is good.
void HAL_I2C_MspInit(I2C_HandleTypeDef* i2cHandle)
{

  GPIO_InitTypeDef GPIO_InitStruct = {0};
  if(i2cHandle->Instance==I2C1)
  {
  /* USER CODE BEGIN I2C1_MspInit 0 */

  /* USER CODE END I2C1_MspInit 0 */

    /* I2C1 clock enable */
    __HAL_RCC_I2C1_CLK_ENABLE();//Put it in front
    __HAL_RCC_GPIOB_CLK_ENABLE();
    //The initialization pin is pulled up and down to reset IIC
    GPIO_InitStruct.Pin = GPIO_PIN_6|GPIO_PIN_7;
    GPIO_InitStruct.Mode = GPIO_MODE_OUTPUT_PP;
    GPIO_InitStruct.Pull = GPIO_PULLUP;
    GPIO_InitStruct.Speed = GPIO_SPEED_FREQ_HIGH;
    HAL_GPIO_Init(GPIOB, &GPIO_InitStruct);
	HAL_GPIO_WritePin(GPIOB, GPIO_PIN_6|GPIO_PIN_7, GPIO_PIN_SET);
	HAL_GPIO_WritePin(GPIOB, GPIO_PIN_6|GPIO_PIN_7, GPIO_PIN_RESET);
	HAL_GPIO_WritePin(GPIOB, GPIO_PIN_6|GPIO_PIN_7, GPIO_PIN_SET);
    i2cHandle->Instance->CR1 = I2C_CR1_SWRST;   //Reset I2C
    i2cHandle->Instance->CR1 = 0;              //Release reset

    /**I2C1 GPIO Configuration
    PB6     ------> I2C1_SCL
    PB7     ------> I2C1_SDA
    */
    GPIO_InitStruct.Pin = GPIO_PIN_6|GPIO_PIN_7;
    GPIO_InitStruct.Mode = GPIO_MODE_AF_OD;
    GPIO_InitStruct.Pull = GPIO_NOPULL;
    GPIO_InitStruct.Speed = GPIO_SPEED_FREQ_HIGH;
    GPIO_InitStruct.Alternate = GPIO_AF1_I2C1;
    HAL_GPIO_Init(GPIOB, &GPIO_InitStruct);

    /* I2C1 interrupt Init */
    HAL_NVIC_SetPriority(I2C1_IRQn, 0, 0);
    HAL_NVIC_EnableIRQ(I2C1_IRQn);
  /* USER CODE BEGIN I2C1_MspInit 1 */

  /* USER CODE END I2C1_MspInit 1 */
  }
}
There should be no more. After adjusting for so many days, summarize and take notes. I hope it can help you.
By the way, you can also use address interrupt to judge the sending and receiving in the address callback function. When calling the corresponding function, you can interrupt the sending and receiving at the same time. The address is below. It is written in detail
void HAL_I2C_AddrCallback(I2C_HandleTypeDef *hi2c, uint8_t TransferDirection, uint16_t AddrMatchCode)
{
  if(TransferDirection == I2C_DIRECTION_TRANSMIT)
  {
	if(HAL_I2C_Slave_Seq_Receive_IT(&hi2c1, i2c.RxData, sizeof(i2c.RxData), I2C_FIRST_FRAME) != HAL_OK)
	{

	}

  }
  else if(TransferDirection == I2C_DIRECTION_RECEIVE)
  {
	if(HAL_I2C_Slave_Seq_Transmit_IT(&hi2c1, i2c.TxData, sizeof(i2c.TxData), I2C_LAST_FRAME)!= HAL_OK)
	{

	}
  }
}
--------
Copyright notice: This article is CSDN Blogger「@Residual dream」Original articles, follow CC 4.0 BY-SA Copyright agreement, please attach the original source link and this statement.
Original link: https://blog.csdn.net/qq_36561846/article/details/117474070