mysql service 1
1. Summarize the common storage engines and characteristics of mysql.
- show engines; View database engines supported by the database

MyISAM engine features:
- Transaction not supported
- Read and write are mutually exclusive and cannot be read or written at the same time
- Foreign keys are not supported
- Read and write data faster and occupy less resources
- Poor crash recovery
- The default database engine before mysql 5.5
Files generated by MyISAM
- table_name.frm
- table_name.MYD
- table_name.MYI
InnoDB engine features:
- Row level locks are supported
- Support transaction operations
- Read / write blocking is related to transaction isolation level
- Data and indexes can be cached
- Good crash recovery
- Support MVCC high concurrency
- mysql5. Default database engine after 5
InnoDB generated files
- table_name.ibd
- table_name.frm
Other engines:
- MEMORY: MEMORY data saving table engine
- ARCHIVE: table queries are related to inserting data
- CSV: table export and import related
2. MySQL log summary.
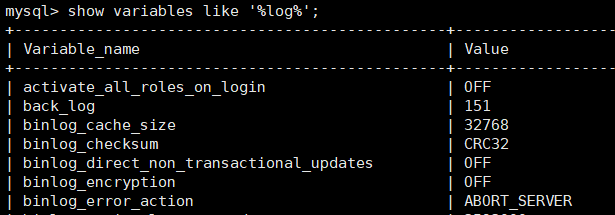
show variables like ‘%log%’; View all log related parameters
Log types include: transaction log (exclusive to innodb engine), error log, general log, slow query log, binary log, etc
- Transaction log: transaction log (log generated only by innodb engine)
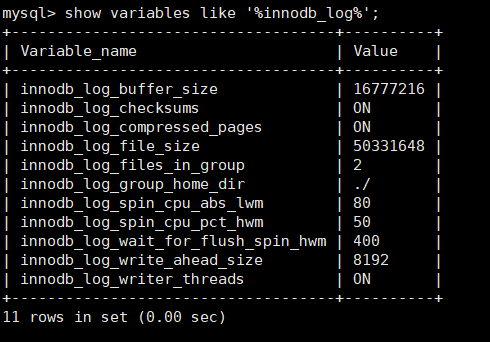
- show variables like '%innodb_log%'; View log related parameters
innodb_log_buffer_size                        Log cache size
innodb_log_checksums                          Check whether the log file is enabled
innodb_log_compressed_pages                   Compress log
innodb_log_file_size                          Single log file size
innodb_log_files_in_group                     How many logs can be stored at most
innodb_log_group_home_dir                     Transaction log storage directory../Indicates the installation directory
show variables like '%innodb_flush_log%'; View log refresh settings
innodb_flush_log_at_timeout log refresh rate
innodb_ flush_ log_ at_ trx_ The level at which the commit log is written to disk

- Error log: the log that outputs error events during mysql operation
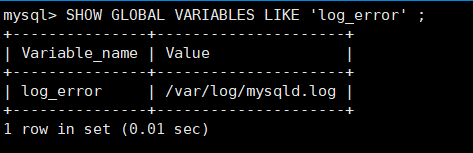
SHOW GLOBAL VARIABLES LIKE 'log_error' ; View error log save path
log_error error log save directory and file name
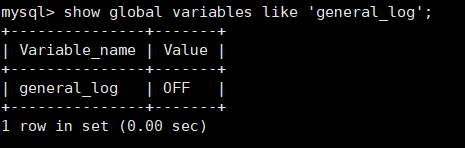
- General log: Records sql statements and other general operations of the database
This function is not enabled by default
show global variables like 'general_log'; Check whether the general log is enabled
Opening mode
vi /etc/my.cnf
#Add under [mysqld]
[mysqld]
general_log=ON
general_log_file=/var/log/mysql/general.log
log_output=file
#It can be set to save logs to the mysql database
#log_ Save the output = table setting to the mysql database
#If the record is set to table format, it will be recorded in general in mysql database_ Log in this table
mkdir /var/log/mysql -p                            Create file save path
chown mysql.mysql /var/log/mysql                   Set directory owner to mysql
systemctl restart mysqld                           Restart service
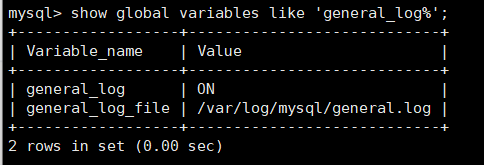
show global variables like 'general_log%'; View general log parameters
general_log whether the general log function is enabled
general_log_file general log saving path
tail -F /var/log/mysql/general.log Check whether the general log is generated in real time

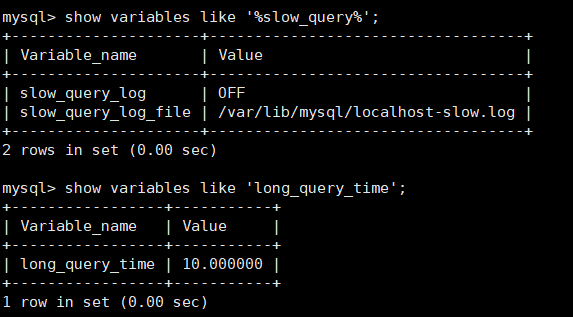
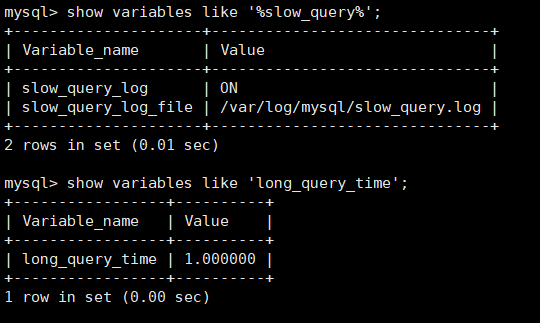
- Slow query log: Records sql statements whose query time exceeds the specified length
show variables like '%slow_query%';    View slow query function

slow_query_log                         Is the slow query function enabled
slow_query_log_file                    Slow query record file path
show variables like 'long_query_time';     View slow query timeout

long_query_time                            sql Statement timeout
Opening mode:
vi /etc/my.cnf
#Add under [mysqld]
[mysqld]
slow_query_log=ON
long_query_time=1 # in seconds
slow_query_log_file=/var/log/mysql/slow_query.log
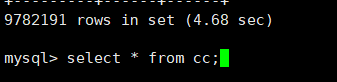
select * from cc; Enter a slow query statement
tail -3 /var/log/mysql/slow_query.log Confirm that the slow query is recorded

- Binary log: used for data recovery and backup after power failure
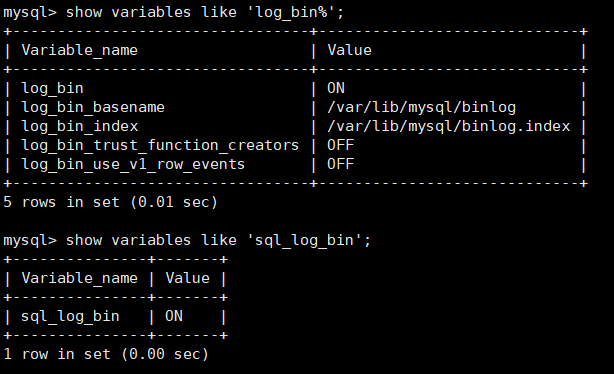
show variables like 'log_bin%';        View binary parameters

log_bin                                Enable binary function
log_bin_basename                       Binary file name
log_bin_index                          Index to log binary files
show variables like 'sql_log_bin'; Binary dynamic variables can be modified directly on the terminal. To recover data, you can turn off this function and pause binary log writing.
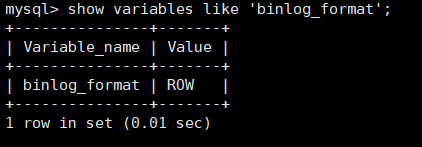
show variables like 'binlog_format';  View binary log save format

binlog_format            View binary log save format
There are three modes of binary logging:
ROW: record line by line in line mode. If there is repetition, it will also be recorded
Statement: statement mode records only sql statements
Mixed: mixed mode: line mode and statement mode are carried out at the same time, and the record is judged by the system
Note: the statement mode only records what sql statements look like. If there is a time stamp when there is data, the time stamp when restoring data will be inconsistent with the original data. Line mode will automatically return the current timestamp.
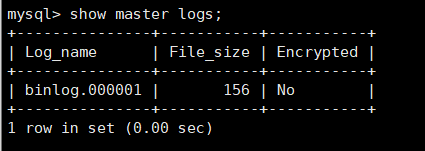
show master logs; View binary list
flush logs; Regenerate a new binary log

- Profile parameters:
vi /etc/my.cnf
#Add under [mysqld]
[mysqld]
log_bin=/var/lib/mysql/              Set binary log save path
binlog_format=ROW                    Set binary recording mode
max_binlog_size=500M                 Set single binary file size
binlog_cache_size=40M                Single binary log cache size
max_binlog_cache_size=500M           Total binary log cache size
expire_logs_days=0                   Set the number of days for binary logs to be automatically deleted. The default value is 0 and will not be deleted
3. Master-slave replication and implementation of master-slave replication
Principle of master-slave replication:
Master node:
Start a Binlog dump thread for each slave node. This thread will transmit the contents of the binary file written by the master node to the slave node in real time.
Slave node:
Start an I/O thread, request and receive the binary data from the thread of the master node, and then save it to the relay log. The SQL thread will write the relay log to the database.

| name | information |
|---|---|
| System version | Centos 7.8 |
| Database version | mysql 8.0.26 |
| master node | 192.168.116.130 |
| slave node | 192.168.116.145 |
cat /etc/redhat-release
mysql -V

Both the master and slave nodes install the database and install mysql-8.0
vi /etc/yum.repos.d/mysql.repo
#Set yum source
[mysql]
name=mysql8.0
baseurl=https://mirrors.tuna.tsinghua.edu.cn/mysql/yum/mysql-8.0-community-el7-x86_64/
gpgcheck=0

yum -y install mysql-community-server      install mysql8.0
systemctl enable mysqld                    Power on
systemctl start mysqld                     Start service
The new mysql version must have a password to log in. By default, there will be an initial password for viewing the log
grep 'temporary password' /var/log/mysqld.log

- Master node configuration:
After starting the service, re initialize the password and initialize the service
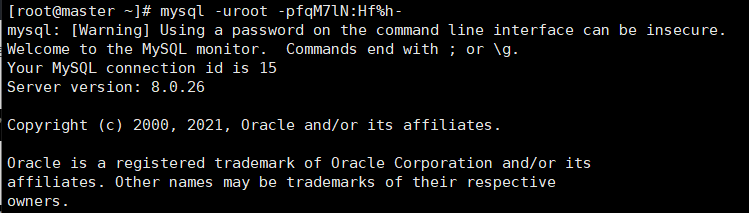
mysql -uroot -pfqM7lN:Hf%h-
alter user user() identified by ‘Master12#$’; Modify the initial root password

Initialize database
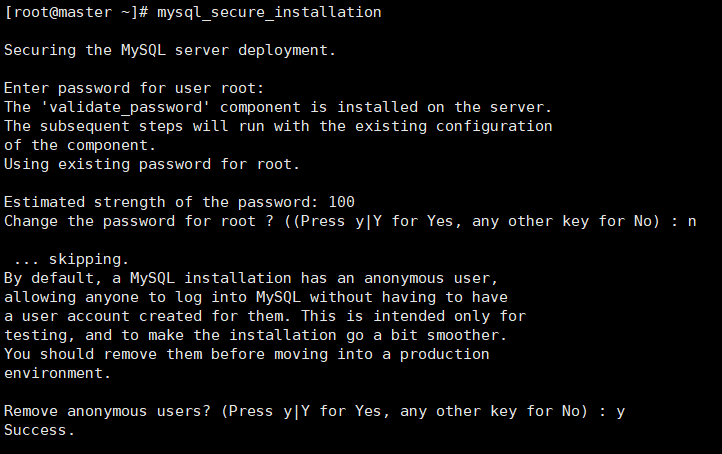
mysql_secure_installation
Enter password for user root: output the new root password you just set#$
Change the password for root ? ((Press y|Y for Yes, any other key for No) : n
Whether to modify the root password, select n
Remove anonymous users? (Press y|Y for Yes, any other key for No) : y
Whether to delete anonymous users, select y
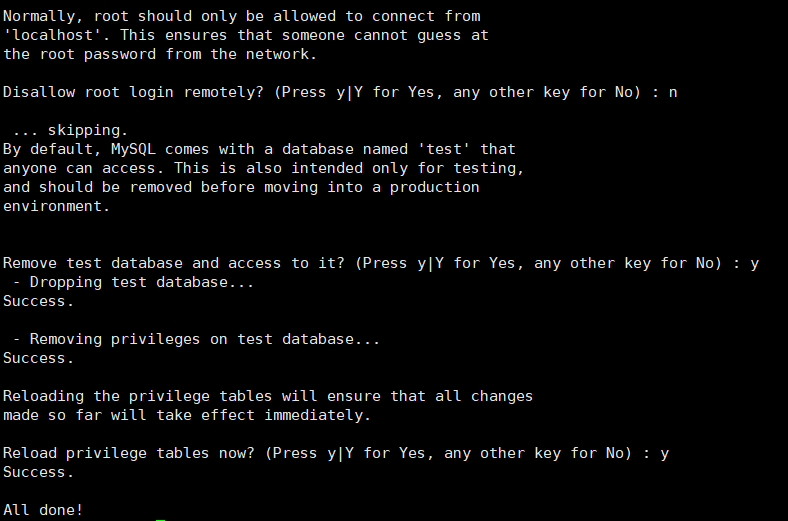
Disallow root login remotely? (Press y|Y for Yes, any other key for No) : n
Whether the root user is allowed to log in remotely can be selected n during the test. You'd better choose y
Remove test database and access to it? (Press y|Y for Yes, any other key for No) : y
The test database will be generated automatically by default. Select y to delete the test database
Reload privilege tables now? (Press y|Y for Yes, any other key for No) : y
Whether to refresh the permission table, select y
After successfully initializing the database:
vi /etc/my.cnf
#Add under [mysqld]
[mysqld]
server-id=1                     #Set ID number
log-bin=/var/lib/mysql/binlog/binlog  #Open binary and set save directory
Command line configuration
mkdir /var/lib/mysql/binlog/ -p             Create binary log save directory
chown mysql.mysql /var/lib/mysql/binlog     set up mysql Is the directory owner
systemctl restart mysqld                    Restart the service for the configuration to take effect
mysql -uroot -pMaster12#$login database
mysql side configuration:
show master logs;
The location of the binary log is 156. The following add account operation will update the location of the binary log
New account
 be careful: mysql 8.0 The version of the password plug-in is different from the old version of the password plug-in.
CREATE USER 'copy'@'192.168.116.%' IDENTIFIED WITH mysql_native_password BY 'Copy12#$';
The authorized account has permission to copy all databases
GRANT replication slave ON *.* TO 'copy'@'192.168.116.%';
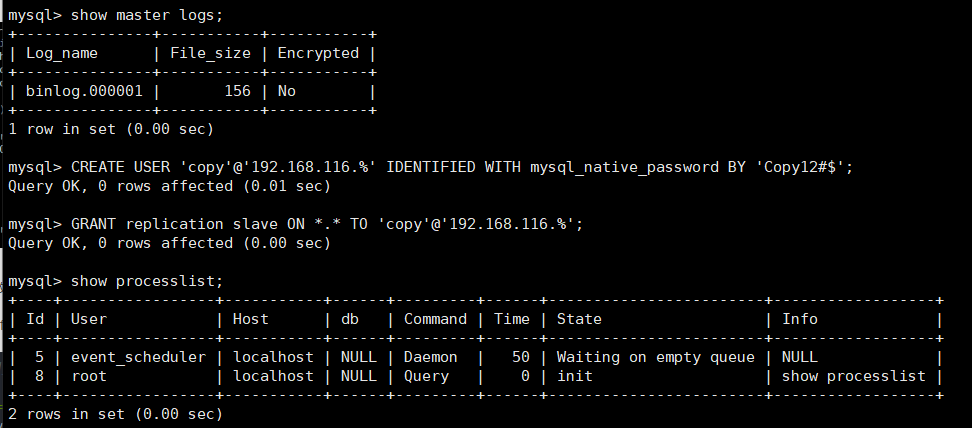
show processlist; Default only root Thread and event_cheduler thread

- Slave node configuration:
systemctl enable mysqld                    Power on
systemctl start mysqld                     Start service
After starting the service, find the password
grep 'temporary password' /var/log/mysqld.log

mysql -uroot -pvoIiq/kSR0%t log in to the database and modify the initial password
alter user user() identified by 'Slave12#$';

Profile modification:
vi /etc/my.cnf
#Add under [mysqld]
[mysqld]
server-id=2
log-bin=/var/lib/mysql/binlog/binlog
read_only
Command line configuration
mkdir /var/lib/mysql/binlog/ -p             Create binary log save directory
chown mysql.mysql /var/lib/mysql/binlog     set up mysql Is the directory owner
systemctl restart mysqld                    Restart the service for the configuration to take effect
mysql is initialized. The initialization steps are shown above
mysql client configuration
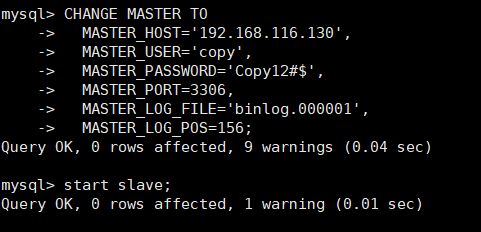
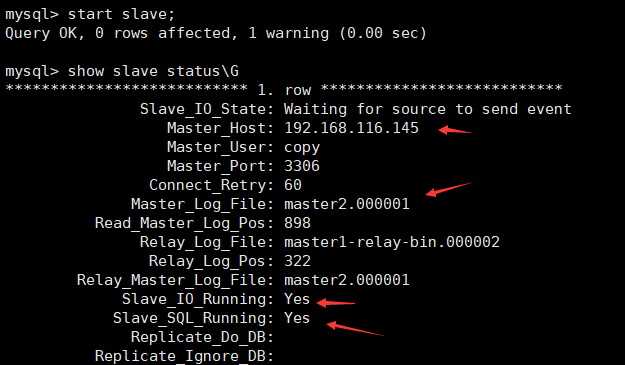
CHANGE MASTER TO
  MASTER_HOST='192.168.116.130',              #Primary server IP
  MASTER_USER='copy',                         #Master server replication account name
  MASTER_PASSWORD='Copy12#$',                 #Master server copy account password
  MASTER_PORT=3306,                           #Primary server port
  MASTER_LOG_FILE='binlog.000001',            #Primary server binary log name
  MASTER_LOG_POS=156;                         #Primary server binary logging location

  start slave;                                #Start master-slave service
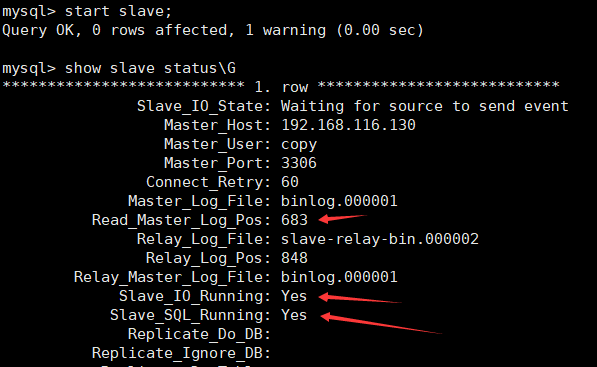
show slave status\G view slave node configuration status
Master_Host: 192.168.116.130               Primary node IP
Master_User: copy                          Master node copy account
Master_Port: 3306                          Master node mysql port
Connect_Retry: 60                          Master slave connection timeout
Master_Log_File: binlog.000001             Binary file name of the master node
Read_Master_Log_Pos: 683                   The binary position of the master node has been read
Relay_Log_File: slave-relay-bin.000002     Relay location name from node
Relay_Log_Pos: 848                         Read location from node relay log
Relay_Master_Log_File: binlog.000001       Slave node SQL Binary name of the thread
Slave_IO_Running: Yes                      From node I/O Connection thread
Slave_SQL_Running: Yes                     From node SQL thread
When you see Slave_IO_Running: Yes ,Slave_SQL_Running: Yes is yes, which proves that the master-slave replication is successful.
Verify master-slave configuration:
Master node:
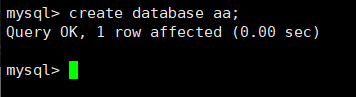
show processlist; One more Binlog Dump thread

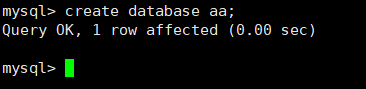
create database aa; Create a new database
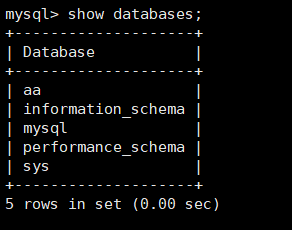
View from node:
show processlist;              View 2 more threads

Connect                        Wait for the master node to update the binary information
Query                          Read relay log and write to database

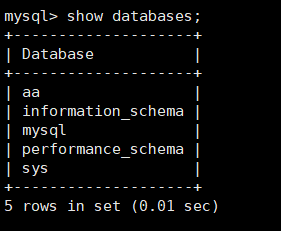
show databases; Confirm that the database created by the master node is updated to the slave node
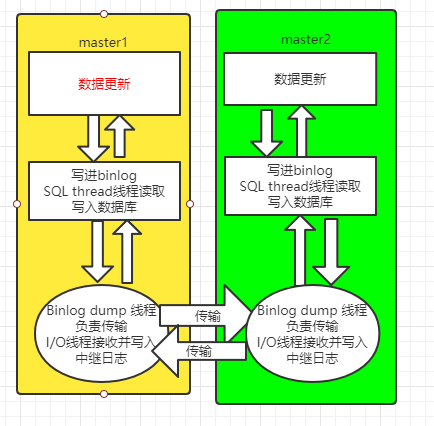
Principle of primary replication:
Nodes are master-slave to each other, and each device is both a master node and a slave node.
| name | information |
|---|---|
| System version | Centos 7.8 |
| Database version | mysql 8.0.26 |
| Master node 1 (master1) | 192.168.116.130 |
| Master node 2 | 192.168.116.145 |
Both servers follow mysql 8.0
vi /etc/yum.repos.d/mysql.repo
#Set yum source
[mysql]
name=mysql8.0
baseurl=https://mirrors.tuna.tsinghua.edu.cn/mysql/yum/mysql-8.0-community-el7-x86_64/
gpgcheck=0
Yum -y install MySQL community server to install MySQL 8.0 0
systemctl enable mysqld boot
systemctl start mysqld start service
The new mysql version must have a password to log in. By default, there will be an initial password for viewing the log
grep 'temporary password' /var/log/mysqld.log

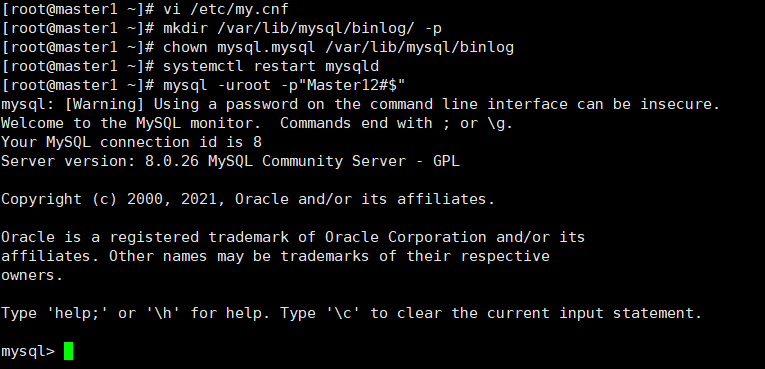
master1 to configure:
mysql -uroot -p"fWsDDf51uQ&7"       Enter database
alter user user() identified by 'Master12#$';    Modify the initial root password
After setting the password, you can initialize yourself. See the above for details.
vi /etc/my.cnf
#Add under [mysqld]
server-id=1
log-bin=/var/lib/mysql/binlog/master1   #Open binary log and specify directory
auto_increment_offset=1                 #Set record start point
auto_increment_increment=2              #Set record increment
mkdir /var/lib/mysql/binlog/ -p             Create binary log save directory
chown mysql.mysql /var/lib/mysql/binlog     set up mysql Is the directory owner
systemctl restart mysqld                    Restart the service for the configuration to take effect
mysql -uroot -p"Master12#$"enter database
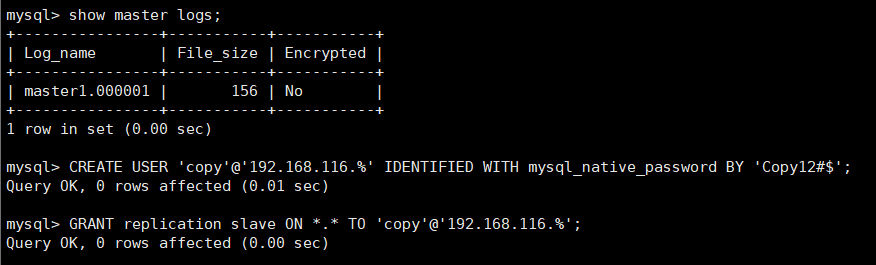
show master logs; Confirm binary logging location
New account
 be careful: mysql 8.0 The version of the password plug-in is different from the old version of the password plug-in.
CREATE USER 'copy'@'192.168.116.%' IDENTIFIED WITH mysql_native_password BY 'Copy12#$';
The authorized account has permission to copy all databases
GRANT replication slave ON *.* TO 'copy'@'192.168.116.%';
Slave node configuration:
grep ‘temporary password’ /var/log/mysqld.log to view the initial root password

master2 to configure:
mysql -uroot -p'.0!zuxoL5aLP'       Enter database
alter user user() identified by 'Master12#$';    Modify the initial root password
After setting the password, you can initialize yourself. See the above for details.
vi /etc/my.cnf
#Add under [mysqld]
server-id=2
auto_increment_offset=2
auto_increment_increment=2
log-bin=/var/lib/mysql/binlog/master2
mkdir /var/lib/mysql/binlog/ -p             Create binary log save directory
chown mysql.mysql /var/lib/mysql/binlog     set up mysql Is the directory owner
systemctl restart mysqld                    Restart the service for the configuration to take effect
CHANGE MASTER TO
  MASTER_HOST='192.168.116.130',              #Primary server IP
  MASTER_USER='copy',                         #Master server replication account name
  MASTER_PASSWORD='Copy12#$',                 #Master server copy account password
  MASTER_PORT=3306,                           #Primary server port
  MASTER_LOG_FILE='master1.000001',            #Primary server binary log name
  MASTER_LOG_POS=156;                         #Primary server binary logging location

  start slave;                                #Start master-slave service
start slave;
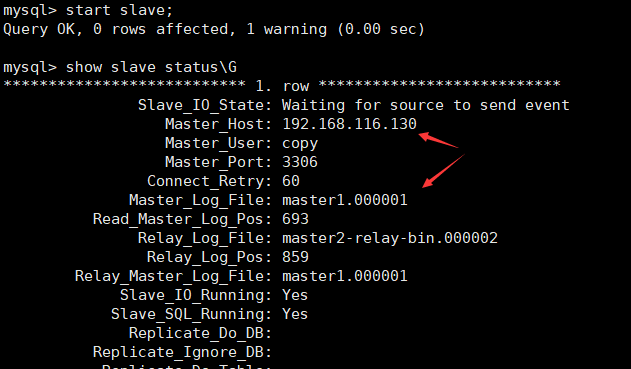
Confirm that master-slave replication with master 1 as master and master 2 as slave succeeded.
show processlist; master2 viewing threads

master1 create database
create database aa;
The master sees that the database is generated successfully
show databases;
Change master1 to the slave node of master2
master2 View binary location
show master logs;

master1 configuration
 CHANGE MASTER TO
    ->   MASTER_HOST='192.168.116.145',      #Set the IP of master2
    ->   MASTER_USER='copy',                 #Just use the account you originally created
    ->   MASTER_PASSWORD='Copy12#$',         #Password unchanged
    ->   MASTER_PORT=3306,                   #Database port of master2
    ->   MASTER_LOG_FILE='master2.000001',   #Binary log file name of master2
    ->   MASTER_LOG_POS=898;                 #Binary log location of master2
start slave;                                 Start master-slave process
show slave status\G                          View master-slave status
Test master1 as slave and master2 as master
master2 create database
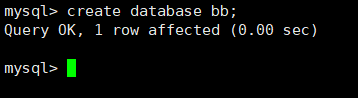
create database bb;
show processlist; View the threads of master2. There is one more replication thread

master1 check whether it is effective
show databases;

show processlist; master1 thread

4. xtrabackup realizes full + incremental + binlog recovery Library
xtrabackup features:
- Fast backup and restore process and high reliability of data restore
- Ongoing transactions are not interrupted during backup
- It can compress files and save disk space
- Open source tools, free software
- Command line operation is convenient for scripts to realize automatic backup
Official website address: https://www.percona.com
For MySQL versions below 5.7, percona xtrabackup version 2.4 can be used
For MySQL version 8.0 or above, percona xtrabackup version 8.0 can be used
Take mysql 5.7.29 as an example
Download the rpm package for xtrabackup. If the database is too new, the backup tool may not support backup.
wget https://downloads.percona.com/downloads/Percona-XtraBackup-2.4/Percona-XtraBackup-2.4.23/binary/redhat/7/x86_64/percona-xtrabackup-24-2.4.23-1.el7.x86_64.rpm
Install rpm package
yum install percona-xtrabackup-24-2.4.23-1.el7.x86_64.rpm -y
Backup steps:
| Database version | mysql5.7.29 |
|---|---|
| System version | Centos 7.8 |
Enter the database to generate some data, so that full backup can be made
create database aa;
use aa;
create table aa(id int,name char(5));
insert aa(id,name)values('1','AA');
insert aa(id,name)values('2','BB');
insert aa(id,name)values('3','CC');
insert aa(id,name)values('4','DD');
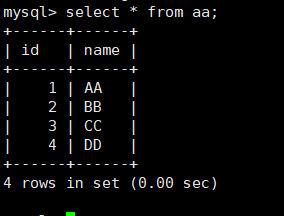
select * from aa; View all contents of the table
cat /mysql/backup/full/xtrabackup_binlog_info View binary backup location

mkdir /mysql/backup -p create a new backup directory
Start full backup
xtrabackup -uroot -pTest1234 --backup --target-dir=/mysql/backup/full
Create new data, and then perform the first incremental backup
use aa;
insert aa(id,name)values('5','EE');
insert aa(id,name)values('6','FF');
insert aa(id,name)values('7','GG');
insert aa(id,name)values('8','HH');
For the first incremental backup, you need to specify the path of full backup
xtrabackup -uroot -pTest1234 --backup --target-dir=/mysql/backup/ZL1 --incremental-basedir=/mysql/backup/full
View binary location after backup
cat /mysql/backup/ZL1/xtrabackup_binlog_info

Create new data, and then perform a second incremental backup
use aa;
insert aa(id,name)values('9','II');
insert aa(id,name)values('10','JJ');
insert aa(id,name)values('11','KK');
insert aa(id,name)values('12','LL');
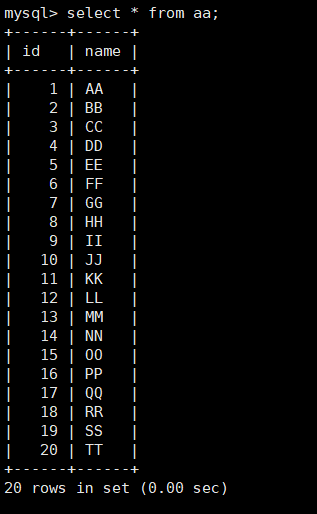
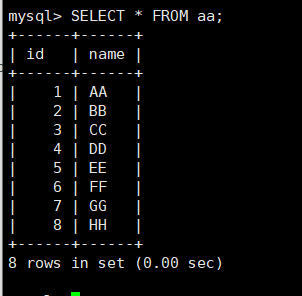
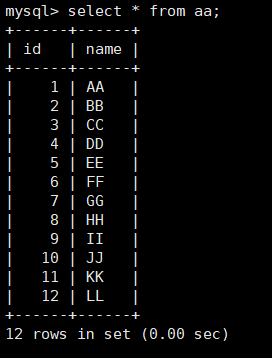
select * from aa;
For the second incremental backup, you need to specify the path of the first incremental backup
xtrabackup -uroot -pTest1234 --backup --target-dir=/mysql/backup/ZL2 --incremental-basedir=/mysql/backup/ZL1
cat /mysql/backup/ZL2/xtrabackup_binlog_info

Create the new data, and then perform the third incremental backup
use aa;
insert aa(id,name)values('13','MM');
insert aa(id,name)values('14','NN');
insert aa(id,name)values('15','OO');
insert aa(id,name)values('16','PP');
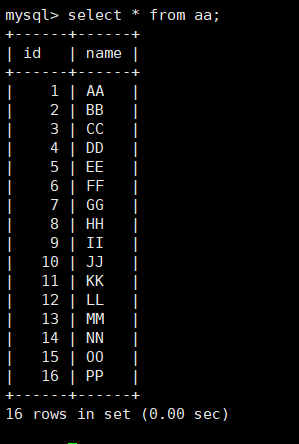
select * from aa;
For the third incremental backup, you need to specify the path of the second incremental backup
xtrabackup -uroot -pTest1234 --backup --target-dir=/mysql/backup/ZL3 --incremental-basedir=/mysql/backup/ZL2
cat /mysql/backup/ZL3/xtrabackup_binlog_info

tar -zcf mysql_ backup. tar. Directory compression for Gz / MySQL backup
If the database is still accessed externally, some data may be lost during recovery. It is best to shut down the database service.
binlog data backup
Create new binlog data
use aa;
insert aa(id,name)values('17','QQ');
insert aa(id,name)values('18','RR');
insert aa(id,name)values('19','SS');
insert aa(id,name)values('20','TT');
commit;                  Commit all transactions
systemctl stop mysqld shut down the database service
The original location of the third incremental backup binary is 4818
cat /mysql/backup/ZL3/xtrabackup_binlog_info
mysqlbinlog is a binlog binary log viewing tool that comes with mysql
If the binlog file is too large or, do not open it directly
mysqlbinlog /data/mysql/localhost-bin. 00000 2|tail view the location of the latest binary
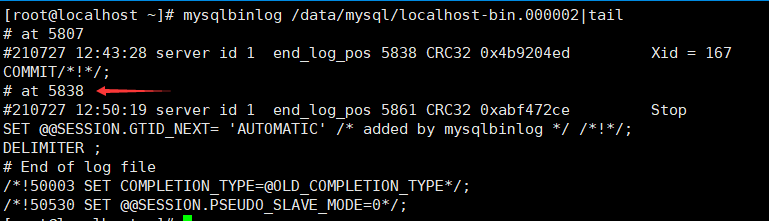
That is, localhost bin is actually required The data between 4818 and 5818 of 00000 2.
Note: - stop position = 5839, the specified end point of the exported binary file needs to be added with 1, otherwise the record 5818 will not be exported.
Export the binlog log file and transfer it to the new node
mysqlbinlog --start-position=4818 --stop-position=5839 /data/mysql/localhost-bin.000002>binlog.sql
/etc/my.cnf and / etc / my cnf. D backup
These two files are mysql configuration files and directories. If they have been configured, they should also be backed up.
cp /etc/my.cnf /mysql/backup/
cp -r /etc/my.cnf.d /mysql/backup/
Full backup and incremental backup restore
It is best to restore the mysql version to be consistent with the system version, otherwise there may be problems.
Transfer the compressed files of full backup and incremental backup to the newly installed database node
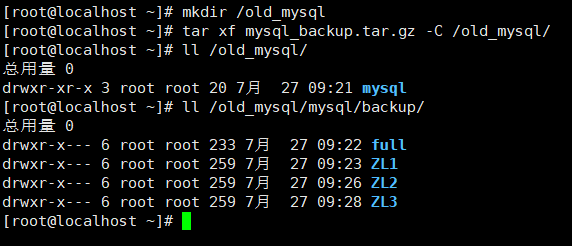
scp mysql-5.7.29-linux-glibc2.12-x86_64.tar.gz 192.168.116.145:/root/
systemctl stop mysqld                          Stop the newly installed database
rm -rf /data/mysql/*                           Delete all contents in the installed database directory
mkdir /old_mysql                               Create a new directory to store the old database files
tar xf mysql_backup.tar.gz -C /old_mysql/      Unzip the backup compressed files to a directory
ll /old_mysql/mysql/backup/                    Confirm that the backup directory is still there
Expand full backup content
xtrabackup --prepare --apply-log-only --target-dir=/old_mysql/mysql/backup/full/
You need to copy the first incremental backup to the full backup folder
xtrabackup --prepare --apply-log-only --target-dir=/old_mysql/mysql/backup/full/ --incremental-dir=/old_mysql/mysql/backup/ZL1
You need to copy the second incremental backup to the full backup folder
xtrabackup --prepare --apply-log-only --target-dir=/old_mysql/mysql/backup/full/ --incremental-dir=/old_mysql/mysql/backup/ZL2
be careful:
The last incremental backup does not need to add the -- apply log only parameter
xtrabackup --prepare --target-dir=/old_mysql/mysql/backup/full/ --incremental-dir=/old_mysql/mysql/backup/ZL3
Copy the restored database file to the database, and specify / old_mysql/mysql/backup/full / is the expanded directory. You will automatically find the directory where mysql is installed
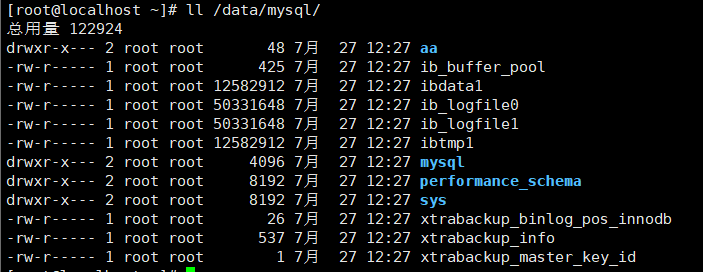
xtrabackup --copy-back --target-dir=/old_mysql/mysql/backup/full/
ll /data/mysql/                                             Confirm successful recovery
chown -R mysql.mysql /data/mysql                            After restore, the permissions of the database directory will be changed back to mysql jurisdiction
systemctl start mysqld
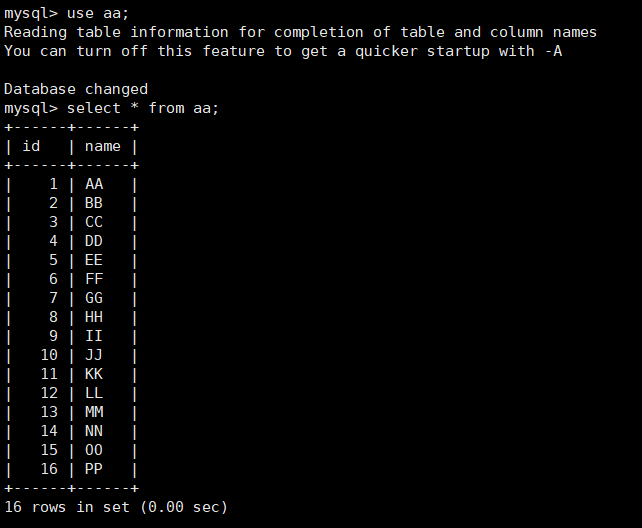
select * from aa; Enter the database to check whether the data is still there
binglog log recovery
Transfer the binlog log file to the newly installed database node
scp binlog.sql 192.168.116.145:/root/
source /root/binlog.sql         Import database
select * from aa;               Confirm that the binary log is imported successfully