Redis (persistence principle, security policy, expiration deletion & memory obsolescence policy, performance pressure measurement, highly available Redis Cluster)
1. Persistence principle
Persistence: Redis is an in memory database, and all data is stored in memory. In order to avoid permanent loss of data caused by process exit, it is necessary to regularly save the data in Redis from memory to hard disk in some form (data or command); When Redis restarts next time, use persistent files to recover data. In addition, for disaster backup, persistent files can be copied to a remote location
1.1 persistence process (disk dropping)
Since redis data can be saved on disk, what is the process like?
There are five processes:
(1) The client sends a write operation to the server (the data is in the client's memory).
(2) The database server receives the data of the write request (the data is in the memory of the server).
(3) The server calls write to write the data to the disk (the data is in the buffer of the system memory).
(4) The operating system transfers the data in the buffer to the disk controller (the data is in the disk cache).
(5) The disk controller writes data to the physical media of the disk (the data actually falls on the disk).
These five processes are a normal saving process under ideal conditions, but in most cases, our machines will have various faults. Here are two cases
(1) If the Redis database fails, as long as the third step above is completed, it can be persisted and saved. The remaining two steps are completed by the operating system for us.
(2) If the operating system fails, the above 5 steps must be completed.
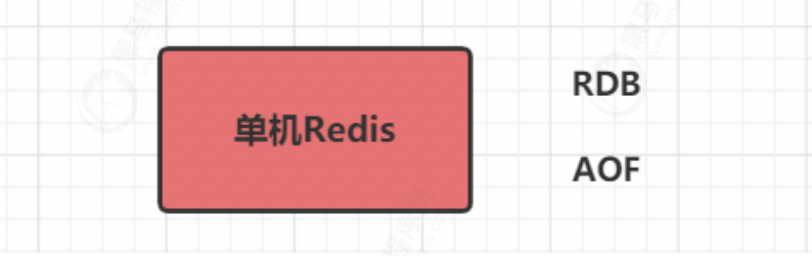
To cope with the above five steps, redis provides two different persistence methods: RDB(Redis DataBase) and AOF(Append OnlyFile)
1.2 RDB details
1.2.1 concept
- RDB: it can snapshot and store your data at a specified time interval.
RDB persistence is to save the snapshot generated by the data in the current process to the hard disk (so it is also called snapshot persistence). The saved file suffix is
rdb; When Redis restarts, you can read the snapshot file recovery data.
After we installed redis After that, all configurations are in redis.conf In the file, there is RDB and AOF Various configurations of the two persistence mechanisms.
1.2.2 trigger & principle
In Redis, there are two types of RDB persistence triggers: manual trigger by instruction and Redis Conf configuration auto trigger
Command manual trigger
Both the save command and bgsave command can generate RDB files
- save: it will block the current Redis server until the RDB file is created. It should not be used online.
- bgsave: this trigger method forks a child process, which is responsible for the persistence process. Therefore, blocking will only occur when forking the child process.
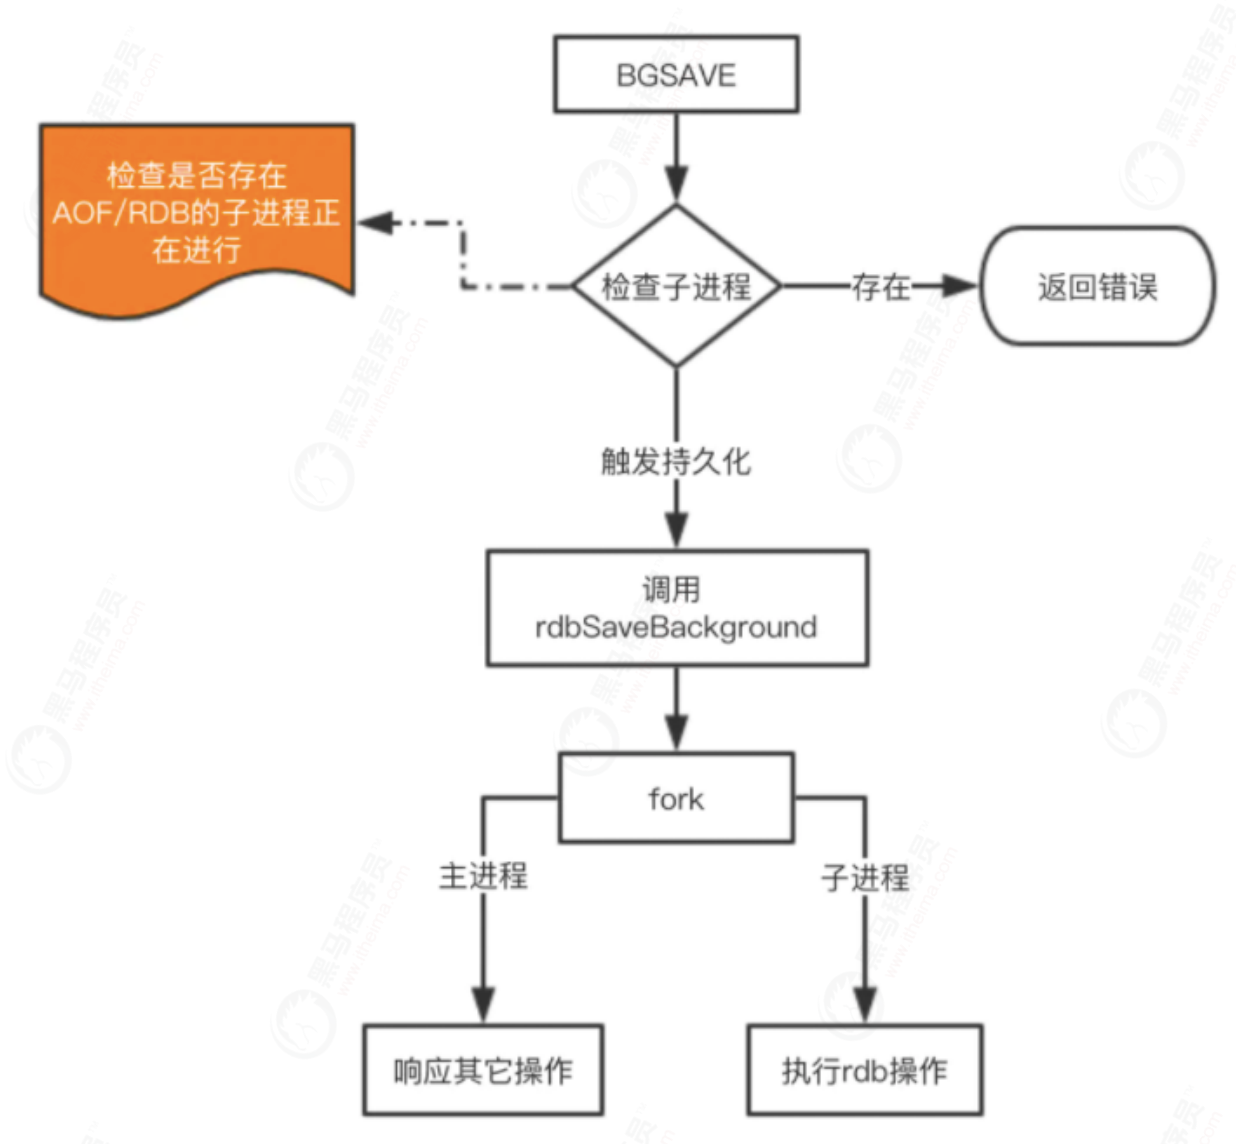
Automatic trigger - Automatically triggered according to our save m n configuration rules;
- When the slave node copies the full amount, the master node sends the rdb file to the slave node to complete the copy operation, and the master node will trigger bgsave;
- When debug reload is executed;
- If aof is not enabled during shutdown, it will also be triggered.
redis.conf:
# temporal strategy
save 900 1 # Indicates that if the value of at least one key changes within 900 seconds, RDB will be triggered
save 300 10 # Indicates that if the value of at least 10 key s changes within 300 seconds, RDB will be triggered
save 60 10000 # Indicates that if the value of at least 10000 key s changes within 60 seconds, RDB will be triggered
# File name
dbfilename dump.rdb
# File save path
dir /home/work/app/redis/data/
# If persistence fails, does the main process stop writing
stop-writes-on-bgsave-error yes
# Compress
rdbcompression yes
# Check when importing
rdbchecksum yes
The configuration is actually very simple. Here's what the persistence time policy means.
- save 900 1 means that if there is a write command within 900s, a snapshot will be triggered, which can be understood as a backup
- save 300 10 indicates that there are 10 writes in 300s, and a snapshot is generated
The following is similar, so why do you need to configure so many rules? Because the read-write requests of Redis in each period are certainly not balanced, in order to balance performance and data security, we can freely customize when to trigger backup. Therefore, this is a reasonable configuration based on its own Redis writing.
- stop-writes-on-bgsave-error yes
This configuration is also a very important configuration. When the backup process fails, the main process stops accepting new write operations to protect the persistent data consistency. If your business has a perfect monitoring system, you can disable this configuration. Otherwise, please enable it. - Regarding the compression configuration, rdbcompression yes, it is not recommended to start it. After all, Redis itself is a CPU intensive server. Turning on compression again will bring more CPU consumption, and the CPU is more valuable than the cost of hard disk.
Of course, if you want to disable RDB configuration, it is also very easy. Just write "save" on the last line of save
1.2.3 realization
Manually trigger bgsave method

Automatic trigger
save 20 3 is configured
1.2.4 RDB summary
ps -ef | grep redis
advantage
1. High execution efficiency, suitable for backup and recovery of large-scale data. Automatic backup does not affect the work of the main thread.
2. Backup files take up less space. The data snapshot is backed up, and the file size is smaller than that of AOF.
inferiority
1. Some data may be lost. Because it is an automatic backup, if the amount of modified data is not enough to trigger an automatic backup, and an exception such as power failure causes redis to fail to shut down normally, so the closed backup is not triggered, then the write operations during the last backup to abnormal downtime will be lost.
2. Automatic backup is performed through the fork process, which will completely copy the memory data of the current process, so this process occupies twice the original space, which may lead to insufficient memory
1.3 AOF details
1.3.1 concept
AOF (append only file): records every operation (command) written to the server. When the server restarts, these commands will be re executed to recover the original data. (not on by default)
AOF features:
 - The write operation requested by the user is recorded in the form of log. The read operation will not be recorded because the write operation will be stored
 - The file is in the form of addition rather than modification
 - redis of aof Recovery is actually to read and write the appended file from the beginning to the end
1.3.2 implementation of AOF persistence
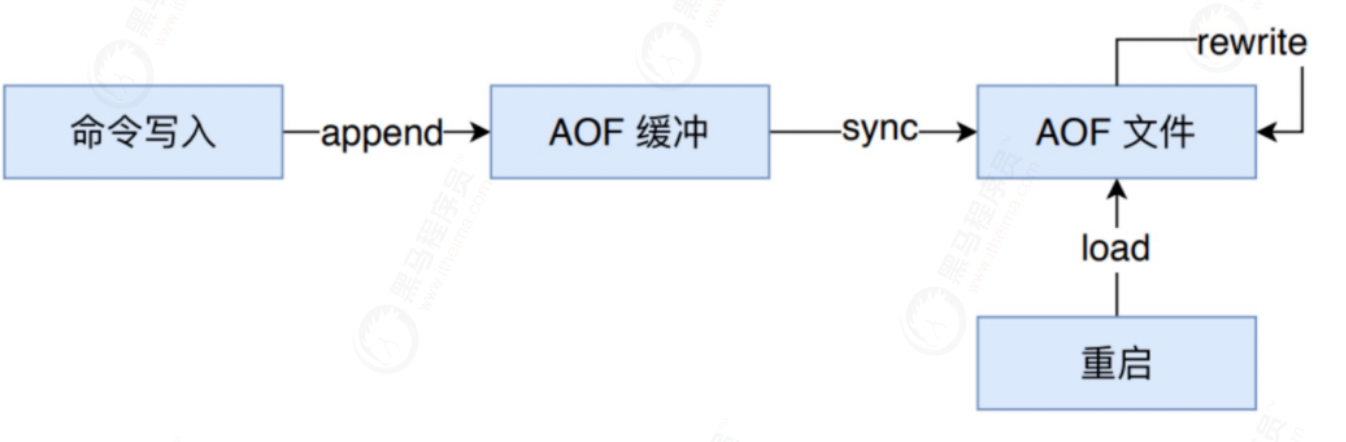
As shown in the figure above, the implementation of AOF persistence function can be divided into command append, file write, file sync, file rewrite and restart load. The process is as follows:
- All write commands are appended to the AOF buffer.
- The AOF buffer performs synchronization operations to the hard disk according to the corresponding policies.
- With the increasing size of AOF files, AOF files need to be rewritten regularly to achieve the purpose of compression.
- When Redis restarts, AOF files can be loaded for data recovery.
1.3.2 opening
# You can modify redis The appendonly parameter in the conf configuration file is enabled
appendonly yes
# The save location of AOF file is the same as that of RDB file, which is set through dir parameter.
dir ./
# The default file name is appendonly Aof, which can be modified through the appendfilename parameter
appendfilename appendonly.aof
1.3.4 command addition
When the AOF persistence function is on, after Redis executes a write command, it will append the executed write command to the end of the AOF buffer maintained by the Redis server in the protocol format (that is, RESP, the communication protocol between the Redis client and the server).
For example, the command SET mykey myvalue is recorded in the AOF buffer in the following format.
- "*3\r\n$3\r\nSET\r\n$5\r\nmykey\r\n$7\r\nmyvalue\r\n"
Redis protocol format will not be repeated in this article. The reason why AOF directly adopts text protocol format is that all write commands need to be appended. The protocol format is directly adopted to avoid secondary processing overhead.
1.3.5 file writing and synchronization (trigger)
Before Redis ends an event loop each time, it will call the flushAppendOnlyFile function to judge whether the contents in the AOF cache need to be written and synchronized to the AOF file.
The behavior of the flushAppendOnlyFile function is determined by redis The value of the appendfsync option in the conf configuration. This option has three optional values, always, everysec, and no:

- always: save every time you execute a command. It is the safest with high consumption
- everysec: save every second
- no: write only and do not save. It is executed when AOF or Redis is closed. The operating system triggers the refresh of the file to the disk
Write and save concepts
   WRITE: Depending on the conditions, the aof_buf Cache in is written to AOF File.
   SAVE: Depending on the condition, call fsync or fdatasync Function that will AOF Save the file to disk.
1.3.6 AOF data recovery
The AOF file contains all the write commands required to rebuild Redis data, so Redis can restore the state before Redis is closed by reading in and re executing the write commands saved in the AOF file
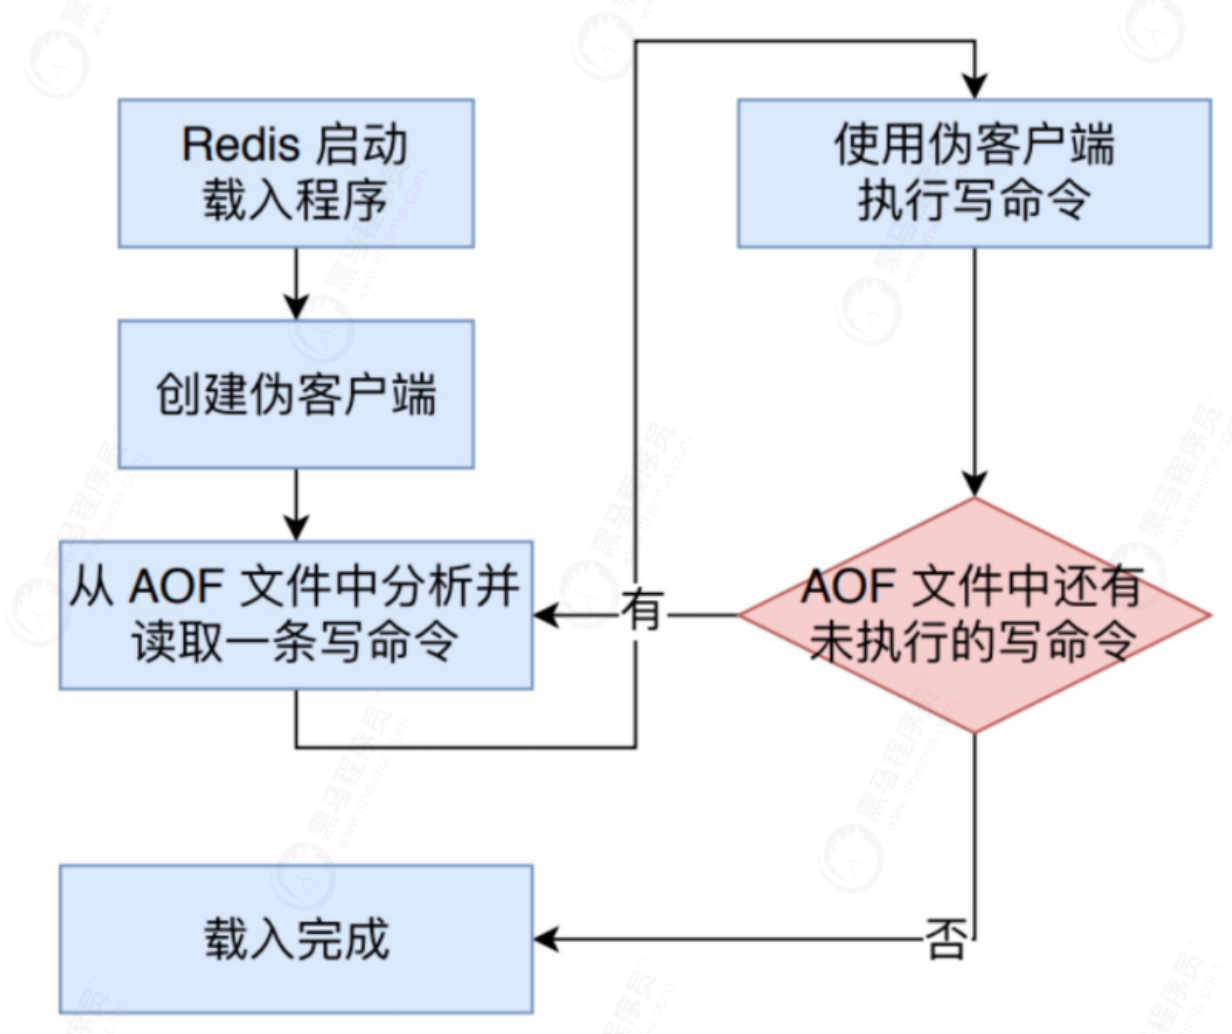
The detailed steps for Redis to read AOF files and restore database status are as follows:
- Create a fake client without a network connection. Because Redis commands can only be executed in the client context, and the commands used when loading the AOF file directly come from the AOF file rather than the network connection, the server uses a fake client without a network connection to execute the write command saved by the AOF file, The effect of pseudo client executing command is exactly the same as that of client with network connection.
- Analyze and take out a write command from the AOF file.
- The pseudo client is used to execute the read write command.
- Continue with steps 2 and 3 until all write commands in the AOF file are processed.
After completing the above steps, the database state saved by the AOF file will be completely restored.
1.3.7 AOF "rewrite"
Problem analysis: AOF adopts the method of file addition. What problems will occur with Redis running for a long time?
Concept:
In order to solve the problem of AOF file volume expansion, Redis provides an AOF file rewrite policy
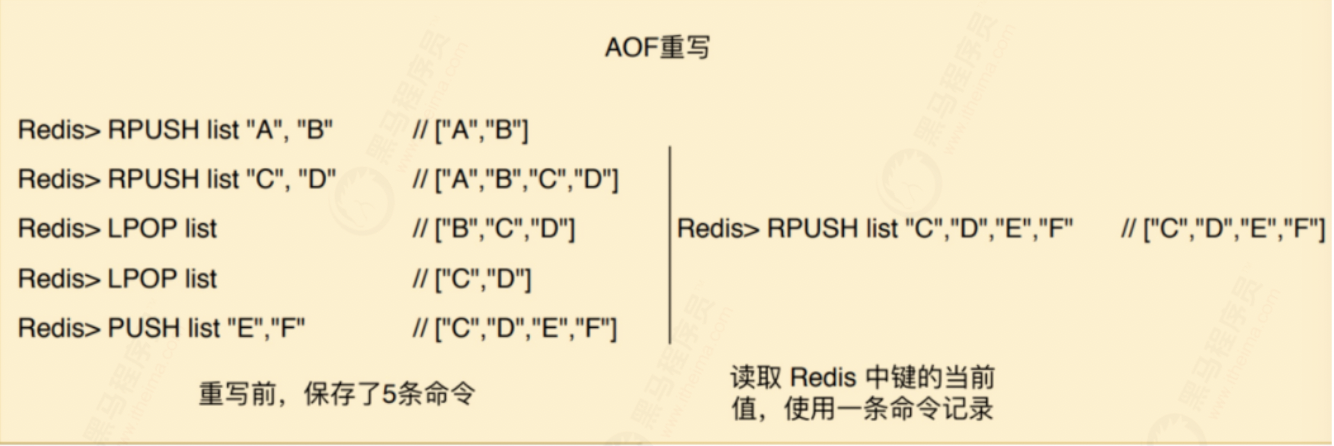
As shown in the figure above, the state of the key named list should be recorded before rewriting. Five commands should be saved in the AOF file, while only one command needs to be saved after rewriting.
Aof file rewriting does not need to read, analyze or write the existing AOF file, but is realized by reading the current database state of the server. First, read the current value of the key from the database, and then use a command to record the key value pair instead of multiple commands that previously recorded the key value pair. This is the implementation principle of AOF rewriting function.
Trigger:
The trigger mechanism of rewrite mainly includes:
- Manually call the bgrewrite AOF command. If there are currently running rewrite subprocesses, the execution of this rewrite will be delayed. Otherwise, a rewrite will be triggered directly
- Auto trigger is triggered according to configuration rules
# Rewriting mechanism: avoid the file getting larger and larger, automatically optimize the compression instruction, and fork a new process to complete the rewriting action, reducing the memory in the new process
The data is rewritten and the old aof The file will not be read and used, similar to rdb
# The size of the current AOF file is 100% of the last AOF size, and the file volume reaches 64m. If both are met, rewriting will be triggered
auto-aof-rewrite-percentage 100
#The second is that the automatic trigger will only be used once. When the capacity is reached, it will be rewritten, and then the first condition will be used
auto-aof-rewrite-min-size 64mb
1.3.8 AOF rewriting principle
The AOF rewrite function will perform a large number of write operations, and the thread calling the function will be blocked for a long time. Therefore, Redis performs AOF rewrite operations in the child process.
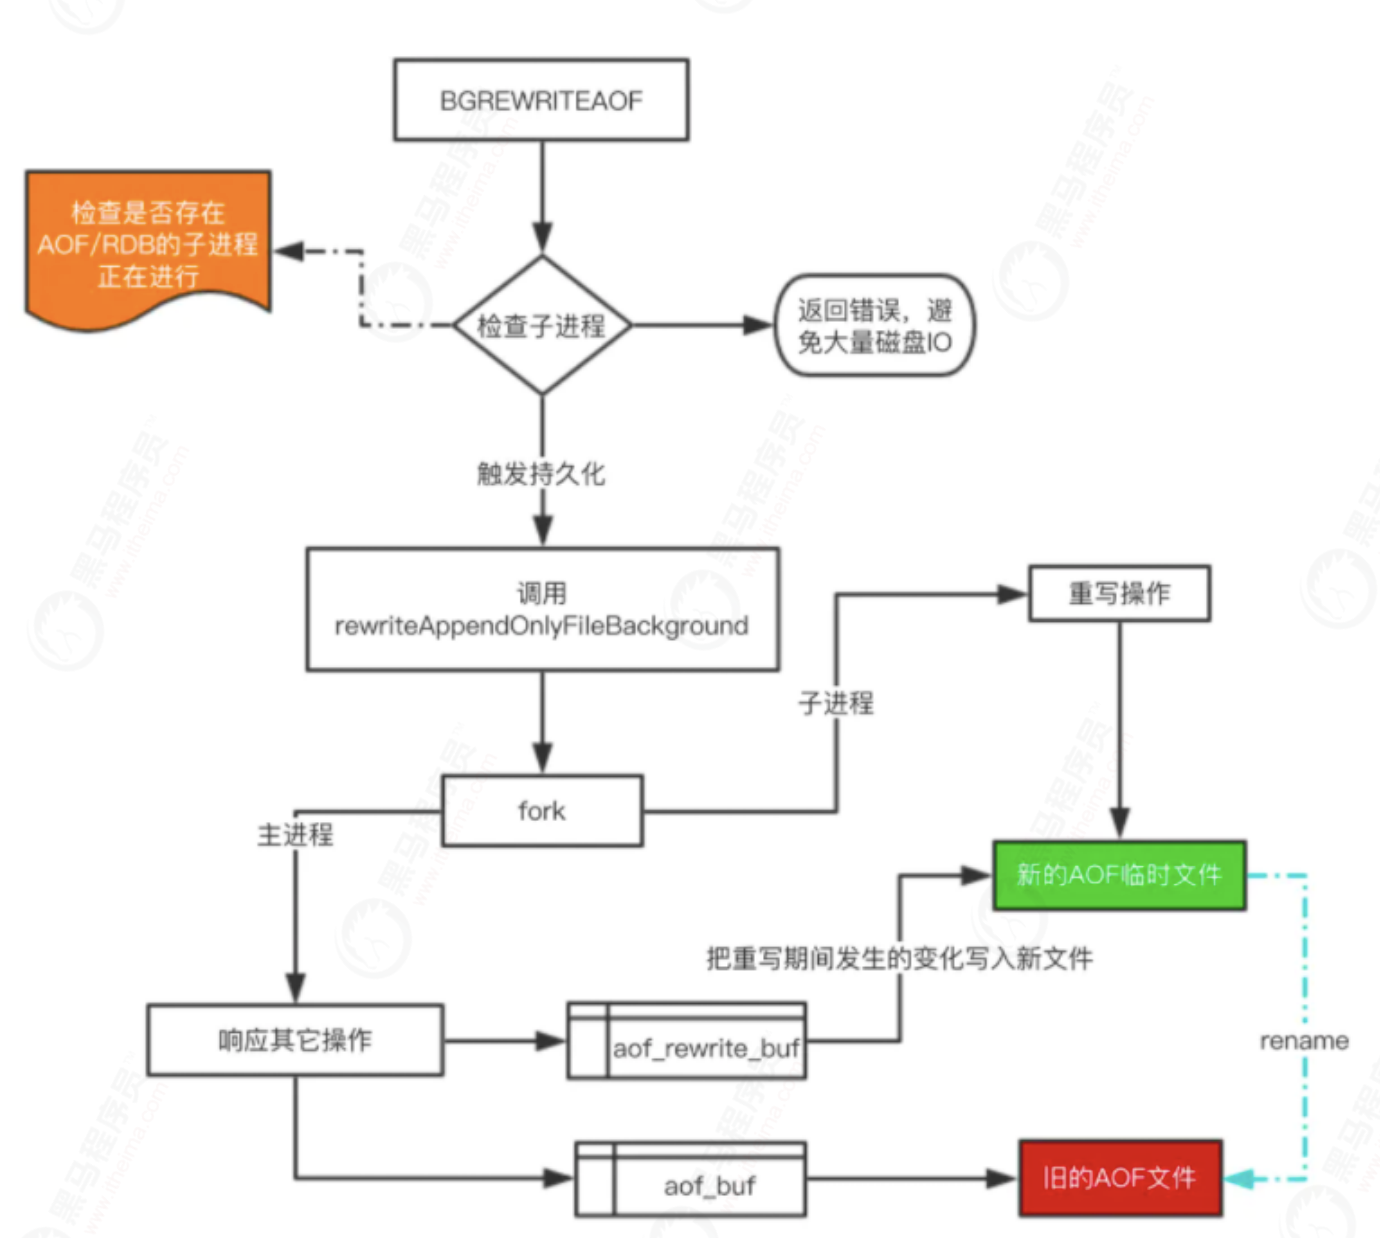
In the whole AOF background rewriting process, only the execution of signal processing function will block the Redis main process. At other times, AOF background rewriting will not block the main process.
1.4 persistence priority
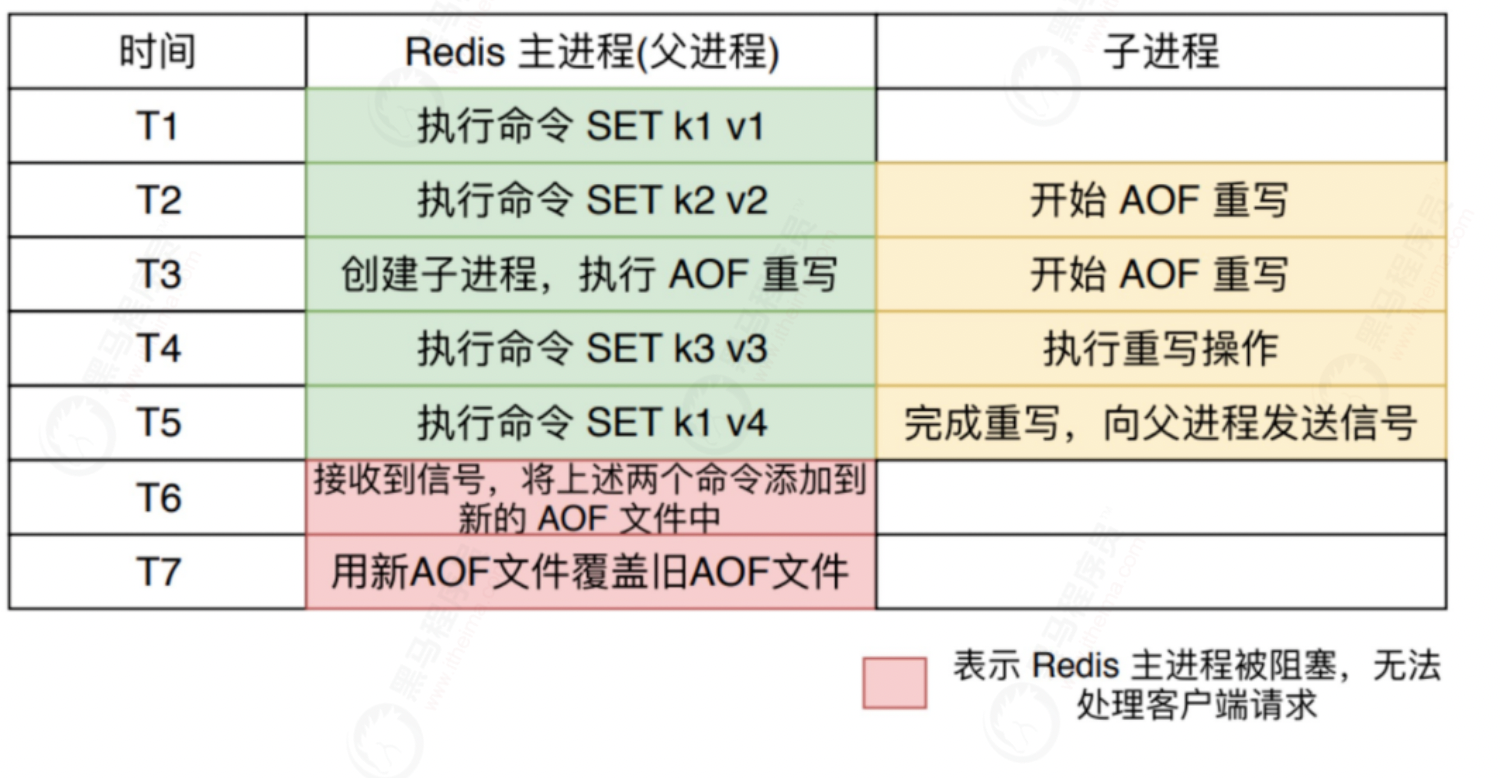
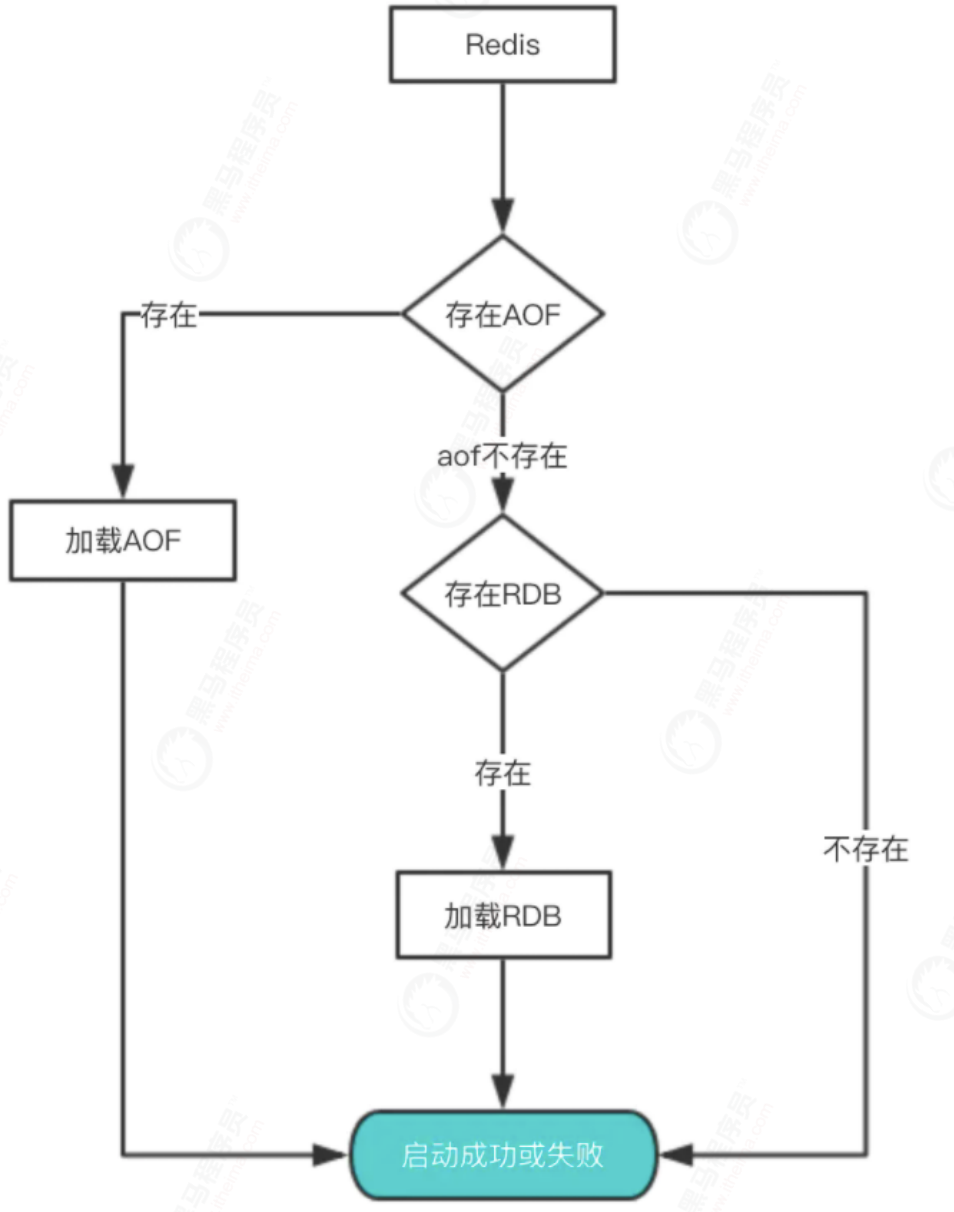
If there are both RDB files and AOF files on a server, who should load them?
1.5 performance and Practice
Through the above analysis, we all know that the RDB snapshot and AOF rewriting need fork, which is a heavyweight operation and will block Redis. Therefore, in order not to affect the response of Redis main process, we need to reduce blocking as much as possible.
- Reduce the frequency of fork s. For example, you can manually trigger RDB to generate snapshots and rewrite with AOF;
- Control the maximum memory used by Redis to prevent fork taking too long;
- Use more powerful hardware;
- Reasonably configure the memory allocation strategy of Linux to avoid fork failure due to insufficient physical memory
Online practical experience - If the data in Redis is not particularly sensitive or can be rewritten and generated in other ways, persistence can be turned off. If the data is lost, it can be recovered in other ways;
- Make your own policies and regularly check Redis, and then you can manually trigger backup and rewrite data;
- You can join the master-slave machine, use one slave machine for backup processing, and other machines respond to the commands of the client normally;
- RDB persistence and AOF persistence can exist simultaneously and be used together.
2. Security policy
1. Password authentication
You can set password parameters through the redis configuration file, so that the client needs password authentication to connect to the redis service, which can make your redis service more secure.
Redis in redis In the conf configuration file, set the configuration item requirepass and account opening password authentication.
open redis.conf,find requirepass Change to the specified password, which shall meet the complexity requirements:
1,More than 8 digits in length
2,Contains three of the following four types of characters:
English capital letters(A reach Z)
English small letters(a reach z)
10 Basic number(0 To 9)
Non alphabetic character(for example !,$,#,%,@,^,&)
3,Avoid using weak passwords that have been disclosed, such as: abcd.1234 ,admin@123 etc.
Then remove the front#No. and restart redis

example
 We can check whether password authentication is set through the following command:
127.0.0.1:6379> CONFIG get requirepass
1) "requirepass"
2) ""
By default, the requirepass parameter is empty, which means that you can connect to the redis service without password authentication.
You can modify this parameter with the following command:
127.0.0.1:6379> CONFIG set requirepass "runoob"
OK
127.0.0.1:6379> CONFIG get requirepass
1) "requirepass"
2) "runoob"
After setting the password, the client needs password authentication to connect to the redis service, otherwise the command cannot be executed.
grammar
The basic syntax format of AUTH command is as follows:
127.0.0.1:6379> AUTH password
example
127.0.0.1:6379> AUTH "runoob"
OK
127.0.0.1:6379> SET mykey "Test value"
OK
127.0.0.1:6379> GET mykey
"Test value"
3. Expiration deletion strategy & memory elimination strategy
3.1. Problem analysis:
① How to set the expiration time of Redis key?
② After setting the expiration time of a key, can the key be obtained at this time? If not, does this key still occupy memory?
③ How to set the memory size of Redis? When the memory is full, what memory elimination strategies does Redis have? How should we choose?
3.2 setting Redis key expiration time
Redis provides four commands to set the expiration time (lifetime).
① . exhibit: indicates that the lifetime of the key is set to ttl seconds.
② PEXPIRE: indicates that the lifetime of the key is set to ttl milliseconds.
③ . EXPIREAT: indicates that the lifetime of the key is set to the second timestamp specified by timestamp.
④ PEXPIREAT: indicates that the lifetime of the key is set to the number of milliseconds timestamp specified by timestamp.
PS: in Redis's internal implementation, the first three commands to set the expiration time will be converted to the last PEXPIREAT command.
Two additional knowledge points are added:
1, Remove key expiration time
PERSIST: indicates to remove the expiration time of the key.
2, Returns the remaining lifetime of the key
TTL: returns the remaining lifetime of the key in seconds.
PTTL: returns the remaining lifetime of the key in milliseconds.
3.3 determination of redis expiration time
Within Redis, whenever we set the expiration time of a key, Redis will store the expiration time of the key in an expiration dictionary. When we query a key, Redis first checks whether the key exists in the expiration dictionary. If so, it obtains its expiration time. Then compare the expiration time with the current system time. If it is greater than the system time, it will not expire; Otherwise, it is determined that the key has expired.
3.4 expiration deletion strategy
We usually delete a key in the following three ways.
① . scheduled deletion
While setting the expiration time of a key, we create a timer to delete it immediately when the expiration time comes.
② . inert deletion
After setting the expiration time of the key, we don't care about it. When we need the key, we check whether it expires. If it expires, we delete it, otherwise, we return the key.
③ . delete regularly
Every once in a while, we check some keys and delete expired keys
3.5 Redis expiration deletion policy
The expired deletion strategy of Redis is: inert deletion and periodic deletion are used together
Lazy deletion: Redis's lazy deletion policy is implemented by dB The C / expireifneed function is implemented. Before all key read / write commands are executed, the expireifneed function will be called to check them. If they expire, the key will be deleted, and then the operation that the key does not exist will be executed; If it is not expired, do not operate and continue to execute the original command.
Delete periodically: by redis.com The C / activeexpirecycle function is implemented. The function runs at a certain frequency. Each time, a certain number of random keys are taken out from a certain number of databases for inspection, and the expired keys are deleted.
Note: instead of checking all libraries and keys at once, check a certain number of keys at random.
The running frequency of the function is deleted regularly in redis2 In version 6, it is specified to run 10 times per second, about once in 100ms.
On redis2 After version 8, you can modify the configuration file redis Conf hz option to adjust this number of times.

Think: will there be some keys that will never be used, and the keys that have been deleted regularly for many times but have not been selected for deletion?
3.6 memory obsolescence strategy
① . set the maximum memory of Redis
In the configuration file redis In conf, you can set the maximum memory through the parameter maxmemory:

If this parameter is not set, it is unlimited by default, but it is usually set to three quarters of the physical memory
② . set memory elimination mode
When the existing memory is greater than maxmemory, redis will be triggered to actively eliminate memory by setting maxmemory policy
There are several elimination methods:
- Volatile LRU: key s with expiration time set are eliminated by LRU algorithm;
- Allkeys LRU: all keys are eliminated by LRU algorithm;
- Volatile LFU: key s with expiration time set are eliminated by LFU algorithm;
- Allkeys LFU: all keys are eliminated by LFU algorithm;
- Volatile random: the key with expiration time set uses random elimination;
- All keys random: all keys are eliminated randomly;
- Volatile TTL: key s with expiration time set are eliminated according to the expiration time. The earlier they expire, the earlier they will be eliminated;
- noeviction: the default policy. When the memory reaches the set maximum value, all operations applying for memory will report errors (such as set,lpush, etc.), and read-only operations such as get command can be executed normally;
* LRU,LFU and volatile-ttl Are approximate random algorithms;
Configure the obsolescence policy using the following parameter maxmemory policy:
#configuration file
maxmemory-policy noeviction
#command line
127.0.0.1:6379> config get maxmemory-policy
1) "maxmemory-policy"
2) "noeviction"
127.0.0.1:6379> config set maxmemory-policy allkeys-random
OK
127.0.0.1:6379> config get maxmemory-policy
1) "maxmemory-policy"
2) "allkeys-random"
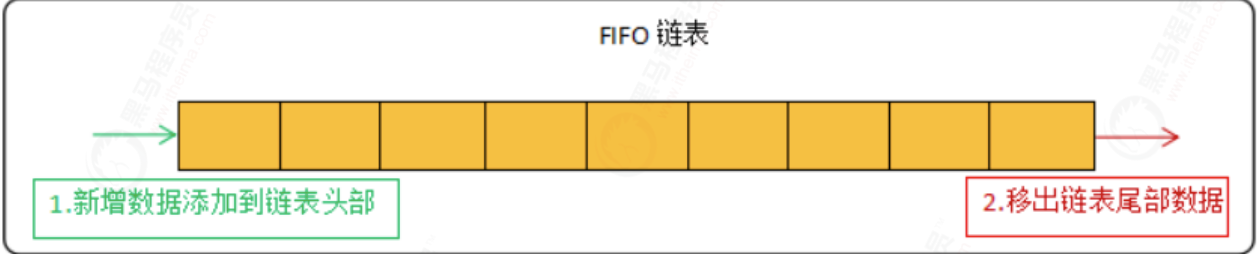
There are three kinds of cache memory elimination strategies: FIFO, LRU and LFU, of which LRU and LFU are used by Redis.
FIFO is the simplest elimination strategy and follows the principle of first in first out. Here is a brief mention:
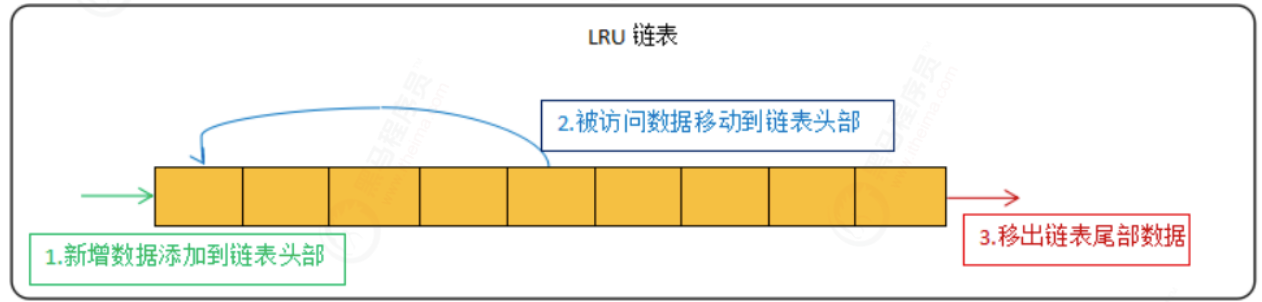
LRU algorithm
LRU (Least Recently Used) means Least Recently Used. The algorithm eliminates data according to the historical access record of data. Its core idea is that "if the data has been accessed recently, the probability of being accessed in the future is higher".
The common implementation method of LRU algorithm is linked list:
The new data is placed at the head of the linked list, and the data in the linked list is moved to the head of the chain when it is accessed. When the linked list is full, the data is removed from the tail of the linked list.
The approximate LRU algorithm is used in redis. Why is it approximate? Redis randomly samples five keys (you can modify the maxmemory samples configuration parameter), and then selects the key with the earliest access time to eliminate it. Therefore, when the number of sampling keys
The closer the number of key s in the Redis library is, the closer the elimination rule is to the LRU algorithm. But the official recommendation of 5 is enough, no more than 10 at most. The larger it is, the more CPU resources will be consumed.
However, under the LRU algorithm, if a hot data is rarely accessed recently, but the non hot data is accessed recently, the hot data will be eliminated by mistake and the non hot data will be left. Therefore, in redis4 LFU algorithm is added in X.
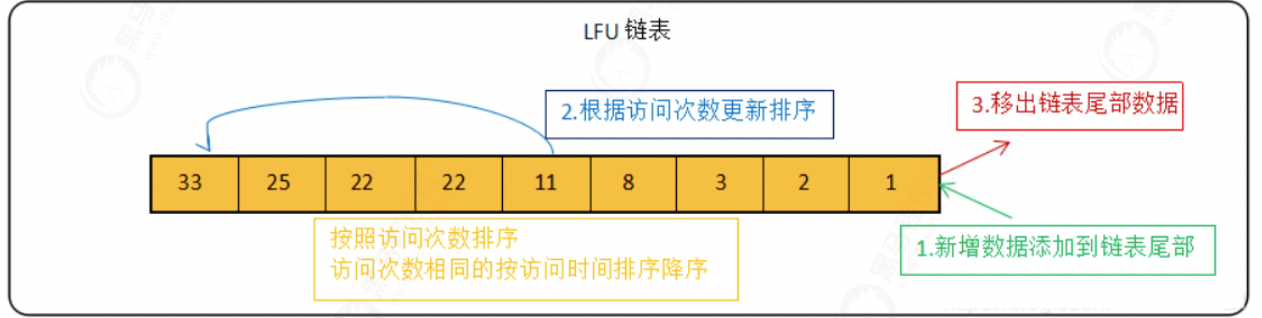
LFU algorithm
LFU (Least Frequently Used) means the Least Frequently Used. It eliminates data according to the historical access frequency of data. Its core idea is that "if data has been accessed many times in the past, it will be accessed more frequently in the future".
LFU algorithm reflects the popularity of a key and will not be mistaken for hot data due to the occasional access of LRU algorithm.
The common implementation method of LFU algorithm is linked list:
The new data is placed at the end of the linked list. The data in the linked list is arranged in descending order according to the number of accesses. The data with the same number of accesses is arranged in descending order according to the latest access time. When the linked list is full, the data is removed from the end of the linked list.
summary
Redis expiration deletion strategy is a combination of lazy deletion and periodic deletion. Lazy deletion can ensure that expired data cannot be obtained when we obtain it. Setting an appropriate frequency for periodic deletion can ensure that invalid data can be released in time without occupying memory data all the time.
However, we say that Redis is deployed on the physical machine, and the memory cannot be expanded indefinitely. When the memory reaches the limit set by us, the Redis memory elimination strategy will be triggered automatically, and the specific strategy method should be selected according to the actual business situation.
4. Performance pressure test
Redis benchmark is the mainstream performance testing tool of redis
4.1. redis-benchmark
Redis officially provides a redis benchmark tool to simulate N clients sending M requests at the same time, which can facilitate the read-write performance pressure test of the server
4.2. grammar
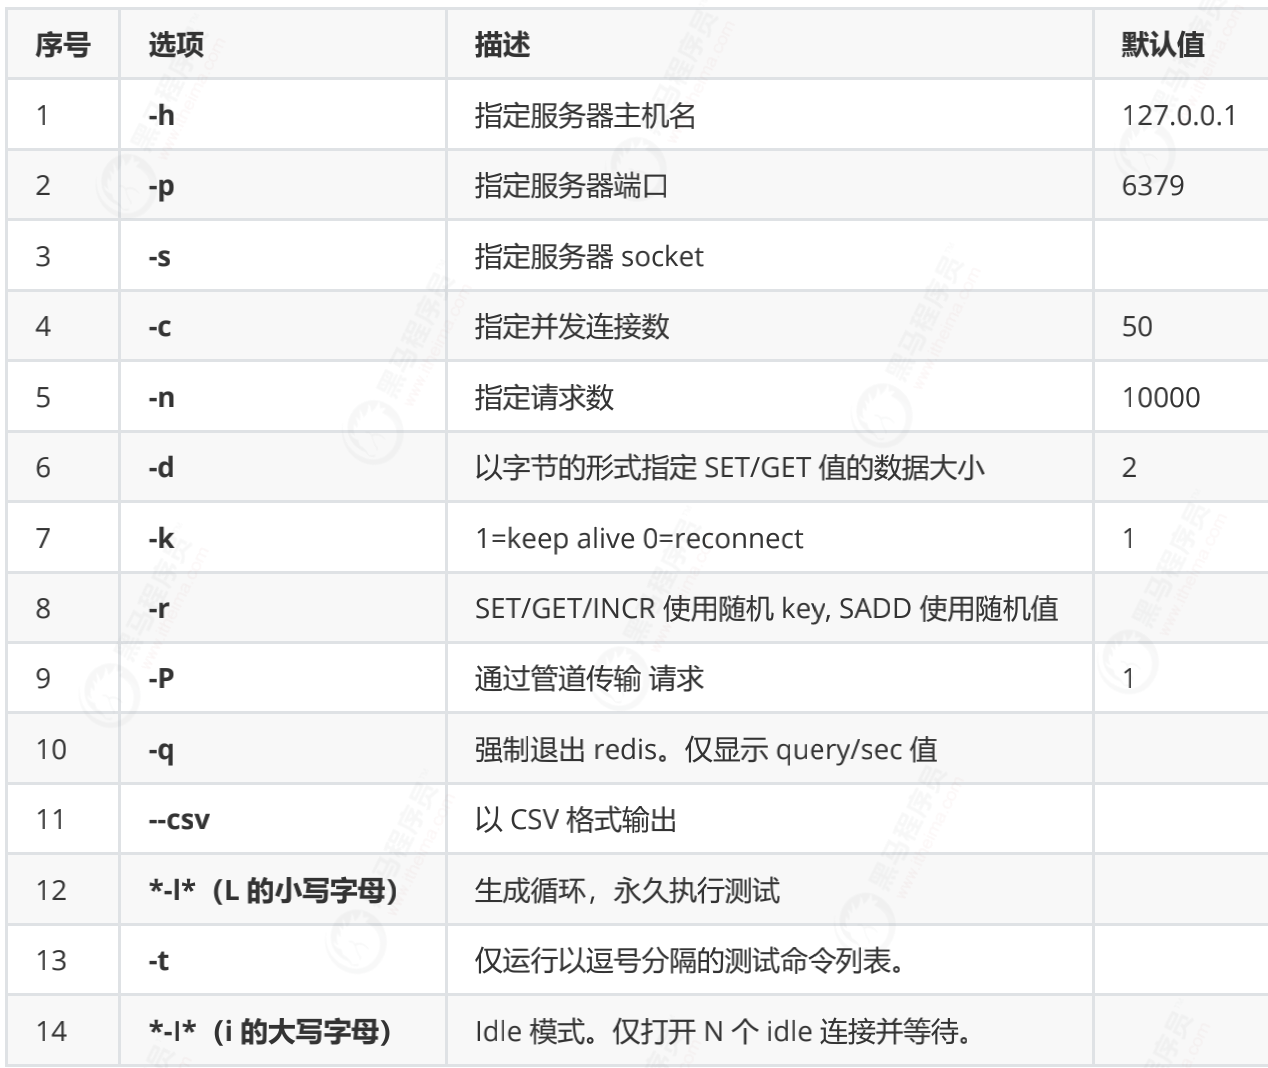
The basic commands for redis performance test are as follows:
4.3. Quick test
redis-benchmark
On the server where Redis is installed, the test can be performed directly without any parameters. The test results are as follows:
====== PING_INLINE ======
100000 requests completed in 1.18 seconds
50 parallel clients
3 bytes payload
keep alive: 1
100.00% <= 0 milliseconds
84388.19 requests per second
====== PING_BULK ======
100000 requests completed in 1.17 seconds
50 parallel clients
3 bytes payload
keep alive: 1
100.00% <= 0 milliseconds
85106.38 requests per second
====== SET ======
100000 requests completed in 1.18 seconds
50 parallel clients
3 bytes payload
keep alive: 1
99.95% <= 1 milliseconds
.......
It can be seen that the commonly used GET/SET/INCR commands are above 8W+ QPS
4.4. Streamline testing
redis-benchmark -t set,get,incr -n 1000000 -q
- Set the - t parameter to test only the SET/GET/INCR command
- Set the - n parameter to perform 1000000 operations per test.
- Set the compact output result through the - q parameter.
The results are as follows:
➜  redis-6.2.5 redis-benchmark -t set,get,incr -n 1000000 -q
SET: rps=0.0 (overall: nan) avg_msec=naSET: rps=190490.0 (overall: 190490.0) aSET: rps=222580.0 (overall: 206503.0) aSET: rps=220816.0 (overall: 211267.6) aSET: rps=222572.0 (overall: 214090.9) aSET: rps=220256.0 (overall: 215322.9) aSET: rps=220378.5 (overall: 216167.8) aSET: rps=219636.0 (overall: 216662.7) aSET: rps=221700.0 (overall: 217291.7) aSET: rps=203976.0 (overall: 215813.5) aSET: rps=221524.0 (overall: 216384.1) aSET: rps=215408.0 (overall: 216295.4) aSET: rps=194564.0 (overall: 214485.7) aSET: rps=219163.4 (overall: 214846.6) aSET: rps=216488.0 (overall: 214963.8) aSET: rps=219796.0 (overall: 215285.6) aSET: rps=206972.0 (overall: 214766.4) aSET: rps=220368.0 (overall: 215095.7) aSET: rps=214236.0 (overall: 215048.0) a                                       SET: 214961.31 requests per second, p50=0.135 msec
           GET: rps=78640.0 (overall: 196600.0) avg_msec=0.151 (overall: 0.151GET: rps=193278.9 (overall: 194225.1) aGET: rps=215244.0 (overall: 202968.4) aGET: rps=211336.0 (overall: 205426.5) aGET: rps=216424.0 (overall: 207923.7) aGET: rps=219952.0 (overall: 210149.5) aGET: rps=216748.0 (overall: 211179.9) aGET: rps=196220.0 (overall: 209159.4) aGET: rps=208745.0 (overall: 209109.9) aGET: rps=222148.0 (overall: 210495.8) aGET: rps=204872.0 (overall: 209955.4) aGET: rps=204840.0 (overall: 209507.0) aGET: rps=212588.0 (overall: 209755.3) aGET: rps=168172.0 (overall: 206653.9) aGET: rps=194868.0 (overall: 205835.9) aGET: rps=182298.8 (overall: 204302.6) aGET: rps=217360.0 (overall: 205098.2) aGET: rps=219036.0 (overall: 205898.7) aGET: rps=214468.0 (overall: 206364.1) a                                       GET: 206868.02 requests per second, p50=0.135 msec
           INCR: rps=16364.0 (overall: 227277.8) avg_msec=0.126 (overall: 0.12INCR: rps=222900.0 (overall: 223194.0) INCR: rps=223864.0 (overall: 223517.4) INCR: rps=222629.5 (overall: 223227.6) INCR: rps=223684.0 (overall: 223339.5) INCR: rps=224528.0 (overall: 223573.7) INCR: rps=224328.0 (overall: 223697.8) INCR: rps=217444.0 (overall: 222814.0) INCR: rps=204196.0 (overall: 220508.7) INCR: rps=202464.0 (overall: 218520.5) INCR: rps=194668.0 (overall: 216153.2) INCR: rps=196255.0 (overall: 214350.2) INCR: rps=175292.0 (overall: 211116.9) INCR: rps=214512.0 (overall: 211376.5) INCR: rps=206040.0 (overall: 210997.4) INCR: rps=223676.0 (overall: 211838.2) INCR: rps=223348.0 (overall: 212554.0) INCR: rps=221160.0 (overall: 213057.8) INCR: rps=195844.0 (overall: 212105.8)                                        INCR: 211282.50 requests per second, p50=0.135 msec

➜  redis-6.2.5 redis-benchmark -q script load "redis.call('set','foo','bar')"
script load redis.call('set','foo','bar'): rps=0.0 (overall: 0.0) avg_msec=nan (overall: nascript load redis.call('set','foo','bar'): rps=188264.0 (overall: 187514.0) avg_msec=0.170                                                                                            script load redis.call('set','foo','bar'): 202839.75 requests per second, p50=0.143 msec
4.5 actual combat drill
Look at a real case. The performance analysis of redis when aof is turned on and off
1) Refer to section 1.1.3. Turn off auth authentication and turn on aof. The policy is always. The configuration file is as follows
#redis.conf
appendonly yes
appendfsync always
#requirepass abc #Turn off auth
#kill the old process and restart redis
[root@iZ8vb3a9qxofwannyywl6zZ aof]# pwd
/opt/redis/latest/aof
[root@iZ8vb3a9qxofwannyywl6zZ aof]# ../src/redis-server redis.conf
2) Pressure test the performance under aof. Take get and set as test cases and record the results for later comparison
[root@iZ8vb3a9qxofwannyywl6zZ aof]# ../src/redis-benchmark -q
PING_INLINE: 95328.88 requests per second, p50=0.263 msec
PING_MBULK: 95693.78 requests per second, p50=0.263 msec
SET: 17217.63 requests per second, p50=3.111 msec
GET: 96525.09 requests per second, p50=0.263 msec
INCR: 16747.61 requests per second, p50=3.143 msec
LPUSH: 16194.33 requests per second, p50=3.247 msec
RPUSH: 16417.67 requests per second, p50=3.159 msec
LPOP: 16339.87 requests per second, p50=3.191 msec
RPOP: 15615.24 requests per second, p50=3.215 msec
SADD: 95510.98 requests per second, p50=0.263 msec
HSET: 15855.40 requests per second, p50=3.311 msec
SPOP: 94250.71 requests per second, p50=0.263 msec
ZADD: 95877.28 requests per second, p50=0.263 msec
ZPOPMIN: 95877.28 requests per second, p50=0.263 msec
LPUSH (needed to benchmark LRANGE): 16452.78 requests per second, p50=3.191 msec
LRANGE_100 (first 100 elements): 53676.86 requests per second, p50=0.463 msec
LRANGE_300 (first 300 elements): 23474.18 requests per second, p50=1.007 msec
LRANGE_500 (first 450 elements): 17114.50 requests per second, p50=1.351 msec
LRANGE_600 (first 600 elements): 12863.39 requests per second, p50=1.711 msec
MSET (10 keys): 14669.21 requests per second, p50=3.647 msec
3) Change the appendonly of the configuration file to no, turn off aof, restart redis, and then test the same command
[root@iZ8vb3a9qxofwannyywl6zZ aof]# ../src/redis-benchmark -q
PING_INLINE: 96899.23 requests per second, p50=0.263 msec
PING_MBULK: 93720.71 requests per second, p50=0.263 msec
SET: 96618.36 requests per second, p50=0.263 msec
GET: 95419.85 requests per second, p50=0.263 msec
INCR: 98135.42 requests per second, p50=0.263 msec
LPUSH: 99304.87 requests per second, p50=0.255 msec
RPUSH: 99206.34 requests per second, p50=0.255 msec
LPOP: 97656.24 requests per second, p50=0.263 msec
RPOP: 96711.80 requests per second, p50=0.263 msec
SADD: 97847.36 requests per second, p50=0.263 msec
HSET: 98328.42 requests per second, p50=0.263 msec
SPOP: 96339.12 requests per second, p50=0.263 msec
ZADD: 97560.98 requests per second, p50=0.263 msec
ZPOPMIN: 96618.36 requests per second, p50=0.263 msec
LPUSH (needed to benchmark LRANGE): 97465.88 requests per second, p50=0.263 msec
LRANGE_100 (first 100 elements): 53561.86 requests per second, p50=0.463 msec
LRANGE_300 (first 300 elements): 24084.78 requests per second, p50=0.999 msec
LRANGE_500 (first 450 elements): 17649.13 requests per second, p50=1.343 msec
LRANGE_600 (first 600 elements): 12928.25 requests per second, p50=1.703 msec
MSET (10 keys): 101729.40 requests per second, p50=0.255 msec
4) Result analysis
- For various read operations, there is little difference in performance: get, spop, queue range, etc
- It has a great impact on write operations. Take set as an example, there is a gap of nearly 6 times, and mset is even larger, nearly 7 times
5) Reference value
If your project has high requirements for data security, and you write less and read more, you can use aof appropriately
If you pursue the ultimate performance, only cache, tolerate data loss, or turn off aof
5. Redis high availability
5.1 master slave replication
5.1.1 problems faced
Redis has two different persistence methods. The redis server uses persistence to persist the redis memory to the hard disk. When redis goes down and we restart the redis server, we can recover the data in memory from RDB files or AOF files.
Question 1: however, the persistent data is still only on one machine. Therefore, when the hardware fails, such as the motherboard or CPU is broken, the server cannot be restarted. What can be done to ensure the security of the data when the server fails? Or can you recover data quickly?
Problem 2: capacity bottleneck
5.1.2 solutions
To solve these problems, redis provides the function of replication, horizontally expands redis services through "master-slave (one master-slave) and" cluster (multi master-slave) ", and uses multiple redis servers to build a highly available redis service system.
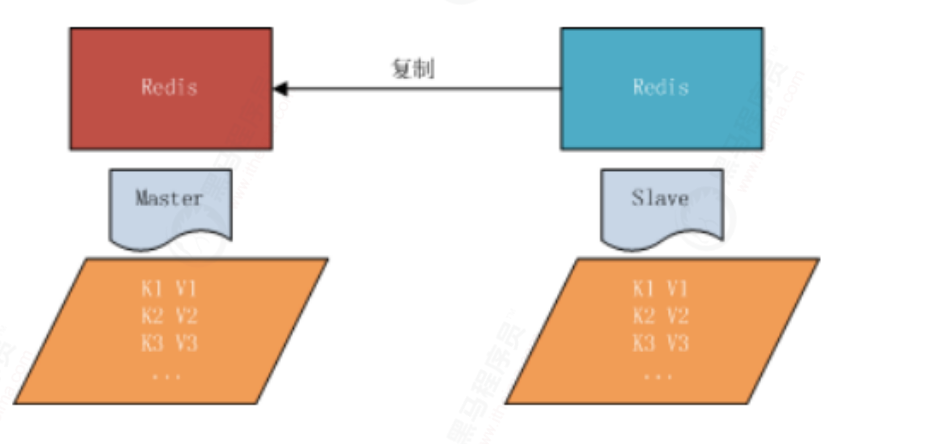
5.1.3 master slave copy
Master slave replication refers to copying data from one Redis server to other Redis servers. The former is called the master node and the latter is called the slave node. Data replication is unidirectional and can only be from the master node to the slave node.
5.1.4 common strategies
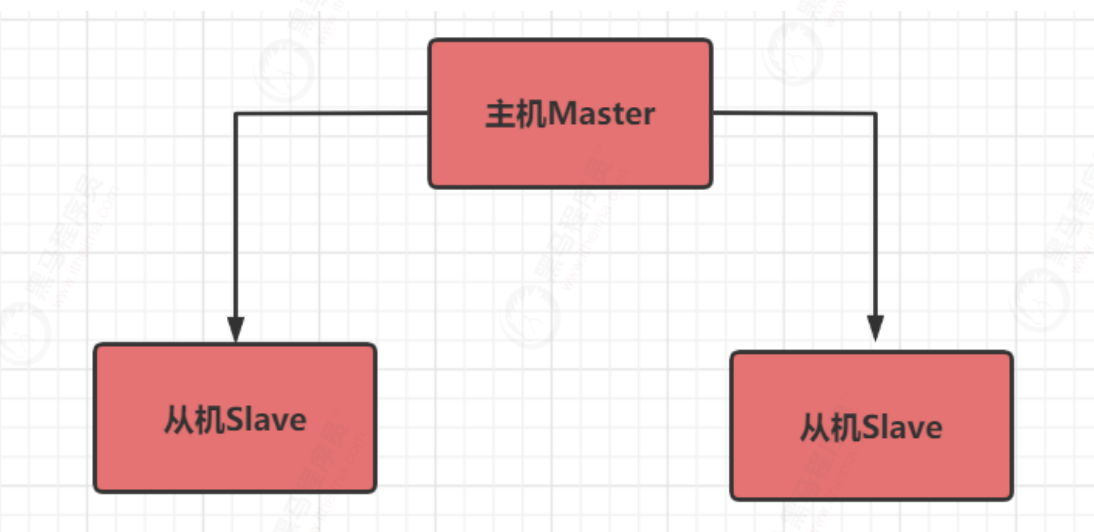
Strategy 1: one master and multiple slaves (write), slave (read)
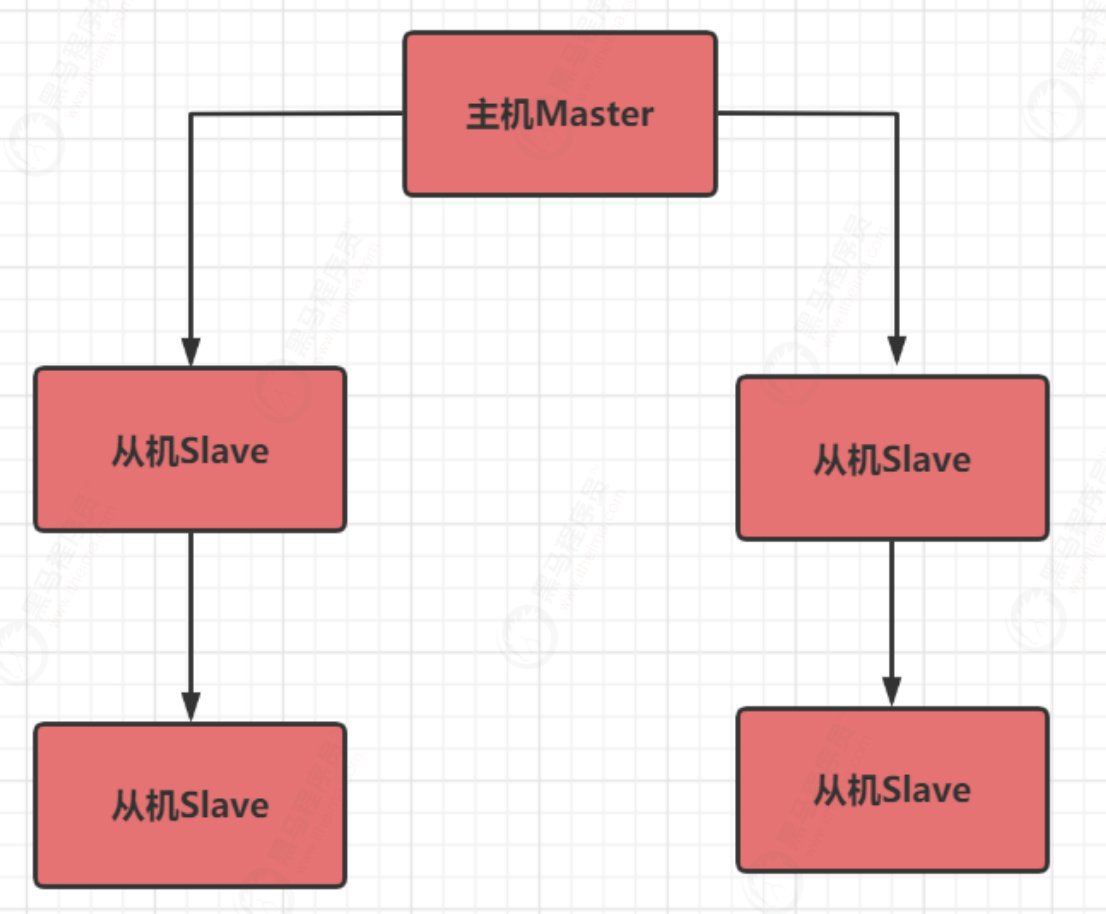
Strategy 2: pass on fire from generation to generation
5.1.5 master slave replication principle
The master-slave replication of Redis is asynchronous replication, which is divided into two aspects. One is that the master server is asynchronous when synchronizing data to the slave, so the master server can still receive other requests here, and the other is that the slave is asynchronous when receiving synchronous data.
Copy mode
- Full replication
The master server sends its own rdb files to the slave server for data synchronization, records other writes during synchronization, and then sends them to the slave server to achieve full synchronization. This method is called full replication.
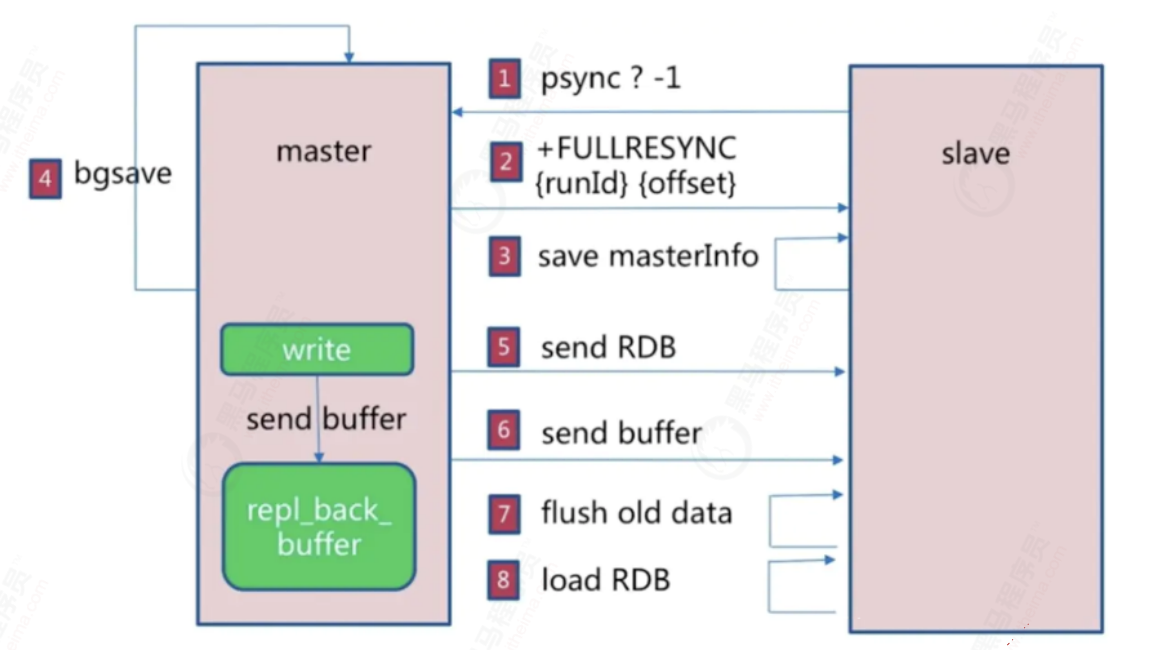
- slave confirms the runid to the master and sends an offset of - 1
- After the master receives it, it sends its runid and offset to save
- slave save information
- After receiving the full copy command, the master executes basave, generates an rdb file in the background, and uses the buffer to record all commands executed from now on
- During this period, other write operations will also be sent to the synchronized buffer
- After the slave gets the rdb file, it cleans up all the data
- Load rdb file
Incremental replication
For various reasons, after the master server is disconnected from the slave server, the slave server will try to retrieve the unsynchronized data after disconnection when reconnecting to the master r server, that is, partial synchronization, or partial replication.
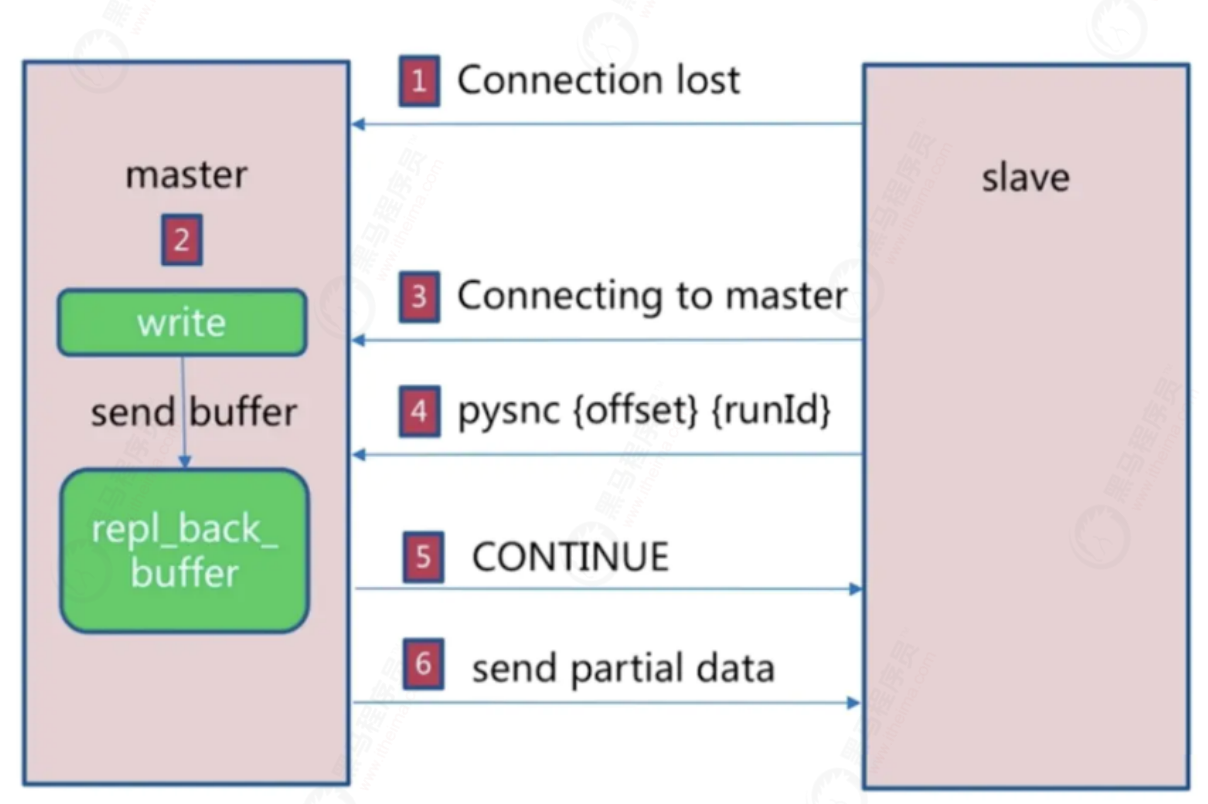
- Broken link due to network jitter
- The master will still put the write request into the copy buffer
- Slave attempts to link host
- Send the current runid and offset to the master, and execute the pysnc command to synchronize
- The master finds that the offset is within the buffer range and returns the continue command
- Synchronize the offset difference data to the slave
working principle
The master server will record a pseudo-random string of replicationId to identify the current dataset version. It will also record the offset of the dataset. Regardless of whether the slave server is configured in the master, the replication Id and offset will always be recorded and exist in pairs. We can view the replication Id and offset through the following command
> info repliaction
Executing this command on the master or slave server through redis cli will print the following information (different server data and different printing information)
connected_slaves:1
slave0:ip=127.0.0.1,port=6380,state=online,offset=9472,lag=1
master_replid:2cbd65f847c0acd608c69f93010dcaa6dd551cee
master_repl_offset:9472
When the master is connected to the slave normally, the slave sends the replicationid and offset of the old master recorded by itself to the master using the PSYNC command. The master calculates the data offset from the slave and synchronizes the offset in the buffer to the slave. At this time, the data of the master and the slave are consistent.
If the replication referenced by the slave is too old and the data difference between the master and the slave is too large, the master and the slave will use full replication for data synchronization.
5.1.6 configuring master-slave replication
Note: the start of master-slave replication is entirely initiated at the slave node; We don't need to do anything at the master node.
There are three ways to enable master-slave replication from a slave node:
(1) Configuration file: add slaveof to the configuration file of the slave server
(2) Add -- slaveof after redis server starts the command
(3) After the Redis server is started, execute the command slaveof directly through the client, and the Redis instance becomes a slave node
start-up
redis-server --port Port number
 link
redis-cli -p Port number
demonstration:
① . view the roles of the three nodes through the info replication command

In the initial state, all three nodes are master s
② Set the master-slave relationship and execute the command from the slave node: SLAVEOF 127.0.0.1 6379

Look at the master node information again:

Here, the master-slave relationship is set by command. Once the service is restarted, the role relationship will no longer exist. To permanently save this relationship, you can configure redis Conf file.
slaveof 127.0.0.1 6379
Cancel copy: slave of on one
5.1.7 test master-slave relationship
① Incremental replication
master operation write:

slave operation get:

② . full replication
By executing SLAVEOF 127.0.0.1 6379, if the master node 6379 has some key s before, the slave node will copy all the previous information after executing the command
③ Master slave read / write separation
Try the slave operation to get:

The reason is in the configuration file 6380redis Configuration of slave read only in conf

If we change it to no, it is possible to execute the write command, but the data of the write command from the slave node is not available from the slave node or the master node
Available.
④ . primary node downtime
Will the roles of the two slave nodes change when the master node master dies?
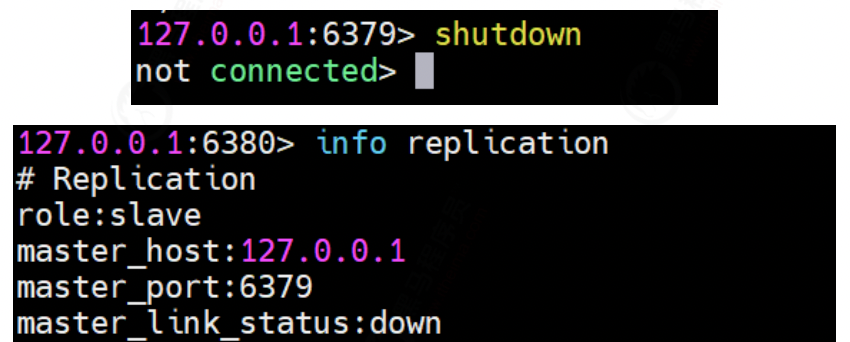
The figure above shows that after the Master node hangs up, the role of the slave node will not change.
⑤ . recovery after primary node downtime
After the Master node hangs up, start the Master node immediately. Does the Master node still play the role of Master?

That is to say, after the primary node hangs up and restarts, the role of the primary node is restored.
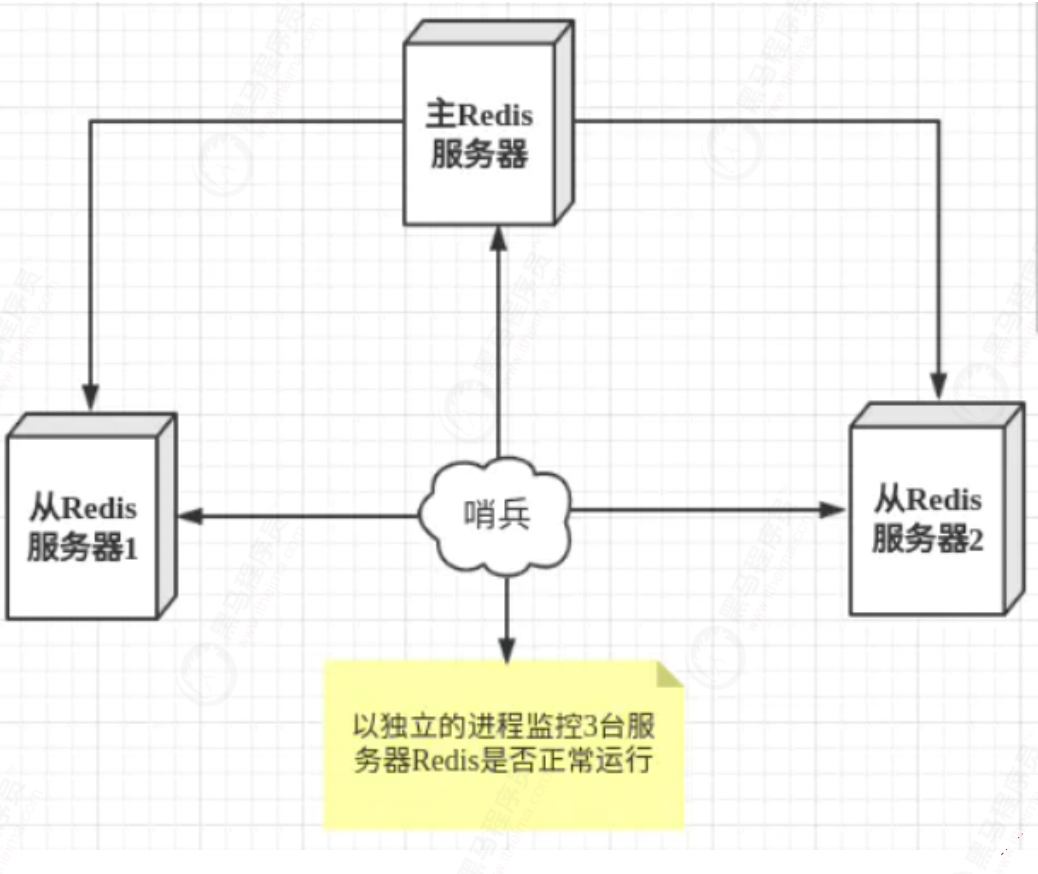
5.2 sentinel mode
Through the previous configuration, there is only one Master node. Once the Master node hangs up, the slave node cannot undertake the task of the Master node, and the whole system cannot run.
If the slave node can automatically become the master node after the master node hangs up, the problem is solved, and the sentinel mode is born.
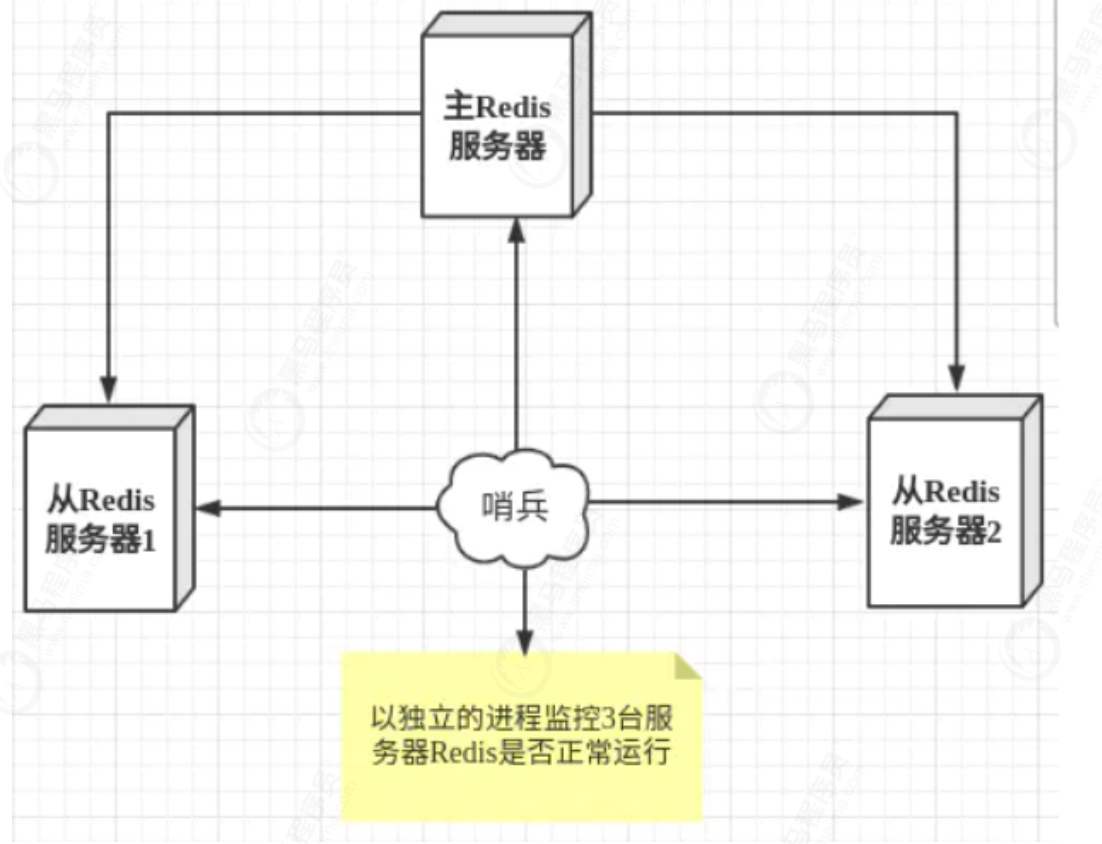
Sentinel mode is a special mode. Firstly, Redis provides sentinel commands. Sentinel is an independent process. As a process, it will run independently. The principle is that the sentinel sends a command and waits for the response of the Redis server, so as to monitor multiple running Redis instances.
Steps to set up sentry mode:
① . create sentinel. In the configuration file directory Conf file, the name must not be wrong, and then configure the corresponding content

sentinel monitor Name of the monitored machine(Name yourself) ip Number of votes for address port number

Configure the monitored name, ip address, port number and number of votes respectively. If the number of votes above is 1, it means that after the host hangs up, save votes to see who will take over as the host. If the number of votes is greater than 1, it will become the host
② Start the sentry
redis-sentinel /etc/redis/sentinel.conf
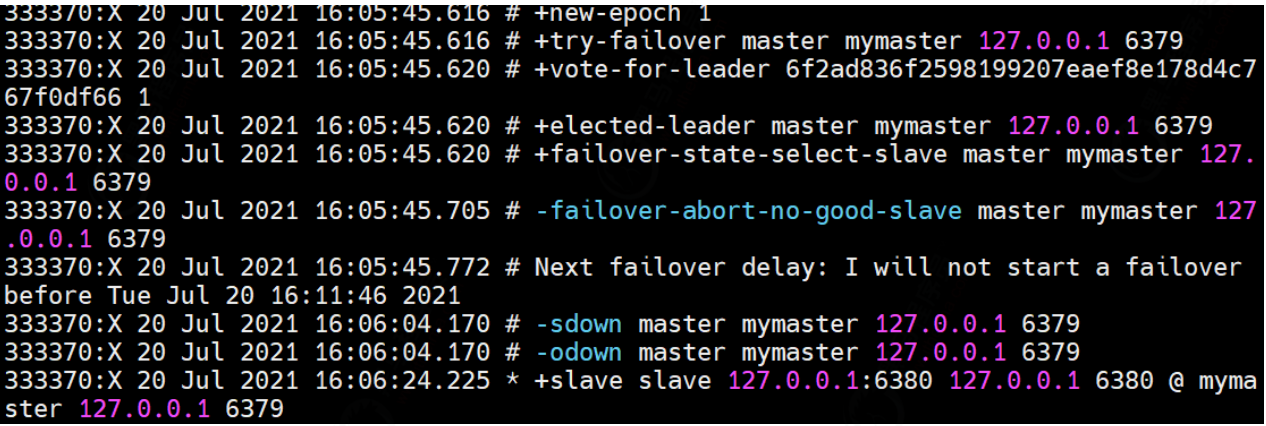
Next, we kill the host 6379 and see what changes the slave node has.

After killing the master node, we check the background print log and find that 6380 votes become the master node

PS: there is also a single point of failure in sentinel mode. If the sentinel machine hangs up, it cannot be monitored. The solution is that sentinels also establish clusters. Redis sentinel mode supports clusters.
6. Redis Cluster
introduction
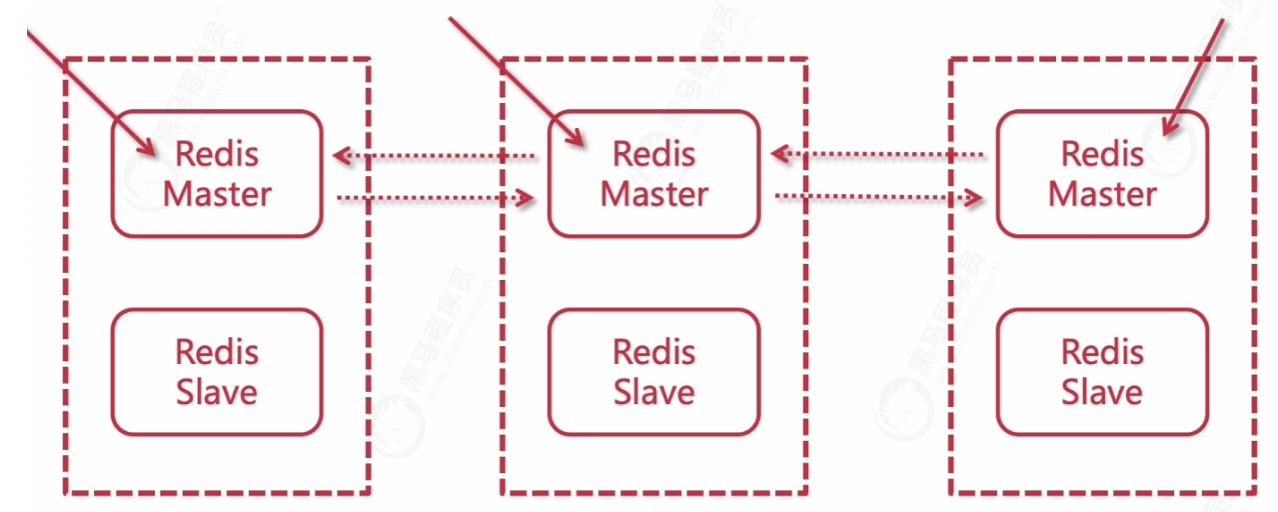
6.1 analysis of master-slave + sentry
(1) In Master-slave + sentinel mode, there is still only one Master node. Sentinel mode does not relieve write pressure when concurrent write requests are large
(2) In Redis Sentinel mode, each node needs to save the full amount of data, which is redundant
6.2 Cluster concept
Since version 3.0, Redis Cluster has been officially launched. Its main purpose is to realize data sharding. However, it can also realize HA, which is currently recommended by the official.

1. Redis cluster adopts a centerless structure
2. The whole cluster fails only when most nodes in the cluster fail at the same time.
3. There are 16384 slot s in the whole cluster. When a key value needs to be placed in the Redis cluster, decide which bucket to put a key in according to the value of CRC16(key) mod16384. The same algorithm is used when reading a key.
4. When the master node fails, the slave node will be upgraded to the master node. After the master node of fail is online, it will automatically become a slave node
6.3 failover
The primary node of Redis cluster has built-in node fault detection and automatic failover functions similar to Redis Sentinel. When a primary node in the cluster goes offline, other online primary nodes in the cluster will notice this and failover the offline primary nodes
6.4 cluster fragmentation strategy
Redis cluster fragmentation strategy is used to solve the problem of key storage location
Common data distribution methods: sequential distribution, hash distribution, node remainder hash, consistency hash
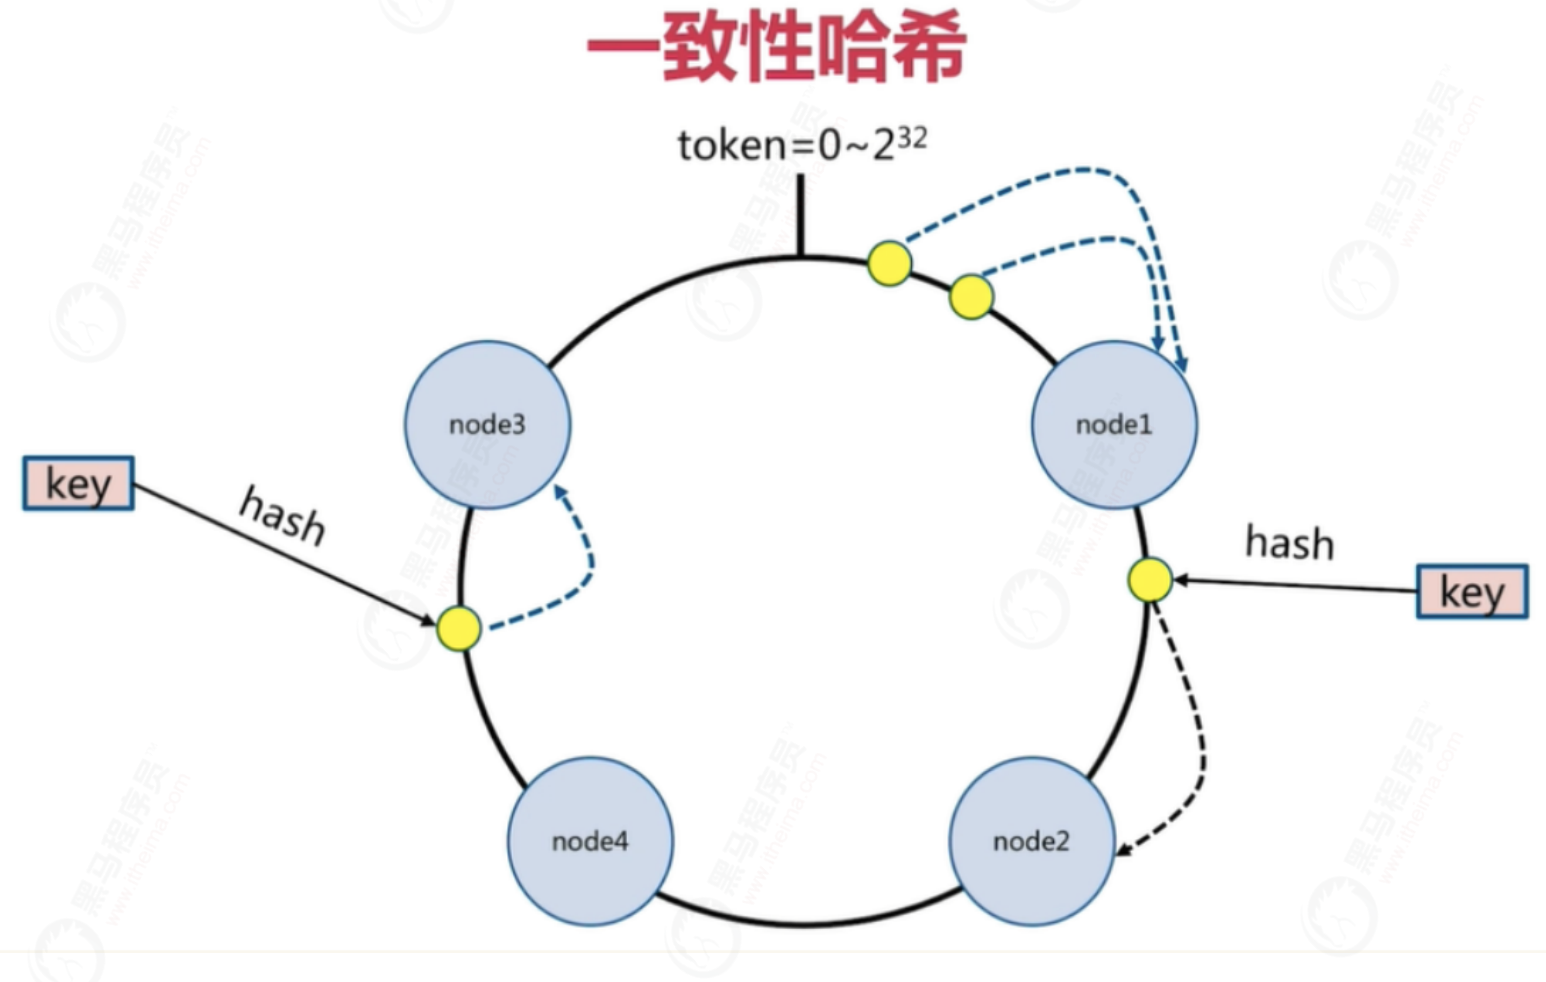
6.5 data fragmentation of redis cluster
Redis cluster does not use consistent hash, but introduces the concept of hash slot
Preset virtual slots. Each slot is equivalent to a number and has a certain range
The preset virtual slots in Redis Cluster range from 0 to 16383
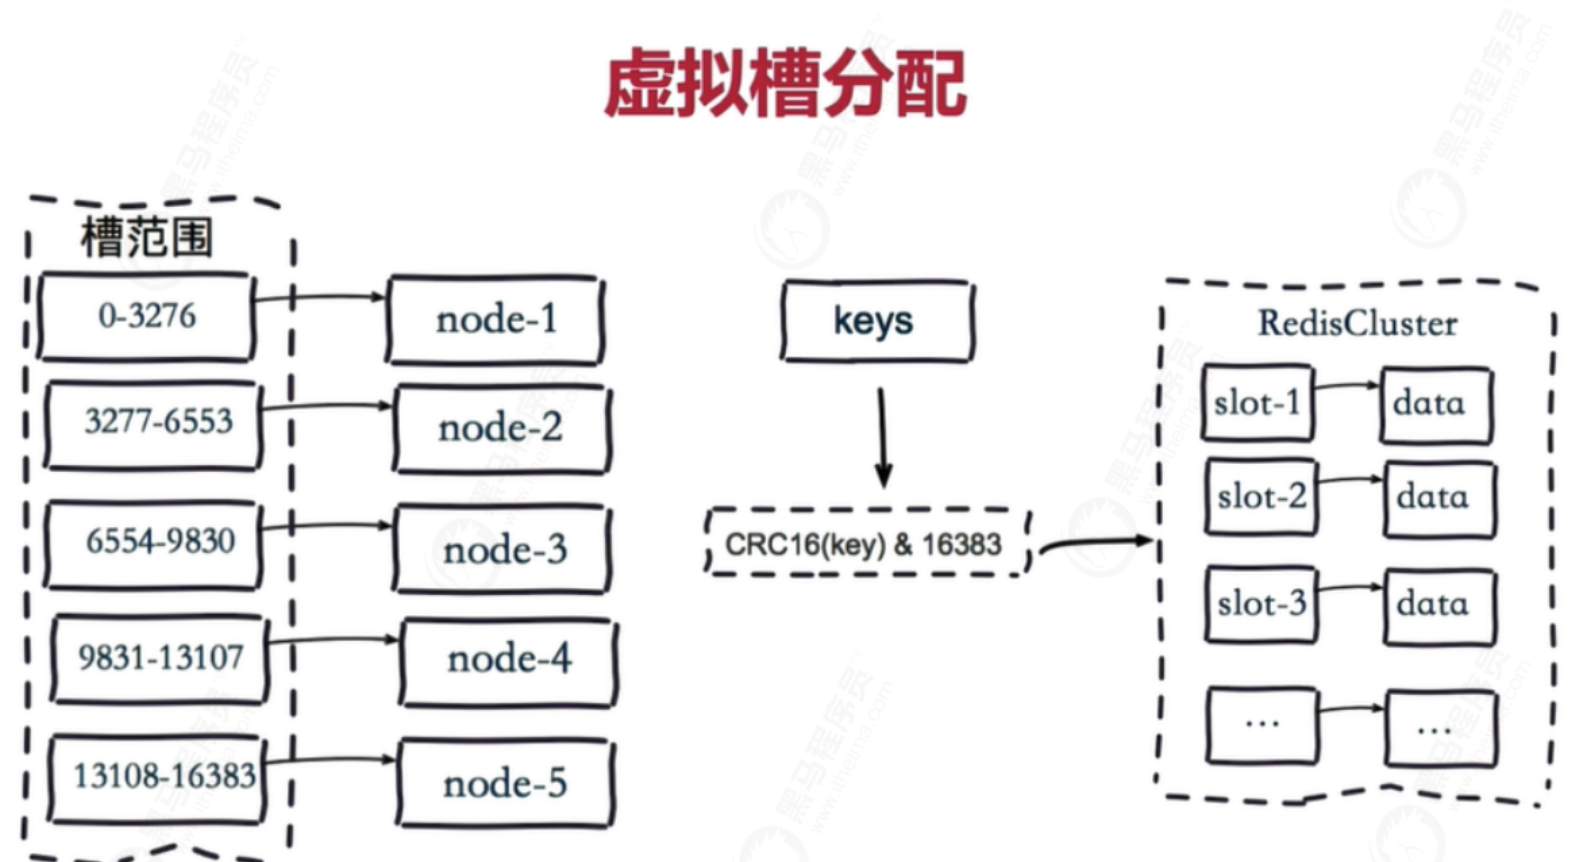
Steps:
1. The 16384 slots are evenly distributed according to the number of nodes and managed by the nodes
2. hash each key according to CRC16 rules
3. Subtract 16383 from the hash result
4. Send the remainder to the Redis node
5. The node receives the data and verifies whether it is within the range of the slot number managed by itself
- If it is within the slot number range managed by yourself, save the data to the data slot, and then return the execution result
- If it is outside the slot number range managed by itself, the data will be sent to the correct node, and the correct node will save the data in the corresponding slot
It should be noted that Redis Cluster nodes share messages, and each node knows which node is responsible for which range of data slots
In the virtual slot distribution mode, since each node manages a part of the data slot, the data is saved to the data slot. When the node expands or shrinks, the data slot can be reallocated and migrated without data loss.
6.6 build Redis Cluster
Step analysis:
Start node: start the node in cluster mode. At this time, the node is independent.
Node Handshake: connect independent nodes into a network.
Slot assignment: 16384 slot positions are assigned to the master node to achieve the effect of saving database key value pairs in slices.
Master-slave replication: Specifies the master node for the slave node.
Step implementation
Start node
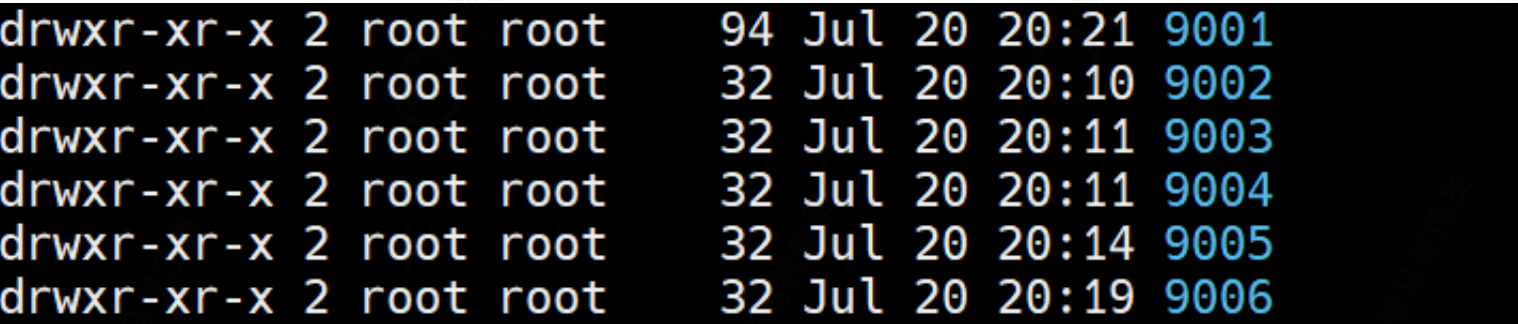
(1) Create a new directory and copy the configuration files of 6 nodes
mkdir redis-cluster
mkdir 900{1,2,3,4,5,6}
(2) Redis Conf, copy it to each 900X directory in turn, and modify redis.conf in each 900X directory Conf configuration file:
Start in cluster mode
# cluster-enabled yes Put the front # Remove
Cluster node nodes Information profile (automatically generated)
# cluster-config-file nodes-6379.conf is changed to cluster config file
"/usr/local/redis/cluster/nodes-9001.conf" # Corresponding to each port
Note: the previous # should be noted out!
(3) Start 6 Redis instances

View process:

Node handshake & slot assignment & master-slave replication
redis5.0 uses redis cli as the command to create a cluster, which is implemented in c language instead of ruby language.
1) With an instance, it is very easy to set up a cluster. You can use the redis cli command
#Replicas indicates the number of replicas. If 1 is specified, it indicates that 1 slave database is used as a backup
redis-cli --cluster create 127.0.0.1:9001 127.0.0.1:9002 127.0.0.1:9003 127.0.0.1:9004 127.0.0.1:9005 127.0.0.1:9006 --cluster-replicas 1
Parameter interpretation:
– cluster replicas 1: indicates that you want to create a slave node (one master and one slave) for each master node in the cluster.
– cluster replicas 2: indicates that you want to create two slave nodes (one master and two slaves) for each master node in the cluster.
2) Note: if there is data on the node, there may be an error prompt:
[ERR] Node 127.0.0.1:8004 is not empty. Either the node already knows other nodes
(check with CLUSTER NODES) or contains some key in database 0.
Delete dump rdb,nodes.conf, log in to redis CLI and flush dB
3) If there is no problem, you will receive the message of successful cluster creation:
>>> Nodes configuration updated
>>> Assign a different config epoch to each node
>>> Sending CLUSTER MEET messages to join the cluster
Waiting for the cluster to join
....
>>> Performing Cluster Check (using node 127.0.0.1:8081)
M: a085dd0366e08d4c03093ea24351ce4e12fcb69f 127.0.0.1:8081
slots:[0-5460] (5461 slots) master
M: 843d8da882f78d3cb09b1eb837140aefba309e06 127.0.0.1:8082
slots:[5461-10922] (5462 slots) master
M: 043d39422d93ef5c7c69e1c6cfb1557f655b5d72 127.0.0.1:8083
slots:[10923-16383] (5461 slots) master
[OK] All nodes agree about slots configuration.
>>> Check for open slots...
>>> Check slots coverage...
[OK] All 16384 slots covered.
Cluster validation
Use redis cli to set multiple values on the server, such as czbk, on different instances. Fragmentation is successful!
1) cluster command validation
#Use redis cli to log in to any node, and use cluster nodes to view cluster information
127.0.0.1:9001> cluster nodes
39c613372129fe80fe93b6fb3070f9562c315a59 127.0.0.1:9001@18082 master - 0
1615193645000 2 connected 5461-10922
725c09c568cb4010afe84d5cb4672fff5a248879 127.0.0.1:9002@18083 master - 0
1615193645976 3 connected 10923-16383
9fad54e90628814c1b2a5b57c2ad22b92f0f7b05 127.0.0.1:9003@18081 myself,master - 0
1615193644000 1 connected 0-5460
2) Use key value and data validation
#Note that the redis cli parameter:
# -c: Automatically redirect to the corresponding node to obtain information. If it is not added, only redirect information will be returned and no value will be obtained
#No - c
[root@ src]# redis-cli -p 9001
127.0.0.1:9001> set a a
(error) MOVED 15495 127.0.0.1:8083
#Plus - c
[root@ src]# redis-cli -p 9001 -c
127.0.0.1:9001> set a a
-> Redirected to slot [15495] located at 127.0.0.1:9003 #Automatically jump to 9003
OK
127.0.0.1:9003> get a #You can successfully get the value of a
"a"
Capacity expansion
1) According to the above method, create a new redis 8084 port
#The first parameter is the address of the new node, and the second parameter is the IP and port of any existing node
redis-cli --cluster add-node 127.0.0.1:9097 127.0.0.1:9001
redis-cli --cluster add-node 127.0.0.1:9098 127.0.0.1:9001
2) Log in to any node using redis CLI and view the new cluster information using cluster nodes
127.0.0.1:9001> cluster nodes
#be careful! The newly added 8084 is empty and no fragments are allocated
eb49056da71858d58801f0f28b3d4a7b354956bc 127.0.0.1:9004@18084 master - 0
1602665893207 0 connected
16a3f8a4be9863e8c57d1bf5b3906444c1fe2578 127.0.0.1:9003@18082 master - 0
1602665891204 2 connected 5461-10922
214e4ca7ece0ceb08ad2566d84ff655fb4447e19 127.0.0.1:9002@18083 master - 0
1602665892000 3 connected 10923-16383
864c3f763ab7264ef0db8765997be0acf428cd60 127.0.0.1:9001@18081 myself,master - 0
1602665890000 1 connected 0-5460
3) Repartition
redis-cli --cluster reshard 127.0.0.1:9001
#Follow the prompts step by step. Check the node partition again. It's OK!
127.0.0.1:8081> cluster nodes
eb49056da71858d58801f0f28b3d4a7b354956bc 127.0.0.1:9004@18084 master - 0
1602666306047 4 connected 0-332 5461-5794 10923-11255
16a3f8a4be9863e8c57d1bf5b3906444c1fe2578 127.0.0.1:9003@18082 master - 0
1602666305045 2 connected 5795-10922
214e4ca7ece0ceb08ad2566d84ff655fb4447e19 127.0.0.1:9002@18083 master - 0
1602666305000 3 connected 11256-16383
864c3f763ab7264ef0db8765997be0acf428cd60 127.0.0.1:9001@18081 myself,master - 0
1602666303000 1 connected 333-5460
springboot
-
It is not difficult to understand from the above principles. When springboot is connected to redis cluster, you can connect any one or write all of them.
-
boot1.x the default client is jedis, 2 X has been replaced by lattice. Jedis is directly connected to redis server in implementation. Lattice connection is based on Netty. The two configuration items are slightly different. For basic knowledge and configuration, you can refer to the documentation of spring boot data.
-
Generally, the slave in the cluster is only used as the data backup of the corresponding master machine. You can set readonly as the read library, but this is generally not the case. If you only use it as a cache and don't care about the loss of data, you think it wastes resources. Even you can set the number of slave to 0 and only use it for data fragmentation.
-
For both Jedis and Lettuce, the reading of data under the redis cluster architecture is based on the official redis recommendations for redis cluster by default. Therefore, neither of them supports the separation of reading and writing under redis cluster by default.
-
If we forcibly configure only the slave address but not the master (this operation is not enough), we can actually read the data, but its internal operation is to redirect to the relevant master host through the slave, and then obtain and output the results.