Welcome to my GitHub
https://github.com/zq2599/blog_demos
Content: classification and summary of all original articles and supporting source code, involving Java, Docker, Kubernetes, DevOPS, etc;
Overview of this article
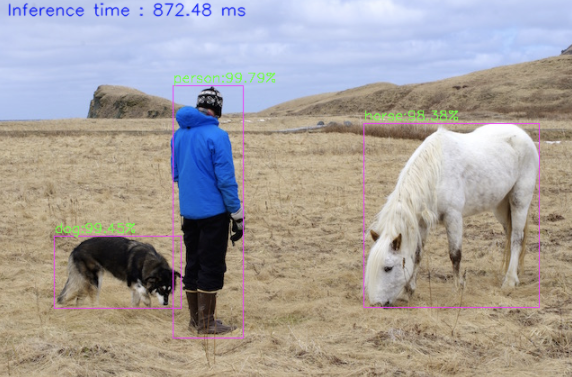
- stay Three minutes: fast experience JAVA version of target detection (YOLO4) In this article, we experienced the powerful object recognition ability of YOLO4. As shown in the figure below, the dog, man and horse in the original figure have been identified and marked:
-
If you have known about deep learning, YOLO, darknet, etc. before, I believe you will have a question: can Java realize these?
-
Yes, today we will start from scratch and develop a SpringBoot application named < font color = "blue" > Yolo demo < / font >
-
The key to let the SpringBoot application recognize the objects in the picture is how to use the trained neural network model. Fortunately, the DNN module integrated with OpenCV can load and use the YOLO4 model. We just need to find a way to use OpenCV
-
My method here is to use JavaCV library. Because JavaCV encapsulates OpenCV, you can finally use the YOLO4 model for reasoning. The dependency is shown in the following figure:
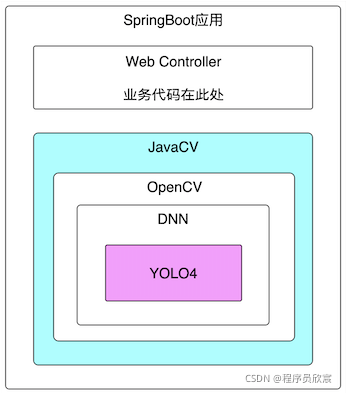
key technology
-
This article involves JavaCV, OpenCV, YOLO4, etc. it can be seen from the above figure that JavaCV has encapsulated these, including the model used in the final reasoning, which is also trained in advance by YOLO4 officials. We just need to know how to use the API of JavaCV
-
The paper of YOVO4 is here: https://arxiv.org/pdf/2004.10934v1.pdf
Version information
- Here is my development environment for your reference:
- Operating system: Ubuntu 16 (MacBook Pro, version 11.2.3, macOS Big Sur)
- docker: 20.10.2 Community
- java: 1.8.0_211
- springboot: 2.4.8
- javacv: 1.5.6
- opencv: 4.5.3
Actual combat steps
-
Before the formal operation, first sort out the actual combat steps, and then implement them step by step;
-
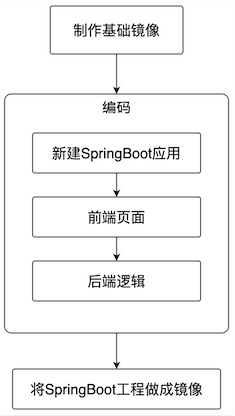
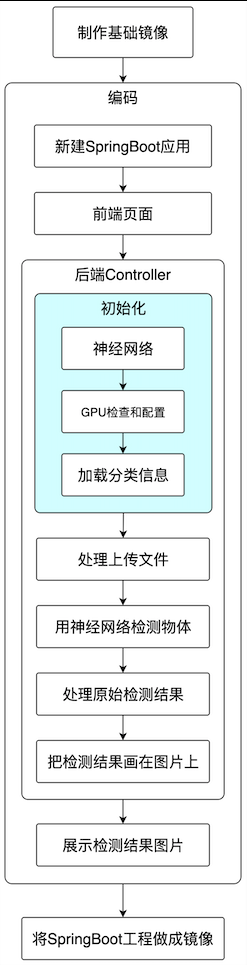
In order to reduce the impact of environment and software differences and make the operation and debugging of the program easier, the SpringBoot application will be made into a docker image and then run in the docker environment. Therefore, the whole actual combat is simply divided into three steps: making a basic image, developing a SpringBoot application and making an application into an image, as shown in the following figure:
-
The first step in the above process < font color = "blue" > creating a basic image < / font >, has been completed in Making the basic Docker image that JavaCV application depends on (CentOS7+JDK8+OpenCV4) As detailed in the article, let's directly use the image < font color = "red" > bolingcavalry / opencv4 5.3:0.0.1 < / font >, the next content will focus on the development of SpringBoot applications;
-
This SpringBoot application has a single function, as shown in the following figure:
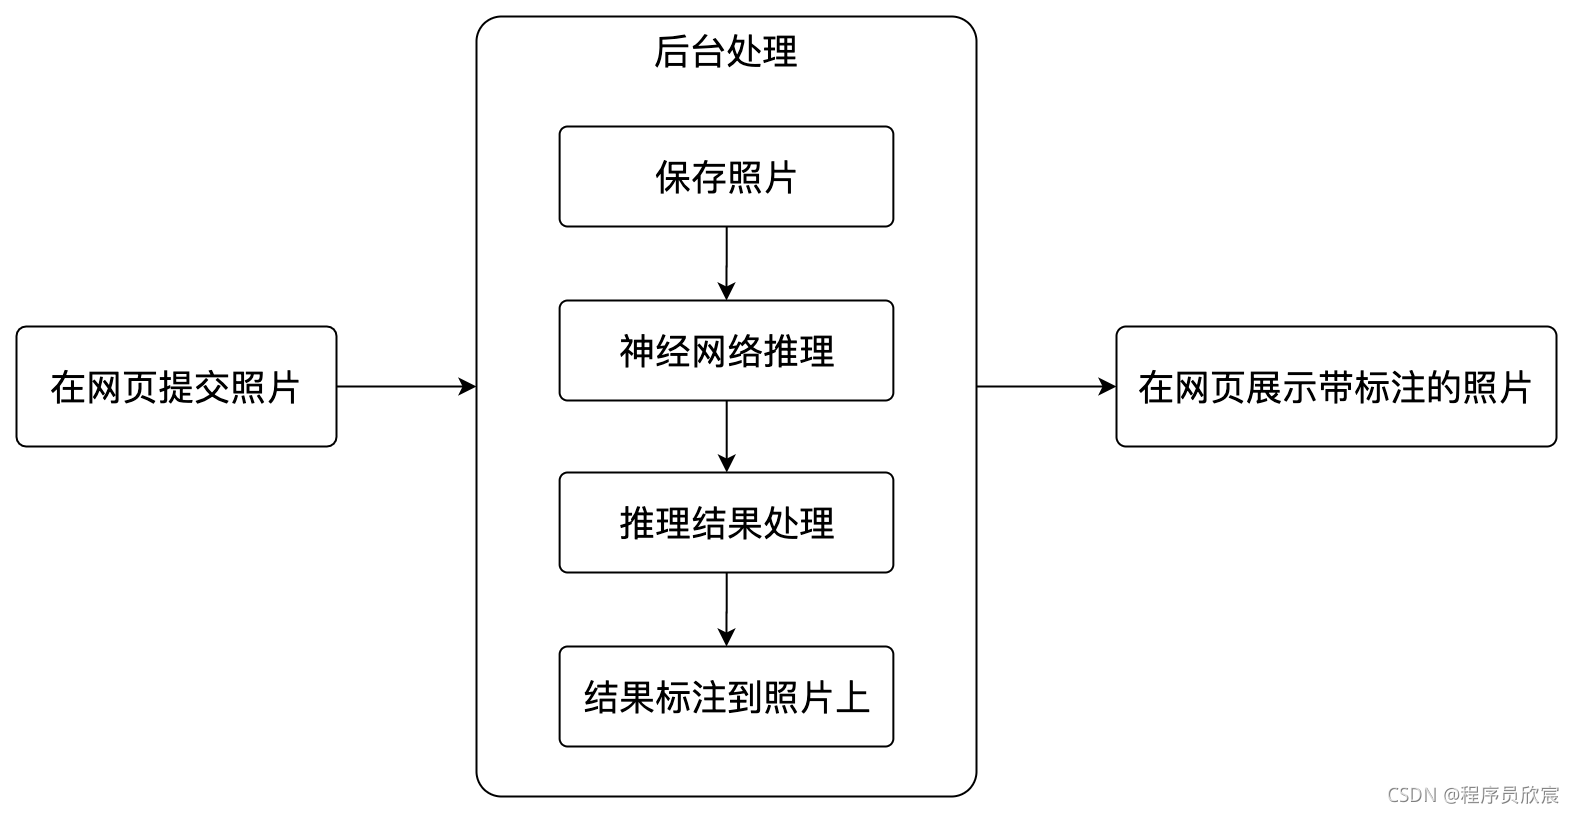
- The whole development process involves these steps: Web page for submitting photos, neural network initialization, file processing, image detection, processing detection results, standard recognition results on images, front-end display images, etc. the complete steps have been sorted out as follows:
- The content is very rich and the harvest will not be less, not to mention Above It has been ensured that it can run successfully, so don't hesitate, let's start!
Source download
- The complete source code in this actual combat can be downloaded from GitHub. The address and link information are shown in the table below( https://github.com/zq2599/blog_demos):
| name | link | remarks |
|---|---|---|
| Project Home | https://github.com/zq2599/blog_demos | The project is on the GitHub home page |
| git warehouse address (https) | https://github.com/zq2599/blog_demos.git | The warehouse address of the source code of the project, https protocol |
| git warehouse address (ssh) | git@github.com:zq2599/blog_demos.git | The project source code warehouse address, ssh protocol |
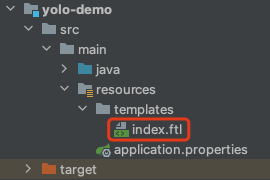
- There are multiple folders in this git project. The source code of this article is in the < font color = "blue" > javacv tutorials < / font > folder, as shown in the red box below:

- < font color = "blue" > javacv tutorials < / font > has several sub projects. Today's code is under the < font color = "red" > Yolo demo < / font > Project:

New SpringBoot application
- Create a maven project named < font color = "blue" > Yolo demo < / font >. Firstly, it is a standard SpringBoot project. Secondly, it adds the dependency Library of javacv, POM The XML content is as follows, focusing on the dependency and accurate version matching of javacv, opencv and other libraries:
<?xml version="1.0" encoding="UTF-8"?>
<project xmlns="http://maven.apache.org/POM/4.0.0"
         xmlns:xsi="http://www.w3.org/2001/XMLSchema-instance"
         xsi:schemaLocation="http://maven.apache.org/POM/4.0.0 http://maven.apache.org/xsd/maven-4.0.0.xsd">
    <modelVersion>4.0.0</modelVersion>
    <groupId>com.bolingcavalry</groupId>
    <version>1.0-SNAPSHOT</version>
    <artifactId>yolo-demo</artifactId>
    <packaging>jar</packaging>

    <properties>
        <java.version>1.8</java.version>
        <maven.compiler.source>8</maven.compiler.source>
        <maven.compiler.target>8</maven.compiler.target>
        <maven-compiler-plugin.version>3.6.1</maven-compiler-plugin.version>
        <springboot.version>2.4.8</springboot.version>
        <project.build.sourceEncoding>UTF-8</project.build.sourceEncoding>
        <project.reporting.outputEncoding>UTF-8</project.reporting.outputEncoding>
        <maven.compiler.encoding>UTF-8</maven.compiler.encoding>
    </properties>

    <dependencyManagement>
        <dependencies>
            <dependency>
                <groupId>org.springframework.boot</groupId>
                <artifactId>spring-boot-dependencies</artifactId>
                <version>${springboot.version}</version>
                <type>pom</type>
                <scope>import</scope>
            </dependency>
        </dependencies>
    </dependencyManagement>

    <dependencies>
        <!--FreeMarker Template view dependency-->
        <dependency>
            <groupId>org.springframework.boot</groupId>
            <artifactId>spring-boot-starter-freemarker</artifactId>
        </dependency>

        <dependency>
            <groupId>org.springframework.boot</groupId>
            <artifactId>spring-boot-starter-web</artifactId>
        </dependency>

        <dependency>
            <groupId>org.projectlombok</groupId>
            <artifactId>lombok</artifactId>
        </dependency>

        <dependency>
            <groupId>org.springframework.boot</groupId>
            <artifactId>spring-boot-starter-test</artifactId>
            <scope>test</scope>
        </dependency>

        <dependency>
            <groupId>org.bytedeco</groupId>
            <artifactId>javacv-platform</artifactId>
            <version>1.5.6</version>
        </dependency>

        <dependency>
            <groupId>org.bytedeco</groupId>
            <artifactId>opencv-platform-gpu</artifactId>
            <version>4.5.3-1.5.6</version>
        </dependency>

    </dependencies>

    <build>
        <plugins>
            <!-- If the parent project is not springboot,You need to use the plug-in in the following ways to generate a normal plug-in jar -->
            <plugin>
                <groupId>org.springframework.boot</groupId>
                <artifactId>spring-boot-maven-plugin</artifactId>
                <configuration>
                    <mainClass>com.bolingcavalry.yolodemo.YoloDemoApplication</mainClass>
                </configuration>
                <executions>
                    <execution>
                        <goals>
                            <goal>repackage</goal>
                        </goals>
                    </execution>
                </executions>
            </plugin>
        </plugins>
    </build>

</project>
- Next, focus on the configuration file < font color = "blue" > application Properties < / font >, as shown below, in addition to the common spring configuration, there are several file path configurations. In actual operation, these paths should store corresponding files for the program to use. How to obtain these files will be discussed later:
### FreeMarker configuration
spring.freemarker.allow-request-override=false
#Enable template caching. Enable template caching.
spring.freemarker.cache=false
spring.freemarker.check-template-location=true
spring.freemarker.charset=UTF-8
spring.freemarker.content-type=text/html
spring.freemarker.expose-request-attributes=false
spring.freemarker.expose-session-attributes=false
spring.freemarker.expose-spring-macro-helpers=false
#Set panel suffix
spring.freemarker.suffix=.ftl

# Set the maximum memory for a single file
spring.servlet.multipart.max-file-size=100MB
# Set maximum memory for all files
spring.servlet.multipart.max-request-size=1000MB
# User defined file upload path
web.upload-path=/app/images
# Model path
# Location of yolo's configuration file
opencv.yolo-cfg-path=/app/model/yolov4.cfg
# Location of yolo's model file
opencv.yolo-weights-path=/app/model/yolov4.weights
# Location of yolo's classification file
opencv.yolo-coconames-path=/app/model/coco.names
# Image width in yolo model reasoning
opencv.yolo-width=608
# Image height in yolo model reasoning
opencv.yolo-height=608
- Startup class < font color = "blue" > yolodemoapplication java</font>:
package com.bolingcavalry.yolodemo;

import org.springframework.boot.SpringApplication;
import org.springframework.boot.autoconfigure.SpringBootApplication;

@SpringBootApplication
public class YoloDemoApplication {

    public static void main(String[] args) {
        SpringApplication.run(YoloDemoApplication.class, args);
    }
}
- The project has been completed. Next, start coding from the front page
Front page
-
As long as it comes to the front end, Xinchen usually makes a self-protection statement: please forgive Xinchen's low front-end level. I can't bear to look directly at the page, but for the integrity of the function, please bear it. It's not that it can't be used. We always have a place to submit photos and show the identification results, don't we?
-
The new name is < font color = "blue" > index The front-end template file of FTL < / font > is located in the red box below:
- <font color="blue">index. The content of FTL < / font > is as follows. It can be seen that it is very simple. There are forms for selecting and submitting files, scripts for displaying results, and prompt information returned from the background. Mm-hmm, that's enough:
<!DOCTYPE html>
<head>
    <meta charset="UTF-8" />
    <title>Picture upload Demo</title>
</head>
<body>
<h1 >Picture upload Demo</h1>
<form action="fileUpload" method="post" enctype="multipart/form-data">
    <p>Select test file: <input type="file" name="fileName"/></p>
    <p><input type="submit" value="Submit"/></p>
</form>
<#--Determine whether to upload files -- >
<#if msg??>
    <span>${msg}</span><br><br>
<#else >
    <span>${msg!("File not uploaded")}</span><br>
</#if>
<#--When displaying an image, you must send a request to the controller in src in img, otherwise the direct jump is garbled -- >
<#if fileName??>
<#--<img src="/show?fileName=${fileName}" style="width: 100px"/>-->
<img src="/show?fileName=${fileName}"/>
<#else>
<#--<img src="/show" style="width: 200px"/>-->
</#if>
</body>
</html>
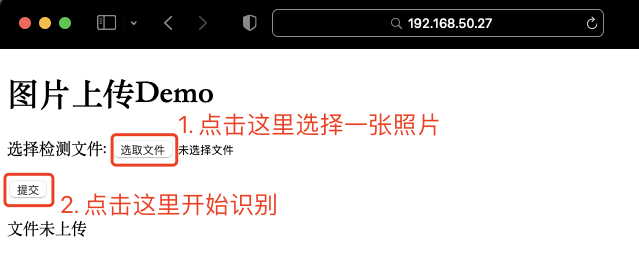
- The effect of the page is as follows:
Backend logic: initialization
-
To keep things simple, all the back-end logic is put in one java file: yoloservicecontroller Java, according to the process combed earlier, let's first look at the initialization part
-
The first is member variables and dependencies
private final ResourceLoader resourceLoader;

    @Autowired
    public YoloServiceController(ResourceLoader resourceLoader) {
        this.resourceLoader = resourceLoader;
    }

    @Value("${web.upload-path}")
    private String uploadPath;

    @Value("${opencv.yolo-cfg-path}")
    private String cfgPath;

    @Value("${opencv.yolo-weights-path}")
    private String weightsPath;

    @Value("${opencv.yolo-coconames-path}")
    private String namesPath;

    @Value("${opencv.yolo-width}")
    private int width;

    @Value("${opencv.yolo-height}")
    private int height;

    /**
     * Confidence threshold (beyond this value, it is considered as a credible reasoning result)
     */
    private float confidenceThreshold = 0.5f;

    private float nmsThreshold = 0.4f;

    // neural network
    private Net net;

    // Output layer
    private StringVector outNames;

    // Classification name
    private List<String> names;
- The next step is the initialization method init. It can be seen that the configuration, training model and other files required by the neural network will be loaded from several previously configured file paths. The key method is to call readNetFromDarknet and check whether there are devices supporting CUDA. If so, set them in Shenjing network:
	@PostConstruct
    private void init() throws Exception {
        // Initialize printing to ensure that the coding is normal, otherwise the log output will be garbled
        log.error("file.encoding is " + System.getProperty("file.encoding"));

        // Neural network initialization
        net = readNetFromDarknet(cfgPath, weightsPath);

        // Check whether the network is empty
        if (net.empty()) {
            log.error("Neural network initialization failed");
            throw new Exception("Neural network initialization failed");
        }

        // Output layer
        outNames = net.getUnconnectedOutLayersNames();

        // Check GPU
        if (getCudaEnabledDeviceCount() > 0) {
            net.setPreferableBackend(opencv_dnn.DNN_BACKEND_CUDA);
            net.setPreferableTarget(opencv_dnn.DNN_TARGET_CUDA);
        }

        // Classification name
        try {
            names = Files.readAllLines(Paths.get(namesPath));
        } catch (IOException e) {
            log.error("Failed to get classification name, file path[{}]", namesPath, e);
        }
    }
Processing uploaded files
- How to handle the binary image file submitted by the front end? Here, a simple file processing method, upload, is sorted out. The file will be saved in the specified location of the server, which will be called later:
/**
     * Upload files to the specified directory
     * @param file file
     * @param path File storage path
     * @param fileName Source file name
     * @return
     */
    private static boolean upload(MultipartFile file, String path, String fileName){
        //Use original file name
        String realPath = path + "/" + fileName;

        File dest = new File(realPath);

        //Determine whether the file parent directory exists
        if(!dest.getParentFile().exists()){
            dest.getParentFile().mkdir();
        }

        try {
            //Save file
            file.transferTo(dest);
            return true;
        } catch (IllegalStateException e) {
            // TODO Auto-generated catch block
            e.printStackTrace();
            return false;
        } catch (IOException e) {
            // TODO Auto-generated catch block
            e.printStackTrace();
            return false;
        }
    }
Object detection
- The preparation work has been completed to write the core object detection code. These codes are placed in the Yolo demo application's method of processing web requests, as shown below. It can be seen that this is only an outline, which links the functions such as reasoning, result processing and image annotation to form a complete process, but does not involve the details of each specific function:
@RequestMapping("fileUpload")
    public String upload(@RequestParam("fileName") MultipartFile file, Map<String, Object> map){
        log.info("file [{}], size [{}]", file.getOriginalFilename(), file.getSize());

        // File name
        String originalFileName = file.getOriginalFilename();

        if (!upload(file, uploadPath, originalFileName)){
            map.put("msg", "Upload failed!");
            return "forward:/index";
        }

        // Read file to Mat
        Mat src = imread(uploadPath + "/" + originalFileName);

        // Executive reasoning
        MatVector outs = doPredict(src);

        // Process the original reasoning results,
        // For each target detected, find the category with the highest confidence as the category of the target,
        // Also find the location of each target, which is stored in the ObjectDetectionResult object
        List<ObjectDetectionResult> results = postprocess(src, outs);

        // Release resources
        outs.releaseReference();

        // Total number of targets detected
        int detectNum = results.size();

        log.info("Total detected{}Goals", detectNum);

        // Not detected
        if (detectNum<1) {
            // display picture
            map.put("msg", "Target not detected");
            // file name
            map.put("fileName", originalFileName);

            return "forward:/index";
        } else {
            // Prompt information on test result page
            map.put("msg", "Detected" + results.size() + "Goals");
        }

        // Calculate the total time and output it in the upper left corner of the picture
        printTimeUsed(src);

        // Mark each recognized object in the picture box, and mark the category of the object in the upper left corner of the box
        markEveryDetectObject(src, results);

        // Keep the annotated picture on the disk, and write the picture information into the map (for the jump page)
        saveMarkedImage(map, src);

        return "forward:/index";
    }
- Now that you can understand the whole process, let's expand on each detail
Object detection using neural network
-
It can be seen from the above code that after the picture is converted into a Mat object (the important data structure in OpenCV can be understood as a matrix, which stores the information of each pixel of the picture), it is sent to the < font color = "blue" > dopredict < / font > method. After the method is executed, the result of object recognition is obtained
-
Looking closely at the doPredict method, we can see that the core is to use the blobFromImage method to obtain the four-dimensional blob object, and then send the object to the neural network for detection (net.setInput, net.forward)
/**
     * Using neural networks to perform reasoning
     * @param src
     * @return
     */
    private MatVector doPredict(Mat src) {
        // Turn the picture into a four-dimensional blog and adjust the size
        Mat inputBlob = blobFromImage(src,
                1 / 255.0,
                new Size(width, height),
                new Scalar(0.0),
                true,
                false,
                CV_32F);

        // Neural network input
        net.setInput(inputBlob);

        // Set the container where the output results are saved
        MatVector outs = new MatVector(outNames.size());

        // Reasoning, and the results are saved in outs
        net.forward(outs, outNames);

        // Release resources
        inputBlob.release();

        return outs;
    }
-
Note that blobFromImage, net setInput,net.forward these are native methods provided by the dnn module of OpenCV
-
The doPredict method returns the MatVector object, which is the detection result
Process original test results
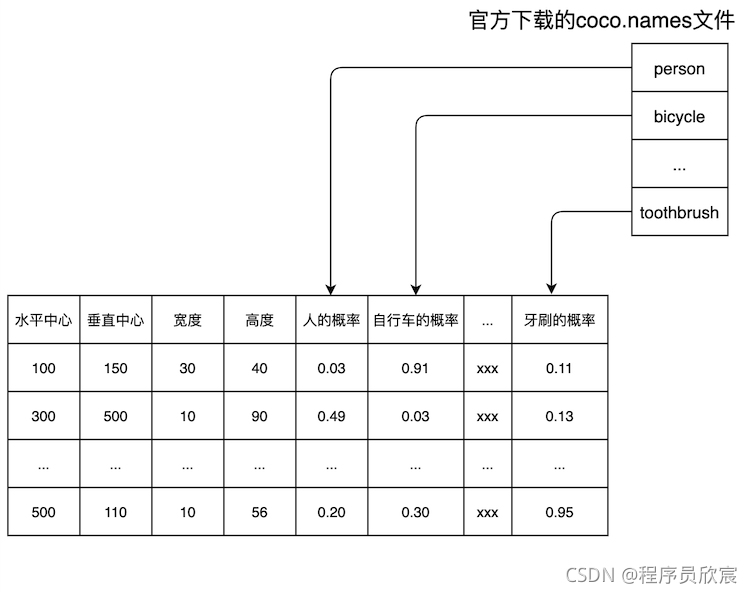
- The test result MatVector object is a set, in which there are multiple Mat objects. Each Mat object is a table with rich data. The specific contents are as follows:
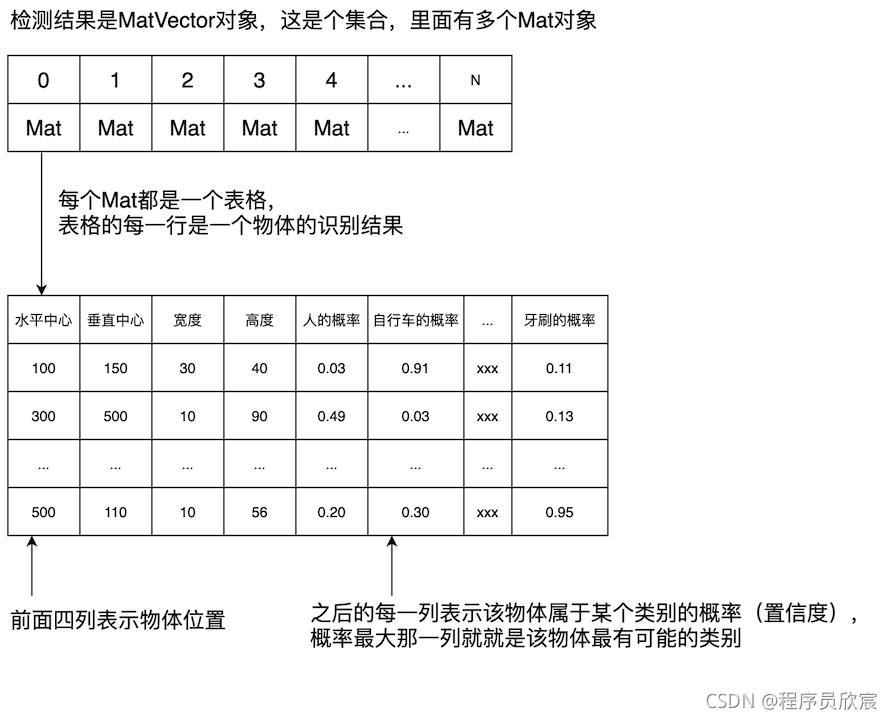
- After reading the above figure, I believe you have a clear idea of how to deal with the original test results. Just take Mat from MatVector one by one, take each Mat as a table, and find the column with the highest probability in each row of the table, This column is the category of the object (as for what each column is, why is the fifth column in the above table human, the sixth column bicycle and the last column toothbrush? This will be discussed later):
    /**
     * Operation after reasoning
     * @param frame
     * @param outs
     * @return
     */
    private List<ObjectDetectionResult> postprocess(Mat frame, MatVector outs) {
        final IntVector classIds = new IntVector();
        final FloatVector confidences = new FloatVector();
        final RectVector boxes = new RectVector();

        // Process the output of neural network
        for (int i = 0; i < outs.size(); ++i) {
            // extract the bounding boxes that have a high enough score
            // and assign their highest confidence class prediction.

            // Each detected object has the corresponding confidence of each type, whichever is the highest
            // For example, if the confidence of the cat is 90% and that of the dog is 80%, it is considered a cat
            Mat result = outs.get(i);
            FloatIndexer data = result.createIndexer();

            // Take the test results as a table,
            // Each line represents an object,
            // The first four columns represent the coordinates of the object, and each subsequent column represents the confidence of the object in a certain category,
            // Each row is traversed from the fifth column to find the maximum value and the corresponding column number,
            for (int j = 0; j < result.rows(); j++) {
                // minMaxLoc implemented in java because it is 1D
                int maxIndex = -1;
                float maxScore = Float.MIN_VALUE;
                for (int k = 5; k < result.cols(); k++) {
                    float score = data.get(j, k);
                    if (score > maxScore) {
                        maxScore = score;
                        maxIndex = k - 5;
                    }
                }

                // If the maximum value is greater than the previously set confidence threshold, it means that this kind of object can be determined,
                // Then save the identification information related to the object. The information to be saved includes: category, confidence and coordinates
                if (maxScore > confidenceThreshold) {
                    int centerX = (int) (data.get(j, 0) * frame.cols());
                    int centerY = (int) (data.get(j, 1) * frame.rows());
                    int width = (int) (data.get(j, 2) * frame.cols());
                    int height = (int) (data.get(j, 3) * frame.rows());
                    int left = centerX - width / 2;
                    int top = centerY - height / 2;

                    // Save category
                    classIds.push_back(maxIndex);
                    // Save confidence
                    confidences.push_back(maxScore);
                    // Save coordinates
                    boxes.push_back(new Rect(left, top, width, height));
                }
            }

            // Resource release
            data.release();
            result.release();
        }

        // remove overlapping bounding boxes with NMS
        IntPointer indices = new IntPointer(confidences.size());
        FloatPointer confidencesPointer = new FloatPointer(confidences.size());
        confidencesPointer.put(confidences.get());

        // Non maximum suppression
        NMSBoxes(boxes, confidencesPointer, confidenceThreshold, nmsThreshold, indices, 1.f, 0);

        // Put the test results into the BO object for business processing
        List<ObjectDetectionResult> detections = new ArrayList<>();
        for (int i = 0; i < indices.limit(); ++i) {
            final int idx = indices.get(i);
            final Rect box = boxes.get(idx);

            final int clsId = classIds.get(idx);

            detections.add(new ObjectDetectionResult(
               clsId,
               names.get(clsId),
               confidences.get(idx),
               box.x(),
               box.y(),
               box.width(),
               box.height()
            ));

            // Release resources
            box.releaseReference();
        }

        // Release resources
        indices.releaseReference();
        confidencesPointer.releaseReference();
        classIds.releaseReference();
        confidences.releaseReference();
        boxes.releaseReference();

        return detections;
    }
- It can be seen that the code is very simple, which is to treat each Mat as a table. There are two special places to deal with:
- confidenceThreshold variable, confidence threshold, here is 0.5. If the maximum probability of a line is less than 0.5, it means that it is unlikely that all categories are known, so it is not recognized, so it will not be stored in the detections set (it will not be marked in the result picture)
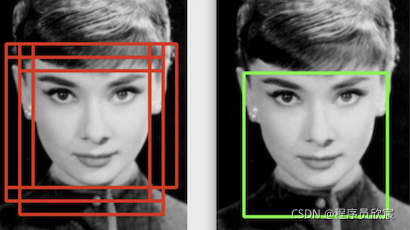
- NMSBoxes: when the classifier evolves into a detector, windows are generated from multiple scales on the original image, which leads to the effect on the left of the figure below. The same person detects multiple faces. At this time, NMSBoxes are used to retain the best result
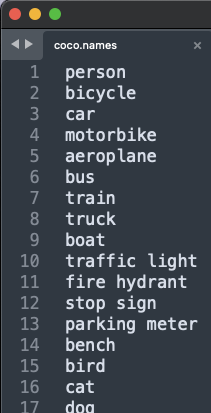
- Now explain the category of each column in the table corresponding to the Mat object: this table is the test result of YOLO4, so the category of each column should be explained by YOLO4. Officially, it is called < font color = "blue" > coco The file names < / font >, as shown in the following figure, has 80 lines in total, and each line represents a category:
- At this moment, you must be smart enough to know what category each column in the Mat table represents: each column in the Mat table corresponds to < font color = "blue" > coco Names < / font >, as shown in the following figure:
- After the postprocess method is executed, the recognition result of a photo is put into the collection called detections. Each element in the collection represents a recognized object. Take a look at the data structure of this element, as shown below. These data are enough for us to mark the recognition result on the photo:
@Data
@AllArgsConstructor
public class ObjectDetectionResult {
    // Category index
    int classId;
    // Category name
    String className;
    // Confidence
    float confidence;
    // Abscissa of an object in a photograph
    int x;
    // The ordinate of an object in a photograph
    int y;
    // Object width
    int width;
    // Object height
    int height;
}
Draw the test results on the picture
-
With the test results in hand, the next thing to do is to draw these results on the original picture, so as to have the effect of object recognition. The drawing is divided into two parts, the first is the total time consumption in the upper left corner, and the second is each object recognition result
-
First draw the total time-consuming of this test in the upper corner of the picture, and the effect is shown in the following figure:
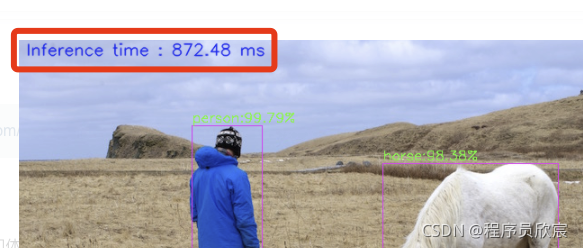
- The printTimeUsed method is responsible for drawing the total time-consuming, as shown below. It can be seen that the total time-consuming is obtained by dividing the total number of multi-layer networks by the frequency. Note that this is not the total time-consuming of interfaces on Web pages, but the total time-consuming of neural network to identify objects. The putText method for drawing is a local method, which is also one of the common methods of OpenCV:
    /**
     * Calculate the total time and output it in the upper left corner of the picture
     * @param src
     */
    private void printTimeUsed(Mat src) {
        // Total times
        long totalNums = net.getPerfProfile(new DoublePointer());
        // frequency
        double freq = getTickFrequency()/1000;
        // The total number of times divided by the frequency is the total time
        double t =  totalNums / freq;

        // Print the total time of this detection in the upper left corner of the display image
        putText(src,
                String.format("Inference time : %.2f ms", t),
                new Point(10, 20),
                FONT_HERSHEY_SIMPLEX,
                0.6,
                new Scalar(255, 0, 0, 0),
                1,
                LINE_AA,
                false);
    }
- Next, draw the recognition result of each object. With the ObjectDetectionResult object set, drawing is very simple: call the local method of drawing rectangle and text:
   /**
     * Mark each recognized object in the picture box, and mark the category of the object in the upper left corner of the box
     * @param src
     * @param results
     */
    private void markEveryDetectObject(Mat src, List<ObjectDetectionResult> results) {
        // Mark each goal on the picture with category and confidence
        for(ObjectDetectionResult result : results) {
            log.info("category[{}],Confidence[{}%]", result.getClassName(), result.getConfidence() * 100f);

            // annotate on image
            rectangle(src,
                    new Point(result.getX(), result.getY()),
                    new Point(result.getX() + result.getWidth(), result.getY() + result.getHeight()),
                    Scalar.MAGENTA,
                    1,
                    LINE_8,
                    0);

            // What is written in the upper left corner of the goal: category + confidence
            String label = result.getClassName() + ":" + String.format("%.2f%%", result.getConfidence() * 100f);

            // Calculate the height required to display these contents
            IntPointer baseLine = new IntPointer();

            Size labelSize = getTextSize(label, FONT_HERSHEY_SIMPLEX, 0.5, 1, baseLine);
            int top = Math.max(result.getY(), labelSize.height());

            // Add content to picture
            putText(src, label, new Point(result.getX(), top-4), FONT_HERSHEY_SIMPLEX, 0.5, new Scalar(0, 255, 0, 0), 1, LINE_4, false);
        }
    }
Show results
- The core work has been completed. The next step is to save the picture and jump to the display page:

- So far, the SpringBoot project has been coded. The next thing to do is to make the whole project into a docker image
Make the SpringBoot project into a docker image
-
front Making the basic Docker image that JavaCV application depends on (CentOS7+JDK8+OpenCV4) The basic image has been prepared, and the JDK and OpenCV libraries have been prepared for us, which makes the next operation particularly simple. Let's do it step by step
-
Write Dockerfile first. Please put Dockerfile in < font color = "blue" > and POM XML the same directory < / font >, as follows:
# The basic image integrates openjdk8 and opencv4 five point three
FROM bolingcavalry/opencv4.5.3:0.0.1

# Create directory
RUN mkdir -p /app/images && mkdir -p /app/model

# Specifies the source location of the mirrored content
ARG DEPENDENCY=target/dependency

# Copy content to mirror
COPY ${DEPENDENCY}/BOOT-INF/lib /app/lib
COPY ${DEPENDENCY}/META-INF /app/META-INF
COPY ${DEPENDENCY}/BOOT-INF/classes /app

ENV LANG C.UTF-8
ENV LANGUAGE zh_CN.UTF-8
ENV LC_ALL C.UTF-8
ENV TZ Asia/Shanghai

# Specify the startup command (pay attention to the encoding, otherwise the log is garbled)
ENTRYPOINT ["java","-Dfile.encoding=utf-8","-cp","app:app/lib/*","com.bolingcavalry.yolodemo.YoloDemoApplication"]
-
The console enters POM In the directory where XML is located, execute the command < font color = "blue" > MVN clean package - U < / font >, which is an ordinary maven command. It will compile the source code and generate a file < font color = "red" > yolo-demo-1.0-snapshot. In the target directory jar</font>
-
Execute the following command to extract the contents required to create a docker image from the jar file:
mkdir -p target/dependency && (cd target/dependency; jar -xf ../*.jar)
- Execute the following command to build a mirror:
docker build -t bolingcavalry/yolodemo:0.0.1 .
- Successfully built:
will@willMini yolo-demo % docker images
REPOSITORY                  TAG       IMAGE ID       CREATED              SIZE
bolingcavalry/yolodemo      0.0.1     d0ef6e734b53   About a minute ago   2.99GB
bolingcavalry/opencv4.5.3   0.0.1     d1518ffa4699   6 days ago           2.01GB
-
At this moment, the SpringBoot application with complete object recognition capability has been developed. Remember application Are the file paths in properties configured? We are going to download these files. There are two ways to download them. You can choose one of them
-
The first is to download from the official website, which can be downloaded from the following three addresses:
- YOLOv4 profile: https://raw.githubusercontent.com/AlexeyAB/darknet/master/cfg/yolov4.cfg
- YOLOv4 weight: https://github.com/AlexeyAB/darknet/releases/download/darknet_yolo_v3_optimal/yolov4.weights
- Category name: https://raw.githubusercontent.com/AlexeyAB/darknet/master/data/coco.names
-
The second is to download from csdn (no points are required). I have packaged the above three files here: https://download.csdn.net/download/boling_cavalry/33229838
-
Either way, you will eventually get three files: yolov4 cfg,yolov4.weights,coco.names, please put them in the same directory. I put them here: / home/will/temp/202110/19/model
-
Create a new directory to store photos. The new directory I created here is: < font color = "blue" > / home / will / temp / 202110 / 19 / images < / font >. Note that the directory can be read and written. The final directory structure is as follows:
/home/will/temp/202110/19/
├── images
└── model
    ├── coco.names
    ├── yolov4.cfg
    └── yolov4.weights
- When everything is ready, run the service by executing the following command:
sudo docker run \
--rm \
--name yolodemo \
-p 8080:8080 \
-v /home/will/temp/202110/19/images:/app/images \
-v /home/will/temp/202110/19/model:/app/model \
bolingcavalry/yolodemo:0.0.1
-
After the service runs, the operation process and effect are the same as Three minutes: fast experience JAVA version of target detection (YOLO4) The article is exactly the same, so I won't repeat it
-
So far, the whole development practice of object recognition has been completed. The convenience of Java in engineering, combined with the excellent model in the field of deep learning, has added an alternative for us to solve the problem of visual image. If you are a java programmer interested in vision and image, I hope this article can give you some reference
You're not alone. Xinchen's original accompanies you all the way
- Java series
- Spring collection
- Docker series
- kubernetes series
- Database + middleware series
- DevOps series
Welcome to the official account: programmer Xin Chen
Wechat search "programmer Xinchen", I'm Xinchen, looking forward to traveling with you in the Java World https://github.com/zq2599/blog_demos