Original: migrate your accelerator based storefront to project Spartacus
If you have read“ Five reasons to migrate to Spartacus javascript storefront project ”And“ Getting started with SAP Commerce Cloud Project Spartacus ”In these two articles, you may want to migrate to storefront based on stateless high-performance architecture and want to know how to actually prepare the migration. This article will discuss a migration method suitable for small storefront, but its process can also help large project migration. For the latter, however, it is recommended that it be fully re implemented.
To Migrate or Not?
Although it is recommended that you migrate to Spartacus as an opportunity to restart and reconsider your store experience, you may need to migrate to Spartacus and maintain the same experience. Depending on the number and method of customizing accelerator based storefronts, you find it easy or difficult to try to migrate your existing experience to Spartacus. If you are unsure, you can use the following steps to practice to determine the number of changes without taking the time to implement them. This gives you an idea of how much work a migration might take compared to starting with the Greenfield approach.
As described in "getting started with SAP Commerce Cloud Project Spartacus", you can run Accelerator and Spartacus storefront at the same time to reduce risk, but it is recommended not to do so for a long time. Maintaining two storefronts on two technology stacks will make development and testing very difficult, not to mention that you may bring inconsistent user experience to customers according to the storefront page they click.
Prerequisites
It is recommended that you start migrating to Spartacus storefront after upgrading to SAP Commerce 1905 or later, because the installation of Omni Commerce Connect (OCC) application programming interfaces (APIs) has been simplified (they can now be used as extension instead of add-on).
To get started, you also need the following:
Initial settings
- Review Spartacus release notes and roadmap to make sure you understand which features are equivalent, which may have changed, and which may be missing
- Upgrade your existing store to use at least SAP Commerce 1905
- Any existing OCC plug-ins have been converted to regular extensions (if SAP Commerce 2005 or later is used)
- You have completed the steps of "building and deploying your first SAP Commerce Cloud project". You may also need to review the content covered in installing SAP Commerce Cloud 2005 for use with Spartacus and ensure that you have configured and implemented Spartacus project settings.
Front-End Team
The front-end user interface building team will be composed of Angular. The core skills of developers will be:
- Angular
- RxJS
- Spartacus
- HMTL5
Back-End Team
The back-end team will build the OCC API required by the front-end team. The core developer skills required are:
- SAP Commerce
- OCC
Anatomy of a Spartacus-based Storefront
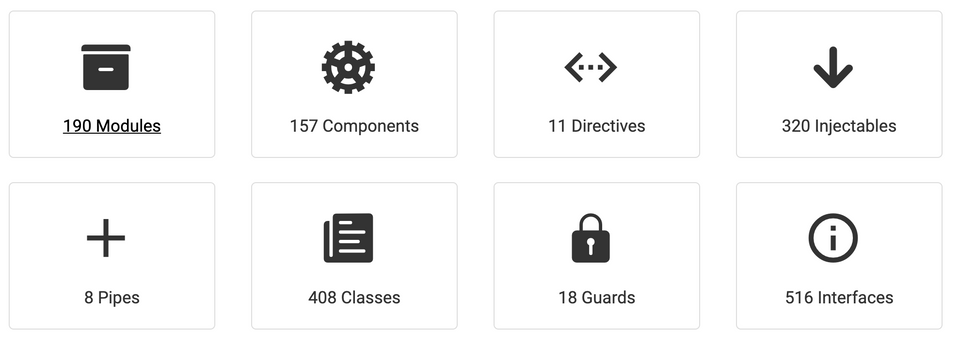
Before you begin the migration, you should be familiar with how the Spartacus store works. First, access the Spartacus Storefront documentation and view the module and component directories. It looks like this:
Browse modules and components and become familiar with the functions provided by Spartacus. Pay special attention to the module that provides the default CmsConfig, which defines the mapping between standard CMS components and Spartacus components. In the following example, BannerComponent provides mappings to SimpleResponsiveBannerComponent, BannerComponent, and SimpleBannerComponent.
BannerModule
@NgModule({
  imports: [CommonModule, RouterModule, GenericLinkModule, MediaModule],
  providers: [
    provideDefaultConfig(<CmsConfig>{
      cmsComponents: {
        SimpleResponsiveBannerComponent: {
          component: BannerComponent,
        },
        BannerComponent: {
          component: BannerComponent,
        },
        SimpleBannerComponent: {
          component: BannerComponent,
        },
      },
    }),
  ],
  declarations: [BannerComponent],
  entryComponents: [BannerComponent],
  exports: [BannerComponent],
})
export class BannerModule {}
Accelerator-based Storefront vs Spartacus-based Storefront
You may be familiar with the standard spring MVC based accelerator on the left of the figure below, but please take a closer look at the description of the Spartacus store on the right to understand the main differences.
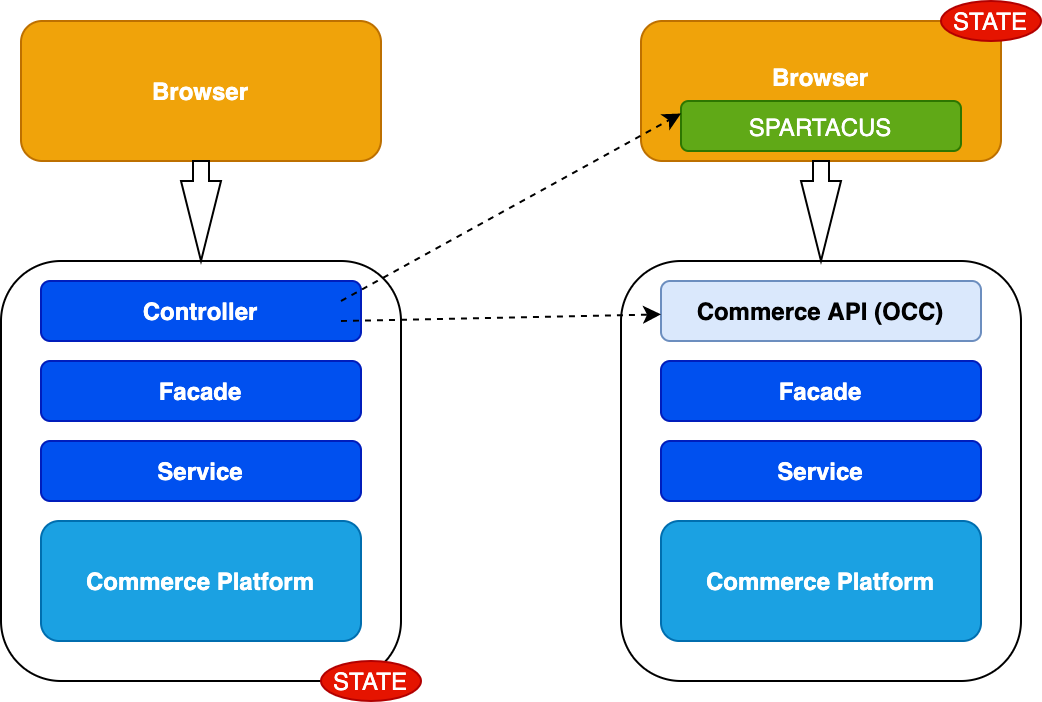
Accelerator Storefront
In the traditional storefront, the browser sends a request to the server, which retrieves the page structure and executes the controller, appearance and services to process and retrieve the information required to render the view.
Most states are saved on the server side.
Spartacus Storefront
In a headless storefront, the front end is loaded on the browser, and the page structure and layout are retrieved from the server (unless it has a static layout). Spartacus components (see modules and components above) are used to build pages on the client side. They perform OCC calls to the server (see OCC API above) to retrieve the data required for rendering. However, for performance and SEO purposes, the initial page may initially be built on the server (using a technology called server-side rendering - SSR).
The status is saved on the client.
During the migration process, you decompose the existing accelerator controller functions into separate Spartacus Angular components (also including view / template logic) and OCC API s, as shown by the dotted line. Note that in some cases, you may also need to modify the existing underlying look and feel and services.
You also need to change the content directory, and the Spartacus document provides a good overview of the differences between the accelerator and Spartacus sample data.
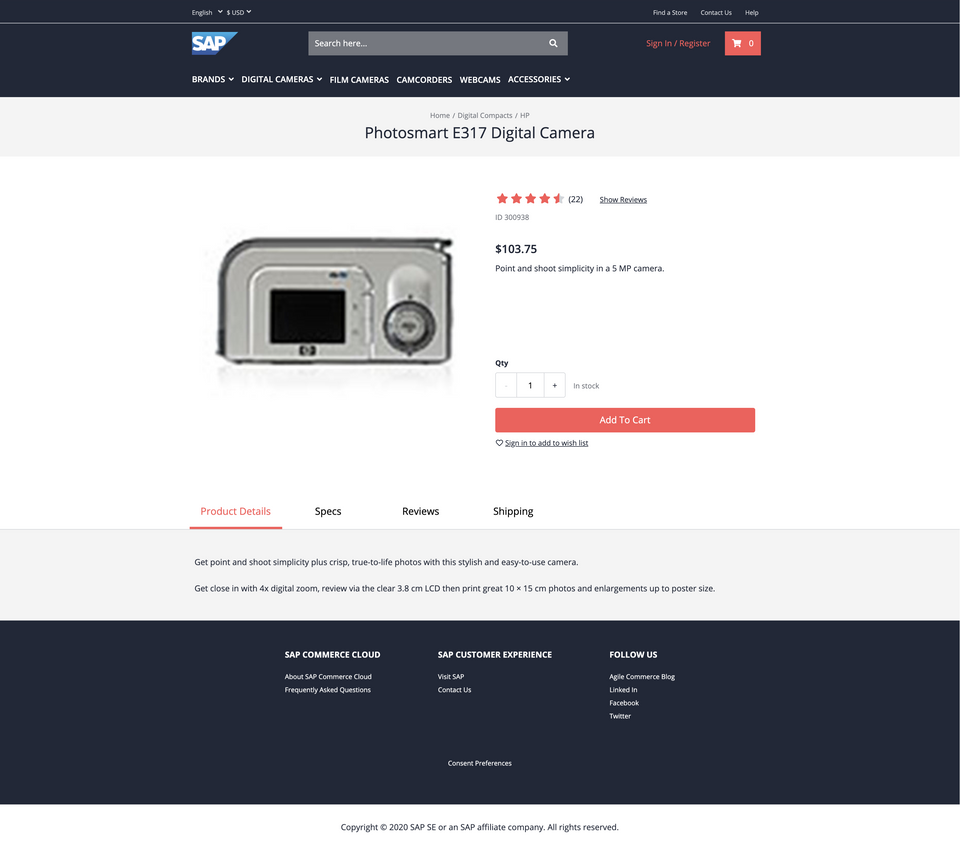
Finally, you can analyze the sample call of the product details page with the help of Chrome developer tools to understand how all the content is combined. Use the network tab to view requests generated by Spartacus.
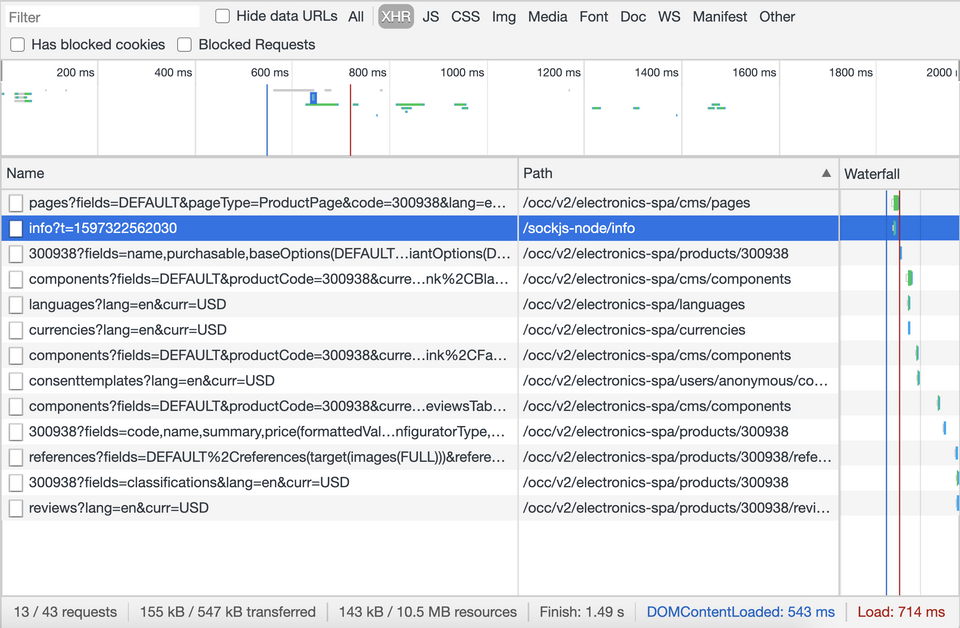
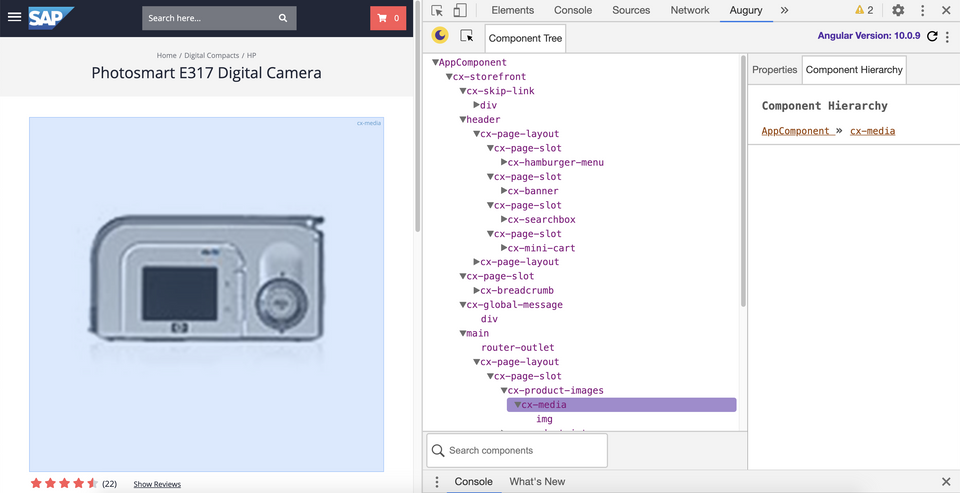
Using the Australian chrome plug-in, you can view the generated component hierarchy after building the page in the browser.
Starting the Migration
Step 1 - inventory your CMS components and pages
It is very important to count the pages and components used in the current store, as shown in the table below. For each page, list the controller and custom CMS components used, and find the data it needs to display or process for each component. Some of the required information may not be visible at first glance, such as drop-down boxes or pop-up windows.
When editing a given page in an existing store to retrieve component details, you can filter requests for / pagescontentslotscomponents in SmartEdit.
Components used in the Accelerator Product Details Page
0: {componentId: "SiteLogoComponent",...}
1: {componentId: "HomepageNavLink",...}
2: {componentId: "OrderComponent",...}
3: {componentId: "MiniCart",...}
4: {componentId: "ElectronicsCategoryNavComponent",...}
5: {componentId: "breadcrumbComponent",...}
6: {componentId: "TabPanelContainer",...}
7: {componentId: "FooterNavigationComponent",...}
8: {componentId: "MyAccountComponent",...}
9: {componentId: "MyCompanyComponent",...}
10: {componentId: "SearchBox",...}
11: {componentId: "VariantSelector",...}
12: {componentId: "AddToCart",...}
13: {componentId: "Similar",...}
14: {componentId: "CookieNotificationComponent",...}
15: {componentId: "AnonymousConsentManagementComponent",...}
16: {componentId: "AssistedServiceComponent",...}
17: {componentId: "ProfileTagScriptComponent",...}
18: {componentId: "PersonalizationScriptComponent",...}
19: {componentId: "BundleCarouselComponent",...}
Spartacus out of the box supports almost all responsive B2C CMS components, so you only need to focus on custom components and components from third-party plug-ins or market extensions not covered in the standard library. They are grouped and classified according to functional areas, using the component list shown below. Note that unlike the Accelerator Page method, everything in Spartacus needs to be a component, so you may need to componentize part of the existing Jakarta Server Page (JSP) layout.
The following query gives you an overview of the components, page templates, and pages used in the store:
// Component list
select
    {ct.code},
    {c.id},
    {ct.extensionName},
    count(*) as cnt
from {
    AbstractCMSComponent as acc
    join ComposedType as ct on {ct.pk} = {acc.itemtype}
    join CatalogVersion as cv on {cv.pk} = {acc.catalogversion}
    join Catalog as c on {cv.catalog} = {c.pk}
}
where {c.id} LIKE '%ContentCatalog' and {cv.version} = 'Online'
group by {ct.code}, {cv.version}, {c.id},{ct.extensionName}
order by cnt desc
// Page Templates
select
    {ct.code},
    {c.id},
    {pt.name},
	{pt.frontendTemplateName}
from {
    PageTemplate as pt
    join ComposedType as ct on {ct.pk} = {pt.itemtype}
    join CatalogVersion as cv on {cv.pk} = {pt.catalogversion}
    join Catalog as c on {cv.catalog} = {c.pk}
}
where {c.id} LIKE '%ContentCatalog' and {cv.version} = 'Online'
order by {ct.code}
// Pages
select
	{ct:code},
    {c:id},
    {ap:name[de]},
    {ap:uid}
from {
    AbstractPage  as ap
    join ComposedType as ct on {ct.pk} = {ap.itemtype}
    join CatalogVersion as cv on {cv.pk} = {ap.catalogversion}
    join Catalog as c on {cv.catalog} = {c.pk}
}
where {c.id} LIKE '%ContentCatalog' and {cv.version} = 'Online'
order by {ct.code}
// Pages, Components and Slots
select
    {c.id},
    {cv.version},
    {p.uid}              as "Page",
    {pt.uid}             as "Template",
    {s4p.position}       as "Template assigned position",
    {st.uid}             as "content slot id 4t",
    {st.active}          as "content slot 4t active",
    {sn.templatePOS}     as "pos",
    {sn.name}            as "template available position",
    {comp.uid},
    {compt.code},
    {comp.visible}
from {
    AbstractPage as p
    join CatalogVersion as cv on {cv.pk} = {p.catalogVersion}
    join Catalog as c on {c.pk} = {cv.catalog}
    join PageTemplate as pt on {pt.pk} = {p.masterTemplate}
    join ContentSlotForPage as s4p on {s4p.page} = {p.pk}
    join ContentSlot as st on {st.pk} = {s4p.contentSlot}
    left join ContentSlotName as sn on {sn.template} = {pt.pk} and {sn.name} = {s4p.position}
    join ElementsForSlot as e2s on {st.pk} = {e2s.source}
    join AbstractCMSComponent as comp on {comp.pk} = {e2s.target}
    join ComposedType as compt on {compt.pk} = {comp.itemtype}
} where
{cv.version} = 'Online' and {c.id} like '%ContentCatalog'
order by {cv.version},{c.id},{p.uid},{sn.templatePOS},{comp.uid}
// Templates, components and slots
select
    {c.id},
    {cv.version},
    {p.uid},
    {pt.uid},
    {s4t.position}       as "template assigned position",
    {st.uid}             as "content slot id 4t",
    {st.active}          as "content slot 4t active",
    {s4t.allowOverwrite} as "template allow overwrite",
    {sn.templatePOS}     as "pos",
    {sn.name}            as "template available position",
    {comp.uid},
    {compt.code},
    {comp.visible}
from {
    AbstractPage as p
    join CatalogVersion as cv on {cv.pk} = {p.catalogVersion}
    join Catalog as c on {c.pk} = {cv.catalog}
    join PageTemplate as pt on {pt.pk} = {p.masterTemplate}
    join ContentSlotForTemplate as s4t on {s4t.pageTemplate} = {pt.pk}
    join ContentSlot as st on {st.pk} = {s4t.contentSlot}
    left join ContentSlotName as sn on {sn.template} = {pt.pk} and {sn.name} = {s4t.position}
    join ElementsForSlot as e2s on {st.pk} = {e2s.source}
    join AbstractCMSComponent as comp on {comp.pk} = {e2s.target}
    join ComposedType as compt on {compt.pk} = {comp.itemtype}
} where
{cv.version} = 'Online' and {c.id} like '%ContentCatalog'
order by {cv.version},{c.id},{p.uid},{sn.templatePOS},{comp.uid}
In the standard accelerator, the PageController (based on AbstractPageController) prepares the context required to render the page. In Spartacus, most of the work has been performed by the framework, but it is a good idea to manually check the logic that may need to be moved to a custom OCC extension or a single component.
Step 2 - Perform a GAP Analysis
For each component, determine whether there is a corresponding OCC API to provide the required data (and corresponding injectable services), otherwise describe the OCC extension that will be required. In addition, set development priorities (or importance) for each component.
Step 3 - Start the API Implementation
Use the API First method to create the missing OCC extension and define the interface according to the semantics of the existing OCC service. Start with an empty (or simulated) implementation, as this will allow the front-end team to start working in parallel in the next step.
Use Swagger CodeGen to automatically generate Typescript Angular client code required by the front end. Enhance DTO with necessary missing fields.
Step 4 - Implement the CMS Pages and Components
Create a basic Web content management system (WCMS) structure to copy your current store and launch your Spartacus application. Open your console tab in the Chrome developer tool, and you will see the warning of each CMS component without corresponding Angular component and the warning of available CMS slots.
Verify that this information matches your CMS component manifest.
In a headless storefront, the front end is loaded on the browser, and the page structure and layout are retrieved from the server (unless it has a static layout). Spartacus components (see modules and components above) are used to build pages on the client side. They perform OCC calls to the server (see OCC API above) to retrieve the data required for rendering. However, for performance and SEO purposes, the initial page may initially be built on the server (using a technology called server-side rendering - SSR). The status is saved on the client.

Conclusion
This article provides a more technical introduction to Spartacus and the technologies needed to migrate existing accelerator stores. Migration may involve a lot of redesign, but there are tangible performance and maintenance advantages that make it worth it. Careful preparation is the key to a successful migration.
More Jerry's original articles are: "Wang Zixi":
