What is authoring?
Authing is the first developer centric full scene identity cloud product in China. It integrates all mainstream identity authentication protocols to provide enterprises and developers with perfect and secure user authentication and access management services.
Taking "API First" as the product cornerstone, all commonly used functions in the identity field are modularized and encapsulated, and all capabilities are provided to developers through the full scene programming language SDK. At the same time, users can flexibly use Authing's open RESTful APIs for function expansion to meet the identity management needs of different enterprises under different business scenarios.
SSO single sign on Transformation of traditional system
Firstly, the user system of the original system needs to be modified to adapt to the general user authentication standard protocol (such as OAuth). If the system volume is large, you even need to consider pulling out the user system from the original business and making it a user center for single sign on. It requires a series of complex development, operation and maintenance operations such as design, coding, testing, upgrading and capacity expansion.
This method consumes time, energy, cost and risk (it needs to step on the pit outside the business field).
Authoring SSO integration
If your application is developed based on the identity system provided by Authing, congratulations. You can easily complete the integration of single sign on in a few steps with less code (or configuration).
This method has low cost, no additional design and development, and adopts standard protocol to get through easily.
Discourse installation
reference material:
- Discover official Docker warehouse: https://github.com/discourse/...
- Installation guide documentation: https://github.com/discourse/...
It is recommended to Fork the discovery docker warehouse, develop and debug locally, and install the product environment after confirmation. The following is a brief description of the installation steps and FAQ s for common problems in configuration.
Note: please install under Linux server or macOS (Windows needs to explore by itself).
Pull the discovery docker warehouse
git clone https://github.com/discourse/discourse_docker.git /var/discourse
cd /var/discourse
Use automated configuration scripts:
./discourse-setup
For non root users, you need to add sudo to run. Enter the configuration items step by step according to the prompts to complete the installation configuration. The default configuration will probably not work when running locally.
Open containers / APP The YML configuration file is used to adjust the configuration. If you configure it manually, you can also execute the following steps:
cp samples/standalone.yml containers/app.yml
Copy a sample template as a starting point.
Application configuration
Before starting configuration, first ensure that the domain name has been bound to the server (A record binding in DNS), or modify the / etc/hosts file locally (do not use example.com or force the domain name suffix of https as local development debugging, such as. app,. dev, etc.).
Environment variable setting reference:
env:
  LC_ALL: en_US.UTF-8
  LANG: en_US.UTF-8
  LANGUAGE: en_US.UTF-8
  EMBER_CLI_PROD_ASSETS: 1
  # DISCOURSE_DEFAULT_LOCALE: en

  ## How many concurrent web requests are supported? Depends on memory and CPU cores.
  ## will be set automatically by bootstrap based on detected CPUs, or you can override
  #UNICORN_WORKERS: 3

  ## TODO: The domain name this Discourse instance will respond to
  ## Required. Discourse will not work with a bare IP number.
  DISCOURSE_HOSTNAME: 'discourse.local'

  ## Uncomment if you want the container to be started with the same
  ## hostname (-h option) as specified above (default "$hostname-$config")
  # DOCKER_USE_HOSTNAME: true

  ## TODO: List of comma delimited emails that will be made admin and developer
  ## on initial signup example 'user1@example.com,user2@example.com'
  DISCOURSE_DEVELOPER_EMAILS: 'willin@willin.org'

  ## TODO: The SMTP mail server used to validate new accounts and send notifications
  # SMTP ADDRESS, username, and password are required
  # WARNING the char '#' in SMTP password can cause problems!
  DISCOURSE_SMTP_ADDRESS: smtp.mail.qq.com
  DISCOURSE_SMTP_PORT: 25
  DISCOURSE_SMTP_USER_NAME: willin@willin.org
  DISCOURSE_SMTP_PASSWORD: "password"
  DISCOURSE_SMTP_ENABLE_START_TLS: fales       # (optional, default true)
  DISCOURSE_SMTP_AUTHENTICATION: plain
  DISCOURSE_SMTP_OPENSSL_VERIFY_MODE: none

  DISCOURSE_NOTIFICATION_EMAIL: willin@willin.org

  ## If you added the Lets Encrypt template, uncomment below to get a free SSL certificate
  #LETSENCRYPT_ACCOUNT_EMAIL: me@example.com
  ## The http or https CDN address for this Discourse instance (configured to pull)
  ## see https://meta.discourse.org/t/14857 for details
  #DISCOURSE_CDN_URL: https://discourse-cdn.example.com
  ## The maxmind geolocation IP address key for IP address lookup
  ## see https://meta.discourse.org/t/-/137387/23 for details
  #DISCOURSE_MAXMIND_LICENSE_KEY: 1234567890123456
Brief description:
- UNICORN_ Worker s: the number of workers is determined according to the number of CPU s or configured manually
- DISCOURSE_HOSTNAME: configure the domain name correctly
- DISCOURSE_ SMTP_ 30: Configure SMTP mail sending service correctly, or you will not receive verification code and notification mail
Plug in configuration:
## Plugins go here
## see https://meta.discourse.org/t/19157 for details
hooks:
  after_code:
    - exec:
        cd: $home/plugins
        cmd:
          - git clone https://github.com/discourse/docker_manager.git
          - git clone https://github.com/discourse/discourse-oauth2-basic.git
          - git clone https://github.com/angelim/discourse_user_auto_activation.git
The functions of these three plug-ins:
- Docker management, with default
- OAuth 2 integration is used to connect with Authing SSO to realize single sign on
- Automatic activation (mailbox) plug-in, optional
Start forum service
Reminder: configure the SSL certificate before starting the service (refer to FAQ SSL certificate configuration, or use Let's Encrypt to issue the certificate).
Create an image after configuration:
./launcher bootstrap app
./launcher start app
If it has been initialized, you can recreate the image:
./launcher rebuild app
The process is long and patient. Here are some problems and tips I encountered during debugging.
FAQ
Domain name configuration
Main modification templates:
templates:
  - "templates/postgres.template.yml"
  - "templates/redis.template.yml"
  - "templates/web.template.yml"
  - "templates/web.ratelimited.template.yml"
## Uncomment these two lines if you wish to add Lets Encrypt (https)
  - "templates/web.ssl.template.yml"
  #- "templates/web.letsencrypt.ssl.template.yml"
- If SSL support is required, the template file "templates/web.ssl.template.yml" needs to be imported.
- If you need a free domain name certificate update, the template "templates/web.letsencrypt.ssl.template.yml" needs to be introduced.
At the same time, open the port as required:
## which TCP/IP ports should this container expose?
## If you want Discourse to share a port with another webserver like Apache or nginx,
## see https://meta.discourse.org/t/17247 for details
expose:
  - "80:80"   # http
  - "443:443" # https
SSL certificate configuration
First, confirm whether the file directory mapping is correct:
## The Docker container is stateless; all data is stored in /shared
volumes:
  - volume:
      host: /var/discourse/shared/standalone
      guest: /shared
  - volume:
      host: /var/discourse/log/var-log
      guest: /var/log
For directory mapping like this, place the certificate file in the corresponding ssl directory and check whether the two file paths are correct:
/var/discourse/shared/standalone/ssl/ssl.crt
/var/discourse/shared/standalone/ssl/ssl.key
Self signed certificate reference:
openssl genrsa -aes256 -passout pass:gsahdg -out ssl.pass.key 4096
openssl rsa -passin pass:gsahdg -in ssl.pass.key -out ssl.key
openssl req -new -key ssl.key -out ssl.csr

# You are about to be asked to enter information that will be incorporated
# into your certificate request.
# What you are about to enter is what is called a Distinguished Name or a DN.
# There are quite a few fields but you can leave some blank
# For some fields there will be a default value,
# If you enter '.', the field will be left blank.
# -----
# Country Name (2 letter code) []:CN
# State or Province Name (full name) []:Jiangsu
# Locality Name (eg, city) []:Nanjing
# Organization Name (eg, company) []:Xibang Tech
# Organizational Unit Name (eg, section) []:
# Common Name (eg, fully qualified host name) []:discourse.local
# Email Address []:willin@willin.org

# Please enter the following 'extra' attributes
# to be sent with your certificate request
# A challenge password []:
openssl x509 -req -sha256 -days 365 -in ssl.csr -signkey ssl.key -out ssl.crt
You need to double-click the. macOS self sign certificate to open it crt file, select trust always trust, and you need to enter the password twice in the process.
Disable SSL
This step is not necessary. If you are too lazy to configure the SSL local self signed certificate (such as me), you can test the original configuration and comment out the SSL part.
# First copy the configuration from the image
docker cp app:/etc/nginx/conf.d/discourse.conf ./discourse.conf
# Execute after modifying the configuration
docker cp ./discourse.conf app:/etc/nginx/conf.d/discourse.conf
docker exec app nginx -s reload
The main modification is to jump the https request back to http:
# attempt to preserve the proto, must be in http context
map $http_x_forwarded_proto $thescheme {
  default $scheme;
  https http;
}
Logical deletion of jump 80 to 443:
server {
  listen 80;
  # Delete the jump part and merge it with the 'server' of listen 443
}
Build or startup failed
Failure reason: an error occurred after executing the git clone command. This occurs when the domestic server pulls the image. You can import Github's warehouse on the code cloud or other domestic Git service providers, and then use the domestic image address.
Failure reason: the domain name cannot be accessed. Check the configuration or local HOSTS to see if the domain name has been bound.
Cause of failure: it is started successfully but cannot be accessed. Generally, it only appears during local debugging. Although the domain name can be started at will, pay attention to the rules (for example, if the SSL certificate is not configured, the nginx error log will have, for example. dev domain name. When I use the self signed SSL certificate during local testing, I will always be unable to access, but the nginx access log will display normally).
Access the forum and initialize the configuration
Access localhost or your configured domain name, register the administrator user and initialize the configuration.
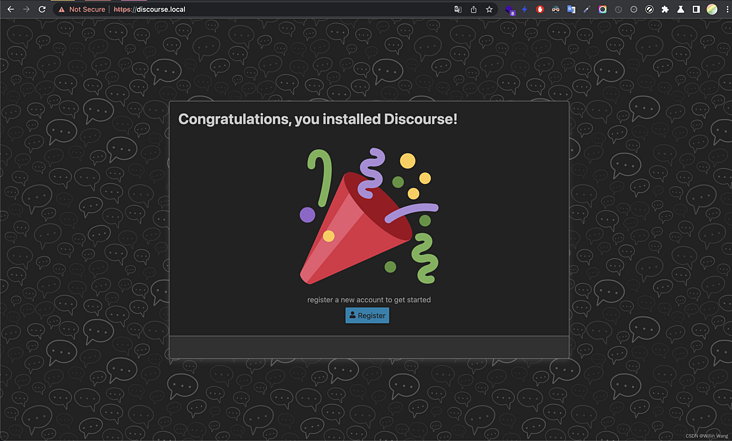
After re entering through the mail verification link, start initializing the configuration. After the 11 steps are set, enter the management background - setting.
Select [login] in the left sidebar
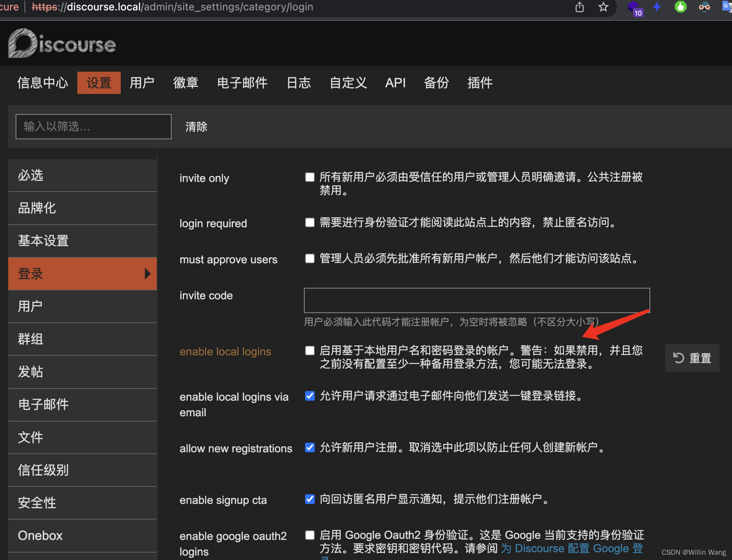
Turn off the local login (it is recommended to be safe to turn off after the single sign on configuration is completed).
Enter plug-in settings:
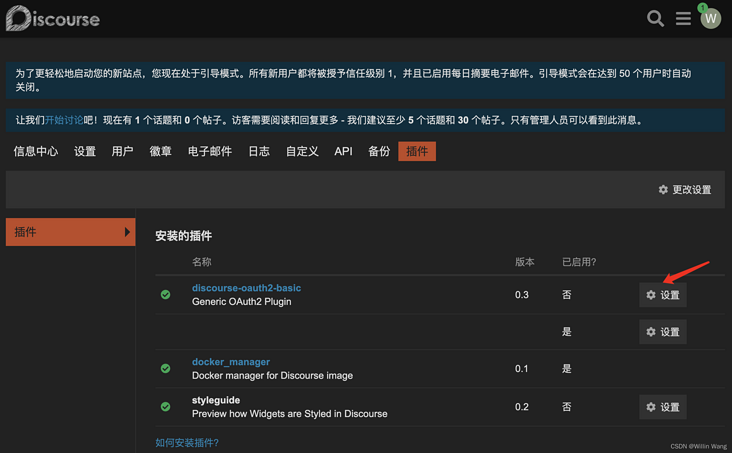
Click Set and stay on the current configuration page (continue setting later). Open the authoring console in a new window.
Authoring SSO single sign on Integration
Search discover in the single sign on SSO market. Click Get Application to enter configuration.
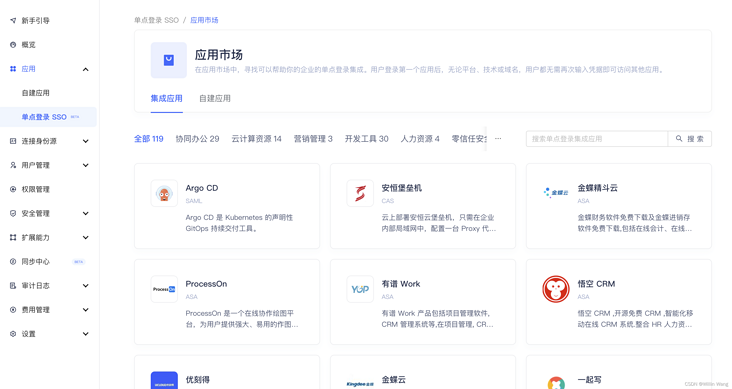
The first step is to fill in the forum name, and the second step is to log in and configure.
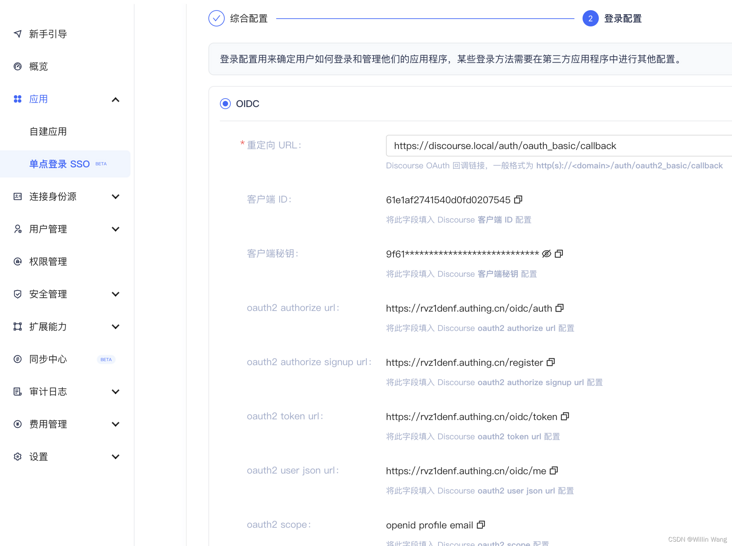
Only one Redirect URI needs to be filled in (note that http / https is distinguished here. If not, a redirect_uri_mismatch error will be reported), and other configuration items will be copied and filled in the discover plug-in configuration accordingly. Example: http://discourse.local/auth/oauth2_basic/callback (replace your domain name and keep the following path consistent).
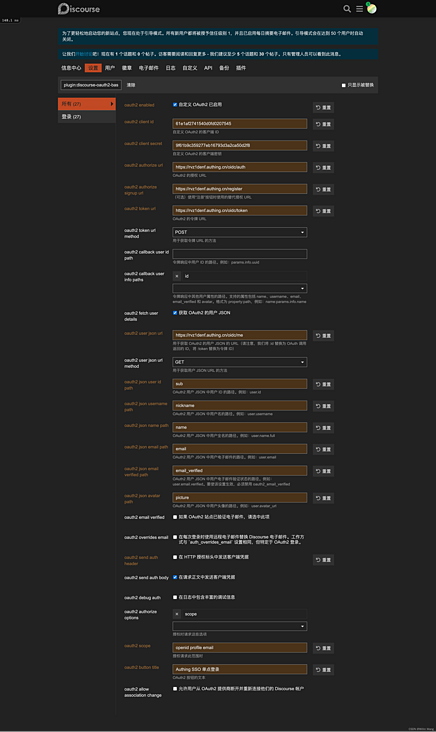
In addition, the items to be configured are:
- oauth2 json user id path: fill in sub
- oauth2 json username path: fill in nickname or username
- oauth2 json name path: fill in name
- oauth2 json email path: fill in email
- oauth2 json email verified path: fill in email_verified
- oauth2 json avatar path: fill in picture
- oauth2 send auth header send client credentials in HTTP authorization header: uncheck
Save the plug-in configuration.
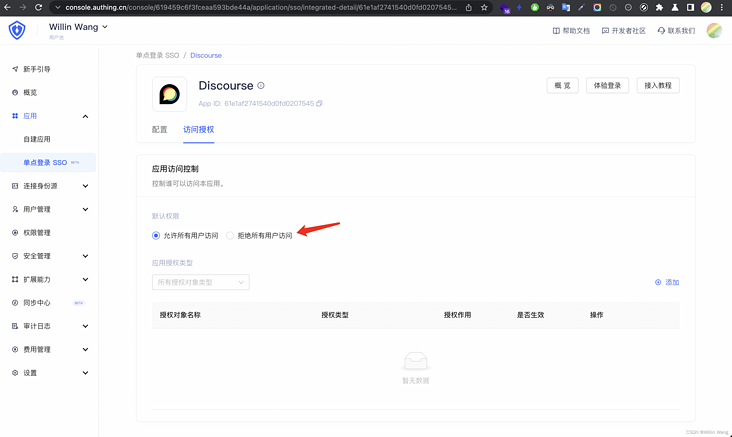
After saving the access authorization, you can test it in the new privacy window.
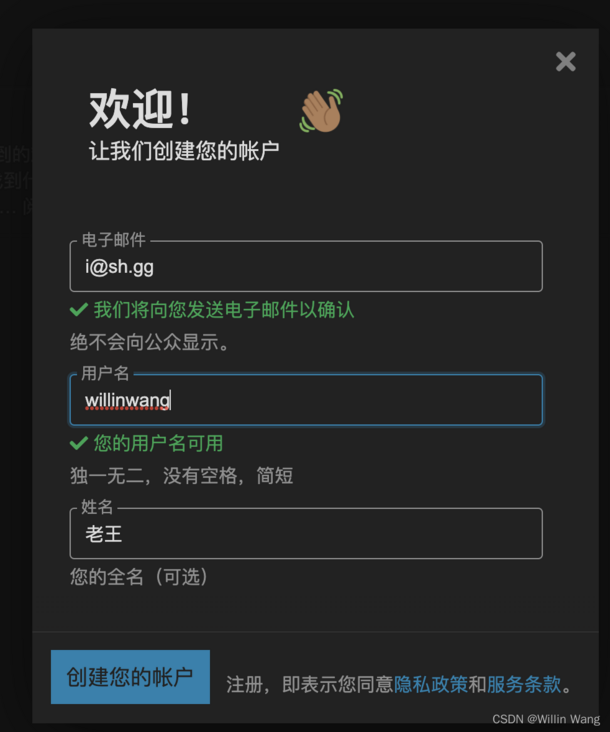
Automatically bring Authing user information into the forum. The test was successful.
At the same time, the administrator account (the mailbox is the same as the Authing user) can be seamlessly connected to the Authing SSO single sign on mode.
That's it. It's done.
extend
Through Authing SSO, you can also access through codeless mode:
- Collaboration tools: such as Zen, ProcessOn, graphite documents, notation, Tower, teamwork, flying book, Confluence, etc
- Cloud computing resources: such as Ali cloud, Tencent cloud, AWS, Baidu intelligent cloud, Jin Shanyun, Hua Weiyun, etc.
- Developer tools: such as Gitlab, Jira, coding Net, Bitbucket, Jenkins, etc
- 120 other services / platforms / software (currently available in the app store)
At the same time, it can also access various systems and software in the form of low code / zero code. At present, the protocols supported by self built applications include:
- OAuth 2.0
- SAML 2
- CAS
Using authoring sso, you can easily integrate single sign on of NodeBB forum, Wordpress site, etc.