Integrating spring security, spring boot and redis, jwt realizes the function of separate login authentication and picture verification code at the front and back ends
First, we need to understand the general implementation process of the spring security filter chain:
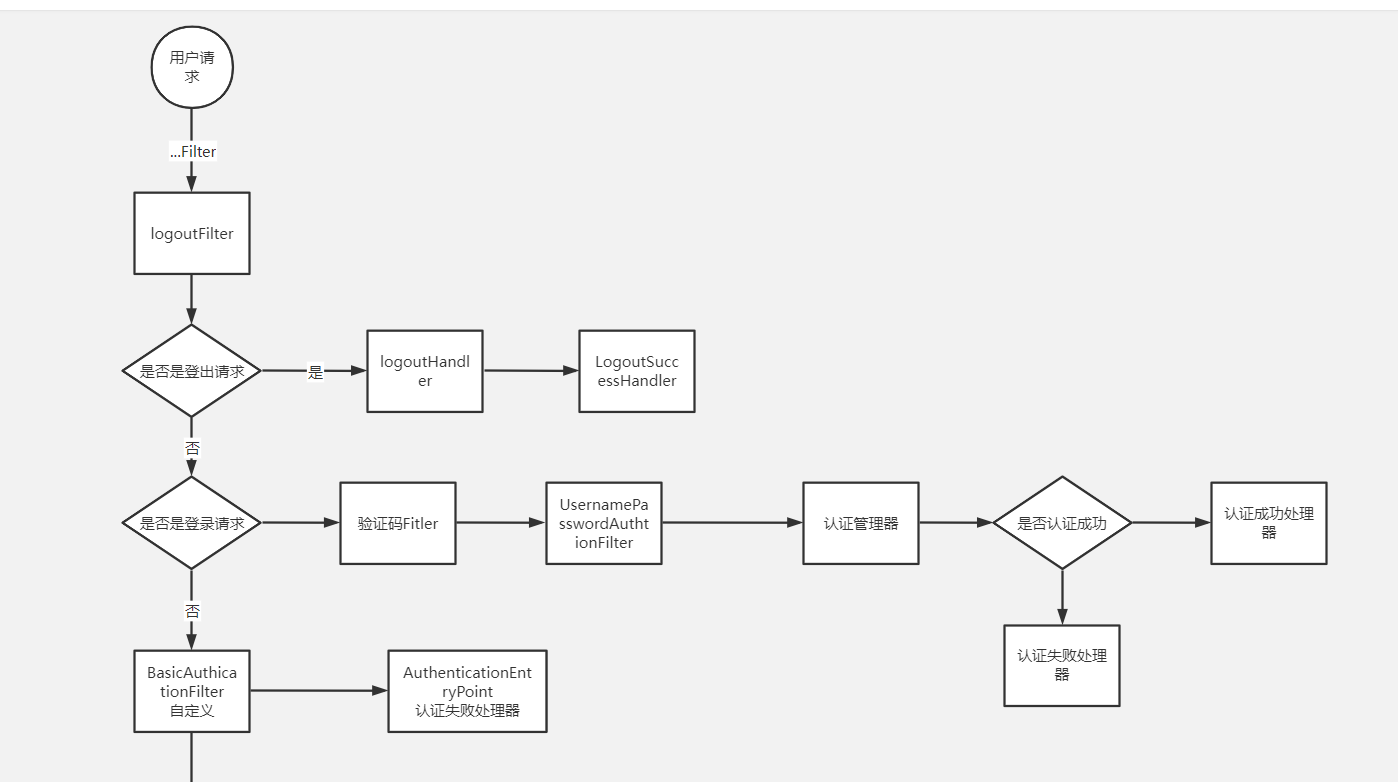
That is, when a user initiates a request, he will enter the Security filter chain.
- Judge whether the LogoutFilter is an exit path. If it is an exit path, go to logoutHandler to exit the processor. If the exit is successful, go to logoutSuccessHandler to exit the successful processing. If it is not the exit path, go directly to the next filter.
- When accessing the UsernamePasswordAuthenticationFilter, judge whether it is the login path. If yes, enter the filter for login operation. If the login fails, go to the AuthenticationFailureHandler for processing. If the login succeeds, go to the AuthenticationSuccessHandler for processing, If it is not a login request, the filter is not entered.
- Enter the authentication BasicAuthenticationFilter for user authentication. If successful, the authenticated result will be written to the attribute authentication of SecurityContext in the SecurityContextHolder. If the authentication fails, it will be handed over to the AuthenticationEntryPoint authentication failure processing class, or an exception will be thrown and handled by the subsequent ExceptionTranslationFilter filter. If it is an AuthenticationException, it will be handed over to the AuthenticationEntryPoint for processing. If it is an AccessDeniedException exception, it will be handed over to the AccessDeniedHandler for processing.
- When you get to the FilterSecurityInterceptor, you will get the uri and find the corresponding authentication management according to the uri
LogoutFilter - logout filter
logoutSuccessHandler - operation class after successful logout
UsernamePasswordAuthenticationFilter - from submit username password login authentication filter
AuthenticationFailureHandler - login failure action class
AuthenticationSuccessHandler - login success operation class
BasicAuthenticationFilter - Basic Authentication filter
SecurityContextHolder - security context static tool class
AuthenticationEntryPoint - authentication failed entry
ExceptionTranslationFilter - exception handling filter
AccessDeniedHandler - insufficient permission operation class
FilterSecurityInterceptor - permission determination interceptor, exit
After understanding the general process, our first step is naturally to import their jar packages.
- For the image verification code function, since we want to implement it, we first need a class to generate the image verification code, in which we set the size and size of the image:
@Configuration
public class KaptchaConfig {
   @Bean
   public DefaultKaptcha producer() {
      Properties properties = new Properties();
      properties.put("kaptcha.border", "no");
      properties.put("kaptcha.textproducer.font.color", "black");
      properties.put("kaptcha.textproducer.char.space", "4");
      properties.put("kaptcha.image.height", "40");
      properties.put("kaptcha.image.width", "120");
      properties.put("kaptcha.textproducer.font.size", "30");
      Config config = new Config(properties);
      DefaultKaptcha defaultKaptcha = new DefaultKaptcha();
      defaultKaptcha.setConfig(config);
      return defaultKaptcha;
   }
}
- Next, we need to write the controller that generates the verification code in the controller layer:
@Slf4j
@RestController
public class AuthController extends BaseController{
   @Autowired
   private Producer producer;
   /**
    * Picture verification code
    */
   @GetMapping("/captcha")
   public Result captcha(HttpServletRequest request, HttpServletResponse response) throws IOException {
      String code = producer.createText();
      String key = UUID.randomUUID().toString();
      BufferedImage image = producer.createImage(code);
      ByteArrayOutputStream outputStream = new ByteArrayOutputStream();
      ImageIO.write(image, "jpg", outputStream);
      BASE64Encoder encoder = new BASE64Encoder();
      String str = "data:image/jpeg;base64,";
      String base64Img = str + encoder.encode(outputStream.toByteArray());

      // Store in redis
      redisUtil.hset(Const.captcha_KEY, key, code, 120);
      log.info("Verification Code -- {} - {}", key, code);
      return Result.succ(
            MapUtil.builder()
            .put("token", key)
            .put("base64Img", base64Img)
            .build()
      );
   }
}
- Since we separate the front and back ends, we need to disable the session. Here, the verification code is cached in redis. Then, each time the verification code is generated, a key is randomly generated to the front end, and the front end submits the key and the verification code together when submitting the form.
- Then, because of the way of image verification code, we encode and base64 encode the image, so that the front end can display the image.
Due to the configuration of springsecurity, we need to set a pre filter before the original login filter to verify whether the verification code is correct:
/**
 * Picture verification code verification filter, before logging in to the filter
 */
@Slf4j
@Component
public class CaptchaFilter extends OncePerRequestFilter {
   private final String loginUrl = "/login";
   @Autowired
   RedisUtil redisUtil;
   @Autowired
   LoginFailureHandler loginFailureHandler;
   @Override
   protected void doFilterInternal(HttpServletRequest request, HttpServletResponse response, FilterChain filterChain)
         throws ServletException, IOException {
      String url = request.getRequestURI();
      if (loginUrl.equals(url) && request.getMethod().equals("POST")) {
         log.info("Get login Link, verifying verification code -- " + url);
         try {
            validate(request);
         } catch (CaptchaException e) {
            log.info(e.getMessage());
            // Give it to the login failure processor for processing
            loginFailureHandler.onAuthenticationFailure(request, response, e);
         }
      }
      filterChain.doFilter(request, response);
   }
   private void validate(HttpServletRequest request) {
      String code = request.getParameter("code");
      String token = request.getParameter("token");
      if (StringUtils.isBlank(code) || StringUtils.isBlank(token)) {
         throw new CaptchaException("Verification code cannot be empty");
      }
      if(!code.equals(redisUtil.hget(Const.captcha_KEY, token))) {
         throw new CaptchaException("Incorrect verification code");
      }
      // Disposable use
      redisUtil.hdel(Const.captcha_KEY, token);
   }
}
- After understanding the previous filter chain execution process, we know that we will have a processor to deal with login failure:
@Component
public class LoginFailureHandler implements AuthenticationFailureHandler {

	@Override
	public void onAuthenticationFailure(HttpServletRequest request, HttpServletResponse response, AuthenticationException exception) throws IOException, ServletException {

		response.setContentType("application/json;charset=UTF-8");
		ServletOutputStream outputStream = response.getOutputStream();

		outputStream.write(JSONUtil.toJsonStr(new ApiResponse<>().setReMsg(exception.getMessage())).getBytes("UTF-8"));

		outputStream.flush();
		outputStream.close();
	}
}
- Similarly, for successful login, we will also have a processor:
@Component
public class LoginSuccessHandler implements AuthenticationSuccessHandler {


	@Autowired
	JwtUtils jwtUtils;

	@Override
	public void onAuthenticationSuccess(HttpServletRequest request, HttpServletResponse response, Authentication authentication) throws IOException, ServletException {


		response.setContentType("application/json;charset=UTF-8");
		ServletOutputStream outputStream = response.getOutputStream();
		// jwt is generated and placed in the request header
		String jwt = jwtUtils.generateToken(authentication.getName());
		response.setHeader(jwtUtils.getHeader(), jwt);
		outputStream.write(JSONUtil.toJsonStr(new ApiResponse<>().setReMsg("Login succeeded")).getBytes("UTF-8"));
		outputStream.flush();
		outputStream.close();
	}

}
- Then, in order to combine jwt, we need a jwt tool class:
@Data
@Component
@ConfigurationProperties(prefix = "matrix.jwt")
public class JwtUtils {

	private long expire;
	private String secret;
	private String header;

	// Generate jwt
	public String generateToken(String username) {

		Date nowDate = new Date();
		Date expireDate = new Date(nowDate.getTime() + 1000 * expire);

		return Jwts.builder()
				.setHeaderParam("typ", "JWT")
				.setSubject(username)
				.setIssuedAt(nowDate)
				.setExpiration(expireDate)// 7 days overdue
				.signWith(SignatureAlgorithm.HS512, secret)
				.compact();
	}

	// Parse jwt
	public Claims getClaimByToken(String jwt) {
		try {
			return Jwts.parser()
					.setSigningKey(secret)
					.parseClaimsJws(jwt)
					.getBody();
		} catch (Exception e) {
			return null;
		}
	}

	// jwt expired
	public boolean isTokenExpired(Claims claims) {
		return claims.getExpiration().before(new Date());
	}

}
- This tool class implements the generation and verification of token s, and the key information should be written in the yml configuration file:
matrix:
  jwt:
    header: authorization
    expire: 604800
    secret: ji8n3439n439n43ld9ne9343fdfer49h
- Because we have implemented jwt technology, we also need a jwt filter to handle the case with token:
public class JwtAuthenticationFilter extends BasicAuthenticationFilter {

	@Autowired
	UserService userService;

	@Autowired
	JwtUtils jwtUtils;
	@Autowired
	UserDetailServiceImpl userDetailService;
	public JwtAuthenticationFilter(AuthenticationManager authenticationManager) {
		super(authenticationManager);
	}

	@Override
	protected void doFilterInternal(HttpServletRequest request, HttpServletResponse response, FilterChain chain) throws IOException, ServletException {

		String jwt = request.getHeader(jwtUtils.getHeader());
		if (StrUtil.isBlankOrUndefined(jwt)) {
			// No jwt direct release
			chain.doFilter(request, response);
			return;
		}
		System.out.println(12312);

		Claims claim = jwtUtils.getClaimByToken(jwt);
		if (claim == null) {
			throw new JwtException("token abnormal");
		}
		if (jwtUtils.isTokenExpired(claim)) {
			// Will be injected into the exception that failed validation
			throw new JwtException("token Expired ");
		}

		String username = claim.getSubject();
		// Obtain user permissions and other information
		User user = userService.getByUsername(username);

		// Store token information
		UsernamePasswordAuthenticationToken token = new UsernamePasswordAuthenticationToken(username, null, userDetailService.getUserAuthority(user.getId()));


		SecurityContextHolder.getContext().setAuthentication(token);
		// Release
		chain.doFilter(request, response);
	}
}
- We also need a processor to solve the exceptions when anonymous users access unauthorized resources:
@Component
public class JwtAuthenticationEntryPoint implements AuthenticationEntryPoint {

	@Override
	public void commence(HttpServletRequest request, HttpServletResponse response, AuthenticationException authException) throws IOException, ServletException {

		response.setContentType("application/json;charset=UTF-8");
		response.setStatus(HttpServletResponse.SC_UNAUTHORIZED);
		ServletOutputStream outputStream = response.getOutputStream();

		outputStream.write(JSONUtil.toJsonStr(new ApiResponse<>().setReMsg("Please log in first")).getBytes("UTF-8"));

		outputStream.flush();
		outputStream.close();
	}
}
- Similarly, our passwords cannot be stored in plaintext. We need to configure encryption, so we need to inject encryption and authentication policies:
@Bean
BCryptPasswordEncoder bCryptPasswordEncoder() {
   return new BCryptPasswordEncoder();
}