[ten thousand words step by step] package vue project with webpack (basic production environment)
This project is a hands-on project. It uses the new novice guide page created by Vue cli. The project itself does not have particularly complex logic, and Vue learning is not involved here. It will only be completed through gradual decomposition, and the final packaging of the project will be completed by using webpack.
The plugins and loaders used this time are:
webpack & webpack-cli
vue-loader & vue-template-compiler
style-loader & less & less-loader
This can be modified according to specific project requirements. LESS is used here, so it needs to be additionally equipped with LESS & LESS loader
css only users can only use style loader
file-loader & url-loader
There is also an alternative relationship here. URL loader plays the role of optimization. Its fallback is file loader, so file loader must be installed when using URL loader
On the contrary, only file loader can be used without installing URL loader
htmlWebpackPlugin
It solves the migration and template problems of HTML files, that is, entry files
clean-webpack-plugin
Automatically clear previously compiled files
copy-webpack-plugin
It meets the needs of migrating other static files
Project analysis
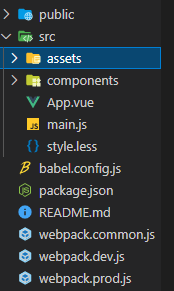
The structure is as follows. The files to be compiled include vue, less and JavaScript, and the files to be compressed include packaged JavaScript and HTML files.
Note *: this project is an initial project created using Vue cli, but the automatic packaging part of the scaffold is removed.
Realize basic functions
This part mainly implements some basic functions. This project is already an initialized node project. Otherwise, you need to use the init command to initialize.
Install webpack and webpack cli
D:\\vue-app-base>npm i webpack webpack-cli -D
i - is the abbreviation of install and - D - is the abbreviation of -- save dev. in this way, webpack and webpack cli are installed as development dependencies.
View package JSON file, you will find that devdependencies has been updated:
{
  "devDependencies": {
    "webpack": "^5.41.0",
    "webpack-cli": "^4.7.2"
  }
}
At this time, a new script command can be added to let npm run webpack:
{
  "script": {
    "build": "webpack"
  }
}
At this time, trying to run npm run build on the command line will get a lot of error results, but this can prove that the command can be run normally.
D:\\vue-app-base>npm run build

> vue-app-base@0.1.0 build D:\\vue-app-base
> webpack

assets by status 0 bytes [cached] 1 asset

WARNING in configuration
The 'mode' option has not been set, webpack will fallback to 'production' for this value.
Set 'mode' option to 'development' or 'production' to enable defaults for each environment.
You can also set it to 'none' to disable any default behavior. Learn more: https://webpack.js.org/configuration/mode/

ERROR in main
Module not found: Error: Can't resolve './src' in 'D:\\vue-app-base
# Save a lot of error information
webpack 5.41.0 compiled with 1 error and 1 warning in 163 ms
Add profile
Finally, create a new webpack. Net under the root directory config. JS is used as the entry of webpack, and the template is nested to configure the packaging mode, entry and exit files.
The configuration file of webpack can export an object, and the corresponding configuration options can be completed by exporting the properties of the object.
// npm original module
const path = require('path');

module.exports = {
  // Entry file
  entry: './src/main.js',
  // Exported part
  output: {
    // Exported file name
    filename: 'bundle.js',
    // The path where the exported file name will be placed
    path: path.resolve(__dirname, 'dist/'),
  },
};
Run npm run build again at this time, and the following results will be obtained:
D:\\vue-app-base>npm run build

> vue-app-base@0.1.0 build D:\\vue-app-base
> webpack

assets by status 4.16 KiB [cached] 1 asset
runtime modules 718 bytes 3 modules
cacheable modules 770 bytes
  ./src/main.js 169 bytes [built] [code generated]
  ./src/App.vue 537 bytes [built] [code generated] [1 error]
  ./src/style.less 64 bytes [built] [code generated] [1 error]
# Omit a pile of error messages
webpack 5.41.0 compiled with 4 errors and 1 warning in 216 ms
This time, four errors and one warning are called out, which is a good thing. At least list all error messages one by one, so that you can start debug ging. What I fear most is not that there are many wrong information, but that there is no clue about the wrong information and I don't know where to start.
webpack gives several problems in the project, namely:
- WARNING in configuration
This means that the mode is not set and will be developed in the production environment by default
-
ERROR in ./src/App.vue 1:0
This hint is obvious. webpack says:
You may need an appropriate loader to handle this file type, currently no loaders are configured to process this file.
A Vue loader is needed to solve the problem
- ERROR in ./src/main.js 1:0-21
This problem should also be the same. The specific error information is as follows:
Module not found: Error: Can't resolve 'vue' in 'D:\\vue-app-base\src'
- ERROR in bundle.js from Terser
This problem belongs to the problem of output file. First solve the problem of packaging above, and then see if this problem will occur
mode problem
This problem is easy to solve. At this stage, the command line parameters in scripts will be modified to set to the development mode:
{
  "scripts": {
    "build": "webpack --mode=development"
  }
}
Similarly, when you run npm run build again, you will find that there is one missing error message:
webpack 5.41.0 compiled with 3 errors in 103 ms
The last error in bundle JS from terser disappeared. That is to say, the remaining three errors are all errors reported during development, so you can start to prepare for the implementation of the open loader and plugin.
In addition, although an error is reported at this time, the dist directory can be displayed to prove that webpack has been run at least once and the packaging file has been exported - this time, it can be confirmed that there are no problems with the installation and basic configuration of webpack: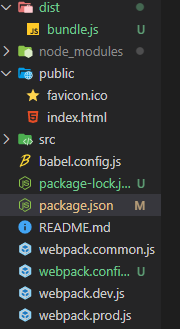
vue loader and related
vue loader It is a webpack plug-in, and the configuration here is implemented with the official documents.
1. Install Vue loader and Vue template compiler
npm install -D vue-loader vue-template-compiler
# I suddenly realized that the error of cannot find Vue was because I didn't download the package Vue listed in JSON
# So download again and download the required dependent packages
npm install
2. According to the content of the official document, rewrite the webpack config. JS
// New content
const { VueLoaderPlugin } = require('vue-loader');

module.exports = {
  // New content
  module: {
    rules: [{ test: /\.vue$/, loader: 'vue-loader' }],
  },
  plugins: [new VueLoaderPlugin()],
};
3. Continue to follow the official documentation, download and install the required dependencies, and rewrite the webpack config. js
# babel is responsible for parsing JavaScript
npm install -D babel-loader @babel/core
# The other two are responsible for parsing CSS
npm install -D vue-style-loader css-loader
# This is also a required plug-in, otherwise an error will be reported
# It is not listed in the official documents. If there are different error reports, you must read the error information
npm i -D @vue/cli-plugin-babel
// New content
const { VueLoaderPlugin } = require('vue-loader');

module.exports = {
  // The content in module is new
  module: {
    rules: [
      // Parsing Vue files
      { test: /\.vue$/, loader: 'vue-loader' },
      // It will be applied to ordinary js ` file
      // And ` ` < script > ` block in vue ` file
      {
        test: /\.js$/,
        loader: 'babel-loader',
      },
      // It will be applied to ordinary css ` file
      // And ` ` < style > ` block in vue ` file
      {
        test: /\.css$/,
        use: ['vue-style-loader', 'css-loader'],
      },
    ],
  },
  plugins: [
    // Please make sure to introduce this plug-in!
    new VueLoaderPlugin(),
  ],
};
4. Run npm run build, and there are only two error messages left. One is png package error (lack of image processing) and the other is less package error (lack of less)
Solve CSS loading
The content loaded by CSS is officially provided by webpack: less-loader Therefore, the error reporting information will be solved step by step here
1. Download required dependent packages
# This is style loader, which is required for the following configuration
npm install style-loader --save-dev
# This is related to less
npm install less less-loader --save-dev
2. Modify profile
Note *: the official document here uses loader, but I don't know why using loader will report an error, so it is changed to use. If you report an error with use, try loader. The version change of webpack may make it very difficult to use
module.exports = {
  module: {
    rules: [
      // Other places remain unchanged
      // Processing less files
      {
        test: /\.less$/i,
        use: [
          // compiles Less to CSS
          'style-loader',
          'css-loader',
          'less-loader',
        ],
      },
    ],
  },
};
3. Run npm run build to check
There is only one png problem left this time
Solve the problem of picture loading
1. Download the corresponding loader. File loader is used here
D:\\vue-app-base>npm i -D file-loader
2. Modify profile
module.exports = {
  output: {
    filename: 'bundle.js',
    path: path.resolve(__dirname, 'dist'),
    // New content: modify the path and change it to relative path instead of absolute path
    publicPath: './',
  },
  module: {
    rules: [
      // Omit other configurations
      // Processing png pictures
      {
        test: /\.png$/i,
        // If you directly use use use: "file loader" as above
        // The picture resource is "[object Module]"
        // This is because the new file loader automatically opens the ES module
        // Manual closing can display correctly
        use: {
          loader: 'file-loader',
          options: {
            esModule: false,
          },
        },
      },
    ],
  },
};
Note *: the file loader here has some special properties. In order to correctly display pictures, you must set esModule to false
This is due to different file loader versions. In the low version environment, the default esModule is closed, so it can be displayed correctly. But the version I'm using now is 6.2. By default, esModule is enabled. When esModule is enabled, the path introduced by the picture is "[object Module]" instead of SRC = ". / 26bd867dd65e26dbc77d1e1151ffd36e0. PNG".
3. Try packaging
Finally, there is no error message. It seems that it has been packaged successfully.
D:\\vue-app-base>npm run build

> vue-app-base@0.1.0 build D:\\vue-app-base
> webpack --mode=development

asset bundle.js 566 KiB [emitted] (name: main)
asset 26bd867dd65e26dbc77d1e151ffd36e0.png 6.69 KiB [emitted] [immutable] [from: src/assets/logo.png] (auxiliary name: main)runtime modules 2.04 KiB 6 modules
modules by path ./node_modules/core-js/ 147 KiB
modules by path ./node_modules/core-js/internals/*.js 85.2 KiB 114 modules
modules by path ./node_modules/core-js/modules/*.js 62 KiB 36 modules
modules by path ./src/ 16.1 KiB 20 modules
modules by path ./node_modules/style-loader/dist/runtime/*.js 4.12 KiB 4 modules
modules by path ./node_modules/vue-style-loader/lib/*.js 6.74 KiB
./node_modules/vue-style-loader/lib/addStylesClient.js 6.09 KiB [built] [code generated]
./node_modules/vue-style-loader/lib/listToStyles.js 671 bytes [built] [code generated]
./node_modules/vue/dist/vue.runtime.esm.js 222 KiB [built] [code generated]
./node_modules/vue-loader/lib/runtime/componentNormalizer.js 2.71 KiB [built] [code generated]
./node_modules/@babel/runtime/helpers/esm/typeof.js 726 bytes [built] [code generated]
./node_modules/css-loader/dist/runtime/api.js 1.75 KiB [built] [code generated]
webpack 5.41.0 compiled successfully in 3548 ms
You can also see new pictures under the packaged Directory:
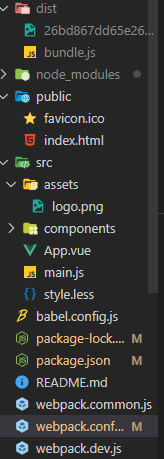
Note *: if the picture is small, you can use URL loader to reduce the number of http requests.
Then, manually copy, paste and modify the index HTML, take a look at the rendering results:

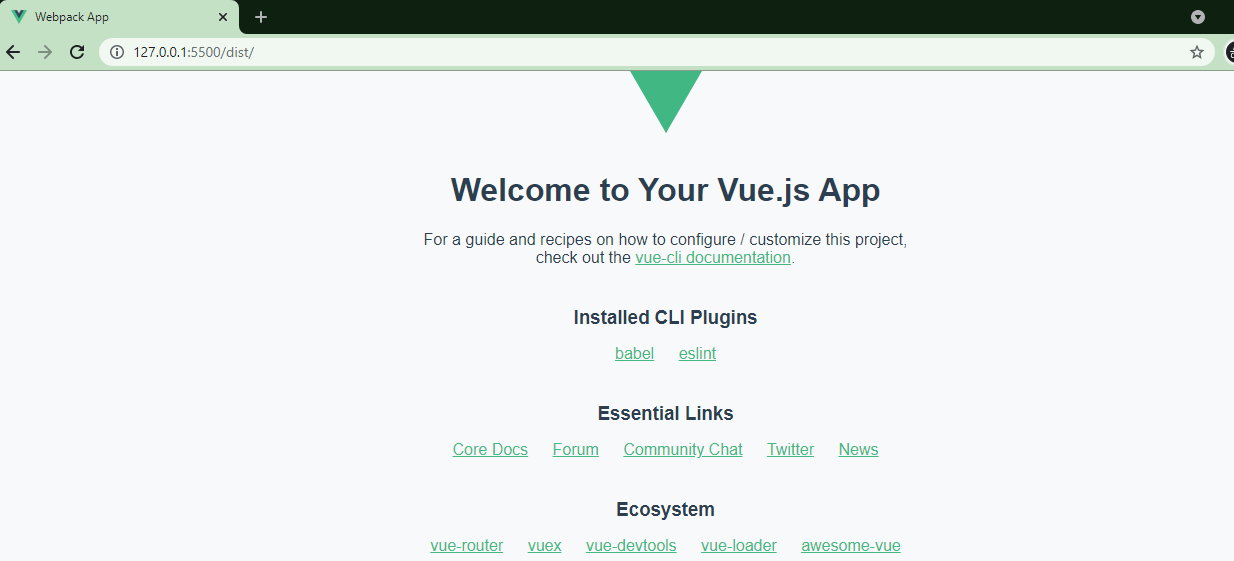
All contents can be displayed normally, and the processing of static resources can be started.
URL loader, image optimization
1. Download the corresponding loader. File loader is used here
D:\\vue-app-base>npm install url-loader --save-dev
2. Modify profile
But speaking, vue's logo is just stuck in the size of 8kb, so what is the conventional rule?
Note that file loader should be changed to URL loader here, and URL loader and file loader cannot be superimposed. The reason is that the fallback function of URL loader is file loader. If two loaders are used at the same time, URL loader will base64 convert the path of the original image file. This causes the converted image to be invisible - the image path is converted, not the image.
The specific discussion is in an issue of URL loader: URL loader is encoding path instead of image.
I stepped on a thunder and learned a knowledge point.
module.exports = {
  module: {
    rules: [
      {
        test: /\.png$/i,
        use: [
          {
            // It was originally file loader, but it should be changed to URL loader here
            loader: 'url-loader',
            options: {
              // The upper limit is set in official documents, so it won't be changed here
              limit: 8192,
              // Similarly, if it is not set to false, esModule will be opened
              esModule: false,
            },
          },
        ],
      },
    ],
  },
};
Solve the loading of static files
The dawn of victory is close at hand. The next step is just to solve the problem of static resources. The static resource here refers to the index. In public HTML and favicon ico. First, you need to cv the contents under public to dist, and then you need to deal with the template file in HTML.
The plug-in used here is htmlWebpackPlugin, which is also a hint in Vue's native project:
<title><%= htmlWebpackPlugin.options.title %></title>
For specific configuration, see the instructions on github:
html-webpack-plugin
1. Download and install plug-ins
D:\\vue-app-base>npm i -D html-webpack-plugin
2. Modify the configuration file
Here is to modify the configuration according to the official documents.
Note *: BASE_URL is an environment variable, so you need to use deinfeProperty to set it
// Two newly imported dependencies
const webpack = require('webpack');
const HtmlWebpackPlugin = require('html-webpack-plugin');

module.exports = {
  plugins: [
    // Set the basic configuration required for webpack
    new webpack.DefinePlugin({
      BASE_URL: JSON.stringify('./'),
    }),
    // An empty dog morning chill will only generate an index HTML, appropriate files will be introduced, but the portal DOM node app is missing, so other configurations are required
    new HtmlWebpackPlugin({
      template: 'public/index.html',
      favicon: 'public/favicon.ico',
    }),
  ],
};
Note 2 *: if you have learned a new trick, you can also set it directly in the HTML webpack plugin:
new HtmlWebpackPlugin({
  template: 'public/index.html',
  templateParameters: {
    BASE_URL: '/',
  },
});
3. Run npm run build package
The results are as follows:
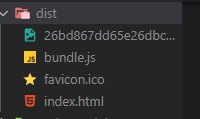
You can see favicon ICO is also packaged, index The contents of HTML are as follows:
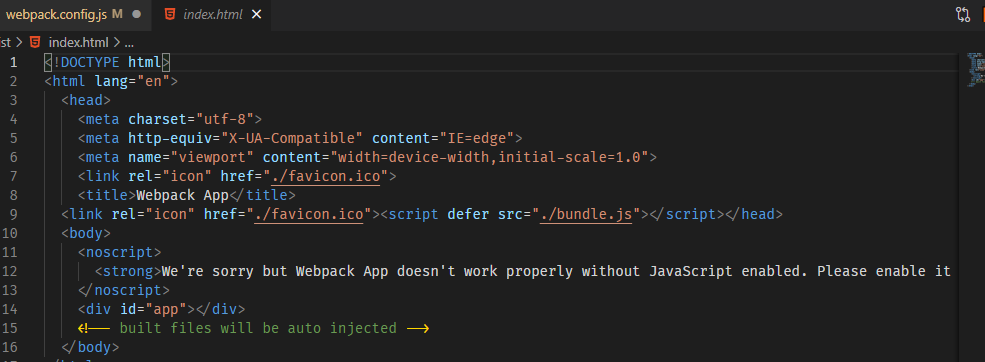
You can see that the title and logo have been dynamically modified, and the content can be rendered normally:
Automatically clear output directory
Now, the contents in dist will be rewritten every time. Although it will not affect the results, it may cause the previously generated files to be left in the folder, resulting in unnecessary waste. The clean webpack plugin will be used to solve this problem. The address of npmjs is: clean webpack plugin
Note *: by default, this version will empty all contents in all output directories.
1. Download and install plug-ins
npm install --save-dev clean-webpack-plugin
2. Modify configuration
This configuration changes quickly. You can directly reference it.
const { CleanWebpackPlugin } = require('clean-webpack-plugin');

module.exports = {
  plugins: [
    // The previous configuration remains unchanged
    new CleanWebpackPlugin(),
  ],
};
3. Run npm run build package
I ran it successfully, and then I will modify another problem.
Copy static files
When configuring the HTML webpack plugin, I added a favicon ICO, and then found that the Vue project originally had a favicon ICO, another one is added here, and a duplicate code appears:

When I called the clean webpack plugin above, I removed the original favicon configuration, and there was a problem that the pictures were not migrated. Here, find a plug-in to migrate static resources.
The plug-in used here is a plug-in found on the official website of webpack: copy-webpack-plugin
1. Download and install plug-ins
npm install copy-webpack-plugin --save-dev
2. Modify configuration
All we need to do here is migrate favicon ICO, so only this file is set, but copy webpack plugin can actually migrate a single file or an entire folder
// Daily reference
const CopyPlugin = require('copy-webpack-plugin');

module.exports = {
  plugins: [
    // The rest remains unchanged
    // Only favico has migrated here ICO this file
    new CopyPlugin({
      patterns: [{ from: 'public/favicon.ico', to: './' }],
    }),
  ],
};
This completes the favicon Migration of ICO files
last
Package Modify the build in JSON as follows:
// It was development
"build": "webpack --mode=production",
When you run the package command {npm run build, webpack will automatically compress the packaged files according to the production environment:
HTML entry file:

Packaged bundle JS file:
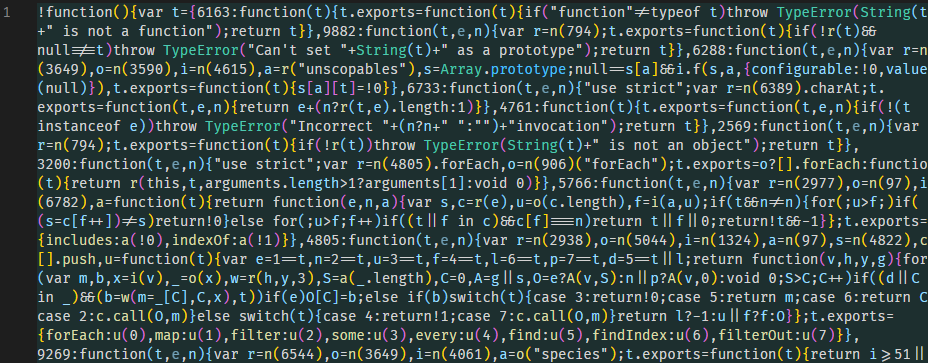
In this way, a basic production environment packaging function is realized.
The next step is to learn how to use webpack dev server to configure the development environment - after all, I use the hot update implemented by the live server plug-in here, but it is not guaranteed that everyone uses one editor / IDE, let alone the same plug-in.
Similarly, tree shaping and code splitting are also issues to be considered, which will be learned and configured in the next article.
Finally, Linting should also be added. Maintaining the unity of code style is very helpful for later maintenance.