1, Project environment
- Front end technology stack: Vue-Cli
- Front end software: WebStorm 2020.3
- Front end style: Bootstrap
- Back end technology stack: SpringBoot
- Back end software: IntelliJ IEDA2019
- JavaJDK: 1.8
- Server: Alibaba cloud Centos 7
- Others: MyBatis, Redis, MySql, Docker, Shiro
2, Project demonstration
- Project source code: shoppingProject01_pub : version6.0
- Project reference: Project05;Bad person_ Vue-Cli;Bad person_ Redis;Bad person_ Axios;Shang Silicon Valley_ Redis
- Project function:
1) Email registration login:
After the user registers with the application mailbox and clicks submit, the website will send an email to the user with an activation code link. The user clicks the link to activate the account Portal.
2) SMS registration login:
When the user registers with the mobile phone number, click the "get verification code" button, and the mobile phone will receive the SMS sent by the website with the verification code. Based on Redis, the verification code is valid for 5 minutes, and each mobile phone number can only obtain the SMS verification code three times Portal.
3) alipay payment:
By downloading Android Alipay sandbox app Users can scan the code to purchase goods on the website through alipay, and the background MySql will record the order behavior Portal , the web page is shown in Figure 1.

4) User rating:
When the user scans the code to buy the annual VIP member, the goods on the website will be half price, and the background MySql records the change of the user's role.
5) User ranking:
Users' purchase of goods will increase their points. The web page is shown in Figure 2.

- Large pits encountered in the project:
1) The mail sending function passed the local test, and the server-side test Bug occurred frequently, terms of settlement.
2) After the project is deployed on the server, Redis on the server cannot be connected. Solution: (1) deploy Redis on the server instead of Docker; (2) Change the Redis port to 7000; (3) Release the server and alicloud port 7000 in the firewall active state; (4) Modify redis Conf file.
3) git uploads the local source code to gitee. Misoperation causes the local source code to be covered by the old code on gitee. It is discovered the next day. Solution: because the jar package of the source code is left on the server, you can use the Decompile tool jd_gui Save half your life. In addition, git upload file reference Portal.
3, Description of main modules
1 Vue cli module description:
1.1 overview of Vue cli:
1) In the past, the back-end was separated and the single page web application (SPA) was characterized. Vue cli could create a Vue project with scaffolding specifications. Vue cli has the following advantages:
(1) Development based on scaffold specifications will become flexible.
(2) Vue cli is built based on webpack with reasonable default configuration. The packaging tool webpack can aggregate single pages and various development components.
(3) Vue cli is a rich collection of official plug-ins, inheriting the best tools in the front-end ecology.
2) Installation process:
(1) Install webstorm (for development), install node JS, install Vue cli, install Axios (used to initiate cross domain requests), and introduce the bootstrap style.
3) Deployment process:
npm run build               # Execute in the WebStorm terminal to generate the dist folder
docker pull nginx:1.19.10   # It is not recommended that the Vue cli project be deployed to tomcat, because Tomcat belongs to a dynamic server and needs a java environment to start, in order to parse the dynamic language jsp; For example, pure static is deployed to the static server nginx.
mkdir html                  # To map data volumes inside and outside the docker container
mv dist/ html/
docker run -p 80:80 --name nginx01 -d -v /root/html/dist/:/usr/share/nginx/html nginx:1.19.10  # Data volume mapping
# It is now accessible http://120.79.133.235:80/index.html
4) Key points of Vue cli development:
(1) In WebStorm, the development process is mainly oriented to src files, as shown in Figure 3:
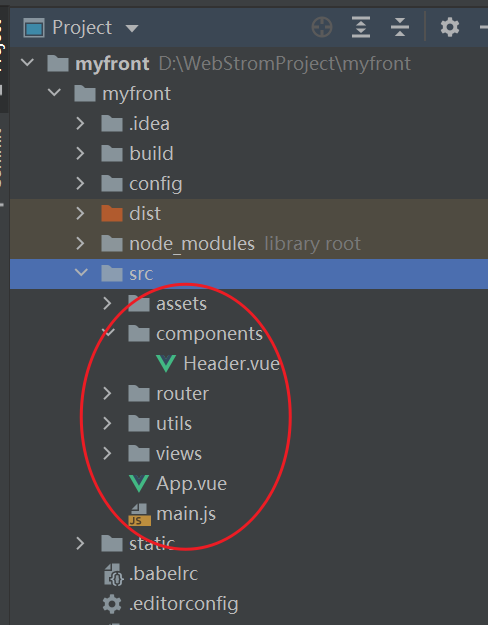
[1] First, master the routing and components (components [public component], views [private component]). Components are "pages". After the components are established, they should be registered with the routing; [2] asserts encapsulates the bootstrap style and displays it in main JS; [3] In order to send cross domain requests, axios instances are encapsulated in utils. The code is as follows:
import axios from 'axios'

// Create default instance
const instance = axios.create({
  baseURL: 'http://120.79.133.235:8989/eb',
  // timeout: 10000,
});

// request interceptor
instance.interceptors.request.use(config=>{
  console.log("request interceptor ");
  return config;
})
// Response interceptor
instance.interceptors.response.use(response=>{
  console.log("Response interceptor");
  return response;
}, err=>{
  console.log("Interceptor entered in response to an error");
});

// Expose instance object
export default instance;
In each component, the get and post request methods for the backend are as follows:
// Get request
// Send the current page number to the back-end interface to obtain the product List of the current page
instance.get("/item/findAllItem?page="+this.page).then(res=>{
        that.items = res.data.items;
        that.totalPage = res.data.totalPage;
        that.page = res.data.page;
      });

// Post request
// Send the current commodity id and user id to the back-end interface to obtain the commodity purchase status
instance.post("/order/alipay/callback",{itemId:this.itemid,userId:this.user.id}).then(res=>{
        if ( res.data.code == 20000 ) {
          alert("Tip: you have purchased this product");
        } else {
          alert("Tip: you have not purchased this product");
        }
      });
    }
[4] The jump and value transfer methods between components are as follows:
// Jump to MailReg component
this.$router.push({name:"MailReg"});

// Jump to the item component and pass the id of the current item
this.$router.push({path:"/item",query:{ItemId:myid}});
// item component receiving method:
this.itemid = this.$route.query.ItemId;

// In addition, different components can obtain the login user information according to the token. redis is required. See the following for details
2 user leaderboard module description:
1.1 IDS overview:
1) Redis is a memory based data storage NoSql;
2) Redis supports rich data types (String, List, Set, ZSet, Hash);
3) Redis has two persistence methods: (1) snapshot storage, also known as rdb persistence, which saves the data state at the current time; (2) AOF(append only file) stores and records all redis write commands in the log file. Redis supports persistence. The fastest interval is one second, so it is unsafe for transactions, that is, it may lose data.
4) Redis application scenario:
(1) The Redis string is used to complete the storage of mobile phone verification code in the project------ The project adopts
(2) Use Redis string type to complete time effective business functions. For example, the order will be closed in 40 minutes.
(3) Redis is used to realize Session sharing in distributed cluster system.
(4) The ranking function is realized by using the ZSet data type (sortable set type: element + score) of Redis------ The project adopts
(5) Redis is used to complete distributed caching------ This project realizes the caching of data in MySql
(6) Redis is used to store the token information after authentication------ Very convenient, this project adopts.
(7) Redis is used to solve the problem of distributed lock in distributed cluster system.
1.2 based on Redis, the front-end component obtains user information from the back-end:
Step 1: front end login The interface for user input login information submission in Vue component is as follows:
// Here, the back-end / user/login interface is called to obtain the token of the currently logged in user and store it in the localStorage of the Session. This token can be called at any time during subsequent web browsing
instance.post("/user/login",this.user).then(res=>{
        if ( res.data.state ) {
          alert(res.data.msg+",Click OK to enter the home page");
          // The front end stores token information
          localStorage.setItem("token",res.data.token);
          that.$router.push({path:"/itemList"});
        } else {
          alert(res.data.msg);
          that.user = {};
        }
      });
Step 2: the backend / user/login interface is implemented as follows:
// Controller layer
@PostMapping("login")
public Map<String, Object> loginAccount(@RequestBody User user, HttpSession session) {
    return userService.loginAccount(user, session);
}

// Service layer
// Case 3: when a user is queried
// Get principal object
try {
     Subject subject = SecurityUtils.getSubject();
     subject.login(new UsernamePasswordToken(user.getName(), user.getPassword()));
     User userDB = userListDB.get(0);
     String token = session.getId();
     if (userDB.getScore() == null) {
           userDB.setScore(0.0);
           userDAO.updateUserScore(userDB);
     }
     redisTemplate.opsForValue().set("TOKEN_" + token, userDB, 30, TimeUnit.MINUTES);
     redisTemplate.opsForZSet().add("userRank", userDB, userDB.getScore());
     map.put("token", token);
     map.put("state",true);
     map.put("msg","Login succeeded");
     return map;
     ...
Redis integration SpringBoot has two templates, RedisTemplate and StringRedisTemplate. String RedisTemplate is a subclass of RedisTemplate. The two methods are basically the same. The difference is that the data types of operations are different. Both generics in RedisTemplate are objects, which means that the stored key and value can be one Object, while both generics of StringRedisTemplate are strings, which means that the key and value of StringRedisTemplate can only be strings.
In step 2, I bind the token with the user information userDB in the database and store it in Redis. The code for subsequent front-end components to obtain the login user information is as follows:
// Get token from localStorage
let token = localStorage.getItem("token");
let that = this;
// Send axios request and obtain user information according to the token
instance.get("/user/token?token="+token).then(res=>{
that.user = res.data;
console.log(that.user);
})
The interface of the backend / user/token is as follows:
@GetMapping({"token"})
public User findUser(String token) {
   System.out.println("Received token Information:" + token);
   return (User)redisTemplate.opsForValue().get("TOKEN_" + token);
}
Step 3: when the user logs out, the corresponding token in the browser shall be eliminated. The back-end interface code is as follows:
    // Log out
    @DeleteMapping({"logout"})
    public Map<String, Object> logout(String token) {
        Map<String, Object> map = new HashMap<>();
        try {
            redisTemplate.delete("TOKEN_" + token);
            Subject subject = SecurityUtils.getSubject();
            subject.logout();
            map.put("state", true);
            map.put("msg", "Prompt: exit the account successfully");
            return map;
        } catch (Exception e) {
            e.printStackTrace();
            map.put("state", false);
            map.put("msg", "Prompt: failed to exit the account");
            return map;
        }
    }
1.3 Redis based user leaderboard implementation:
The user information in MySql is shown in Figure 4:

The UserRank in Redis is shown in Figure 5:

Step 1: when a user logs in, his primary task is to access the information corresponding to UserRank. The back-end code is as follows:
if (userDB.getScore() == null) {
    userDB.setScore(0.0);
    userDAO.updateUserScore(userDB);
}
    redisTemplate.opsForValue().set("TOKEN_" + token, userDB, 30, TimeUnit.MINUTES);
    redisTemplate.opsForZSet().add("userRank", userDB, userDB.getScore());
userDB is the information of the currently logged in User in the database (there must be, you registered, right?), If a User logs in for the first time, I Set his Score to 0.0 in the database, and then I add this User to the ZSet of Redis. You know, the Set set will not store elements with duplicate key values, so the same User will not appear in the UserRank twice. The two templates complete the process of binding the token to the User and the User to the Score in the UserRank. The subsequent Score update process will be implemented by using these two templates repeatedly.
Step 2: when the user information is updated, the corresponding two template s related to the user information will change. The code is as follows:
// key value serialization
redisTemplate.setKeySerializer(new StringRedisSerializer());
// Get the current user's information from the current user's token
User firstUser = (User)redisTemplate.opsForValue().get("TOKEN_" + token);
// Delete the current user in zSet
 redisTemplate.opsForZSet().remove("userRank", firstUser);
// Generate a new current user (nickname change)
List<User> userListDB = this.userDAO.selectUserByName(user.getName());
User secondUser = userListDB.get(0);
// Update the information of the current user in the token
redisTemplate.opsForValue().set("TOKEN_" + token, secondUser, 30, TimeUnit.MINUTES);
// Generate current user in zSet
redisTemplate.opsForZSet().add("userRank", secondUser, secondUser.getScore());
Step 3: when the user scans the code for payment, the back-end controller for the first time is as follows:
// Pay for single item
    @GetMapping("payForItem")
    public byte[] alipay(String itemid,String userid, String token) {
        this.token = token;
        log.info("itemid=====>"+itemid);
        log.info("userid=====>"+userid);
        PayVo payVo = new PayVo();
        payVo.setItemId(itemid);
        payVo.setUserId(userid);
        System.out.println(payVo.getUserId());
        return alipayService.alipay(payVo);
    }
There is a small user rating in alipayService, that is, the shopping price of vip users is halved:
            // 1: Paid user
            String userId = payVo.getUserId();
            // my 1: query users by user id
            User user = userService.selectUserById(Integer.valueOf(userId));
            // Query commodity by commodity id
            Item item = itemService.getItemById(payVo.getItemId());
            // my 1: query users by user id
            if ( item == null ) return null;
            // 2: Payment amount
            String tempMoney = item.getPrice().toString();
            String money = "";
            if ( user.getRole().equals("normal") ) {
                money = tempMoney;
            }
            if ( user.getRole().equals("vip") ) {
                Double tempMoney2 = Double.valueOf(tempMoney)*0.5;
                money = String.valueOf(tempMoney2);
            }
Under the same payForItem file, payCommonService is called, where user points and user levels will be updated:
payCommonService.payUserPublic(bodyJsonObject, userId, user.getName(), orderNumber, tradeno, "alipay", this.token);
Set the id of the "VIP" commodity to "666". When the user purchases the commodity, the current user update process is as follows:
if ( itemId.equals("666") ) {
            int myuserId = Integer.valueOf(userId);
            User userDB = userService.selectUserById(myuserId);
            // key value serialization
            this.redisTemplate.setKeySerializer(new StringRedisSerializer());
            // Get the current user information from the current token
            User firstUser = (User)redisTemplate.opsForValue().get("TOKEN_" + token);
            // Delete the current user zSet from the current user information
            redisTemplate.opsForZSet().remove("userRank", firstUser);
            // Update current user identity information
            userDB.setRole("vip");
            // Update the score of the current user's new identity
            userService.updateUserRole(userDB);
            List<User> userListDB = this.userDAO.selectUserByName(userDB.getName());
            // Get the complete information of the current new identity user
            User secondUser = userListDB.get(0);
            // Update the current user corresponding to the current token
            redisTemplate.opsForValue().set("TOKEN_" + token, secondUser, 30, TimeUnit.MINUTES);
            // Sets the zSet of the current user
            redisTemplate.opsForZSet().add("userRank", secondUser, secondUser.getScore().doubleValue());
        }
The update process of current user points is as follows:
        // Update the current user's points
        double tempScore = Double.valueOf(orderDetail.getPrice()) * 0.3;
        String key1 = "TOKEN_" + token;
        // Get the current user from the current token
        User user = (User)redisTemplate.opsForValue().get(key1);
        // Update zSet score of current user
        redisTemplate.opsForZSet().incrementScore("userRank", user, tempScore);
        // Gets the zSet score of the current user
        double newScore = redisTemplate.opsForZSet().score("userRank", user);
        // Delete the zSet of the current user (because to update the information of the current user, synchronize the score of the current user in the database)
        redisTemplate.opsForZSet().remove("userRank", new Object[] { user });
        user.setScore(newScore);
        userDAO.updateUserScore(user);
        // Update the information of the current user corresponding to the token
        redisTemplate.opsForValue().set(key1, user);
        // Add a zSet for the current user
        redisTemplate.opsForZSet().add("userRank", user, newScore);