❥ it is mainly used for self review, plus experience exchange and sharing, one shift every day ❥
background
❀ a library is a collection of program components that can be reused in different programs. ANSI C + + includes a C++ STL (Standard Template Library), namely C + + Standard Template Library (c + + generic library). It defines common data structures and algorithms in the std namespace, which is very convenient to use.
❀ STL codes are broadly divided into three categories: algorithm, container and iterator. We have been using a large number of standard function libraries, and all mathematical functions, string manipulation functions and input / output implementation programs use those proven very good reusable algorithms.
❀ after you are familiar with STL, you will find that many "complex and interesting function" codes written before can be replaced in just a few lines. By calling the algorithm template, you can get some efficient code to better complete the required functions.
❀ the following mainly introduces various commonly used containers, iterators and algorithms in C++ STL.
Vector container
1. Introduction
The vector container can not only randomly access elements like an array, but also insert elements at the end. It is a simple and efficient container that can completely replace an array. Vector also has the function of automatic memory management. For the insertion and deletion of elements, the memory space occupied can be dynamically adjusted.
To use the vector container, you need to include the header file < vector >.
Like arrays, the subscripts of vector containers are counted from 0. That is, if the size of the vector container is n, the subscript of the element is 0 ~ n-1. For the capacity definition of vector container, a fixed size can be defined in advance, and then its size can be adjusted at any time; You can also use push at any time without defining it in advance_ The back () method expands the element from the tail, or you can use insert() to insert a new element before an element position.
The vector container has two important methods, begin() and end(). begin() returns the iterator of the first element position; end() returns the iterator at the next element position of the last element.
2. Create a vector object
There are three common forms for creating vector objects:
- Do not specify the number of elements of the container, such as defining a container for storing integers, vector < int > V;
- Specify the size of the container during creation, such as defining a vector container for storing 10 double type elements vector < double > V (10); The subscript of the element is 0 ~ 9; In addition, the value of each element is initialized to 0.0.
- Create a vector container object with n elements, and each element has the specified initial value vector < double > v (10, 8.6); The above statement defines a v vector container with 10 elements, and the value of each element is 8.6.
3. Tail element expansion
Usually, push back() is used to append a new element to the tail of the vector container. After appending elements to the tail, the vector container will automatically allocate new memory space. You can expand not only empty vector objects, but also vector objects with existing elements.
The following program adds the three elements 6, 7 and 8 from the tail to the v container, so that there are three elements in the v container, and their values are 6, 7 and 8 in turn
#include <vector>
using namespace std;
int main()
{
    vector<int> v;
	v.push_back(2);
	v.push_back(7);
	v.push_back(9);
	return 0;
}
4. Subscript access to the vector element
Accessing or traversing a vector object is similar to accessing an array. For a vector object, you can freely access one of its elements by subscript, or you can reassign an element by subscript.
The following procedure is to re assign an element by subscript:
#include <vector>
#include <iostream>
using namespace std;
int main()
{
    vector<int> v(3);
	v[0] = 6;
	v[1] = 7;
	v[2] = 8;
	cout<<v[0]<<" "<<v[1]<<" "<<v[2]<<" ";
	return 0;
}
5. Accessing vector elements with iterators
Iterators and loop statements are usually used to traverse the vector object. The type of iterator must be consistent with the element type of the vector object it wants to traverse.
The following procedure uses iterators to traverse the vector:
#include <vector>
#include <iostream>
using namespace std;
int main()
{
    vector<int> v(3);
	v[0] = 6;
	v[1] = 7;
	v[2] = 8;
	vector<int>::iterator it; //Define iterator variables
	for(it=v.begin(); it!=v.end(); it++) {
		cout << *it << " ";
	}
	return 0;
}
6. Insert element
The insert method can insert a new element in front of any position of the vector object. At the same time, the vector will automatically expand an element space, and all elements after the insertion position will move back one position in turn.
It should be noted that the insert() method requires the insertion position to be the iterator position of the element, not the subscript of the element.
The following procedure demonstrates the use of the insert() method:
#include <vector>
#include <iostream>
using namespace std;
int main()
{
    vector<int> v(3);
	v[0] = 6;
	v[1] = 7;
	v[2] = 8;
	v.insert(v.begin(),9); //Inserts a new element at the beginning of the current sequence with an element value of 9
	v.insert(v.begin()+2,1); //Insert new element 1 before the third element of the current sequence
    v.insert(v.end(),3); //Append a new element 3 to the end of the current sequence
	vector<int>::iterator it; //Define iterator variables
	for(it=v.begin(); it!=v.end(); it++) {
		cout << *it << " "; //Output element value on iterator
	}
	cout << endl;
	return 0;
}
The operation results are as follows:
7. Element deletion
The erase() method can delete an element or all elements in an interval referred to by the iterator in the vector. The clear() method deletes all elements in the vector at once.
The following procedure demonstrates the use of the erase() method:
#include <vector>
#include <iostream>
#include <cstdio>
#include <cstdlib>
#include <ctime>
using namespace std;
int main()
{
    srand(time(NULL));
	vector<int> v(10);
	for(int i=0; i<10; i++) {
		v[i] = rand() % 100; //Assign a value to a vector
	}
	vector<int>::iterator it; //Define iterator variables

	for(it=v.begin(); it!=v.end(); it++) {
		cout << *it << " "; //Outputs the element value on the original iterator
	}
	cout << endl;

	v.erase(v.begin()+2); //Delete the 3rd element
	for(it=v.begin(); it!=v.end(); it++) {
		cout << *it << " "; //Outputs the element value on the iterator after processing
	}
	cout << endl;

	v.erase(v.begin()+1,v.begin()+5); //Delete the number of intervals 2 to 6 of the iterator
	for(it=v.begin(); it!=v.end(); it++) {
		cout << *it << " "; //Outputs the element value on the iterator after processing
	}
	cout << endl;

	v.clear(); //Empty vector
	cout << v.size() <<endl; //Output vector size
	return 0;
}
The operation results are as follows (different due to different random numbers):
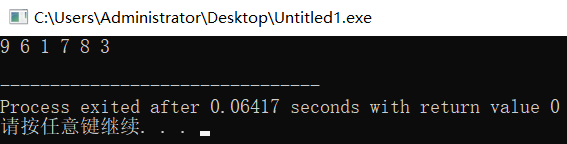
8. Reverse reverse permutation algorithm
reverse() reverse permutation algorithm, which needs to include the header file algorithm. The reverse algorithm can reverse the elements of a certain iterator interval in the vector. See the following code:
#include <vector>
#include <iostream>
#include <algorithm>
#include <cstdio>
#include <cstdlib>
#include <ctime>
using namespace std;
int main()
{
srand(time(NULL));
vector<int> v(10);
for(int i=0; i<10; i++) {
v[i] = rand() % 100; //Assign a value to a vector
}
vector<int>::iterator it; //Define iterator variables
for(it=v.begin(); it!=v.end(); it++) {
cout << *it << " "; //Outputs the element value on the original iterator
}
cout << endl;
reverse(v.begin(),v.end()); //Reverses the elements of the vector from head to tail
for(it=v.begin(); it!=v.end(); it++) {
cout << *it << " "; //Output the element value on the iterator after processing
}
cout << endl;
return 0;
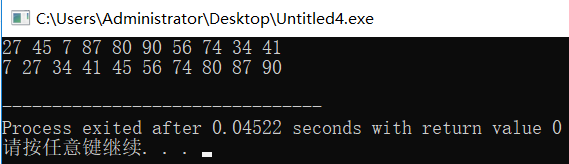
}The operation results are as follows:
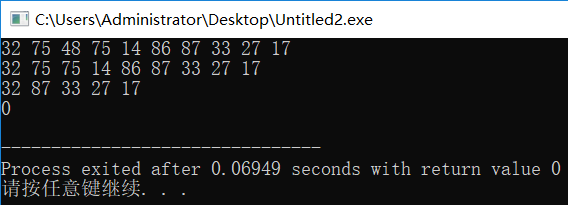
9. Sort vector elements using sort algorithm
Using the sort algorithm, you need to include the header file algorithm. The sort algorithm requires the use of random access iterators for sorting. By default, the vector elements are arranged in ascending order.
The following procedure explains how to use the sort algorithm:
#include <vector>
#include <iostream>
#include <algorithm>
#include <cstdio>
#include <cstdlib>
#include <ctime>
using namespace std;
int main()
{
    srand(time(NULL));
	vector<int> v;
	for(int i=0; i<10; i++) {
		v.push_back(rand() % 100); //Assign a value to a vector
	}

	for(int i=0; i<10; i++) {
		cout << v[i] << " "; //Output element value before sorting
	}
	cout << endl;

	sort(v.begin(),v.end());
	for(int i=0; i<10; i++) {
		cout << v[i] << " "; //Output sorted element values
	}

	cout << endl;
	return 0;
}
The operation results are as follows:
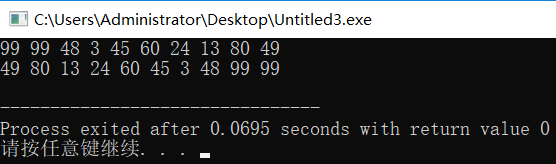
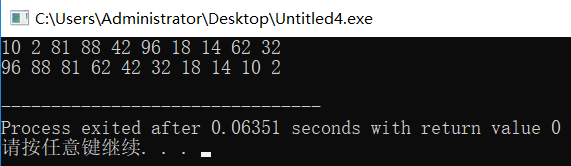
You can also design your own sorting and comparison function, and then assign this function to the sort algorithm. Then, sort will sort according to the sorting rules specified by the comparison function.
The following program designs a sort comparison function cmp, which requires sorting the values of elements from large to small:
#include <vector>
#include <iostream>
#include <algorithm>
#include <cstdio>
#include <cstdlib>
#include <ctime>
using namespace std;
bool cmp(const int&a, const int &b) {
	return a > b;
}
int main()
{
    srand(time(NULL));
	vector<int> v;
	for(int i=0; i<10; i++) {
		v.push_back(rand() % 100); //Assign a value to a vector
	}

	for(int i=0; i<10; i++) {
		cout << v[i] << " "; //Output element value before sorting
	}
	cout << endl;

	sort(v.begin(),v.end(),cmp); //Sort by cmp function comparison rule
	for(int i=0; i<10; i++) {
		cout << v[i] << " "; //Output sorted element values
	}

	cout << endl;
	return 0;
}
The operation results are as follows:
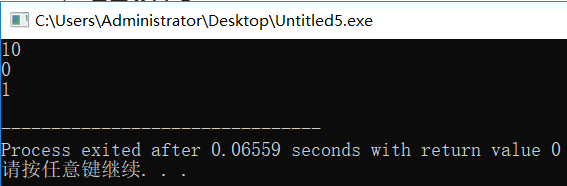
10. Size of vector
Use the size() method to return the size of the vector, that is, the number of elements. Use the empty() method to return whether the vector is empty.
The following program demonstrates the usage of the {size() method and} empty() method:
#include <vector>
#include <iostream>
#include <cstdio>
#include <cstdlib>
#include <ctime>
using namespace std;
int main()
{
    srand(time(NULL));
	vector<int> v(10);
	for(int i=0; i<10; i++) {
		v[i] = rand() % 100; //Assign a value to a vector
	}
	cout << v.size() << endl; //The size of the output vector, that is, how many elements are included
	cout << v.empty() << endl; //If the vector is empty, it returns logical false and outputs 0; vice versa
	v.clear(); //Empty vector
	cout << v.empty() << endl;
	return 0;
}
The operation results are as follows: