preface
This article was written on July 15, 2021. If there is an error in the configuration according to the method in this article, please pay attention to whether it is too far away from the writing time.
Make sure your PC graphics card is NVIDIA. This article does not apply to AMD graphics cards and Intel integrated graphics cards.
1, Update system software package
Execute the following commands in the terminal to upgrade the system kernel and basic components to the latest version, otherwise the subsequent compilation will encounter unexpected errors due to component version problems.
# Update software warehouse cache
sudo apt-get update

# Update all software packages to the latest version
sudo apt-get upgrade -y

# During the update process, the Linux kernel may be upgraded. Execute the following command to delete the old kernel that is no longer used
sudo apt-get autoremove --purge -y

# restart
reboot
2, Install NVIDIA graphics driver
Here, use the Ubuntu drivers command to install the NVIDIA driver in the software warehouse. This method is not only simple, but also the installed driver is very stable and will not lead to system crash.
# Automatically install recommended drivers
sudo ubuntu-drivers autoinstall

# restart
reboot
After restart, enter NVIDIA SMI command to check whether NVIDIA driver and CUDA driver are installed correctly. If there is an output like the following, the installation is successful.
+-----------------------------------------------------------------------------+
| NVIDIA-SMI 460.84       Driver Version: 460.84       CUDA Version: 11.2     |
|-------------------------------+----------------------+----------------------+
| GPU  Name        Persistence-M| Bus-Id        Disp.A | Volatile Uncorr. ECC |
| Fan  Temp  Perf  Pwr:Usage/Cap|         Memory-Usage | GPU-Util  Compute M. |
|                               |                      |               MIG M. |
|===============================+======================+======================|
|   0  GeForce GT 720      Off  | 00000000:01:00.0 N/A |                  N/A |
| 40%   41C    P0    N/A /  N/A |    146MiB /   974MiB |     N/A      Default |
|                               |                      |                  N/A |
+-------------------------------+----------------------+----------------------+

+-----------------------------------------------------------------------------+
| Processes:                                                                  |
|  GPU   GI   CI        PID   Type   Process name                  GPU Memory |
|        ID   ID                                                   Usage      |
|=============================================================================|
|  No running processes found                                                 |
+-----------------------------------------------------------------------------+
3, Install CUDA Kit
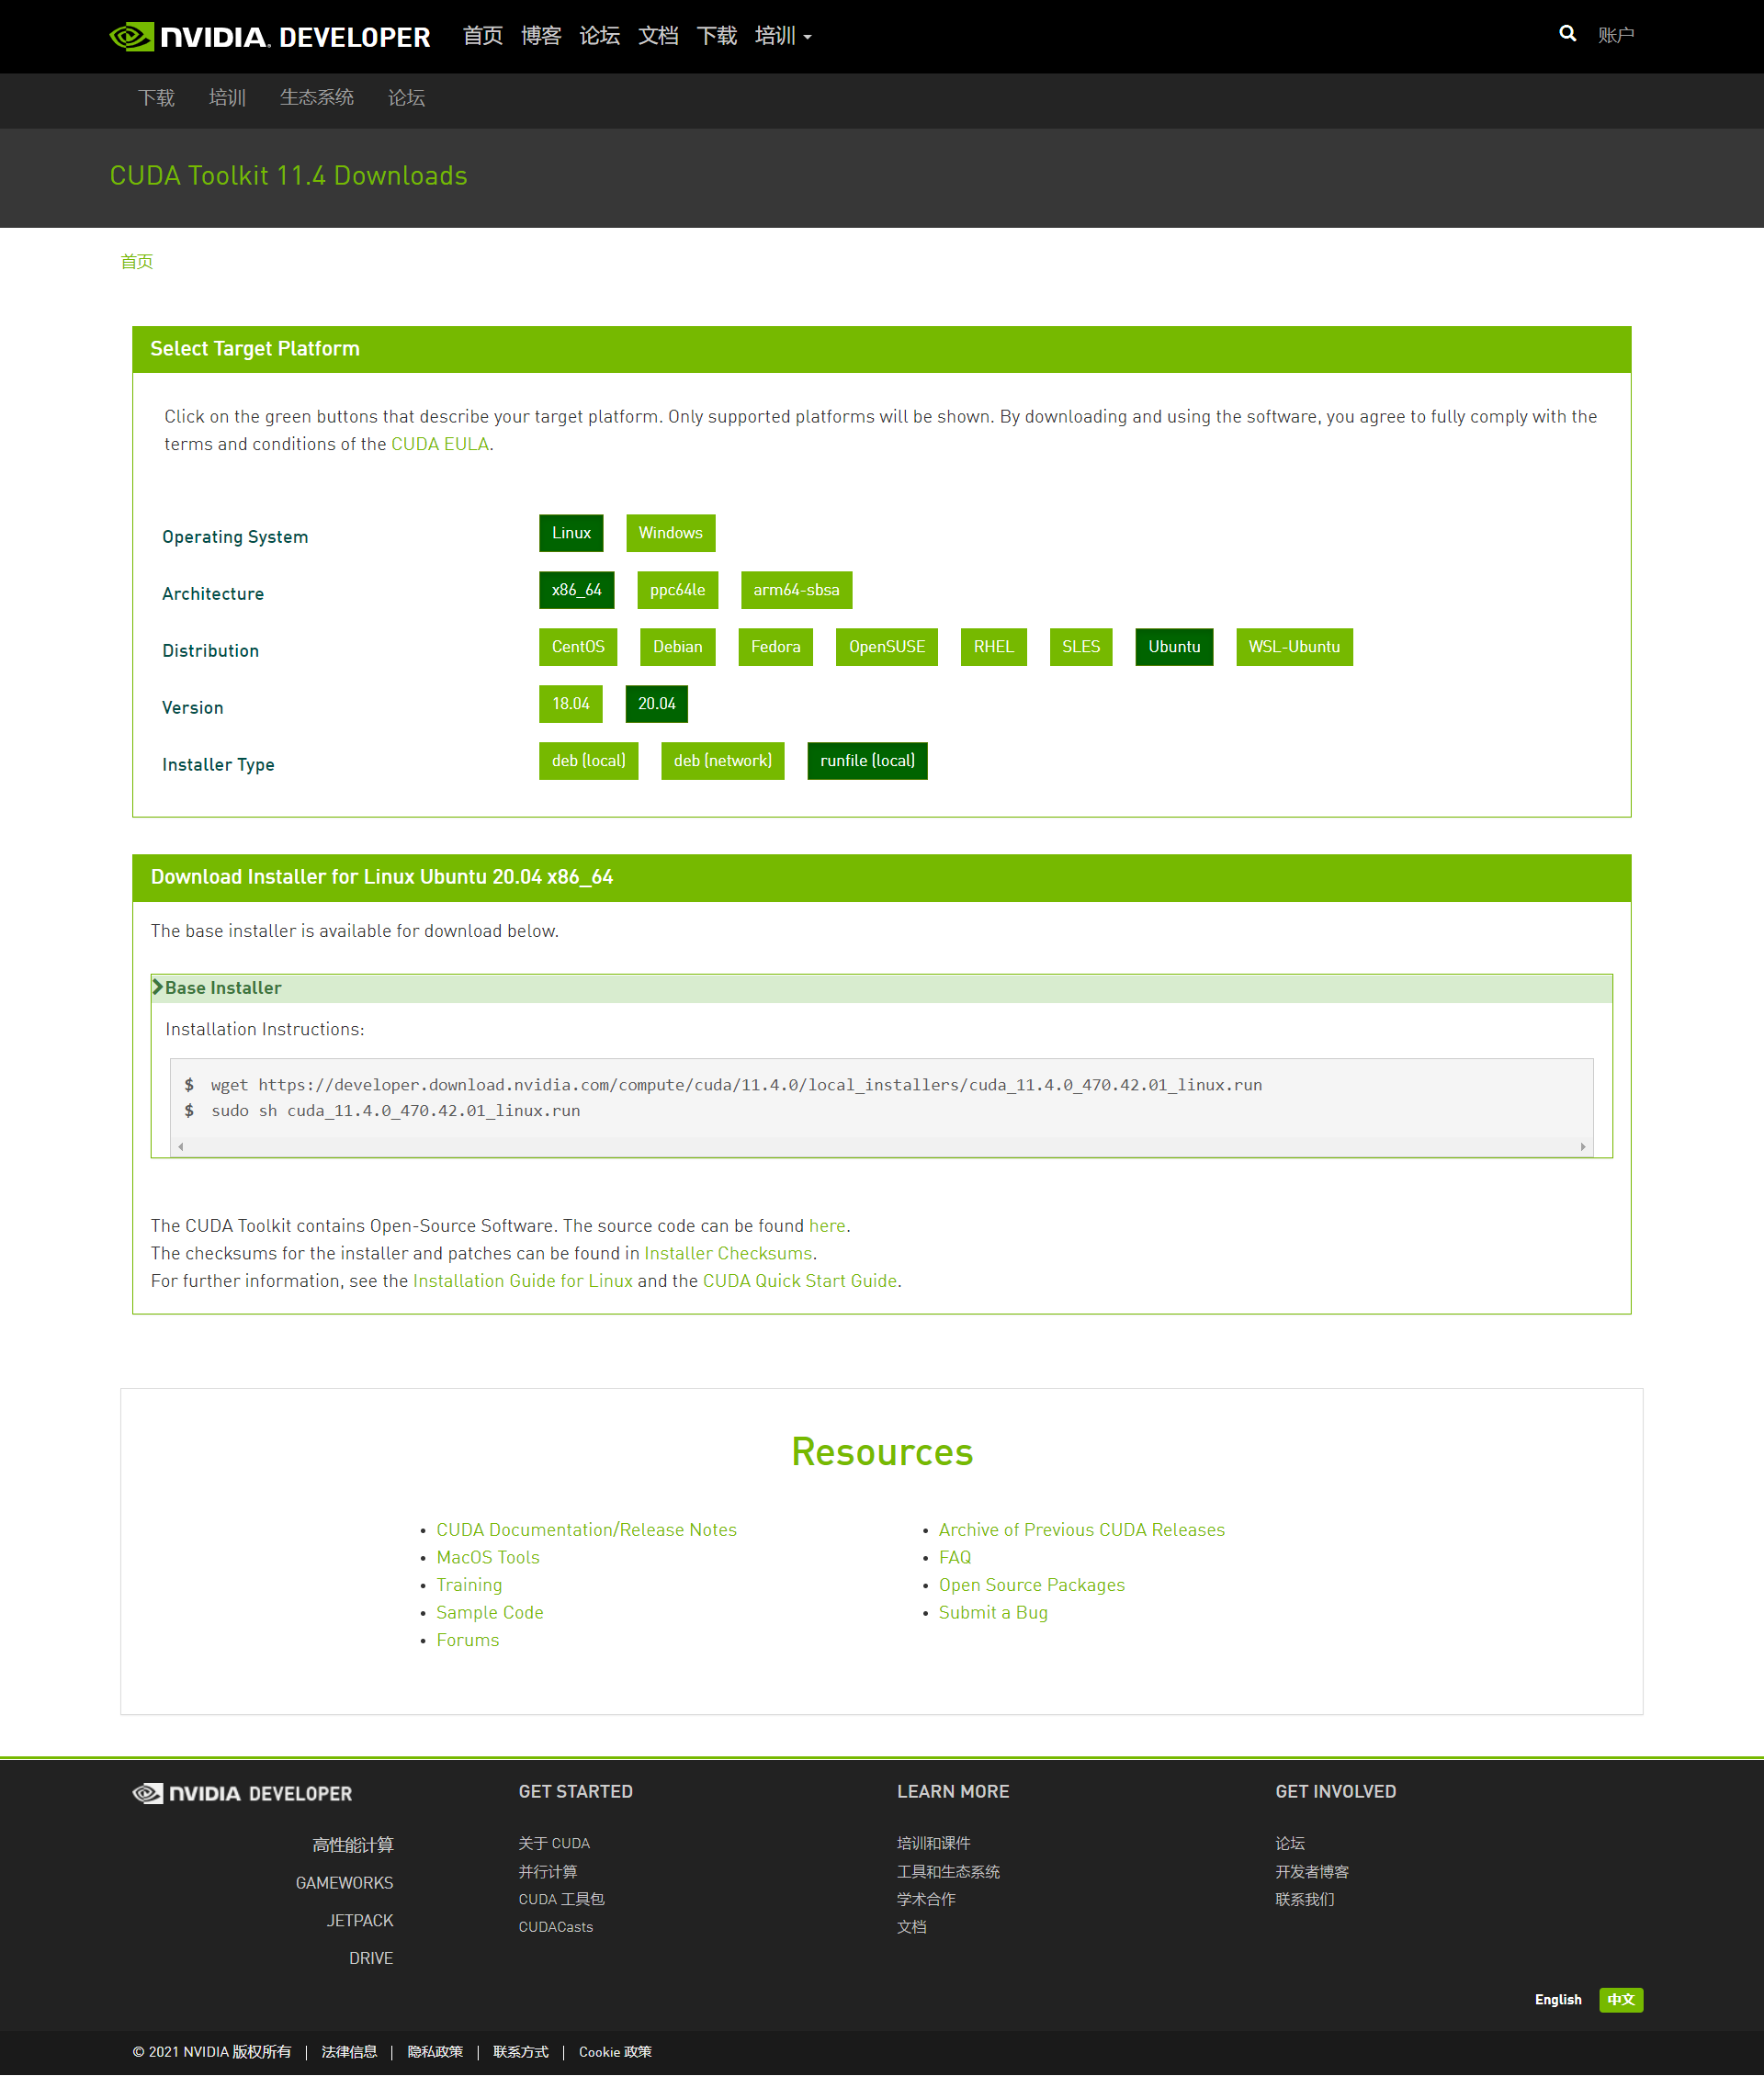
Open NVIDIA developer's official website with a browser NVIDIA Developer | NVIDIA Developer , click [CUDA development kit / SDK] in [common SDK] at the bottom of the page to enter the CUDA zone. Click [download now] and configure the download options in the following order:
Operating System: Linux
Architecture: x86_64
Distribution: Ubuntu
Version: 20.04
Installer Type: runfile (local)
The web page is displayed as shown in the following figure:
According to the instructions on the web page, we type the following commands in the terminal to download CUDA Toolkit:
# Switch to user directory
cd ~

# Download the installer for the CUDA toolkit
wget https://developer.download.nvidia.com/compute/cuda\
/11.4.0/local_installers/cuda_11.4.0_470.42.01_linux.run

# Run setup
sudo sh cuda_11.4.0_470.42.01_linux.run

# If the above command reports an error, the / tmp directory space is insufficient
# You need to create a temporary directory of CUDA installer in a partition with at least 5GB space
# Suppose you create it in your own user directory (~ / cuda_temp)
rm -rf /tmp/*
mkdir cuda_temp
sudo sh cuda_11.4.0_470.42.01_linux.run --tmpdir=~/cuda_temp
After entering the installer, first enter the accept agreement, and then enter the section to select the components to install. The installer will install the CUDA driver by default, but because the CUDA driver has been installed synchronously when installing the NVIDIA driver in the second step, we don't need to install it again.
Position the cursor at CUDA Driver, press Enter, uncheck it, then move the cursor to the bottom, and Enter i to start installation.
After installation, configure the environment variables according to the instructions of the installer.
The / usr/local/cuda-11.4/bin directory needs to be added to the PATH variable.
Need to be in LD_ LIBRARY_ Add / usr/local/cuda-11.4/lib64 directory to the path variable.
# Open the / etc/profile file with a text editor for editing environment variables
# I use Ubuntu Kylin. The text editor in version 20.04 has become pluma
# I don't know if the native Ubuntu is like this. If not, replace the following pluma with gedit
sudo pluma /etc/profile

# At the end of the file, add the following three lines and save
export PATH=/usr/local/cuda-11.4/bin${PATH:+:${PATH}}
export LD_LIBRARY_PATH=/usr/local/cuda-11.4/lib64\
${LD_LIBRARY_PATH:+:${LD_LIBRARY_PATH}}

# Return to the terminal and restart the computer to make the environment variable configuration effective
reboot
After restarting the computer, let's verify whether the CUDA toolkit is installed successfully.
# Switch to CUDA Sample directory
cd ~/NVIDIA_CUDA-11.4_Samples

# Compile the source code of the demonstration project into an executable file
make -j8

# Try running the demo project
cd bin/x86_64/linux/release
./deviceQuery
If there are outputs similar to the following in the terminal, the CUDA toolkit is installed successfully.
./deviceQuery Starting...

 CUDA Device Query (Runtime API) version (CUDART static linking)

Detected 1 CUDA Capable device(s)

Device 0: "GeForce GT 720"
  CUDA Driver Version / Runtime Version          11.2 / 11.4
  CUDA Capability Major/Minor version number:    3.5
  Total amount of global memory:                 974 MBytes (1021575168 bytes)
  (001) Multiprocessors, (192) CUDA Cores/MP:    192 CUDA Cores
  GPU Max Clock rate:                            797 MHz (0.80 GHz)
  Memory Clock rate:                             900 Mhz
  Memory Bus Width:                              64-bit
  L2 Cache Size:                                 524288 bytes
  Maximum Texture Dimension Size (x,y,z)         1D=(65536), 2D=(65536, 65536), 3D=(4096, 4096, 4096)
  Maximum Layered 1D Texture Size, (num) layers  1D=(16384), 2048 layers
  Maximum Layered 2D Texture Size, (num) layers  2D=(16384, 16384), 2048 layers
  Total amount of constant memory:               65536 bytes
  Total amount of shared memory per block:       49152 bytes
  Total shared memory per multiprocessor:        49152 bytes
  Total number of registers available per block: 65536
  Warp size:                                     32
  Maximum number of threads per multiprocessor:  2048
  Maximum number of threads per block:           1024
  Max dimension size of a thread block (x,y,z): (1024, 1024, 64)
  Max dimension size of a grid size    (x,y,z): (2147483647, 65535, 65535)
  Maximum memory pitch:                          2147483647 bytes
  Texture alignment:                             512 bytes
  Concurrent copy and kernel execution:          Yes with 1 copy engine(s)
  Run time limit on kernels:                     Yes
  Integrated GPU sharing Host Memory:            No
  Support host page-locked memory mapping:       Yes
  Alignment requirement for Surfaces:            Yes
  Device has ECC support:                        Disabled
  Device supports Unified Addressing (UVA):      Yes
  Device supports Managed Memory:                Yes
  Device supports Compute Preemption:            No
  Supports Cooperative Kernel Launch:            No
  Supports MultiDevice Co-op Kernel Launch:      No
  Device PCI Domain ID / Bus ID / location ID:   0 / 1 / 0
  Compute Mode:
     < Default (multiple host threads can use ::cudaSetDevice() with device simultaneously) >

deviceQuery, CUDA Driver = CUDART, CUDA Driver Version = 11.2, CUDA Runtime Version = 11.4, NumDevs = 1
Result = PASS
4, Third party libraries necessary to install the Caffe framework
According to Caffe's official website Caffe | Deep Learning Framework (berkeleyvision.org) To install the dependency, execute the following command:
# General dependency
sudo apt-get install libprotobuf-dev libleveldb-dev libsnappy-dev
sudo apt-get install libopencv-dev libboost-all-dev libhdf5-serial-dev
sudo apt-get install libgflags-dev libgoogle-glog-dev liblmdb-dev
sudo apt-get install protobuf-compiler

# BLAS (linear algebra Library) dependency
sudo apt-get install libatlas-base-dev libopenblas-dev

# Note: the above dependencies can be written in one command and do not need to be written separately
# It's written separately just to improve the reading experience
5, [very important] install OpenCV 3
Libopencv dev has been installed in the above dependencies, but OpenCV 4 is installed. Version 1.0 of Caffe framework was released in 2017, four years ago, and no new version has been released during this period. Some codes in version 1.0 call API s that only exist in opencv 3 and cannot be applied to OpenCV 4. If 4 is forcibly used, errors will be reported in the subsequent compilation process, and such errors cannot be simply modified by modifying makefile Config configuration file. So here we need to download the source code of OpenCV 3, and then compile a copy of OpenCV 3 Library in / usr/local. This error bothered me for several days. Recompiling the lower version of OpenCV is the last solution I can think of. I didn't expect it to succeed.
We now follow the tutorial instructions on the OpenCV official website OpenCV: Installation in Linux To configure OpenCV.
# Installing dependencies for OpenCV 3.4.14
sudo apt-get install cmake libgtk2.0-dev pkg-config
sudo apt-get install libavcodec-dev libavformat-dev libswscale-dev
sudo apt-get install python-dev python-numpy libtbb2 libtbb-dev
sudo apt-get install libjpeg-dev libpng-dev libtiff-dev libdc1394-22-dev

# Download the source code of OpenCV 3.4.14 to the temporary directory
cd /tmp
wget https://github.com/opencv/opencv/archive/3.4.14.zip

# decompression
unzip 3.4.14.zip
cd opencv-3.4.14

# Compile in a temporary directory so that the next time you start, you will only
# /The compiled library and header files are left in usr/local, and the source code in / tmp will be cleared
# Note that the last two points of the second command are used to indicate the upper level directory and cannot be omitted
mkdir build && cd build
cmake -D CMAKE_BUILD_TYPE=Release -D CMAKE_INSTALL_PREFIX=/usr/local ..
make -j8 && sudo make install
As CUDA is compiled from the source code, it is not installed directly from the software warehouse, so similarly, after compilation, we need to configure the environment variables, and the search directory (LD_LIBRARY_PATH) of the dynamic library needs to be added to the inventory directory of the newly installed OpenCV 3.
# Open the / etc/profile file with a text editor for editing environment variables
# I use Ubuntu Kylin. The text editor in version 20.04 has become pluma
# I don't know if the native Ubuntu is like this. If not, replace the following pluma with gedit
sudo pluma /etc/profile

# Modify LD_LIBRARY_PATH variable plus / usr/local/lib directory
export LD_LIBRARY_PATH=/usr/local/lib:/usr/local/cuda-11.4/lib64\
${LD_LIBRARY_PATH:+:${LD_LIBRARY_PATH}}

# Return to the terminal and restart the computer to make the environment variable configuration effective
reboot
Colored egg: in the previous article on configuring cafe on CentOS 7, it was not stated that OpenCV 3 should be installed with the source code. This is because in the software warehouse of CentOS 7, opencv devel is version 2.4.5, not series 4. Caffe framework is compatible with OpenCV Series 2 and 3, but not series 4.
6, Installing Caffe frame
First, download the source code of Caffe stable version from GitHub:
# Switch to user directory
cd ~

# Download the source code of Caffe 1.0 from GitHub
wget https://github.com/BVLC/caffe/archive/refs/tags/1.0.zip

# decompression
unzip 1.0.zip
At this point, a directory called caffe-1.0 will be added to your user directory. This is the directory where our Caffe framework is located.
Before installing the Caffe framework, we need to do some configuration. The framework of version 1.0 was released in 2017, four years from now, and the code architecture of various third-party libraries it relies on has also changed greatly. The original default configuration file cannot be compiled and installed correctly. We need to make major changes to the configuration file.
# Enter Caffe framework directory
cd caffe-1.0

# Rename the configuration file for the example suffix
mv Makefile.config.example Makefile.config

# Open the configuration file for editing
# If the prompt does not find the command pluma, change the pluma to gedit
pluma Makefile.config
We need to make the following changes to the configuration file:
- The OpenCV version uses 3 instead of the default 2
# Uncomment if you're using OpenCV 3
OPENCV_VERSION := 3 #Remove the left of this line # number
- For CUDA architecture, only the computing power of more than 3.5 is reserved. CUDA version 11.4 no longer supports computing power lower than 3.5. Keeping low computing power will lead to an error that the low computing power API cannot be found in the compilation.
# Original configuration:
# CUDA_ARCH := -gencode arch=compute_20,code=sm_20 \
# 		-gencode arch=compute_20,code=sm_21 \
# 		-gencode arch=compute_30,code=sm_30 \
# 		-gencode arch=compute_35,code=sm_35 \
# 		-gencode arch=compute_50,code=sm_50 \
# 		-gencode arch=compute_52,code=sm_52 \
# 		-gencode arch=compute_60,code=sm_60 \
# 		-gencode arch=compute_61,code=sm_61 \
# 		-gencode arch=compute_61,code=compute_61
#
# Remove the first three lines 20, 21 and 30 and change to the following
CUDA_ARCH := -gencode arch=compute_35,code=sm_35 \
		-gencode arch=compute_50,code=sm_50 \
		-gencode arch=compute_52,code=sm_52 \
		-gencode arch=compute_60,code=sm_60 \
		-gencode arch=compute_61,code=sm_61 \
		-gencode arch=compute_61,code=compute_61
-
For the linear algebra library, ATLAS is used by default. We need to change it to OpenBLAS. Why do you want to change it, because when you configure it in CentOS 7, if you keep ATLAS, you will report the error that - lcblas and - latlas cannot be found. It has been compiled after being changed to OpenBLAS, so I'm too lazy to try what will happen if I force the ATLAS Library under Ubuntu. Interested partners can also try what will happen if they insist on using ATLAS.
# BLAS := atlas
# Find the line above and change atlas to open
BLAS := open
-
Add some directories to the header file directory and Library Directory. Mainly for hdf5 this dependency. In Ubuntu 20.04, the hdf5 dependency installed with apt get is not placed in / usr/include, but in / usr/include/hdf5/serial. The library files have also been relocated, not in / usr/lib, but in / usr/lib / x86_ 64 Linux GNU / hdf5 / serial. These subdirectories will not be included by default. We need to specify them explicitly.
# Find the following three lines
# # Whatever else you find you need goes here.
# INCLUDE_DIRS := $(PYTHON_INCLUDE) /usr/local/include
# LIBRARY_DIRS := $(PYTHON_LIB) /usr/local/lib /usr/lib
#
# Make the following modifications:
# INCLUDE_DIRS adds the / usr/include/hdf5/serial directory at the end
# LIBRARY_DIRS adds / usr / lib / x86 at the end_ 64 Linux GNU and
# /usr/lib/x86_ 64 Linux GNU / HDF5 / serial directories
INCLUDE_DIRS := $(PYTHON_INCLUDE) /usr/local/include /usr/include/hdf5/serial
LIBRARY_DIRS := $(PYTHON_LIB) /usr/local/lib /usr/lib \
                /usr/lib/x86_64-linux-gnu /usr/lib/x86_64-linux-gnu/hdf5/serial
After completing the above configuration, we save the configuration file, and then complete the following one click three connections in the terminal. If there is no error message in the middle, the Caffe framework is installed successfully!
make all -j8 && make test -j8 && make runtest -j8
7, Training MNIST (handwritten numeral) training set with Caffe
Please jump here to continue reading: Caffe deep learning environment is configured for the latest version of CentOS 7 in 2021_ s.M.i.L.e-CSDN blog