This note is based on Small mound teaching video The notes are detailed and not boring. They are recommended to students who want to learn target detection. The following personal notes are for your reference. If there are errors, please correct them!
Target detection: location + Category
Face detection: face target
Text detection: text target
The mainstream target detection is output in the form of matrix box
Semantic segmentation, as shown in the figure below, can achieve higher accuracy

Introduction to VOC dataset
There are VOC 2007 and VOC 2012
Official website: VOC dataset

For VOC2012 the majority of the annotation effort was put into increasing the size of the segmentation and action classification datasets, and no additional annotation was performed for the classification/detection tasks. The list below summarizes the differences in the data between VOC2012 and VOC2011.
Voc207 as an example:
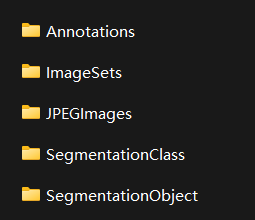
Annotations: includes xml files that describe various information of the picture, especially the location coordinates of the target
Imagesets: mainly focus on the contents of the Main folder. The files in the Main folder include the image names of training / verification data sets of different categories of targets
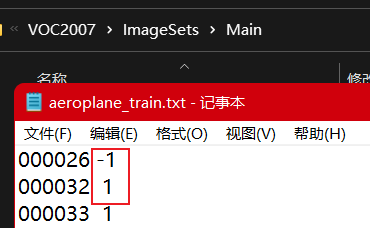
For example: 1 indicates that there is an aircraft in the picture, - 1 indicates that there is no aircraft
JPEGImages: original image
SegmentationClass/Object: used for semantic segmentation
Introduction to COCO dataset

The commonly used data set is COCO2017
Official website: COCO2017 dataset
Make dataset
Detailed explanation of data set production
- Get your own dataset – manual annotation
- Get your own dataset – semi manual annotation (fine tune the labeled dataset)
- Simulation data set (GAN, digital image processing method) (the effect may not be very good)
Using Roboflow
Collect Images
- Training on images similar to the ones it will see in the wild is of the utmost importance. collect a wide variety of images from the same configuration as you will ultimately deploy your project.
- start from a public dataset to train your initial model and then sample images from the wild during inference to improve your dataset and model iteratively.
Create Labels
-
Roboflow Annotate is a simple web-based tool for managing and labeling your images with your team and exporting them in YOLOv5's annotation format.
Whether you label your images with Roboflow or not, you can use it to convert your dataset into YOLO format, create a YOLOv5 YAML configuration file, and host it for importing into your training script.
-
Online website: Dataset making (makesense)
Steps:
Add dimension category


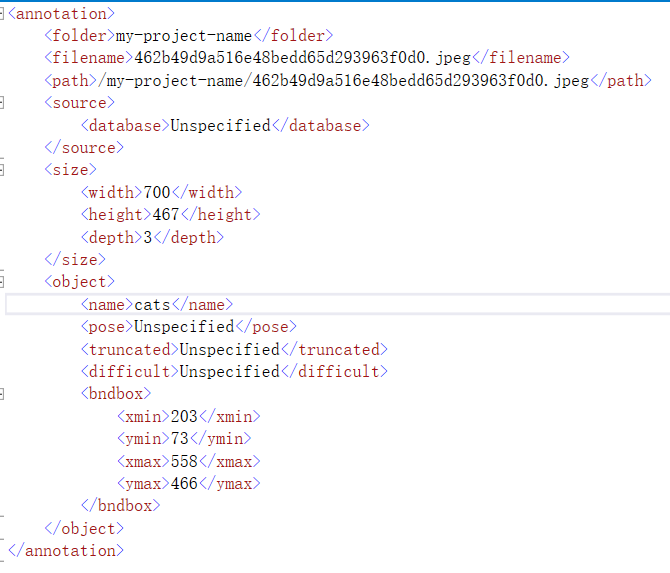
After adding the category, select the content box to be identified on the picture, and then select the label category on the right. When all the labels are marked, export the labels in Actions/Export Annotations. The following is the content in xml file format, including filename, path, picture information, object object (label, and coordinate rectangular box to identify the object), etc
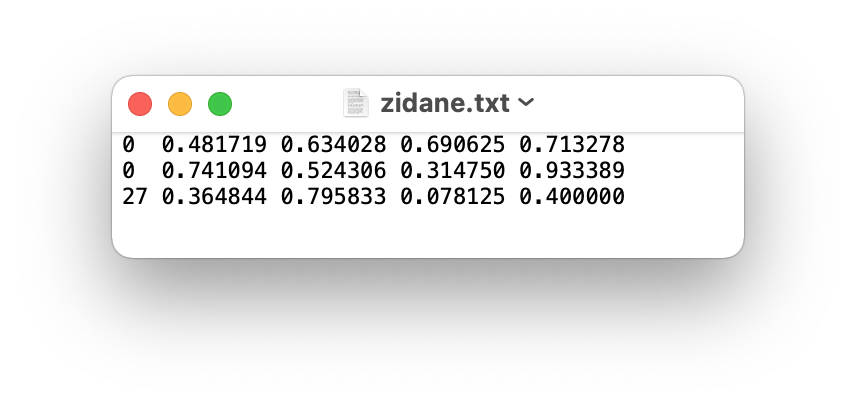
The exported YOLO is in txt format. The contents are as follows: the first 0 / 1 / 2 represents the category, the second and third are the coordinates of the object center, and the fourth and fifth are the width and height
- One row per object
- Each row is class x_center y_center width height format.
- Box coordinates must be in normalized xywh format (from 0 - 1) If your boxes are in pixels, divide x_center and width by image width, and y_center and height by image height.
- Class numbers are zero-indexed (start from 0).

You can select AI labels, and you will be prompted to create labels that have not been created, and automatically frame objects on the picture. Click.
- Multiplayer online annotation
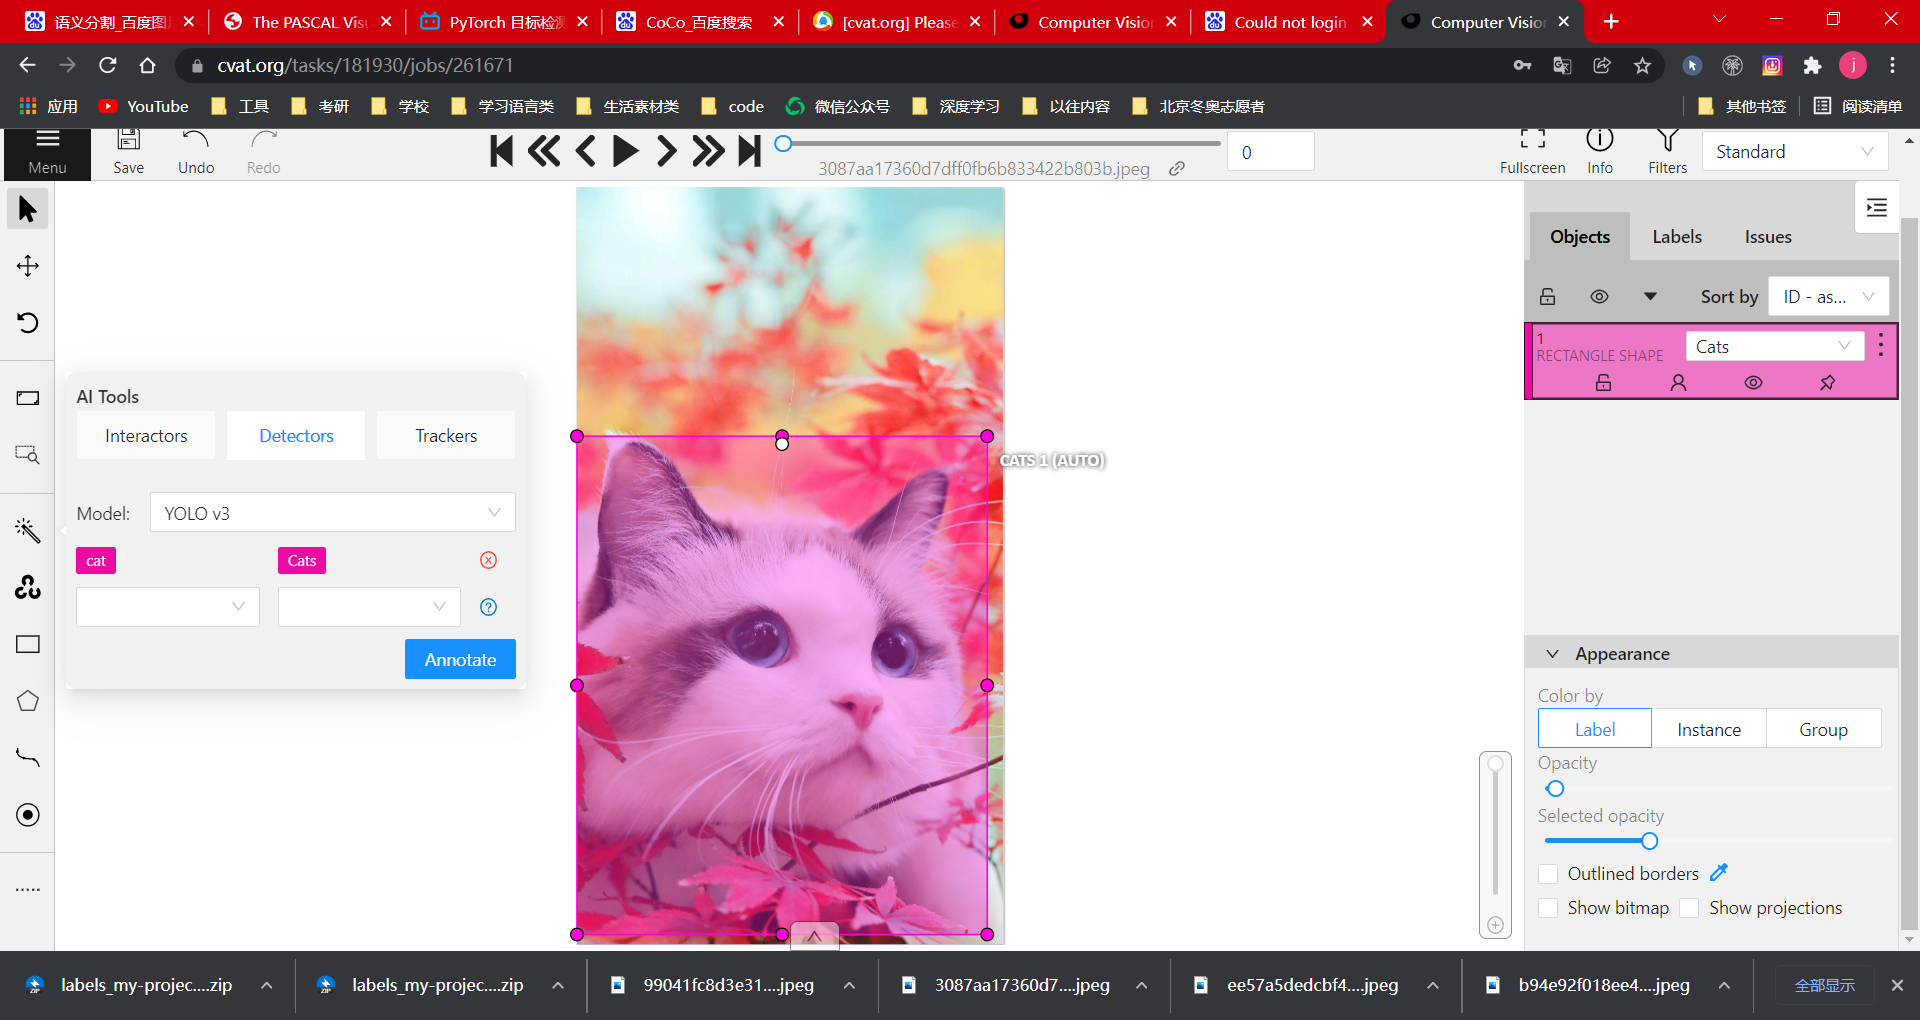
website: Data set production (cvat) (VPN is required)

Create a task, add a label, load the picture and submit it.
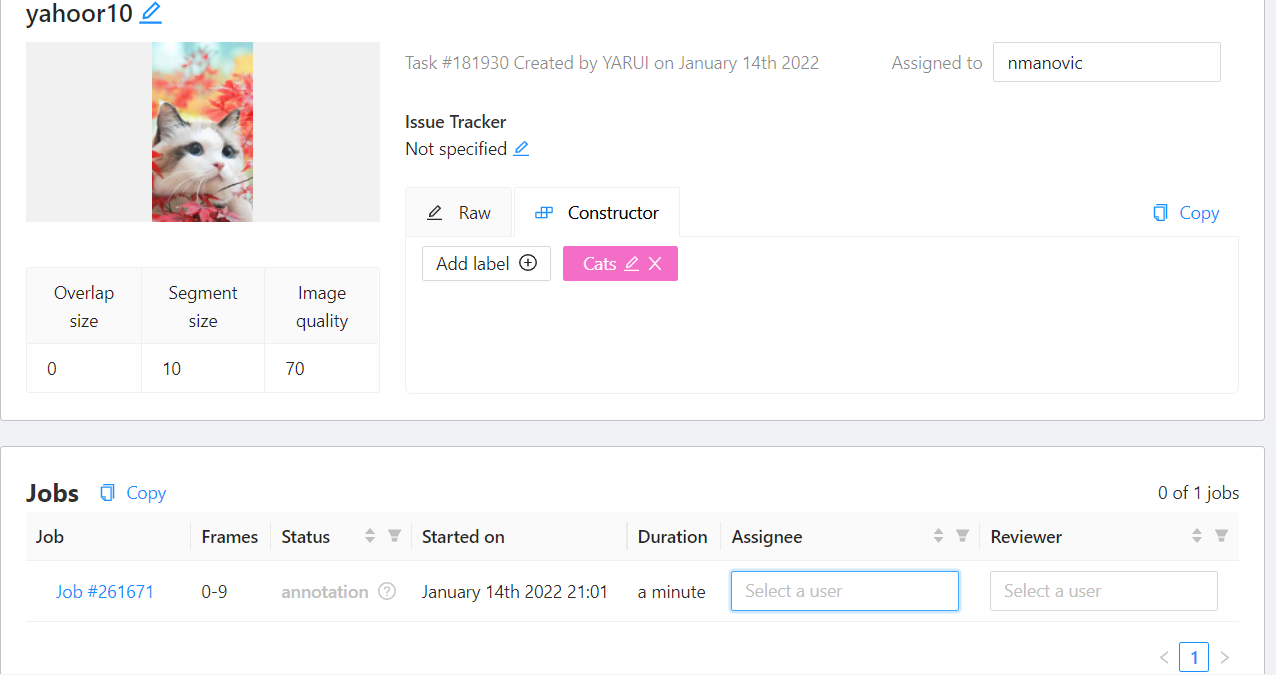
Projects can be assigned to certain people

Automatic recognition function can be selected
Select Detectors, and select YOLO v3 for the model. The model can recognize many contents. For example, after selecting cat (3), it will automatically recognize the box selection. If it is recognized as cat, it will be marked as its own label category, i.e. (4)
There are many export types, and COCO types are supported
As you can see, when opening a json file with Pychram, it will only appear on one line. We can press shift twice, select Action and enter reformat code to adjust the code to json data format
Prepare dataset manually
-
Create dataset.yaml
Modify according to subsequent requirements:
You only need to modify the yaml of the dataset, and do not modify others
the dataset config file that defines
1) the dataset root directory path and relative paths to train / val / test image directories (or *.txt files with image paths),
**3)**a list of class names # pay attention to the order of labels and do not reverse them
# Train/val/test sets as 1) dir: path/to/imgs, 2) file: path/to/imgs.txt, or 3) list: [path/to/imgs1, path/to/imgs2, ..]
path: ../datasets/coco128  # dataset root dir
train: images/train2017  # train images (relative to 'path') 128 images
val: images/train2017  # val images (relative to 'path') 128 images
test:  # test images (optional)

# Classes
nc: 80  # number of classes
names: [ 'person', 'bicycle', 'car', 'motorcycle', 'airplane', 'bus', 'train', 'truck', 'boat', 'traffic light',
         'fire hydrant', 'stop sign', 'parking meter', 'bench', 'bird', 'cat', 'dog', 'horse', 'sheep', 'cow',
         'elephant', 'bear', 'zebra', 'giraffe', 'backpack', 'umbrella', 'handbag', 'tie', 'suitcase', 'frisbee',
         'skis', 'snowboard', 'sports ball', 'kite', 'baseball bat', 'baseball glove', 'skateboard', 'surfboard',
         'tennis racket', 'bottle', 'wine glass', 'cup', 'fork', 'knife', 'spoon', 'bowl', 'banana', 'apple',
         'sandwich', 'orange', 'broccoli', 'carrot', 'hot dog', 'pizza', 'donut', 'cake', 'chair', 'couch',
         'potted plant', 'bed', 'dining table', 'toilet', 'tv', 'laptop', 'mouse', 'remote', 'keyboard', 'cell phone',
         'microwave', 'oven', 'toaster', 'sink', 'refrigerator', 'book', 'clock', 'vase', 'scissors', 'teddy bear',
         'hair drier', 'toothbrush' ]  # class names
Collect pictures and create labels according to method 1, and then create a directory in the following format
../datasets/coco128/images/im0.jpg  # Mainly don't change the names of images
../datasets/coco128/labels/im0.txt  # Mainly don't change the labels name

Because retrieval takes time, if the item is large, you can put the contents of these datasets outside, that is, right-click Mark Directory as/Excluded, and other contents will not be modified
YOLOv5-6.0
Download link: YOLOv5-6.0
The official code of YOLOv5 is implemented based on the pytoch framework
Select the corresponding Canada configuration environment and download the requirements through the system prompt Txt package
If the author does not provide requirements Txt file, add it manually according to the error message

detect.py
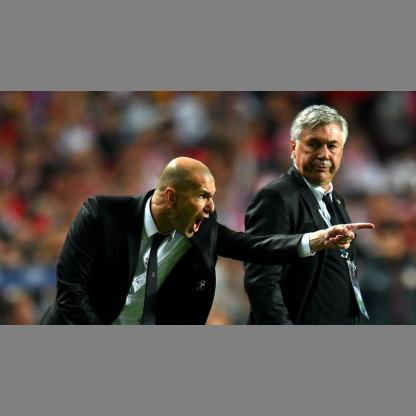
Information settings can be in the following forms: local pictures, videos, files in the directory, and video streams detected in real time

1.–iou-thres
The selection area of the above pictures is controlled by IOU thres to select the best result
If you need to execute with some parameters, you can configure them in the following figure


Only identify the car (classes 2) and save the test results with txt

By setting opt = parser parse_ Args() sets a breakpoint and observes the values of various parameters. There is no default. If it is not defined, it is FALSE
Common parameters are analyzed as follows:
def parse_opt():
parser = argparse.ArgumentParser()
parser.add_argument('--weights', nargs='+', type=str, default=ROOT / 'yolov5x6.pt', help='model path(s)')#You can change the network model as needed
parser.add_argument('--source', type=str, default=ROOT / 'data/images', help='file/dir/URL/glob, 0 for webcam')#The middle path can be a picture / video. If it is a folder, all the images will be detected
parser.add_argument('--imgsz', '--img', '--img-size', nargs='+', type=int, default=[640], help='inference size h,w')#IMG size will be scaled during training, and the input and output will be the same
parser.add_argument('--conf-thres', type=float, default=0.25, help='confidence threshold')#Confidence, 0.25 means that the probability is greater than 0.25. I think it is this object, which can be debugged repeatedly as required
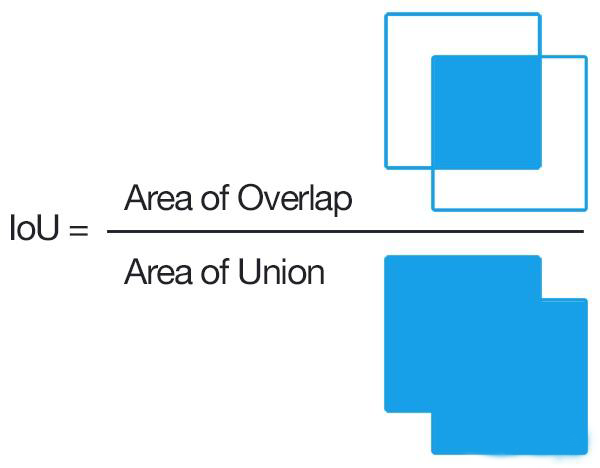
parser.add_argument('--iou-thres', type=float, default=0.45, help='NMS IoU threshold')#The object can be judged from many aspects, but the best one can be selected. When the overlapping part reaches 0.45 compared with all the frame selected areas, it is considered to be the same target, so it is not selected. If iou is 0, there is no intersecting frame
parser.add_argument('--max-det', type=int, default=1000, help='maximum detections per image')
parser.add_argument('--device', default='', help='cuda device, i.e. 0 or 0,1,2,3 or cpu')
parser.add_argument('--view-img', action='store_true', help='show results')#TRUE as long as -- View img is defined. Execute the following help
parser.add_argument('--save-txt', action='store_true', help='save results to *.txt')#You can save some annotations
parser.add_argument('--save-conf', action='store_true', help='save confidences in --save-txt labels')
parser.add_argument('--save-crop', action='store_true', help='save cropped prediction boxes')
parser.add_argument('--nosave', action='store_true', help='do not save images/videos')
parser.add_argument('--classes', nargs='+', type=int, help='filter by class: --classes 0, or --classes 0 2 3')#'+' indicates that multiple values can be assigned to select the object to be recognized,
parser.add_argument('--agnostic-nms', action='store_true', help='class-agnostic NMS')#After setting, NMS is enhanced to enhance the recognition probability
parser.add_argument('--augment', action='store_true', help='augmented inference')#After setting, the recognition probability is enhanced
parser.add_argument('--visualize', action='store_true', help='visualize features')
parser.add_argument('--update', action='store_true', help='update all models')
parser.add_argument('--project', default=ROOT / 'runs/detect', help='save results to project/name')#Set save path
parser.add_argument('--name', default='exp', help='save results to project/name')
parser.add_argument('--exist-ok', action='store_true', help='existing project/name ok, do not increment')#Do you want to save in an existing file or create a new file
parser.add_argument('--line-thickness', default=3, type=int, help='bounding box thickness (pixels)')
parser.add_argument('--hide-labels', default=False, action='store_true', help='hide labels')
parser.add_argument('--hide-conf', default=False, action='store_true', help='hide confidences')
parser.add_argument('--half', action='store_true', help='use FP16 half-precision inference')
parser.add_argument('--dnn', action='store_true', help='use OpenCV DNN for ONNX inference')#Opencv interface type
opt = parser.parse_args()
opt.imgsz *= 2 if len(opt.imgsz) == 1 else 1 # expand
print_args(FILE.stem, opt)
return opt
train.py
-
rectangular trainin
In the past, the training will complete the picture according to the specified square (as shown in the first picture), but now it will only add a little (as shown in the second picture), so as to reduce unnecessary information and speed up the training speed.
-
–resume
Train based on the specified model. Note that the specified file needs to be placed in the weights directory. default=False

-
–noautoanchor
adopt k-means Clustering + genetic algorithm to generate anchors with higher matching degree with the current data set. If you want to use this script, you should pay attention to two points:
- train. Parse of PY_ The parameter noautoanchor under opt must be False, that is, it is not defined and is turned on by default
- hyp. scratch. The anchors parameter under yaml must be commented out
k-means is a very classical and effective clustering method, which gathers the closer samples into the same category (cluster) by calculating the distance (similarity) between samples
Main flow of k-means algorithm
- Manually set the number of clusters K, assuming k=2;
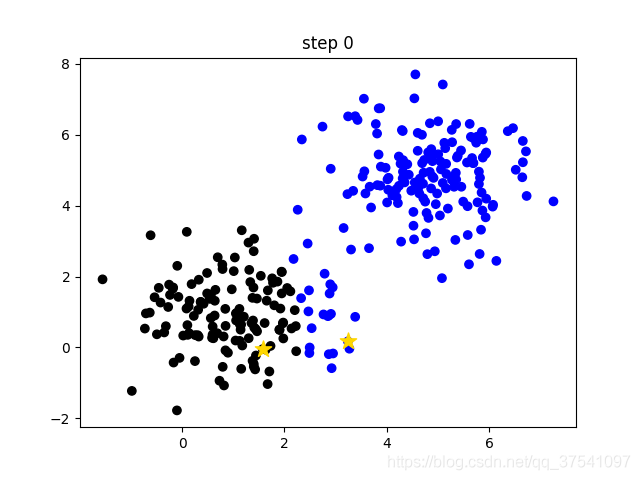
- Among all samples, k samples are randomly selected as the initial centers of clusters. In the following figure (random clusters), two small yellow stars represent the two randomly initialized cluster centers;
- Calculate the distance between each sample and the center of each cluster (taking the Euclidean distance as an example), and then divide the sample into the nearest cluster. As shown in the following figure (step 0), different clusters are distinguished by different colors;
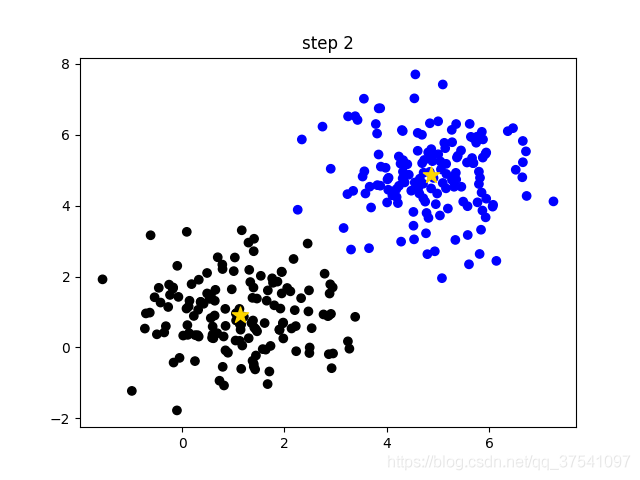
- Update the center of the cluster and calculate the mean value of all samples in each cluster (the method is not unique) as the new cluster center. As shown in the following figure (step 1), two small yellow stars have moved to the center of the corresponding cluster;
- Repeat steps 3 to 4 until the cluster center does not change or the cluster center changes very little to meet the given termination conditions. As shown in the following figure (step 2), the final clustering result.


- –evolve
yolov5 provides a hyperparametric optimization method – hyperparametric evolution, that is, hyperparametric evolution. Hyperparametric evolution is a method of hyperparametric optimization using genetic algorithm (GA). We can choose more suitable hyperparameters by this method.
The default parameters provided are also evolved by using super parameters on the COCO dataset. Since super parameter evolution will consume a lot of resources and time, if the training results of default parameters can meet your use, it is also a good choice to use default parameters.
- –quad
the quad dataloader is an experimental feature we thought of that may allow some benefits of higher --img size training at lower --img sizes.
–quad model predictably can run inference at --img-sizes above 640, while the normal model suffers worse performance at > 640 image sizes (both models were trained at --img 640). Training with 640 size, and then in pictures larger than 640 will have a better test effect
The compare though (there's always a compare) is that the quad model performs slowly at 640
- –linear-lr
# Scheduler
if opt.linear_lr:
    lf = lambda x: (1 - x / (epochs - 1)) * (1.0 - hyp['lrf']) + hyp['lrf']  # linear
else:
    lf = one_cycle(1, hyp['lrf'], epochs)  # cosine 1->hyp['lrf']
If defined, it will be processed in a linear manner, and if not defined, it will be processed in a cosine manner
- –label-smoothing
The neural network will promote itself to learn in the direction of the maximum difference between the correct label and the wrong label. When the training data is less and is not enough to represent all the sample characteristics, it will lead to over fitting of the network.
label smoothing can solve the above problems. This is a regularization strategy, which mainly adds noise through soft one hot, reduces the weight of the category of real sample labels in calculating the loss function, and finally suppresses over fitting.
Relevant parameters are as follows:
parser.add_argument('--weights', type=str, default=ROOT / '', help='initial weights path')#When you add yolov5s When Pt or other model files are loaded from the model, the training from scratch can be empty by default
parser.add_argument('--cfg', type=str, default='models/yolov5x.yaml', help='model.yaml path')#Load the model configuration, and there is a model In yaml, according to models / yolov5x Yaml structure training model
parser.add_argument('--data', type=str, default=ROOT / 'data/coco128.yaml', help='dataset.yaml path')#The dataset path can be coco128 yaml,coco.yaml,VOC.yaml,Argoverse.yaml
parser.add_argument('--hyp', type=str, default=ROOT / 'data/hyps/hyp.scratch.yaml', help='hyperparameters path')#hyperparameters
parser.add_argument('--epochs', type=int, default=300)#Number of training rounds
parser.add_argument('--batch-size', type=int, default=16, help='total batch size for all GPUs')#Set batch_size, how many pictures do you put in a group
parser.add_argument('--imgsz', '--img', '--img-size', type=int, default=640, help='train, val image size (pixels)')#Set picture size uniformly
parser.add_argument('--rect', action='store_true', help='rectangular training')#There is no default value. Execute help content after definition. rectangle is the training method of matrix
parser.add_argument('--resume', nargs='?', const=True, default='runs/train/exp/weights/last.pt', help='resume most recent training')#Train based on the specified model. Note that the specified file needs to be placed in the weights directory. default=False
parser.add_argument('--nosave', action='store_true', help='only save final checkpoint')#Look help
parser.add_argument('--noval', action='store_true', help='only validate final epoch')
parser.add_argument('--noautoanchor', action='store_true', help='disable autoanchor check')#Generally not defined
parser.add_argument('--evolve', type=int, nargs='?', const=300, help='evolve hyperparameters for x generations')
parser.add_argument('--bucket', type=str, default='', help='gsutil bucket')#Never mind
parser.add_argument('--cache', type=str, nargs='?', const='ram', help='--cache images in "ram" (default) or "disk"')#Cache for better training
parser.add_argument('--image-weights', action='store_true', help='use weighted image selection for training')#For some test s that don't perform well, in the next round of training, increase the weight, but the effect is not very good
parser.add_argument('--device', default='', help='cuda device, i.e. 0 or 0,1,2,3 or cpu')
parser.add_argument('--multi-scale', action='store_true', help='vary img-size +/- 50%%')
parser.add_argument('--single-cls', action='store_true', help='train multi-class data as single-class')#Training list category
parser.add_argument('--adam', action='store_true', help='use torch.optim.Adam() optimizer')#If defined, the optimizer is used, and the default is random gradient descent
parser.add_argument('--sync-bn', action='store_true', help='use SyncBatchNorm, only available in DDP mode')#DDP is applicable to the distribution of multiple GPU s
parser.add_argument('--workers', type=int, default=0, help='maximum number of dataloader workers')#This parameter is best adjusted from small