BlingOS Development notes -- development preparation and environment configuration
preface
Reasons for developing the operating system:
1. Want to understand the operating system in a more direct way
2. This ™ It's me, bisher
References:
1. Operating system image restoration
2. The 4th edition of the original book of modern operating system
3. Orange'S: implementation of an operating system
4. Design and implementation of a 64 bit operating system (main)
Development environment configuration
I use Clion to connect to the virtual machine through SSH, because Clion in the virtual machine is too slow After compilation, write the file to the virtual hard disk, then transfer it back to the host through FTP, and then debug in bochs
Tools required:
- Clion(IDE, which is convenient to use)
- Bochs (virtual machine for running and debugging)
- Any ftp server tool (such as FileZilla)
- gcc
- nasm
- make
- QEMU NBD QEMU img (used to generate and mount virtual hard disks)
- fdisk
- Grub (for booting OS)
Configuration steps
1. The entire virtual machine, preferably ubuntu, and then install the above 4-9 tools
2. Establish directory structure
BlingOS
├─bootloader
│  └─legacy
├─include
│  ├─device
│  └─kernel
├─lib
├─script
├─src
│  ├─device
│  ├─kernel
│  └─user
└─target
    ├─device_obj
    ├─kernel_obj
    └─lst
include is the directory of header files, src is the directory of source code, and target is the directory of generated target files, kernel programs, virtual disks and other files
3. Create a makefile in the root directory of the project, and write the frequently used commands into the makefile
First run the following command directly in the shell
qemu-img create -f vpc target/disk.vhd 20G #The format of the virtual hard disk is vhd and the size is 20G
sudo modprobe nbd	#Load nbd kernel module
sudo qemu-nbd -c /dev/nbd0 ~/BlingOS/target/disk.vhd	#Mount a virtual hard disk using QEMU NBD
Then partition the virtual hard disk
fdisk /dev/nbd0	#Using fdisk to operate nbd0
o	#Create DOS partition table
n	#Create a new partition
p	#Primary partition
1	#Partition No. 1
2048	#First sector number 2048
+300M	#Size 300M
t	#Change file system type
0c	#Change to FAT32
a	#Activate primary partition
w	#Write changes
Then install GRUB on the virtual hard disk
mkdir ~/tmp		#Create a directory for mounting partitions
sudo mount /dev/nbd0p1 ~/tmp	#Mount the partition just separated to tmp
sudo mkdir ~/tmp/boot ~/tmp/BlingOS #Create two directories, boot for grub and blingos for kernel
sudo grub-install --boot-directory=/home/user name/tmp/boot /dev/nbd0		#Installing GRUB
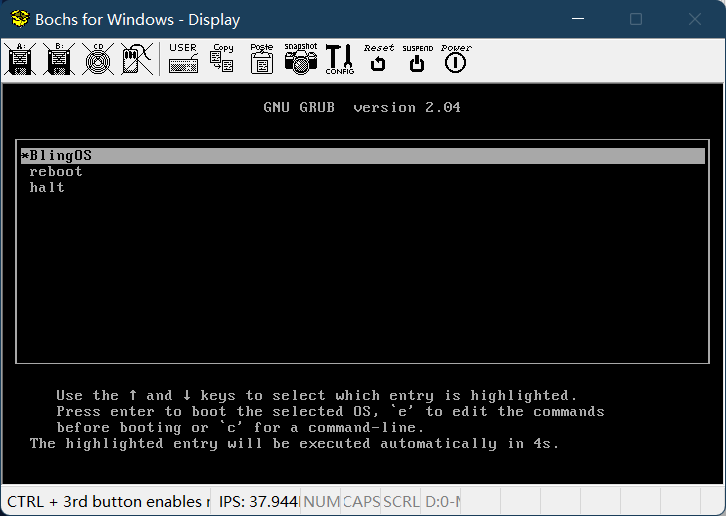
Then create grub under ~ / tmp/boot/grub CFG, write the following
set default=0

set timeout_style=menu
set timeout=5


menuentry "BlingOS" {
    insmod multiboot2
    multiboot2 /BlingOS/kernel
    boot
}

menuentry "reboot" {
    insmod reboot
    reboot
}

menuentry "halt" {
    insmod halt
    halt
}
After writing, upload the vhd file to the host (ftp or other methods are available), and the next operations are carried out in the host
Create a bochsrc Bxrc file, write the following contents (the contents related to the path can be changed according to your own situation)
# configuration file generated by Bochs
plugin_ctrl: unmapped=true, biosdev=true, speaker=true, extfpuirq=true, parallel=true, serial=true, gameport=true
config_interface: win32config
display_library: win32, options="gui_debug"
memory: host=512, guest=512
romimage: file="bochs Installation path/BIOS-bochs-latest**", address=0x00000000, options=none
vgaromimage: file="bochs Installation path/VGABIOS-lgpl-latest"
boot: disk, floppy, cdrom,
floppy_bootsig_check: disabled=1

# no floppyb
ata0: enabled=true, ioaddr1=0x1f0, ioaddr2=0x3f0, irq=14
ata0-master: type=disk, path="Virtual disk absolute path", mode=vpc
ata0-slave: type=none
ata1: enabled=true, ioaddr1=0x170, ioaddr2=0x370, irq=15
ata1-master: type=none
ata1-slave: type=none
ata2: enabled=false
ata3: enabled=false
optromimage1: file=none
optromimage2: file=none
optromimage3: file=none
optromimage4: file=none
optramimage1: file=none
optramimage2: file=none
optramimage3: file=none
optramimage4: file=none
pci: enabled=1, chipset=i440fx
vga: extension=vbe, update_freq=5, realtime=1
cpu: count=1:1:1, ips=20000000, model=bx_generic, reset_on_triple_fault=0, cpuid_limit_winnt=0, ignore_bad_msrs=1, mwait_is_nop=0
cpuid: level=6, stepping=6, model=3, family=6, vendor_string="GenuineIntel", brand_string="Intel(R) Core(TM) i7-4770 CPU (Haswell)"
cpuid: mmx=true, apic=xapic, simd=ssse3, sse4a=false, misaligned_sse=false, sep=true
cpuid: movbe=true, adx=true, aes=true, sha=true, xsave=true, xsaveopt=true, x86_64=true
cpuid: 1g_pages=true, pcid=true, fsgsbase=true, smep=true, smap=true, mwait=true
cpuid: vmx=1
print_timestamps: enabled=0
port_e9_hack: enabled=0
private_colormap: enabled=0
clock: sync=none, time0=local, rtc_sync=0
# no cmosimage
log: -
logprefix: %t%e%d
debug: action=ignore
info: action=report
error: action=report
panic: action=ask
keyboard: type=mf, serial_delay=250, paste_delay=100000, user_shortcut=none
mouse: type=ps2, enabled=false, toggle=ctrl+mbutton
sound: waveoutdrv=win, waveout=none, waveindrv=win, wavein=none, midioutdrv=win, midiout=none
speaker: enabled=true, mode=sound
parport1: enabled=true, file=none
parport2: enabled=false
com1: enabled=true, mode=null
com2: enabled=false
com3: enabled=false
com4: enabled=false
usb_uhci: enabled=1, port1=none, options1=none, port2=none, options2=none
Then win+r enter cmd to open the command prompt
cd /D "bochs Installation directory"
bochsdbg -f bochsrc.bxrc Path of -q
Then bochs will start the GUI debugger and click continue. When the following screen appears, it indicates that it is successful
Note: when using FTP to upload the virtual hard disk to the host computer, the transmission mode must be set to binary, otherwise the uploaded virtual hard disk is different from the source file