preface
In this small room with only cangls and Xiaobai, there was a discussion on learning methods.
Xiaobai: cangls, I want to ask you a question. How do you remember so many linux commands.
cangls: I, others watch my little movies. I don't know! Maybe there are too many examples, just remember some.
The inspiration for this writing comes from a book on psychology. The dialogue method is properly used and really attractive.
Soul torture? How do novices learn linux? How to get from novice to proficient? How to play linux? How does linux master so many commands? Fun to learn about linux. Based on actual combat exercises, while highlighting the key points. Whether the 25000 word long article is true or not, you might as well collect it first and then comment.
From another perspective, the great gods of linux start with Xiaobai. No one is a great God from the beginning.
It's just that others use more and naturally remember more commands, so they are better at summarizing learning methods.
If you are a Linux operator or a beginner programmer. According to their own work experience and self-study summary, the length is very long, and many sample codes are added. But very detailed! I believe you will gain something.

text
Seven years ago, I was a stupid child who didn't even know what linux was. However, now I can meet my immediate needs in my daily work by relying on the knowledge accumulated by self-study, and I have taught new colleagues many tips. Start with some interesting knowledge, commonly known as literacy, and have a heart of learning.

01 first night
Based on linux, the knowledge is connected in series, and some personal experience summary is added for reference only! Of course, you can push this article to your relatives and friends as an introductory course to learn linux.
Personal suggestions. If you feel that the suggestions are not in place, you can ignore them. Please read the text directly. I believe there will be harvest
When giving advice to others, I hope to think from the perspective of others. Don't come up and dump a tutorial or video directly. It's very unfriendly to newcomers.
First of all, we should form the good habit of self-study. The best way is often to go to the official website to consult documents, followed by major forums, and then search engines. However, the official documents are generally in English. Xiaobai often has more heart than strength. Remember to consult and accumulate in dictionaries. However, now linux has the support of simplified Chinese version. We can choose simplified Chinese when building the learning environment. When you learn deep, you will find that official documents are the most reliable.
To build the environment, it is recommended to deploy linux servers (Redhat series, Ubuntu, Fedora, Debian, etc.) with real machines and virtual machine tools. Don't worry about the server crashing by yourself. The terminal management tool recommends tabby (available on github). Although the terminal does not support Chinese character input at present, it is open source and free. As for what kind of linux distribution to learn, I hope not to follow the trend. Listening to the wind is rain, which depends on your actual situation. If I have to recommend, I recommend Centos or Ubuntu series of Redhat series. There are many tutorials and resources. Give me the poor tutorial I wrote before. The introduction and practice of linux to cultivate talents is super detailed (if you want to do good things, you must first sharpen their tools). I hope it will be helpful to you (based on Centos 6.5):
https://blog.csdn.net/Tolove_dream/article/details/103823216
For CentOS 7, please refer to this article:
https://blog.csdn.net/Tolove_dream/article/details/116085467
Then I'll talk about the simplified Chinese version of linux. The advantage is that when I read the help commands, some of them are in Chinese, which is very good for our study. When you ask this question, you should be very interested in linux, a very attractive operating system. If you are interested, it's easy to do. You will think about how learning is more beneficial to yourself. At this time, you will read the documents. Finally, you will find that the official documents are the most useful and learn to accumulate experience. Slowly from Xiaobai to veteran, there is a difficult road to go alone and enjoy the beauty of this process.
Have you ever seen such content in major forums or blog sites, from deleting the library to running away. The vast majority of servers in the world are basically linux servers. Without permission, do you still want to delete the library to run? Of course, it's just a joke. We are all law-abiding five good young people.
The previous delete library to run is just to introduce another charm of linux, and the permission is transparent enough. If you are quite skilled in authority, you can save a lot of teacher cang's works. I can appreciate it myself, but others can't see it. It's exciting to think about it. When it comes to Mr. cang, everyone is full of light, concentrate and call experts. Let's just peel it. Isn't this to arouse your interest in learning?
I have done a lot of foreshadowing. Here I will talk about my own learning process in detail. The dialogue between Xiaobai and cangls will be displayed in the form of dialogue day and night. What is cangls? Don't ask me. I just don't know. It's only meaningful but unspeakable.
1, Discussion on learning methods
In this small room with only cangls and Xiaobai, there was a discussion on learning methods.
Xiaobai: cangls, I want to ask you a question. How do you remember so many linux commands.
cangls: I, others watch my little movies. I don't know! Maybe there are too many examples, just remember some.
Xiaobai: that's right! Can you be specific? I'm very interested.
cangls: OK, let's talk about each other.
What's going on? I suspect you two are not only driving, but also making color and speeding. All right, let's play, let's go back to business.
Xiaobai: I'd like to check the previous learning materials (small movies)
cangls: use the ls command to view directories and files.
# Without parameters
$ ls
# -a parameter, query all, including band Hidden
$ ls -a
# -l parameter, long format display: displays the group, owner, modification time and file name
$ ls -l
Xiaobai: I want to change the name of the folder. Shame.
cangls: easy to handle. You can handle it with the mv command.
$ mv cangls bols
Xiaobai: what if I want to move to another folder?
cangls: you can also use the mv command, but you should take the path!
$ mv /opt/cangls /home/cangls/av
Xiaobai: cangls, I have too many files to save at present. I want to classify them in a centralized way.
cangls: you want to store multiple files in the same directory. mkdir command to create a new folder can meet your needs. Remember to use the mv command above to transfer learning materials.
$ mkdir /home/cangls/av
At this time, Xiaobai looked at the time and couldn't remember how many times she had come to consult cangls. Cangls taught Xiaobai a very chicken rib but very practical command.
cangls: Xiaobai, do you know how many days today is this year?
Xiaobai: I don't remember. Just look at your mobile phone.
cangls: don't bother. You can use the command cal that comes with linux to view it.
$ cal -jy
At this time, cangls sees Xiaobai's interest increase instead of decrease, so he introduces the help commands help and man to facilitate Xiaobai's self-study.
Isn't the above dialogue very interesting. When you are upset, you might as well calm down and try. Find a direction of interest and verify these commands. If you are interested, some of the articles I wrote before may be of some help to you.
The conversation between cangls and Xiaobai is not over. Please continue to see what happened in this small room with only two people.
02 second night
On the first night, I discussed the learning methods and how to improve my interest in learning step by step. The next night, cangls and Xiaobai continued to discuss the basic commands of linux.
cangls: Xiaobai, you're here. It seems that you still have a lot of questions!
Xiaobai: Yes, although you said some help commands about linux last time, I still couldn't figure it out.
cangls: it doesn't matter. I'll bring you a detailed explanation of help commands. Learning methods are very important!
Xiaobai took out his little notebook and began to record it
2, Discussion on basic command
Note: # symbol indicates login of root user and $symbol indicates login of ordinary user.
1. Help command (key)
This method is one of the means to output it to a file and then summarize it. Then the scp command is transmitted to the local record to the small book.
[root@cnwangk ~]# ls --help > helpcmd.txt
[root@cnwangk ~]# man ls >> helpcmd.txt
#With the help of the local terminal management tool, use the scp command to get to the Windows local desktop, that is, send it back to the local from the remote
$ scp root@192.168.245.131:/root/helpcmd.txt ~/Desktop/
root@192.168.245.131's password:
helpcmd.txt                                                                                              100%   21KB   3.8MB/s   00:00
Note: > the symbol is the redirection input, which will overwrite the contents of the original file. The > > symbol is also the redirection input to the specified file, but it is appended.
1.1. help command
As shown below, directly entering the help command will output many prompts, or add the parameter -- help to the command used for operation.
$ help
$ ls --help
The first command above represents the direct input of the help command, and some help documents will also be fed back. The second way is to use the -- help help command with the specific command ls to obtain the help document of the specified command.
1.2 man command
1.2.1 level and function of man
| parameter | effect |
|---|---|
| 1 | View help for commands |
| 2 | View help for functions that can be called by the kernel |
| 3 | View help for functions and function libraries |
| 4 | View help for special parts (mainly files in / dev directory) |
| 5 | View help for profiles |
| 6 | View game help |
| 7 | View help for other miscellaneous items |
| 8 | View help for commands available to your system administrator |
| 9 | View help for kernel related files |
For example: view the help of passwd's configuration file, view the help of null special parts, and view the help of commands available to ifconfig system administrators.
$ man 5 passwd
$ man 4 null
$ man 8 ifconfig
man command, get the help of the specified command, display all the contents of ls command, and help manual.
$ man ls
See what level of help the command has. The man -f command is equivalent to the whatis command.
$ man -f
[root@cnwangk ~]# man -f
whatis what?
$ whatis
View all help related to the command. The man -k command is equivalent to the apropos command. For example:
$ man -k
$ apropos
#View the help command for passwd
$ apropos passwd
1.2.2 detailed display of man command
Directly enter the man command in the terminal, and you will be prompted what man page you need? Here, take the help manual of the ls command as an example to explain the examples and list some examples.
tips: enter q to exit the help manual directly.
[root@cnwangk ~]# man
 What man pages do you need?
#Enter the help document of ls command
$ man ls
LS(1)                              General Commands Manual                                                   LS(1)
NAME
       ls, dir, vdir - Column directory content
 summary
       ls [option] [file name...]
       POSIX Standard options: [-CFRacdilqrtu1]
GNU option (Short format):
       [-1abcdfgiklmnopqrstuxABCDFGLNQRSUX] [-w cols] [-T cols] [-I pattern] [--full-time] [--format={long,verbose,commas,across,verti‐
       cal,single-column}] [--sort={none,time,size,extension}] [--time={atime,access,use,ctime,status}]  [--color[={none,auto,always}]]
       [--help] [--version] [--]
Description( DESCRIPTION )
       program ls List the non directory file items first, and then the "displayable" files in each directory. If no parameter other than options appears, the default value is "."(Current directory). Options“ -d "Make directory and non directory items treated the same. Unless“ -a " Option appears with the file name in“."The starting file is not a displayable file.
       Based on the current directory, each group of files (including non directory file items and each directory containing files) are sorted by file name comparison order. If“-l"Option exists, and a summary line is displayed before each group of files: Give the sum of the length of this group of files (in 512 bytes).
       Output is to standard output( stdout). Unless“-C"This option requires output in multiple columns. The output will be one line at a time. However, when output to the terminal, single column output or multi column output is uncertain. Options can be used separately“ -1 " Or“ -C "To force single column or multi column output.
       -C     Multi column output, vertical sorting.
       -F     Each directory name plus“ / "Suffix, each FIFO Mingjia“ | "Suffix, each runnable name plus“ * "suffix.
       -R     Recursively lists subdirectories encountered.
       -a     List all files, including "." Implied file at the beginning.
The above is the explanation of man help command. I believe you will love the help command in linux. This time I should understand how the great God of linux remembers so many commands!
2. Discussion on the function of common catalogues
| option | effect |
|---|---|
| / | root directory |
| /bin | Command save directory (commands that can be read by ordinary users) |
| /boot | Startup directory, startup related files |
| /dev | Device file saving directory |
| /etc | Profile save directory |
| /home | Home directory of ordinary users |
| /lib | System library save directory |
| /mnt | System mount directory |
| /media | Mount directory |
| /root | Super user's home directory |
| /tmp | Temporary directory |
| /sbin | Command save directory (a directory that can only be used by super users) |
| /proc | Write directly to memory |
| /sys | |
| /usr | System software resource directory |
| /usr/bin | System command (ordinary user) |
| /usr/sbin | System commands (superuser) |
| /var | System related documents |
3. Summary of the most commonly used commands
3.1 summary of learning methods
The most commonly used commands are often the most basic commands, which are also explained here by adding, deleting, modifying and querying (CURD). If you want to subdivide artificially, here is a learning idea, which can be followed as shown in the mind map:
graph LR
Linux Command classification --> linux Service management
Linux Command classification --> linux Software installation management
Linux Command classification --> linux Network management
Linux Command classification --> linux system management
Linux Command classification --> linux System permissions
Of course, it can also be summarized as follows:
graph TD
Linux Command classification --> file management
Linux Command classification --> documents editing
Linux Command classification --> file transfer
Linux Command classification --> Disk management
Linux Command classification --> Disk maintenance
Linux Command classification --> Network communication
Linux Command classification --> system management
Linux Command classification --> System settings
Linux Command classification --> Backup compression
Linux Command classification --> Backup management
List some common commands, make a brief introduction first, and have an impression in your mind. Let's continue to make a detailed introduction.
$ ls #View files and directories
$ ll #Equivalent to ls -l
$ cat #View details
$ cd #Switch directory
$ mkdir # New folder
$ touch # new file
$ cp #Copy file
$ mv #Move or rename files
$ vim #A means of editing files under linux, which will be introduced in detail in this paper.
$ rm #Delete file
$ chmod #Grant authority
$ chown #Change file owner
3.2 detailed introduction of command
ls command, view directory and file commands, not all of which will be shown below, but only part of them.
#Without any parameters
[root@cnwangk ~]# ls
anaconda-ks.cfg  av  cangls.av  history.txt  scp_test
#Add the parameter - l to list the information in a longer format
[root@cnwangk ~]# ls -l
drwxr-xr-x  2 root root    23 1 April 20:21 av
-rw-r--r--  1 root root    10 1 April 20:16 cangls.av
# -a parameter, do not hide any Projects started
[root@cnwangk ~]# ls -a
.  .bash_history  .bash_profile  .cache  .config ..  av  .bash_logout   .bashrc   cangls.av  .ssh  .viminfo
The ll command is an abbreviated form of ls -l, which is equivalent to an alias. Lists information in a long format, including permissions, file owner, date, and file name.
$ ll
drwxr-xr-x  2 root root    23 1 April 20:21 av
-rw-r--r--  1 root root    10 1 April 20:16 cangls.av
-rwxr-xr-x  1 root root    78 1 September 19-21:23 hello.sh
cat command, view the contents of the file, and create a new hello SH script is used as a demonstration to show the content of the script.
[root@cnwangk ~]# cat hello.sh
#!/bin/bash
echo "hello cangls"
echo hello linux
echo create btrfs filesystem
cd command, this need not do too much introduction, we are very familiar with this command.
#Switch to the opt directory
$ cd /opt
#Return to the previous level
$ cd ..
#Enter the current user's home directory
$ cd ~
mkdir command, create a new directory, and create a collection directory of cangls.
[root@cnwangk ~]# mkdir canglsList
[root@cnwangk ~]# ls
anaconda-ks.cfg  cangls.av  canglsList  hello.sh
touch command, create a new cangls Avi file
$ touch cangls.avi
cp command, copy command, can be a single file or directory. Set cangls Copy the AVI file to the new canglsList directory.
[root@cnwangk ~]# cp cangls.avi /root/canglsList/
[root@cnwangk ~]# ls /root/canglsList/ #View the copied cangls file collection directory
cangls.avi
mv command, move or rename. When the file paths are the same, we will modify and rename them; For different paths, it is cut. I will cangls Rename the AVI file to acngls.asp mp4. Then put cangls Move the MP4 file to the canglsList directory.
[root@cnwangk ~]# mv cangls.avi cangls.mp4
[root@cnwangk ~]# ls
anaconda-ks.cfg  av  cangls.av  canglsList  cangls.mp4  hello.sh
[root@cnwangk ~]# mv cangls.mp4 /root/canglsList/
[root@cnwangk ~]# ls
anaconda-ks.cfg  av  cangls.av  canglsList  hello.sh  history.txt  scp_test
[root@cnwangk ~]# ls /root/canglsList/
cangls.avi  cangls.mp4
The final view is in the / root / directory cangls The MP4 part has been moved to the canglsList collection directory by me.
vim command, a simple demonstration here, will be described in detail below. Enter hello cangls and use cat to display the content.
[root@cnwangk ~]# vim /root/canglsList/cangls.avi
[root@cnwangk ~]# cat /root/canglsList/cangls.avi
hello cangls
rm command, delete command. Demo, delete cangls AV file.
[root@cnwangk ~]# ls #Check that I have cangls AV this file
anaconda-ks.cfg  av  cangls.av  canglsList  hello.sh
[root@cnwangk ~]# rm cangls.av #To delete, you need to enter confirmation
rm: Delete normal file "cangls.av"?y
[root@cnwangk ~]# rm -rf cangls.av  #Forced deletion and recursive deletion without confirmation
[root@cnwangk ~]# ls
anaconda-ks.cfg  av  canglsList  hello.sh
chmod command, a brief introduction to the command to grant permission, is generally used in 755 and 644. To cangls SH enter the content of the point, and then give permission.
[root@cnwangk ~]# echo echo "hello cangls" > cangls.sh
[root@cnwangk ~]# cat cangls.av
hello cangls
[root@cnwangk ~]# ll #View cangls SH script permissions
-rw-r--r--  1 root root    13 1 June 19-22:50 cangls.sh
[root@cnwangk ~]# chmod 755 cangls.sh
[root@cnwangk ~]# ll #The comparison permission changes to RWX RX Rx, and the corresponding number is 755
-rwxr-xr-x  1 root root    13 1 June 19-22:50 cangls.sh
#Execute the script cangls sh
[root@cnwangk ~]# ./cangls.sh
hello cangls
chown command, change the file owner, and set cangls The SH file is changed from root to test user.
[root@cnwangk ~]# chown test cangls.sh
[root@cnwangk ~]# ll
-rwxr-xr-x  1 test root    18 1 June 19-22:55 cangls.sh
According to my experience over the years, I think there are some commands most commonly used in my work. That's all. There are other common commands, please read on.
4. Other common commands
4.1. Mount command format
mount [-t file system] [- o special options] device file name mount point
| parameter | effect |
|---|---|
| -t | File system. Add the system file type to specify the mounting type. It can be ext3, ext4, iso9660, xfs, btrfs and other file systems |
| -o | Special options, additional options for mounting can be specified |
4.2. Query and mount
Query the mounted devices in the system and the mount command.
#Query the mounted devices in the system
$ mount
#List some devices that have been mounted in my own test environment, Redhat7 series
#I tested using the btrfs file system
/dev/sdb2 on /data type btrfs (rw,relatime,space_cache,subvolid=5,subvol=/)
#The file system format used by the system default mount is xfs
/dev/sda2 on /home type xfs (rw,relatime,attr2,inode64,noquota)
/dev/sda1 on /boot type xfs (rw,relatime,attr2,inode64,noquota)
The above lists some devices that have been mounted in my own test environment, Redhat7 series. Incidentally, RedHat 7 began to recommend the use of xfs file system. What I demonstrated also includes the xfs file system mounted, as well as the btrfs file system described above.
Some parameters are described in the following table:
| parameter | effect |
|---|---|
| mount -a | Mount automatically according to the contents of the configuration file / etc/fstb |
| atime/noatime | Update access time / do not update access time. Whether to update the access time of the file when accessing the partition file. The default is update. |
| async/sync | Asynchronous / synchronous, asynchronous by default |
| auto/noauto | Automatic / Manual: whether the contents of the / etc/fstb file will be mounted automatically when the mount -a command is executed. It is automatic by default. |
| defaults | Define the default value, which is equivalent to the seven options rw, suid, dev, exec, auto, nouser and async. |
| exec/noexec | Execute / not execute: set whether executable files are allowed to be executed in the file system. exec allows by default. |
| remount | Remounting a mounted file system is generally used to specify special permissions for modification. |
| rw/ro | Read / write / read-only. Whether the file system has read / write permission when it is mounted. The default is rw. |
| suid/nosuid | With / without suid permission, set whether the file system has suid and sgid permission. It has by default. |
| user/nouser | Allow / disallow ordinary users to mount. Set whether the file system allows ordinary users to mount. It is not allowed by default. Only root can mount partitions. |
| usrquota | Write represents that the file system supports user disk quota, which is not supported by default. |
| grpquota | Write represents the disk quota of the file system support group, which is not supported by default. |
For disk mount, if you are interested, please refer to the articles I organized on github or gitee. In the linux folder in the code base, articles in PDF file format are also sorted out for easy reading, and are still being sorted out and improved.
For the address of personal github warehouse, the PDF file will be updated first, and then the markdown file will be uploaded. If accessing github is too slow, you can access gitee for cloning.
https://github.com/cnwangk/SQL-study
4.2.1. Mount CD
First, create a mount point. The command is as follows:
$ mkdir /mnt/cdrom/
Mount the CD. Here's the explanation: it's just customary to create it under mnt, and it's OK to create it under media.
Brief introduction: / dev/sr0 is the file to be mounted, and / mnt/cdrom is the disk path where the storage is mounted
$ mount -t iso9660 /dev/cdrom /mnt/cdrom/
$ mount /dev/sr0  /mnt/cdrom/
Uninstall command, device file name or mount point, such as uninstalling the sdb attached to the new disk
$ umount /dev/sdb
4.2.2 mount U SB flash disk
View the file name of U SB flash disk device, fdisk -l view the disk list
$ fdisk -l
$ mount -t vfat /dev/sdb1 /mnt/usb/
4.3. User login view command
View user login information
$ w
[root@cnwangk ~]# w
 21:31:12 up  1:39,  1 user,  load average: 0.00, 0.04, 0.05
USER     TTY      FROM             LOGIN@   IDLE   JCPU   PCPU WHAT
root     pts/0    192.168.245.1    19:52    0.00s  0.28s  0.02s w
As shown above, enter the w command to view my login information. There is only one user. I logged in with ssh, but there is no login in the local virtual machine. The command output is as follows:
4.3.1 command output
Parameter description and function are shown in the following table:
| parameter | effect |
|---|---|
| USER | Login user name |
| TTY | login terminal |
| FROM | From which IP address |
| LOGIN@ | login time |
| DILE | User idle time |
| JCPU | The time occupied by all processes connected to the terminal. This time does not include the past background job time, but includes the time occupied by the currently running background job |
| PCPU | Time consumed by the current process |
| WHAT | Currently running commands |
| w | Query login users, display system time and running time, number of users and average load. |
4.3.2. View login user information
Command output: user name, login terminal, login time (login source IP address)
#View user information
$ who
[root@cnwangk ~]# who  #View current user information
root     pts/0        2022-01-19 19:52 (192.168.245.1)
#View current user
$ whoami #Check that the current user identity is root
[root@cnwangk ~]# whoami
root
It is found that the current user is root, the login terminal pts/0, the login key and IP: 2022-01-19 19:52 (192.168.245.1), and the environment built by the virtual machine.
Query current login and past login user information
The last command reads the data from the / var/log/wtmp file by default. Command output: user name, login terminal, login IP, login time, exit time (online time)
$ last
root     tty1                          Sun Jan  5 21:47 - 21:50  (00:02)
reboot   system boot  3.10.0-514.el7.x Sun Jan  5 21:44 - 21:59 (7+00:15)
You can see my oldest login information recorded. It's really a long time. It's basically used very late.
View the last login time of all users
#The lastlog command reads the contents of the / var/log/lastlog file by default
#Command output: user name, login terminal, login IP, last login time
$ lastlog
[root@cnwangk ~]# lastlog
user name           port     come from               Last login time
root            pts/0   192.168.245.1      III. January 19 22:52:46 +0800 2022
bin                                        **Never logged in**
The above Chinese shows that I chose the simplified Chinese version when installing, which is very friendly for beginners.
When viewing the network status, you generally pay attention to the ESTABLISHED status
$ netstat -an | grep ESTABLISHED
[root@cnwangk ~]# netstat -an | grep ESTABLISHED
tcp        0      0 192.168.245.131:22      192.168.245.1:3579      ESTABLISHED
4.4. Decompression command
Only some common compression commands, such as zip and gzip, are introduced; Unpacking command tar.
4.4.1 compression command
For example: zip, gzip. Compress canglsAVList into canglsAVList ZIP format, compress bolsAVList into bolsAVList GZ format.
zip -r canglsAVList > cangls.zip
gzip -c bolsAVList > bolsAVList.gz
4.4.2 unpacking command tar
Unzip a redis source package
$ tar -zxvf redis-6.0.8.tar.gz
The package command tar -zcvf packages redis-6.0.8-bak into a tar package
$ tar -zcvf redis-6.0.8-bak > redis-6.0.8-bak.tar
Then redis-6.0.8-bak Tar compressed into gz format
$ gzip redis-6.0.8-bak.tar > redis-6.0.8-bak.tar.gz
4.5. Search command
4.5.1. locate command
The locate command can only be followed by the file name. For example, let's search the file of cangls. Oh, there are many more:
locate cangls
[root@cnwangk opt]# locate cangls
/root/cangls.av
/root/cangls.sh
/root/canglsList
/root/canglsList/cangls.avi
/root/canglsList/cangls.mp4
The background command searched by the locate command is not updated in time. In this case, you can use the updatedb command to update:
$ updatedb
locate command configuration file / etc / updatedb Conf configuration file
- PRUNE_BIND_MOUNTS: turn on search restrictions
- Prenefs = "": system files not searched
- Prunnames = "": file types not searched
- Prenepaehs = "": path not searched
4.5.2 command search command
Command search commands, such as which, which, and find commands.
Here, we will focus on the use of the find command:
Case insensitive, search for cangls SH script
$ find /root -iname cangls.sh
Search by owner
$ find /root -user root
Find files modified 10 days ago
find /var/log -mtime +10
Find files larger than 1M in the / etc directory
find /etc -size +1M
Find the file with i node 26267295, call the expert directly, and when a small movie of bols was added.
[root@cnwangk ~]# find . -inum 26267295
./bolsList
Find files larger than 100KB and smaller than 200KB in the / etc / directory
find /etc -size +100k -a -size -200k
- -a is equivalent to and, logic and. Both conditions are satisfied
- -o is equivalent to or, logical or. One of the two conditions can be satisfied
Find files larger than 100KB and smaller than 200KB in the / etc / directory, and display details
#-exec/-ok command
#{}\; Perform actions on search results
find /etc -size +100k -a -size -200k -exec ls -lh {} \;
grep string search element command
- grep [options] string file name, which matches the matching string in the file
- -i. Ignore case
- -v. Exclude specified string
Match according to file size, Anaconda ks Cfg file is a file that comes with the installation of Redhat series.
$ grep "size" anaconda-ks.cfg
part swap --fstype="swap" --ondisk=sda --size=2000
part /boot --fstype="xfs" --ondisk=sda --size=200
part / --fstype="xfs" --ondisk=sda --size=16278
part /home --fstype="xfs" --ondisk=sda --size=2000
The difference between find and grep
- find command: search for qualified file names in the system. If you need to match, use wildcards. Wildcards are exact matches.
- grep command: search for qualified strings in files. If matching is needed, use regular expression to match. Regular expression contains matching.
5. Shutdown and restart commands
5.1 shutdown command
Generally speaking, the shutdown and restart commands will not be given to ordinary users, and only the root user has the permission to execute them.
$ shutdown
# shutdown -h now #Shut down immediately
| parameter | effect |
|---|---|
| -c | Cancels the previous shutdown command |
| -h | Shut down |
| -r | restart |
Other shutdown commands: halt, poweroff, init 0
Note: when using the server, do not use the shutdown command casually. Once used, it will cause unnecessary trouble.
5.2 restart command
Generally speaking, the shutdown and restart commands will not be given to ordinary users, and only the root user has the permission to execute them.
#Restart command 1. Restart immediately. You can also specify the world and the interval between restarts
$ shutdown -r now
#Restart Command 2, restart now
$ reboot
Note: use the logout command to log out of the shell and form a good habit of logging out
Other restart commands: reboot, init 6
03 third night
The second night's knowledge was a little too much, and Xiaobai didn't digest it.
cangls: Xiaobai, you're here. Am I white? Am I old? Do I look good? Don't go, I'm here
Xiaobai: what? puzzled face
At this time, Xiaobai's real heart thought: don't think I don't understand. We can't stand it for learning. It's really big and white. It tempts me every day.
cangls: no kidding. Let's get back to the point. There were a lot of knowledge yesterday. I hope I can digest it well. Today we'll bring some tips on advanced linux.
Xiaobai: nodded and listened carefully.
3, Advanced common
1. scp command
1.1 grammar
usage: scp [-12346BCpqrv] [-c cipher] [-F ssh_config] [-i identity_file]
           [-l limit] [-o ssh_option] [-P port] [-S program]
           [[user@]host1:]file1 ... [[user@]host2:]file2
1.2. Application method
Simply put: scp [optional parameter] local file destination directory
scp /root/av/local_file.av remote_username@ip:/root/av
scp [optional parameter] local directory destination directory
scp -r /root/av/ remote_username@ip:/root/
Introduction to command format
#Copy file format, local to remote server
scp local_file remote_username@remote_ip:remote_directory
#perhaps
scp local_file remote_username@remote_ip:remote_file
#perhaps
scp local_file  remote_ip:remote_directory
#perhaps
scp local_file remote_ip:remote_file
Copy directory command format
#Copy command format, local to remote server
scp -r local_directory remote_username@remote_ip:remote_directory
#perhaps
scp -r local_directory remote_ip:remote_directory
For details, please refer to our blog post: [SCP command] safe and fast linux tips SCP command
2. Routing command
The following is a brief introduction to some common routing commands (network configuration tools).
2.1 ifconfig command, the display contents are as follows:
tips: when we judge the network environment, the dropped parameter value is very important. Generally, the normal state is 0. If the packet switching number will rise.
[root@cnwangk ~]# ifconfig
docker0: flags=4099<UP,BROADCAST,MULTICAST>  mtu 1500
        inet 172.17.0.1  netmask 255.255.0.0  broadcast 172.17.255.255
        ether 02:42:38:38:ab:fe  txqueuelen 0  (Ethernet)
        RX packets 0  bytes 0 (0.0 B)
        RX errors 0  dropped 0  overruns 0  frame 0
        TX packets 0  bytes 0 (0.0 B)
        TX errors 0  dropped 0 overruns 0  carrier 0  collisions 0

ens33: flags=4163<UP,BROADCAST,RUNNING,MULTICAST>  mtu 1500
        inet 192.168.245.131  netmask 255.255.255.0  broadcast 192.168.245.255
        inet6 fe80::b314:8248:917a:d808  prefixlen 64  scopeid 0x20<link>
        ether 00:0c:29:47:be:5f  txqueuelen 1000  (Ethernet)
        RX packets 14160  bytes 1053042 (1.0 MiB)
        RX errors 0  dropped 0  overruns 0  frame 0
        TX packets 7652  bytes 713027 (696.3 KiB)
        TX errors 0  dropped 0 overruns 0  carrier 0  collisions 0

lo: flags=73<UP,LOOPBACK,RUNNING>  mtu 65536
        inet 127.0.0.1  netmask 255.0.0.0
        inet6 ::1  prefixlen 128  scopeid 0x10<host>
        loop  txqueuelen 1  (Local Loopback)
        RX packets 1474  bytes 91198 (89.0 KiB)
        RX errors 0  dropped 0  overruns 0  frame 0
        TX packets 1474  bytes 91198 (89.0 KiB)
        TX errors 0  dropped 0 overruns 0  carrier 0  collisions 0
The most common function of ifconfig is to look at the set ip address, dns and gateway. In fact, it is to look at the parameters set by the network card. When you see docker, yes, I installed the docker environment.
2.2. Use the ip command as follows:
[root@cnwangk ~]# ip addr list
1: lo: <LOOPBACK,UP,LOWER_UP> mtu 65536 qdisc noqueue state UNKNOWN group default qlen 1
    link/loopback 00:00:00:00:00:00 brd 00:00:00:00:00:00
    inet 127.0.0.1/8 scope host lo
       valid_lft forever preferred_lft forever
    inet6 ::1/128 scope host
       valid_lft forever preferred_lft forever
2: ens33: <BROADCAST,MULTICAST,UP,LOWER_UP> mtu 1500 qdisc pfifo_fast state UP group default qlen 1000
    link/ether 00:0c:29:47:be:5f brd ff:ff:ff:ff:ff:ff
    inet 192.168.245.131/24 brd 192.168.245.255 scope global noprefixroute ens33
       valid_lft forever preferred_lft forever
    inet6 fe80::b314:8248:917a:d808/64 scope link noprefixroute
       valid_lft forever preferred_lft forever
3: docker0: <NO-CARRIER,BROADCAST,MULTICAST,UP> mtu 1500 qdisc noqueue state DOWN group default
    link/ether 02:42:38:38:ab:fe brd ff:ff:ff:ff:ff:ff
    inet 172.17.0.1/16 brd 172.17.255.255 scope global docker0
       valid_lft forever preferred_lft forever
#The ip command can also be used with the route command
[root@cnwangk ~]# ip route list
default via 192.168.245.2 dev ens33 proto static metric 100
172.17.0.0/16 dev docker0 proto kernel scope link src 172.17.0.1
192.168.245.0/24 dev ens33 proto kernel scope link src 192.168.245.131 metric 100
The ip command can also be used in conjunction with the route command, and the route command alone can also be used for configuration.
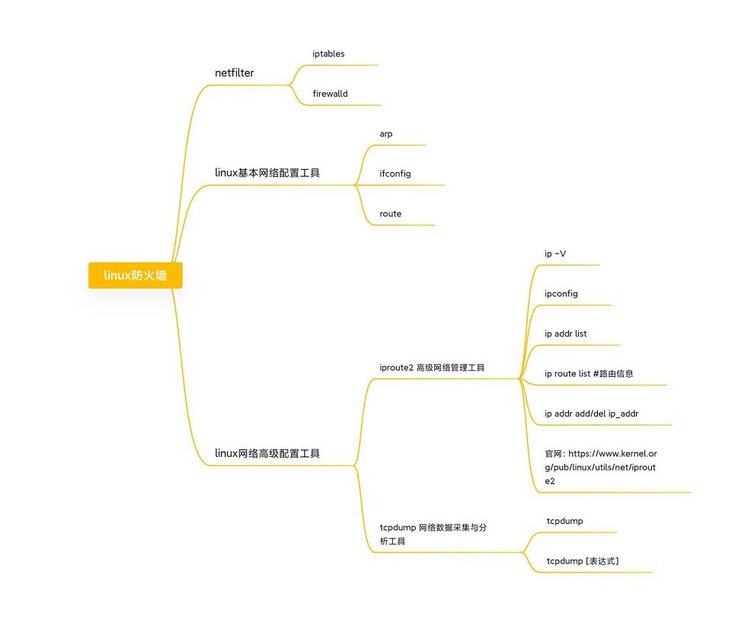
The following figure is a simple mind map I made before. It was originally intended to be placed in the firewall knowledge, but now it is also applicable. I didn't put the original picture. The original picture is too big. I can see it clearly if I shrink it a little!
3. Firewall command
Here, I only introduce the firewalld command line mode. For detailed operation instructions, please refer to the blog post: [Redhat series linux Firewall tools] fierce collision between firewalld and iptables firewall tools
1.1. Region selection
After the current operating system is installed, the firewall will set a default area and add the interface to the default area. The first step for the user to configure the firewall is to obtain the default area and modify it. The operations are as follows:
View all areas in the current system
firewall-cmd --get-zones
View the current default area
firewall-cmd --get-default-zone
View currently activated areas
firewall-cmd --get-active-zones
Get the area to which the interface ens33 belongs
firewall-cmd --get-zone-of-interface=ens33
Modify the area to which the interface belongs
firewall-cmd --permanent --zone=internal --change-interface=ens33
1.2 firewalld service management
Reload firewall configuration
firewall-cmd --reload
Restart firewall (redhat Series)
systemctl restart firewalld.service
Temporarily turn off the firewall
systemctl stop firewalld.service
Boot enable firewall
systemctl enable firewalld.service
Boot disable firewall
systemctl disable firewalld.service
View the running status of firewalld
firewall-cmd --state
1.3. firewalld open port
The public area (public) setting opens port 21 permanently and writes it to the configuration file (parameter: - permanent)
#Parameter: - permanent, the setting takes effect immediately and is written to the configuration file
firewall-cmd --zone=public --add-port=21/tcp --permanent
Check whether firewall port 21 is open
firewall-cmd --zone=public --query-port=21/tcp
Remove open port 21
firewall-cmd --zone=public --remove-port=21/tcp --permanent
1.4 modification of regional rules
Query firewall rule list
firewall-cmd --zone=public --list-all
Add an area rule httpd service
firewall-cmd --permanent --zone=internal --add-service=http
Validation rules
firewall-cmd --zone=internal --list-all
4. Process related commands
Process related commands mainly introduce four
- ps -aux | grep [service name]
- ps -ef | grep [service name]
- ps -le | grep [service name]
- top
If the httpd service is not installed, the Redhat series can be installed using the yum command, and the Ubuntu series can be installed through apt install. Apt is the Shell front-end package manager in Debian and Ubuntu.
$ yum -y install httpd
View the ps commands commonly used by the process to demonstrate the httpd process. Here only the practical ones in work are introduced.
#Use the - ef parameter to view the httpd process
$ ps -ef | grep httpd
[root@cnwangk ~]# ps -ef | grep httpd
root      1329     1  0 13:37 ?        00:00:00 /usr/sbin/httpd -DFOREGROUND
apache    2216  1329  0 13:37 ?        00:00:00 /usr/sbin/httpd -DFOREGROUND
apache    2218  1329  0 13:37 ?        00:00:00 /usr/sbin/httpd -DFOREGROUND
apache    2219  1329  0 13:37 ?        00:00:00 /usr/sbin/httpd -DFOREGROUND
apache    2220  1329  0 13:37 ?        00:00:00 /usr/sbin/httpd -DFOREGROUND
apache    2221  1329  0 13:37 ?        00:00:00 /usr/sbin/httpd -DFOREGROUND
apache    2222  1329  0 13:37 ?        00:00:00 /usr/sbin/httpd -DFOREGROUND
root      2276  2226  0 13:38 pts/0    00:00:00 grep --color=auto httpd
#Use the - aux parameter to view the httpd process
$ ps -aux | grep httpd
[root@cnwangk ~]# ps -ef | grep httpd
root      1329     1  0 13:37 ?        00:00:00 /usr/sbin/httpd -DFOREGROUND
apache    2216  1329  0 13:37 ?        00:00:00 /usr/sbin/httpd -DFOREGROUND
apache    2218  1329  0 13:37 ?        00:00:00 /usr/sbin/httpd -DFOREGROUND
apache    2219  1329  0 13:37 ?        00:00:00 /usr/sbin/httpd -DFOREGROUND
apache    2220  1329  0 13:37 ?        00:00:00 /usr/sbin/httpd -DFOREGROUND
apache    2221  1329  0 13:37 ?        00:00:00 /usr/sbin/httpd -DFOREGROUND
apache    2222  1329  0 13:37 ?        00:00:00 /usr/sbin/httpd -DFOREGROUND
root      2276  2226  0 13:38 pts/0    00:00:00 grep --color=auto httpd
#Query httpd process in long format
$ ps -le | grep httpd
[root@cnwangk ~]# ps -le | grep httpd
4 S     0  1329     1  0  80   0 - 104198 poll_s ?       00:00:00 httpd
5 S    48  2216  1329  0  80   0 - 70677 poll_s ?        00:00:00 httpd
5 S    48  2218  1329  0  80   0 - 105278 SYSC_s ?       00:00:00 httpd
5 S    48  2219  1329  0  80   0 - 105278 ep_pol ?       00:00:00 httpd
5 S    48  2220  1329  0  80   0 - 105278 SYSC_s ?       00:00:00 httpd
5 S    48  2221  1329  0  80   0 - 105278 SYSC_s ?       00:00:00 httpd
5 S    48  2222  1329  0  80   0 - 105278 SYSC_s ?       00:00:00 httpd
Check the process. Of course, the top command should also understand that you can see some process related information without any parameters. For example, the current server time, running days, number of users, load balancing, total number of tasks, how many processes are running and sleeping, stopping and zombie processes, cpu utilization, memory occupation, caching and buffering. To view, you can directly use top, exit and press q.
$ top
top - 13:41:24 up 5 min,  1 user,  load average: 0.06, 0.28, 0.16
Tasks: 193 total,   1 running, 192 sleeping,   0 stopped,   0 zombie
%Cpu(s):  0.3 us,  0.7 sy,  0.0 ni, 98.7 id,  0.3 wa,  0.0 hi,  0.0 si,  0.0 st
KiB Mem :  1877588 total,   940396 free,   481804 used,   455388 buff/cache
KiB Swap:  2047996 total,  2047996 free,        0 used.  1235960 avail Mem
To view the process, the pstree command is also essential. The vsftpd I deployed and the monitoring system service zabbix are displayed in a tree structure.
$ pstree
        ├─vsftpd
        ├─zabbix_agentd───5*[zabbix_agentd]
        ├─zabbix_proxy
        └─zabbix_server───33*[zabbix_server]
If the process really can't end normally, then use violent means to kill the order and forcibly close it.
$ kill -1 3033 #Restart process
$ kill -9 3034   #Force kill process
There's so much about the process. It's too much to digest. For more detailed description, please refer to my history blog.
5. System permissions
System permissions, if not classified, can be roughly divided into basic permissions and special permissions.
Permission allocation principle: for files, the maximum permission is x (execution); For the directory: the maximum permission is w (write). Then use the file cangls to show you the meaning of authority represented by numbers. rwx adds up to 7:
- The corresponding digital permission of r is: 4, read permission
- w the corresponding digital permission is: 2, write permission
- The digital permission corresponding to x is: 1, execution permission
[root@cnwangk ~]# chmod 711 cangls.av
[root@cnwangk ~]# ll cangls.av
-rwx--x--x 1 root root 13 1 June 19-22:49 cangls.av
[root@cnwangk ~]# chmod 722 cangls.av
[root@cnwangk ~]# ll cangls.av
-rwx-w--w- 1 root root 13 1 June 19-22:49 cangls.av
[root@cnwangk ~]# chmod 744 cangls.av
[root@cnwangk ~]# ll cangls.av
-rwxr--r-- 1 root root 13 1 June 19-22:49 cangls.av
Through the above demonstration, cangls AV this file gives permissions 711, 722, 744 to test. 711 corresponding permission - rwx--x--x, 722 corresponding permission - rwx-w--w, 744 corresponding permission: - rwxr--r -- of course, this setting is meaningless. In order to demonstrate the test, demonstrate the meaning of the number.
tips: another way is ugo mode, which is just for understanding.
04 fourth night
cangls: remember what we discussed about linux three days ago?
Xiaobai: of course, I remember it all in my notebook. I repeat it below:
- learning method;
- linux basic commands, the most important is to help the use of commands;
- linux Advanced tips, such as: scp secure file transfer command, routing command, firewalld firewall command, etc;
- linux process related commands: ps -ef, ps -aux, top;
- linux system permission command: chmod.
cangls: next, there will be a little episode to explain some knowledge of server deployment projects, such as Java Web projects.
Xiaobai: OK, I'm very interested!
4, Java related
Based on the application in practical work, this paper introduces some knowledge related to web project and server. Please don't be surprised when you see that my article will show Java related knowledge more or less. I'm actually a poor Java coder. It's so magical. Well, I admit that I'm not even half a bucket. I just have some CURD experience. The experience of operating on Linux is richer than the Java experience I mainly studied, thanks to years of self-study and dealing with servers and virtual machines.
1. jar package service and war package service
Java programs run in the background through middleware, and the & symbol is to put the program into the background for execution
$ java -jar demo-1.0.jar &
The jar package or war package runs in the middleware background, optimizes the version, and outputs the log to the specified file demo-1.0 log. The jvm runs in client mode, and the default Xmx size is 64M. In server mode, the default Xmx size is 1024M, and the default Xms size is 1M. In server mode, the default Xms size is 128M.
$ nohup java -server -Xms256M -Xmx2048M -jar demo-1.0.jar &> demo-1.0.log &
When you encounter the console log output garbled code, don't panic at this time, please think calmly. Of course, there is a solution, that is to specify a fixed code, such as utf-8 code, when the Java jar command is executed on the console.
$ java -jar -Dfile.encoding=utf-8 demo-1.0.jar &
$ nohup java -server -Xms256M -Xmx2048M -jar -Dfile.encoding=utf-8 demo-1.0.jar &> demo-1.0.log &
Personal suggestion: Based on actual work. No matter how to optimize, the machine is always a machine, and the memory must always be consumed. If it cannot be released, human intervention measures need to be taken, such as restarting the server regularly. Many problems can't be solved after finding many reasons, but it's so magical to restart the server.
2. tomcat middleware optimization
Limit heap memory. Specifically, calculate and optimize according to the memory of the server and the real machine. The following knowledge shows example values.
$ set JAVA_OPS = -Xms800m -Xmx1024m -XX:PermSize=800m -XX:MaxPermSize=1024m
https self signed certificate configuration
<!--Self signed certificate configuration, certificate password keystorePass,key Include file keystoreFile=""-->
  <!-- <Connector port="8443" protocol="org.apache.coyote.http11.Http11Protocol"
               maxThreads="150" SSLEnabled="true" scheme="https" secure="true"
               clientAuth="false" sslProtocol="TLS"
              keystoreFile="D:\\company-workspace\\mykeys\\tomcat.keystore"
              keystorePass="123456"
              truststoreFile="D:\\company-workspace\\mykeys\\tomcat.keystore"
              truststorePass="123456"
               />-->
When it comes to tomcat middleware, it is generally naturally associated with nginx middleware. Generally, it is not recommended to configure directly in tomcat. Instead, nginx is used as a layer of reverse proxy, and then ssl is set in nginx.
Brief introduction to nginx middleware configuration
Load balancing, polling can be realized by weighted weight.
   upstream tomcat {
                server 192.168.0.233:8080;
                server 192.168.0.233:8888;
                server 192.168.0.233:9999;
        }
Configure ssl reference
server
    {
        listen 80;
        listen 443 ssl;
        server_name 192.168.245.130;
    #ssl set begin
        #Write rewrite rules gracefully
        #rewrite ^ https://www.nginx.org$request_uri?;
        #Redirect forward to https
        #proxy_redirect http:// $scheme://;
        #301 redirection
        #return  301 https://$server_name$request_uri;
        #http requests are redirected to https requests, and non-standard 433 ports are used
        #error_page 497  https://$host$uri?$args;
        #ssl set off or mask
        ssl off;
        ssl_certificate ssl/server.crt;#Server certificate
          ssl_certificate_key ssl/server.key;#Server private key
        ssl_session_cache shared:SSL:1m;#Set shared session cache size
        ssl_session_timeout 5m;#Configure the session valid time for 5 minutes
        ssl_prefer_server_ciphers on;#Server algorithm is preferred
        ssl_protocols TLSv1 TLSv1.1 TLSv1.2;#Enable specified protocol
        #encryption algorithm
        ssl_ciphers  EECDH+CHACHA20:EECDH+AES128:RSA+AES128:EECDH+AES256:RSA+AES256:EECDH+3DES:RSA+3DES:!MD5;
        #ssl_verify_client on;# Turn on client certificate verification
        #ssl_client_certificate ssl/ca.crt;#Set authentication client certificate
        #ssl_verify_depth 6; #Check depth
        #ssl_trusted_certificate ssl/ca.crt;#Set CA as trusted certificate
    #ssl set end
    location / {
          #Configure proxy_set_header request header
        proxy_pass_header User-Agent;
          proxy_set_header Host $http_host;
          proxy_set_header X-Real-IP $remote_addr;
          proxy_set_header X-Forwarded-For $proxy_add_x_forwarded_for;
        proxy_set_header X-Forwarded-Proto https;
          proxy_pass http://tomcat;
          proxy_redirect http:// https://;
    }
3. Optimization of domestic Zhongchuang Middleware
There are two solutions to incomplete JDK:
- First: download the full version of JDK;
- The second is to use the compiler built in as, and adjust it as shown below.
Find the Java config configuration column and add the following parameters in \ < JVM Options >.
<jvm-options>-Dorg.apache.jasper.compiler.disablejsr199=true</jvm-options>
Or modify the domain.config in the as/domains/domain1/config / directory XML, change false to true.
<jvm-options>-Dorg.apache.jasper.compiler.disablejsr199=false</jvm-options>
05 fifth night
After four nights of in-depth discussion, Xiaobai already has some basic knowledge of linux and has a certain understanding of project launch and maintenance.
cangls: I believe Xiaobai has a certain understanding of the basic knowledge of linux and can apply it to his work.
Xiaobai: cangls, thank you for your careful teaching. You have such a lost sense of achievement.
cangls: learning is to have this momentum, good! Today I'll teach you the exclusive secret I've collected for many years: the use of vim tools.
Xiaobai: OK, the exclusive secret collection? Is it Joyoung's magic or jade girl's heart? Show a look of expectation.
cangls: what do you think? It is an editing artifact in linux. Using vim well will be of great benefit to your work!
Xiaobai: I see. I began to take out my little book records
5, Use of vim
1. vim is easy to use
Then the above example hello SH script continues.
$ vim hello.sh #Start editing script
In hello Write a paragraph in the SH script:
tips: after entering, press i key to insert content.
#!/bin/bash
echo "hello cangls"
echo hello linux
echo create btrfs filesystem
Press ESC, enter: wq save exit, and then execute the script:
[root@cnwangk ~]# ./hello.sh
hello cangls
hello linux
create btrfs filesystem
After executing the script, you will find that the hello cangls just entered through vim has taken effect.
If you don't have permission, give permission through the root user:
#Grant read and execute permissions
chmod 755 /hello.sh
2. Play vim
Summarize some commonly used shortcut commands based on personal experience
| parameter | effect |
|---|---|
| i | Edit and insert content |
| :wq | Save and exit |
| :q! | Exit without saving |
| shirt + pgup | Page up |
| shift + pgdown | Page down |
| / | Search content |
| :set number | Display rows |
| ESC | Exit editing |
For more command parameters, refer to man vim, a powerful help command man.
Attached is a vim keyboard diagram from the rookie tutorial, You can go to the rookie tutorial to download the original picture.

06 the sixth night
After the first five nights of continuous fighting, Xiaobai still has high fighting spirit.
cangls: classmate Xiaobai, you seem to have some problems today!
Xiaobai: Yes, I recently read articles related to linux shell, but I have a lot of doubts.
cangls: can you describe it in detail?
Xiaobai: Well, I'm confused about the basic knowledge and usage.
cangls: it doesn't matter. I'm going to teach you the basic knowledge of shell today. I hope it will help you.
Xiaobai: at this time, I took out a small notebook and began to record
6, shell script
1. shell overview
- The two main syntax types of the shell are Bourne and C, which are incompatible with each other. Bourne family mainly includes: sh, ksh, Bash, psh, zsh;
- C family mainly includes csh and tcsh.
Other special symbols in Bash are shown in the following table:
| option | Symbolic meaning |
|---|---|
| ' ' | In single quotation marks, all special symbols such as "$" and "`" (back quotation marks) have no special meaning |
| " " | Double quotation marks. In double quotation marks, all special symbols have no special meaning except "$", "," "," \ ". "$", "," "and" \ "have the meanings of" call variable value "," reference command "and" escape character " |
| `` | Enclosed in backquotes are system commands, which will be executed first in Bash. And & dollar; () the same function. It is recommended to use & dollar; (), backquotes are misleading. |
| $() | Same as backquotes, used to reference system commands. |
| # | In a shell script, # represents a comment. |
| $ | It is used to call the value of the variable. If you need to call the value of name, you need to use $name to get the value of the variable. |
| \ | Escape character, the special symbol following \ will lose its special meaning and become an ordinary character. For example: & dollar; If the "$" symbol is output, it will not be referenced as a variable. |
2. Basic shell Scripting
#Write a simple linux script and use the vim command
vim /home/hello.sh
#Pay attention to a standard shell The script must add:#!/bin/bash
#!/bin/bash
echo "hello world"  >> /root/hello.log #Append hello world to hello Log in this file
#Grant read and execute permissions
chmod 755 /hello.sh
#Use sh hello SH command execution
sh hello.sh && ./hello.sh
3. Aliases and shortcuts
3.1. View and set alias
Alias alias = 'original command', set the command alias. Of course, this setting will only take effect temporarily.
Alias command, view all command aliases in the system command, such as the system alias installed by me, as follows:
alias cp='cp -i'
alias egrep='egrep --color=auto'
alias fgrep='fgrep --color=auto'
alias grep='grep --color=auto'
alias l.='ls -d .* --color=auto'
alias ll='ls -l --color=auto'
alias ls='ls --color=auto'
alias mv='mv -i'
alias rm='rm -i'
alias which='alias | /usr/bin/which --tty-only --read-alias --show-dot --show-tilde'
Alias permanent and delete alias
Write the environment variable configuration file to take effect permanently.
#Write the environment variable of the current user, which can be set in Ubuntu
$ vi ~/.bashrc
#Redhat7 series
[root@cnwangk ~]# vi ~/.bash_profile
The above describes the modification of environment variables under Ubuntu and current user environment variables of Redhat7 series respectively. I have written blog before, in this article: linux environment variable, second, I understand linux configuration global and current user environment variables, also uploaded to my github and gitee repository, WeChat official account has also been released.
Delete alias
$ unalias Connect alias
Order of command effectiveness
- The first sequence executes a command executed with an absolute path or a relative path
- Second sequential execution alias
- The third sequence executes Bash's internal commands
- The fourth sequence executes the first command found in the directory lookup order defined by the $PATH environment variable
4. Historical command
Directly enter the history command in the terminal to see the history command you entered.
$ history
History [options] [history command save file]
- -c: Clear history command
- -w: Write the history command in the cache to the history command save file ~ / bash_history
Call of historical command
- Use the up and down arrows to invoke previous historical commands
- Repeat command n with "! N"
- Use "!" Repeat the previous command
- Use "! String" to repeat the last command that starts with the string
5. Output redirection
The most basic demonstration of echo usage, outputting hello world to hello In the SH script, if you are not familiar with the echo command, you can use the man help command I described above to find it. For example:
$ man echo
-e parameter introduction: support character conversion controlled by backslash
$ echo "hello world" > hello.sh
[root@cnwangk ~]# cat hello.sh
hello world
#Enter a string to hello SH script
[root@cnwangk ~]# echo -e "echo "hello linux"\necho "create btrfs filesystem"" > hello.sh
[root@cnwangk ~]# chmod 755 hello.sh  #Grant 755 permissions
[root@cnwangk ~]# sh hello.sh  #Execute script
hello linux
create btrfs filesystem
The function of control characters is shown in the following table:
| parameter | effect |
|---|---|
| \a | Output warning tone |
| \b | Backspace key, left delete |
| \n | Newline character |
| \r | enter key |
| \t | TAB, TAB key |
| \v | vertical tab |
| \0nnn | Output characters according to octal ASCII code. Where 0 is the digit zero and nnn is a three digit octal number. |
| \xhh | Output characters in hexadecimal ASCII code. hh is a two digit hexadecimal number. |
For example, it means that teacher Cang is output to av file in the form of append. Hey, hey, let's talk about it.
echo "cangls" >> av.avi
Standard output redirection, as shown in the following table:
| Command format | effect |
|---|---|
| Commands > file | The correct output of the command to the specified file or device is overwritten |
| Command > > file | The correct output of the command to the specified file or device by appending |
| Error command 2 > file | Output the command error to the specified file or device by overwriting |
| Error command 2 > > file | Output the error of the command to the specified file or device by appending |
Correct output and error output are saved at the same time, and their functions are shown in the following table:
| Command format | effect |
|---|---|
| Commands > file 2 > & 1 | Save the correct and wrong output of the command in the same file by overwriting |
| Command > > file 2 > & 1 | Save the correct and wrong output of the command in the same file by appending |
| Command & > file | Save the correct and wrong output of the command in the same file by overwriting |
| Command & > > file | Save the correct and wrong output of the command in the same file by appending |
| Command > > file 1 2 > > file 2 | Output the correct to file 1 and the wrong to file 2 |
wc command
wc [options] [file name], the number of lines, words and lines in the output file
Example, statistics hello There are two rows of SH, corresponding to the above demonstration.
$ wc -l
[root@cnwangk ~]# wc -l hello.sh  #Statistics hello There are two rows of SH, corresponding to the above demonstration.
2 hello.sh
Finally, several practical methods are summarized to output the error and correct results to the file in the form of addition:
- Command > > file 2 > & 1
- Command & > > file
- Command > > file1 2 > > File2
6. Pipe symbol
6.1. The command format is shown in the following table:
| Command format | effect | ||||
|---|---|---|---|---|---|
| Command 1\ | Command 2 | The correct output of command 1 is the operation object of Command 2 | |||
| ;, Format 1: Command 2 | Multiple commands are executed sequentially, and there is no logical relationship between commands | ||||
| &&, command1 & & command2 | Logic and. When command 1 is executed correctly, command 2 will be executed; Command 1 cannot be executed correctly and Command 2 will not be executed | ||||
| \ | \ | , command 1\ | \ | Command 2 | Logical or, when command 1 is not executed correctly, command 2 will be executed; Command 1 is executed correctly and Command 2 is not executed |
6.2 the wildcards in linux are partially sorted as shown in the following table:
| parameter | effect |
|---|---|
| * | Match any content |
| ? | Match any character |
| [] | Match any character in brackets. For example, [abc] means to match a character, which may be a, b or c. |
| [-] | Match any character in brackets, - represents a range, for example: [a-z] represents matching a lowercase letter. |
| [ ^ ] | Logical non matching is not a character in brackets. For example: [^ 0-9] represents matching a non numeric character. |
Continuous update optimization
summary
All the people who can see here are handsome boys and pretty girls. The above is all the content of this article. I hope it can be helpful to your work. Feel well written, take out your one button three times. If I feel that the summary is not in place, I hope I can leave your valuable opinions, and I will adjust and optimize it in the article.
It is not easy to be original. Please indicate the source and author for reprint, and respect the original. This article will be uploaded to gitee or github from time to time and published to wechat public platform. The official account of my WeChat public number is the same as the other platform nickname sky. Identify Longteng Wanli sky. If you see that other platforms either send my article with this ID or reprint it.
linux series articles: linux tips, scp command and linux disk management have been uploaded to github and gitee.
For the address of personal github warehouse, the PDF file will be updated first, and then the markdown file will be uploaded. If accessing github is too slow, you can access gitee for cloning.
https://github.com/cnwangk/SQL-study
For personal gitee warehouse address, the PDF file will be updated first, and then the markdown file will be uploaded.
https://gitee.com/dywangk/SQL-study
<H5 align=center>by Long Teng Wanli sky </H5>