background
Recently, the company has an account recharge business scenario that needs to be migrated from offline payment to online payment:
- Offline payment scenario: customers pay through POS machine or scan the QR code provided by the sales classmate to complete the payment. Then the sales classmate enters the relevant information into the CRM background, and the recharge process is formally completed after the financial review is passed.
- Online payment scenario: the sales students first enter the order after entering the recharge information in the CRM stud applet, then the Alipay or WeChat payment code is generated, and the sales students send the pictures generated from the payment code page to the customers, and the customers complete the recharge process after payment.
After the whole recharge process is optimized and launched, the time from recharge payment to recharge arrival of the customer account is greatly shortened, and the efficiency of recharging the customer account is significantly improved.
requirement analysis
The small program of this iteration function is a small program developed by using the native nailing language. As for why it is developed by the native language, that is a historical reason, which is beyond the scope of this article. The development experience of the native language is obviously not as good as that of using the small program frameworks such as uni app and taro. When taking over, it needs to check the documents and develop at the same time, which is relatively inefficient.
To realize the online payment function, there are two key problems to be solved:
- The back end interface is returned to the applet by WeChat or Alipay's payment link, and the small program needs to be converted to two-dimensional code to display on the page.
- In addition to the payment QR code, the page also includes the company logo, customer information, payment amount and other information that needs to generate pictures. Click the save picture button at the bottom of the page to generate pictures from the above information and save them to the local album
Based on the above two steps, the technical problems to be solved in realizing the requirements include the following points:
- Use Canvas to convert the link into a QR code and display it on the page with the help of a third-party library weapp-qrcode This library is for wechat applets, but it can also be used in nailing applets. You need to change the source code
- Draw the elements of the whole page to another Canvas, but the problem is how to draw the QR code Canvas to another Canvas. There is a pit in this development. Later, I will say that this time I used a small skill. When saving the picture, first use toTempFilePath to convert the QR code Canvas into a temporary picture, and then draw it to another Canvas, Then use toTempFilePath to convert another Canvas into a temporary picture, and finally use dd.saveImage to save the temporary picture to the local album
- Adaptation of contents in small program Canvas
Technical realization
Page implementation
	<view class="container">
            // Omit some code
            <canvas canvas-id="myQrCode" id="myQrCode" class="pay-code"></canvas>
            // Omit some code
	</view>
</view>
The final effect is as follows:

The QR code on the page is implemented using web QRcode. Since the native applet cannot use npm to install the third-party library, we need to download the source code to the project directory. The official document also gives an example:
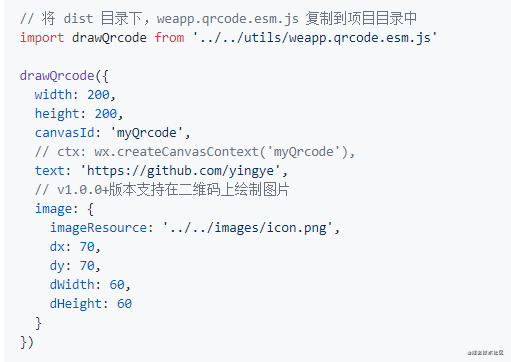
After downloading, I need to change the source code, that is, the web app qrcode. esm. Replace the wechat applet api used in the JS file with the nailing applet api, and search wx And replace with dd.
Step 1: introduce plug-ins on the page:
import drawQrcode from '/utils/weapp.qrcode.esm.js'
const app = getApp()
page({
    data:{
    },
    onload() {
    }
})
Step 2: draw QR code on Canvas in onload life cycle:
import drawQrcode from '/utils/weapp.qrcode.esm.js'
const app = getApp()
page({
    data:{
    },
    onload(query) {
        let self = this
        let { qrCodeLink } = query
        setTimeout(() => {
            drawQrcode({
                width: 250,
                height: 250,
                canvasId: 'myQrCode',
                text: qrCodeLink,
            })
        }, 500)

    }
})
There are two points to pay attention to in this step. One is to set a countdown to ensure that the canvas on the page can be obtained when drawQrcode is executed, otherwise the QR code cannot be drawn. The other is the id of the canvas. The canvas id on the plug-in corresponds to the canvas id attribute on the page element, The canvas id of the nailing applet corresponds to the id on the page element. If you don't notice this, it will affect the next step.
Step 3: convert QR code into temporary picture file
import drawQrcode from '/utils/weapp.qrcode.esm.js'
const app = getApp()
page({
    data:{
        filePath: ''
    },
    onload() {
        let self = this
        let { qrCodeLink } = query
        setTimeout(() => {
            drawQrcode({
                width: 220,
                height: 220,
                canvasId: 'myQrCode',
                text: qrCodeLink,
            })
            setTimeout(() => {
                let ctx = dd.createCanvasContext('myQrCode')
                ctx.toTempFilePath({
                    fileType: "jpg",
                    quality: 1,
                    canvasId: 'myQrCode',
                    success: function(res) {
                        self.setData({
                            filePath: res.filePath
                        })
                    },
                    fail: function(e) {
                        console.log('fail:', e)
                    }
                })
            }, 500)
        }, 500)
    }
})
In this step, the toTempFilePath method is used, and a 1-second countdown is still set. Why do you do this? Because the drawQrcode in the previous step is a time-consuming synchronization task, you need to ensure that the canvas has been generated on the page before converting the canvas into an image. It should be noted that dd.createCanvasContext('myQrCode ') and the canvasId in the toTempFilePath method correspond to the id attribute on the page element.
Step 4: make the content on Canvas adaptive
The screen size has been obtained in the onload life cycle:
dd.getSystemInfo({
    success(res){
        self.setData({
            canWidth: res.windowWidth / 750, // 750 wide design draft
            canHeight: res.windowWidth / 750 * 1239 // 750px wide design draft export picture height pixels
        })
    }
})
Set the width and height of the canvas to be converted into a picture:
<canvas style="width:{{canWidth*750}}px;height:{{canHeight}}px;position:absolute;left:-1000px;top:-1000px;" canvas-id="myCanvas" id="myCanvas" class="myCanvas"></canvas>
At the same time, I also set the absolute positioning so that the canvas can be separated from the document flow and displayed off the screen.
Draw elements onto canvas:
let rpx = res.windowWidth / 750
const ctx = dd.createCanvasContext('myCanvas')
ctx.setFillStyle('#fff'); //  Default white

ctx.drawImage('/static/icon/logo.png',rpx * 307, rpx * 32, rpx * 135.2, rpx * 64)
ctx.fillRect(0, 0, rpx * 750, res.windowWidth / 750 * 1239) // fillRect(x,y, width, height)

ctx.setFontSize(rpx * 56)
ctx.setFillStyle('#191F25')
ctx.setTextAlign('center')
ctx.fillText(self.data.shopName, rpx * 750 / 2, rpx * 176)

ctx.setFontSize(rpx * 24)
ctx.setFillStyle('#333333')
ctx.fillText('Gear mouth ID:'+ self.data.shopId, rpx * 750 / 2, rpx * 246)

ctx.setFontSize(rpx * 28)
ctx.setFillStyle('#333333')
ctx.fillText('Payment amount', rpx * 750 / 2, rpx * 338)

ctx.setFontSize(rpx * 48)
ctx.setFillStyle('#333333')
ctx.fillText('¥' + self.data.totalAmount, rpx * 750 / 2, rpx * 396)

ctx.drawImage(self.data.bankType == 2 ? '/static/icon/wechat.png' : '/static/icon/alipay.png',rpx * 153, rpx * 478, rpx * 64, rpx * 64)

ctx.setFontSize(rpx * 28)
ctx.setFillStyle('#333333')
ctx.setTextAlign('left')
ctx.fillText(self.data.bankType == 2 ? 'WeChat' : 'Alipay', rpx * 236, rpx * 520)

ctx.setFontSize(rpx * 28)
ctx.setFillStyle('#3296FA')
ctx.setTextAlign('left')
ctx.fillText('Please use' + (self.data.bankType == 2 ? 'WeChat' : 'Alipay') + 'scan', rpx * 355, rpx * 500)

ctx.setFontSize(rpx * 28)
ctx.setFillStyle('#3296FA')
ctx.fillText('Scan QR code for payment', rpx * 355, rpx * 544)
ctx.drawImage(self.data.filePath, rpx * 149, rpx * 570, rpx * 452, rpx * 458)

ctx.setFontSize(rpx * 24)
ctx.setFillStyle('#919497')
ctx.setTextAlign('center')
ctx.fillText('Recharge Order No', rpx * 750 / 2, rpx * 1095)

ctx.setFontSize(rpx * 24)
ctx.setFillStyle('#919497')
ctx.setTextAlign('center')
ctx.fillText(self.data.applyId, rpx * 750 / 2, rpx * 1134)

ctx.draw(true)
The values in the above code are measured directly on the design draft. After multiplying by rpx, they can be displayed adaptively.
The last step: convert the canvas into a picture and save it to the album. These operations are performed in the callback method of the draw method:
dd.showLoading() // Click the save picture button to display loading
let rpx = res.windowWidth / 750
const ctx = dd.createCanvasContext('myCanvas')
// Omit some code
ctx.draw(true, (()=>{
    setTimeout(()=>{
        ctx.toTempFilePath({
            fileType: "jpg",
            quality: 1,
            canvasId: 'myCanvas',
            success: function(res) {
                dd.saveImage({
                    url: res.filePath,
                    showActionSheet: true,
                    success: () => {
                        dd.hideLoading()
                        dd.alert({
                            title: 'Saved successfully',
                        });
                    },
                    fail: function() {
                        dd.hideLoading()
                            dd.alert({
                            title: 'Save failed',
                        });
                    }
                });
            },
            fail: function() {
                dd.hideLoading()
                    dd.alert({
                    title: 'Save failed',
                });
            }
        })
    }, 1000)
})())
Here we can basically meet the requirements. Of course, there are areas that can be optimized. The exported picture effect is as follows:

summary
The requirements have been realized, but there are still several points worth thinking about:
- The problem that the canvas is not clear after it is converted into a picture
- When saving pictures to the album, if the user has prohibited nailing from accessing the album, give a user-friendly prompt
It is inevitable that there are some deficiencies in the text. Welcome to my WeChat official account. (front end migrant workers)