6.1 Data Persistence technology
It refers to storing the instantaneous data in the memory into the storage device to ensure that the data will not be lost when the mobile phone and computer are turned off. Persistence technology provides the transition of data from transient state to persistent state.
Android provides three ways: file storage, shared Preference Storage and database storage. In addition, it can also be saved to SD card. But the first three are safer.
6.2 file storage
The openFileOutput method is provided in the Context class. The first parameter is the file name. The file name specified here does not contain the path. It is stored in / data / data / < package > / files / directory by default. The second parameter is the file operation mode. There are two modes available: MODE_PRIVATE and MODE_APPEND, where the previous one is the default mode, and a file with the same name will overwrite the content. The second means that if the file exists, the content will be added, otherwise the file will be created.
The openFileOutput method returns a FileOutputStream stream object. After obtaining this object, you can write the file as a java stream:
public void save(){
    String data = "data to save";
    FileOutStream out = null;
    BufferedWriter writer = null;
    try{
        out = openFileOutput("data",Contect.MODE_PRIVATE);
        writer = new BufferWriter(new OutputStreamWriter(out));
        writer.write(data);
    } catch (Exception e){
        e.printStackTrace();
    } finally{
        try{
            if(writer != null) {
                writer.close();
            }
        } catch(IOException e){
            e.printStackTrace();
        }
    }
}
Next, let's write a complete example:
public class MainActivity extends AppCompatActivity {

    private EditText editText;

    @Override
    protected void onCreate(Bundle savedInstanceState) {
        super.onCreate(savedInstanceState);
        setContentView(R.layout.activity_main);
        editText = (EditText) findViewById(R.id.edit);
    }

    @Override
    protected void onDestroy() {
        super.onDestroy();
        String input = editText.getText().toString();
        save(input);
    }

    public void save(String input){
        FileOutputStream out = null;
        BufferedWriter writer = null;
        try {
            out = openFileOutput("data", Context.MODE_PRIVATE);
            writer = new BufferedWriter(new OutputStreamWriter(out));
            writer.write(input);
        } catch (IOException e){
            e.printStackTrace();
        } finally {
            try{
                if(writer != null){
                    writer.close();
                }
            } catch (IOException e){
                e.printStackTrace();
            }
        }
    }
}
In this way, we can save our files after pressing the Back key.
6.2.2 reading data from file
The Context class also provides a method of OpenFileInput to read data. It only receives one parameter, that is, the read file name. The following is the java stream read.
public String load(){
    FileInputStream in = null;
    BufferReader reader = null;
    StringBuilder content = new StringBuilder();
    try {
        in = openFileInput("data");
        reader = new BufferedReader(new InputStreamReader(in));
        String line = "";
        while((line = reader.readLine()) != null) {
            content.append(line);
        }
    } catch (IOEception e) {
        e.printStackTrace();
    } finally {
        if(reader != null){
            try {
                reader.close();
            } catch {
                e.printStackTrace();
            }
        }
    }
    return content.toString();
}
After BufferedReader is built, it can be read line by line and stored in a StringBuilder object. Finally, return the content.
public class MainActivity extends AppCompatActivity {

    private EditText editText;

    @Override
    protected void onCreate(Bundle savedInstanceState) {
        super.onCreate(savedInstanceState);
        setContentView(R.layout.activity_main);
        editText = (EditText) findViewById(R.id.edit);
        String input = load();
        if(!TextUtils.isEmpty(input)){
            editText.setText(input);
            editText.setSelection(input.length());
            Toast.makeText(this, "Refill text",Toast.LENGTH_SHORT).show();
        }
    }

    @Override
    protected void onDestroy() {
        super.onDestroy();
        String input = editText.getText().toString();
        save(input);
    }

    public void save(String input){
        FileOutputStream out = null;
        BufferedWriter writer = null;
        try {
            out = openFileOutput("data", Context.MODE_PRIVATE);
            writer = new BufferedWriter(new OutputStreamWriter(out));
            writer.write(input);
        } catch (IOException e){
            e.printStackTrace();
        } finally {
            try{
                if(writer != null){
                    writer.close();
                }
            } catch (IOException e){
                e.printStackTrace();
            }
        }
    }

    public String load(){
        FileInputStream in = null;
        BufferedReader reader = null;
        StringBuilder content = new StringBuilder();
        try {
            in = openFileInput("data");
            reader = new BufferedReader(new InputStreamReader(in));
            String line = "";
            while((line = reader.readLine()) != null){
                content.append(line);
            }
        } catch (IOException e){
            e.printStackTrace();
        } finally {
            try {
                reader.close();
            } catch (IOException e) {
                e.printStackTrace();
            }
        }
        return content.toString();
    }
}
TextUtils.isEmpty method can judge two null values. Null and "" are both counted as false.
6.3 using SharedPreference storage
Shared preference uses key values to store data. Saving data is to get the key values.
6.3.1 store data in SharedPreferences
First, get the SharedPreferences object. Android provides three methods:
1. getSharedPreference method in context class
This method receives two parameters. The first specifies the name of the SharedPreferences file. If the specified file does not exist, create one. The file is stored in data / data / < package name > / shared_ Prefs / directory. There is only one mode available MODE_PRIVATE. You can pass in 0 directly. Others have been abandoned.
2. getPreferences method in activity class
Only one operation mode parameter is accepted, and the current active class name is automatically taken as the file name.
3. getDefaultSharedPreferences method in preferencemanager class
This is a static method that receives the Context parameter and names the SharedPreferences file with the current package name as a prefix. Finally, the data can be stored, which can be divided into three steps:
- Call the edit method inside SharedPreferences to get a SharedPreferences Editor
- To sharedpreference When adding data in editor, use putBoolean to add Boolean class and putString to add string
- Call apply to submit the data and complete the data storage operation.
Our example has only one Button. The main program reads as follows:
public class MainActivity extends AppCompatActivity {

    private Button button;

    @Override
    protected void onCreate(Bundle savedInstanceState) {
        super.onCreate(savedInstanceState);
        setContentView(R.layout.activity_main);
        button = (Button) findViewById(R.id.save_data);
        button.setOnClickListener(new View.OnClickListener() {
            @Override
            public void onClick(View v) {
                SharedPreferences.Editor editor = getSharedPreferences("data",MODE_PRIVATE).edit();
                editor.putString("name","Tom");
                editor.putInt("age",28);
                editor.putBoolean("married",false);
                editor.apply();
            }
        });
    }
}
Finally, we stored an xml:
<?xml version='1.0' encoding='utf-8' standalone='yes' ?>
<map>
    <string name="name">Tom</string>
    <boolean name="married" value="false" />
    <int name="age" value="28" />
</map>
6.3.2 reading data from SharedPreferences
There are also a series of get methods corresponding to the put method.
button_r.setOnClickListener(new View.OnClickListener() {
            @Override
            public void onClick(View v) {
                SharedPreferences pref = getSharedPreferences("data",MODE_PRIVATE);
                String name = pref.getString("name","");
                int age = pref.getInt("age",0);
                boolean married = pref.getBoolean("married",false);
                Log.d("MainActivity","name is " + name);
                Log.d("MainActivity","age is " + age);
                Log.d("MainActivity","married is " + married);
            }
        });
    }
The effects are as follows:

6.3.3 realize the function of remembering password
Also use our BroadcastBestPractice to add the remember password function:
public class LoginActivity extends BaseActivity {

    private SharedPreferences pref;
    private SharedPreferences.Editor editor;
    private EditText account;
    private EditText password;
    private Button login;
    private CheckBox checkBox;

    @Override
    protected void onCreate(@Nullable Bundle savedInstanceState) {
        super.onCreate(savedInstanceState);
        setContentView(R.layout.activity_login);
        pref = PreferenceManager.getDefaultSharedPreferences(this);
        account = (EditText) findViewById(R.id.account);
        password = (EditText) findViewById(R.id.password);
        login = (Button) findViewById(R.id.login);
        checkBox = (CheckBox) findViewById(R.id.remember_password);
        boolean isRemember = pref.getBoolean("remember_password",false);
        if (isRemember) {
            String account_text = pref.getString("account","");
            String password_text = pref.getString("password","");
            account.setText(account_text);
            password.setText(password_text);
            checkBox.setChecked(true);
        }
        login.setOnClickListener(new View.OnClickListener() {
            @Override
            public void onClick(View v) {
                String account_text = account.getText().toString();
                String password_text = password.getText().toString();
                if(account_text.equals("admin") && password_text.equals("123456")){
                    editor = pref.edit();
                    if(checkBox.isChecked()){
                        editor.putBoolean("remember_password",true);
                        editor.putString("account",account_text);
                        editor.putString("password",password_text);
                    } else {
                        editor.clear();
                    }
                    editor.apply();
                    Intent intent = new Intent(LoginActivity.this,MainActivity.class);
                    startActivity(intent);
                    finish();
                } else {
                    Toast.makeText(LoginActivity.this,"account or password is wrong",Toast.LENGTH_SHORT)
                            .show();
                }
            }
        });
    }
}
This clear text method cannot be used to actually save the password, which is very unsafe.
6.4 SQLite database storage
A database with large amount of data and complex structure.
6.4.1 create database
In order to make it easy for us to manage the database, Android provides SQLIteOpenHelper help class. This is an abstract class. You must inherit it if you want to use it. There are two abstract methods, onCreate and onUpgrade, which need to be rewritten in the help class to realize the logic of creating and upgrading the database respectively.
The help class also has two important instance methods: getReadableDatabase and getWritableDatabase. Both methods can create or open an existing database (open if it exists, and create if it does not exist), and return an operable object. When the database is not writable (the disk space is full), the object returned by getReadableDatabase is read-only, and getWritableDatabase has an exception.
SQLite has two construction methods that can be rewritten. Generally, the constructor with few parameters can be used. This constructor receives four parameters. The first is Context, the second is database name, and the third is the custom Cursor returned when querying data. Generally, null is passed in. The fourth parameter represents the current database version number, which can be used to build upgrade operations. After the instance is created, the database can be created by calling the getReadableDatabase method or getWritableDatabase method. The database file exists. / data / data / < package name > / databases. Overriding the onCreate method will also be executed, so it usually handles some logic for creating tables.
New project:
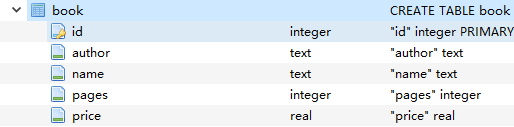
We want to create one called bookstore DB database and Book table. The table creation language is as follows:
create table Book(
	id interger primary key antoincrement,
    author text,
    price real,
    oages integer,
    name text
)
The primary key is used to set the primary key to id, and the anti increment indicates that the id column is self growing.
This code needs to be executed in SQL to create a table.
public class MyDatabaseHelper extends SQLiteOpenHelper {

    public static final String CREATE_BOOK = "create table Book ("
            + "id integer primary key antoincrement,"
            + "author text,"
            + "price real,"
            + "pages integer,"
            + "name text)";

    private Context mContext;

    public MyDatabaseHelper(Context context, String name, SQLiteDatabase.CursorFactory factory, int version){
        super(context,name,factory,version);
        mContext = context;
    }

    @Override
    public void onCreate(SQLiteDatabase db) {
        db.execSQL(CREATE_BOOK);
        Toast.makeText(mContext,"Create Succeeded", Toast.LENGTH_SHORT).show();
    }

    @Override
    public void onUpgrade(SQLiteDatabase db, int oldVersion, int newVersion) {

    }
}
We use the execSQL method to execute the table creation statement. Next, we add a button to create the table.
public class MyDatabaseHelper extends SQLiteOpenHelper {

    public static final String CREATE_BOOK = "create table Book ("
            + "id integer primary key autoincrement,"
            + "author text,"
            + "price real,"
            + "pages integer,"
            + "name text)";

    private Context mContext;

    public MyDatabaseHelper(Context context, String name, SQLiteDatabase.CursorFactory factory, int version){
        super(context,name,factory,version);
        mContext = context;
    }

    @Override
    public void onCreate(SQLiteDatabase db) {
        db.execSQL(CREATE_BOOK);
        Toast.makeText(mContext,"Create Succeeded", Toast.LENGTH_SHORT).show();
    }

    @Override
    public void onUpgrade(SQLiteDatabase db, int oldVersion, int newVersion) {

    }
}
However, we can't view the database directly. We can only use the adb debugging tool, which must be configured to the environment variable before use.
Use adb shell to enter, cd to the path, and sqlite3 + database name can be accessed Table view table schema view our table creation statement exit or Quit quit.
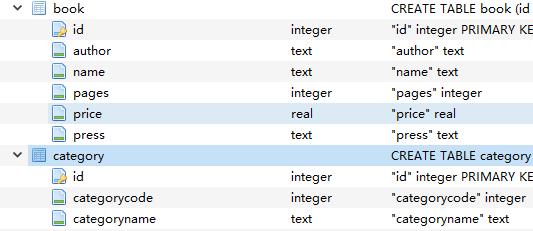
6.4.2 upgrading database
If we want to add a table Category to record the classification of books, we can directly add a statement in onCreate, but we can't add it because there is already a bookstore DB, so the new table cannot be added. Unless you uninstall the program first. Therefore, we can use the onUpgrade method to update.
public class MyDatabaseHelper extends SQLiteOpenHelper {

    public static final String CREATE_BOOK = "create table Book ("
            + "id integer primary key autoincrement,"
            + "author text,"
            + "price real,"
            + "pages integer,"
            + "name text)";

    public static final String GREATE_CATEGORY = "create table Category("
            + "id integer primary key autoincrement,"
            + "category_name text,"
            + "category_code integer)";

    private Context mContext;

    public MyDatabaseHelper(Context context, String name, SQLiteDatabase.CursorFactory factory, int version){
        super(context,name,factory,version);
        mContext = context;
    }

    @Override
    public void onCreate(SQLiteDatabase db) {
        db.execSQL(CREATE_BOOK);
        db.execSQL(GREATE_CATEGORY);
        Toast.makeText(mContext,"Create Succeeded", Toast.LENGTH_SHORT).show();
    }

    @Override
    public void onUpgrade(SQLiteDatabase db, int oldVersion, int newVersion) {
        db.execSQL("drop table if exists Book");
        db.execSQL("drop table if exists Category");
        onCreate();
    }
}
Let's execute the DROP statement first. If these two tables already exist, delete them first. Then the call is created. If you do not delete it, an error will be reported if you directly create a table. How to make onUpgrade execute is to change the incoming version number to a number greater than 1.
3.6.3 adding data
There are four kinds of data operations: CRUD, C for Create, R for Retrieve, U for update, and D for delete. Each operation corresponds to an SQL command. insert for adding, select for querying, update data, delete data.
getReadableDatabase and getWritableDatabase can not only create and upgrade databases. These two methods also return a SQLiteDatabase object for CRUD operation.
The first is the insert method, which has three parameters - table name. The second parameter is used to automatically assign NULL to some nullable columns when adding data is not specified. Generally, this function is not used. The third parameter is the ContentValues object, which overloads a series of put functions to add data to it. Next, click the Add button to add data:
Button addData = (Button) findViewById(R.id.add_data);
        addData.setOnClickListener(new View.OnClickListener() {
            @Override
            public void onClick(View v) {
                SQLiteDatabase db = dbHelper.getWritableDatabase();
                ContentValues values = new ContentValues();
                values.put("name","The Da Vinci Code");
                values.put("author","Dan Brown");
                values.put("pages",454);
                values.put("price",19.6);
                db.insert("Book",null,values);
                values.clear();
                values.put("name","The Lost Symbol");
                values.put("author","Dan Brown");
                values.put("pages",510);
                values.put("price",19.95);
                db.insert("Book",null,values);
            }
        });
    }
The newly added data can be found directly in the table:

6.4.4 update data
We want to modify the price to attract customers. What we need to use is the Update method. This method has four parameters. The first one specifies the table. The second parameter specifies the ContentValues object. The third and fourth parameters are used to restrict the updating of a row or several rows of data. If not specified, all rows will be updated by default. Add a new button first:
updateData.setOnClickListener(new View.OnClickListener() {
            @Override
            public void onClick(View v) {
                SQLiteDatabase db = dbHelper.getWritableDatabase();
                ContentValues values = new ContentValues();
                values.put("price",10.99);
                db.update("Book",values,"name = ?", new String[] {"The Da Vinci Code"});
            }
Parameter 3 as a where statement,? Is a placeholder, and parameter 4 specifies the value of the placeholder.
6.4.5 deleting data
Delete data is the delete method. Three parameters are received. The first one is the table name, the second one specifies the deleted row. Do not specify to delete all rows.
deleteData.setOnClickListener(new View.OnClickListener() {
            @Override
            public void onClick(View v) {
                SQLiteDatabase db = dbHelper.getWritableDatabase();
                db.delete("Book","pages > ?", new String[] {"500"});
            }
        });
6.4.6 query data
Querying data is the most complex operation. SQL is called Structured Query Language. But the query content is very much.
The query method is the query method, which provides 7 parameters. Parameter 1 is the table name. Parameter 2 specifies which column to query, not all columns. Parameters 3 and 4 restrict the query of a row or several rows of data. All rows are queried by default. Parameter 5 specifies the column to be group by. If it is not specified, the result will not be operated by group by. Parameter 6 filters the data of group by. If it is not specified, there is no filtering. The seventh parameter specifies the sorting method and does not specify to use the default sorting method.
Method returns the Cursor object, and the queried data is taken out of this object.
 querydata.setOnClickListener(new View.OnClickListener() {
            @Override
            public void onClick(View v) {
                SQLiteDatabase db = dbHelper.getWritableDatabase();
                Cursor cursor = db.query("Book",null,null,null,null,null,null);
                if(cursor.moveToFirst()){
                    do{
                        String name = cursor.getString(cursor.getColumnIndex("name"));
                        Log.d("MainActivity",name);
                    } while (cursor.moveToNext());
                }
                cursor.close();
            }
        });
Use the moveToFirst method to move to the first element, and then traverse it in turn. getColumnIndex to get the class name.
6.4.7 using SQL to operate database
-
Add data:
db.execSQL("insert into Book(name, author, pages, price) values (?,?,?,?)", new String[] {"The Da Vinci Code", "Dan Brown", "454", "16.96"}); -
Update data:
db.execSQL("update Book set price = ? where name = ?", new String[] {"10.99", "The Da Vinci Code"}); -
Delete data:
db.execSQL("delete from Book where pages > ?", new String[] {"500"}); -
Query data
db.rawQuery("select * from Book", null);
Except that the query uses the rawQuery method, the rest are execSQL methods.
6.5 operation method of using LitePal
6.5.1 introduction to litepal
An open source database framework adopts the method of object relational mapping (ORM), and encapsulates our commonly used database functions. This makes it possible to complete the operations of creating tables and adding, deleting, querying and modifying without writing a row of SQL statements.
6.5.2 configuring LitePal
First, in build Gradle's independent closure plus:
implementation 'org.litepal.android:core:1.3.2'
Then create an asset folder in the main directory and an XML file named litepal xml.
<?xml version="1.0" encoding="utf-8"?>
<litepal>
    <dbname value = "BookStore"></dbname>
    <version value = "1"></version>

    <list>
    </list>
</litepal>
dbname specifies the database name and version specifies the version number. Next, you need to configure LitePalApplication in Android manifest XML join:
    <application
       →android:name="org.litepal.LitePalApplication"
        android:allowBackup="true"
        android:icon="@mipmap/ic_launcher"
        ...
6.5.3 creating and upgrading databases
Before that, you need to inherit a SQLiteOpenHelper, and then implement it in onCreate. There's no need for so much trouble now. We will copy our layout file directly:
LitePal uses the object relational mapping pattern, which is to establish a mapping relationship between object-oriented language and relational database. This is object relational mapping. We use an object-oriented approach to create tables. First, we create a class Book:
public class Book {

    private int id;

    private String author;

    private double price;

    private int pages;

    private String name;

    public int getId() {
        return id;
    }

    public void setId(int id) {
        this.id = id;
    }

    public String getAuthor() {
        return author;
    }

    public void setAuthor(String author) {
        this.author = author;
    }

    public double getPrice() {
        return price;
    }

    public void setPrice(double price) {
        this.price = price;
    }

    public int getPages() {
        return pages;
    }

    public void setPages(int pages) {
        this.pages = pages;
    }

    public String getName() {
        return name;
    }

    public void setName(String name) {
        this.name = name;
    }
}
Right click → Generator → Getter and Setter to select all method settings. Next, you need to configure Book to litepal XML forms a mapping.
<list>
        <mapping class = "com.example.litepaldatabase.Book"></mapping>
    </list>
The mapping tag declares the mapping model class we want to configure, and pay attention to using the complete class name. No matter how many classes to map, just add them directly to the list tag.
createDatabase.setOnClickListener(new View.OnClickListener() {
            @Override
            public void onClick(View v) {
                Connector.getDatabase();
            }
        });
We can build a database in one sentence.
However, if we want to upgrade the database, we must drop unused tables and create new tables according to our previous method, which will lead to data loss. However, LitePal can directly add new data or tables, and only need version + 1 after updating.
We will add Press to the Book library and a new table Category.
6.5.4 adding data to LitePal
We don't need class inheritance when creating tables, but we need to inherit DataSupport class when CRUD operation. We just need to create an instance of the class, use the setter method to set the data, and finally directly use the save method to add our data. In addition to save, there are many other methods you can use.
addData.setOnClickListener(new View.OnClickListener() {
            @Override
            public void onClick(View v) {
                Book book = new Book();
                book.setName("The Da Vin Code");
                book.setAuthor("Ban Brown");
                book.setPages(454);
                book.setPrice(19.96);
                book.setPress("Unknown");
                book.save();
            }
        });

6.5.5 updating data using LitePal
Updating data is complex and involves many API s.
The simplest way is to reset the value of the stored object, and then save it directly. What are stored objects? For LitePal, whether an object exists or not is to call model Issaved method. If true is returned, it means it has been saved; otherwise, it has not been saved. True is returned only in two cases: 1 Model. Has been called Save save object, 2 The model object is found through the API provided by LitePal. Since we haven't learned the query API yet, we use the first method to verify it.
updateData.setOnClickListener(new View.OnClickListener() {
            @Override
            public void onClick(View v) {
                Book book = new Book();
                book.setName("The Lost Symbol");
                book.setAuthor("Dan Brown");
                book.setPages(510);
                book.setPrice(19.95);
                book.setPress("Unknown");
                book.save();
                book.setPrice(10.99);
                book.save();
            }
        });
We changed the price again. Because the Book object has been stored, we only saved the updated price:

This method is only applicable to stored objects and has great limitations. Next, you can use a more clever way:
updateData.setOnClickListener(new View.OnClickListener() {
            @Override
            public void onClick(View v) {
                Book book = new Book();
                book.setPrice(14.95);
                book.setPress("Anchor");
                book.updateAll("name = ? and author = ?","The Lost Symbol","Dan Brown");
            }
        });
updateAll can specify constraints, similar to the where operation. If it is not specified, all constraints will be updated.
However, if you want to update a value to the default value, you can't use this method. All data type fields in Java have default values. int is 0, boolean is false, and String is null. After the Book is generated, it will be the default value. At this time, calling set("pages",0) has no effect, so you need to use the setToDefault method.
6.5.6 deleting data using LitePal
You can use the delete method, which is similar to the save method. You can also use the deleteAll method:
DataSupport.deleteAll(Book.class,"price < ?","15")
The first parameter indicates which table data to delete, and the second parameter indicates the constraint condition.
6.5.7 querying data using LitePal
All data can be found by calling the findAll method, for example:
<list> Book books = DataSupport.findAll(Book.class);
Besides findAll, findFirst and findLast can query the first and last data
-
The select method is used to select which columns of data to query:
<list> Book books = DataSupport.select("name","author").find(Book.class); -
The where method specifies the constraint
<list> Book books = DataSupport.where("pages > ?","40").find(Book.class); -
Order specifies the order of the results. desc is in descending order, not written, or asc is in ascending order.
<list> Book books = DataSupport.order("price desc").find(Book.class); -
limit specifies the number of query results:
<list> Book books = DataSupport.limit("3").find(Book.class); -
Offset specifies the offset:
<list> Book books = DataSupport.limit("3").offset(1).find(Book.class);
All statements support concatenation.
Finally, if we have special needs, we can directly execute SQL statements. We can use the method findBySQL. The Cursor variable is returned. You still need to take it out one by one.