0 Preface
Updated the latest version of the installation method, and currently supports tensorflow1 13.1 -> TensorFlow2. 4.0: see Section 1.3
This article will lead you to install TF2 in the simplest way 0 official version (CPU and GPU), let me step on the pit to facilitate everyone to experience the official version of TF2 0
No more nonsense. Now officially start the tutorial.
1 Environmental preparation
At present, I use the python environment managed by conda on Windows 10, install cuda and cudnn (GPU support) through conda, and install tensorflow2 through pip 0 After trying, it is only the simplest installation method without configuring a complex environment.
(for the installation of ubuntu and mac versions, you can follow this method, because conda supports multiple platforms, so there should be no problem. If you have many questions, you can comment. I will update the ubuntu installation tutorial later.)
1.0 conda environment preparation
conda is a good python management tool, which can easily establish and manage multiple python environments. In the following installation steps, I will also introduce some common conda instructions.
conda I recommend installing miniconda. You can understand that the simplified version of anaconda only retains some necessary components, so the installation will be much faster than that, and it can also meet our needs for managing the python environment. (anaconda generally takes a few gigabytes of memory to install on solid-state drives, which takes 1-2 hours. M iniconda generally takes several hundred megabytes, and the installation can be completed in 10 minutes.)
miniconda recommends Tsinghua source download: https://mirrors.tuna.tsinghua.edu.cn/anaconda/miniconda/
Just choose the version that suits you,
- windows recommended address: https://mirrors.tuna.tsinghua.edu.cn/anaconda/miniconda/Miniconda3-4.7.10-Windows-x86_64.exe
- ubuntu recommended address: https://mirrors.tuna.tsinghua.edu.cn/anaconda/miniconda/Miniconda3-4.7.10-Linux-x86_64.sh
- Mac os recommended address: https://mirrors.tuna.tsinghua.edu.cn/anaconda/miniconda/Miniconda3-4.7.10-MacOSX-x86_64.pkg
Next, use the windows version to install minicanda as a demonstration. Download the appropriate version from the above. After downloading, open it with administrator privileges and click Install.
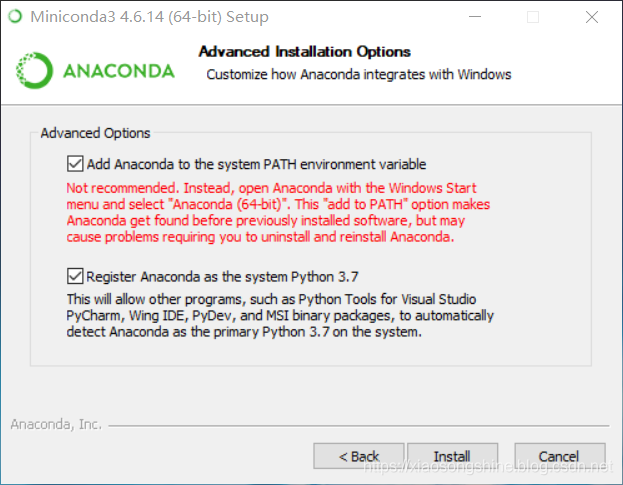
Note that both of these should be checked. One is that we can directly use the conda instruction in cmd, and the other is to use the python 3.0 provided by miniconda 7 as the system python.
After installation, you can use the conda command in cmd. The opening mode of cmd is windows + R. the input box pops up. Enter cmd to enter. You can also directly search cmd in windows and click Run.
Here are some cmd conda instructions (env_name stands for environment name):
- View conda environment: conda env list
- Create a new conda environment (env_name is the name of the created environment, which can be customized): conda create -n env_name
- Activate the conda environment (ubuntu and Macos replace conda with source): conda activate env_name
- Exit conda environment: conda deactivate
- Installing and uninstalling python packages: conda install numpy # conda uninstall numpy
- View the list of installed python: conda list -n env_name
Knowing these instructions, you can start using conda to create a new environment to install TF2 0.
At the same time, in order to speed up the installation, you can change the sources of conda and pip.
Next, change the "conda" source to Tsinghua source to accelerate. Copy and paste the following instructions in "CMD" and enter:
conda config --add channels https://mirrors.tuna.tsinghua.edu.cn/anaconda/cloud/conda-forge/

conda config --add channels https://mirrors.tuna.tsinghua.edu.cn/anaconda/pkgs/free/

conda config --add channels https://mirrors.tuna.tsinghua.edu.cn/anaconda/pkgs/main/

conda config --append channels https://mirrors.tuna.tsinghua.edu.cn/anaconda/cloud/fastai/

conda config --append channels https://mirrors.tuna.tsinghua.edu.cn/anaconda/cloud/pytorch/

conda config --append channels https://mirrors.tuna.tsinghua.edu.cn/anaconda/cloud/bioconda/


conda config --set show_channel_urls yes
At the same time, we also change "pip" to Tsinghua source for acceleration, copy and paste the following instructions in "CMD" and enter:
pip config set global.index-url https://pypi.tuna.tsinghua.edu.cn/simple
1.1 TF2.0 CPU version installation
TF CPU installation is relatively simple. Because GPU does not need to be configured, the installation methods of windows ubuntu macOS are similar. The disadvantage is that it runs slowly, but it can be used for daily learning.
The following is a demonstration of the windows version: the following operations are performed on the command line
1.1.0 create a new TF2 0 CPU environment (using conda to create a new environment directive python==3.6 means that Python 3.6 is used when creating a new environment)
conda create -n TF_2C python=3.6
When pop-up: processed ([y] / N)? Enter y enter
After completion, you can enter this environment
1.1.1 entering TF_2C environment
conda activate TF_2C
After entering, we can find that: (TF_2C) is in front of the previous path, indicating entering this environment. Use conda deactivate to exit.
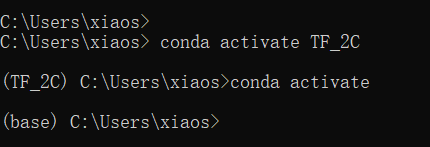
We enter CONDA activate TF again_ 2c to facilitate the execution of the following commands
1.1.2 installing TF2 0 CPU Version (the following - i means downloading from the domestic Tsinghua source, which is much faster than the default source)
pip install tensorflow==2.0.0 -i https://pypi.tuna.tsinghua.edu.cn/simple
If the network is not good, perform it several times. Then it will be installed in a moment. Let's do a simple test.
1.1.3 test TF2 0 CPU Version (save the following code to demo.py and run with TF_2C python)
import tensorflow as tf
version = tf.__version__
gpu_ok = tf.test.is_gpu_available()
print("tf version:",version,"\nuse GPU",gpu_ok)
If there is no problem, the output results are as follows: you can see that the tf version is 2.0.0. Because it is the cpu version, the gpu is False
1.2 TF2.0 GPU version installation
The version of GPU is similar to that of CPU, but one more step will be taken for the installation of GPU support. Let's do it step by step. Make sure your PC has Nvidia's GPU before installing
1.2.0 create a new TF2 0 GPU environment (using conda to create a new environment directive python==3.6 means that Python 3.6 is used when creating an environment)
conda create -n TF_2G python=3.6
When pop-up: processed ([y] / N)? Enter y enter
After completion, you can enter this environment
1.1.1 entering TF_2G environment
conda activate TF_2G
1.1.2 install GPU version support. windows with Nvidia GPU generally have default drivers. You only need to install cudatoolkit and cudnn package. Note that cudatoolkit version 10.0 needs to be installed. Note that if the cudatoolkit of the system is less than 10.0, it needs to be updated to 10.0
conda install cudatoolkit=10.0 cudnn
1.1.3 installing TF2 0 GPU Version (the following - i means downloading from the domestic Tsinghua source, which is much faster than the default source)
pip install tensorflow-gpu==2.0.0 -i https://pypi.tuna.tsinghua.edu.cn/simple
If the network is not good, perform it several times. Then it will be installed in a moment. Let's do a simple test.
1.1.3 test TF2 0 GPU Version (save the following code to demo.py and run it with TF_2G python)
import tensorflow as tf
version = tf.__version__
gpu_ok = tf.test.is_gpu_available()
print("tf version:",version,"\nuse GPU",gpu_ok)
If there is no problem, the output results are as follows: you can see that the tf version is 2.0.0. Because it is the gpu version, the gpu is True, which indicates that the gpu version installation is completed.
tf version: 2.0.0
use GPU True
1.3 installation of other versions of tensorflow (tensorflow 1.13.1 - > tensorflow 2.4.0)
First, you can use this link to see the dependencies corresponding to TensorFlow version:
https://tensorflow.google.com/install/source#linux
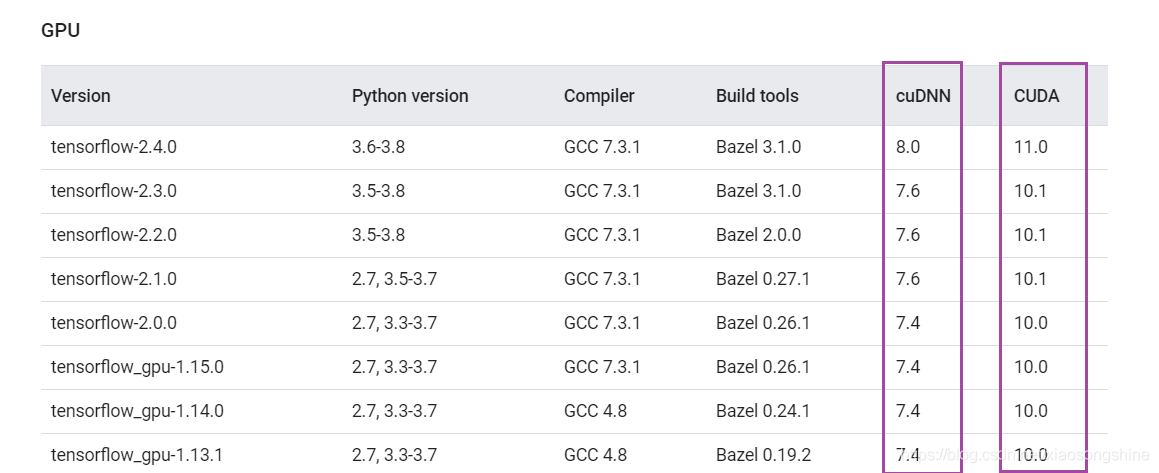
As you can see, if tensorflow2 is installed 4, CUDA=11.0, cuDNN=8.0; TensorFlow2.1-2.3 corresponds to CUDA=10.1, cuDNN=7.6; TensorFlow2.0, corresponding CUDA=10.0, cuDNN=7.6; TensorFlow1.13.1-1.15.0, corresponding to CUDA=10.0, cuDNN=7.6. Note that the version number of Nvidia Driver should be > = CUDA version number.
It should be noted that the wrong version will cause GPU installation failure.
The following describes different versions of TensorFlow.
Starting from TensorFlow 2.1, the pip package tensorflow also includes GPU support. There is no need to install the GPU version through the specific pip package tensorflow GPU. If you are sensitive to the size of the pip package, you can use the tensorflow CPU package to install the tensorflow version that only supports CPU.
- TensorFlow2.4/2.3 cpu version installation
pip install tensorflow-cpu==2.4

#or

pip install tensorflow-cpu==2.3
- TensorFlow2.4 gpu version installation (cudnn8 needs to be installed with pytorch because cudnn8 has not been updated in conda)
conda install pytorch=1.7.1 torchvision torchaudio cudatoolkit=11.0

pip install tensorflow==2.4
- TensorFlow2.3/2.2/2.1 gpu version installation
conda install cudatoolkit=10.1 cudnn=7

pip install tensorflow==2.3
- TensorFlow2.0 gpu version installation
conda install cudatoolkit=10.0 cudnn=7

pip install tensorflow-gpu==2.0
- TensorFlow1.15/1.14/1.13.1 gpu version installation
conda install cudatoolkit=10.0 cudnn=7

pip install tensorflow-gpu==1.15
1.4 finally, we test one using TF2 Linear fitting code written in version 0
Save the following code as main py
import tensorflow as tf

X = tf.constant([[1.0, 2.0, 3.0], [4.0, 5.0, 6.0]])
y = tf.constant([[10.0], [20.0]])


class Linear(tf.keras.Model):
    def __init__(self):
        super().__init__()
        self.dense = tf.keras.layers.Dense(
            units=1,
            activation=None,
            kernel_initializer=tf.zeros_initializer(),
            bias_initializer=tf.zeros_initializer()
        )

    def call(self, input):
        output = self.dense(input)
        return output


# The following code structure is similar to the previous section
model = Linear()
optimizer = tf.keras.optimizers.SGD(learning_rate=0.01)
for i in range(100):
    with tf.GradientTape() as tape:
        y_pred = model(X)      # Call model y_pred = model(X) instead of explicitly writing out y_pred = a * X + b
        loss = tf.reduce_mean(tf.square(y_pred - y))

    grads = tape.gradient(loss, model.variables)    # Use model The variables attribute directly obtains all variables in the model
    optimizer.apply_gradients(grads_and_vars=zip(grads, model.variables))
    if i % 10 == 0:
        print(i, loss.numpy())
print(model.variables)
The output results are as follows:
0 250.0
10 0.73648137
20 0.6172349
30 0.5172956
40 0.4335389
50 0.36334264
60 0.3045124
70 0.25520816
80 0.2138865
90 0.17925593
[<tf.Variable 'linear/dense/kernel:0' shape=(3, 1) dtype=float32, numpy=
array([[0.40784496],
       [1.191065  ],
       [1.9742855 ]], dtype=float32)>, <tf.Variable 'linear/dense/bias:0' shape=(1,) dtype=float32, numpy=array([0.78322077], dtype=float32)>]
-1. Postscript
Reply to the more frequently asked questions in the two comment areas:
Is it necessary to install the new tf environment? I installed it directly in root several times
Reply: the default installation environment is used when installing directly without creating a new environment. This is not recommended. There may be conflicts after installing new modules in the default environment. Different environments are recommended for different tasks..
Using conda install, you don't need to configure CUDA toolkit and cudnn in advance. (cudatoolkit and cudnn version issues)
Reply: currently TF2 0 does not support conda install yet. You can only use pip install. Windows can directly use conda install cudatoolkit cudnn. One thing to note, TF1 14. Cudatoolkit > = 10.0 shall be used for the above. Since the default CUDA toolkit for windows 10 is version 9, you need to manually install version 10. In fact, their relationship is downward inclusive, that is, if you install version 10, versions 9, 8 and 7 can be installed with conda