1, Project display
2, Project business process
3, Project gitee open source address
4, Summary and improvement of wechat applet cloud development
1. Common knowledge of wxml
1) wx:for traversal
<view class="card-all" >
    <view class="van-card" wx:for="{{hotRecruits}}" wx:key="_id"  bindtap="toDetailsTap" data-id="{{item._id}}"  >
      <view class="van-card_left">
        <image class="van-card_img" mode="aspectFill"  src="{{item.imgs[0]}}">
        </image>
      </view>
      <view class="van-card_right" >
          <view class="introduce" >
            <view class="van-card__title text-deal-1">{{item.recruitName}}</view>
          <view class="van-card__desc text-deal jianjie">{{item.recruitIntroduce}}</view>
          </view>
          <view class="van-card__bottom">
            <view class="van-card__price">
              <view class="van-card__price-integer recruit-num text-deal-1">Number of recruits:{{item.recruitNumber}}</view>
              <view class="line-box">
                <view class="van-card__price-decimal apply-num">Number of applicants:{{item.applicationNum}}</view>
                <view class="endtime">[In progress]</view>
              </view>
            </view>
          </view>
      </view>
  </view>
  </view>

   <view class="van-card" wx:for="{{hotRecruits}}" wx:key="_id"  bindtap="toDetailsTap" data-id="{{item._id}}"  >
1,Key statement wx:for Array to traverse
2 ,wx:key Give this traversal an index. In order to improve the traversal performance, it is generally selected id When the traversed object itself is a primary key, you can use wx:key="*this" For example:<swiper-item wx:for="{{[0,1,2,3]}}"  wx:key="*this">
3,wx:for-index='i' Get the lower edge of the current traversal. It is used when there are two arrays with the same length and need to be traversed at the same time
 For example:
<block wx:for="{{getMyApplications}}" wx:key="_id" wx:for-index='i'>
    <view class="box-private " style="display: {{isShow[i]}};" bindtap="goDetails" data-id='{{item.recruit._id}}'>
        <view class="name">{{item.recruit.recruitName}}</view>
        <view class="content">{{item.recruit.recruitIntroduce}}</view>
        <view class="van-line">
            <view class="nick-name bottom-content">{{item.recruit.personLiable}}</view>  <view class="time bottom-   content">{{startTime[i]}}</view>
            <view class="liulanliang ">
                <text class="iconfont icon-liulanliang">111</text>
                <text class="state">[{{timeState[i]}}]</text>
            </view>
        </view>
    </view>
</block>
4, bindtap="goDetails" data-id='{{item.recruit._id}}'
bindtap Bind a click event goDetails  data-id Parameters carried when this event is triggered [data-Parameter name]
The parameters carried here can be objects. Generally, objects and strings will be passed id
5 ,style="display: {{isShow[i]}};"
When we need to dynamically load styles, we can use js Just pass the value of the style
2) wx:if judgment and hidden = "true" (true is hidden)
These two are often used to determine whether to load labels
wx:if is not to render the label directly, hidden = "ture" is to hide the label
wx:if case
<view class="iconfront btn_buy" bind:tap="submit" data-id="{{recruit._id}}" wx:if="{{submitBtnType==0}}">Sign up now</view>
<view class="iconfront btn_buy_end"  data-id="{{recruit._id}}" wx:if="{{submitBtnType==2}}">Has ended</view>
3) Rotation chart
It should be noted that I used 4~5M images when I developed the rotation map, resulting in slow loading and very jamming of the home page. Therefore, it is necessary not to be too large, preferably less than 1M, when using network pictures
case
<view class="swiper-container">
  <swiper class="swiper1" indicator-dots="true" indicator-active-color="#fff" autoplay circular>
    <swiper-item>
      <image mode="aspectFill"  src="cloud://cloud1-2guh9tam1ee71336.636c-cloud1-2guh9tam1ee71336-1305678983/imgs/tmp/1.jpg" />
    </swiper-item>
    <swiper-item>
      <image mode="aspectFill"  src="cloud://cloud1-2guh9tam1ee71336.636c-cloud1-2guh9tam1ee71336-1305678983/imgs/tmp/2.jpg" />
    </swiper-item>
  </swiper>
  <view class="goodsDynamic">
    <swiper class="swiper2" autoplay circular vertical>
      <navigator  url="">
        <swiper-item>
          <view class="goodsDynamic-item">
            <image mode="aspectFill" src="https://t7.baidu.com/it/u=2621658848,3952322712&fm=193&f=GIF"></image>
            <text> Test version(1.0) </text>
          </view>
        </swiper-item>
        <swiper-item>
          <view class="goodsDynamic-item">
            <image mode="aspectFill" src="https://t7.baidu.com/it/u=2621658848,3952322712&fm=193&f=GIF"></image>
            <text> (contact us:) </text>
          </view>
        </swiper-item>
      </navigator>
    </swiper>
  </view>
</view>
among autoplay Is auto play circular It's connected playback  vertical It is vertical rotation, and the default is horizontal rotation
view Equivalent to html of div
text Equivalent to html span
 And only text It can copy text by pressing
4) Form
input
<view class="section">
    <label>Recruitment name</label>
    <input name="recruitName" maxlength="20"  placeholder="Please enter recruitment name" />
</view>
<view class="section">
     <label>Number of recruits</label>
     <input name="recruitNumber" type="number" maxlength="10" placeholder="Please enter the number of recruits" />
 </view>
 maxlength="20" Now enter the maximum length of characters
 type="number" Limit input to numbers
Radio box, check box
By controlling the value of items, you can realize single selection and check
html code
<view class="section_gap">
   <label>Select cover</label>
    <radio-group class="radio-group" bindchange="radioChange">
        <radio class="radio" wx:for-items="{{items}}" wx:key="name" value="{{item.name}}" checked="{{item.checked}}">
            <text>{{item.value}}</text>
        </radio>
    </radio-group>
</view>
 js code
 data{
  items: [
      { name: 'cover1', value: 'Default cover 1' },
      { name: 'cover2', value: 'Default cover 2', checked: 'true'},
      { name: 'cover3', value: 'Default cover 3' },
      { name: 'customCover', value: 'custom' }
    ],
    radioValue:'',
}
 radioChange: function (e) {
    console.log('radio happen change Event, carry value The value is:', e.detail.value)
    this.setData({
      radioValue:e.detail.value,
    })
    console.log('radio Selective value The value is:', this.data.radioValue)
}
Gets the value of the form input field input
<!--pages/resume/resume.wxml-->
<view class="all">
  <form bindsubmit="formSubmit" bindreset="formReset" >
    <view class="container">
      <view id="name">
        <text class="view-left">full name</text>
        <input type="text" placeholder="Please enter your name" class="view-right" name="name" maxlength="10" ></input>
      </view>
      <view>
        <text class="view-left">Gender</text>
        <view class="view-right">
          <radio-group class="radio-group" bindchange="radioChange">
            <radio class="radio" wx:for-items="{{items}}" wx:key="name" value="{{item.name}}" checked="{{item.checked}}">
                <text>{{item.value}}</text>
            </radio>
        </radio-group>
        </view>
      </view>
      <view>
        <text class="view-left">college</text>
        <input type="text" placeholder="Please enter the college name" class="view-right" name="college" maxlength="15"></input>
      </view>
      <view>
        <text class="view-left">Professional class</text>
        <input type="text" placeholder="Please enter professional class" class="view-right" name="major" maxlength="20"></input>
      </view>
      <view>
        <text class="view-left">Student number</text>
        <input type="number" placeholder="Please enter student number" class="view-right" name="studentID" maxlength="20"></input>
      </view>
      <view>
        <text class="view-left">cell-phone number</text>
        <input type="number" placeholder="Please enter your mobile phone number" class="view-right" name="telephone" maxlength="15"></input>
      </view>
      <view>
        <text class="view-left">E-mail</text>
        <input type="email" placeholder="Please enter email address" class="view-right" name="email"></input>
      </view>
      <view class="scjl">
        <text class="view-left scjl-left">Upload resume</text>
        <view class="view-right fileName">{{fileName}}</view>
        <view class="view-right-file" bindtap="chooseMessageFile"><text class="iconfont icon-shangchuan view-right-file-tb"></text> Upload resume</view>
      </view>
    </view>
    <button style="background: #00a8f3;  margin-top: 80rpx;  margin-bottom:10rpx;  Width: 50% "formtype =" submit "> submit < / button >
  </form>
</view>

There are three steps to get the value inside
1,<form bindsubmit="formSubmit" bindreset="formReset" > to form Bind event bind as bindsubmit="formSubmit"
2,<input type="text" placeholder="Please enter your name" class="view-right" name="name" maxlength="10" ></input> Need to pass form Gets the of the value input One name Properties, such as here name="name" ,Because the input is obtained through key value pairs
3,Submission type should be formType="submit" In this way, after clicking the submit button, the bound event will be triggered and the entered value will be obtained
<button style="background: #00a8f3;  margin-top: 80rpx;  margin-bottom:10rpx;  Width: 50% "formtype =" submit "> submit < / button >

js code

formSubmit:function(e){
Through the parameters here e To get the entered value
let name = e.detail.value.name
console.log('This is what we entered name',e.detail.value.name)
}
5) Time selector
html code
<view class="section">
        <label >start time</label>
        <picker mode="date"   start="{{nowDate}}" end="2999-09-01" bindchange="bindDateChangeStart">
            <view class="picker">
                <text class="iconfont icon-piliangshezhishijian" ></text>:{{startDate}}
            </view>
        </picker>
    </view>
    <view class="line"></view>
    <view class="section">
        <label>End time</label>
        <picker mode="date"   start="{{nowDate}}" end="2999-09-01" bindchange="bindDateChangeEnd">
            <view class="picker">
                <text class="iconfont icon-piliangshezhishijian"></text>:{{endDate}}
            </view>
        </picker>
    </view>
1,start="{{nowDate}}"For the start time, that is, when you can start, for example  start="2021-6-6" Then you can only choose 2021-6-6 ~Later time
2,end="2999-09-01"  Opposite to start time
 What needs to be noted here is
 The start time we pass in is dynamically selected as the current time nowDate  It seems that the time stamp should be passed in, otherwise the time will be inaccurate. How to convert the standard time and time stamp into each other is written later

js code
data: {
    nowDate:dataTime,
    startDate: dataTime,//Start time
    endDate:dataTime,//End time
    }
     //-------------------------------------------Select time to start--------------
  //Start time calling method
  bindDateChangeStart: function (e) {
    // console.log('picker sends selection change, carrying value is', e.detail.value)
    this.setData({
      startDate: e.detail.value
    })
  },
  //End time call method
  bindDateChangeEnd: function (e) {
    // console.log('picker sends selection change, carrying value is', e.detail.value)
    this.setData({
      endDate: e.detail.value
    })
  },
2. Common knowledge of wxss
1) Make labels appear in one line
.van-line {
  display: flex;
}
2) Incomplete display is indicated by
It is often used to display long text and prevent long text from squeezing the box and causing box deformation
/* Display is not fully used */
.text-deal{
  overflow : hidden;
  text-overflow: ellipsis;
  display: -webkit-box;
  -webkit-line-clamp: 2; /* Specify a few lines here. 2 refers to more than two lines Represents the remaining text */
  -webkit-box-orient: vertical;
  word-break: break-all;
}

 /* Gray split line */
.space {
  height: 25rpx;
  background-color: #ecebeb;
}
3) Gray split line
 /* Gray split line */
.space {
  height: 25rpx;
  background-color: #ecebeb;
}
4) Rounded box with bottom border shadow
/*Rounded box with bottom border shadow*/
.box {
  width: 97%;
  border-radius: 20rpx;
  margin-top: 30rpx;
  padding: 3vw;
  box-shadow: 10rpx 10rpx 10rpx rgba(0, 0, 0, 0.2);
}
Style display

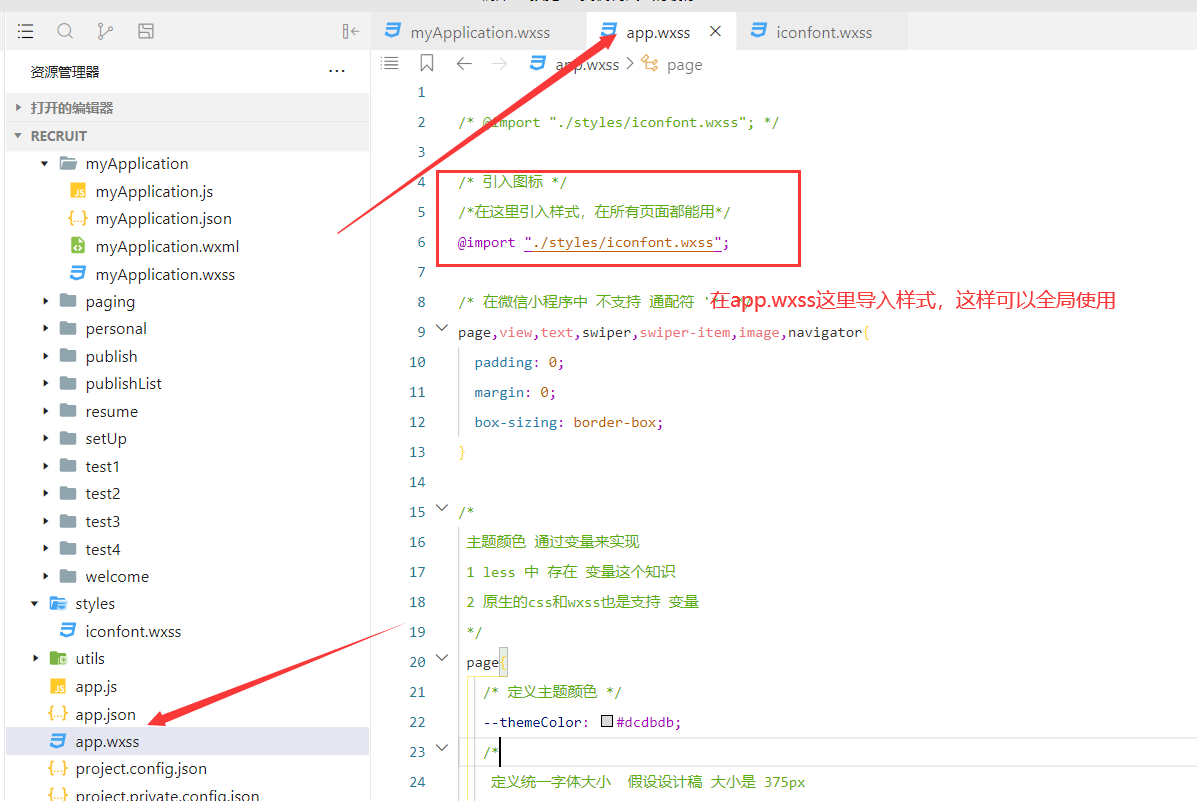
5) Import external styles
Import external styles
 Only absolute paths can be used
@import "./styles/iconfont.wxss";
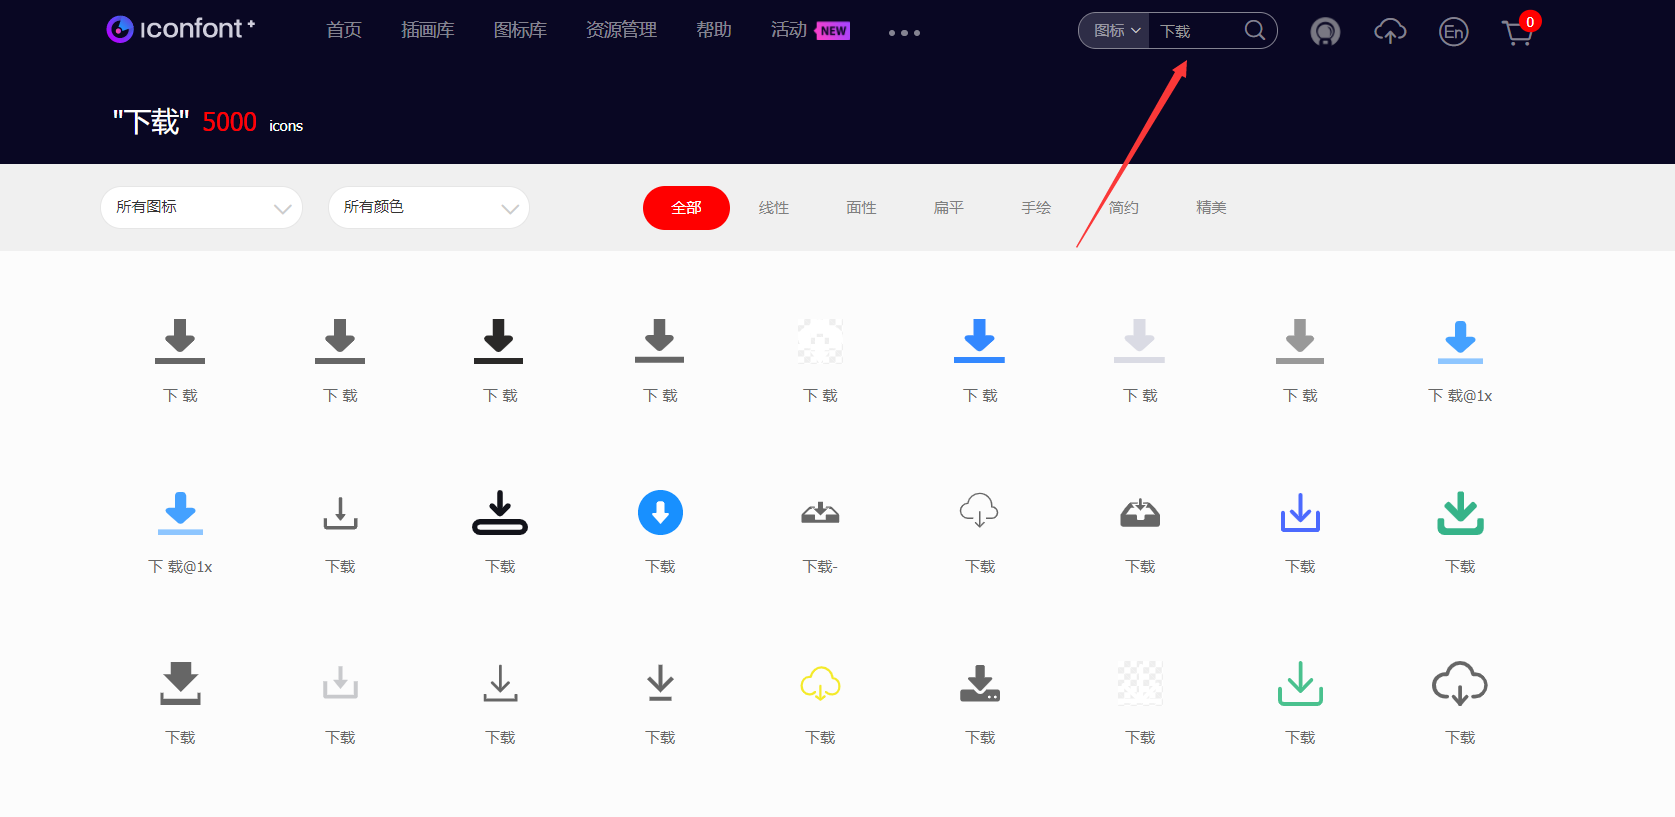
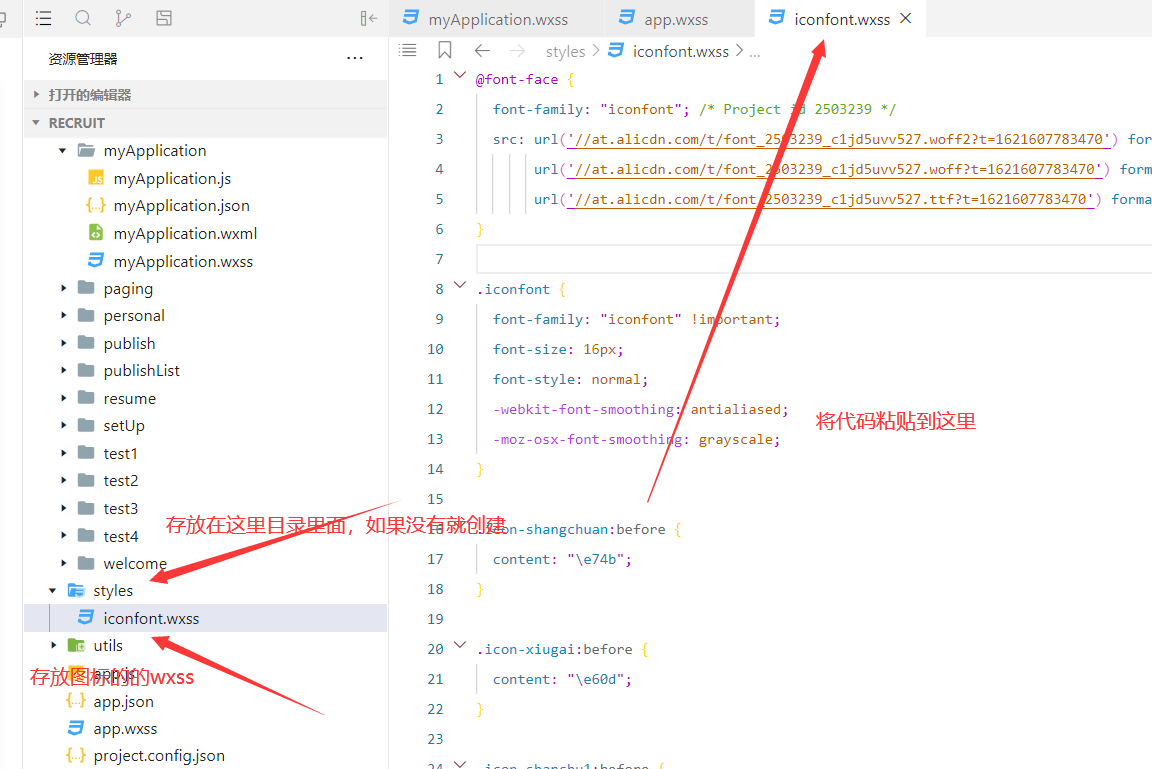
6) Import font icons (take Alibaba icon library as an example)
Search for the desired icon and add to the shopping cart
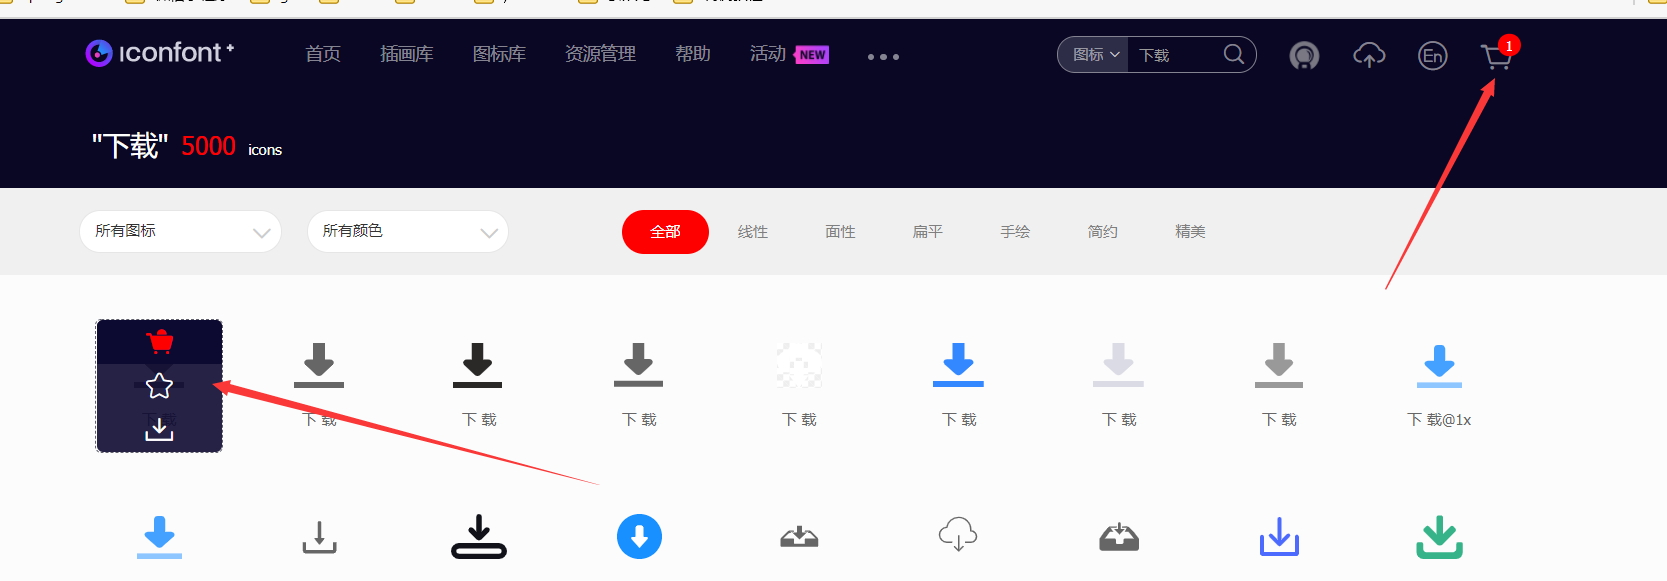
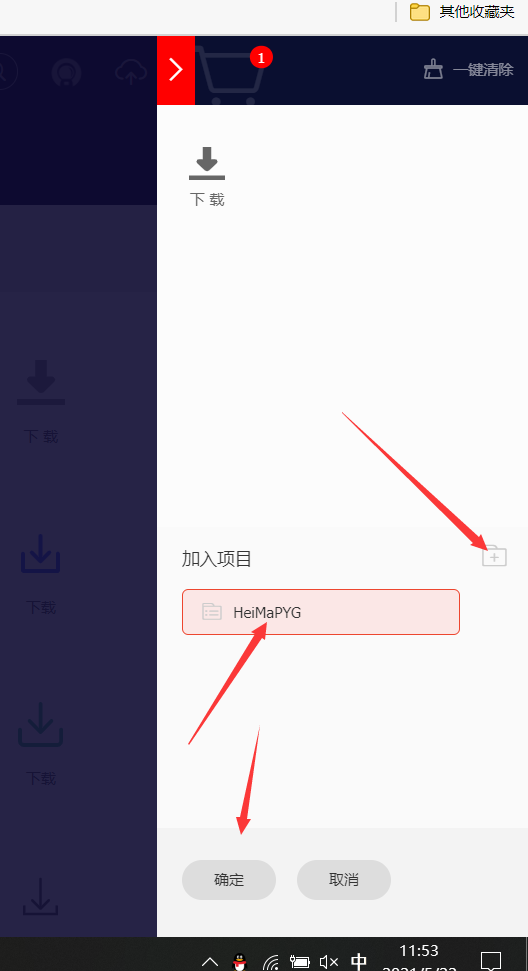
Before adding to the project, you need to create a project
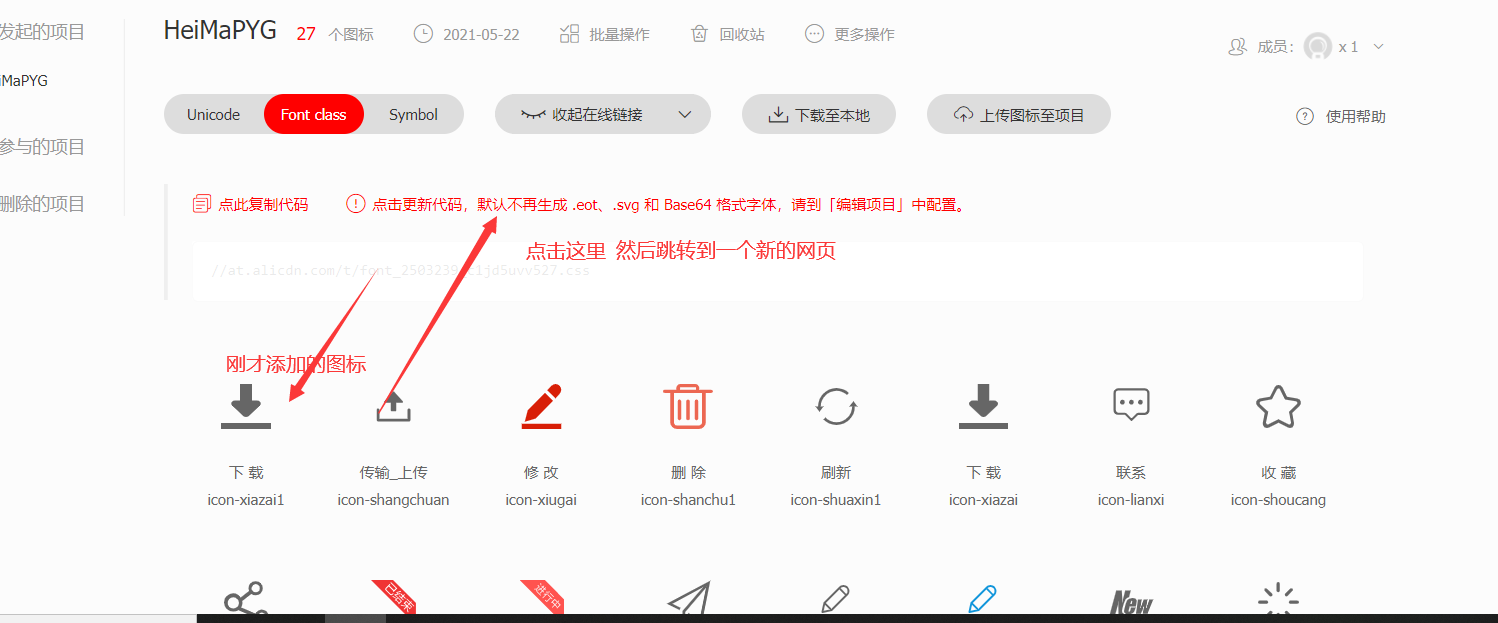

Copy code

Copy all
Then create a wxss to store icons in the development tool
Use Font Icon
Add a class on the page you want to use
For example, to use the downloaded icon, import class = "iconfont". For example, Download Icon (class = "iconfont icon-xiazai1")
These names are the id of the icon. You can import whatever you want to use

Like this, you can use the downloaded Font Icon
<view class="iconfont icon-xiazai1"></view>
7) Set fillet border
.box
  border-radius: 20rpx;   Size represents radians
}
8) Left and right horizontal lines of title

Relative positioning of parent box and absolute positioning of child box
 <view class="rmzm">
    <view class="xian-l"></view>
    <text class="rmzmTB iconfont icon-remen"></text>
    <view class="table-text van-divider ">Popular recruitment</view>
    <view class="xian-r"></view>
  </view>
.rmzm{
  width: 100%;
  height: 60rpx;
  position: relative;
  display: flex;
  padding: 10rpx 0 10rpx 0;
}
.table-text {
  position: absolute;
  color: black ;
  font-size: 38rpx ;
  /* padding: 0 28rpx; */
  left: 43%;
  width: 20%;
}
.xian-l{
  left: 2%;
  position: absolute;
  top: 54%;
  height: 2rpx ;
  width: 33%;
  background:#dfdede;
}
.xian-r{
  position: absolute;
  top: 54%;
  right: 2%;
  height: 2rpx ;
  width: 33%;
  background:#dfdede;
}
.rmzmTB{
  position: absolute;
  left: 37%;
  width: 10%;
  top: 15rpx;
  color: rgb(217,44,30);
}
9) Mask layer
<!-- mask -->
<view class="zzc" style="display:{{zzc}} ;" bindtap="zzc"></view>
/* mask */
.zzc{
position: fixed;
width: 100%;
height: 100%;
top: 0px;left: 0px;
display: none;
z-index:99;
background-color:rgba(0,0,0,0.5);
}
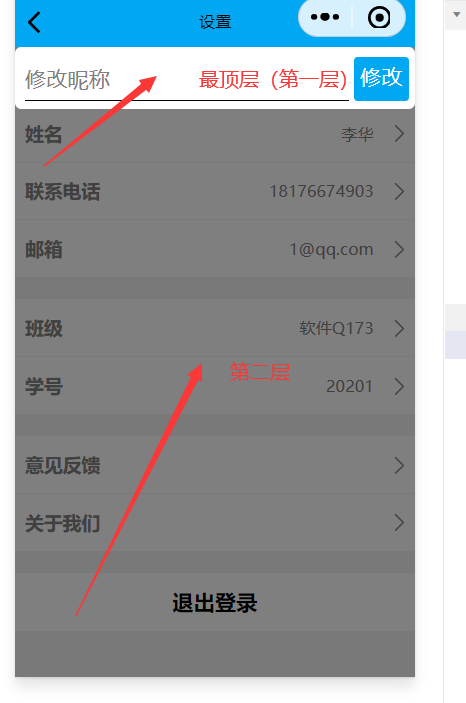
js By changing style="display:{{zzc}} ;"of display Value of( none hide block Display) controls whether the mask layer is displayed, which is not displayed by default
z-index:99; It is used to specify the layer of the view (the mask layer is generally on the second layer). The higher the value, the higher the number of layers
for example
10) Query the width of the phone screen
Call this to Wx getSystemInfoSync(). windowHeight
Specific use
Note that the unit here is px
<view style=" height: {{height}}px; background-color: #F2f2f2; ">
data: {
    height: null,
},
onLoad: function (options) {
this.setData({
    height:wx.getSystemInfoSync().windowHeight
})
}
11) Column display (left and right sliding conversion page)
design sketch

html code
<view >
    <scroll-view scroll-x="true" class="tab-h" scroll-left="{{scrollLeft}}">
        <view class="tab-item {{currentTab==0?'active':''}}"  data-current="0" bindtap="swichNav">whole</view>
        <view class="tab-item {{currentTab==1?'active':''}}" data-current="1" bindtap="swichNav">Passed</view>
        <view class="tab-item {{currentTab==2?'active':''}}" data-current="2" bindtap="swichNav">Fail</view>
    </scroll-view>
    <swiper class="tab-content" current="{{currentTab}}" duration="300" bindchange="switchTab"
     style="height:{{winHeight}}rpx">
        <swiper-item wx:for="{{[0,1,2]}}">
            <scroll-view scroll-y="true" class="scoll-h" >
                <block wx:for="{{[1,2,3,4,5,6,7,8]}}" wx:key="*this">
                    <view class="item-ans">
                        <view class="avatar">
                            <!-- View application list -->
                            <text class="applicationList iconfont icon-jianliliebiao"></text>
                            <image class="img" mode="" src="https://t7.baidu.com/it/u=1951548898,3927145&fm=193&f=GIF"></image>
                        </view>
                        <view class="box-private ">
                            <view class="name">name</view>
                            <view class="content">brief introduction</view>
                            <view class="van-line">
                                <view class="nick-name bottom-content">Publisher</view>  <view class="time bottom-content">time</view>
                                <view class="liulanliang ">
                                    <text class="iconfont icon-liulanliang">111</text>
                                    <text class="state">[[closed]</text>
                                </view>
                            </view>
                        </view>
                    </view>
                </block>
            </scroll-view>
        </swiper-item>
    </swiper>
</view>

css code
.tab-h{
  height: 80rpx;width: 100%; box-sizing: border-box;overflow: hidden;line-height: 80rpx;background: #F7F7F7; font-size: 16px; white-space: nowrap;position: fixed;top: 0; left: 0; z-index: 99;
  text-align: center
}
.tab-item{
  margin:0 36rpx;display: inline-block;
}
.tab-item.active{
  color: #4675F9;position: relative;
}
.tab-item.active:after{
  content: "";display: block;height: 8rpx;width:100%;background: #4675F9;position: absolute; bottom: 0;
  border-radius: 16rpx;
}
.avatar{width: 150rpx;height: 150rpx;position: relative; padding-left: 5rpx;padding-top: 10rpx;}
.avatar .img{width: 100%;height: 100%;}
/* .avatar .doyen{width: 40rpx;height: 40rpx;position: absolute;bottom: -2px;right: 20rpx;} */

.applicationList {
  color: rgb(121, 121, 121);
  font-size: 50rpx;
  position: absolute;
  top: 10rpx;
  right: -450%;
}
.tab-content{
  margin-top: 80rpx;
}
.scoll-h{
  height: 100%;
}
.item-ans {
  display: flex;
}
.box-private{
  width: 95%;
  padding: 10rpx;
  margin-left: 10rpx;
  border-bottom: 1px solid #F2F2F2;
}
.line-title{
  width:100%;
  height:1rpx;
  background:#aaa;
}

.van-line {
  margin-top: 15rpx;
  width: 100%;
  display: flex;
  font-size: 30rpx;
  color: #aaa;
  position: relative;
}
.name{
  font-size: 35rpx;
  font-weight: 750;
}
.content {
  margin-top: 10rpx;
  font-size: 32rpx;
  color: #aaa;
}
.bottom-content{
  margin-right: 40rpx;
}
.liulanliang {
  text-align: right;
  position: absolute;
  right: 0;
}
.liulanliang text {
  font-size: 32rpx;
  color: #aaa;
}

js code
var app = getApp();
Page({
    data:{
        winHeight:"",//Window height
        currentTab:0, //Preset the value of the current item
        scrollLeft:0, //Scroll bar position of tab title

    },
    // Scroll to toggle label styles
    switchTab:function(e){
        this.setData({
            currentTab:e.detail.current
        });
        this.checkCor();
    },
    // Click the title to change the style when switching the current page
    swichNav:function(e){
        var cur=e.target.dataset.current;
        if(this.data.currentTaB==cur){return false;}
        else{
            this.setData({
                currentTab:cur
            })
        }
    },
    //When judging that the current scroll exceeds one screen, set the tab Title scroll bar.
    checkCor:function(){
      if (this.data.currentTab>4){
        this.setData({
          scrollLeft:300
        })
      }else{
        this.setData({
          scrollLeft:0
        })
      }
    },
    onLoad: function() {
        // console.log('Date.now()',Date.now()/1000)
        // console.log('Date.parse(new Date())/1000',Date.parse(new Date())/1000)
        var that = this;
        //  Highly adaptive
        wx.getSystemInfo( {
            success: function( res ) {
                var clientHeight=res.windowHeight,
                    clientWidth=res.windowWidth,
                    rpxR=750/clientWidth;
              var  calc=clientHeight*rpxR-180;
                console.log(calc)
                that.setData( {
                    winHeight: calc
                });
            }
        });
    },
    footerTap:app.footerTap
})
3. js common knowledge
1) On app JS encapsulated function call
Add var app = getApp() to the js to be called
Then through app call
2) push and concat operations of arrays
//push: add an element to the array
let imgs = []
imgs.push('1.jpg')

//concat: copying an array to another array will return a new array
let imgs = ['1.jpg','2.jpg']
let imgs1 = ['3.jpg','4.jpg']
imgs = imgs.concat(imgs1)
//imgs = ['1.jpg','2.jpg','3.jpg','4.jpg']
3) Conversion between standard time and timestamp
Create a utils package (it seems that it is created by default)
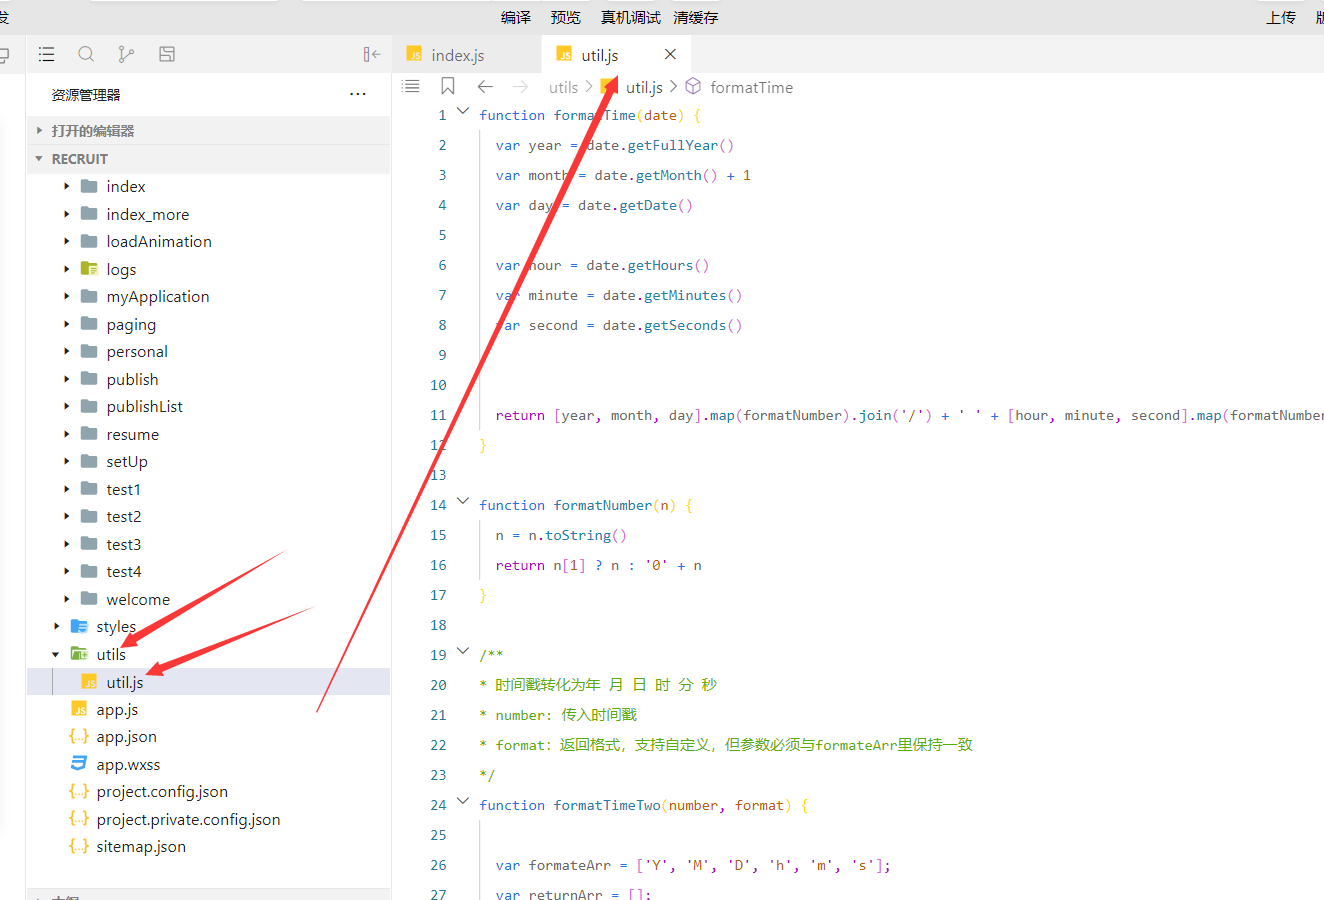
2. Create a util JS file. If it already exists, create another one
util.js
function formatTime(date) {
  var year = date.getFullYear()
  var month = date.getMonth() + 1
  var day = date.getDate()

  var hour = date.getHours()
  var minute = date.getMinutes()
  var second = date.getSeconds()


  return [year, month, day].map(formatNumber).join('/') + ' ' + [hour, minute, second].map(formatNumber).join(':')
}

function formatNumber(n) {
  n = n.toString()
  return n[1] ? n : '0' + n
}

/**
* The time stamp is converted to mm / DD / yyyy / h / min / s
* number: Incoming timestamp
* format: The return format supports customization, but the parameters must be consistent with those in formatear
*/
function formatTimeTwo(number, format) {

  var formateArr = ['Y', 'M', 'D', 'h', 'm', 's'];
  var returnArr = [];

  var date = new Date(number * 1000);
  returnArr.push(date.getFullYear());
  returnArr.push(formatNumber(date.getMonth() + 1));
  returnArr.push(formatNumber(date.getDate()));

  returnArr.push(formatNumber(date.getHours()));
  returnArr.push(formatNumber(date.getMinutes()));
  returnArr.push(formatNumber(date.getSeconds()));

  for (var i in returnArr) {
      format = format.replace(formateArr[i], returnArr[i]);
  }
  return format;
}

module.exports = {
  formatTime: formatTime,  //Timestamp to date
  formatTimeTwo: formatTimeTwo  //Date to timestamp
}
3. Import util. In the JS to be converted js
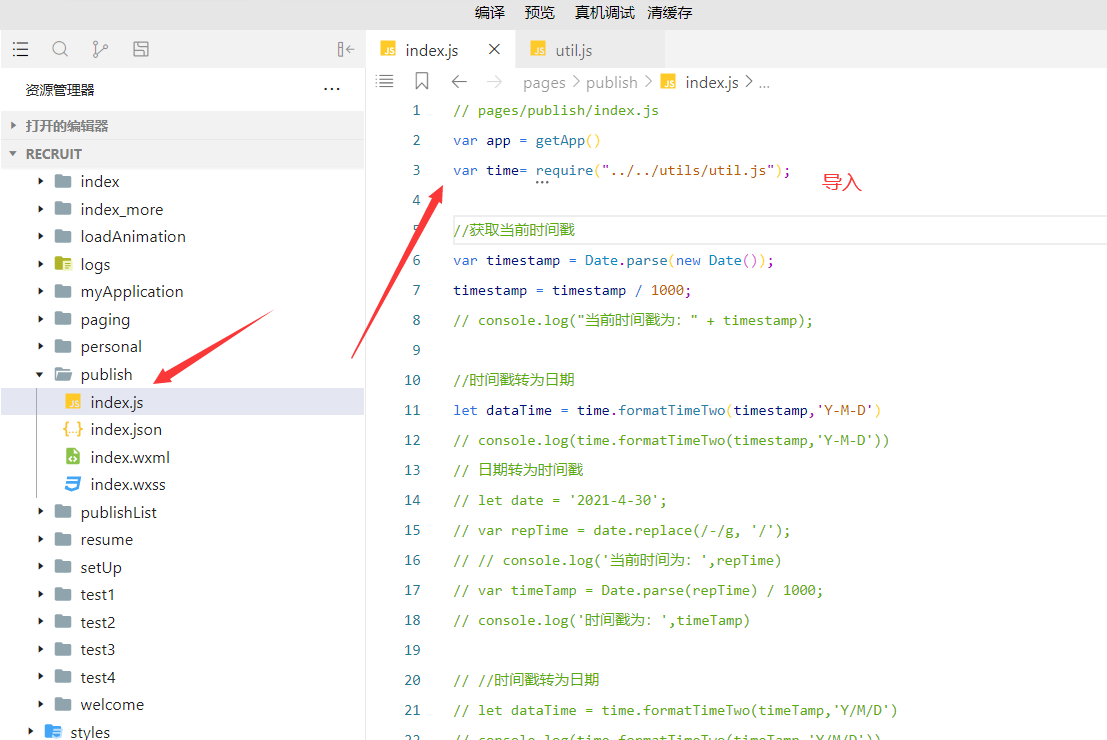
4. Through var time= require("... /... / utils/util.js"); call
Gets the timestamp of the current time
var timeTamp = Date.parse(new Date()) / 1000; //Gets the timestamp of the current time
Convert standard time to timestamp
//Date to timestamp
let date = '2021-4-30';
var repTime = date.replace(/-/g, '/');  //Convert '2021-4-30' time format to '2021 / 4 / 30' for compatibility with apple
console.log('The current time is:',repTime)
var timeTamp = Date.parse(repTime) / 1000;  //transformation
console.log('The timestamp is:',timeTamp)
Converts a timestamp to a date time in the specified format
// //Timestamp to date
let dataTime = time.formatTimeTwo(timeTamp,'Y/M/D')  //Timestamp is the incoming timestamp, 'Y/M/D' is the input format, or other formats, such as' y-m-d 'y.m.d
console.log(time.formatTimeTwo(timeTamp,'Y/M/D'))
4) Using Promise of ES6 to solve the problem caused by asynchronous applet
Multitasking blocking
//Create an array to store the code running asynchronously, such as querying the database using cloud functions
let promiseArr = [];
promiseArr.push(new Promise((reslove, reject) => {
  //Add the asynchronous task to the queue. The parameter reslove is the data returned after the call is successful, which is equivalent to return. Reject is the data returned after the call fails, which is equivalent to return (for example, reslove(res) after the call is successful, reject(msg)) after the call fails
	wx.cloud.callFunction({
       name:'personal',
       data:{
         parameter:'getApplications',
       },
       success: (res) => {
         reslove(res.result);
         console.log('Successfully updated the application information submitted by the user',res)
         wx.setStorageSync('getMyApplications',res.result)
       },
       fail: (msg) => {
         reject('request was aborted');
       }
   })
}
Promise.all(promiseArr).then(res => { //After all asynchronous tasks in the queue are completed, execute the code in then
    console.log(res)
}.catch(err=>{
    console.log(err)
})
Attention:In writing promiseArr.push(new Promise((reslove, reject) => {

}Inside when
 Don't use it  than(res=>{console.log(err)}) and catch(err=>{console.log(err)})
 To use
 success: (res) => {
   reslove(res.result);
   console.log('Successfully updated the application information submitted by the user',res)
   wx.setStorageSync('getMyApplications',res.result)
 },
fail: (msg) => {
   reject('request was aborted');
 }
Single task blocking
getApplications:function() {
    return new Promise((reslove, reject) => {
    //The application status is 0 by default. 0 is being approved, 1 is passed and 2 is not passed
     wx.cloud.callFunction({
       name:'personal',
       data:{
         parameter:'getApplications',
       },
       success: (res) => {
         reslove(res.result);
         console.log('Successfully updated the application information submitted by the user',res)
         wx.setStorageSync('getMyApplications',res.result)
       },
       fail: (msg) => {
         reject('request was aborted');
       }
     })
   })
//call
app.getApplications().then(res=>{
     this.setData({
       recruits:res,
     })
   }).catch(err=>{
      console.log(err)
   })
4. Upload pictures and files to cloud storage and delete cloud files
1) Upload pictures
1. Select Picture
Simple explanation of selecting pictures
If we want to transmit pictures for a long time, we first need to select pictures,
After selecting a picture, it will return to the temporary address of a picture (which will be used to upload the picture later),
In this case, res.tempFilePaths returns the temporary address of the picture, which is an array
2. How to display a picture after we select it.
1. It has been said that after selecting a picture, a temporary address of the picture will be returned, and this address can be displayed in the src attribute
<image class='img' src='{{tempFilePath}}' mode="aspectFill"></image>
  chooseImage: function(e) {
  wx.chooseImage({
    count: 1, //Set how many pictures can be selected at a time
    sizeType: ['original', 'compressed'], // You can specify whether to use the original or compressed image. Both are available by default
    sourceType: ['album', 'camera'], // You can specify whether the source is an album or a camera. Both are available by default
    success: function(res) {
      // console.log('tempFilePaths',res.tempFilePaths)
      // Returns the list of local file paths of the selected photo. tempFilePath can display the picture as the src attribute of img tag
      var tempFilePaths = res.tempFilePaths
      //If you want to upload multiple pictures, we need to keep the temporary address of each selected picture. This uses imgbox = imgbox concat(tempFilePaths);  The temporary address array returned each time can be spliced together
      if(imgbox.length+tempFilePaths.length<5){  //By default, 4 pictures need to be uploaded here
        imgbox = imgbox.concat(tempFilePaths);
      }
      this.setData({     //Save the temporary path of each selected picture for uploading
        imgbox: imgbox
      });
      console.log('imgbox',that.data.imgbox)
    }
  })
},
3. Delete a selected picture
We just need to remove the temporary path of the corresponding image from the array waiting to be uploaded, so that the image will not be uploaded when uploading
//imgbox here is the temporary path used to store all selected pictures
imgDelete1: function(e) {
  let that = this;
  let index = e.currentTarget.dataset.deindex;
  let imgbox = this.data.imgbox;
  imgbox.splice(index, 1)  //Remove the stored temporary path according to the array subscript
  that.setData({
    imgbox: imgbox
  });
  // console.log('imgbox',that.data.imgbox)
},
4. Upload pictures
Upload pictures according to the array of temporary paths.
1. We need to give a path to the uploaded pictures so that we can know which folder the pictures are uploaded to
2. We need to give a name to the uploaded image, and obtain the extension of the uploaded image according to the temporary address obtained after selecting the image
3. The extension of the file is returned through regular expression to judge the extension of the picture
let item = this.data.imgbox[i]; //Gets the temporary address saved when selecting a picture
let suffix = /\.\w+$/.exec(item)[0]; //The regular expression returns the extension of the file
 var that = this
 var timestamp = Date.parse(new Date());  //Name the picture by obtaining the timestamp of the current time
 wx.cloud.uploadFile({
   cloudPath:'imgs/recruitImgs/'+timestamp+i+suffix,   //Where to upload the picture to the cloud storage. This path needs to be created first
   filePath:item,  //Temporary address of picture
   success:res=>{
     that.setData({
       fileIDs: that.data.fileIDs.concat(res.fileID)    //After success, the fileID of an image will be returned. Through this fileID, we can know where the image is and open it. The fileID returned here is very important. If we want to display this picture, we need to store the fileID of this picture in the database, and then we can access the picture through the fileID.
    //fileID can be directly put into src of image
     });
     reslove();
   },
   fail(err){
     console.log(res)
     reject();
   }
 })
5. Show uploaded pictures
You only need to access the image according to the fileID returned from the uploaded image
<image class='img' src='{{fileID}}' mode="aspectFill"></image>
6. Summary
Uploading pictures can be divided into the following steps
1. Select the picture and record the returned temporary address
2. Gets the extension of the temporary address
3. Upload the picture according to the temporary address. Before uploading the picture, we need to give the name and storage path of the picture
4. After uploading a picture successfully, you need to record the returned fileID to display the picture
2) Upload file
Uploading files is the same principle as uploading pictures
Only the methods called are different
Select file
chooseEnclosure:function(e){
    var that = this;
    wx.chooseMessageFile({
      count: 1,  //Number of files that can be selected
      type: 'file', //You can choose the type of file. I only allow uploading files here There are videos, pictures, or all of them
      success(res) {
        // console.log('File res',res)
        var size = res.tempFiles[0].size;
        var filename = res.tempFiles[0].path;
        var newfilename = filename + "";
        let ext = newfilename.substr(newfilename.lastIndexOf(".")).replace('.', ''); //Get file name suffix
        // console.log(ext)
        if (size > 4194304){ //Limits the file size and specific file type | (EXT! ='docx '& & ext! ='pdf')
          wx.showToast({
          title: 'The file size cannot exceed 4 MB,Format must be pdf,docx,doc!',
          icon: "none",
          duration: 2000,
          mask: true
          })
        }else{
          that.setData({
            enclosureTmp: res.tempFiles[0].path, //Save the path of the file on the variable of the page to facilitate Wx UploadFile call
            fileName:res.tempFiles[0].name, //Echo file name
          })
          console.log('enclosureTmp',that.data.enclosureTmp)
        }
      }
    })
  },
upload
let enclosureTmp = this.data.enclosureTmp;
let suffix = /\.\w+$/.exec(enclosureTmp)[0]; //The regular expression returns the extension of the file
 var that = this
 var timestamp = Date.parse(new Date());
 wx.cloud.uploadFile({
   cloudPath:'file/enclosure/'+timestamp+suffix,
   filePath:enclosureTmp,
   success:res=>{
     that.setData({
       enclosureCloudUrl: res.fileID
     });
     console.log(that.data.enclosureCloudUrl) //Output the return address of the uploaded picture
     reslove();
   },
   fail(err){
     console.log(res)
     reject()
   }
 })
3) Delete file
//Delete according to fileID
deleteFile:function(fileList){  //fileList is the id array of cloud files
    wx.cloud.deleteFile({
      fileList: fileList
    }).then(res => {
      // handle success
      console.log('The following static resources were successfully deleted',res.fileList)
    }).catch(error => {
      // handle error
    })
  },