scene
Hongmeng development - realize page Jump and page return:
https://blog.csdn.net/BADAO_LIUMANG_QIZHI/article/details/118383025
Based on the above implementation of jumping from the main page to todolist page
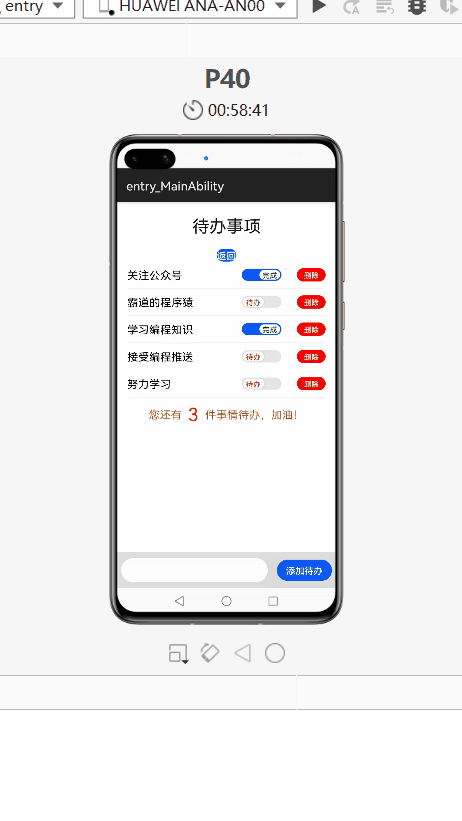
Fully realize the function of todolist, that is, to-do items.
Note:
Blog:
https://blog.csdn.net/badao_liumang_qizhi
Official account
Domineering procedural ape
Get programming related e-books, tutorial push and free download.
realization
First, make page layout in hml
<div class="container">
    <text class="title">To do list</text>
    <button @click="goback">return</button>
    <div class="item" for="{{todoList}}">
        <text class="todo">{{$item.info}}</text>
        <switch showtext="true" checked="{{$item.status}}"
                texton="complete" textoff="need to be dealt with"
                class="switch"
                @change="checkStatus($idx)"></switch>
        <button class="remove" onclick="remove($idx)">delete</button>
    </div>
    <div class="info">
        <text class="info-text">You have</text>
        <text class="info-num">{{needTodoNum}}</text>
        <text class="info-text">One thing to do, come on!</text>
    </div>
    <div class="add-todo">
        <input class="plan-input" type="text" onchange="getNewTodo"></input>
        <button class="plan-btn" onclick="addTodo">Add to do</button>
    </div>
</div>
Notice how the for loop is used here.
Directly use for="{{todoList}}" to traverse the list, and then the content of each item through {{$item.info}}
Display. The item here is fixed, and info and status are the attributes of the object.
Then the switch switch component is used here.
Its attribute is
| name | type | Default value | Required | describe |
|---|---|---|---|---|
| checked | boolean | false | no | Check or not. |
| showtext | boolean | false | no | Whether to display text. |
| texton | string | "On" | no | Text to display when selected. |
| textoff | string | "Off" | no | Text displayed when not selected. |
Whether to check here depends on the status attribute of each to-do object, which is a Boolean value.
Then, the change event is bound to the operation when it is changed, and the index is passed through $idx.
Then, the number of several to-do items is displayed by calculating the attribute needTodoNum.
The addTodo method is called by adding a representative click event.
Then render its style in css.
.container {
    flex-direction: column;
    justify-content: flex-start;
    align-items: center;
    padding-bottom: 100px;
}
.title {
    font-size: 25px;
    margin-top: 20px;
    margin-bottom: 20px;
    color: #000000;
    opacity: 0.9;
    font-size: 28px;
}
.item{
    width: 325px;
    padding: 10px 0;
    flex-direction: row;
    align-items: center;
    justify-content: space-around;
    border-bottom: 1px solid #eee;
}
.todo{
    color: #000;
    width: 180px;
    font-size: 18px;
}
.switch{
    font-size: 12px;
    texton-color: green;
    textoff-color:red;
    text-padding: 5px;
    width: 100px;
    height: 24px;
    allow-scale: false;
}
.remove {
    font-size: 12px;
    margin-left: 10px;
    width: 50px;
    height: 22px;
    color: #fff;
    background-color: red;
}
.info{
    width: 100%;
    margin-top: 10px;
    justify-content: center;
}
.info-text {
    font-size: 18px;
    color: #AD7A1B;
}
.info-num{
    color: orangered;
    margin-left: 10px;
    margin-right: 10px;
}
.add-todo {
    position: fixed;
    left: 0;
    bottom: 0;
    width: 100%;
    height: 60px;
    flex-direction: row;
    justify-content: space-around;
    align-items: center;
    background-color: #ddd;
}

.plan-input {
    width: 240px;
    height: 40px;
    background-color: #fff;
}
.plan-btn {
    width: 90px;
    height: 35px;
    font-size: 15px;
}
Finally, some of the above event methods are implemented in js
import todoList from "../../common/datas/todoList.js"
import router from '@system.router';
export default {
    data: {
    // To do list
        todoList,
        inputTodo: "IDE Unable to call input"
    },
    computed:{
        needTodoNum(){
            let num = 0;
            this.todoList.forEach(item => {
                if(!item.status){
                    num++;
                }
            });
            return num;
        }
    },
    remove(index){
        console.log(index)
        this.todoList.splice(index,1)
    },
    addTodo() {
        this.todoList.push({
            info:this.inputTodo,
            status: false
        })
    },
    checkStatus(index){
        console.log(index);
        this.todoList[index].status = !this.todoList[index].status;
    },
    getNewTodo(e){
        this.inputTodo = e.value;
    },
    goback(){
        router.back();
    }
}
First, the data source is assigned to todolist through import.
The remaining to-do items are calculated through the comouted calculation attribute, and the status in the traversal data source todollist is
Number of false. And assign it to needToNum and display it on the page.
In the change event of switch, reverse its status.
    checkStatus(index){
        console.log(index);
        this.todoList[index].status = !this.todoList[index].status;
    },
When deleting a to-do, delete it from the list through the passed index.
    remove(index){
        console.log(index)
        this.todoList.splice(index,1)
    },
Add to-do items by setting the change event of input
    getNewTodo(e){
        this.inputTodo = e.value;
    },
Assign the input value to the variable inputTodo.
Then in the click event of the new button
    addTodo() {
        this.todoList.push({
            info:this.inputTodo,
            status: false
        })
    },
Add an object to the data source.
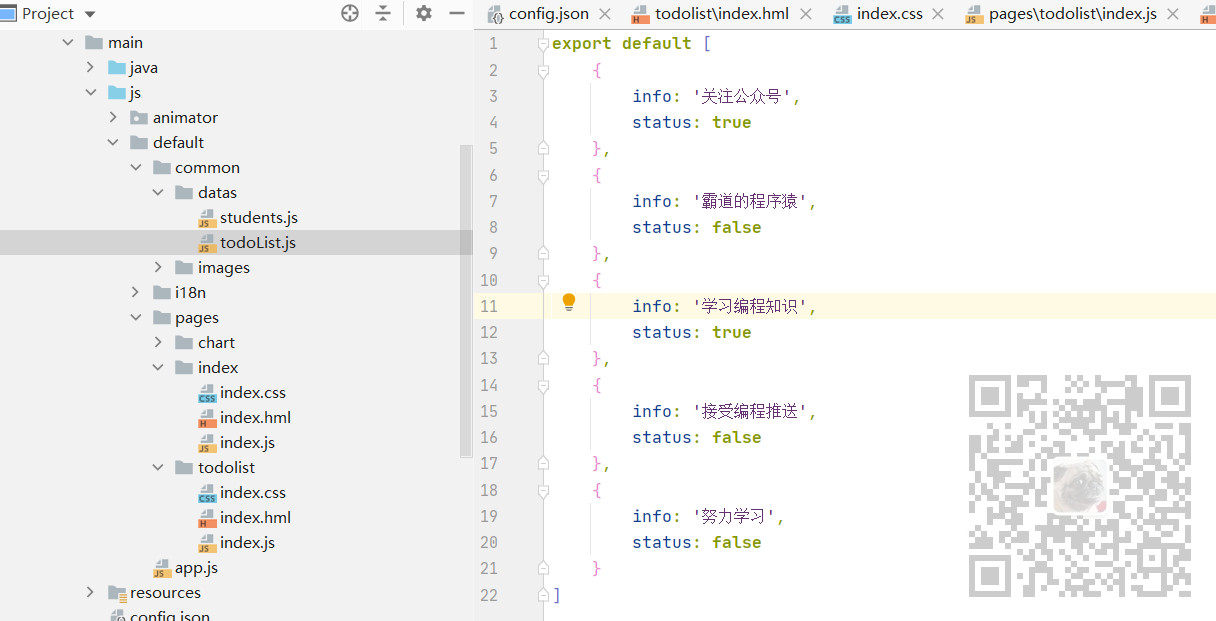
The data source is imported from todoList under common data
export default [
    {
        info: 'Official account',
        status: true
    },
    {
        info: 'Domineering procedural ape',
        status: false
    },
    {
        info: 'Learn programming knowledge',
        status: true
    },
    {
        info: 'Accept programmed push',
        status: false
    },
    {
        info: 'study hard',
        status: false
    }
]
Note that the keyboard cannot be adjusted when adding to-do items in preview mode, so it needs to be run on the simulator.
effect