1, Configure ssl certificate to provide https access
1. Install SSL module
To configure https in nginx, you must install SSL module, that is: http_ssl_module.
Enter the unzipped directory of nginx: / home/software/nginx-1.16.1
Add ssl modules (the original modules need to be retained)
./configure --prefix=/usr/local/nginx --pid-path=/var/run/nginx/nginx.pid --lock-path=/var/lock/nginx.lock --error-log-path=/var/log/nginx/error.log --http-log-path=/var/log/nginx/access.log --with-http_gzip_static_module --http-client-body-temp-path=/var/temp/nginx/client --http-proxy-temp-path=/var/temp/nginx/proxy --http-fastcgi-temp-path=/var/temp/nginx/fastcgi --http-uwsgi-temp-path=/var/temp/nginx/uwsgi --http-scgi-temp-path=/var/temp/nginx/scgi --with-http_ssl_module
Compilation and installation
make
make install
2. Configure HTTPS
ssl certificate * crt and private key * Copy the key to the / usr/local/nginx/conf directory.
If there is no SSL certificate, you can refer to https://blog.csdn.net/erlib/article/details/46636055 perhaps https://www.cnblogs.com/lcchuguo/p/5124073.html Obtain the certificate of the test.
Add server listening 443 port:
server {
    listen       443;
    server_name  www.imoocdsp.com;
    #Enable ssl
    ssl     on;
    #Configure ssl certificate
    ssl_certificate      1_www.imoocdsp.com_bundle.crt;
    #Configure certificate key
    ssl_certificate_key  2_www.imoocdsp.com.key;
    #ssl session cache
    ssl_session_cache    shared:SSL:1m;
    #ssl session timeout
    ssl_session_timeout  5m;
    #Configure the encryption suite and follow the openssl standard
    ssl_protocols TLSv1 TLSv1.1 TLSv1.2;
    ssl_ciphers ECDHE-RSA-AES128-GCM-SHA256:HIGH:!aNULL:!MD5:!RC4:!DHE;
    ssl_prefer_server_ciphers on;

    location / {
        proxy_pass http://tomcats/;
        index  index.html index.htm;
    }
}
server 80 port add request forwarding:
server {
        listen       80;
        server_name  localhost;
        #Convert request to https
		rewrite ^(.*)$ https://$host$1 permanent;
        #charset koi8-r;

        #access_log  logs/host.access.log  main;

        location / {
	    proxy_pass http://hello-server;
            root   html;
            index  index.html index.htm;
        }
}
6, Configure ha nginx
1. Install keepalived
(1) Download
https://www.keepalived.org/download.html
(2) Decompress
tar -zxvf keepalived-2.0.18.tar.gz
(3) Use the configure command to configure the installation directory and the location of the core configuration file:
./configure --prefix=/usr/local/keepalived --sysconf=/etc
- prefix: location of keepalived installation sysconf: location of keepalived core configuration file, fixed location. If it is changed to other locations, keepalived cannot be started, and an error will be reported in / var/log/messages
- sysconf: keepalived: the location of the core configuration file is fixed. If it is changed to another location, keepalived cannot be started, and an error will be reported in / var/log/messages
Warning messages may appear during configuration, as follows:
*** WARNING - this build will not support IPVS with IPv6. Please install libnl/libnl-3 dev libraries to support IPv6 with IPVS.

#Install libnl/libnl-3 dependencies
yum -y install libnl libnl-devel
(4) Install keepalived
make && make install
(5) The configuration file is in / etc / kept / kept conf
(6) If you forget to install the configured directory, you can find it through the following command:
whereis keepalived
(7) Start keepalived
Enter sbin directory
./keepalived
2. Configuring a keepalived host
(1) Via the command VIM keepalived Conf open configuration file
global_defs {
    #Routing id: the host identifier of the node currently installed with keepalived, which ensures global uniqueness
    router_id keep_171
}

vrrp_instance VI_1 {
    #Indicates whether the status is MASTER or BACKUP
    state MASTER
    #Network card bound to this instance
    interface ens33
    #Ensure that the primary and standby nodes are consistent
    virtual_router_id 51
    #The weight of the master is generally higher than that of the backup. If there are more than one, it is the election. Whoever has the highest weight will be elected
    priority 100
    #Synchronization check interval between active and standby, in seconds
    advert_int 2
    #Authentication authority password to prevent illegal nodes from entering
    authentication {
        auth_type PASS
        auth_pass 1111
    }
    #Virtual ip can have multiple (vip)
    virtual_ipaddress {
        192.168.1.161
    }
}
Attachment: command to view network card information
ip addr
(2) Start keepalived
(3) View process
ps -ef|grep keepalived
(4) View VIP (virtual ip)
Under the network card ens33, there is an additional 192.168.1.161, which is the virtual ip
3. Register keepalived as a system service
(1) Copy profile
- Put the keepalived directory in etc / init D / keepalived copy to / etc / init D / down
- Copy etc/sysconfig / kept in the kept directory to / etc/sysconfig /
(2) Refresh systemctl
systemctl daemon-reload
(3) Start, stop and restart kept
#start-up
systemctl start keepalived.service
#stop it
systemctl stop keepalived.service
#restart
systemctl restart keepalived.service
4. Achieve dual active and standby high availability
(1) Modify standby configuration
global_defs {
    router_id keep_172
}
vrrp_instance VI_1 {
    #The standby machine is set to BACKUP
    state BACKUP
    interface ens33
    virtual_router_id 51
    #Weight lower than MASTER
    priority 80
    advert_int 2
    authentication {
        auth_type PASS auth_pass 1111
    }
    virtual_ipaddress {
        #Note: both active and standby VIPs are the same and bound to the same vip
        192.168.1.161
    }
}
(2) Start Keepalived
(3) You can access the host by accessing vip. When the host fails, accessing vip will access the standby machine
5. keepalived configure nginx automatic restart
(1) Script
Create a script check under / etc / kept /_ nginx_ alive_ or_ not
#!/bin/bash

A=`ps -C nginx --no-header |wc -l`
#Judge whether nginx is down. If it is down, try to restart it
if [ $A -eq 0 ];then
    /usr/local/nginx/sbin/nginx
    #Wait for a while and check nginx again. If it fails to start successfully, stop keepalived and start the standby machine
    sleep 3
        if [ `ps -C nginx --no-header |wc -l` -eq 0 ];then
            killall keepalived
        fi
fi
(2) Add run permissions
chmod +x /etc/keepalived/check_nginx_alive_or_not.sh
(3) Configure keepalived listening nginx script
vrrp_script check_nginx_alive {
    script "/etc/keepalived/check_nginx_alive_or_not.sh"
    interval 2 #Run the previous line of script every two seconds
    weight 10 #If the script fails to run, the upgrade weight is + 10
}
(4) In VRRP_ New monitoring script in instance
track_script {
    check_nginx_alive #Trace # nginx # script
}
(5) Restart Keepalived to make the configuration file effective
systemctl restart keepalived
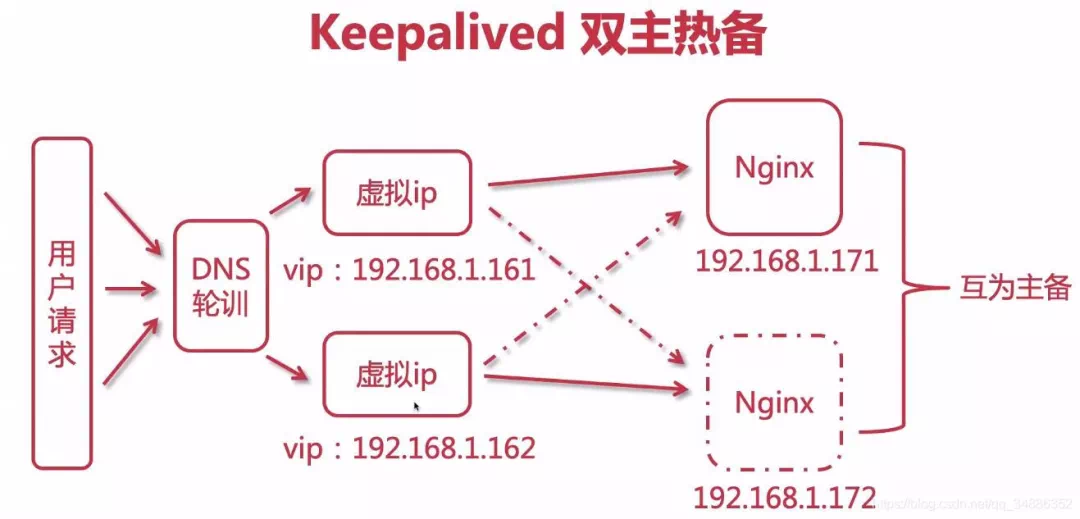
6. Kept dual active hot standby
(1) Configure DNS polling
Configure two ip addresses under the same domain name to Baidu itself
(2) Configure the first host
global_defs {
    router_id keep_171
}
vrrp_instance VI_1 {
    state MASTER i
    nterface ens33
    virtual_router_id 51
    priority 100
    advert_int 1
    authentication {
        auth_type PASS
        auth_pass 1111
    }
    virtual_ipaddress {
        192.168.1.161
    }
}

vrrp_instance VI_2  {
    state BACKUP
    interface ens33
    virtual_router_id 52
    priority 80
    advert_int 1
    authentication {
        auth_type PASS
        auth_pass 1111
    }
    virtual_ipaddress {
        192.168.1.162
    }
}
(3) Configure second host
global_defs {
    router_id keep_172
}
vrrp_instance VI_1 {
    state BACKUP
    interface ens33
    virtual_router_id 51
    priority 80
    advert_int 1
    authentication {
        auth_type PASS
        auth_pass 1111
    }
    virtual_ipaddress {
        192.168.1.161
    }
}

vrrp_instance VI_2 {
    state MASTER
    interface ens33
    virtual_router_id 52
    priority 100
    advert_int 1
    authentication {
        auth_type PASS
        auth_pass 1111
    }
    virtual_ipaddress {
        192.168.1.162
    }
}
(4) Restart two Keepalived
systemctl restart keepalived
7, LVS (Linux Virtual Server) realizes high availability load balancing
1. Why use LVS+Nginx
- LVS is based on four layer load balancing, and its work efficiency is higher than that of Nginx's seven layer load. Using LVS to build Nginx cluster can improve performance
- Layer 4 load balancing cannot process information, and can only be forwarded through ip + ports, so 70% of the load is required for data processing
- When Nginx receives the request back and forth, LVS can only accept no response
2. Three modes of LVS
(1)NAT mode
- The client sends the request to LVS, and LVS will select a server to respond to the request. The server will return the result to LVS, and LVS will return it to the client.
- In NAT mode, the gateway of the server must point to LVS, otherwise the message cannot be delivered to the client
- NAT technology rewrites the address of the requested message and the response message through LVS. Therefore, when the website traffic is relatively large, the load balancing scheduler has a relatively large bottleneck, which generally requires up to 10-20 nodes
- NAT mode supports IP address and port conversion. That is, the port requested by the user and the port of the real server can be inconsistent
(2)TUN mode
- The client sends the request to LVS, and LVS will select a server to respond to the request, establish a tunnel between the client and the server, and the server will directly return the response when returning the result without passing through LVS.
- In TUN mode, all servers must be bound with VIP IP addresses, and all servers must have network cards.
- TUN mode is difficult for tunnel operation and maintenance, and will directly expose the server address
- The server sends the response packet directly to the user. Therefore, a large amount of data flow of the load balancer is reduced. The load balancer is no longer the bottleneck of the system and can handle a huge amount of requests. In this way, a load balancer can distribute to many servers. And running on the public network can be distributed in different regions
(3)DR mode
- The client sends the request to LVS, and LVS will select a server to respond to the request. When returning the result, it will be returned through a unified route, not through LVS.
- Like the TUN mode, LVS only distributes requests, and the response packets are returned to the client through a separate route. Compared with TUN, this method does not need a tunnel structure and is compatible with most operating systems. At the same time, the unified route can hide the real physical server. DR mode is more efficient, but the configuration is more complex
- All server nodes and LVS can only be in one LAN.
3. Build LVS-DR mode
Close the network configuration manager on the server first to avoid network interface conflict
systemctl stop NetworkManager
systemctl disable NetworkManager
(1) Create sub interface (create virtual ip of LVS)
Enter the network card configuration directory / etc / sysconfig / network scripts /, and find the network card configuration file. Take ifcfg-ens33 as an example, copy and create sub interfaces
cp ifcfg-ens33 ifcfg-ens33:1
Modify the sub interface configuration as follows
- 192.168.1.150 in the configuration is vip, which is the ip address provided for Internet users to access
DEVICE="ens33:1"
ONBOOT="yes"
IPADDR=192.168.1.150
NETMASK=255.255.255.0
BOOTPROTO=static
- service network restart
service network restart
After the restart is successful, check the ip addr and you will find an additional ip, that is, virtual ip (vip)
Note: Alibaba cloud does not support the configuration of network cards, so you need to purchase corresponding load balancing services. Tencent cloud supports the configuration of network cards, but you need to purchase network card support. One network card supports 10 virtual ip configurations
(2) Install ipvsadm
Today's centos are integrated with LVS, so ipvs comes with it. We only need to install ipvsadm (ipvsadm is a tool for managing clusters. Through ipvs, we can manage clusters, view clusters and other operations)
yum install ipvsadm
(3) Configure the virtual ip of the server (RS)
Enter the network card configuration directory / etc / sysconfig / network scripts /, find ifcfg lo, copy and create sub interfaces
cp ifcfg-lo ifcfg-lo:1
Modify the sub interface configuration as follows
DEVICE="lo:1"
IPADDR=192.168.1.150
NETMASK=255.255.255.255
NETWORK=127.0.0.0
BROADCAST=127.255.255.255
ONBOOT="yes"
NAME=loopback
After restarting the network service successfully, check the ip addr. You will find that there is an additional ip, that is, virtual ip (vip)
(4) Configure arp for server (RS)
Description of ARP response level and notification behavior parameters
arp-ignore: ARP Response level (processing request)
    0: As long as the machine is configured ip,You can respond to the request
    1: Only when the target address of the request reaches the corresponding network interface will the request be responded to
arp-announce: ARP Notification behavior (return response)
    0: Any network interface on this machine will announce to the outside, and all network cards can receive the notification
    1: Try to avoid the announcement between this network card and mismatched targets. 2: only announce on this network card
Open sysctl conf:
vim /etc/sysctl.conf
Configure the arp response level and notification behavior of all network cards, default network cards and virtual network cards, corresponding to: all, default, lo
# configration for lvs
net.ipv4.conf.all.arp_ignore = 1
net.ipv4.conf.default.arp_ignore = 1
net.ipv4.conf.lo.arp_ignore = 1

net.ipv4.conf.all.arp_announce = 2
net.ipv4.conf.default.arp_announce = 2
net.ipv4.conf.lo.arp_announce = 2
Refresh profile
sysctl -p
A gateway is added to receive data messages. When there is a request to the local machine, it will be handed over to lo for processing
route add -host 192.168.1.150 dev lo:1
Add gateway to boot
echo "route add -host 192.168.1.150 dev lo:1" >> /etc/rc.local
(4) Configuring cluster rules using ipvsadm
Create an LVS node and the cluster scheduler accessed by the user
ipvsadm -A -t 192.168.1.150:80 -s rr -p 5
- -A: Add cluster
- -t: tcp protocol ip address: set the access of the cluster
- ip: virtual ip of LVS
- -s: Set the load balancing algorithm,
- rr: indicates polling
- -p: Set the connection persistence time. Within the specified time, the requests of the same user will access the same server
Create multiple RS real servers
ipvsadm -a -t 192.168.1.150:80 -r 192.168.1.171:80 -g
ipvsadm -a -t 192.168.1.150:80 -r 192.168.1.172:80 -g
- -a: Add real server
- -t: tcp protocol
- -r: ip address of real server
- -g: Set DR mode
Save to the rule base, otherwise the restart will be invalid
ipvsadm -S
Check cluster
#View cluster list
ipvsadm -Ln
#View cluster status
ipvsadm -Ln --stats
Some other commands
 #Restart ipvsadm and reconfigure it after restart
 service ipvsadm restart
 #View persistent connections
 ipvsadm -Ln --persistent-conn
 #View the expiration time of the connection request and the source ip and destination ip of the request
 ipvsadm -Lnc
 #Set the expiration time of tcp # tcpfin # udp # (generally keep the default)
 ipvsadm --set 1 1 1
 #View expiration time
 ipvsadm -Ln --timeout
(5) Access virtual ip and complete LVS construction
Attachment: LVS load balancing algorithm
(1) Static algorithm
Static: distribute user requests according to the free fixed algorithm of LVS itself.
- Round Robin (abbreviated as' rr '): the polling algorithm assumes that all servers have the same ability to process requests, and the scheduler will distribute all requests equally to each real server. (same as polling of Nginx)
- Weighted round robin (abbreviated as' wrr '): install the weight proportion to allocate user requests. The higher the weight, the more requests are assigned to processing. (same as the weight of Nginx)
- Source Hash (abbreviated as' sh '): the request of the same user IP will be processed by the same RS. (same as ip_hash of Nginx)
- Destination Hash (short for 'dh'): request different RS according to different URLs. (same as the url_hash of Nginx)
(2) Dynamic algorithm
Dynamic: user requests will be allocated according to different traffic or different pressure of the server, which is calculated dynamically.
- Least Connections (abbreviated as' lc '): allocate new connection requests to the server with the smallest number of connections at present.
- Weighted least connections (wlc): the processing performance of the server is represented by a numerical value. The greater the weight, the more requests will be processed. There may be performance differences between real servers. wlc dynamically obtains the load status of different servers and distributes requests to servers with good performance and relatively idle.
- Shortest Expected Delay (abbreviated as' sed '): a special wlc algorithm. For example, suppose there are three ABC servers with weights of 1, 2 and 3 respectively. If the wlc algorithm is used, when a new request comes in, it may be distributed to any one of the ABC. After using sed algorithm, the following operations will be performed:
- A: (1+1)/1=2
- B: (1+2)/2=3/2
- C: (1+3)/3=4/3
In the end, the request will be sent to the server with the smallest calculation result. Least queue scheduling (abbreviated 'nq'): never use a queue. If the number of connections of Real Server is equal to 0, the request will be allocated directly. There is no need to wait in the queue (sed operation).
8, Build a Keepalived+Lvs+Nginx high availability cluster load balancing
If LVS+nginx is configured on the original server, you need to clear the configuration in ipvsadm
ipvsadm -C
If a Keepalived+Nginx dual master cluster is configured, you also need to remove the original configuration in Keepalived and configure it according to the following text
(1) Configure Master LVS with keepalived
Install keepalived on the LVS machine. Refer to the above for the installation process
(1) Modify the configuration of keepalived
global_defs {
    router_id keep_151
}
vrrp_instance VI_1 {
    state MASTER
    interface ens33
    virtual_router_id 41
    priority 100
    advert_int 1
    authentication {
        auth_type PASS
        auth_pass 1111
    }
    virtual_ipaddress {
        192.168.1.150
    }
}

#Configure the ip + port accessed by the cluster, and the port is consistent with nginx
virtual_server 192.168.1.150 80{
    #Time of health examination, in seconds
    delay_loop 6
    #Configure the load balancing algorithm and the default polling
    lb_algo rr
    #Set the mode of LVS | NAT|TUN|DR
    lb-kind DR
    #Set the duration of session persistence
    persistence_timeout 5
    #agreement
    protocol TCP

    #Configure the real server for load balancing, that is, the specific ip address of nginx node
    real_server 192.168.1.171 80{
        #Polling weight ratio
        weight 1
        #Set up health check
        TCP_CHECK {
            #Check port 80
            connect_port 80
            #Timeout
            connect_timeout 2
            #retry count
            nb_get_retry 2
            #Retry interval
            delay_before_retry 3
        }
    }
    real_server 192.168.1.171 80{
        weight 1
        TCP_CHECK {
            connect_port 80
            connect_timeout 2
            nb_get_retry 2
            delay_before_retry 3
        }
    }
}
(2) Start / restart keepalived
systemctl restart keepalived
(2) Configuring Backup LVS with keepalived
Configured on standby machine
global_defs {
    router_id keep_152
}
vrrp_instance VI_1 {
    state  BACKUP
    interface ens33
    virtual_router_id 41
    priority 50
    advert_int 1
    authentication {
        auth_type PASS
        auth_pass 1111
    }
    virtual_ipaddress {
        192.168.1.150
    }
}

#Configure the ip + port accessed by the cluster, and the port is consistent with nginx
virtual_server 192.168.1.150 80{
    #Time of health examination, in seconds
    delay_loop 6
    #Configure the load balancing algorithm and the default polling
    lb_algo rr
    #Set the mode of LVS | NAT|TUN|DR
    lb-kind DR
    #Set the duration of session persistence
    persistence_timeout 5
    #agreement
    protocol TCP

    #Configure the real server for load balancing, that is, the specific ip address of nginx node
    real_server 192.168.1.171 80{
        #Polling weight ratio
        weight 1
        #Set up health check
        TCP_CHECK {
            #Check port 80
            connect_port 80
            #Timeout
            connect_timeout 2
            #retry count
            nb_get_retry 2
            #Retry interval
            delay_before_retry 3
        }
    }
    real_server 192.168.1.171 80{
        weight 1
        TCP_CHECK {
            connect_port 80
            connect_timeout 2
            nb_get_retry 2
            delay_before_retry 3
        }
    }
}