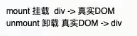
(pay attention to whether I can accept the update push)
I Knowledge supplement
1.1. (understand) this in methods
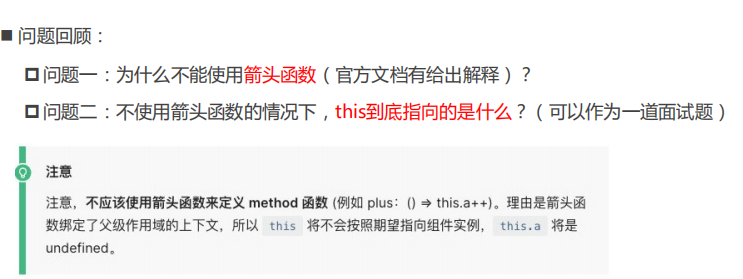
1.1.1. Arrow functions cannot be used
If we want to use data to return the data in the object in methods, this must have a value, and the data in the data return object should be available through this.
So can this be a window?
- It can't be window, because we can't get the data in the data return object in window;
- But if we use the arrow function, this will be window;
Let's look at the following code:
- I replaced increment with an arrow function, so this in it is window when printing;
const App = {
  template: "#my-app",
  data() {
    return {
      counter: 0
    }
  },
  methods: {
    increment: () => {
      // this.counter++;
      console.log(this);
    },
    decrement() {
      this.counter--;
    }
  }
}
Why window?
- Here, the arrow function uses the search rule of this, which will find this in its upper scope;
- Finally, it happens to find this in the script scope, so it is window;
How does this find and bind?
- There is another article in coderwhy's official account, which explains the binding rules of this in detail.
- https://mp.weixin.qq.com/s/hYm0JgBI25grNG_2sCRlTA;
- After careful study, you are absolutely clear about the binding of this;
Small mistakes in this article
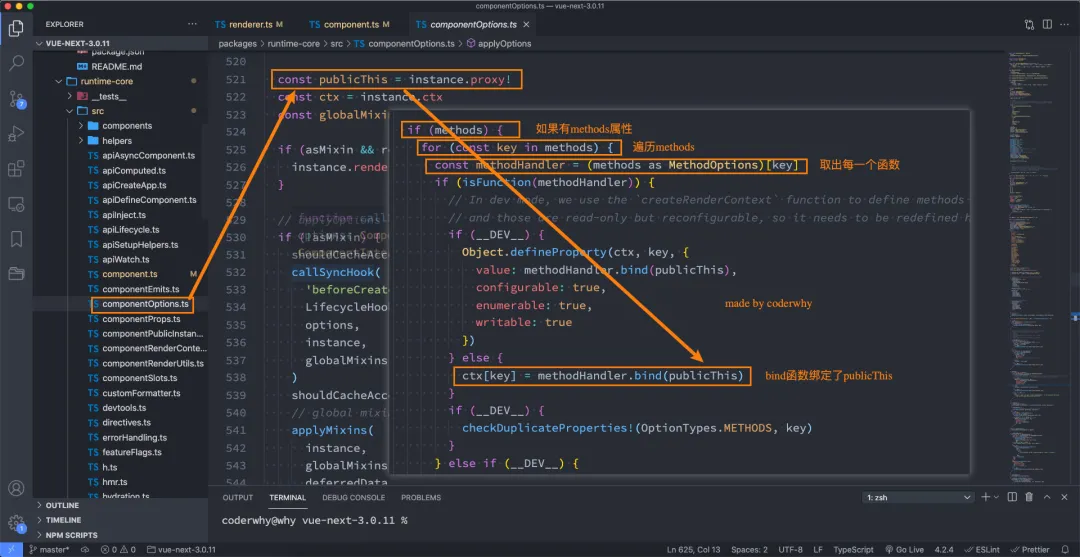
1.1.2. What exactly does this point to
In fact, Vue's source code traverses all functions in methods and binds this through bind:
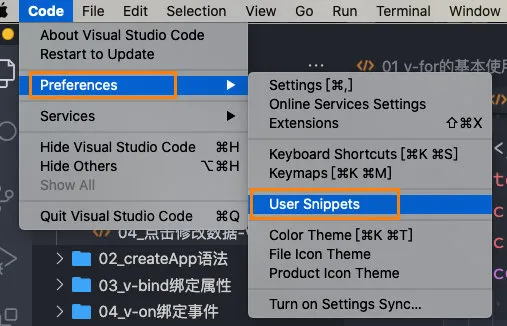
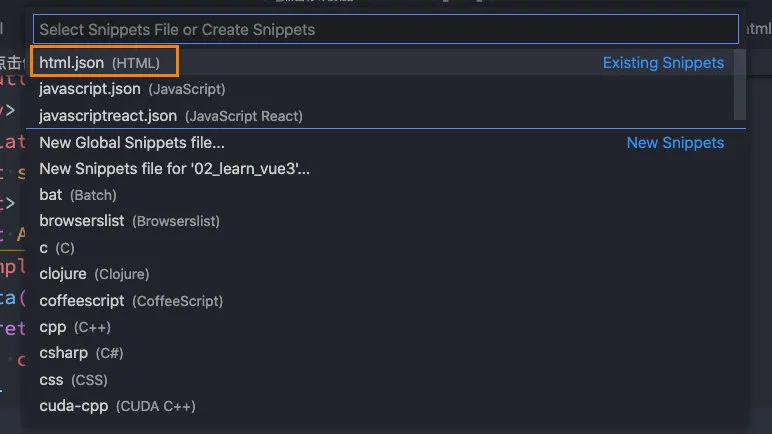
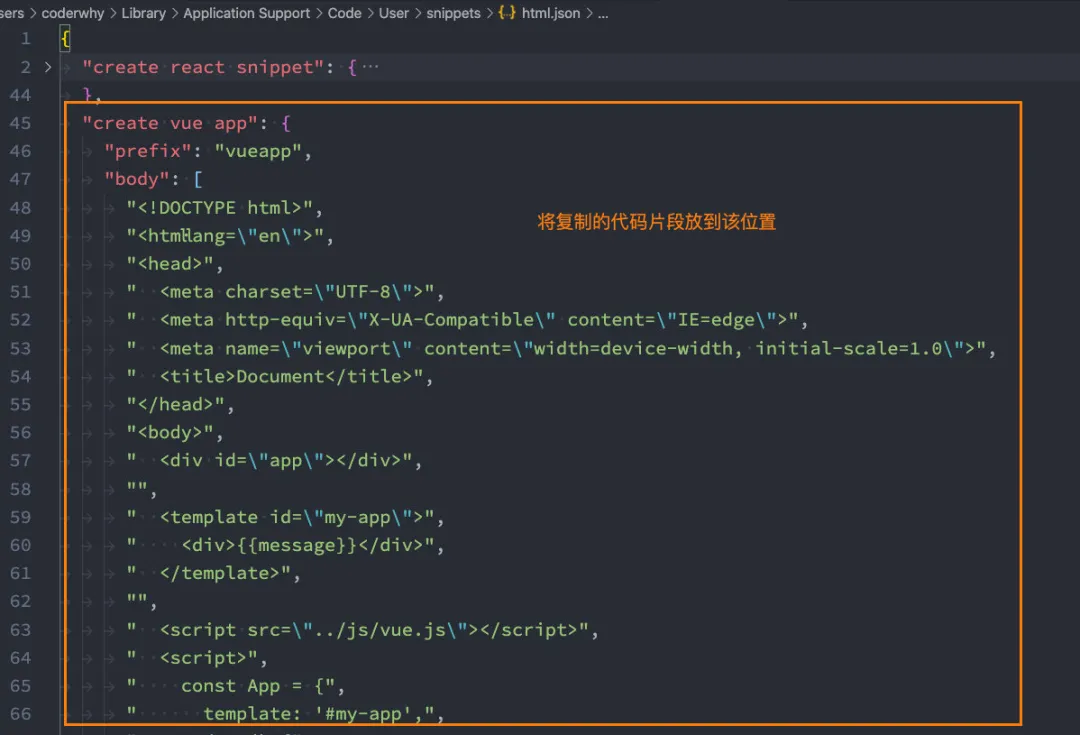
1.2. (understand) adding code snippets to VSCode
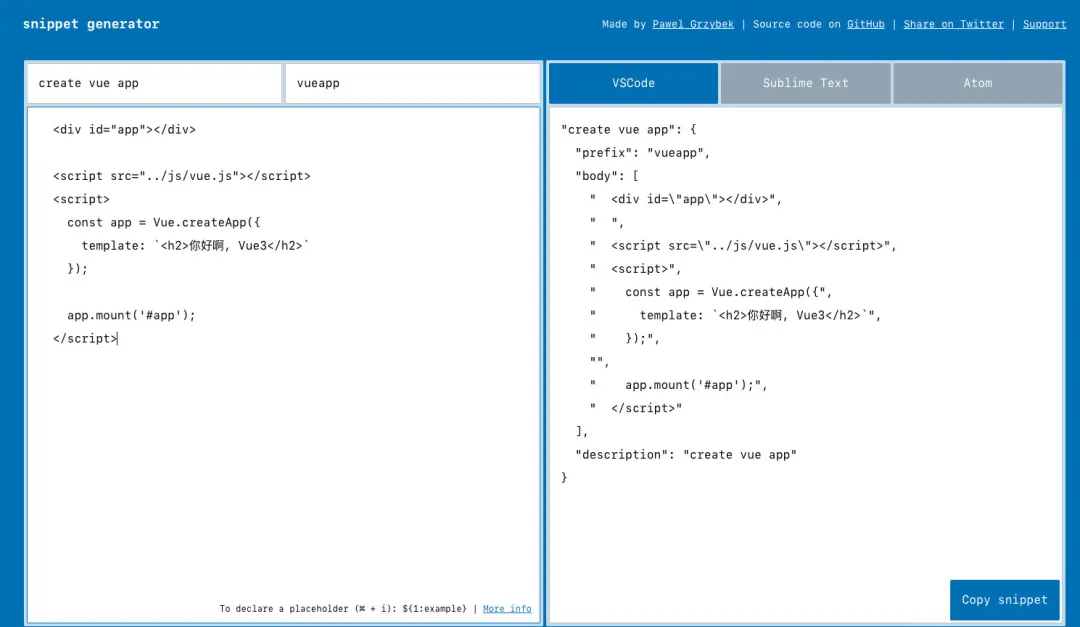
During the previous practice of Vue, some code fragments need to be written frequently. We can generate a code fragment in VSCode to facilitate our rapid generation.
The code fragment in VSCode has a fixed format, so we usually complete it with the help of an online tool.
The specific steps are as follows:
- The first step is to copy the code you need to generate code fragments;
- Step two, https://snippet-generator.app/ Generate code snippets in the website;
- The third step is to generate code fragments in VSCode;
II Template syntax
The development mode of React:
- React uses jsx, so the corresponding code is written with a syntax similar to js;
- Then compile jsx into react. Com through Babel CreateElement function call;
Vue also supports the development mode of jsx (I will talk about it later):
-
However, in most cases, HTML based template syntax is used;
-
In the template, developers are allowed to bind DOM to the data of underlying component instances in a declarative manner;
-
In the underlying implementation, Vue compiles the template into a virtual DOM rendering function, which I will talk about later;
Therefore, learning template syntax is very important for learning Vue.
2.1. (Master) interpolation syntax
2.1.1. mustache grammar
If we want to display the data in the template, the most used syntax is the text interpolation of "Mustache" syntax (double braces)
<div>{{message}}</div>
As we mentioned earlier, the object returned by data is added to Vue's responsive system. When the data in data changes, the corresponding content will also be updated.
Of course, Mustache can be not only an attribute in data, but also a JavaScript expression:
<body>
  <div id="app"></div>

  <template id="my-app">
    <div>
      <!-- mustache Basic use -->
      <h2>{{message}}</h2>
      <!-- JavaScript expression -->
      <h2>{{ counter * 2}}</h2>
      <h2>{{message.split(" ").reverse().join(" ")}}</h2>
      <!-- Call a methods Functions in -->
      <h2>{{reverse(message)}}</h2>
    </div>
  </template>

  <script src="../js/vue.js"></script>
  <script>
    // Create App component
    const App = {
      template: '#my-app',
      data() {
        return {
          message: "Hello World",
          counter: 10,
        }
      },
      methods: {
        reverse(msg) {
          return msg.split(" ").reverse().join(" ")
        }
      }
    }

    // Create the application and mount it
    Vue.createApp(App).mount('#app');
  </script>
</body>
But the following code is wrong:
<!-- Wrong writing -->
<!-- This is an assignment statement, Not an expression -->
<h2>{{var name = "Hello"}}</h2>
<!-- Control flow if Statements are also not supported, You can use ternary operators -->
<h2>{{ if (true) { return message } }}</h2>
Ternary operators are possible:
<!-- Ternary operator  -->
<h2>{{ true ? message: counter }}</h2>
Full code:
  <div id="app"></div>

  <template id="my-app">
    <!-- 1.mustache Basic use of -->
    <h2>{{message}} - {{message}}</h2>
    <!-- 2.Is an expression -->
    <h2>{{counter * 10}}</h2>
    <h2>{{ message.split(" ").reverse().join(" ") }}</h2>
    <!-- 3.You can also call functions -->
    <!-- have access to computed(Calculation properties) -->
    <h2>{{getReverseMessage()}}</h2>
    <!-- 4.Ternary operator  -->
    <h2>{{ isShow ? "Ha ha ha": "" }}</h2>
    <button @click="toggle">switch</button>

    <!-- Incorrect usage -->
    <!-- var name = "abc" -> Assignment statement -->
    <!-- <h2>{{var name = "abc"}}</h2>
    <h2>{{ if(isShow) {  return "Ha ha ha" } }}</h2> -->
  </template>

  <script src="../js/vue.js"></script>
  <script>
    const App = {
      template: '#my-app',
      data() {
        return {
          message: "Hello World",
          counter: 100,
          isShow: true
        }
      },
      methods: {
        getReverseMessage() {
          return this.message.split(" ").reverse().join(" ");
        },
        toggle() {
          this.isShow = !this.isShow;
        }
      }
    }

    Vue.createApp(App).mount('#app');
  </script>
2.1.2. v-once
Used to specify that an element or component is rendered only once:
- When the data changes, the element or component and all its child elements will be regarded as static content and skipped;
- The instruction can be used for performance optimization;
<h2 v-once>Current count: {{counter}}</h2>
<button @click="increment">+1</button>
If it is a child node, it will render only once:
<div v-once>
  <h2>Current count: {{counter}}</h2>
  <button @click="increment">+1</button>
</div>
Full code:
 <div id="app"></div>

  <template id="my-app">
      <!-- Re render -->
    <h2>{{counter}}</h2>
      <!-- No re rendering -->
    <div v-once>
      <h2>{{counter}}</h2>
      <h2>{{message}}</h2>
    </div>
    <button @click="increment">+1</button>
  </template>

  <script src="../js/vue.js"></script>
  <script>
    const App = {
      template: '#my-app',
      data() {
        return {
          counter: 100,
          message: "abc"
        }
      },
      methods: {
        increment() {
          this.counter++;
        }
      }
    }

    Vue.createApp(App).mount('#app');
  </script>
2.1.3. v-text
textContent for updating elements:
<span v-text="msg"></span>
<!-- Equivalent to -->
<span>{{msg}}</span>
2.1.4. v-html
By default, if the content we show is html, vue will not parse it specially.
If we want this content to be parsed by Vue, we can use v-html to display:
<body>
  <div id="app"></div>

  <template id="my-app">
    <div v-html='info'></div>
  </template>

  <script src="../js/vue.js"></script>
  <script>
    const App = {
      template: '#my-app',
      data() {
        return {
          info: `<span style='color: red; font-size: 30px'>Ha ha ha</span>`
        }
      }
    }

    Vue.createApp(App).mount('#app');
  </script>
</body>
2.1.5. v-pre
v-pre is used to skip the compilation process of the element and its child elements and display the original Mustache tag:
- Skip nodes that do not need to be compiled to speed up compilation;
<div v-pre>{{message}}</div>

2.1.6. v-cloak
This instruction remains on the element until the associated component instance finishes compiling.
- When used with CSS rules such as [v-cloak] {display: none}, this instruction can hide the uncompiled Mustache tag until the component instance is ready.
[v-cloak] {
  display: none;
}
<div v-cloak>
  {{ message }}
</div>
< div > will not be displayed until the end of compilation.
2.2. (Master) v-bind
The front-end talks about a series of instructions, which are mainly related to content. In addition to content, elements also have various attributes.
For binding properties, we use v-bind:
- Abbreviation:
- Expected: any (with argument) | Object (without argument)
- Parameter: attrOrProp (optional)
- Modifier:
- . camel - converts the kebab case attribute name to camelCase.
- Usage: dynamically bind one or more attribute s or a component prop to an expression.
2.2.1. Binding basic properties
v-bind is used to bind one or more attribute values, or pass props values to another component (this will be introduced when learning the component);
The syntax of Mustache we talked about earlier is mainly to insert content into innerHTML.
In many cases, the attributes of elements are also dynamic:
- For example, the href attribute of a element and the src attribute of img element;
  <div id="app"></div>

  <!-- vue2 template There can only be one root element in a template -->
  <!-- vue3 Is allowed template There are multiple root elements in -->
  <template id="my-app">
    <!-- 1.v-bind Basic use of -->
    <img v-bind:src="imgUrl" alt="">
    <a v-bind:href="link">use Baidu Search</a>

    <!-- 2.v-bind Provide a syntax sugar : -->
    <img :src="imgUrl" alt="">
    <img src="imgUrl" alt="">
  </template>

  <script src="../js/vue.js"></script>
  <script>
    const App = {
      template: '#my-app',
      data() {
        return {
          imgUrl: "https://avatars.githubusercontent.com/u/10335230?s=60&v=4",
          link: "https://www.baidu.com"
        }
      }
    }

    Vue.createApp(App).mount('#app');
  </script>
2.2.2. Bind class attribute
Object syntax
We can pass: class (v-bind: short for class) an object to dynamically switch classes.
 <div id="app"></div>

  <template id="my-app">
    <!-- 1.Common binding method -->
    <div :class="className">{{message}}</div>
    <!-- 2.Object binding -->
    <!-- Dynamic switching class Join: {class(variable): boolean(true/false)} -->
    <div class="why" :class="{nba: true, 'james': true}"></div>
    <!-- Case exercise -->
    <div :class="{'active': isActive}">Ha ha ha</div>
    <button @click="toggle">switch</button>
    <!-- Binding object -->
    <div :class="classObj">Ha ha ha</div>
    <!-- from methods Get in -->
    <div :class="getClassObj()">Interesting</div>
  </template>

  <script src="../js/vue.js"></script>
  <script>
    const App = {
      template: '#my-app',
      data() {
        return {
          message: "Hello World",
          className: "why",
          nba: 'kobe',
          isActive: false,
          classObj: {
            why: true,
            kobe: true,
            james: false
          }
        }
      },
      methods: {
        toggle() {
          this.isActive = !this.isActive;
        },
        getClassObj() {
          return {
            why: true,
            kobe: true,
            james: false
          }
        }
      }
    }

    Vue.createApp(App).mount('#app');
  </script>
Array syntax:
We can pass an array to: class to apply a class list;
  <div id="app"></div>

  <template id="my-app">
    <!-- 1.Pass in an array directly -->
    <div :class="['abc', title]">Ha ha ha ha</div>
    <!-- 2.Ternary operators or bound variables can also be used in arrays -->
    <div :class="['abc', title, isActive ? 'active': '']">Ha ha ha ha</div>
    <!-- 3.You can also use (nested) object syntax in arrays -->
    <div :class="['abc', title, {active: isActive}]">Ha ha ha ha</div>
  </template>

  <script src="../js/vue.js"></script>
  <script>
    const App = {
      template: '#my-app',
      data() {
        return {
          message: "Hello World",
          title: "cba",
          isActive: true
        }
      }
    }

    Vue.createApp(App).mount('#app');
  </script>
2.2.3. Bind style attribute
Object syntax:
- : style's object syntax is very intuitive - it looks very much like CSS, but it's actually a JavaScript object.
- CSS property names can be named with camel case or kebab case
  <div id="app"></div>

  <template id="my-app">
    <!-- :style="{cssPropertyName: cssPropertyValue}" -->
    <div :style="{color: finalColor, 'font-size': '30px'}">Ha ha ha ha</div>
    <div :style="{color: finalColor, fontSize: '30px'}">Ha ha ha ha</div>
    <div :style="{color: finalColor, fontSize: finalFontSize + 'px'}">Ha ha ha ha</div>

    <!-- Bind one data Attribute values in, And is an object -->
    <div :style="finalStyleObj">Hehe hehe</div>
    <!-- Call a method -->
    <div :style="getFinalStyleObj()">Hehe hehe</div>
  </template>

  <script src="../js/vue.js"></script>
  <script>
    const App = {
      template: '#my-app',
      data() {
        return {
          message: "Hello World",
          finalColor: 'red',
          finalFontSize: 50,
          finalStyleObj: {
            'font-size': '50px',
            fontWeight: 700,
            backgroundColor: 'red'
          }
        }
      },
      methods: {
        getFinalStyleObj() {
          return {
            'font-size': '50px',
            fontWeight: 700,
            backgroundColor: 'red'
          }
        }
      }
    }

    Vue.createApp(App).mount('#app');
  </script>
Array syntax:
- : style's array syntax can apply multiple style objects to the same element;
<div id="app"></div>

  <template id="my-app">
    <div :style="[styleObj1, styleObj2]">{{message}}</div>
  </template>

  <script src="../js/vue.js"></script>
  <script>
    const App = {
      template: '#my-app',
      data() {
        return {
          message: "Hello World",
          size: 50,
          styleObj1: {
            color: 'red',
            fontSize: '50px',
            'background-color': 'blue'
          },
          styleObj2: {
            textDecoration: 'underline',
            fontWeight: 700
          }
        }
      }
    }

    Vue.createApp(App).mount('#app');
  </script>
2.2.4. Dynamic binding properties
In some cases, the name of our attribute may not be fixed:
- In the front end, the attribute names are fixed regardless of the binding src, href, class and style;
- If the attribute name is not fixed, we can define it in the format of [attribute name] = "value";
- This binding method is called dynamic binding attribute;
  <div id="app"></div>

  <template id="my-app">
    <!-- Property names and values are dynamic -->
    <div :[name]="value">Ha ha ha</div>
  </template>

  <script src="../js/vue.js"></script>
  <script>
    const App = {
      template: '#my-app',
      data() {
        return {
          name: "cba",
          value: "kobe"
        }
      }
    }

    Vue.createApp(App).mount('#app');
  </script>
2.2.5. Bind an object
If we want to bind all the attributes of an object to all the attributes on the element, what should we do?
- Very simple, we can directly bind an object with v-bind;
- info object will be disassembled into various attributes of div;
  <div id="app"></div>

  <template id="my-app">
    <div v-bind="info">Ha ha ha ha</div>
    <div :="info">Ha ha ha ha</div>
  </template>

  <script src="../js/vue.js"></script>
  <script>
    const App = {
      template: '#my-app',
      data() {
        return {
          info: {
            name: "why",
            age: 18,
            height: 1.88
          }
        }
      }
    }

    Vue.createApp(App).mount('#app');
  </script>
2.3. (Master) v-on
Previously, we bound the content and attributes of elements. Another very important feature in front-end development is interaction.
In front-end development, we need to often interact with users in various ways:
-
At this time, we must monitor the user's occurrence time, such as click, drag, keyboard events and so on
-
How to listen for events in Vue? Using the v-on instruction
Use of v-on: -
Abbreviation:@
-
Expected: Function | Inline Statement | Object
-
Parameter: event
-
Modifier:
- . stop - call event stopPropagation().
- . prevent - call event preventDefault().
- . capture - use capture mode when adding event listeners.
- . self - the callback is triggered only when the event is triggered from the element bound by the listener itself.
- . {keyAlias} - the callback is triggered only if the event is triggered from a specific key.
- . once - only one callback is triggered.
- . left - triggered only when the left mouse button is clicked.
- . right - triggered only when the right mouse button is clicked.
- . middle - triggered only when the middle mouse button is clicked.
- . passive - {passive: true} mode add listener
-
Usage: binding event listening
Case drill:
<div id="app"></div>

  <template id="my-app">
    <div>{{message}}</div>
    <!-- Basic use -->
    <!-- 1.Binding function -->
    <button v-on:click="btnClick">Button 1</button>
    <button @click="btnClick">Button 2</button>
    <div v-on:mousemove="mouseMove">div Region of</div>

    <!-- 2.Binding object -->
    <button v-on="{click: btnClick, mousemove: mouseMove}">Special button 3</button>

    <!-- 3.Inline statement -->
    <!-- By default event Object incoming -->
    <button @click="btn4Click">Button 4</button>
    <!-- Inline statement passing in other properties -->
    <button @click="btn4Click($event, 'why')">Button 5</button>

    <!-- 4.Modifier  -->
    <div @click="divClick">
      <button @click.stop="btnClick">Button 6</button>
    </div>
    <input type="text" @keyup.enter="onEnter">

  </template>

  <script src="../js/vue.js"></script>
  <script>
    const App = {
      template: '#my-app',
      data() {
        return {
          message: "Hello World"
        }
      },
      methods: {
        btnClick() {
          console.log("The button was clicked");
        },
        btn4Click(event) {
          console.log(event);
        },
        btn4Click(event, message) {
          console.log(event, message);
        },
        mouseMove() {
          console.log("Mouse movement");
        },
        divClick() {
          console.log("divClick");
        },
        onEnter(event) {
          console.log(event.target.value);
        }
      }
    }

    Vue.createApp(App).mount('#app');
  </script>
2.4. (Master) conditional rendering
In some cases, we need to decide whether to render some elements or components according to the current conditions. At this time, we need to judge the conditions.
Vue provides the following instructions to judge conditions:
- v-if
- v-else
- v-else-if
- v-show
Now let's learn from them
2.4.1. v-if,v-else,v-else-if
v-if, v-else and v-else-if are used to render the content of a block according to conditions:
- These contents will be rendered only when the condition is true;
- These three instructions are similar to the conditional statements if, else and else if of JavaScript;
<!-- vue3 in, template It is no longer required that there must be only one root element -->
    <div id="app"></div>

  <template id="my-app">
    <input type="text" v-model="score">
    <h2 v-if="score > 90">excellent</h2>
    <h2 v-else-if="score > 60">good</h2>
    <h2 v-else>fail,</h2>
  </template>

  <script src="../js/vue.js"></script>
  <script>
    const App = {
      template: '#my-app',
      data() {
        return {
          score: 95
        }
      }
    }

    Vue.createApp(App).mount('#app');
  </script>
Rendering principle of v-if:
- v-if is inert;
- When the condition is false, the judged content will not be rendered or destroyed at all;
- When the condition is true, the content in the condition block will be truly rendered;
2.4.2. template element
Because v-if is an instruction, it must be added to an element:
- But what if we want to switch between multiple elements?
- At this point, we render the div, but we don't want the div element to be rendered;
- At this time, we can choose to use template;
The template element can be used as an invisible package element and used on v-if, but the final template will not be rendered:
- It's a bit like a block in an applet
  <div id="app"></div>

  <template id="my-app">
    <template v-if="isShowHa">
      <h2>Ha ha ha ha</h2>
      <h2>Ha ha ha ha</h2>
      <h2>Ha ha ha ha</h2>
    </template>

    <template v-else>
      <h2>Hehe hehe</h2>
      <h2>Hehe hehe</h2>
      <h2>Hehe hehe</h2>
    </template>
  </template>

  <script src="../js/vue.js"></script>
  <script>
    const App = {
      template: '#my-app',
      data() {
        return {
          isShowHa: true
        }
      }
    }

    Vue.createApp(App).mount('#app');
  </script>
2.4.3. v-show
The usage of v-show and v-if seems to be the same:
<div id="app"></div>

  <template id="my-app">
    <h2 v-show="isShow">Ha ha ha ha</h2>
  </template>

  <script src="../js/vue.js"></script>
  <script>
    const App = {
      template: '#my-app',
      data() {
        return {
          isShow: true
        }
      }
    }

    Vue.createApp(App).mount('#app');
  </script>
2.4.4. Difference between v-show and v-if
First, the differences in usage:
- v-show does not support template;
- v-show cannot be used with v-else;
Secondly, the essential difference:
- Whether the v-show element needs to be displayed on the browser or not, its DOM is actually rendered, which is only switched through the display attribute of CSS;
- v-if when the condition is false, the corresponding native root will not be rendered into the DOM;
How to choose in development?
If our native requires frequent switching between display and hiding, use v-show;
If switching does not occur frequently, use v-if;
2.5. List rendering
In real development, we often get a set of data from the server and need to render it.
- At this time, we can use v-for to complete;
- v-for is similar to the for loop of JavaScript, which can be used to traverse a set of data;
2.5.1. (Master) basic use of v-for
The basic format of v-for is "item in array":
- Arrays are usually from data or prop, or in other ways;
- item is an alias we give to each element, which can be defined by ourselves;
 <template id="my-app">
    <h2>Movie list</h2>
    <ul>
      <li v-for="item in movies">{{item}}</li>
    </ul>
  </template>
We know that when traversing an array, we often need to get the index of the array:
- If we need an index, we can use the format: "(item, index) in array";
- Note the above order: the array element item item is in the front, and the index item index is in the back;
 <template id="my-app">
    <h2>Movie list</h2>
    <ul>
      <li v-for="(item, index) in movies">{{index}}-{{item}}</li>
    </ul>
  </template>
2.5.2. (Master) v-for support types
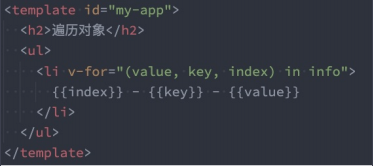
v-for also supports traversal of objects, and supports one, two or three parameters:
- One parameter: "value in object";
- Two parameters: "(value, key) in object";
- Three parameters: "(value, key, index) in object";
  <template id="my-app">
    <h2>Traversal object</h2>
    <ul>
      <li v-for="(value, key, index) in info">
        {{index}} - {{key}} - {{value}}
      </li>
    </ul>
  </template>
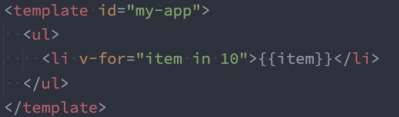
- v-for also supports the traversal of numbers:
- Every item is a number;
Complete code
 <div id="app"></div>

  <template id="my-app">
    <h2>Movie list</h2>
    <ul>
      <!-- Traversal array -->
      <li v-for="(movie, index) in movies">{{index+1}}.{{movie}}</li>
    </ul>
    <h2>personal information</h2>
    <ul>
      <!-- Traversal object -->
      <li v-for="(value, key, index) in info">{{value}}-{{key}}-{{index}}</li>
    </ul>
    <h2>Traversal number</h2>
    <ul>
      <li v-for="(num, index) in 10">{{num}}-{{index}}</li>
    </ul>
  </template>

  <script src="../js/vue.js"></script>
  <script>
    const App = {
      template: '#my-app',
      data() {
        return {
          movies: [
            "Interstellar crossing",
            "Inception",
            "Westward Journey",
            "godfather",
            "Juvenile school"
          ],
          info: {
            name: "why",
            age: 18,
            height: 1.88
          }
        }
      }
    }

    Vue.createApp(App).mount('#app');
  </script>
2.5.3. template element
Similar to v-if, you can use the template element to cycle through a piece of content containing multiple elements:
- We use template to wrap multiple elements instead of div;
 <div id="app"></div>

  <template id="my-app">
    <ul>
      <template v-for="(value, key) in info">
        <li>{{key}}</li>
        <li>{{value}}</li>
        <hr>
      </template>
    </ul>
  </template>

  <script src="../js/vue.js"></script>
  <script>
    const App = {
      template: '#my-app',
      data() {
        return {
          info: {
            name: 'why',
            age: 18,
            height: 1.88
          }
        }
      }
    }

    Vue.createApp(App).mount('#app');
  </script>
2.5.4. Array update detection
Vue wraps the change method of the array being listened on, so they will also trigger view updates. These wrapped methods include:
- push()
- pop()
- shift()
- unshift()
- splice()
- sort()
- reverse()
  <div id="app"></div>

  <template id="my-app">
    <h2>Movie list</h2>
    <ul>
      <li v-for="(movie, index) in movies">{{index+1}}.{{movie}}</li>
    </ul>
    <input type="text" v-model="newMovie">
    <button @click="addMovie">Add movie</button>
  </template>

  <script src="../js/vue.js"></script>
  <script>
    const App = {
      template: '#my-app',
      data() {
        return {
          newMovie: "",
          movies: [
            "Interstellar crossing",
            "Inception",
            "Westward Journey",
            "godfather",
            "Juvenile school"
          ]
        }
      },
      methods: {
        addMovie() {
          this.movies.push(this.newMovie);
          this.newMovie = "";

          // this.movies = this.movies.filter(item => item.length > 2);
        }
      }
    }

    Vue.createApp(App).mount('#app');
  </script>
Method of replacing array
The above method will directly modify the original array, but some methods will not replace the original array, but will generate new arrays, such as filter(), concat(), slice().
const nums = [10, 21, 34, 6];
const newNums = nums.filter(num => num % 2 === 0);
console.log(newNums);
2.6. key and diff algorithm
2.6.1. (understand) know VNode and VDOM
When using v-for for list rendering, we usually bind a key attribute to an element or component.
What is the function of this key attribute? Let's first look at the official explanation:
The key attribute is mainly used in Vue's virtual DOM algorithm to identify VNodes when comparing old and new nodes;
- If the key is not used, Vue will use an algorithm that minimizes dynamic elements and tries to modify / reuse elements of the same type in place as much as possible;
- When using the key, it will rearrange the element order based on the change of the key, and remove / destroy the elements that do not exist in the key;
The official explanation is not easy to understand for beginners, such as the following questions:
- What are old and new nodes and VNode?
- How to try to modify and reuse when there is no key?
- When there are keys, how to rearrange them based on keys?
Let's first explain the concept of VNode:
- At present, we do not have a relatively complete concept of learning components, so we first understand the VNode created by HTML elements;
- The full name of VNode is Virtual Node, that is, Virtual Node;
In fact, both components and elements are ultimately represented in Vue as vnodes; - The essence of VNode is a JavaScript object;
<div class="title" style="font-size: 30px; color: red;">Ha ha ha</div>
In our Vue, it will be transformed to create a VNode object:
const vnode = {
  type: 'div',
  props: {
    'class': 'title',
    style: {
      'font-size': '30px',
      color: 'red'
    }
  },
  children: 'Ha ha ha'
}
After getting the vnode object, Vue will process the vnode and render it into a real DOM.
- In this part, I will specifically read the createApp function with you later;

If we are not just a simple div, but have a lot of elements, they should form a VNode Tree:
<div>
  <p>
    <i>Ha ha ha ha</i>
    <i>Ha ha ha ha</i>
  </p>
  <span>Hee hee hee</span>
  <strong>Hehe hehe</strong>
</div>
What does this have to do with our key?
- Next, we will make a specific analysis;
Note:
- DOM is a tree, and node is the node of the tree
- Why not render to real DOM? For cross platform and high performance
2.6.2. (understand) key function and diff algorithm
diff=different
Let's start with an example:
This example is that when I click the button, an f will be inserted in the middle;
 <div id="app"></div>

  <template id="my-app">
    <ul>
      <li v-for="item in letters">{{item}}</li>
    </ul>
    <button @click="insertF">insert f</button>
  </template>

  <script src="../js/vue.js"></script>
  <script>
    const App = {
      template: '#my-app',
      data() {
        return {
          letters: ['a', 'b', 'c', 'd']
        }
      },
      methods: {
        insertF() {
          this.letters.splice(2, 0, 'f');
        }
      }
    }

    Vue.createApp(App).mount('#app');
  </script>
Insert scheme for F
- Replace all arrays with new ones when they are updated
- a. B remains unchanged. Replace c with f, d with C, and add a D element
- If other elements remain unchanged and f is inserted directly in the middle, diff algorithm is required. (for the scheme with the highest performance, the performance of the above two schemes is lower)
We can be sure that this update does not need to be updated for ul and button. What needs to be updated is our list of li:
- In Vue, the entire list is not re rendered for child element nodes of the same parent element;
- Because there is no change for a, b, c and d in the list;
- When operating the real DOM, we only need to insert a li of f in the middle;
So how does Vue update the list?
- Vue actually calls two different methods for having a key and not having a key;
- If there is a key, use the patchKeyedChildren method;
- If there is no key, use the patchUnkeyedChildren method;
2.6.3. (understood) there is no key to perform the operation
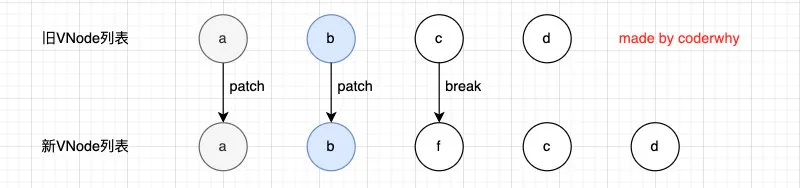
The source code corresponding to no key is as follows:
Its process drawing is the following operations:
We will find that the above diff algorithm is not efficient:
- c and d, in fact, they do not need any changes;
- However, because our c is used by f, all subsequent contents must be changed at one time and added at last;
2.6.4. (understand) there are key s to perform operations
If there is a key, what operations will be performed?
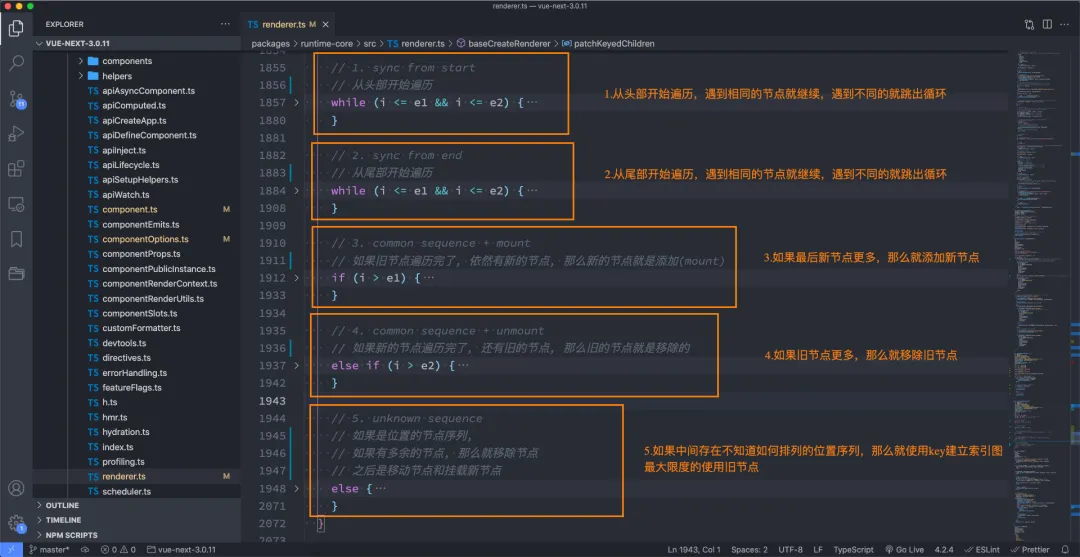
Patch - > If n1 exists, update it
Patch - > null, mount operation
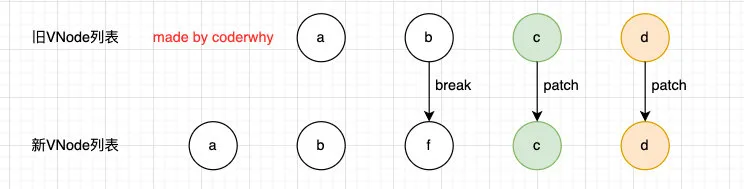
The first step is to traverse and compare from the beginning:
- a and b are consistent and will continue to be compared;
- Because the key s of c and f are inconsistent, they will break out of the loop;
The second step is to traverse and compare from the tail:
The third step is to add a new node if the old node is traversed but there are still new nodes:
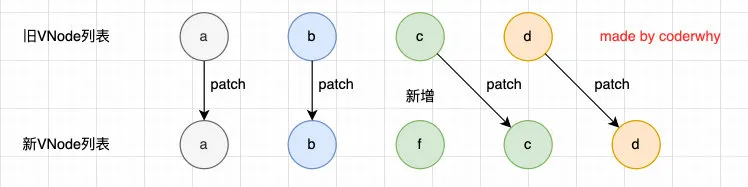
The fourth step is to remove the old node if the new node is traversed but there are still old nodes:
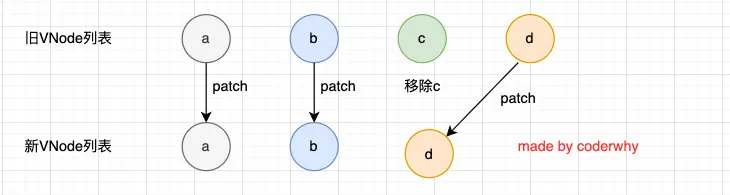
The fifth step is the most characteristic case. There are many unknown or disordered nodes in the middle:
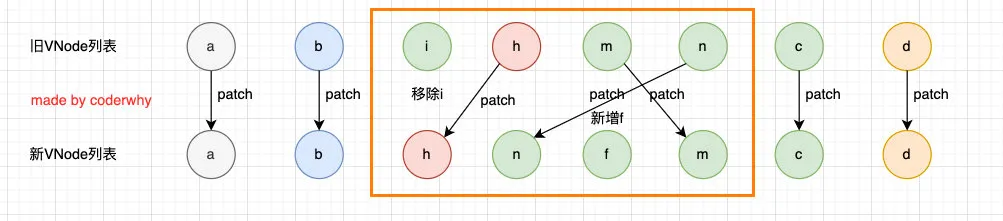
Therefore, we can find that Vue will try to use our key to optimize the diff algorithm:
- When there is no key, our efficiency is very inefficient;
- When inserting or resetting the order, keeping the same key can make the diff algorithm more efficient;