ubuntu 18.04 reproducing OpenPCDet
preface:
I've installed NVIDIA 460 91.03 driver, and cuda 10.1 is also installed.
However, because spconv (giant pit Library) needs to be installed in OpenPCDet, cuda above 10.2 can only pip install spconv of version 2.0, otherwise the old version of spconv is too difficult to install (countless pits). Therefore, in order to avoid spconv being too difficult to install, I choose to use a higher version of cuda. Wouldn't it be nice to directly pip in the subsequent configuration environment?
So the first step is to install / switch multiple versions of cuda (careful reference for non multiple versions of cuda!)
- Download cuda run file of version 11.1( Official download website (there are many other versions)
wget https://developer.download.nvidia.com/compute/cuda/11.1.0/local_installers/cuda_11.1.0_455.23.05_linux.run
sudo sh cuda_11.1.0_455.23.05_linux.run
(one more word, if wget doesn't want to use it, you can directly put it after wget (i.e https://developer.download.nvidia.com/compute/cuda/11.1.0/local_installers/cuda_11.1.0_455.23.05_linux.run )Copy your web address to the browser and you can download it. This method is suitable for any wget (download with website)
Then install cuda version 11.1. First in sudo sh cuda_ 11.1.0_ 455.23.05_ linux. Enter accept after run, and then select continue to enter the installation option cuda installer
Where X represents selection, press enter to cancel and X disappears (i.e. no selection).
Because I have installed the driver, I don't choose the driver option. I choose all the others. Then I choose install to install it. It will be installed in a moment.
Cuda11 1 is installed, and then at ~ / Add path in bashrc
If only one version is installed, the path is added as follows:
export LD_LIBRARY_PATH=/usr/local/cuda-10.1/lib64:$LD_LIBRARY_PATH
export PATH=/usr/local/cuda-10.1/bin:$PATH
export CUDA_HOME=/usr/local/cuda-10.1
If there are multiple versions, it needs to be written in another way, as follows:
export CUDA_HOME=/usr/local/cuda
export PATH=$PATH:$CUDA_HOME/bin
export LD_LIBRARY_PATH=/usr/local/cuda/lib64${LD_LIBRARY_PATH:+:${LD_LIBRARY_PATH}}
But after nvcc -V, it is still 10.1. This is because the soft connection has not changed, so the next step is to change the soft connection.
sudo rm -rf /usr/local/cuda                                      #Delete previously created soft links
sudo ln -s /usr/local/cuda-11.1  /usr/local/cuda      #Create soft link for new cuda
At this time, another terminal nvcc -V will become cuda11 1.
Then install cudnn( cudnn official download address)
Then select the version that matches the CUDA version, here because I want to create cuda11 1 install cudnn, so I chose cudnn-11.1-linux-x64-v8 0.5.39. tgz
Unzip after downloading:
tar zxvf cudnn-11.1-linux-x64-v8.0.5.39.tgz
Then there is:
sudo cp include/cudnn*.h /usr/local/cuda/include/
sudo cp lib64/lib* /usr/local/cuda/lib64/
Then establish the soft connection of cudnn
cd /usr/local/cuda/lib64/
sudo chmod +r libcudnn.so.8.0.5
sudo ln -sf libcudnn.so.8.0.5 libcudnn.so.8
sudo ln -sf libcudnn.so.8 libcudnn.so
sudo ldconfig
If there are the following errors:
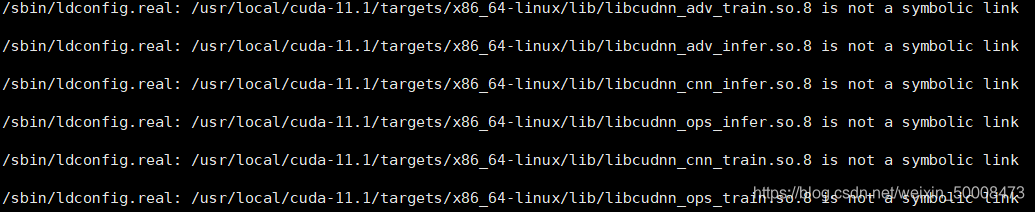 Borrow someone else's Tuha, I forgot my own screenshot!
terms of settlement:
For files that are not symbolic links, do the following:
sudo mv /usr/local/cuda-11.1/targets/x86_64-linux/lib/libcudnn_adv_train.so.8 /usr/local/cuda-11.1/targets/x86_64-linux/lib/libcudnn_adv_train.so.8.org

udo mv /usr/local/cuda-11.1/targets/x86_64-linux/lib/libcudnn_adv_infer.so.8 /usr/local/cuda-11.1/targets/x86_64-linux/lib/libcudnn_adv_infer.so.8.org

sudo mv /usr/local/cuda-11.1/targets/x86_64-linux/lib/libcudnn_cnn_infer.so.8 /usr/local/cuda-11.1/targets/x86_64-linux/lib/libcudnn_cnn_infer.so.8.org

sudo mv /usr/local/cuda-11.1/targets/x86_64-linux/lib/libcudnn_ops_infer.so.8 /usr/local/cuda-11.1/targets/x86_64-linux/lib/libcudnn_ops_infer.so.8.org

sudo mv /usr/local/cuda-11.1/targets/x86_64-linux/lib/libcudnn_ops_train.so.8 /usr/local/cuda-11.1/targets/x86_64-linux/lib/libcudnn_ops_train.so.8.org

sudo mv /usr/local/cuda-11.1/targets/x86_64-linux/lib/libcudnn_cnn_train.so.8 /usr/local/cuda-11.1/targets/x86_64-linux/lib/libcudnn_cnn_train.so.8.org
Then sudo ldconfig will be OK.
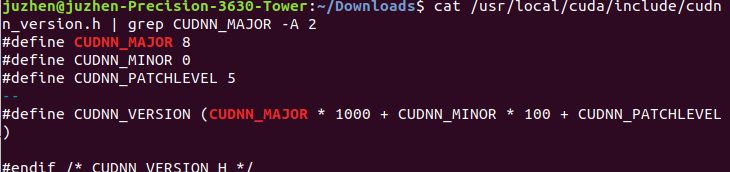
Then check cudnn version:
cat /usr/include/cudnn_version.h | grep CUDNN_MAJOR -A 2
But here comes the question:

The solution is to check the cudnn version correctly with the following command:
cat /usr/local/cuda/include/cudnn_version.h | grep CUDNN_MAJOR -A 2
So far, the coexistence / switching of multiple versions of cuda has been completed.
The OpenPCDet environment will be configured later
 1. Create a virtual environment
conda create -n pcdet python=3.7
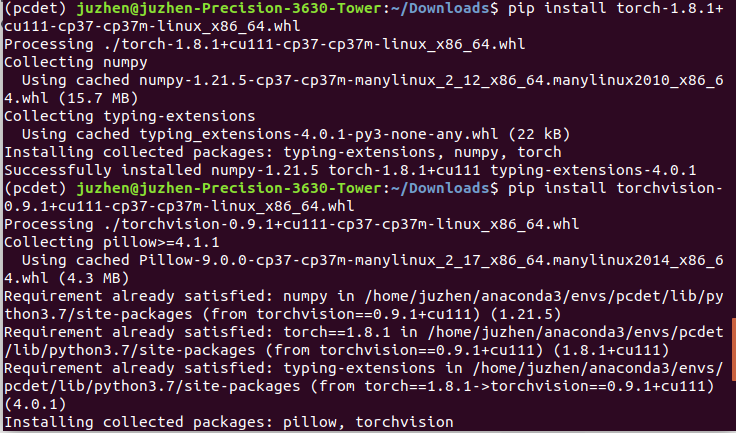
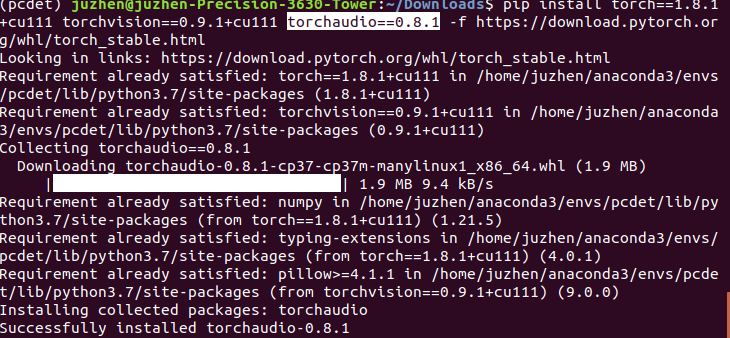
Install pytorch/torchvision and torchaudio
(note the version matching problem. The version I use is also pasted with: torch 1.8.1 + Cu111 torch vision 0.9.1 + Cu111 torch audio = = 0.8.1):
whl wheel download address Recommended
Official website download address (however, this method is very slow to download, which is extremely slow. The first method is recommended)
I use whl to install them. Find the matching version of torch and torch vision in the whl wheel download address, and then cd them to the download directory pip to install them
Then install torchaudio==0.8.1 (because I don't see it, I'm laughing to death, maybe I'm small eyed!)
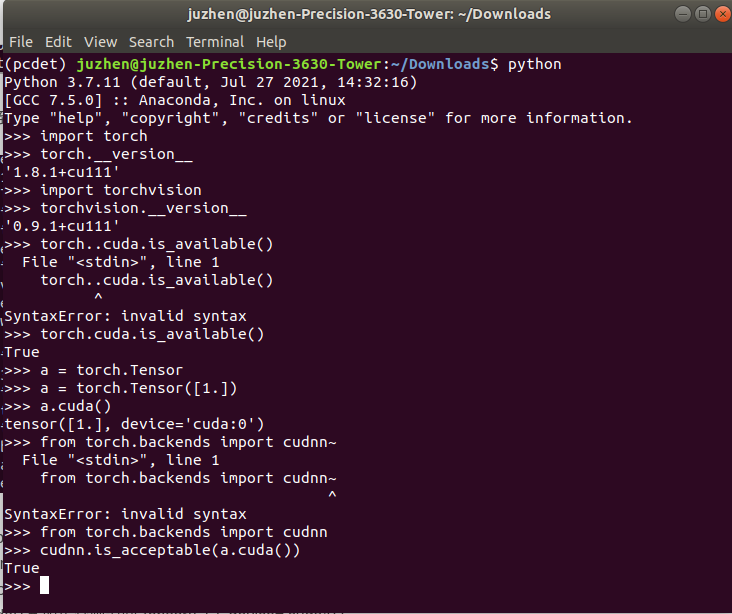
Then verify the success and availability:
python
import torch    # Silence if normal
torch.__version__ #View torch version
import torchvision
 torchvision.__version__ #View torch vision version
 torch.cuda.is_available() #Return "True" if normal
a = torch.Tensor([1.])    # Silence if normal
a.cuda()    # If normal, return to "tensor ([1.]), device='cuda:0')"
from torch.backends import cudnn # Silence if normal
cudnn.is_acceptable(a.cuda())    # Return "True" if normal
Then it's the highlight!!!! Install spconv!!!
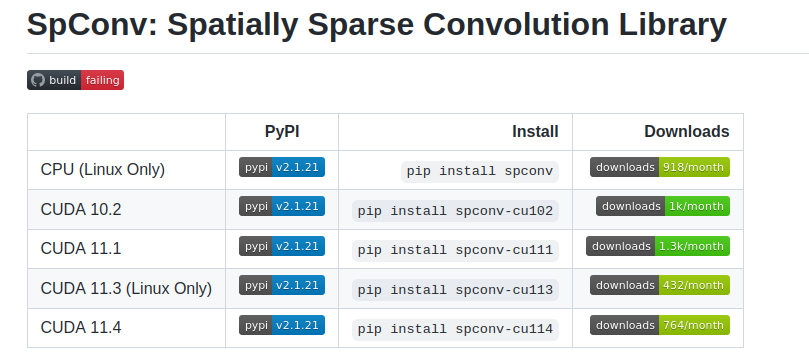
As we mentioned earlier, cuda above 10.2 can install spconv directly from pip as follows:
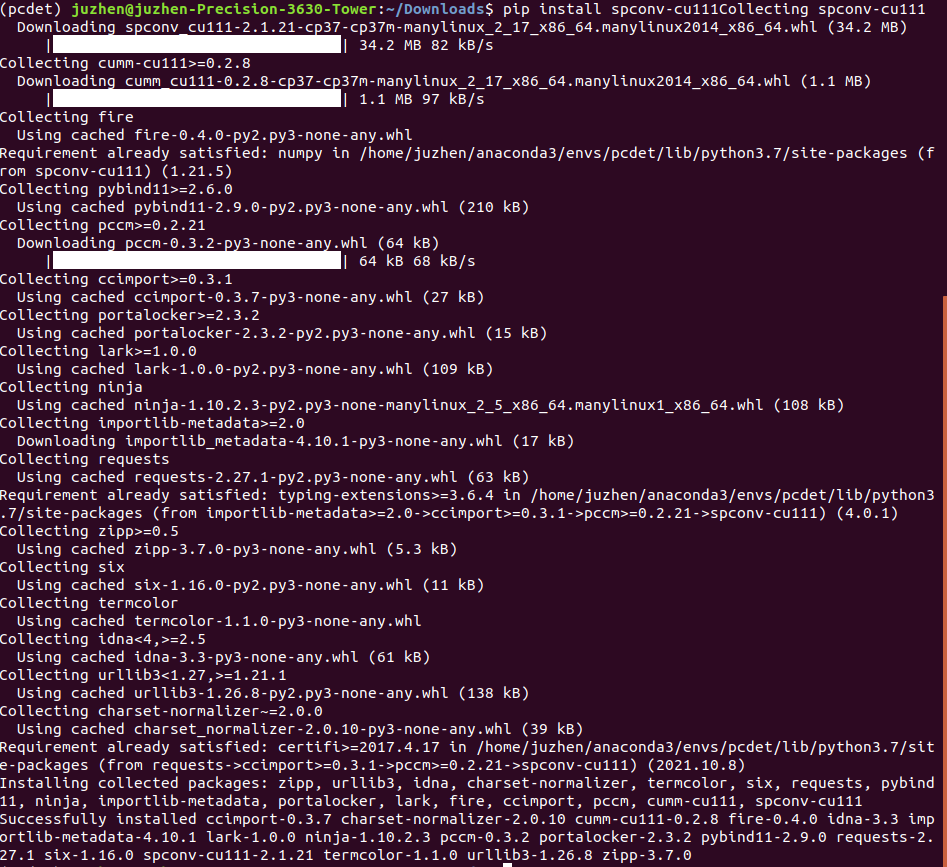
pip install spconv-cu111 #My cuda is 11.1. I choose the spconv version according to the cuda version
Installation completed (isn't it easy? Hahaha!)
Then verify that the installed spconv works:

Ha ha, no mistake!!!
So far, a small part of OpenPCDet is still OK.
Clone OpenPCDet
git clone https://github.com/open-mmlab/OpenPCDet.git
Then install the pcdet library and some dependencies.
python setup.py develop
It will take some time. Scikit image llvmlite is difficult to download (it should be the reason of the Internet, and scientific Internet access should be easy to solve), it is easy to make mistakes (I tried twice and timeout), and the solution (take scikit image as an example, others are the same):

Open the website circled above, then download locally (it's really slow, it took more than ten minutes), and install offline after downloading
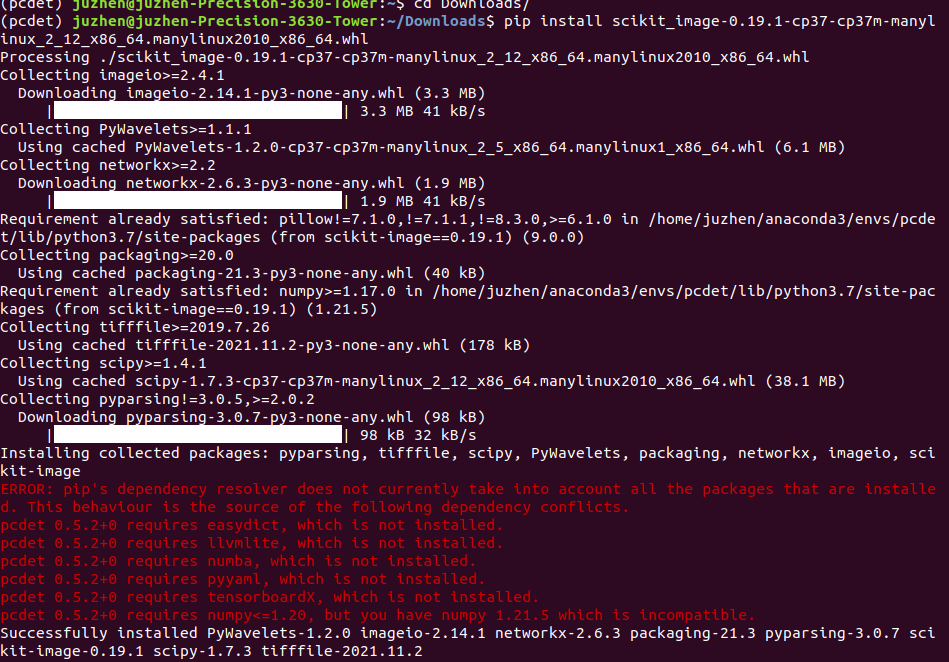
Then come to Python setup py develop
After success, see the figure below;

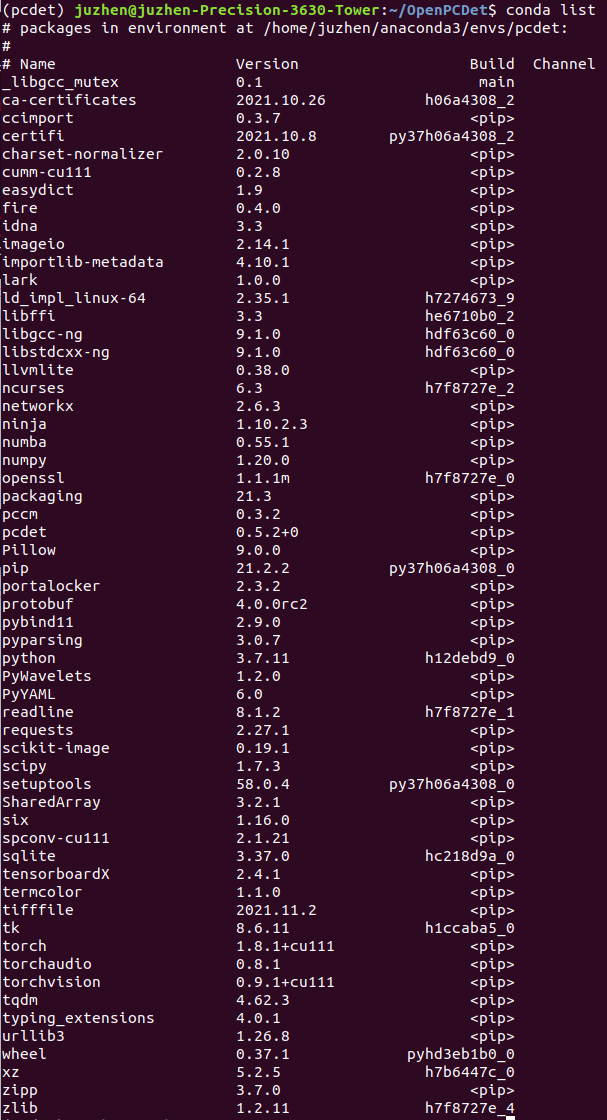
Paste another conda list:
The next step is to prepare for training!
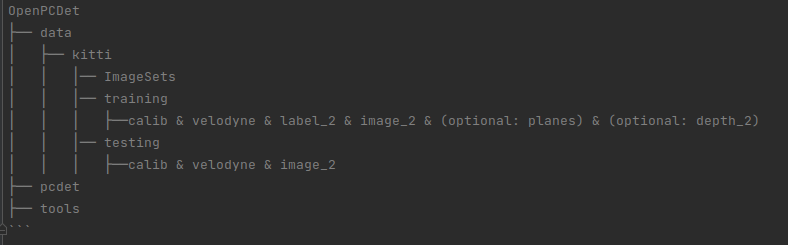
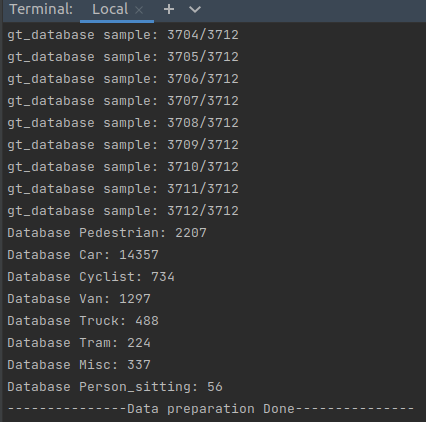
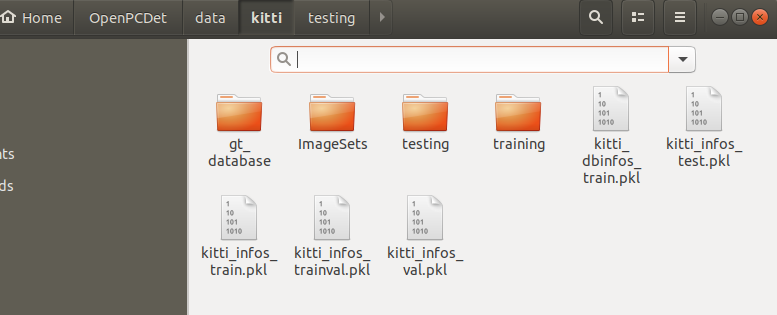
The first is to prepare the data (data format is shown in the figure below) and generate some information of the data:
python -m pcdet.datasets.kitti.kitti_dataset create_kitti_infos tools/cfgs/dataset_configs/kitti_dataset.yaml
Next, you can train the model. cd it to tools:
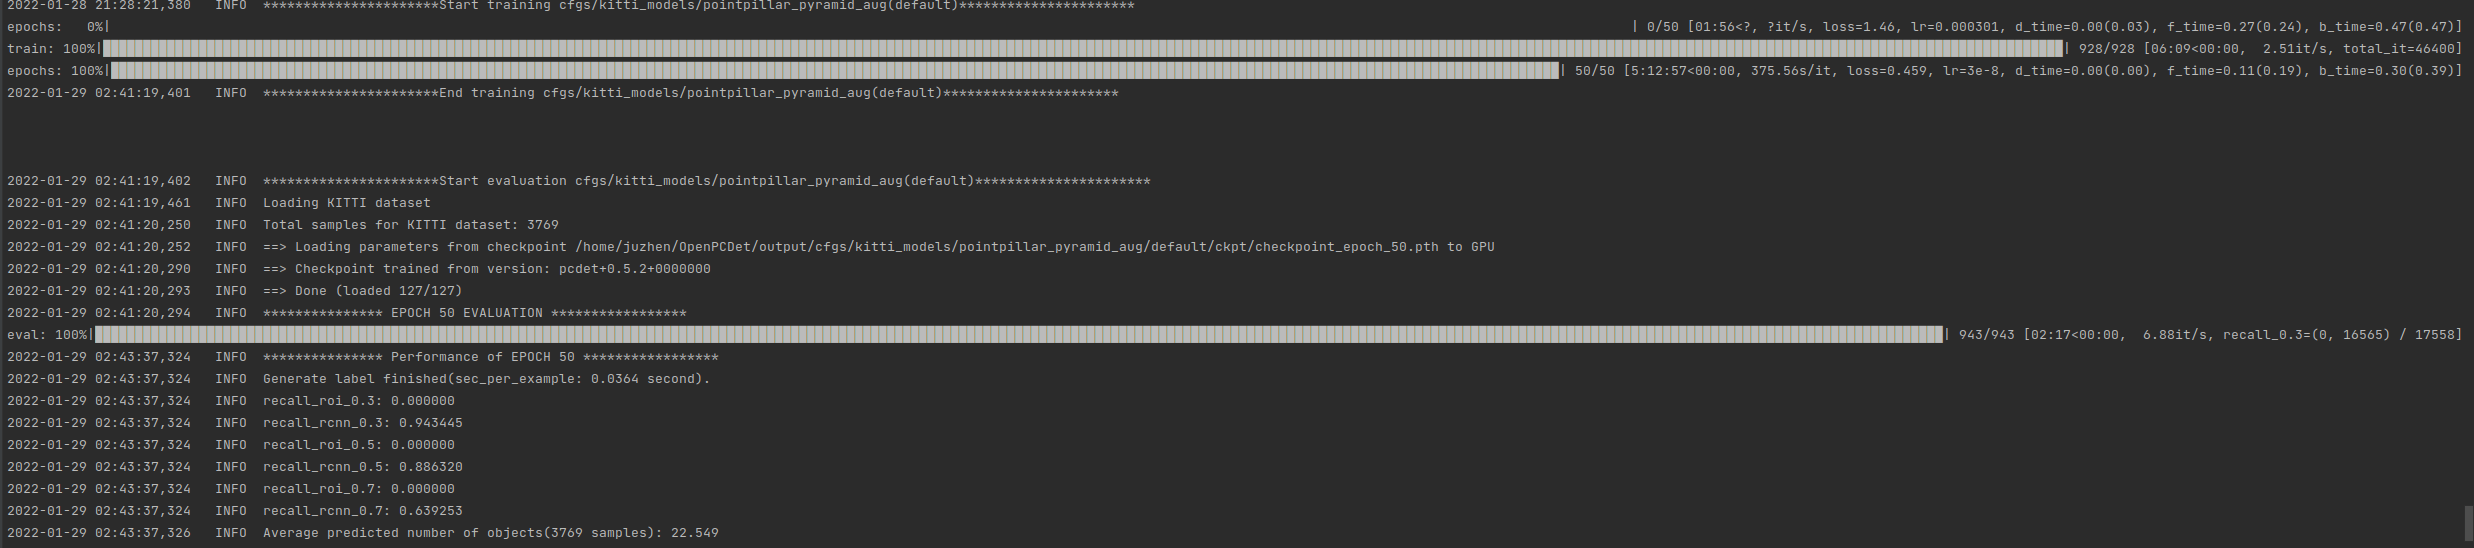
python train.py --cfg_file ./cfgs/kitti_models/pointpillar_pyramid_aug.yaml --batch_size 4 --epochs 50
Sub son in training

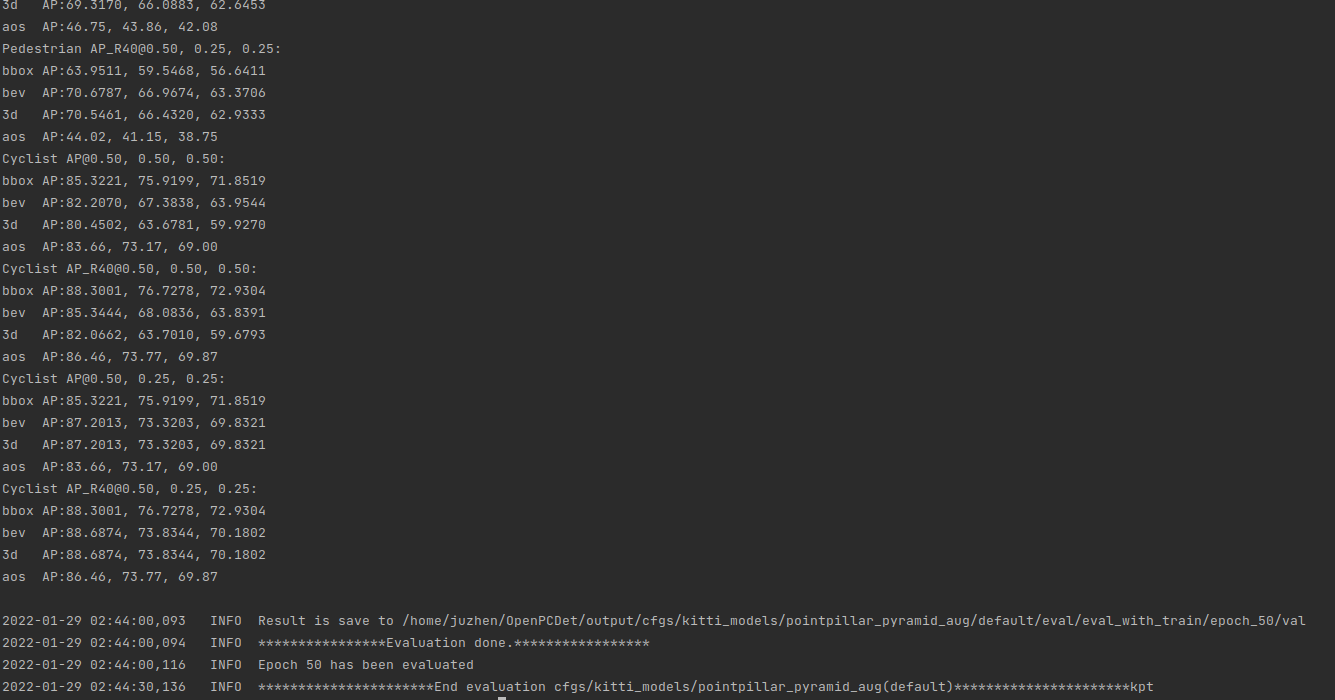
After the training, the last model will be evaluated automatically, followed by the following sub models:
After the training, let's demo to see the effect:
First install the visualization tool mayavi
pip3 install mayavi (you can try pip install mayavi, and the subsequent mistakes may be gone?)
Wait until the installation is completed, and then test whether it can be used:
python
import mayavi

When you find that everything is normal, you feel happy and quickly enter the visualization command:
python demo.py --cfg_file ./cfgs/kitti_models/pointpillar_pyramid_aug.yaml --ckpt /home/juzhen/OpenPCDet/output/cfgs/kitti_models/pointpillar_pyramid_aug/default/ckpt/checkpoint_epoch_50.pth --data_path /home/juzhen/OpenPCDet/data/kitti/testing/velodyne/000517.bin (where the CKPT and point cloud data paths are changed according to their own circumstances)
Then an error is reported: ModuleNotFoundError: No module named 'importlib_resources’:
 Then install: pip install importlib_resources
Continue the visualization after success. If you are silly, you will make another mistake. ModuleNotFoundError: No module named 'vtkcommoncore Python':
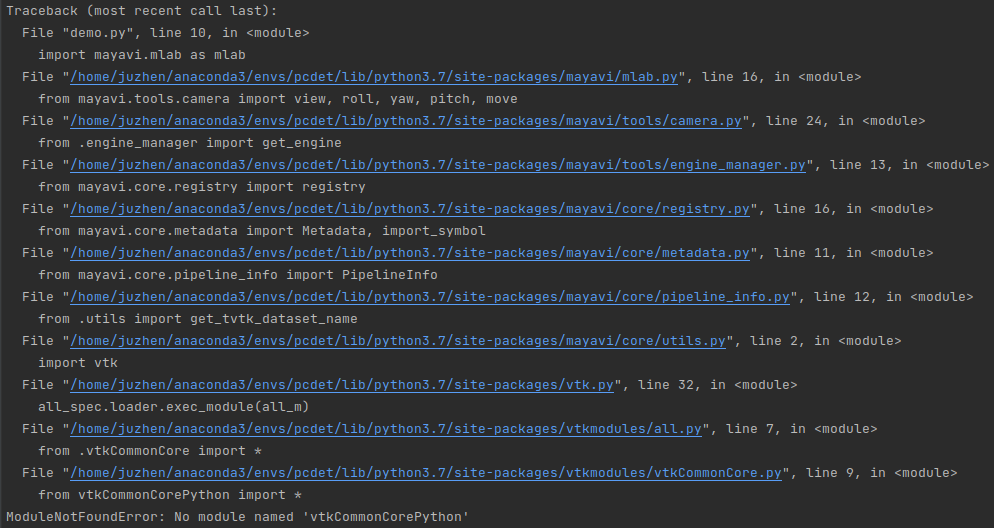
pip can't be installed this time. Try to solve it, but failed! If you don't understand why, give up using mayavi. Use open3d instead.
pip install open3d
It's too slow. Cancel and start again
Add mirror source after
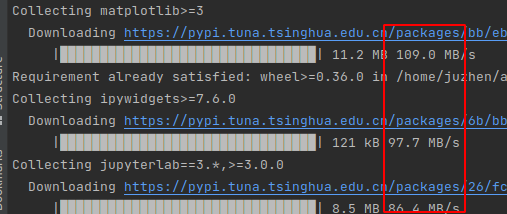
pip install open3d -i https://pypi.tuna.tsinghua.edu.cn/simple
Wuhu, take off at speed!
 Then install and complete the test;

No problem, keep visualizing (I think it's all right?), However... An error is reported importerror: numpy core. multiarray failed to import
Then continue to overcome the difficulties. After looking for a long time, there is a feasible method (roughly there are multiple numpy handles)....
pip show numpy
pip uninstall numpy

Uninstall numpy1 20.0, and then pip show numpy
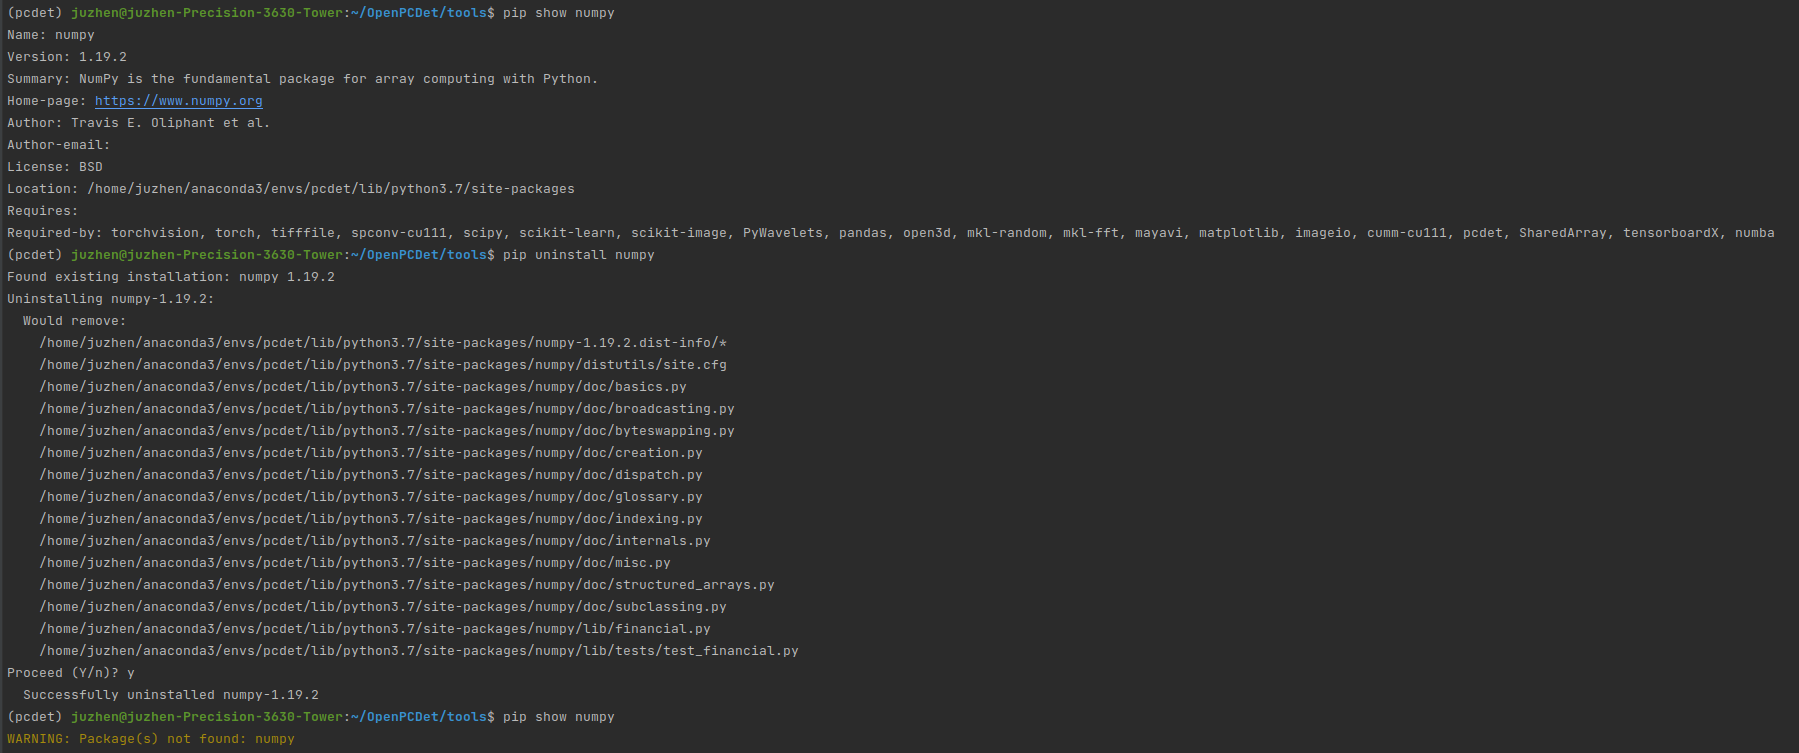
Sure enough, there is a version of numpy1 19.2 (this seems to be installed when creating a virtual environment), and pcdet0.0 will be installed later At 5.2, it seems to be installed again (vaguely remember ha!)
Uninstall it! Stay away from it!!!!
At this time, pip show numpy is completely gone, so I'll reinstall numpy1 twenty

Then is the moment to witness the miracle, continue to visualize!!
python demo.py --cfg_file ./cfgs/kitti_models/pointpillar_pyramid_aug.yaml --ckpt /home/juzhen/OpenPCDet/output/cfgs/kitti_models/pointpillar_pyramid_aug/default/ckpt/checkpoint_epoch_50.pth --data_path /home/juzhen/OpenPCDet/data/kitti/testing/velodyne/000517.bin (again, pay attention to the path HA)
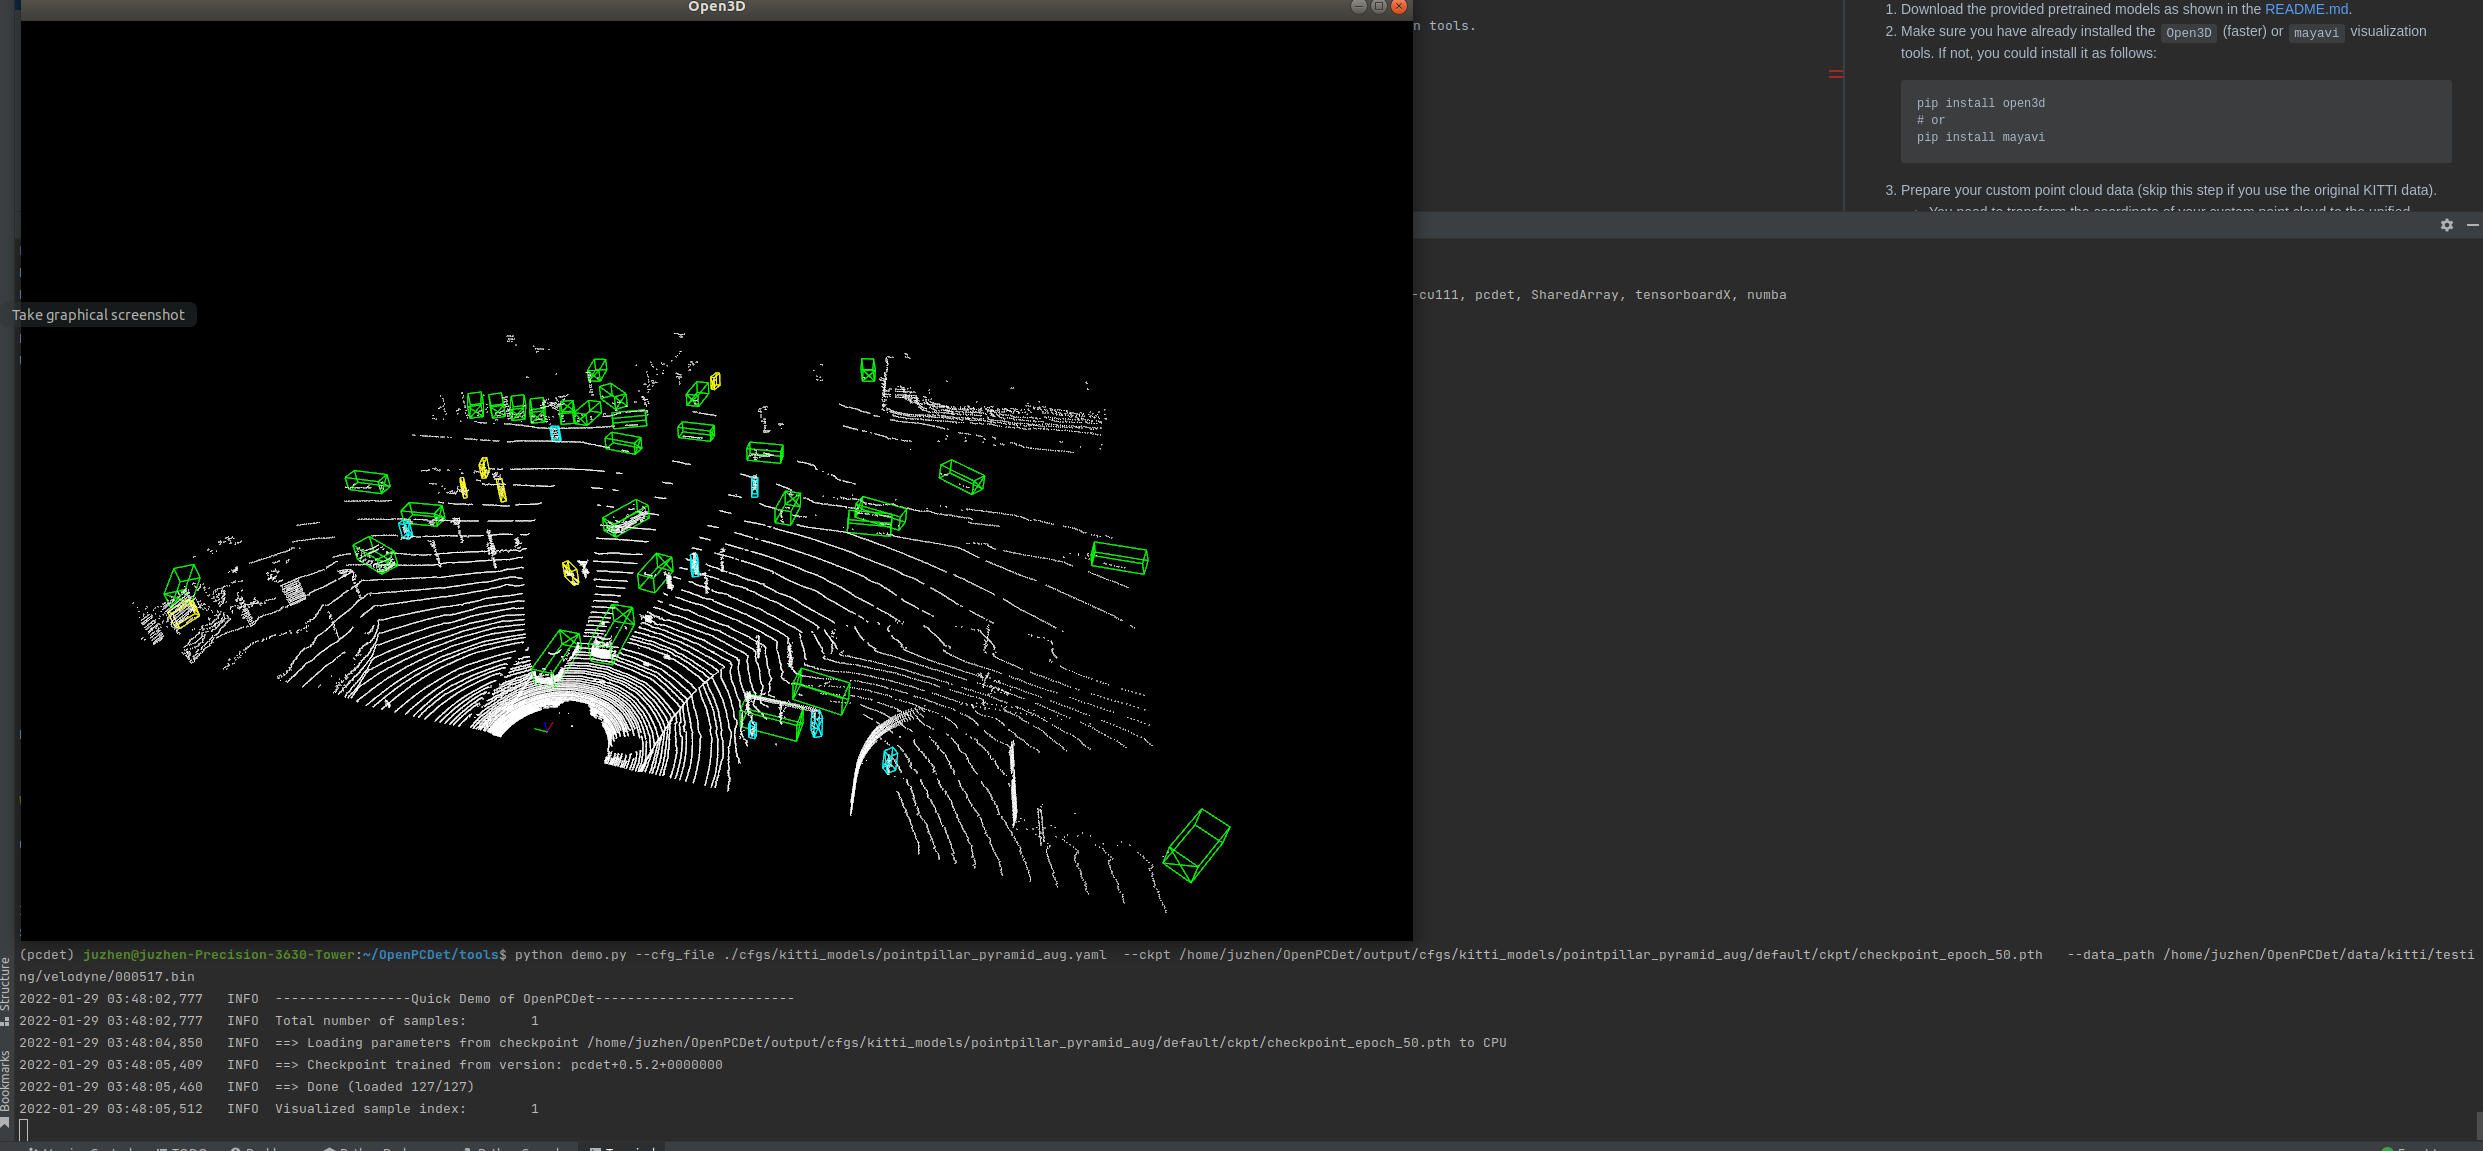
OK, I have a problem. Have a little fun!
Later, I looked at the image of the loss function:
pip install tensorboardX
pip install tensorflow
Then in / home / Juzhen / openpcdet / output / CFGs / Kitti_ models/pointpillar_ pyramid_ Open Aug / default / Tenant Board (i.e. under the folder of events.out.tfevents.) to activate the virtual environment of pcdet, enter:
tensorboard --logdir=/home/juzhen/OpenPCDet/output/cfgs/kitti_models/pointpillar_pyramid_aug/default/tensorboard
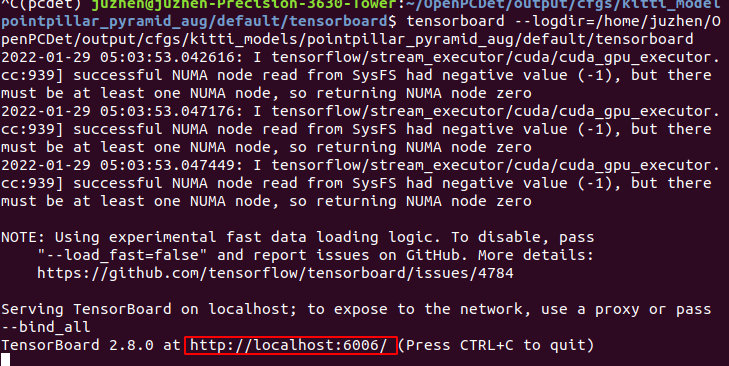 Right click to open the red box website to view the visualization of loss function during training:
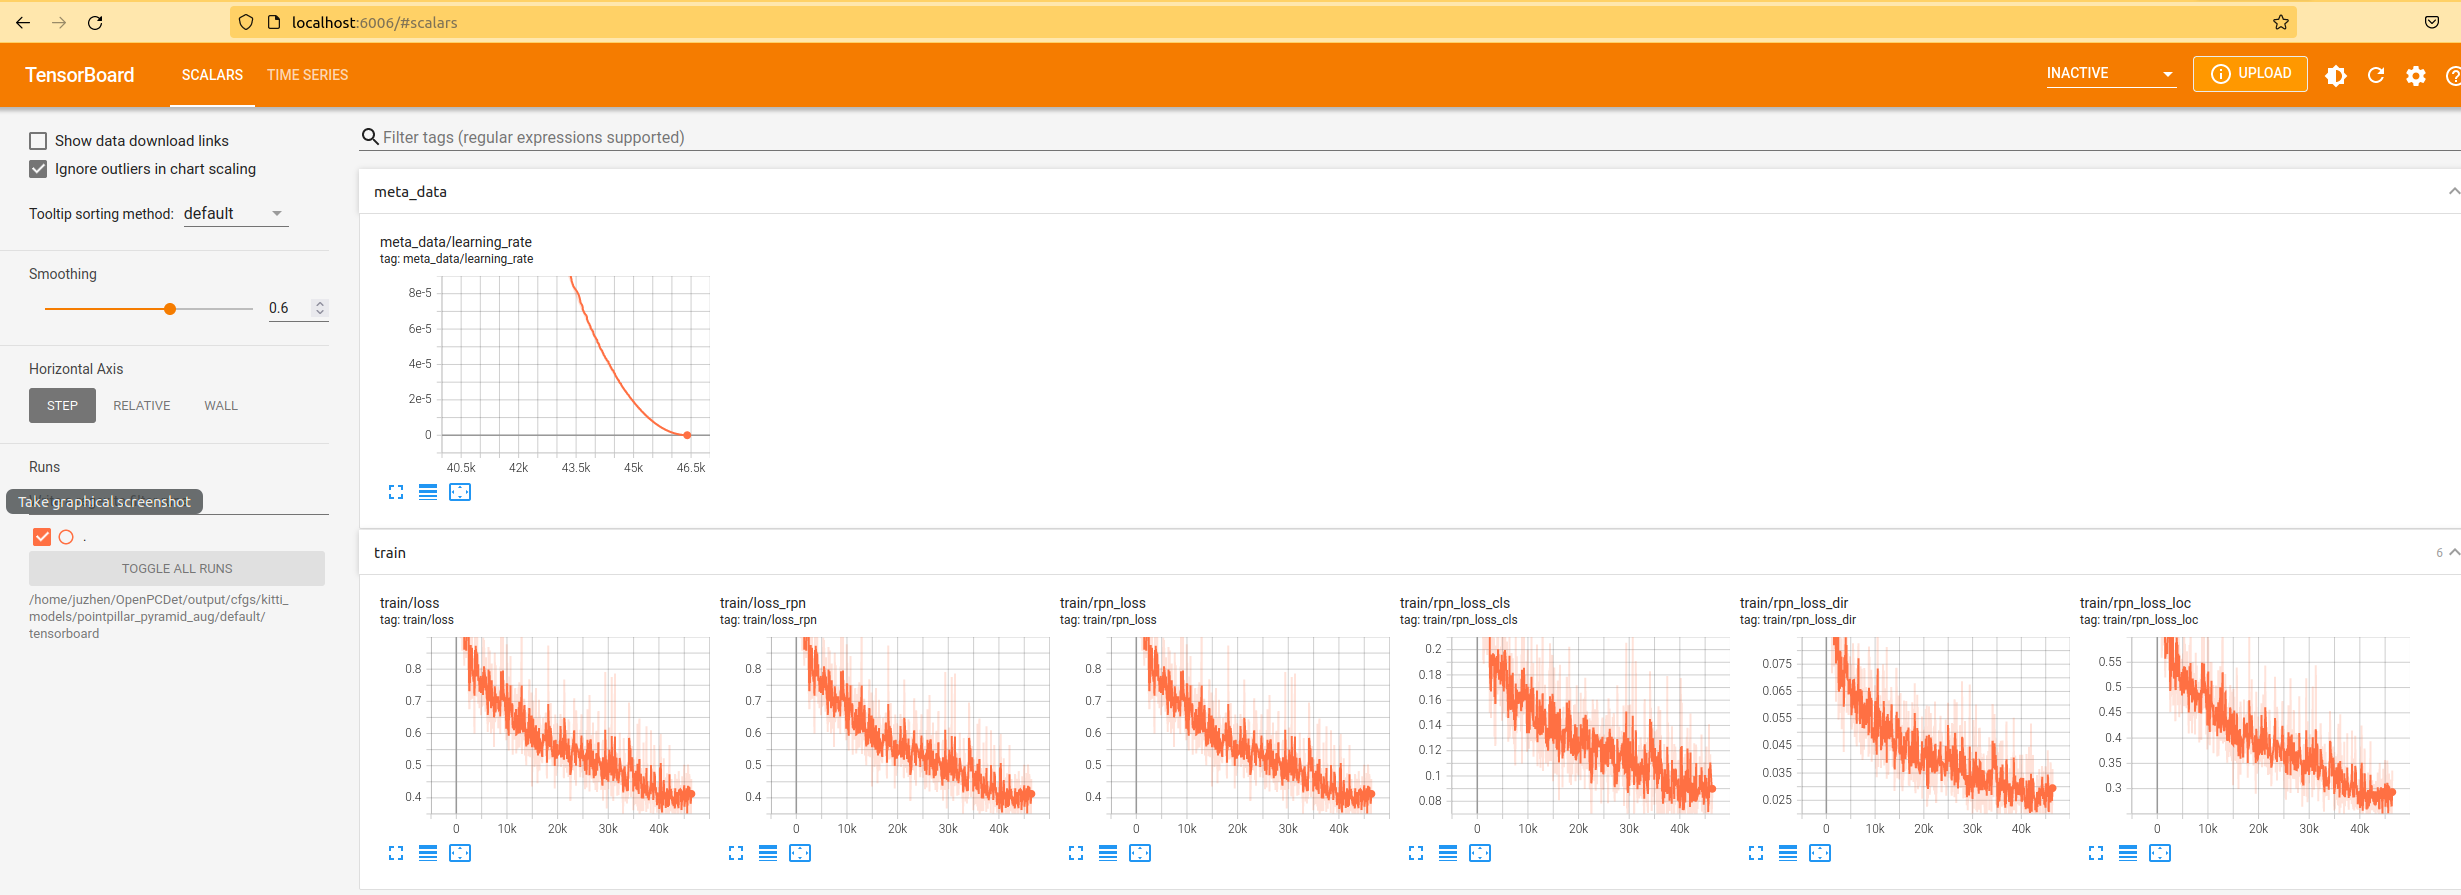
It can be seen from the figure that the loss function does not converge smoothly, indicating that the training is not in place. epochs=50 is not enough. You can continue to add it. I train pointpillars on another framework, which is 160epochs. You can try 160.
So far, it's over. Sprinkle flowers!!
The above content is only your own learning record, and it is not easy to be original. Reprint please indicate the source, thank you!!!