1. Use expressions to write interface
1.1 create a basic server
// Import express
const express = require('express')
// Create server instance
const app = express()

app.listen(80,() => {
  console.log('express server running at http://127.0.0.1');
})
1.2 create api routing module
// apiRouter. JS (routing module)
const express = require('express')
const apiRouter = express.Router()

// Mount the corresponding route here
// ...
module.exports = apiRouter
// app. JS (import and register routing module)
const apiRouter = require('./apiRouter')
app.use('/api',apiRouter)
1.3 write GET interface
apiRouter.get('/get',(req,res) => {
  // Gets the data sent by the client to the server through the query string
  const query = req.query
  // Respond the data to the client
  res.send({
    status: 0,  // 0 means success and 1 means failure
    msg: 'GET Request succeeded',
    data: query // Specific data that needs to be responded to the client
  })
})
1.4 Write POST interface
apiRouter.post('/post',(req,res) => {
  // Get the URL encoded data sent by the client to the server through the request body
  const body = req.body
  // Respond the data to the client
  res.send({
    status: 0,  // 0 means success and 1 means failure
    msg: 'POST Request succeeded',
    data: body  // Specific data that needs to be responded to the client
  })
})
2. Cross domain issues of interfaces
There is a serious problem with the GET and POST interfaces just written: cross domain requests are not supported
We create a new html page and write the code for sending ajax requests. The following errors will be reported on the console:
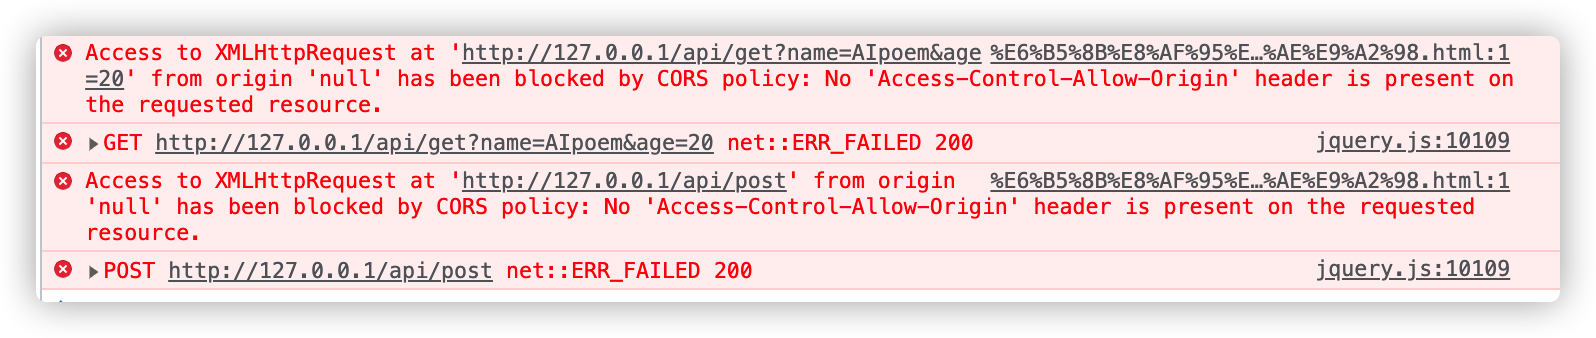
Because we open this page with file protocol, but the requested interface is http protocol. Different protocols lead to cross domain problems
There are two main solutions to interface cross domain problems:
- CORS (mainstream solution)
- JSONP (defective solution: only GET requests are supported)
3. Use cors middleware to solve cross domain problems
cors is a third-party middleware of express. Cross domain problems can be easily solved by installing and configuring cors middleware
Use steps:
1.npm install cors installation Middleware
2.const cors = require('cors') import Middleware
3. call app. before routing. Use (cors()) configuration Middleware
4. CORS
CORS (cross domain resource sharing) consists of a series of HTTP response headers, which determine whether the browser prevents the front-end JS code from obtaining resources across domains
By default, the browser's homology security policy prevents web pages from "cross domain" access to resources. However, if the interface server is configured with CORS related HTTP response headers, the cross domain access restrictions on the browser side can be lifted
CORS is mainly configured on the server side. The client browser can request to open the CORS interface without any additional configuration
CORS is compatible in browsers. Only browsers that support XMLHttpRequest Level 2 can normally access the server interface with CORS enabled (e.g. IE10 +, Chorome4 +, Firefox 3.5 +)
4.1 CORS response header - access control allow origin
The response header can carry an access control allow origin field. Its syntax is as follows:
Access-Control-Allow-Origin: <origin> | *
The value of the origin parameter specifies the foreign domain URL that is allowed to access the resource
For example, the following field values will only be allowed from http://www.baidu.com Request for:
res.setHeader('Access-Control-Allow-Origin','http://www.baidu.com')
If the value of access control allow origin field is specified as wildcard *, it means that requests from any domain are allowed. The code is as follows:
The following line of code has the same effect as the cors middleware configured above
res.setHeader('Access-Control-Allow-Origin','*')
4.2 CORS response headers - access control allow headers
By default, CORS only supports the following 9 request headers sent by the client to the server:
Accept,Accept-Language,Content-Language,DPR,Downlink,Save-Data,Viewport-Width,Width,Content-Type
If the client sends additional request header information to the server, you need to declare the additional request header on the server through access control allow headers, otherwise the request will fail!
// Allow the client to send additional content type request headers and X-Custom-Header request headers to the server
// Note: multiple request headers are separated by English commas
res.setHeader('Access-Control-Allow-Headers','Content-Type, X-Custom-Header')
4.3 CORS response header - access control allow methods
By default, CORS only supports GET, POST and HEAD requests initiated by clients
If the client wants to request the server's resources through PUT, DELETE, etc., it needs to indicate the HTTP method allowed by the actual request through access control allow methods on the server side
// Only POST, GET, DELETE and HEAD are allowed
res.setHeader('Access-Control-Allow-Methods','POST, GET, DELETE, HEAD')
// Allow all HTTP request methods
res.setHeader('Access-Control-Allow-Methods','*')
5. Classification of CORS requests
When the client requests the CORS interface, according to the different request methods and request headers, the CORS requests can be divided into two categories, namely:
- Simple request
- Pre inspection request
5.1 simple request
Meet the following two conditions at the same time:
- Request method: one of GET, POST and HEAD
- The HTTP header information shall not exceed the following fields: no custom header field, Accept, Accept language, content language, DPR, Downlink, save data, viewport Width, Width and content type
5.2 pre inspection request
Requests that meet any of the following conditions are pre inspection requests
- The request Method is the request Method type other than GET, POST and HEAD
- The request header contains a custom header field
- Sent data in application/json format to the server
Before the formal communication between the browser and the server, the browser will send an OPTION request for pre check to know whether the server allows the actual request. Therefore, this OPTION request is called "pre check request".
After the server successfully responds to the pre inspection request, it will send the real request and carry the real data
The difference between simple request and pre inspection request is:
Simple request: only one request will occur between the client and the server
Pre check request: there will be two requests between the client and the server
6. JSONP interface
6.1 concept of jsonp
The browser requests the data of the server through the src attribute of the < script > tag, and the server returns a function call. This way of requesting data is called JSONP
6.2 characteristics of jsonp
- JSONP is not a real AJAX request because it does not use the XMLHttpRequest object
- JSONP only supports GET requests, not POST, PUT, DELETE and other requests
6.3 precautions for creating JSONP interface
If CORS cross domain resource sharing has been configured in the project, in order to prevent conflicts, the JSONP interface must be declared before configuring CORS middleware. Otherwise, the JSONP interface will be processed as an interface with CORS enabled
// Create JSONP interface first (this interface will not be processed as CORS interface)
app.get('/api/jsonp',(req,res) => {})

// Reconfigure CORS middleware (all subsequent interfaces will be processed into CORS interfaces)
app.use(cors())

// This is an interface with CORS enabled
app.get('/api/get',(req,res) => {})
6.4 steps of implementing JSONP interface
1. Get the name of the callback sent by the client
2. Get the data to be sent to the client in the form of JSONP
3. According to the data obtained in the first two steps, splice a function call string
4. Parse and execute the string spliced in the previous step in response to the < script > tag of the client
app.get('/api/jsonp',(req,res) => {
  // 1. Get the name of the callback function sent by the client
  const funcName = req.query.callback
  // 2. Get the data to be sent to the client in the form of JSONP
  const data = { name: 'AIpoem', age: 20}
  // 3. Splice a string of function calls
  const scriptStr = `${funcName}(${JSON.stringify(data)})`
  // 4. Parse and execute the string spliced in the previous step in response to the < script > tag of the client
  res.send(scriptStr)
})
Initiate a JSONP request using jquery in a web page
$('#btnJSONP').on('click', function () {
  $.ajax({
    method: 'GET',
    url: 'http://127.0.0.1/api/jsonp',
    dataType: 'jsonp', // Indicates to initiate a JSONP request
    success: function (res) {
      console.log(res);
    }
  })
})
finish