You might want to ask manjaro what's good? Look at the picture and don't say much.
introduce
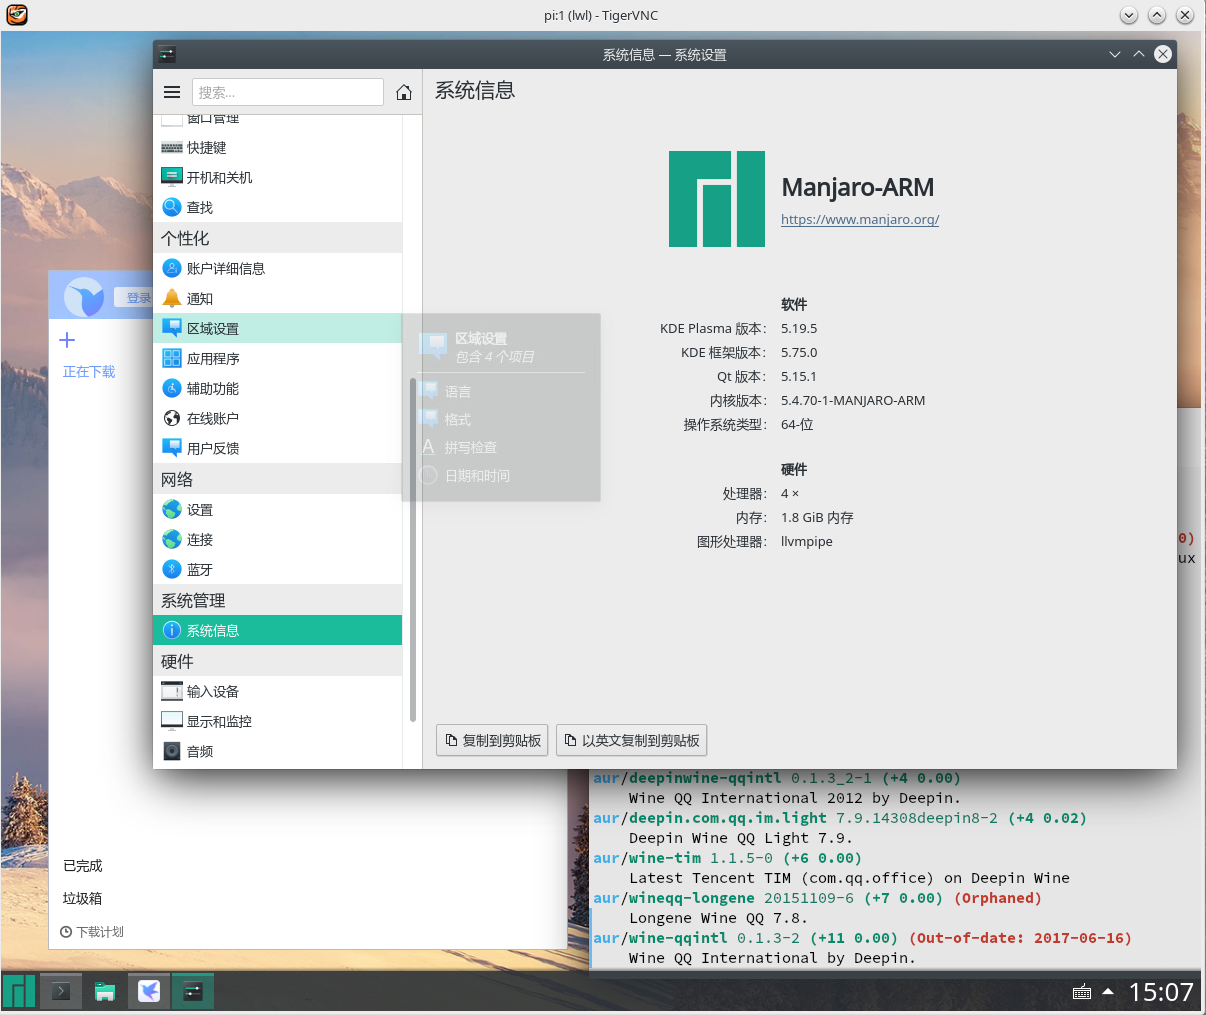
64 bit system
The first and most easy-to-use KDE desktop
Xunlei, QQ, wechat, and the latest software are many
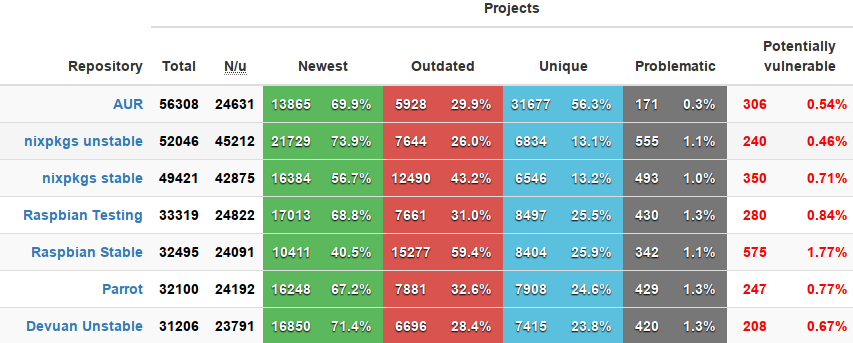
 manjaro has the richest software warehouse
The latest software is preferred
Look at the picture, manjaro's user warehouse is AUR, far ahead
Shumei sect 4B manjaro arm system image download address:
https://mirrors.tuna.tsinghua.edu.cn/osdn/storage/g/m/ma/manjaro-arm/rpi4/
You can burn it with the tools of Shumei sect. I won't say much.
source
- Let the terminal output color display
sudo sed -i 's@#Color@Color@g' /etc/pacman.conf
- Select Ali image to stabilize
if [ ! -z "$(grep "mirrorlist" /etc/pacman.d/mirrorlist)" ];then
        sudo systemctl disable pamac-mirrorlist.timer
        echo 'Server = https://mirrors.aliyun.com/manjaro/arm-stable/$repo/$arch' | sudo tee /etc/pacman.d/mirrorlist
    fi
Pamac mirrorlist is closed Timer service, otherwise it may change your source by itself
- Next, update the system to the latest:
sudo pacman -Syyu
Install software
- Compiler tool
This is very useful because the software in the warehouse may be compiled and installed during installation. Without it, some software may not be installed.
sudo pacman -S base-devel bc linux-rpi4-headers
- User software warehouse
pacman is the official warehouse and yay is the user warehouse.
sudo pacman -S yay
The user warehouse is AUR, where a large number of software are located. For example, install Xunlei, QQ, Netease music and so on
yay -S xunlei-bin
- typewriting
sudo pacman -S kcm-fcitx fcitx-qt5
Configure enable IME
echo 'GTK_IM_MODULE=fcitx
QT_IM_MODULE=fcitx
XMODIFIERS=@im=fcitx' | sudo tee ~/.pam_environment
- Network tools
If you want to use the tree plum pie as a router, these are necessary. No need to install without this requirement.
sudo pacman -S usb_modeswitch dhclient bridge-utils net-tools dnsmasq hostapd
LAN sharing
sudo pacman -S samba manjaro-settings-samba
Configuring samba
First create the samba password
sudo smbpasswd -a $USER
Next, configure SMB Conf change the following users to your own
    sudo mkdir /mnt/Local disk
    sudo sed -i '/homes/,$d'  /etc/samba/smb.conf
    sudo sed -i '/Share Definitions/,$d'  /etc/samba/smb.conf
    echo \
    "#====== Share Definitions ===========
[Shumei sect]
    comment = /home/lwl/
    create mask = 0664
    directory mask = 0775
    path = /home/lwl/
    read only = No
[Shared disk]
    comment = 1TB
    create mask = 0664
    directory mask = 0775
    path = /mnt/Local disk/
    read only = No
    "  | sudo tee -a /etc/samba/smb.conf
Finally, start the samba service
sudo systemctl enable smb nmb
sudo systemctl restart smb nmb
Remote desktop tigervnc
First, suppose that raspberry pie is host A and your computer is host B
First, A installs tigervnc
sudo pacman -S tigervnc
The first step is to configure A password, which is the password to be entered when other computers access vnc
vncpasswd
Step 2: A configures tigervnc users
Change the user name lwl to your own
    if [ -z "$(grep lwl /etc/tigervnc/vncserver.users)" ];then
        #sudo sed -i '/lwl/d' /etc/tigervnc/vncserver.users
        echo "  :1=lwl" | sudo tee -a /etc/tigervnc/vncserver.users
    fi
Step 3: A configure the conf file
My desktop is changed from plasma to your own
If you are not clear, you can check it directly
ls /usr/share/xsessions/
The following code cannot enable the localhost option, otherwise you cannot connect
cat > ~/.vnc/config << 'END'
#This is your desktop. Check the desktop instructions ls /usr/share/xsessions/
session=plasma
#Here is the resolution. When using realvnc connection, the desktop resolution is displayed
geometry=1200x980
alwaysshared
#This option specifies that VNC can only be used for local connection and can cooperate with SSH encrypted transmission
# localhost
END
Step 4: A starts the service tigervnc
Where: 1 refers to port 5901
sudo systemctl enable vncserver@:1
sudo systemctl start vncserver@:1
Step 5: B accesses A's desktop
Host B is also installed with tigervnc, or RealVNCviewer, as shown in the figure below, to access the desktop of host A, that is, the desktop of raspberry pie.
192.168.9.1 is the IP of my raspberry pie, which is modified to your raspberry pie IP
That is, access port 5901 of 192.168.9.1
192.168.9.1:1

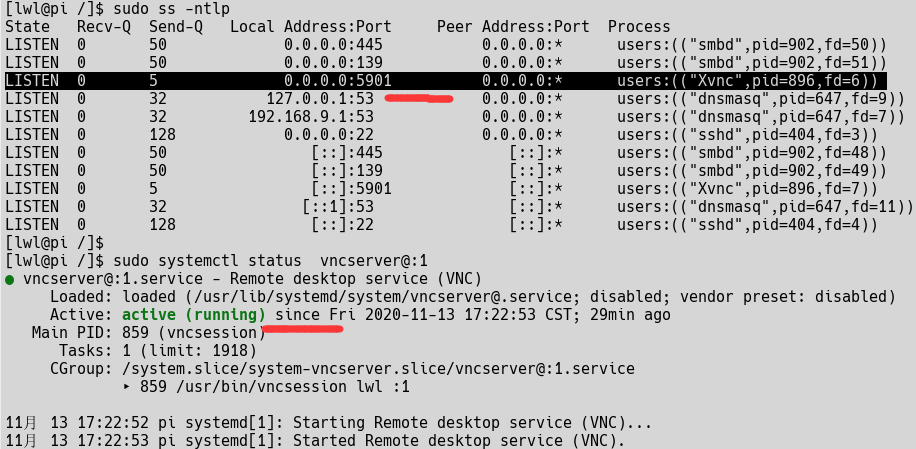
Check for proper operation
sudo ss -ntlp
sudo systemctl status  vncserver@:1
Finally, optional steps. If VNC is only used within the LAN, this step is not required
There is no need for encrypted transmission in LAN. If it is an external network, SSH tunnel encryption can be used
1. In the third step above, host A turns on the localhost option, and host A turns on the SSH service
sudo systemctl enable sshd
sudo systemctl start sshd
2. Host B executes the following command to start SSH port mapping
That is, 192.168.9.1, that is, 5901 port of host A, is mapped to 9000 port of local host B
ssh 192.168.9.1 -L 9000:localhost:5901
Then, host B uses step 5 to access the raspberry pie desktop of host A VNC server is filled in as follows
localhost:9000
At this point, it is successful. All data is transmitted through ssh encryption
firewall
Limited level, for reference only
My tree plum pie is used for routing, and the network port provides a network for my computer.
192.168.9.0/24 in the following code is my LAN, which can be deleted or changed to your own.
echo \
"

*filter
:INPUT ACCEPT [0:0]
:FORWARD ACCEPT [0:0]
:OUTPUT ACCEPT [0:0]
#In this way, it means that only the message responding to us can pass through the firewall. If it is a new message actively sent by others, it cannot pass through the firewall
-A INPUT -m state --state ESTABLISHED,RELATED -j ACCEPT

#Allow host to be ping ed
-A INPUT -p icmp -j ACCEPT
-A OUTPUT -p icmp -j ACCEPT

#Open the "loop" first to avoid unnecessary trouble
-A INPUT -i lo -j ACCEPT
-A OUTPUT -o lo -j ACCEPT

#Allow DNS access from port 53
-A INPUT -s 192.168.9.0/24,192.168.7.0/24 -p udp  --dport 53 -j ACCEPT

#Allow DHCP access, and the secondary host can obtain IP
-A INPUT -p udp --dport 67:68 -j ACCEPT


#SSH service is allowed to be accessed
-A INPUT -s 192.168.9.0/24,192.168.7.0/24 -m state --state NEW -p tcp --dport 22 -j ACCEPT

#samba is accessed
-A INPUT -s 192.168.9.0/24,192.168.7.0/24 -p tcp -m multiport --dports 139,445 -j ACCEPT
-A INPUT -s 192.168.9.0/24,192.168.7.0/24 -p udp -m multiport --dports 137,138 -j ACCEPT
-A OUTPUT -s 192.168.9.0/24,192.168.7.0/24 -p tcp -m multiport --dports 139,445 -j ACCEPT
-A OUTPUT -s 192.168.9.0/24,192.168.7.0/24 -p udp -m multiport --dports 137,138 -j ACCEPT

#vncserver sends a request to start
-A INPUT -s 192.168.9.0/24,192.168.7.0/24 -m state --state NEW -m tcp -p tcp --dport 5901 -j ACCEPT
-A INPUT -s 192.168.9.0/24,192.168.7.0/24 -m state --state NEW -m tcp -p tcp --dport 5902 -j ACCEPT
-A INPUT -s 192.168.9.0/24,192.168.7.0/24 -m state --state NEW -m tcp -p tcp --dport 5903 -j ACCEPT

#=========Open ports must precede these two commands:
# Reject all external input requests
-A INPUT -j REJECT --reject-with icmp-host-prohibited

COMMIT

" | sudo tee /etc/iptables/iptables.rules    >/dev/null
start-up
If there is no error, it's really OK
sudo systemctl enable iptables
sudo systemctl restart iptables
Concluding remarks
Check the services you turn on and off above
#Check the service status and whether it is enabled
systemctl list-unit-files | grep iptables
systemctl list-unit-files | grep smb
systemctl list-unit-files | grep vncserver
systemctl list-unit-files | grep pamac-mirrorlist.timer
If Shumei sect is used for routing, its network management can be turned off. Otherwise, No.
sudo systemctl disable NetworkManager
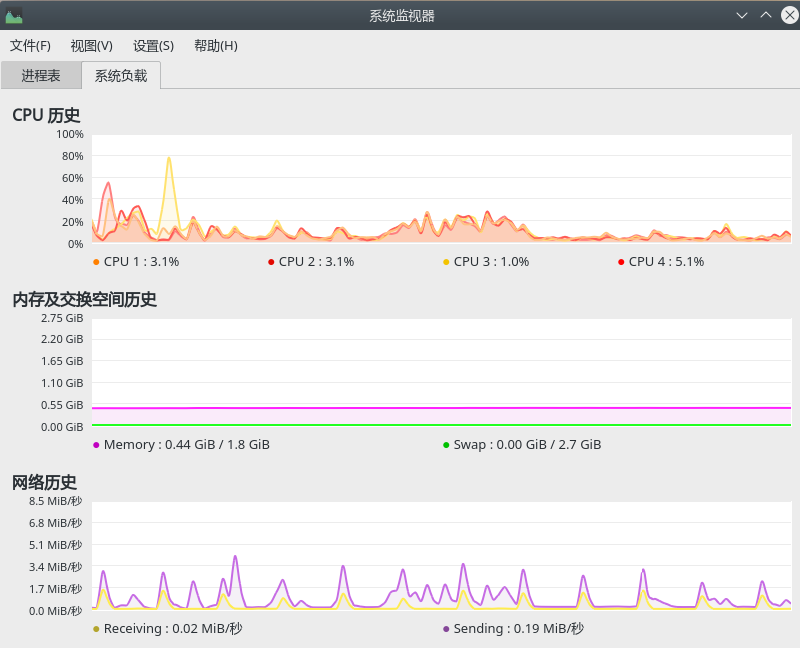
The main reason is that KDE is so easy to use. Personally, I think the experience is excellent. Power on takes up about 400M of memory.
Enjoy yourself.